Recently, after working with some logging on my Cisco SG300-20 switch, I wanted to write up a quick post on Cisco SG300 time configuration and how to go about setting this up.
Cisco SG300 time configuration
For the purposes of the post, I will show how to setup the SNTP settings in the web GUI as it is the simplest way to get your current time configuration up and running quickly.
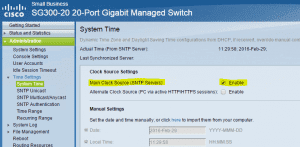
Login to your SG300 and go to Administration >> Time Settings >> System Time.
Here you will find the Clock Source Settings and Main Clock Source (SNTP Servers). Select to Enable this setting.
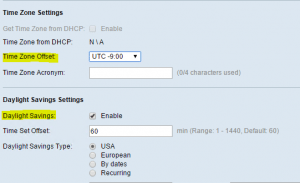
Also on that same configuration page, you can set your time zone offset as well as enable or disable Daylight Savings.
Next click on the SNTP Unicast menu option and select to enable the SNTP Client Unicast setting. On the same page you can add your NTP servers under the Unicast SNTP Server Table by clicking the Add button.
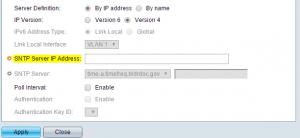
This brings up the dialog box to add your NTP servers. Select to add either by IP Address or By Name and enter the SNTP Server IP Address.
After you have edited the configuration above, you need to save your changes by either clicking the little blinking save nag button at the top right hand of the browser session or by the CLI running the copy run start command on your switch.
Final Thoughts
Time configuration is an often overlooked area of a lab or even production network in some cases. However, most devices are very time sensitive and it is a huge security issue to not have an accurate time source and configuration for devices in your environment. Logging, authentication, and other major infrastructure services are affected.
If you don’t have an internal time source for your network, pointing to pool.ntp.org is a good alternative for having accurate time configuration on network devices.


