Homepage Docker – Customized Home Lab Dashboard for Applications
Let’s look at Homepage Docker, a project for having a customized home lab dashboard for your self-hosted applications.
Table of contents
What are Home Lab Dashboards?
Home Lab enthusiasts generally run a multitude of services in their lab environments. When you run dozens or even hundreds of services, virtual machines, and containers in the environment, it can be difficult to keep track of all these services and integrations.
Home Lab or application dashboards provide an easy way to access your services in one place instead of having separate bookmarks and other ways to access these links.
What is Homepage Docker?
It is a contemporary, secure (completely proxied), and highly customizable application dashboard that offers integrations for over 25 services and supports translations in more than 15 languages. Configuration is a breeze with YAML files (or through automatic discovery using Docker labels).
Homepage Docker Features
Note the following features of Homepage Docker:
All API requests to backend services are routed through a proxy server, keeping your API keys hidden from the frontend client
Compatible with AMD64 (x86_64), ARM64, ARMv7, and ARMv6 architectures
Fully supported on all Raspberry Pi devices, most SBCs, and Apple Silicon.
Comprehensive internationalization with translations for languages such as Catalan, Chinese, Dutch, Finnish, French, German, Hebrew, Hungarian, Malay, Norwegian Bokmål, Polish, Portuguese, Romanian, Russian, Spanish, Swedish, and Yue
Interested in contributing to translations? Join the Weblate project
Service & Web Bookmarks feature
Docker Integration includes container status (Running / Stopped) & statistics (CPU, Memory, Network)
Automatic service discovery through labels
Extensive Service Integration with Sonarr, Radarr, Readarr, Prowlarr, Bazarr, Lidarr, Emby, Jellyfin, Tautulli, Plex, and more; Ombi, Overseerr, Jellyseerr, Jackett, NZBGet, SABnzbd, ruTorrent, Transmission, qBittorrent, and more; Portainer, Traefik, Speedtest Tracker, PiHole, AdGuard Home, Nginx Proxy Manager, Gotify, Syncthing Relay Server, Authentik, Proxmox, and more
Information Providers include Coin Market Cap, Mastodon, and more
Information & Utility Widgets such as System Stats (Disk, CPU, Memory), Weather via OpenWeatherMap or Open-Meteo, Web Search Bar, UniFi Console, Glances, and more
Instant “Quick-launch” search functionality
Highly customizable with 21 theme colors, light and dark mode support, background image support, and column and row layout options
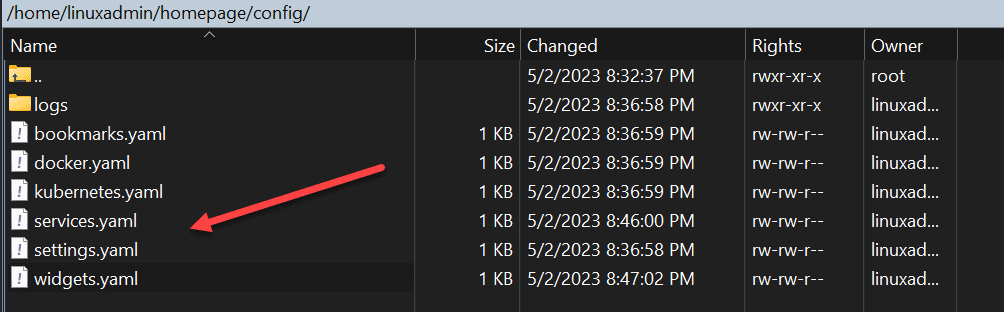
Setting Up Your Local Config Directory
Before getting started, ensure your local config directory exists. This is crucial as the local config directory will store important yaml and config files for your Homepage Docker setup.
Using Docker Compose, you can easily maintain and manage your configurations by having a dedicated directory for your docker images and configurations.
Installing the Homepage Docker Container
Let’s look at the installation process of the Homepage Docker container solution.
Step 1: Obtain the Docker Compose YAML File
First, you need to obtain the Docker Compose YAML file containing the configuration for the Homepage Docker container. You can create or download this file from the Homepage Docker project’s GitHub repository.
To create the file yourself, open a text editor and save a new file with the name docker-compose.yml. Then, paste the following YAML configuration into the file:
version: '3.8'
services:
  homepage:
    image: ghcr.io/benphelps/homepage:latest
    container_name: homepage
    volumes:
      - ./config:/config
      - /var/run/docker.sock:/var/run/docker.sock
    ports:
      - 80:80
      - 443:443
    environment:
      - PUID=1000
      - PGID=1000
      - TZ=Your_Timezone
    restart: unless-stopped
Replace Your_Timezone with your appropriate timezone, such as America/New_York or Europe/London. You can find a list of supported timezones here.
Step 2: Run Docker Compose
Now that you have your docker-compose.yml file in your local config directory, open a terminal or command prompt, navigate to the directory containing the YAML file, and run the following command:
docker-compose up -dThis command will download the latest image from ghcr.io/benphelps/homepage:latest, create the necessary homepage container, and launch it in detached mode, running it in the background.

You can also use docker run to pull down and run the Homepage solution:
docker run -p 3000:3000 -v /path/to/config:/app/config -v /var/run/docker.sock:/var/run/docker.sock ghcr.io/benphelps/homepage:latestStep 3: Access the Homepage Dashboard
Once the Homepage Docker container is up and running, you can access the homepage dashboard by opening your web browser and navigating to http://localhost or http://your_server_ip. You should now see the Homepage Docker dashboard, where you can begin customizing your homepage and adding integrations.
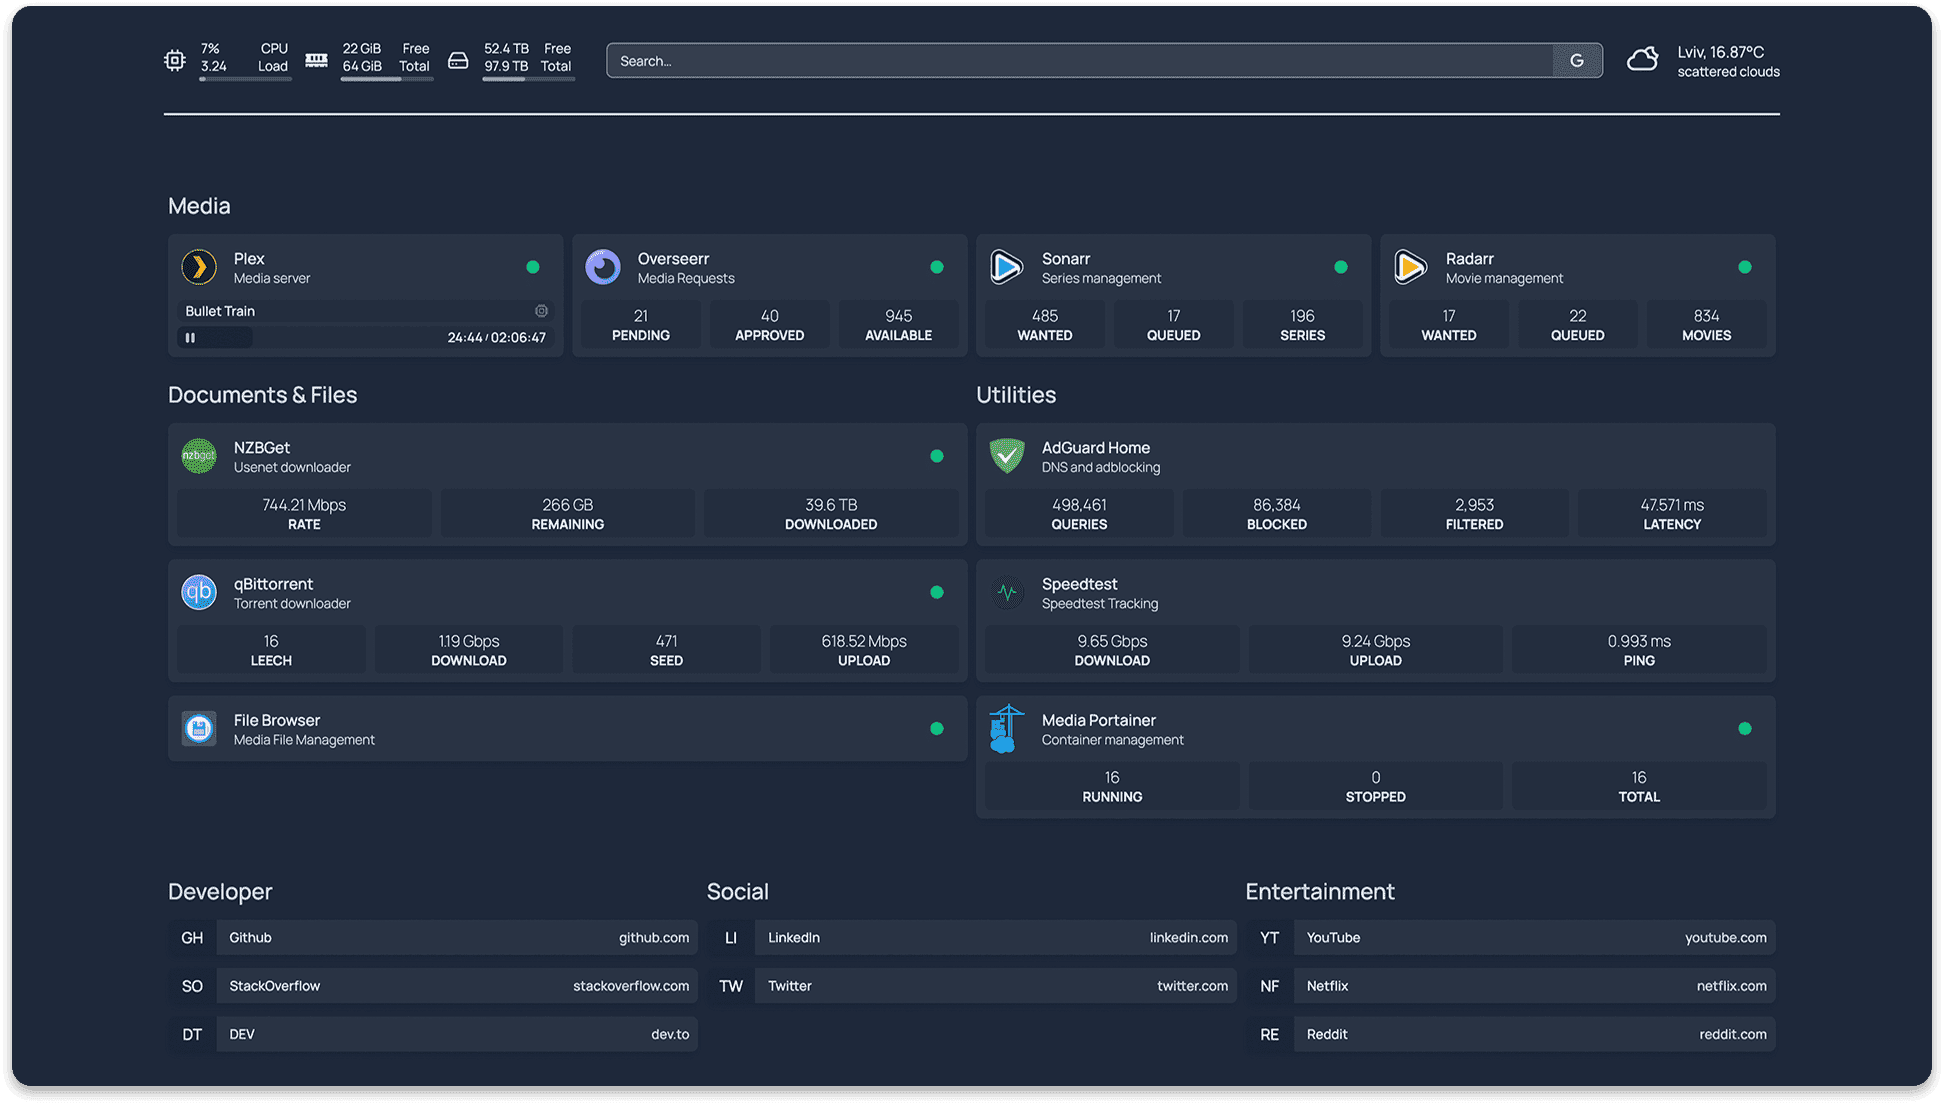
Below is the default Homepage displayed, ready to be customized.

Step 4: Customize and Configure Your Homepage
With the Homepage Docker container installed and running, you can now customize and configure your homepage according to your needs. In your Homepage Docker config file directory, you will see a number of YAML files you configure to implement a customized configuration for your particular environment.
You can find examples of what you place in the configuration files on the official Homepage website here: Installation – Homepage (gethomepage.dev)
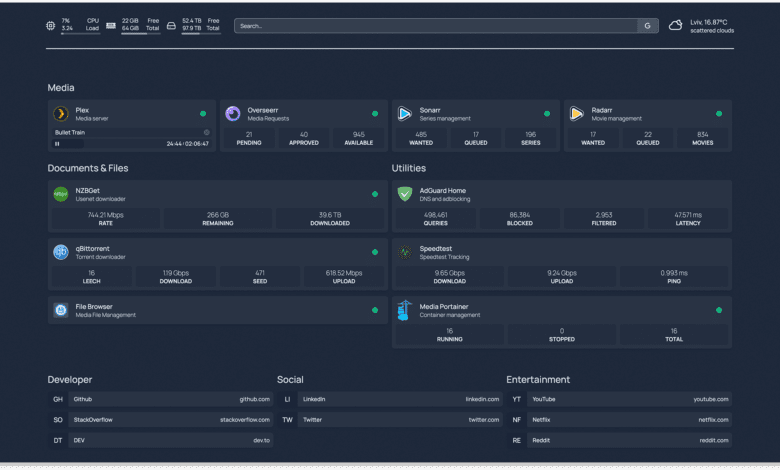
Below is an example of how the dashboard can look after you have added services and other applications, allowing you to query information without accessing a frontend client website. The dashboard can make an API request for information, such as querying a service like Pi-Hole or other backend services.
By following these steps, you’ll have successfully installed the Homepage Docker container on your system, paving the way for a highly customizable and efficient homepage setup.
Integrating Services and Configuring Homepage Dashboard
A significant advantage of Homepage Docker is its ability to support various Docker integrations with other services. By configuring your homepage dashboard, you can include features like Speedtest Tracker and Syncthing Relay Server, making your homepage more functional and versatile.
Nginx or Traefik reverse proxy
The Nginx Proxy Manager is a popular proxy manager that can be integrated into your Homepage Docker setup. It allows you to manage your proxy server through a user-friendly web interface, making configuring and maintaining your homepage ports easier.
Traefik is also a very popular option allowing you to access your Homepage configuration easily. It allows you to handle SSL connections without the complexities of certificates in the service itself.
API Requests and Keys
When integrating services like Syncthing Relay Server or Pi-Hole, you may need to provide API keys to authenticate and access their features. Ensure you have the necessary API keys and include them in your config files to enable seamless service integration.
Wrapping up
With Homepage Docker, creating a highly customizable homepage is more accessible than ever. You can create a powerful and versatile homepage tailored to your needs using Docker Compose, YAML files, and the numerous integrations available. If you are looking for a great homepage or home lab dashboard solution, Homepage Docker may be it.


In your YAML config you have ports 80 and 443, but in the docker cli command, you’re using port 3000. The YAML config did not work for me as the container is configured to listen on port 3000, hard coded.
The developer’s website even shows this: https://gethomepage.dev/en/installation/docker/
Hope this helps others.
Example:
version: “3.3”
services:
homepage:
image: ghcr.io/benphelps/homepage:latest
container_name: homepage
ports:
– 49325:3000 # To user a different port than 3000 if 3000 is being used by another container.
volumes:
– /home/servicesmon:/app/config # Make sure your local config directory exists (/home/servicesmon)
– /var/run/docker.sock:/var/run/docker.sock # (optional) For docker integrations
environment:
– TZ=America/Halifax # Timezone
restart: always # I personally set this to always.
Scott,
Thank you for your post. I need to check and see if my Traefik config was in play here.
Brandon