



I have covered a lot of different angles on home lab backups. For the most part though, these are around the hypervisor, virtual machines on a Proxmox server, and persistent data for Docker and Kubernetes. But, there is another aspect of our home labs that we need to have a good way to perform backups and that is the network. Do you have backups of all your switch configs? If you don’t, which is common, this is something that I would like to talk through how to shore up in your home lab environment. Let’s look at how I built a server that watches every change on my home lab network and keeps copies of my configs.
Why network configuration backups are different
Network backups are not quite as straightforward as just simply backing up a full virtual machine. Usually managed network devices have some type of “config” file that houses all the configuration for your network device.
Cisco devices are arguably the most common one that people are familiar with in terms of the architecture and terminology. So they have a running config and a startup config that houses either the current configuration or the config the device boots with. So, to back up these devices you need to snag a copy of this configuration.
The configuration of a switch for example with contain some of the following types of information:
- Ports that were configured as trunks
- Which VLANs were tagged on which ports
- Which VLAN was the management VLAN
- What the default VLAN is
- What MTUs are configured on which ports (think jumbo frames)
- ACLs that might be applied to which interfaces
- Static routes
When you think about it, there is a LOT of very time-consuming configuration that you have captured in your network device that if it goes “poof” and is gone all of the sudden, that could make for a very long evening of recovering and trying to get things back to a working configuration.
Also, another problem that we might have if we don’t have backups is that we have a configuration that we have out in our “production” home lab. But, maybe we changed something a few days ago and don’t remember what changes we made. Then a few days later we start seeing or noticing some weird network behavior. What did we change? Sometimes we may be hard pressed to remember exactly what it was we were tinkering with. Having a way to store “versions” of your configs is super helpful.
Oxidized for the home lab network
Oxidized is a very cool open source solution for an automated configuration collector for your home lab network equipment. The neat thing is there are already a lot of models that it already supports out of the box, but if you know a little bit of Ruby (I don’t but AI does), you can write you own custom device types and allow it to connect and pull configurations. I will show below what I did for my Unifi 48 port Enterprise switch.
Your backup workflow looks a little bit like this:
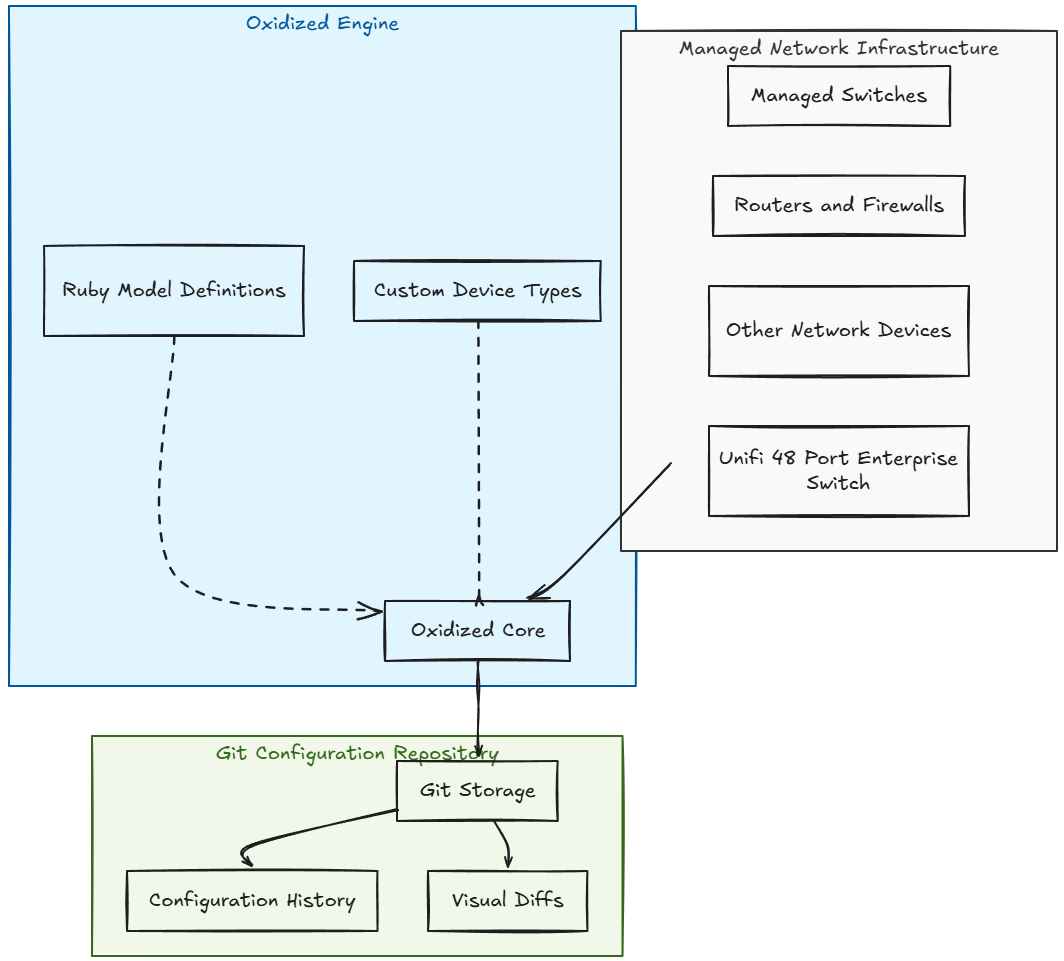
One of the really cool things that Oxidized does as well is that it allows you to version control your network config backups and store these in your source control. Using something like this in your config file, you can define that you want the output to be sent to Git:
output:
  default: git
  git:
    user: Oxidized
    email: [email protected]
    repo: "/home/oxidized/.config/oxidized/git-repos/default.git"
Getting setup to run Oxidized
Oxidized doesn’t take much at all to get going with. You could run this in a small LXC container, Docker container, or even a small Linux VM (but you would honestly be wasting resources with a VM). The official project with Oxidized includes container images for AMD64 and ARM64, so you could potentially run this on a Raspberry Pi, or better yet, the new Proxmox ARM64 running Docker or LXC with the ARM64 version of it running!
The first thing I did in my test environment to play around with Oxidized is to get the directory setup. I like to organize my Docker compose projects in their own folders. So, here I created an “oxidized” folder, then made another child directory called “config”. Later I will show you how I made a “model” directory as well for my Unifi switch.
mkdir -p ~/oxidized
cd ~/oxidized
mkdir config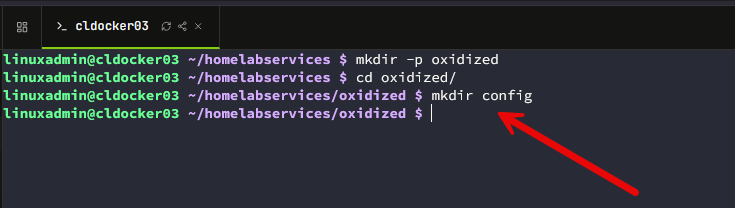
Another “file” that you need, not folder, is the router.db file inside the config directory. If you don’t you will get an error when you start your docker compose that it is missing when you run your docker compose up -d command. You can quickly create an empty file with:
touch router.dbThen you can put your first device in there like the following which is a small Cisco switch that I have. Usually with Cisco, you use the “ios” designator for true enterprise full IOS switches. But the one I have is a Cisco Small business switch. So as it turns out I had to use the “ciscosmb” designator in my router.db file:
##Normal cisco IOS switches
10.1.149.163:ios

##small business switch
10.1.149.163:ciscosmb
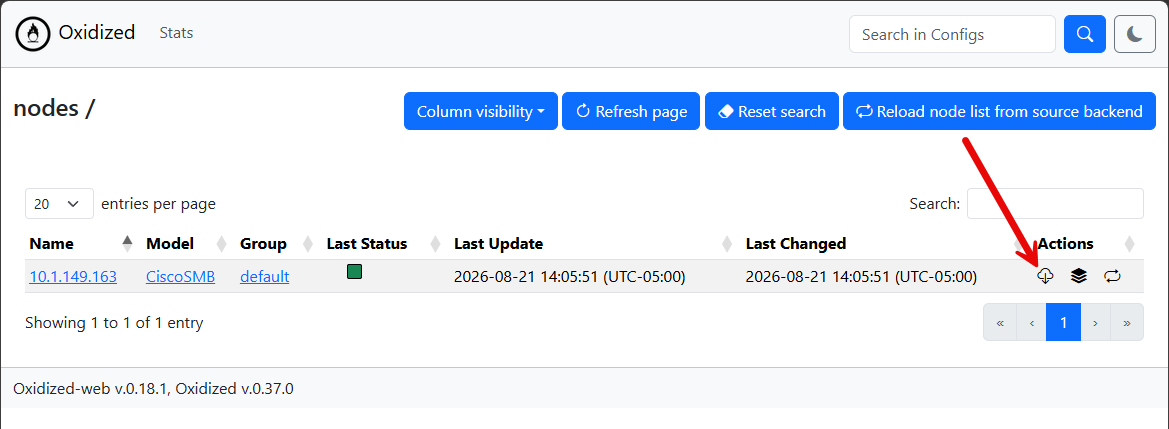
Below is how the web interface looked after adding my first switch (see below on how to enable the web interface).
Running Oxidized with Docker Compose
Now, one of the things that I love about Oxidized is that you can run it in a container. Most of the solutions that I run any more in the home lab are containerized apps. So, when I saw you could run Oxidized in a container, I started looking at the Docker compose.
A simple Compose file that you can use for Oxidized is the following:
services:
  oxidized:
    image: docker.io/oxidized/oxidized:latest
    container_name: oxidized
    restart: unless-stopped
    ports:
      - "8888:8888"
    environment:
      CONFIG_RELOAD_INTERVAL: 3600
    volumes:
      - ./config:/home/oxidized/.config/oxidized
You can save this as either docker-compose.yml or compose.yml, whichever you prefer. Then, start it with:
docker compose up -dI like to watch the startup process with the following:
docker compose logs -fWeb interface
Oxidized does have a web interface built-in, but it is disabled by default. The Oxidized web interface and REST API use port 8888 as its default configuration in the Docker deployment that I used, once you enable the web interface. To enable the web interface, you change the config in the default config file for the web interface section to this:
extensions:
  oxidized-web:
    load: true
    listen: 0.0.0.0
    port: 8888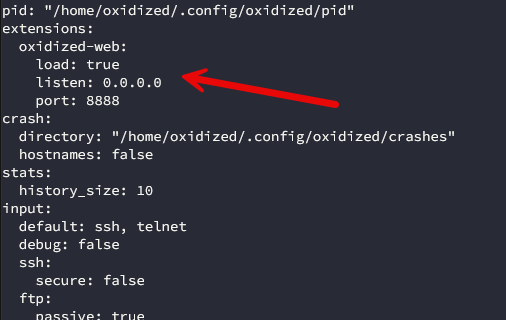
Then, all you have to do is browse out to port 8888 of your docker host. Keep in mind this is plain text HTTP traffic with no encryption. So this is only good or should be, for testing. Be sure to put it behind a reverse proxy that secures it with an SSL certificate.
How to add devices to Oxidized
Oxidized by its default configuration has the CSV formatted router.rb file that is where you put your devices. I showed you the “ciscosmb” device type above in the outset, but there are many other varieties of hardware vendors you can place in the file. One of the most important aspects of this file is the model name that you can see on the end (ios is Cisco, and aoscx is Aruba).
For example:
switch01.example.local:aoscx
switch02.example.local:ios
router01.example.local:ios
What I would recommend is to start with 1 device that you have up and running that is more standard, like a cisco for example as these are standard. This will allow you to see how things are configured and get your feet wet with a single switch so you aren’t having to troubleshoot multiple things at once.
Configuring the device source
So, for the configuration of Oxidized, it stores that inside a YAML file. The CSV source block can look like this:
source:
  default: csv
  csv:
    file: /home/oxidized/.config/oxidized/router.db
    delimiter: !ruby/regexp /:/
    map:
      name: 0
      model: 1
There are different ways to do your usernames and passwords. You can do this as additional fields and then you can map these to different configs.
source:
  default: csv
  csv:
    file: /home/oxidized/.config/oxidized/router.db
    delimiter: !ruby/regexp /:/
    map:
      name: 0
      model: 1
      username: 2
      password: 3
The config with the password might look like this inside the router.rb
switch01.example.local:aoscx:oxidized:passwordJust understand that these credentials are in plain text. I would definitely lock this directory down so that only what needs permissions to it can see and read your configuration for Oxidized.
Getting my Unifi Enterprise 48 port switch to work
This was a bit of a chore to get my Unifi USW-Enterprise-48-PoE switch recognized and working for backup purposes, but I was able to get it done with just a little bit of persistence. Since I couldn’t find that there is a ready made device profile for something like “unifiswitch”, only “edgeswitch” and “unifiap” I decided to see if I could cobble together some ruby to make this work.
What I created was a new model folder under the config directory and then put a unifiswitch.rb file inside that directory like the following:
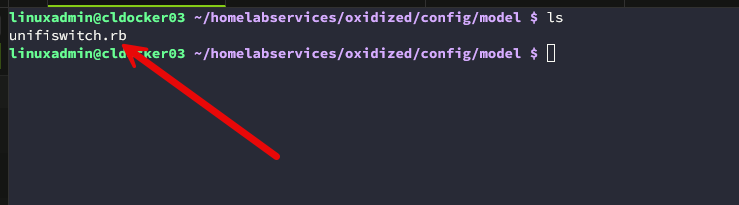
Now, let me show you what is in that file. It is below. How did I arrive at this for the Ruby code? Well, I low-level SSH’ed to my Unifi 48 port switch and ran the various commands I needed to run to get to the “show config” command and then exit back out. AI then translated that into Ruby code:
class Unifiswitch < Oxidized::Model
  using Refinements

  prompt /^.*[>#]\s?$/
  comment '! '

  expect /--More--(?: or \(q\)uit)?/ do |data, re|
    send ' '
    data.sub re, ''
  end

  cmd :all do |cfg|
    cfg.cut_both
  end

  cmd 'show running-config'

  cfg :ssh do
    post_login do
      cmd 'cli'
      cmd 'enable'
    end

    pre_logout do
      cmd 'exit'
      cmd 'exit'
      send "exit\n"
    end
  end
end
So, then after getting that file in place, this is my sanitized config file that I used that uses “groups” for the password configuration instead:
---
username: admin
password: "FALLBACK_PASSWORD"
model: ciscosmb

resolve_dns: true
interval: 3600
debug: false
run_once: false
threads: 30
use_max_threads: false
timeout: 20
timelimit: 300
retries: 3

prompt: !ruby/regexp /^([\w.@()-]+[#>]\s?)$/
next_adds_job: false

vars: {}

groups:
  cisco:
    username: admin
    password: "CISCO_SWITCH_PASSWORD"
    vars:
      ssh_host_key: ssh-rsa

  unifi:
    username: UNIFI_SSH_USERNAME
    password: "UNIFI_SSH_PASSWORD"

group_map: {}
models: {}

pid: "/home/oxidized/.config/oxidized/pid"

extensions:
  oxidized-web:
    load: true
    listen: 0.0.0.0
    port: 8888

crash:
  directory: "/home/oxidized/.config/oxidized/crashes"
  hostnames: false

stats:
  history_size: 10

input:
  default: ssh
  debug: false
  ssh:
    secure: false
  ftp:
    passive: true
  utf8_encoded: true

output:
  default: file
  file:
    directory: "/home/oxidized/.config/oxidized/configs"

source:
  default: csv
  csv:
    file: "/home/oxidized/.config/oxidized/router.db"
    delimiter: !ruby/regexp /:/
    map:
      name: 0
      model: 1
      group: 2
    gpg: false

model_map:
  juniper: junos
  cisco: ios
Then my final router.rb file is this:
10.1.149.163:ciscosmb:cisco
10.3.33.9:unifiswitch:unifi
After I got everything in place, I just ran a docker compose down and then a docker compose up -d:
docker compose down
docker compose up -d
Then both switches were connected!
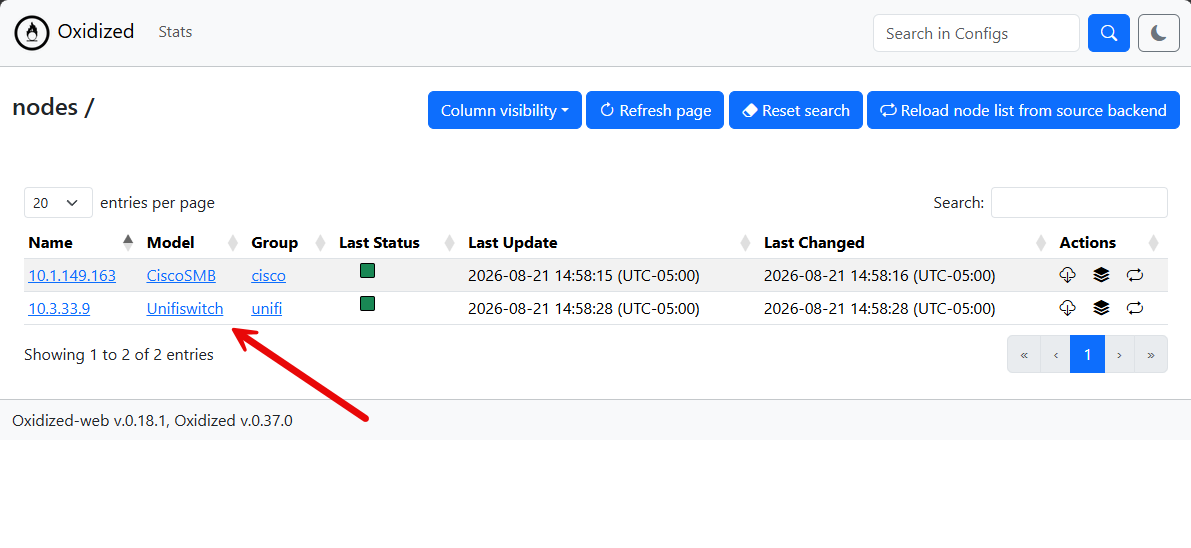
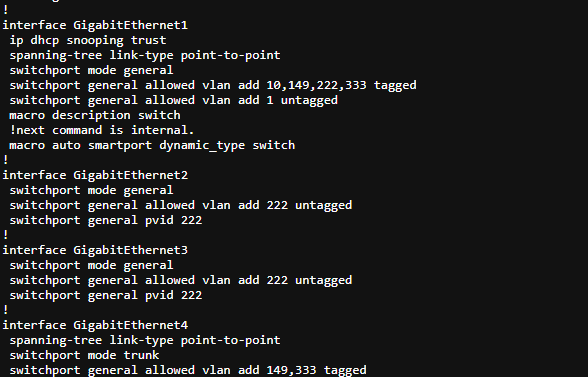
When you click the little “cloud” icon with download symbol, you can see your config for that device:
Git version control
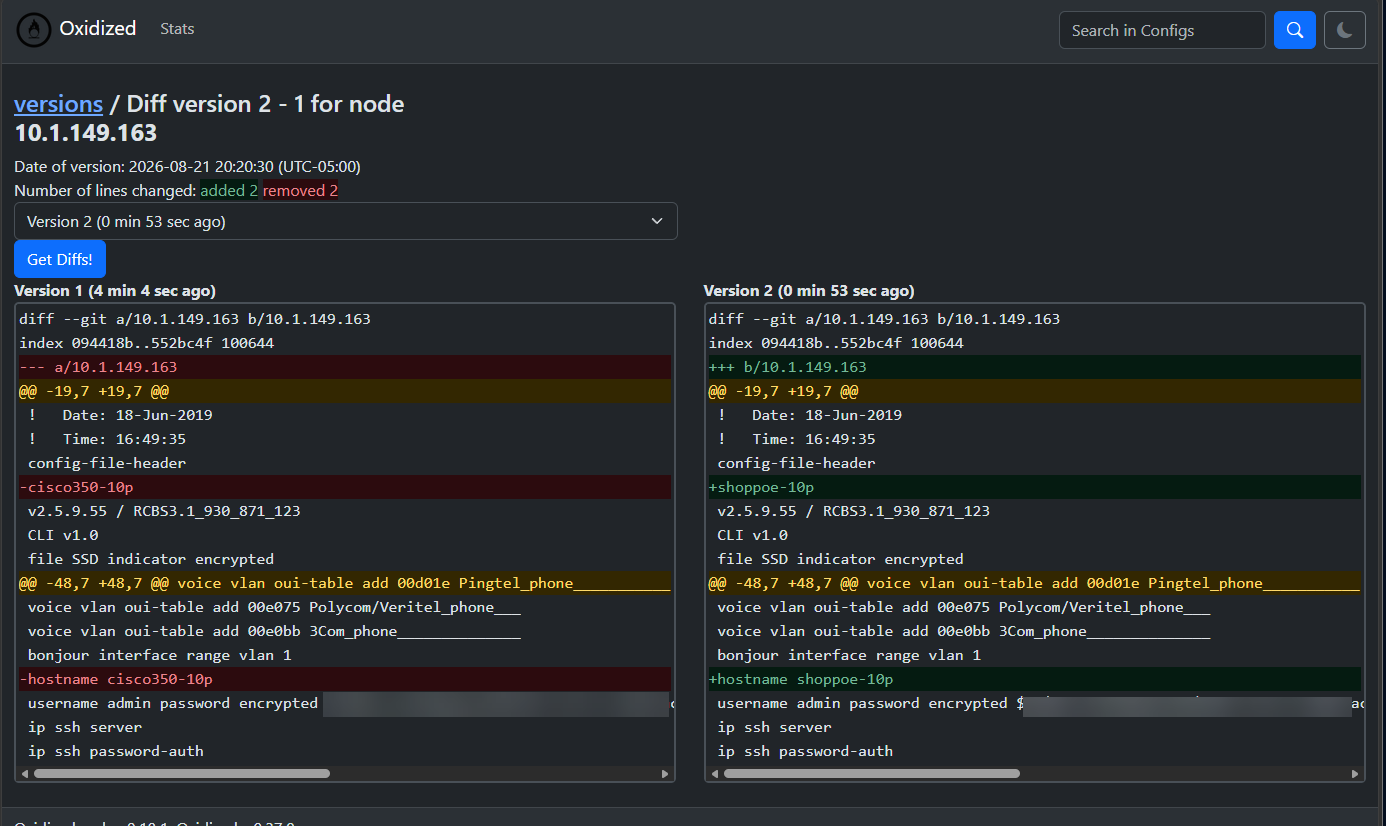
As I mentioned in the little blurb above on Git, this is one of the really cool features of the solution I think. When you integrate it with Git version control, the “versions” button becomes useable and you can actually see what the differences are between different config versions. For instance, here is my test Cisco SMB switch that I was using. I changed the name of the switch and then pulled a new config backup. Then I could do a “diff” of the configs.
You can see the differences between the two configs here:
Wrapping up
I was super impressed with Oxidized after using it for a little bit and just how customizable it really is. Honestly, I think if you have enough time and you want to get a switch working that you may have running in the home lab, i think you can do that in Oxidized. That is the beauty of having something like this is just how extensible and customizable it is. I also like that when it comes down to it, it is simple. That gives you peace of mind to be able to have backups of your network devices stored “outside” the devices and also have versioning with Git integration if you want to do that too. How about you? Are you using Oxidized or something else to backup your network configs? Let me know in the comments.
More in this topic


Google is updating how articles are shown. Don’t miss our leading home lab and tech content, written by humans, by setting Virtualization Howto as a preferred source.
About The Author

Nice one Brandon! I need to try this.
Very interesting