
One of the core disciplines in networking that you will want to learn is segmentation. We can benefit from segmentation even in the home lab environment. You can treat your network at home much like you would a production environment. No matter what you are running, whether this is Proxmox, Docker Swarm, Kubernetes, or just a handful of VMs, isolating your traffic is a great way to improve your networking experience and make it more powerful. It allows things to start to scale, makes security easier, and lends itself to better documentation. This is where VLANs come into play. I’m going to show you my VLAN strategy for segmenting services in Docker and Proxmox.
Why segment your traffic in the home lab with VLANs?
You may say, I don’t need VLANs at home. And, arguably you may not NEED them necessarily for the same reasons that are needed in the enterprise. However, there are still great benefits you can reap, AND, I have mentioned many times before, I am a huge advocate of project-based learning. Implementing VLANs at home will take you over and above many others in your understanding of core networking concepts and being able to put this into practice in the enterprise.
Implementing VLANs at home means you can do the following:
- Keep your management interfaces isolated from container traffic
- Lock down storage protocols like NFS or CephFS behind firewalls
- Avoid cross-talk between services unless explicitly allowed
- Simulate real-world enterprise networking best practices
- Have a structure that you can document much more easily
- More easily create firewall rules to restrict traffic types, etc
For me, VLANs also helped clean up a lot of network chaos once I started exposing services to the internet via reverse proxies and experimenting with AI inference stacks, containers, and IoT devices, smart home, etc.
My VLAN Layout
Here’s how I currently organize traffic across my environment. The VLAN numbers and subnets are just placeholders. You can replace with your own VLANs and subnets
| VLAN ID | Name | Purpose | Subnet |
|---|---|---|---|
| 10 | Management | Proxmox UI, SSH, monitoring agents | 10.0.10.0/24 |
| 20 | Storage | NFS, GlusterFS, CephFS, backup targets | 10.0.20.0/24 |
| 30 | Internal Docker | Internal-only containers | 10.0.30.0/24 |
| 40 | DMZ / Public | Exposed Docker services (Traefik, etc.) | 10.0.40.0/24 |
| 50 | Lab / IoT / Server traffic | Test VMs, microservices, servers | 10.0.50.0/24 |
| 60 | Cluster traffic | Isolate specific Proxmox cluster traffic | 10.0.60.0/24 |
| 70 | Live migration | Isolate live migration traffic | 10.0.70.0/24 |
| 80 | Smart home | Smarthome and smart devices traffic | 10.0.80.0/24 |
| 90 | Wireless | Wireless network | 10.0.90.0/24 |
| 100 | General LAN | General LAN traffic | 10.0.100.0/24 |
This gives me full control over how traffic flows between service types and how I can restrict traffic.
VLAN Configuration on Proxmox
Proxmox makes VLAN-aware setups fairly easy. I use trunk ports on my Unifi switch, and all VLANs are tagged except for the native VLAN 10 (management). The Proxmox host handles the tagging internally via the Linux bridge interface.
Here’s a simplified version of my /etc/network/interfaces config:
auto enp3s0
iface enp3s0 inet manual

auto vmbr0
iface vmbr0 inet manual
    bridge-ports enp3s0
    bridge-stp off
    bridge-fd 0
    bridge-vlan-aware yes

auto vmbr0.10
iface vmbr0.10 inet static
    address 10.0.10.2/24
    gateway 10.0.10.1

auto vmbr0.20
iface vmbr0.20 inet static
    address 10.0.20.2/24
Each VM or container gets attached to the correct VLAN using Proxmox’s GUI dropdown or CLI. For example, I’ll assign a VM backup server to VLAN 20 and keep monitoring agents like Netdata on VLAN 10.
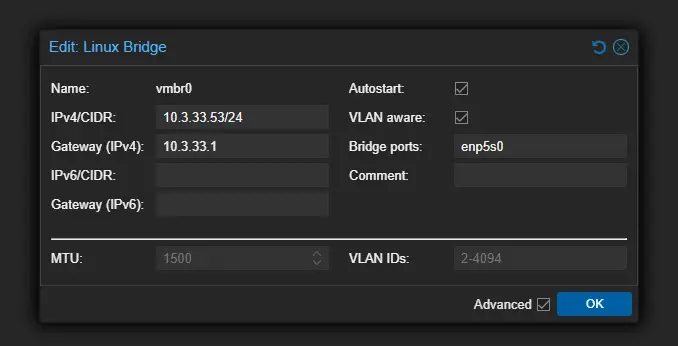
One tip: Don’t forget to enable “VLAN Aware” on the bridge in the GUI for this to work properly. Note the VLAN aware checkbox in the bridge configuration below. Too, we leave the VLAN IDs set to 2-4094 which is essentially a trunk port and will pass all tagged traffic that we want to traverse the Linux bridge. You can restrict this if you want.
Check out my deep dive video on this topic for Proxmox:
Segmenting Docker services with Macvlan
Docker by default isolates containers on a bridge network. However, that doesn’t help if you want services to live on different subnets or VLANs. To address this, I use macvlan networks with VLAN tagging directly in Docker.
For standalone Docker hosts, here’s a snippet from my docker-compose.yml:
networks:
  internal_net:
    driver: macvlan
    driver_opts:
      parent: enp3s0.30
    ipam:
      config:
        - subnet: 10.0.30.0/24
          gateway: 10.0.30.1
For Docker Swarm, I pre-create the network:
docker network create -d macvlan \
  --subnet=10.0.30.0/24 \
  --gateway=10.0.30.1 \
  -o parent=enp3s0.30 \
  docker_internal_net
This puts the container directly on the VLAN’s subnet, with its own MAC address and IP. This is ideal for workloads like Traefik, Unifi Controller, phpIPAM, and anything that benefits from segmentation or aligns with a specific traffic type in the VLAN strategy.
One thing to keep in mind: macvlan blocks host-container communication by default. You’ll either need a dedicated bridge container or a workaround if you want containers to talk back to the host (e.g., for metrics or logging).
Note: Also really important, macvlan networks do not grab DHCP addresses like standard networks either. You will need to manually assign IP addresses to your containers connected to macvlan networks like so:
services:
  nginx:
    image: nginx
    networks:
      dmz_net:
        ipv4_address: 10.0.40.10
Routing Between VLANs
All inter-VLAN routing is handled by my pfSense firewall, which acts as the layer 3 gateway for each subnet. From there, I apply strict firewall rules to limit what can talk to what. For example:
- Storage VLAN (20) cannot initiate connections to Management VLAN (10)
- DMZ VLAN (40) is fully isolated from all other VLANs except for port 443 to Traefik’s backend containers
- Internal Docker VLAN (30) is allowed to communicate with Storage VLAN (20) for access to databases, Prometheus metrics, etc.
I also monitor this traffic with Netdata and Prometheus + Grafana to identify misconfigured services and I use arpwatch to give me alerting for new devices discovered on the various network segments.
VLAN Tagging on the Switch
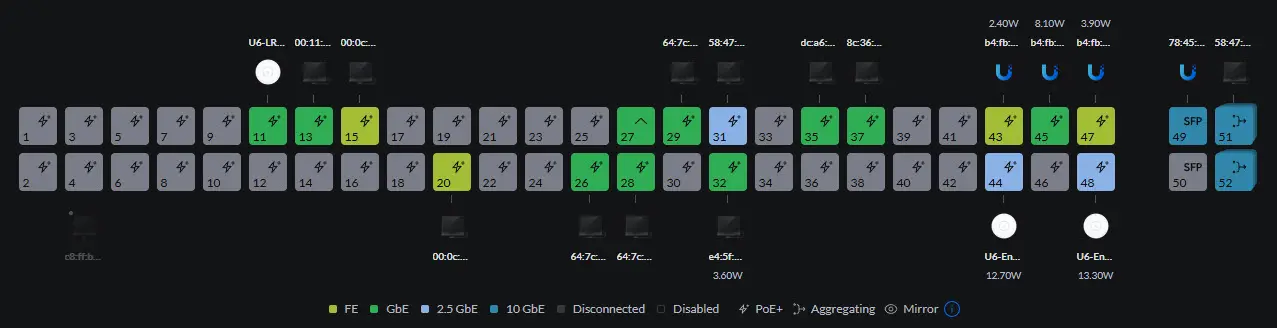
I use a Unifi switch, where each Proxmox or Docker host port is set to trunk mode:
- Native VLAN: 10 (for management)
- Tagged VLANs: 20, 30, 40, 50
Each VLAN also has a corresponding interface on the pfSense router with DHCP reservations and firewall rules.
In the Unifi dashboard, this looks like:
- Port 1 (Proxmox node): Native VLAN 10, tagged 20/30/40/50
- Port 2 (Docker host): Native VLAN 10, tagged 30/40
This setup ensures that each host sees all the VLANs it needs without any untagged surprises.
Gotchas and Lessons Learned
- Macvlan limitations: If you need containers to talk to the host, macvlan can be painful. Workarounds include additional interfaces or dedicated bridge containers.
- Don’t forget VLAN-aware settings in Proxmox: If you forget to enable this, tagging won’t work properly.
- MTU mismatch can cause headaches: If you’re using Jumbo Frames on one VLAN (like for Ceph), make sure it’s consistent across all NICs and switches.
- Some containers don’t like tagged interfaces: Older or less maintained Docker images may not behave well when assigned to macvlan networks.
Downloadable VLAN strategy worksheet for home lab
Check out the downloadable VLAN strategy worksheet with resources for your home lab environment.
Wrapping up
If you are running Proxmox and Docker in your home lab, which I suspect most will be if they are not already, setting up VLANs will be the best thing you can do for your networking experience. It might seem like it adds complexity at first. However, once you have more than a handful of services, especially with storage, public-facing apps, and many virtual machines, VLANs will be a game changer in a good way.
Start with a simple setup with a couple of VLANs. I recommend starting by separating off “general LAN” traffic that your wife and kids use from “server or home lab” traffic. This way you can make changes on the server side and leave the general LAN unaffected. As your traffic types grow, introduce new VLANs one at a time.
Happy homelabbing!
Google is updating how articles are shown. Don’t miss our leading home lab and tech content, written by humans, by setting Virtualization Howto as a preferred source.
About The Author

Hi Brandon.
Did you managed to get a fixed IP to assign to a service in swarm? I am having issues to get it to work. Ir seems to random assign these and whats worse when you reboot the service it creates new mac so you get dozens of them. Tried to put it as external in the stack.yml. I have 4 swarm nodes and have per node 3 network interfaces eth0-eth2 These are connected to vlan5, 20 and 30 via Linux vlan/vmbr in Proxmox.
Any ideas?
Warm regards
Rene.
docker network create \
-d macvlan \
--scope swarm \
--subnet=10.10.5.0/24 \
--gateway=10.10.5.1 \
-o parent=eth0 \
macvlan_vlan5
docker network inspect macvlan_vlan5
[
{
"Name": "macvlan_vlan5",
"Id": "zl84lufxoffe18y7fjzs8rwix",
"Created": "2025-10-22T00:51:27.683102258Z",
"Scope": "swarm",
"Driver": "macvlan",
"EnableIPv4": true,
"EnableIPv6": false,
"IPAM": {
"Driver": "",
"Options": null,
"Config": []
},
"Internal": false,
"Attachable": false,
"Ingress": false,
"ConfigFrom": {
"Network": ""
},
"ConfigOnly": false,
"Containers": null,
"Options": null,
"Labels": null
}
]
Looked up the wrong node. This is the correct one with the attached container
docker network inspect macvlan_vlan5
[
{
“Name”: “macvlan_vlan5”,
“Id”: “c0gs1l3za3aazw8ucase5n5k6”,
“Created”: “2025-10-22T03:45:50.831560833+02:00”,
“Scope”: “swarm”,
“Driver”: “macvlan”,
“EnableIPv4”: true,
“EnableIPv6”: false,
“IPAM”: {
“Driver”: “default”,
“Options”: null,
“Config”: [
{
“Subnet”: “172.19.0.0/16”
}
]
},
“Internal”: false,
“Attachable”: true,
“Ingress”: false,
“ConfigFrom”: {
“Network”: “”
},
“ConfigOnly”: false,
“Containers”: {
“cc27dbf2ac7c2c9e2a2752e32b80d9b46b5561bac85e860a1cfc5e7cc198f3f7”: {
“Name”: “mattermost_mattermost.1.nhv93koaaiawbklscm70cmjit”,
“EndpointID”: “018eaf6b8ed311a44086d3945bc9f3fdf8bd46851662ffa656ee188e0ce5539b”,
“MacAddress”: “b2:86:67:47:c6:44”,
“IPv4Address”: “172.19.0.1/16”,
“IPv6Address”: “”
}
},
“Options”: {},
“Labels”: {},
“Peers”: [
{
“Name”: “8c3d4496bcf0”,
“IP”: “10.10.5.15”
}
]
}
]
Rene,
I have definitely had some trickiness with Docker Swarm and ip addressing/VLANs. Do you care to share your stack file as well?
Brandon
Sorry Brandon did not see that you replied forgot to switch on the bell :).
This is what the stack looks like. This Mattermost is pretty picky :).
The volumes are created outside the stack because of using NFS4.
I tried using all kinds of ways to get the network to connect but no diece.
No worries on missing the notification! I think I might see what’s going on ***possibly***. When you inspect the network, it shows “Subnet”: “172.19.0.0/16” instead of the 10.10.5.0/24 you specified when creating it if I am looking at the outputs correct. That makes me wonder if the network creation didn’t stick properly. Also noticed your stack uses macvlan_vlan15 but you were troubleshooting macvlan_vlan5…was one used just for troubleshooting? just want to make sure we’re looking at the right one!
One thing that might help too adding the –ip-range param when creating the network. This should tell Docker exactly which IPs to use. So something like:
As for the MAC address weirdness…I believe that’s a known issues with macvlan in Swarm. ipvlan might be worth trying out since it shares the parent MAC instead of creating new ones. Keep in mind I haven’t tested that in a Swarm environment myself.
Give that a shot and let me know if it helps!
Brandon
In the end i done a ipvlan with /32 SO Only one IP address nothing else works. Also ipadress inside docker compose is ignored.
Rene,
That is one thing I hate about some solutions inside Swarm or K8s are pesky issues like these.😮
For completeness here is the code. Feel free to clean up this tree :).
docker network create \--config-only \
--subnet 10.10.xx.0/24 \
--gateway 10.10.xx.1 \
--ip-range 10.10.xx.xxx/32 \
-o parent=eth0 \
-o ipvlan_mode=l2 \
-ipvlan-config
docker network create \
-d ipvlan \
--scope swarm \
--config-from -ipvlan-config \
--attachable \
-ipvlan
Very nice @ReneB! Thank you for sharing your code here.