Many running Proxmox and self-hosting services will want to run TrueNAS on top of Proxmox. In doing this, a great way to ensure you have the best performance possible is passing physical HDD and SSDs through. Not only with solutions like TrueNAS, but there are other use cases where you may want to pass along the physical hardware to Proxmox, instead of having the virtual layer on top of the hardware. Let’s look at Proxmox passthrough disk configuration and how this is accomplished.
Proxmox and Disk Passthrough
Proxmox VE is an open-source solution gaining popularity, especially since Broadcom’s VMware meltdown. It is built on top of the KVM hypervisor and can also run LXC containers. Recently, with Proxmox 8.1, you can run software-defined networking, and you have had software-defined storage capabilities with Ceph for quite some time now. It can take advantage of traditional storage, like iSCSI block-level storage, NFS, local, etc.
The concept of a “proxmox passthrough disk” allows a Proxmox VM to read and write to a disk as if it were connected directly to the VM, rather than the virtual disk configuration that we traditionally know with virtual machines. As mentioned at the outset, if you have a VM that you want to have high-performance access to the underlying storage, like TrueNAS, this is a great way to do that.
However, you can do this for a Windows VM, Ubuntu VM, or other Linux VM you are running on top of Proxmox and KVM. You can also add a new HDD or use an existing HDD for this purpose as long as it isn’t claimed by Proxmox for other purposes.
Configuring Proxmox for Disk Passthrough
Let’s now look at configuring Proxmox disk passthrough. First, we need to make sure the disk is not used by another process and we need to identify the disk ID we are going to use.
Preparing the Physical Disk for Passthrough
Ensure the disk is not in use or mounted on the host system. If it was previously used, you might need to unmount it to prevent data loss. This step is crucial as it prevents the host and VM from accessing the disk at the same time, which could lead to data corruption.
Managing Disk IDs and Device Paths
Managing disks by ID rather than device name (e.g., /dev/sda) helps make sure the VM’s storage configuration is persistent between reboots. This helps eliminate issues that come from the device name changing. This can happen when the host system’s hardware configuration changes.
Identifying the Physical Disk
You can list all disks available on your Proxmox host by using the command lsblk or by checking the “dev disk by id” directory, which holds all disks by their unique identifiers.
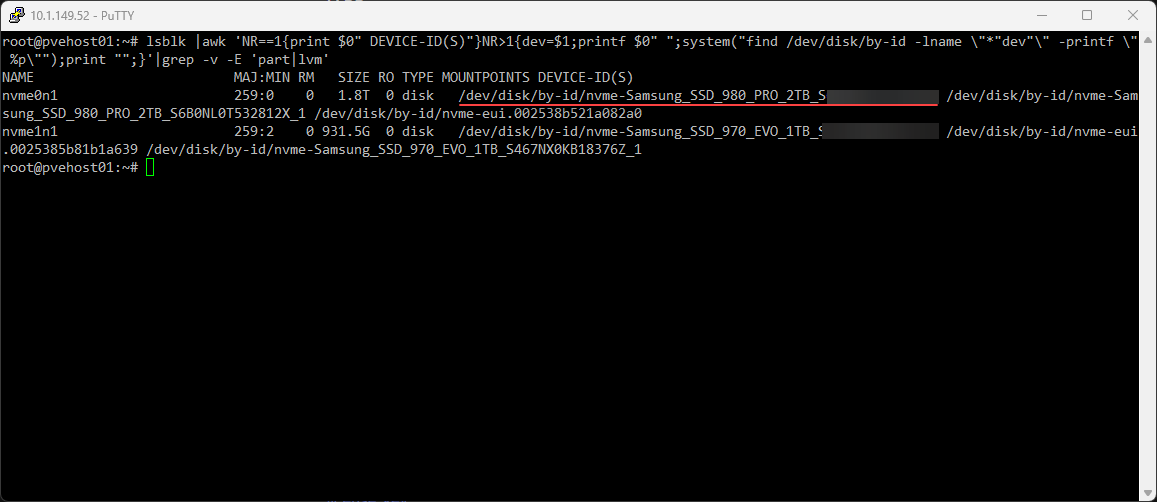
One of the easiest ways I have found is using the following command found in the official Proxmox documentation:
lsblk |awk 'NR==1{print $0" DEVICE-ID(S)"}NR>1{dev=$1;printf $0" ";system("find /dev/disk/by-id -lname \"*"dev"\" -printf \" %p\"");print "";}'|grep -v -E 'part|lvm'This command allows you to list disk by ID ata identifier. In the command output, we are looking for the identifier that starts with /dev/disk/by-id. Since I know it is a Samsung 980 Pro NVMe drive that I am passing through, I can easily identity it by the name.
Proxmox Disk passthrough to a VM
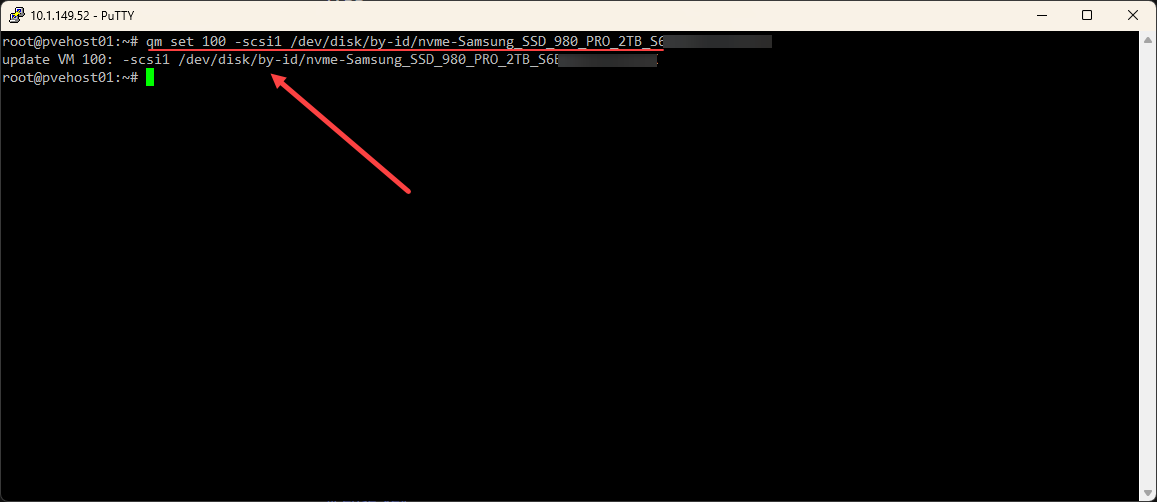
Once the disk is prepared, you can proceed to attach it to the desired VM. Use the qm set command followed by the VM ID and disk details to complete the passthrough. For instance,
qm set <vm id> -virtio0 /dev/disk/by-id/<disk-id>.After running the command, you shouldn’t receive any error messages. You will also see the message about it updating the VM with the specified Proxmox ID.
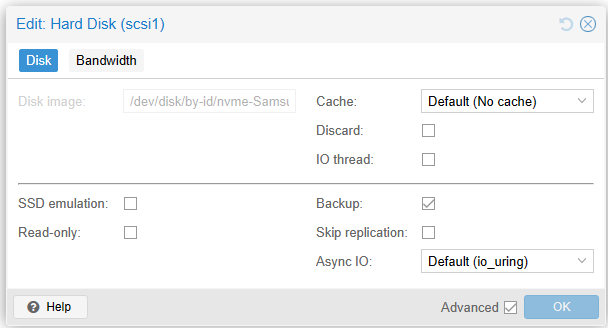
In the Proxmox web UI, we can also check the hardware configuration to see the VM hard disk with the correct identifier has been passed through.

Verification and Boot-up
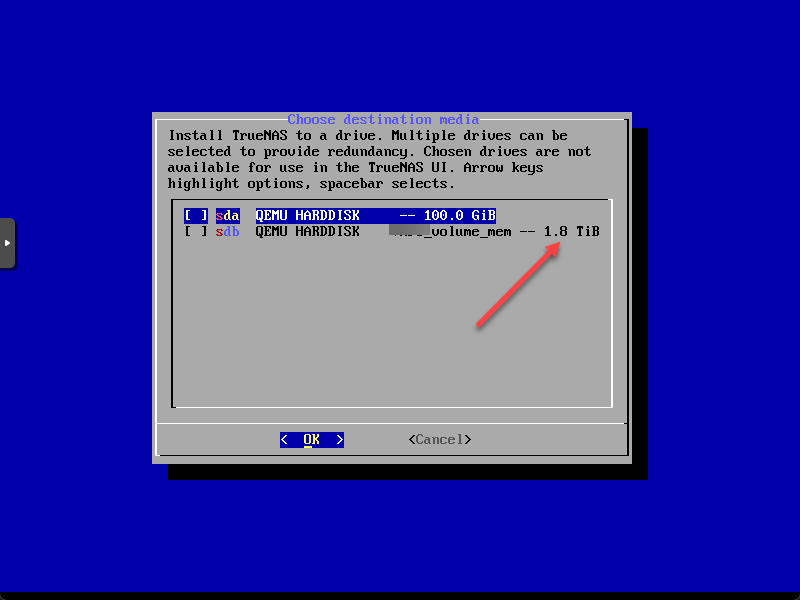
After configuring the disk passthrough, verify the setup by starting the VM and check to make sure you can see the disk in the guest operating system for use. The disk should appear as a physical disk within the VM, allowing for native disk operations like partitioning and formatting.
SSD emulation and performance
While passing through a physical disk, you can also emulate SSD characteristics if you use an HDD to improve performance. Adjustments in the VM configuration can enable features like TRIM support, which is beneficial for SSDs.
Next steps
What should you do next after passing through your physical disk to a Proxmox VM? Make sure you can see the disk in the operating system as we have shown above. Also, make sure you can format and use the disk without issues. If you run into issues, take a look at the troubleshooting section below.
Troubleshooting
VM Fails to Recognize the Physical Disk
Problem: After setting up passthrough, the physical disk does not appear within the VM’s operating system.
Solutions:
- Check VM Configuration: Ensure the
qm setcommand was executed correctly with the appropriate VM ID and disk ID. The command should look like this:qm set <vm id> -virtio0 /dev/disk/by-id/<disk-id>. - Verify VM Hardware Compatibility: Some VMs, especially those with older operating systems like certain Windows versions, might not recognize modern storage interfaces. Check if your VM’s OS supports the disk interface, such as SATA or SCSI.
Disk Performance Is Suboptimal
Problem: The disk is recognized, but performance is lower than expected.
Solutions:
- Check Disk Type and Mode: Make sure the disk is operating in the correct mode. SSDs should have TRIM enabled, and HDDs should be checked for correct alignment and sector size.
- Optimize Proxmox VM Settings: Adjust the cache settings and IO thread usage in the VM configuration to better suit the type of disk you are using. For SSDs, using a write back cache can improve performance.
Error During Passthrough Setup
Problem: Receiving errors during the passthrough command execution in Proxmox.
Solutions:
- Review Proxmox Logs: Check the Proxmox logs for any error messages that can indicate what might be going wrong. The logs can provide clues whether the issue is related to the Proxmox configuration or the underlying hardware.
- Recheck Disk ID: Ensure that the disk ID used in the passthrough command is correct and corresponds to the physical disk you intend to use. Use the
ls -l /dev/disk/by-id/command to list the available disks and their IDs again to confirm.
Disk Not Showing Up After Reboot
Problem: Disk passthrough configuration works until a reboot, after which the disk no longer appears in the VM.
Solutions:
- Persistent Configuration: Check if the passthrough configuration is persistent across reboots. You may need to edit the VM’s configuration file directly to ensure the settings are permanently applied.
- Hardware Changes: Verify that no hardware changes have affected disk visibility. Changes in the host system’s hardware setup can sometimes reset disk priorities or paths.
Wrapping up Proxmox passthrough disk
Disk passthrough in Proxmox is a great feature that helps optimize the performance of your virtual machines. By giving VMs direct access to physical storage devices, you can reduce latency and increase throughput. This helps significantly improve performance for disk-intensive applications.
In the comments, let me know if you have used Proxmox disk passthrough and how you may be using it in your home lab environment.
More in this topic


Discuss this in the Community
Google is updating how articles are shown. Don’t miss our leading home lab and tech content, written by humans, by setting Virtualization Howto as a preferred source.
About The Author
