This post will consider how to send an encrypted email in Outlook, different types of encryption, and how this can be implemented.
Table of contents
What is encryption?
Encryption is probably one of the most well-known and trusted types of security mechanisms that can be used to prevent your data from falling into the hands of an attacker who is looking to leak, or otherwise get your data into the wrong hands.
It scrambles the contents of the data using a key pair encryption algorithm. You need a side of the encryption key pair to “turn the lock” so to speak on the encrypted data, so that when the right key is used for the data, it is readable once again.

What is email encryption?
Email encryption takes the concept of making data unreadable and applying this to email communications. Using encryption email data is scrambled until someone has the right key to read it.
Email Encryption Options
There are a few different email encryption options that you can be and need to be aware of for security. These include the following:
- Transport Layer Security (TLS)
- Secure/Multipurpose Internet Mail Extensions (S/MIME)
- Pretty Good Privacy (PGP)
These are the main ones to know about and ones that have easy ways to configure the solution.
Sending secure in Outlook
Outlook has many different ways included and that you can configure or admins can configure to encrypt communications. This is needed especially to make sure that no one is snooping on your email comms which is needed to make sure data is not readable unless someone is authorized, and is important to configure.
Office 365 Message Encryption (OME)
S/MIME
TLS
Each method has its own set of advantages and drawbacks.
How to set up your e-mail certificate
To use encryption methods like S/MIME in Outlook, you need a digital ID:
Get a digital ID as it is called from a trusted certificate authority (CA).
Install it on your computer.
In Outlook, navigate to the File tab, click Options, then Trust Center, and select Trust Center Settings.
Go to the Email Security tab and click Import/Export under Digital IDs (Certificates).
Finish out the setup of the digital id method
Microsoft 365 encrypted email
You can use these steps to setup Microsoft 365 encrypted email which Microsoft has made easier than you think, take a look:
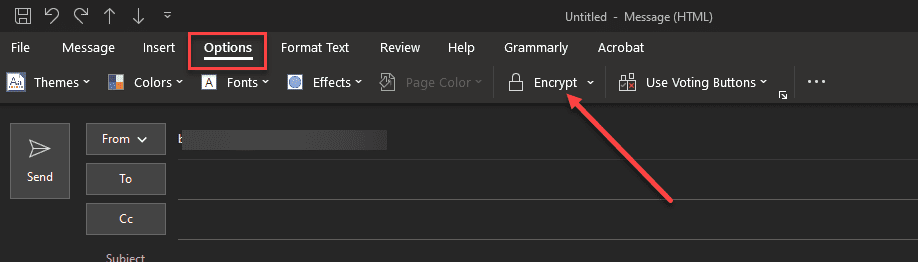
Compose a new email message in Outlook.
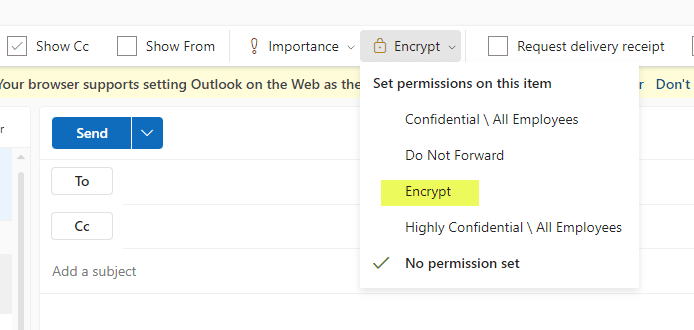
Click the Options tab, then click the Encrypt button.
Choose the appropriate encryption option, such as “Encrypt Only” or “Do Not Forward.”
Finish composing your email and click Send.
The email will be encrypted, ensuring only the intended recipient can read it.
Encrypt all email messages in Outlook
To encrypt all outgoing email messages in Outlook, follow these steps:
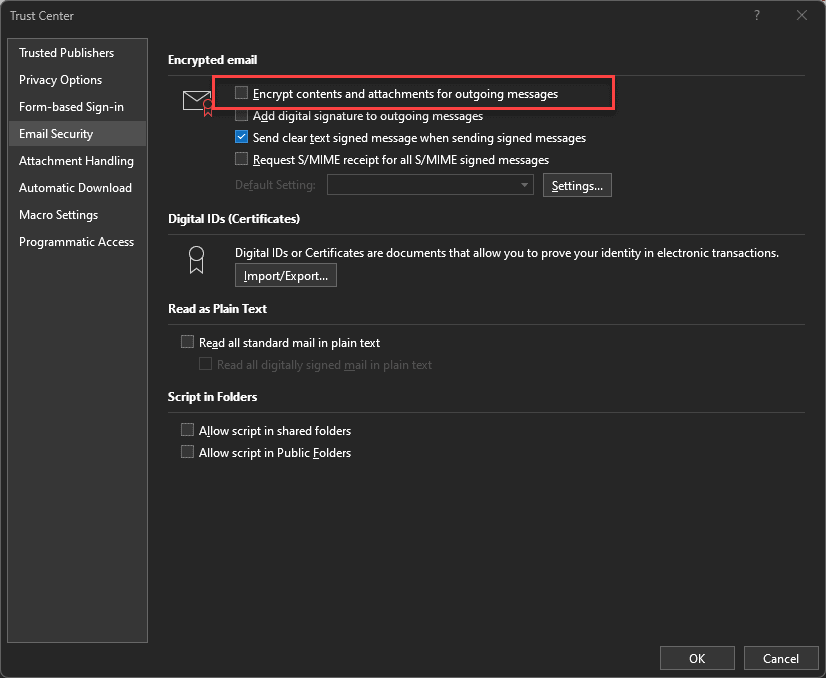
Navigate to the File tab, click Options, then Trust Center, and select Trust Center Settings.
Go to the Email Security tab.
Under Encrypted Email, check the box next to “Encrypt contents and attachments for outgoing messages.”
Click OK to save your settings.
Now, all your email messages will be encrypted automatically before being sent.
Microsoft Outlook desktop app
For Outlook email encryption, follow these steps:
Open Outlook and compose a new message.
Click the Options tab and then the Encrypt button.
Select the desired encryption option, such as “Encrypt Only” or “Do Not Forward.”
Finish composing your email and click Send.
The email will be encrypted, ensuring only the intended recipient can read it.
Wrapping up
There are many ways to encrypt email. Email encryption is a great way to secure communication when using email through Outlook.
Google is updating how articles are shown. Don’t miss our leading home lab and tech content, written by humans, by setting Virtualization Howto as a preferred source.
About The Author