How to Manage VMware Snapshots: A Guide
They can be one of the best features in a VMware vSphere environment, or perhaps the worst, depending on how they are managed and the understanding of what purpose they serve. VMware snapshots provide really great functionality and capabilities for vSphere administrators to manage the state of a particular VMware vSphere virtual machine. While this is a concept that most of us are familiar with, let’s revisit how to manage VMware snapshots and look at best practices, concepts, features, and ways this feature of VMware vSphere can be used effectively.
What are VMware snapshots?
Obviously, when we think about the term “snapshot,” we think about a camera or a picture that captures a moment in time and the state of how everything existed in the picture exactly as it appeared the moment when the picture is taken. We can think of the VMware snapshot in much the same way. The snapshot provides the ability to capture the state of a running virtual machine exactly as it existed at the moment the snapshot is taken. This can even include the memory footprint of the virtual machine.
VMware snapshots of a virtual machine can also capture the virtual hardware state and configuration of a virtual machine as well. This means it can capture the virtual hardware
What are the benefits of VMware snapshots?
As you can probably imagine, the VMware snapshot provides many great capabilities when it comes to development and other use cases. Let me detail where I have seen snapshots used successfully and where I have used them that are beneficial. Where do snapshots really come into play?
VMware snapshots are really meant for development purposes and non-production environments. They especially come in extremely handy when you need to deploy code or other changes to a box and you want to have a quick rollback from the changes being made. The following are great examples of where snapshots can help:
- Code changes – deploying new code to a development server
- Operating system updates – Installing Windows Updates, etc
- Driver installs – Changing or upgrading a driver
- Upgrading software – Upgrading to a new version of software installed
- Adding new software – Adding new software to a server
- Forensics – Capturing a specific state of a server or client VM after a suspected malicious attack or other activity
- Power state – Taking a snapshot preserves the power state of a VM
- Capturing VM settings and hardware – You can also use snapshots to capture VM settings and virtual hardware if you are changing many settings and need a failsafe to revert if needed
Needless to say, snapshots are great for any of the above use cases. Your business may have further needs where snapshots fit the use case. They are much easier to roll back than having to restore a full backup of a VM to recover from software, drivers, or other changes made to a box.
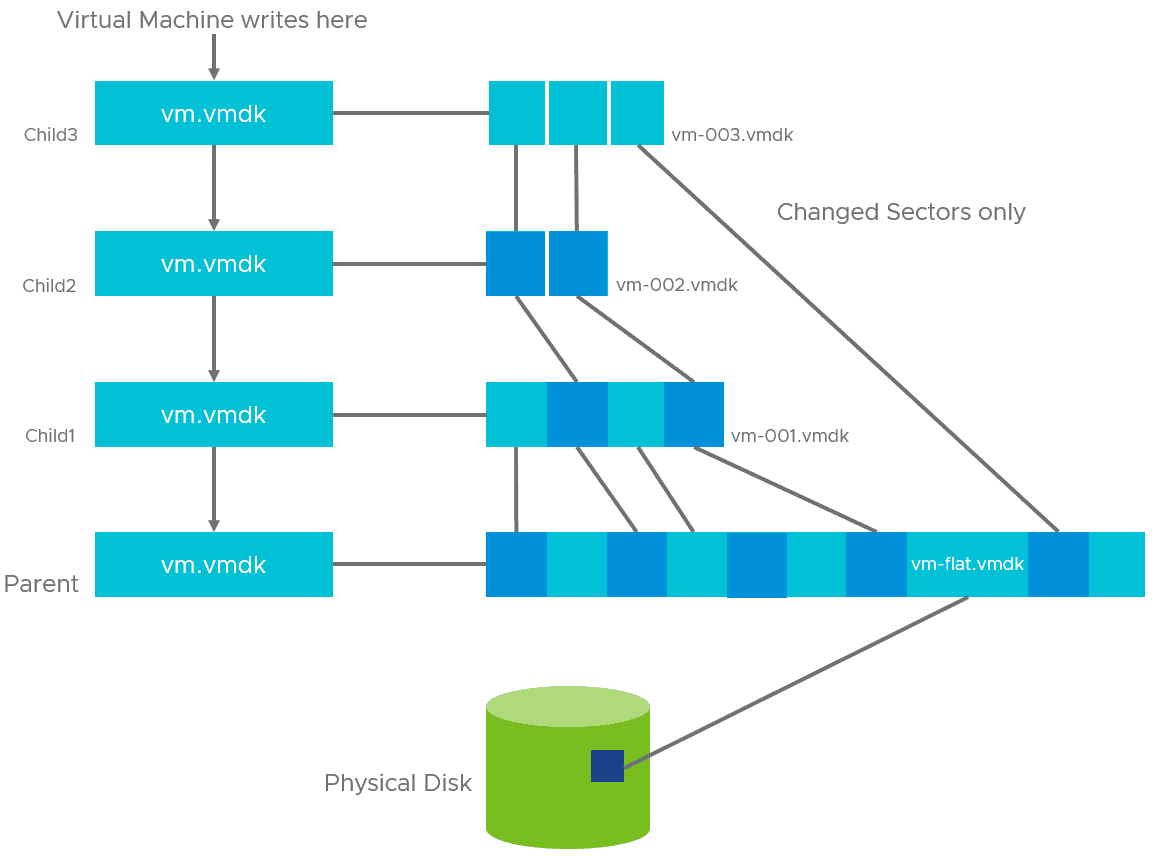
VMware snapshot architecture
What is the architecture of a VMware snapshot? What makes them work and have the capability to revert changes as they do? The snapshot is comprised of the following files that make up the architecture of the snapshot itself:
- -.vmdk and –delta.vmdk – The vmdks and delta vmdks are at the heart of the snapshot and its ability to roll back data changes. Snapshots can be created upon other snapshots. This creates a chain of snapshots that rely on all the other disks in the chain for the snapshot to be viable.
- .vmsd – The vmsd file is a kind of “mini database” containing the information about the VMware snapshot. This includes the information that defines the relationships between the snapshots and the child disks contained in the snapshot
- Snapshot.vmsn – The vmsn file is what allows you to capture the active memory state of the virtual machine. Capturing the memory state of a virtual machine allows you to take a snapshot of a virtual machine in a state of being powered on. When you capture the memory with a snapshot, these take longer to create than creating a snapshot without the memory state of the virtual machine.
Determining if a Virtual Machine is running on snapshots
While snapshots provide a lot of great features and capabilities in a development, testing, or other environment for various needs, you want to keep up with which virtual machines have snapshots running. We will look at best practices considerations in just a bit with this, however, how can you tell if a VM is running with snapshots?
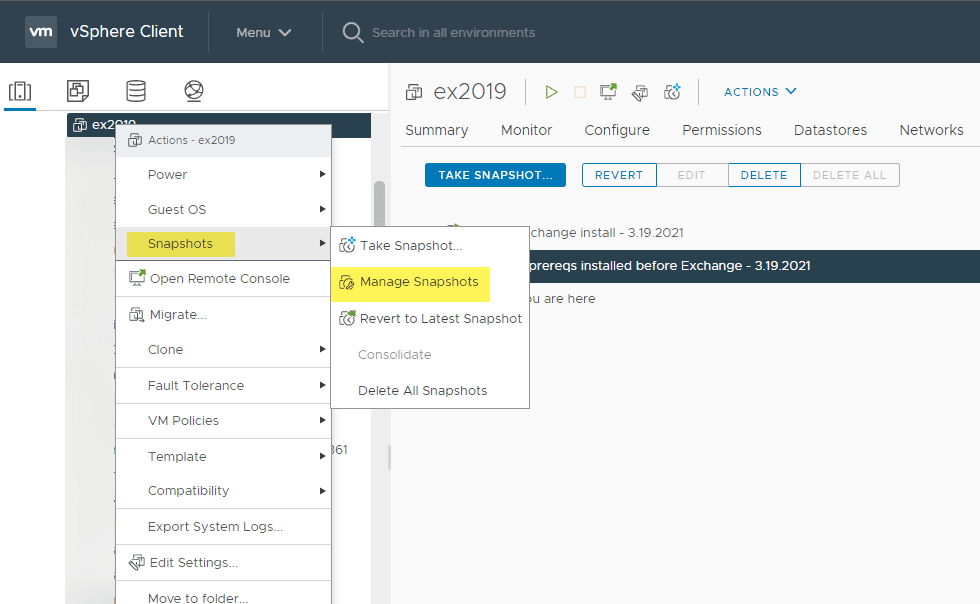
When you are simply looking at a VMware virtual machine in the vSphere inventory, you can’t tell by looking at the VM that it is running on snapshots. Instead, you have to look in the vSphere Client under the Snapshots > Manage Snapshots menu option to see and list out the snapshots that may exist on any particular virtual machine.
Checking your VMware vSphere virtual environment manually using the vSphere Client GUI may be less than ideal, especially if you have a lot of virtual machines running. Using a command-line or automated means for managing and checking VMware snapshots is a much better approach than using the GUI in this case.
Using PowerCLI, you can find all snapshots running on a single VM or multiple VMs running in VMware vSphere.
get-vm <vm name> | get-snapshotIf you want to find all the snapshots running on multiple VMs found in a folder, you can do that using:
get-vm -location <folder name> | get-snapshot | flVMware snapshots best practices
Since snapshots are powerful and provide many great features, can you just use them anywhere and for any type of use case? What are the best practices you need to be aware of with VMware snapshots? There are many things you need to consider related to using snapshots. These include:
As noted by VMware, you want to keep the following in mind when using snapshots:
- Do not consider or use them as a backup – Snapshots are not a standalone copy of your data. They rely on the base disks of the VM. Without these, they are useless and not a complete set of your data since they are “delta” disks.
- There is a supported maximum of 32 snapshots per VM in a snapshot change. It is best not to use more than a maximum of 2 or 3. More than this number will seriously degrade performance.
- Snapshots continue to grow as they exist on a virtual machine. They should not be left in place for more than 72 hours. If left unattended, snapshots can continue to grown and potentially fill up a LUN.
- Data protection solutions that make use of snapshots should only use these until the backup iteration is complete. It is important to make sure these are properly pruned off the V after the backup job is finished
- Snapshots prevent any changes to the disks on a virtual machine – This includes extending the size of a virtual disk
Creating snapshots with the vSphere Client
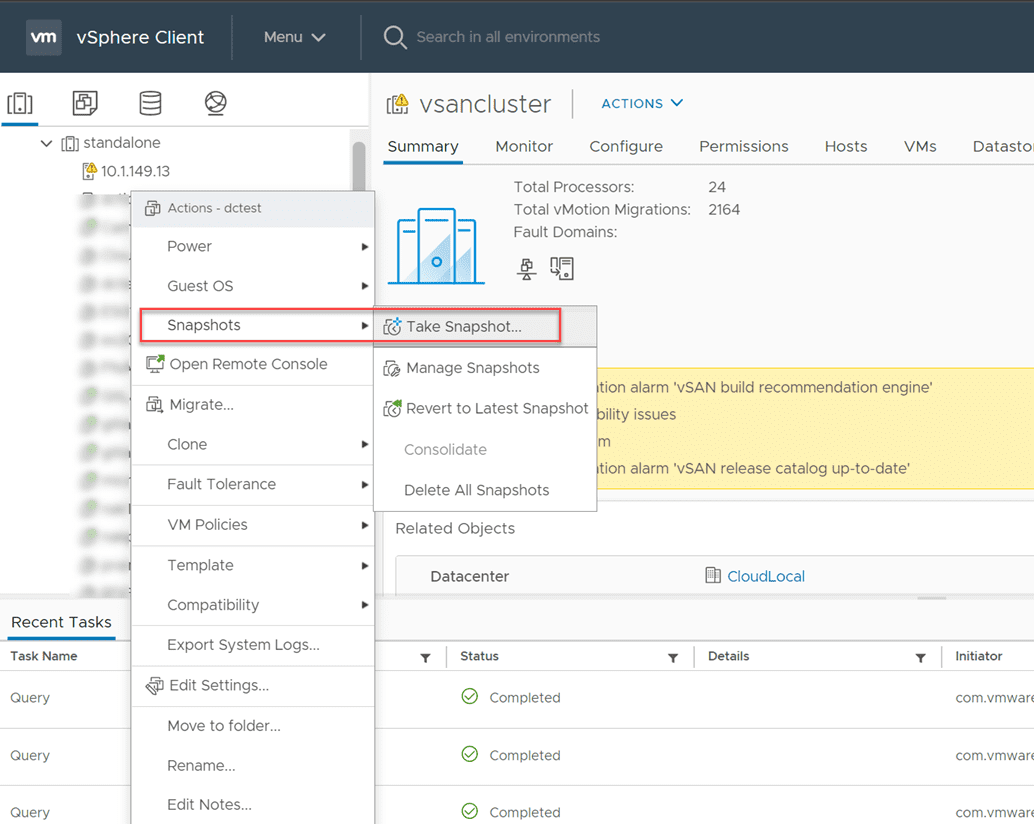
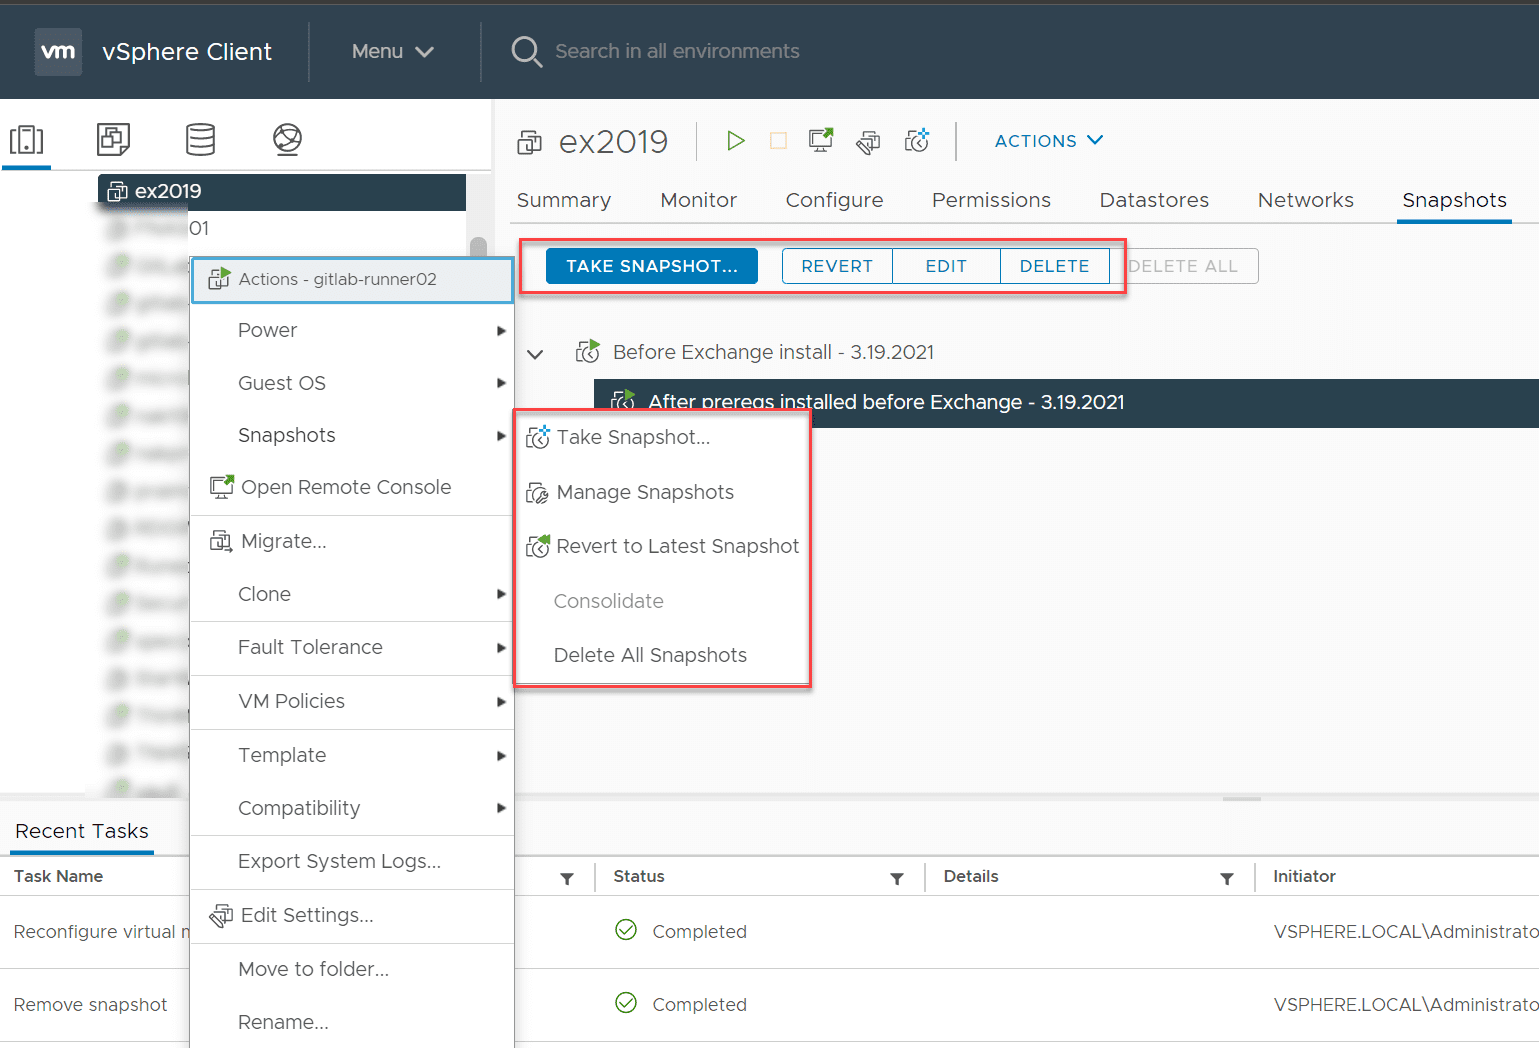
Creating snapshots can easily be accomplished using the VMware vSphere Client GUI or by using PowerCLI. Let’s start by looking at the vSphere Client. Creating a VMware snapshot using the vSphere Client is as easy as right-clicking on a virtual machine and selecting Snapshots > Take Snapshot…
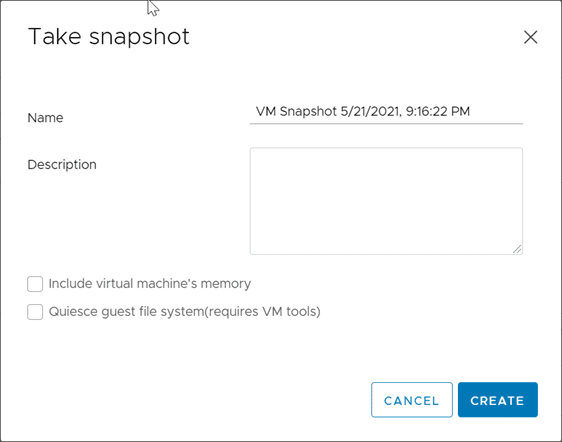
You will see the Take snapshot dialog box appear. Here you will need to name the snapshot and choose a description (optional). Also, there area a couple of other options:
- Include virtual machine’s memory – This option captures the memory footprint of the
- Quiesce guest file system (requires VM tools) – Quiescing a file system is a process of bringing the on-disk data of a physical or virtual computer into a state suitable for backups
Using PowerCLI to create VMware Snapshots
While creating an ad-hoc or one-off VMware snapshot using the vSphere Client GUI is perfectly ok for one virtual machine here and there. However, what if you want to manage VMware snapshots in mass? What if you want to take a snapshot of several virtual machines at once? You can’t do this using the vSphere Client. PowerCLI makes interacting with your vSphere environment and managing VMware vSphere snapshots super easy. To create a VMware snapshot using PowerCLI, you can do that using the following command:
get-vm <vm name> | new-snapshot -Memory -quiesce -name "testmulticlone"If you want to create snapshots on multiple virtual machines based on the folder name, you can do that using the following:
get-vm -location "testclone" | new-snapshot -Memory -quiesce -name "testmulticlone"With this approach, you can effectively create snapshots on multiple virtual machines in tandem. This is a great way to create a point in time roll back for multiple machines that may be involved
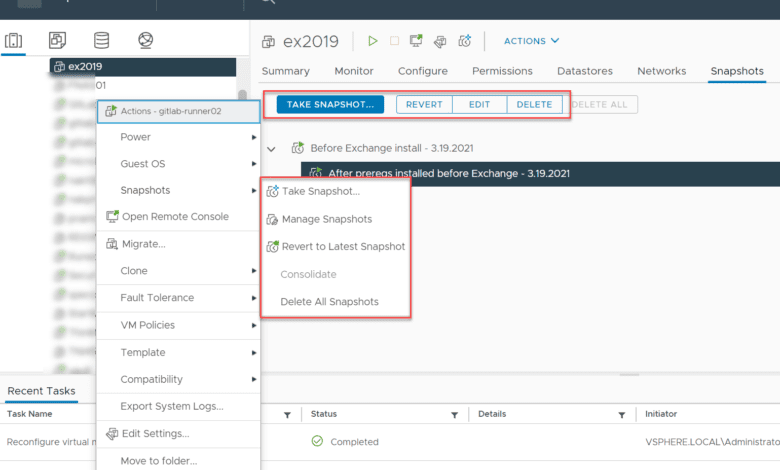
Managing, reverting, and deleting snapshots
The other snapshot options you will use include the manage snapshots, revert and delete snapshots option. When you click to manage snapshots, you will be taken to a view of all snapshots on your virtual machine where you can choose which snapshot you want to revert to or delete. You can use the quick revert to latest snapshot to revert to the most recent snapshot running on a virtual machine. Also, you can use the delete all snapshots option to get rid of all snapshots that are found on a virtual machine.
As you can see below, the vSphere Client Gui provides an intuitive interface that allows easily managing the VMware snapshots found on your virtual machine.
How can you delete a specific snapshot name that may be present on multiple virtual machines? In the PowerCLI script below, we can easily remove a snapshot by name from all VMs located in a specific folder.
$vms = get-vm -location "foldername"
$snapshotname = "My snapshot name"

foreach ($vm in $vms) {

$snapshot= Get-Snapshot -VM $vm -Name $snapshotname
remove-snapshot -snapshot $snapshot -RunAsync -confirm:$false

}
Considerations when removing a snapshot
When you remove snapshots on a virtual machine in VMware vSphere, you won’t be able to perform any other actions on the virtual machine. This is important to know. Especially if you have a large snapshot on a virtual machine, kicking off the snapshot deletion process will need to run until the consolidation of the delta disk into the base disk is complete. Keep this in mind as rolling off a snapshot will mean that backup iterations will not be running in the meantime and you can’t perform other virtual machine operations as mentioned.
A virtual machine may also become unresponsive for a short period of time during a snapshot deletion. Why is this? The reason the Virtual machine may become unresponsive is because of the stun process. This has to do with the consolidation process.
The stun/freeze happens due to changes written back to the base disk from the Delta disks. A VM under heavy load or I/O operations may have longer consolidation times and stun times can increase. There is a safety mechanism of sorts. In ESXi, it predetermines how long the stun goes, and if it detects it takes more than 15 seconds, it waits for another Iteration, it keeps doing that for 10 iterations. On the 10th iteration, it stuns the virtual machine for the required period of time it needs to. This process has changed and if the process detects that it is over 15 seconds, after 9th iteration it stops trying and cannot delete the snapshot.
Snapshots are not a replacement for backups
We have already mentioned this under the snapshots best practices list noted. However, it deserves its own section as this is an important concept to understand with snapshots. While snapshots provide some “backup-like” features, including the ability to get back to a known good state, snapshots are not backups.
By definition, a backup should be a standalone copy of your data that allows stored outside your production infrastructure or the resource that is being protected. Since a snapshot relies on the snapshot chain, it is not a complete standalone copy of your data. It is also not stored outside the production infrastructure. This means if you lose one part of the snapshot change, the rest of the data is worthless.
Also, don’t get confused by the fact that modern data protection solutions use snapshots in the backup process. Why is this? Backup solutions use snapshots to divert writes to the VM from the base disk and into the snapshot disk. By doing this, the backup solution can take a copy of the data that resides in the base disk. New data that is written during the backup run is contained in the delta disk and will be captured as part of the base disk in the next backup run. Once the backup has copied over the data in the base disk, the snapshot is rolled off and the delta disk is consolidated with the base disk.
Robust backup solutions like NAKIVO Backup & Replication provide true enterprise-grade backups that are standalone copies of your data. NAKIVO offers modern features that allow backing up VMware vSphere effectively. This includes changed block tracking which allows NAKIVO to only copy the changes since the last backup which is much more efficient than copying all data.
Learn more about NAKIVO and download a fully featured trial version here:
Wrapping Up
VMware snapshots are a powerful tool in the toolbelt of vSphere administrators. The snapshot provides arguably the quickest rollback to a known good state that you have available. They are meant to be a dev/test/staging type tool and not run in production. However, many create snapshots in production before applying updates, making software changes, updating drivers, and other types of scenarios where having a quick rollback is beneficial. In this guide, we have covered many facets of the VMware snapshot and how it can be used, managed, created, deleted, and automated using VMware PowerCLI. Especially keep in mind, snapshots are not backups. Using an enterprise backup solution like NAKIVO is a great way to protect your data the right way to avoid data loss.