Configure Wasabi Backup Repository in NAKIVO
One of the new features that I wanted to kick the tires on with the new NAKIVO Backup & Replication v10 release is the backup to Wasabi cloud storage. Integrating cloud into your backup architecture is a great way to easily achieve the 3-2-1 backup methodology in your disaster recovery plan. This helps to ensure that you have additional copies of your backups located offsite and on a different form of “media”. Let’s take a look at how to configure Wasabi backup respository in NAKIVO v10.
What is Wasabi Storage and why is it good for backups?
Wasabi is a cloud storage provider that touts very performant cloud storage with some very steep price advantages when compared to AWS S3 and other wellknown cloud storage solutions. On the Wasabi page, they mention they are 1/5 the price of AWS S3.
To take a look at the Wasabi price comparison with AWS S3 storage here:
According to the calculator provided, Wasabi is extremely cheap when compared to AWS and the point of their pricing model that stands out to me is they do not charge for egress or API requests. Most other wellknown cloud storage solutions like AWS S3 charge you when data leaves the environment.
This can certainly add up over time. Especially with backups, there is a good chance that you will need to pull data out of the cloud environment since this may be needed in a disaster recovery scenario where all the other copies of your data may have been destroyed but you still have your backups stored in the backup repository in your cloud environment.
NAKIVO Backup & Replication v10 Adds Wasabi Backup Repositories
With the release of NAKIVO Backup & Replication v10, NAKIVO has added Wasabi storage as part of the native offering when you setup your backup repositories. This means it is extremely easy to integrate Wasabi cloud storage as part of your backup infrastructure with v10.
How do you go about configuring the NAKIVO Backup & Replication v10 Wasabi backup repository? There are only a few steps involved. Let’s take a look at the steps involved both on the Wasabi side as well as in NAKIVO Backup & Replication v10.
Configure Wasabi Backup Repository in NAKIVO v10
What are the steps involved to get Wasabi hot cloud storage integrated with your NAKIVO Backup & Replication v10 environment? We will look at the following steps:
- Create a Wasabi account
- Setup a Wasabi storage “bucket”
- Create an API key
- Add a Wasabi account to NAKIVO inventory
- Add a Wasabi Repository in NAKIVO
Let’s first take a look at the Wasabi side of things and see how to setup Wasabi for use with NAKIVO.
Configure Wasabi Hot Cloud Storage for NAKIVO backup repository
Starting with the Wasabi side of things, you will first need to sign up for a Wasabi account. This is a simple process and includes the very common fill out a form process and verify your email.
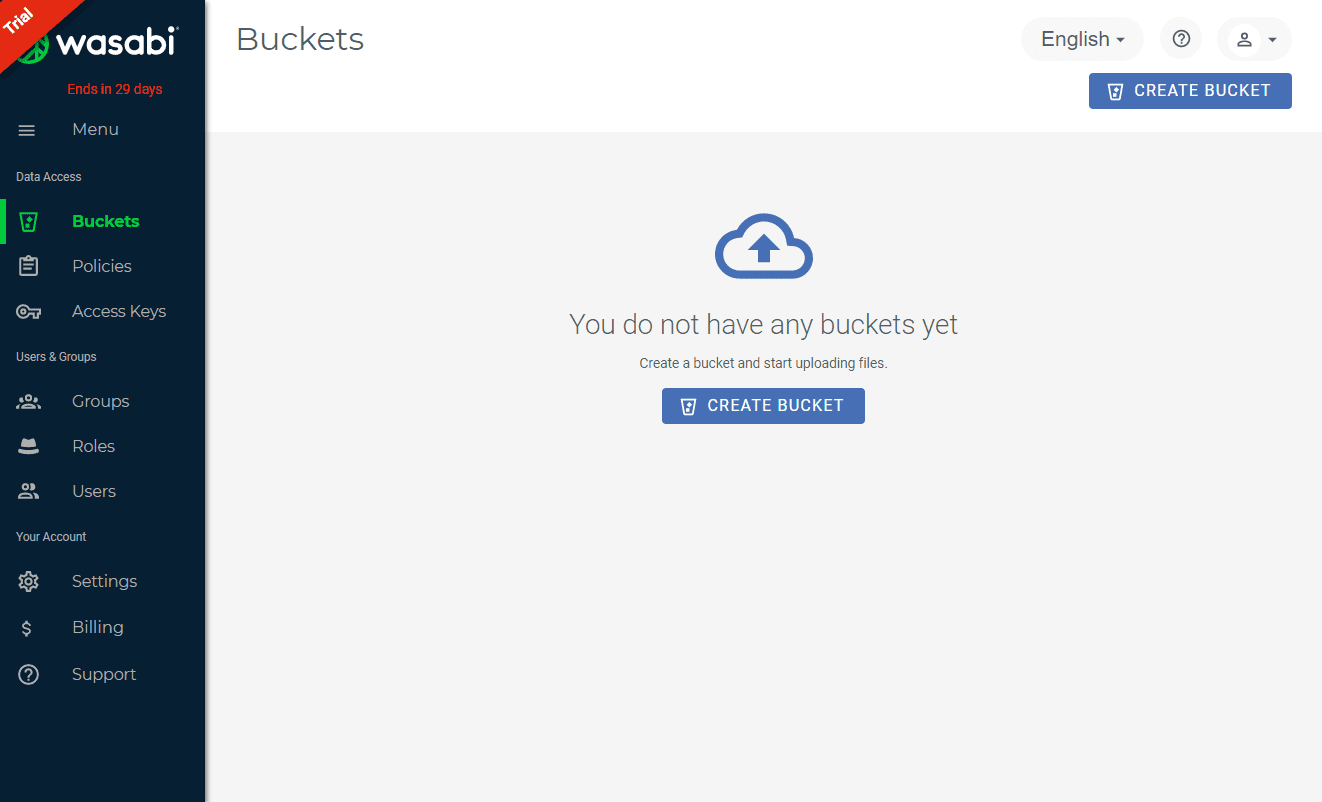
Let’s fast forward to you having access to your Wasabi account and now logged in ready to configure the account. The first step in the process to get ready for adding your Wasabi backup repository is to create your Wasabi storage bucket.
The storage bucket is like the virtual storage “container” of sorts that will house your NAKIVO backups. Click the Create Bucket button.
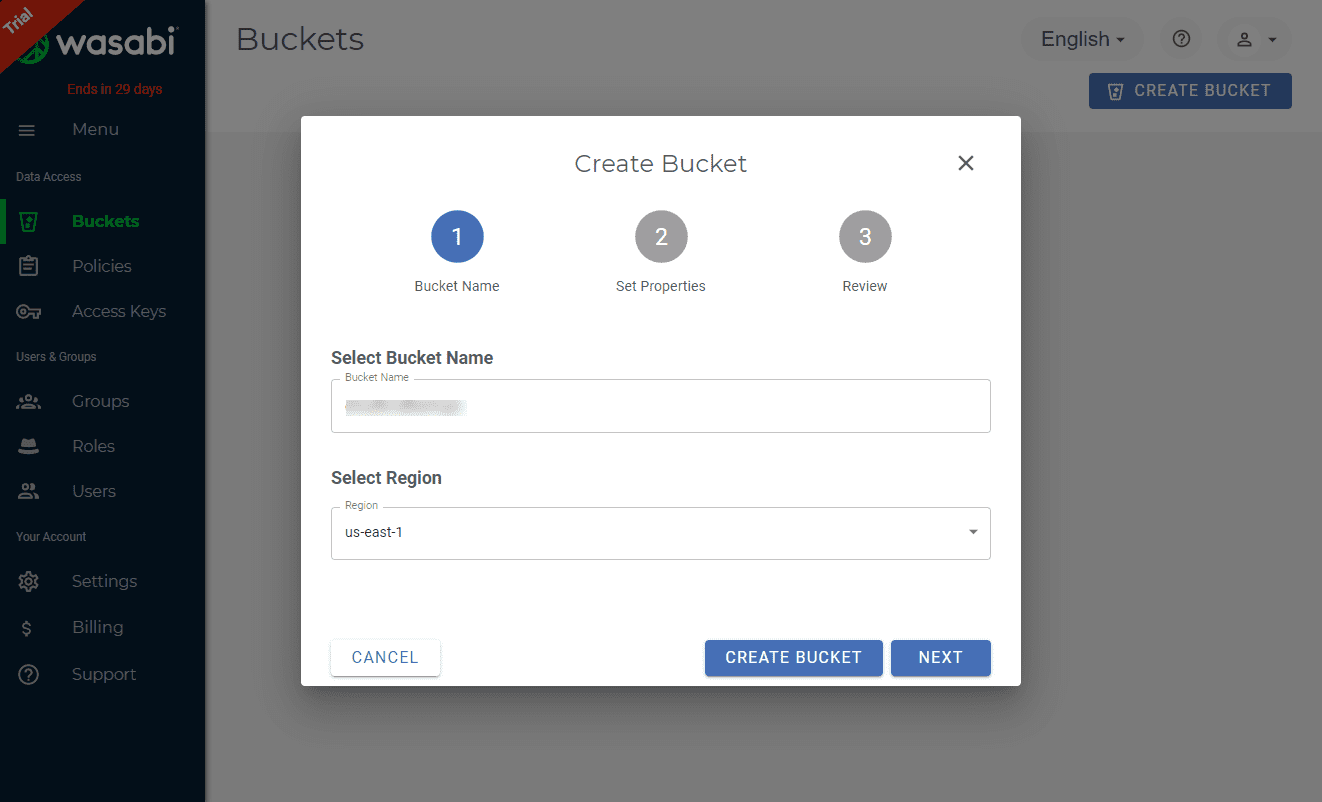
This launches the Create Bucket wizard. The first step is to name the bucket and also select the geographic region the storage container will be located in.
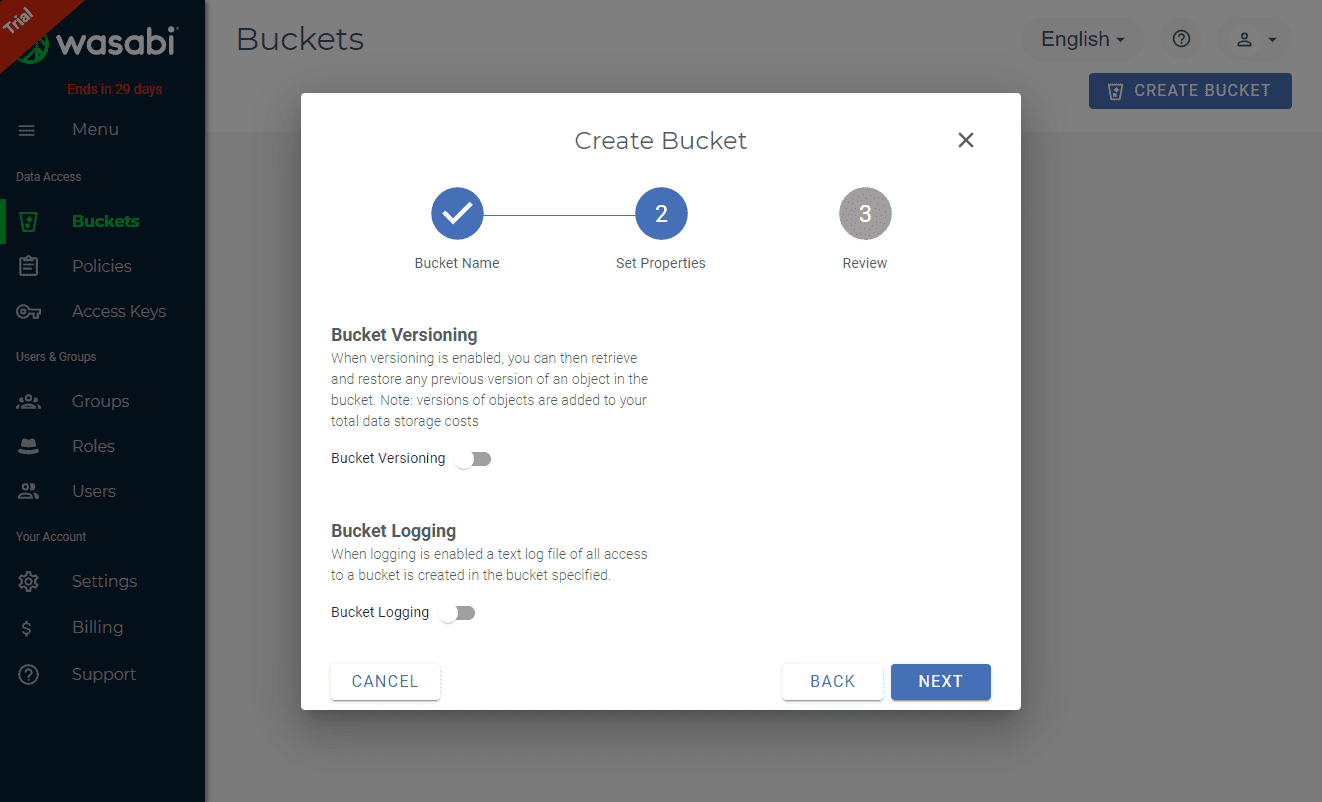
On the Set Properties screen, you can select to enable versioning as well as bucket logging. Versioning will keep additional versions of your data on top of any versioning you are doing. Logging will provide additional logging. For my NAKIVO repository, I am simply accepting the defaults here.
Review and finish out the creation of the new bucket.

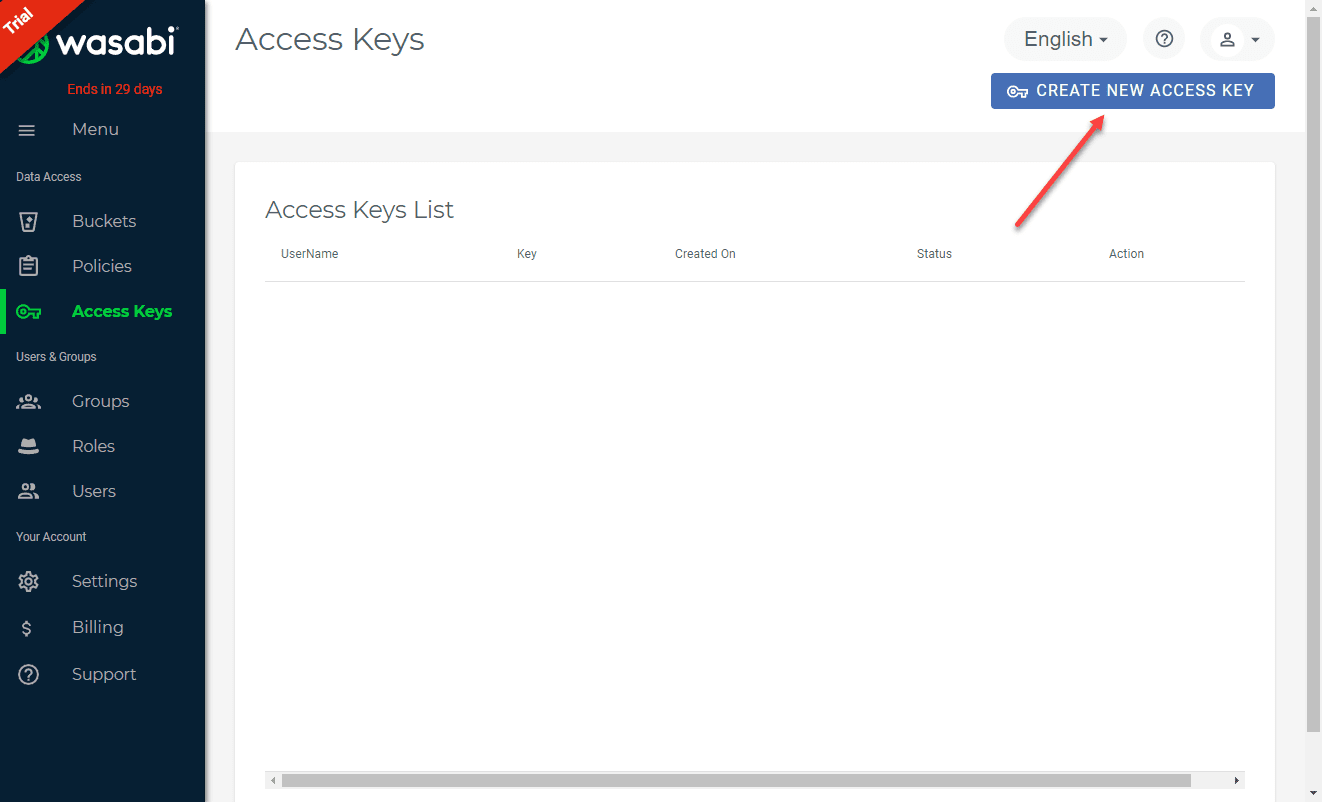
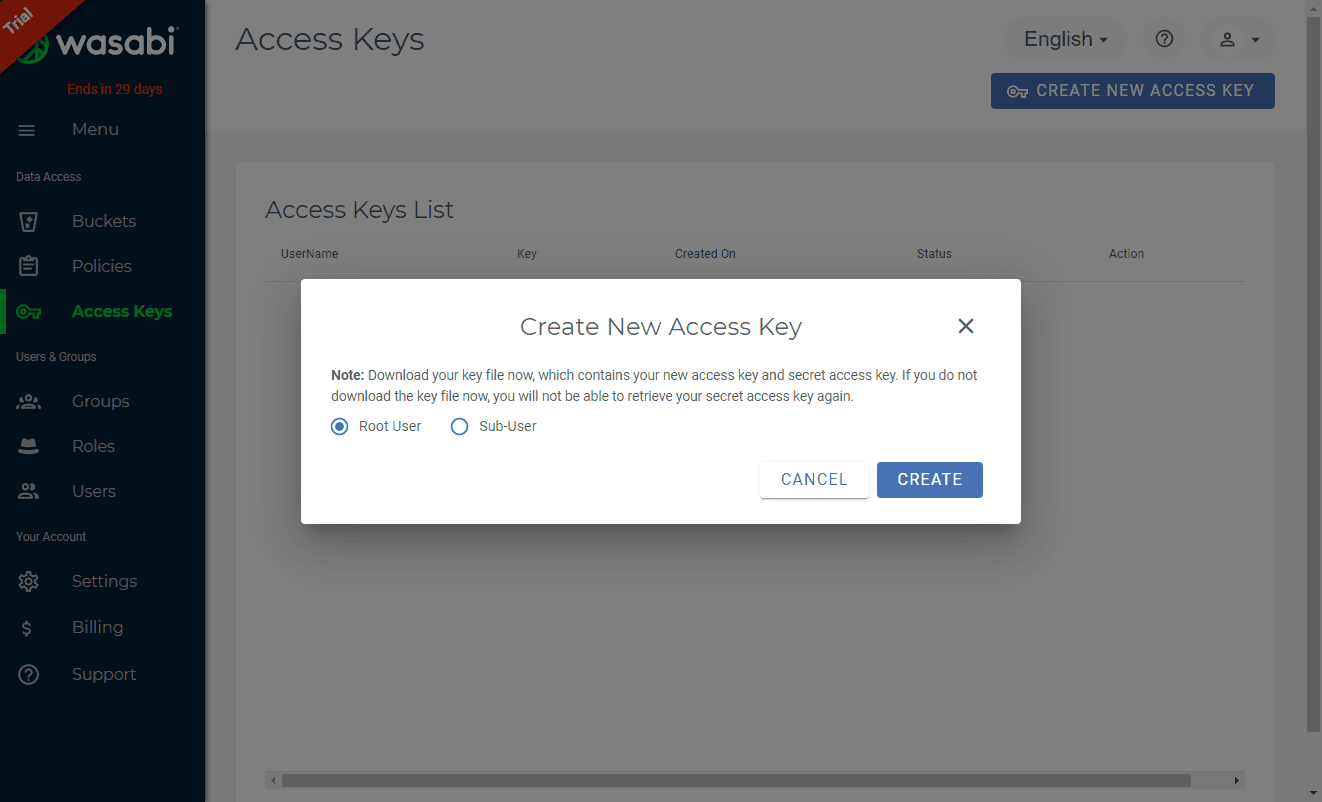
Now, we need to Create New Access Key by clicking this button. This will create the credentials that will be needed by NAKIVO to authenticate to Wasabi.
On the create new access key select either root user or sub-user for access. Here I am selecting root user, however, this may not be necessary. I have not delved completely into the permissions required here, so using a root user.
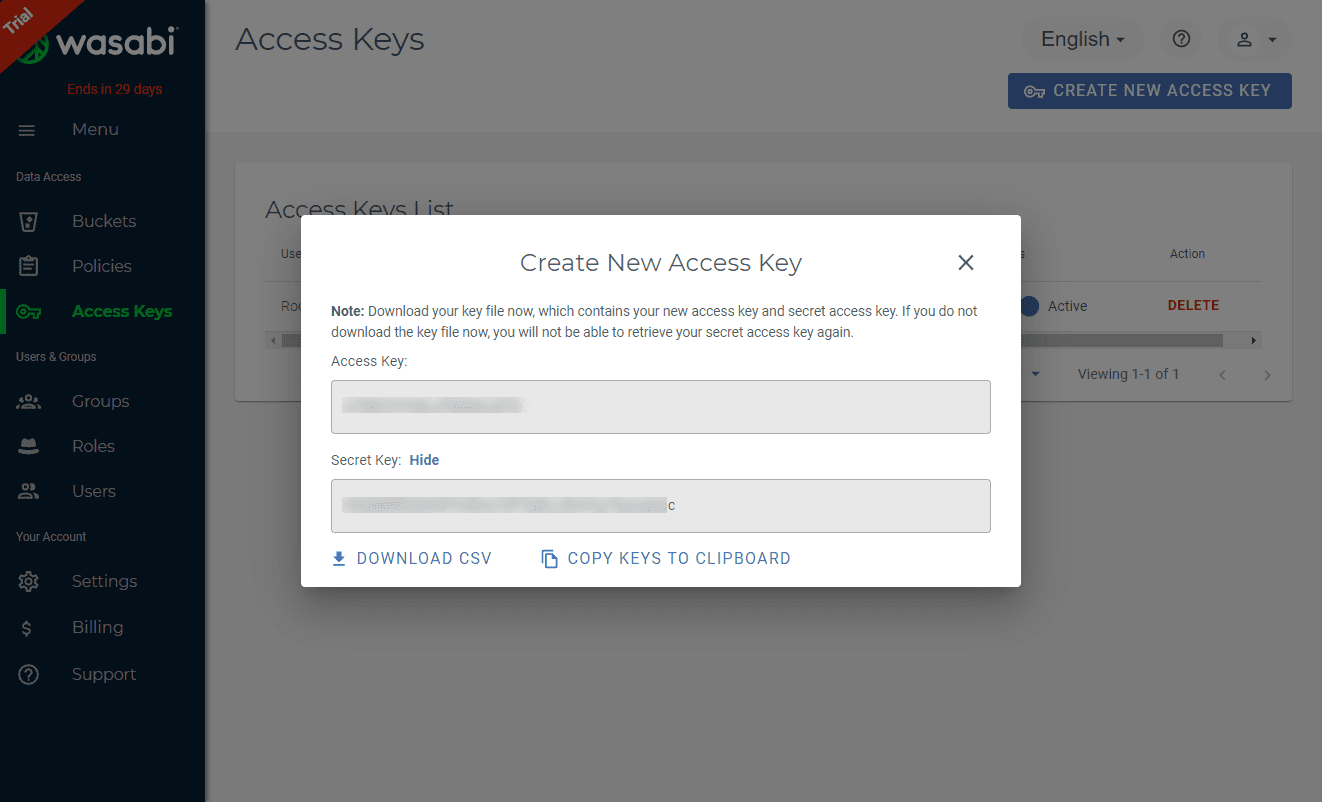
The new access key is created successfully. You can either download the CSV of the key or copy the keys to the clipboard. Just remember, if you misplace these you will have to create a new access key as you will not be able to retrieve them after this screen.
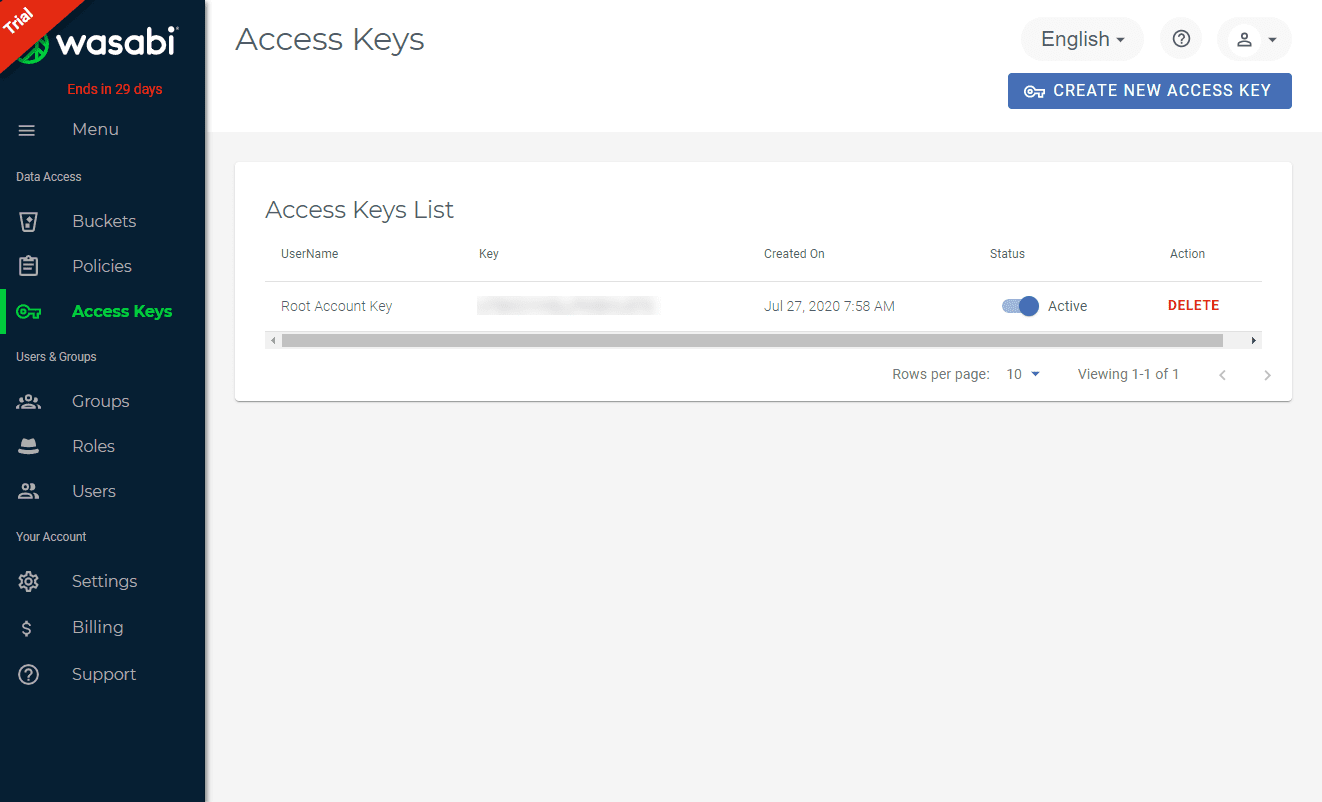
The access key is created successfully.
Now that we have the basic Wasabi configuration in place, let’s turn to configuring the NAKIVO Backup & Replication v10 side of things.
Add Wasabi Account and Backup Repository in NAKIVO
On the NAKIVO side there are a couple of tasks that need to be completed. What are those?
- Add the Wasabi account to the NAKIVO inventory
- Create/Add the Wasabi backup repository
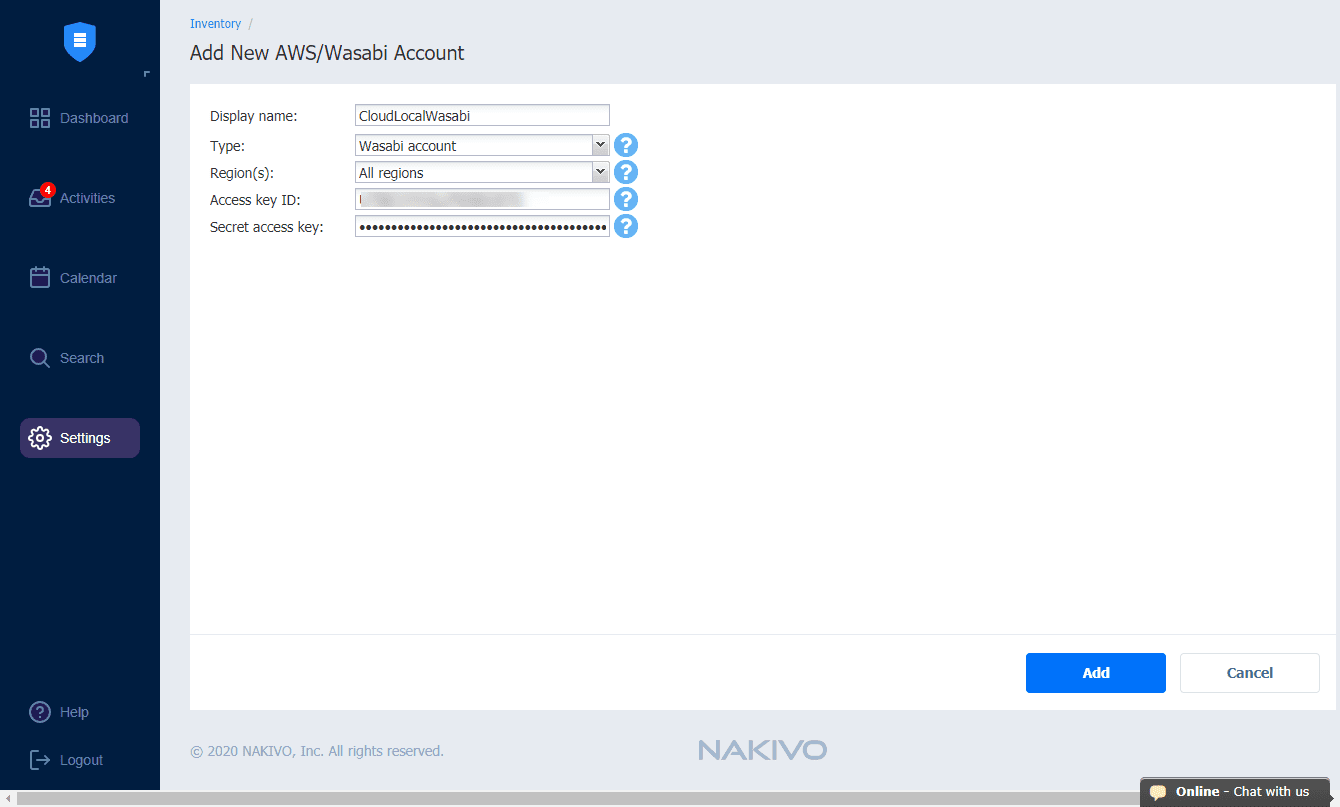
Before actually getting to the point of creating the Wasabi backup repository, you need to first add your Wasabi account to the NAKIVO inventory.
To do this go to Settings > Inventory > Add New and choose the AWS/Wasabi Account. Select Wasabi account in the Type drop down. Click Add.
Now that you have the Wasabi account added, you can create/add the Wasabi backup repository. If you already have a Wasabi repository from another NAKIVO installation, you can add it to your new installation.
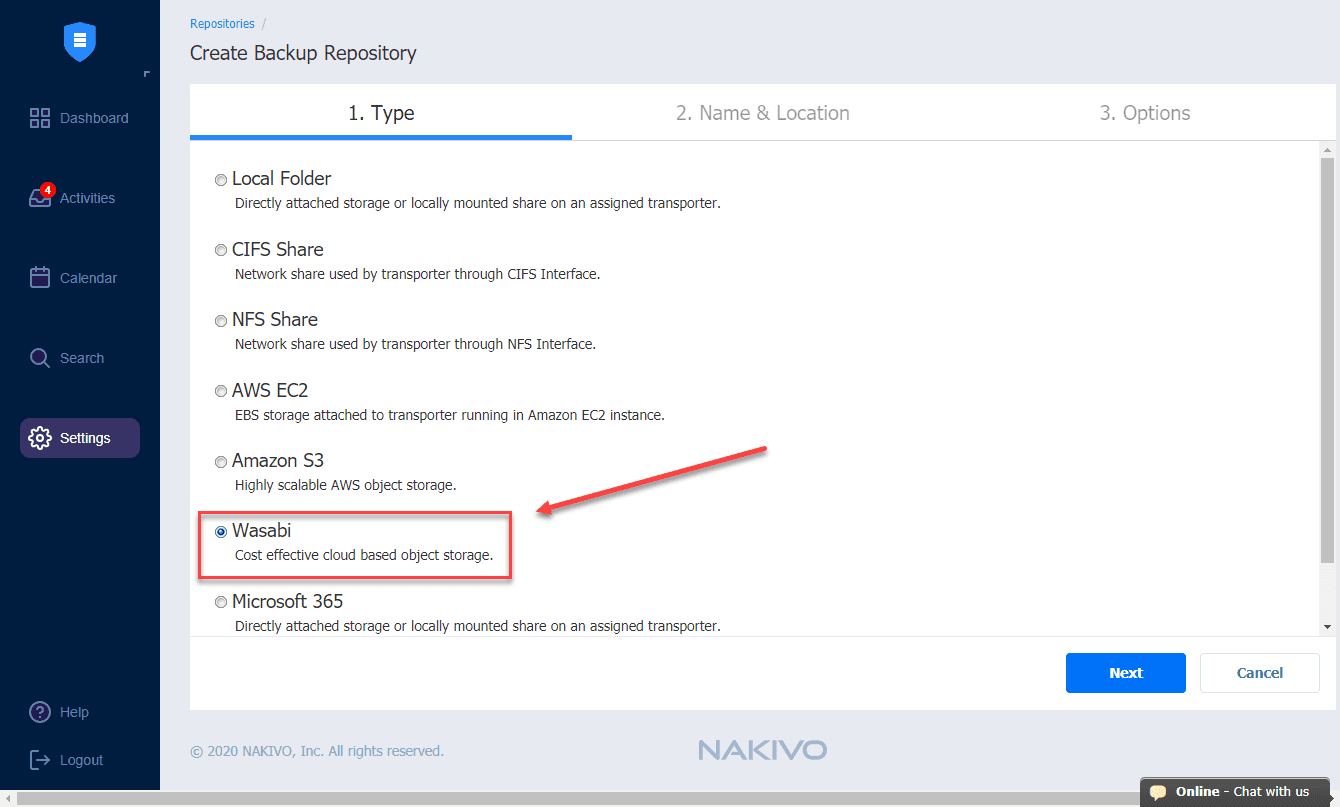
Here, I am creating a new repository. To do that, navigate to Settings > Repositories > Create new backup respository > Wasabi. Then select Next.
On the Name & Location step, name your new repository, configure the assigned transporter, select the Wasabi account, region, and bucket.

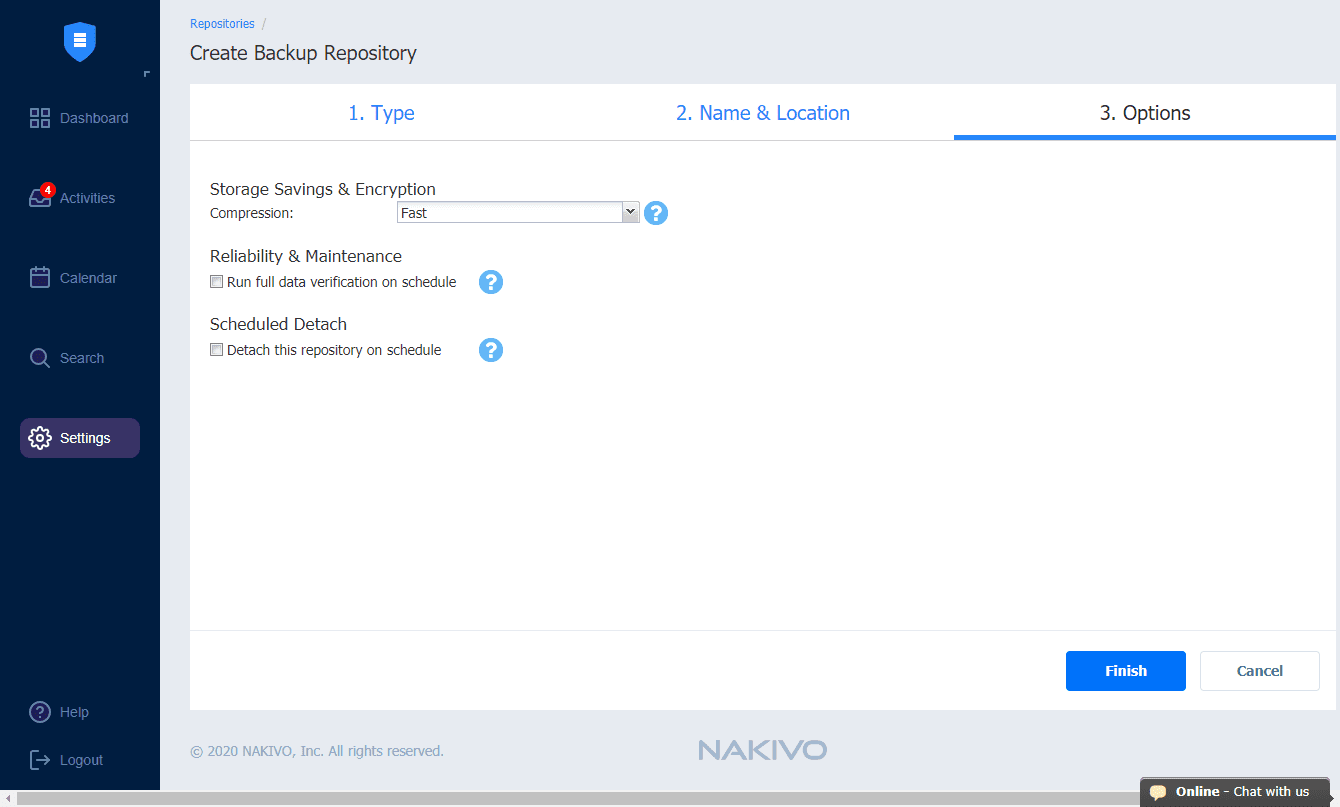
On the Options screen, you can select the storage settings you want to apply to the repository.
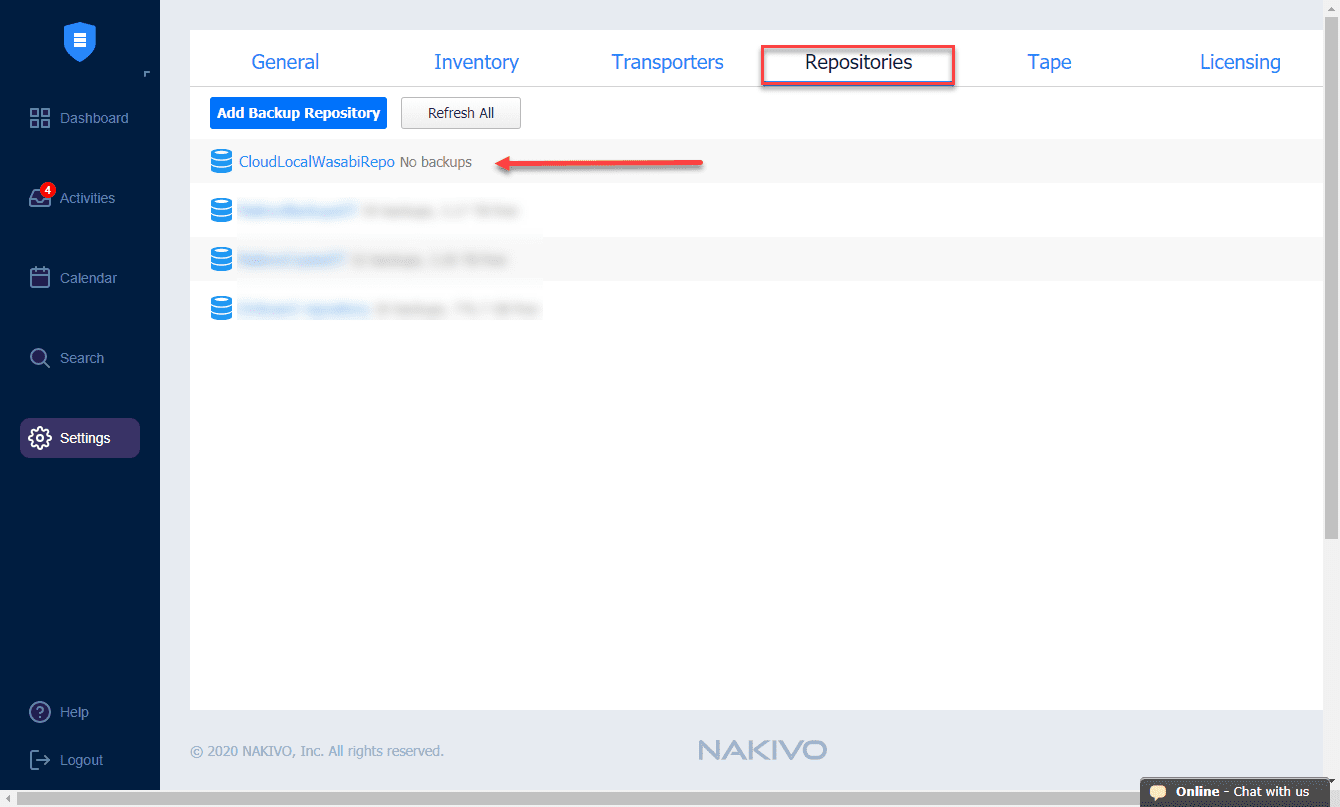
The new Wasabi hot cloud storage repository is successfully added in NAKIVO Backup & Replication v10.
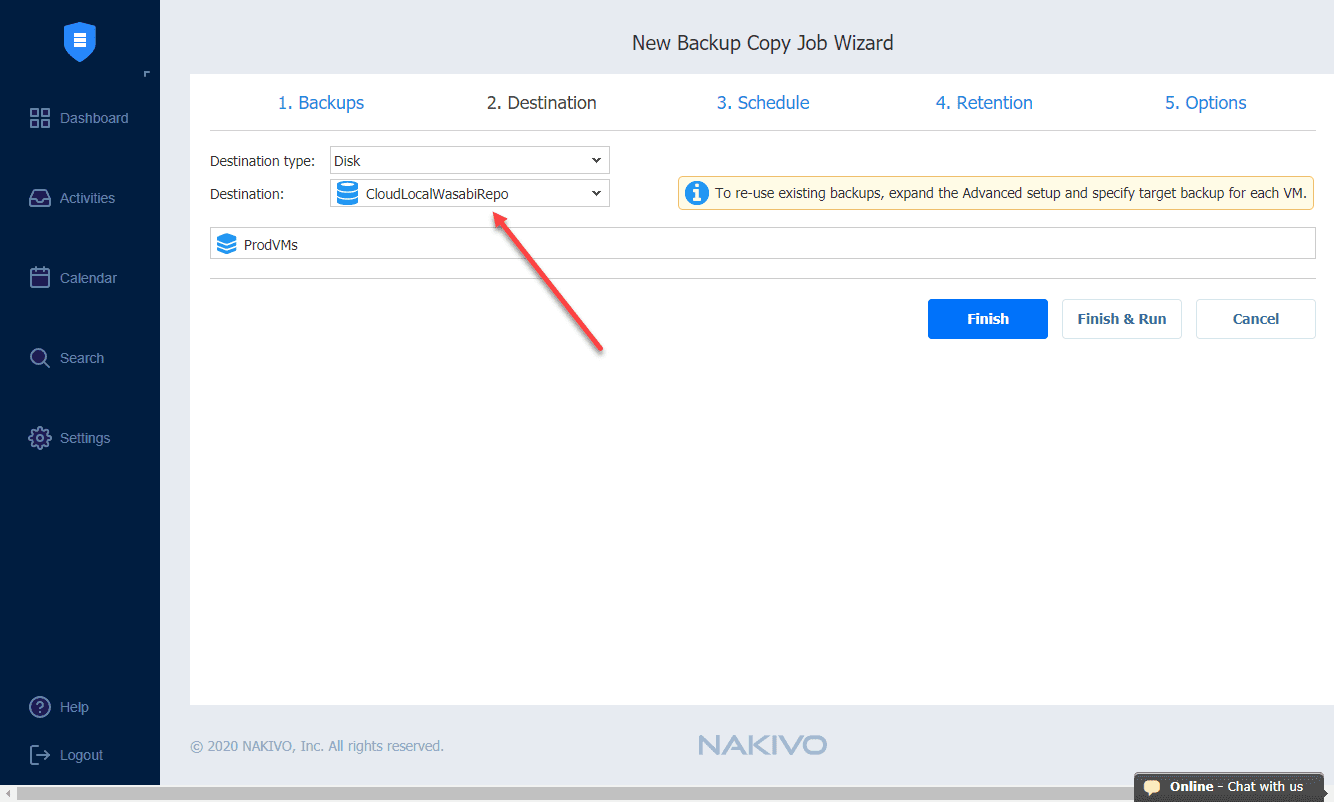
Now that we have the new Wasabi backup repository in place, it can now be targeted for your jobs. Below, I am setting up a backup copy job to utilize the Wasabi backup repository.
Backup copy jobs make a lot of sense to have located in a cloud storage environment, since their sole purpose is to create an additional copy of your backups in case something goes wrong with the primary copy.
Wrapping Up
I found the steps involved to configure Wasabi backup repository in NAKIVO v10 to be straightforward. It is very simple to setup on the Wasabi side and equally easy on the NAKIVO side of things.
As shown, you basically create the bucket, create the access key, add the account in NAKIVO, and then create your backup repository. Once you do this, you will see the new Wasabi backup repository available for use with your subsequent jobs as an available storage target.
Leveraging cloud storage in your backup methodology helps to achieve the objectives of 3-2-1 backup best practices where you need to have at least (3) copies of your data stored on at least (2) different kinds of media, with at least (1) copy stored offsite.