More VMware NSX-T Data Center 2.4 fun! Working through deploying NSX-T 2.4 in the home lab and stepping through the various functional components of getting the lab up and running with NSX-T Data Center 2.4. After working through a few little issues with the Transport hosts with NSX-T 2.4, in this post, I will step through how to deploy VMware NSX-T 2.4 Edge Transport Appliance VM in the NSX-T 2.4 infrastructure. Also, we will look at a few things to consider for home lab purposes with resources, etc. So, let’s get right to how to deploy VMware NSX-T 2.4 Edge Transport Appliance VM.
What is the NSX-T Edge Transport Appliance?
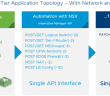
The NSX-T Edge appliance provides routing services and connectivity to networks that are external to the NSX-T environment. An NSX Edge is required if you want to deploy a tier-0 router or a tier-1 router with stateful services such as network address translation (NAT), VPN and so on.
| Requirements | Description |
|---|---|
| Supported deployment methods | OVA/OVFISO with PXEISO without PXE |
| Supported platforms | NSX Edge is supported only on ESXi or on bare metal.NSX Edge is not supported on KVM. |
| PXE installation | The Password string must be encrypted with sha-512 algorithm for the root and admin user password. |
| NSX-T Data Centerappliance password | At least 12 charactersAt least one lower-case letterAt least one upper-case letterAt least one digitAt least one special characterAt least five different charactersNo dictionary wordsNo palindromesMore than four monotonic character sequence is not allowed |
| Hostname | When installing NSX Edge, specify a hostname that does not contain invalid characters such as an underscore. If the hostname contains any invalid character, after deployment the hostname will be set to localhost. For more information about hostname restrictions, see https://tools.ietf.org/html/rfc952 and https://tools.ietf.org/html/rfc1123. |
| VMware Tools | The NSX Edge VM running on ESXi has VMTools installed. Do not remove or upgrade VMTools. |
| System | Verify that the system requirements are met. See NSX Edge VM System Requirements. |
| Ports | Verify that the required ports are open. See Ports and Protocols. |
| IP Addresses | If you have multiple management networks, you can add static routes to the other networks from the NSX-T Data Center appliance.Plan your NSX Edge IPv4 or IPv6 IP addressing scheme. |
| OVF Template | Verify that you have adequate privileges to deploy an OVF template on the ESXi host.Verify that hostnames do not include underscores. Otherwise, the hostname is set to nsx-manager.A management tool that can deploy OVF templates, such as vCenter Server or the vSphere Client.The OVF deployment tool must support configuration options to allow for a manual configuration.The Client Integration Plug-in must be installed. |
| NTP Server | The same NTP server must be configured on all NSX Edge servers in an Edge cluster. |
Deploy VMware NSX-T 2.4 Edge Transport Appliance VM
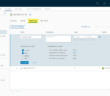
Let’s look at a walk through of deploying the NSX Edge Transport Appliance VM in NSX-T 2.4 in the home lab. Navigate to System > Fabric > Edge Transport Nodes > Add Edge VM to deploy a new Edge Transport Appliance VM.

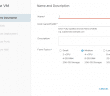
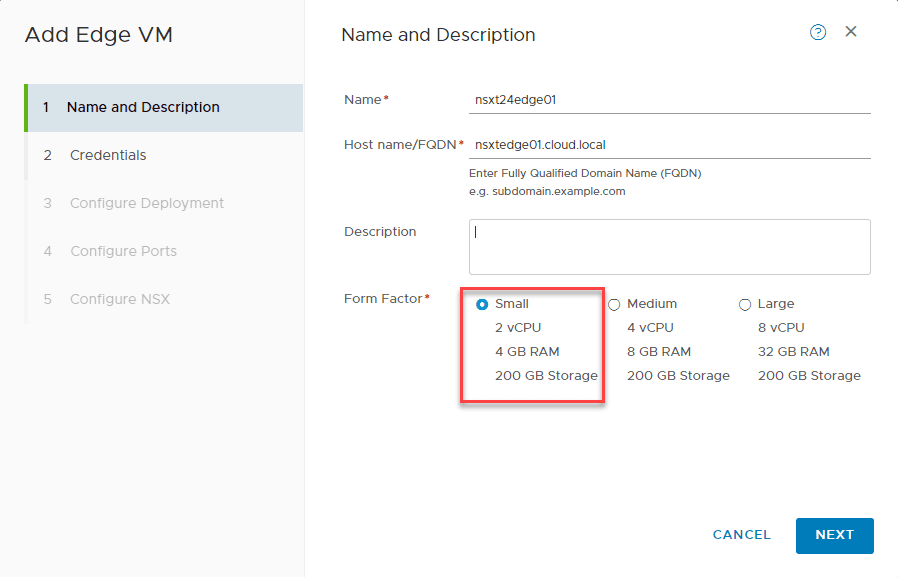
This launches the Add Edge VM wizard. In the Name and Description screen, you need to populate:
- Name
- Host name/FQDN
- Description (optional)
- Form Factor
I am choosing the Small form factor here for the nested installation I am provisioning.
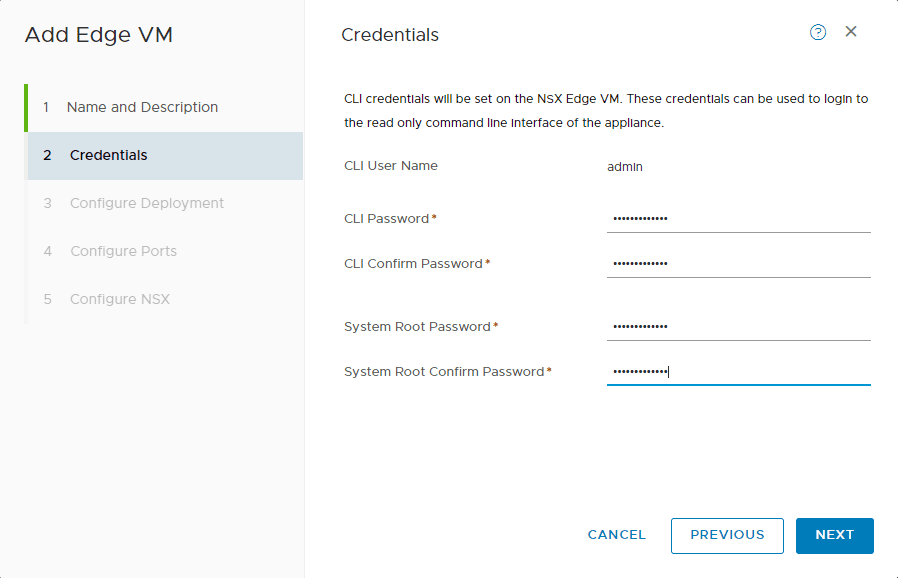
On the second step of the deployment, the Credentials screen has you enter passwords for CLI and root.
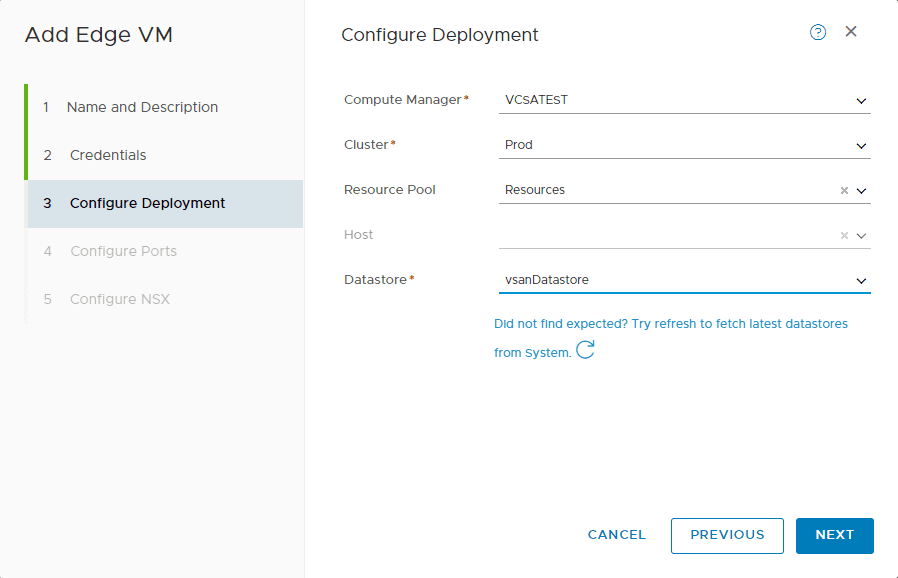
On the Configure Deployment screen, you populate configuration for:
- Compute Manager
- Cluster
- Host – if not cluster
- Datastore
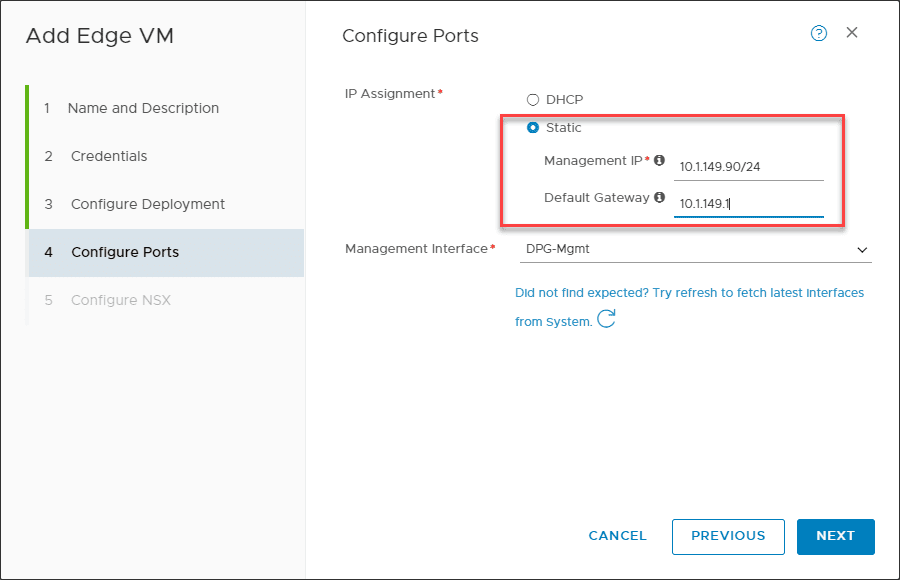
The Configure Ports screen contains the IP Assignment and Management Interface configuration. You can choose between DHCP and Static and then choose the management interface port group you want the management interface connected to.
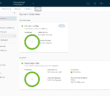
On the Configure NSX screen, there is quite a bit of configuration options you want to pay attention to. Here, we are configuring the Transport Zone. I had already configured a VCSATESTTransport zone that I have selected, however, from this screen you can choose the OR Create New Transport Zone if you want to create one on the fly.
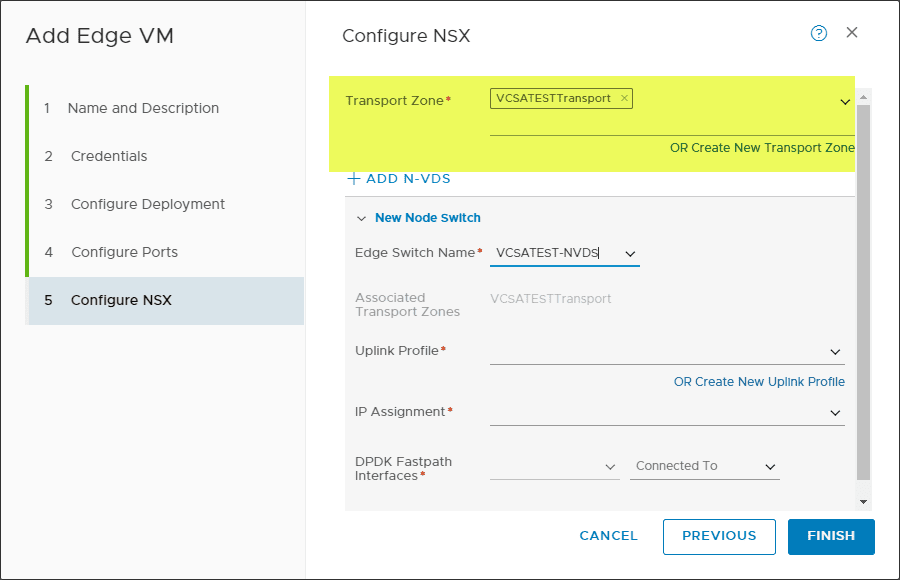
Below, on the same screen (I have scrolled down here), you configure the settings of the N-VDS. This includes:
- Edge Switch Name
- Uplink Profile
- IP Assignment
- IP Pool
- DPDK Fastpath Interfaces
What is N-VDS? From the Flexible deployment options for NSX-T Data Center Edge V Blog post:
“N-VDS is the next generation virtual distributed switch installed by NSX-T Manager on Transport nodes such as ESXi, KVM, Edge node etc. Its job is to forward traffic between components running on the transport nodes (e.g., between virtual machines) or between internal components and the physical network. Just like VSS or VDS, N-VDS owns one or more physical NICs and cannot share a physical NIC with VSS, VDS or any other N-VDS.”
Same post helps to explain DPDK Fastpath interfaces:
“Edge node VM in NSX-T can have a total of 4 vNICs- one of the vNICs is dedicated for Management traffic and the rest of the interfaces are assigned to DPDK fast path. These fast path interfaces are used for sending Overlay traffic and uplink traffic towards TOR (Top of Rack) switches. It depends on the design whether you choose one or more fast path interfaces for overlay or uplink traffic (explained in the NSX-T reference design guide). Typically, customers choose one fastpath interface for overlay traffic and two fastpath interfaces for uplink traffic. However, if you choose to use 3 vNICs of the Edge VM, make sure that the 4th vNIC is disconnected.”

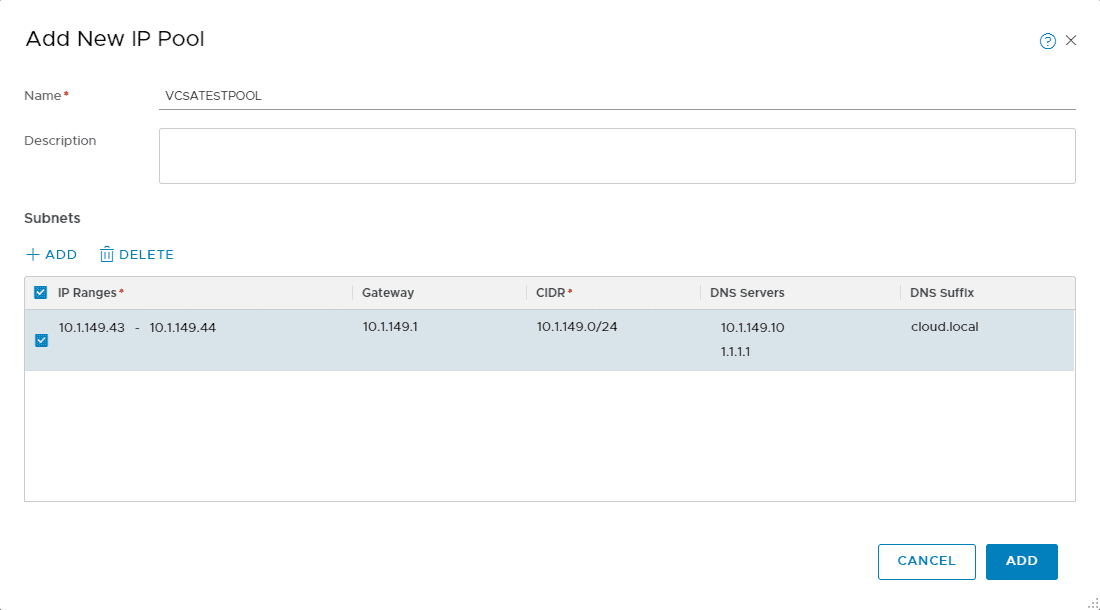
If you need to add an IP Pool, you can do that by clicking the OR Create and Use a new IP Pool.
Clicking Finish on the Step 5 Configure NSX screen will start the deployment process of the NSX-T 2.4 Edge Transport Appliance VM.

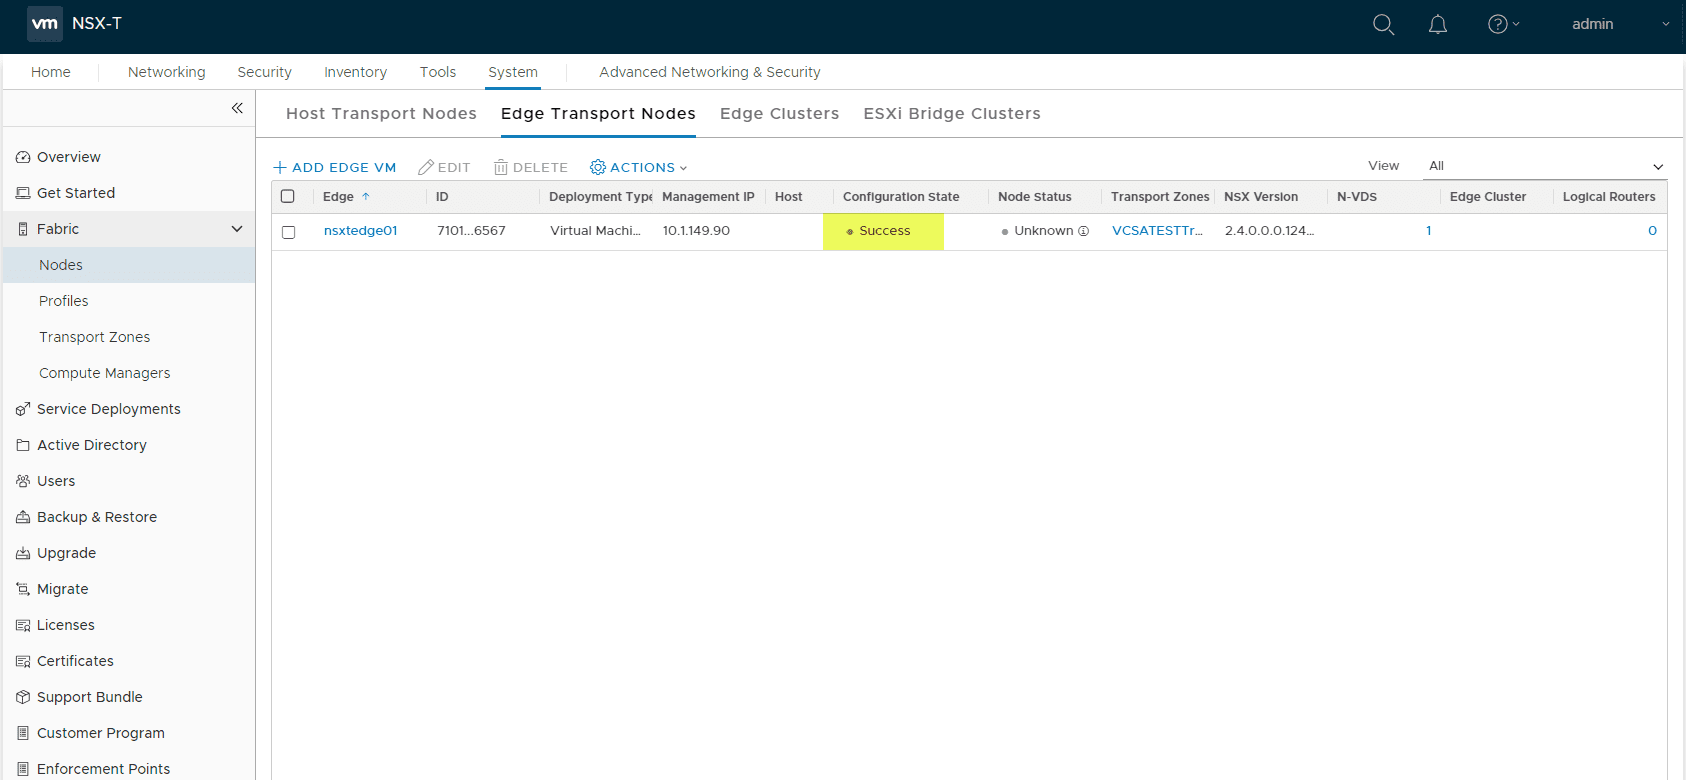
After the appliance is successfully deployed, powered on, and synchronized, you should see the Configuration State display Success.
Edge Transport Appliance VM Home Lab Considerations
A quick note here about the Edge Transport Appliance VM for those running home labs wanting to have the most efficient resource usage. I chose the small Edge Appliance VM configuration as I was running this in a nested installation of ESXi hosts in a nested cluster. If you are provisioning your ESXi hosts with a small memory footprint, you need to note the Edge Transport Appliance VMs will provision with 4 GB of memory with a 4 GB memory reservation.
I ran into a memory issue on my nested ESXi hosts even with 8 GB of memory provisioned as it was unable to satisfy the memory reservation and the deployment failed with the error unable to power on after the deployment in progress was underway.
However, after seeing the failed to power on error, I was able to manually unconfigure the reservation and manually power on the Edge VM. After a few minutes the NSX-T screen was able to see the deployment as successful.
Wrapping Up
To Deploy VMware NSX-T 2.4 Edge Transport Appliance VM, it is simply a matter of navigating to the Fabric configuration for the Edge Transport section and Adding the VM appliance here. The wizard is fairly straightforward for provisioning the VM. As mentioned, you will most likely need/want to tweak the reservation setting on the Edge Transport VM that is provisioned if you are using ESXi hosts that have very little resources configured for labbing purposes.
Google is updating how articles are shown. Don’t miss our leading home lab and tech content, written by humans, by setting Virtualization Howto as a preferred source.
About The Author