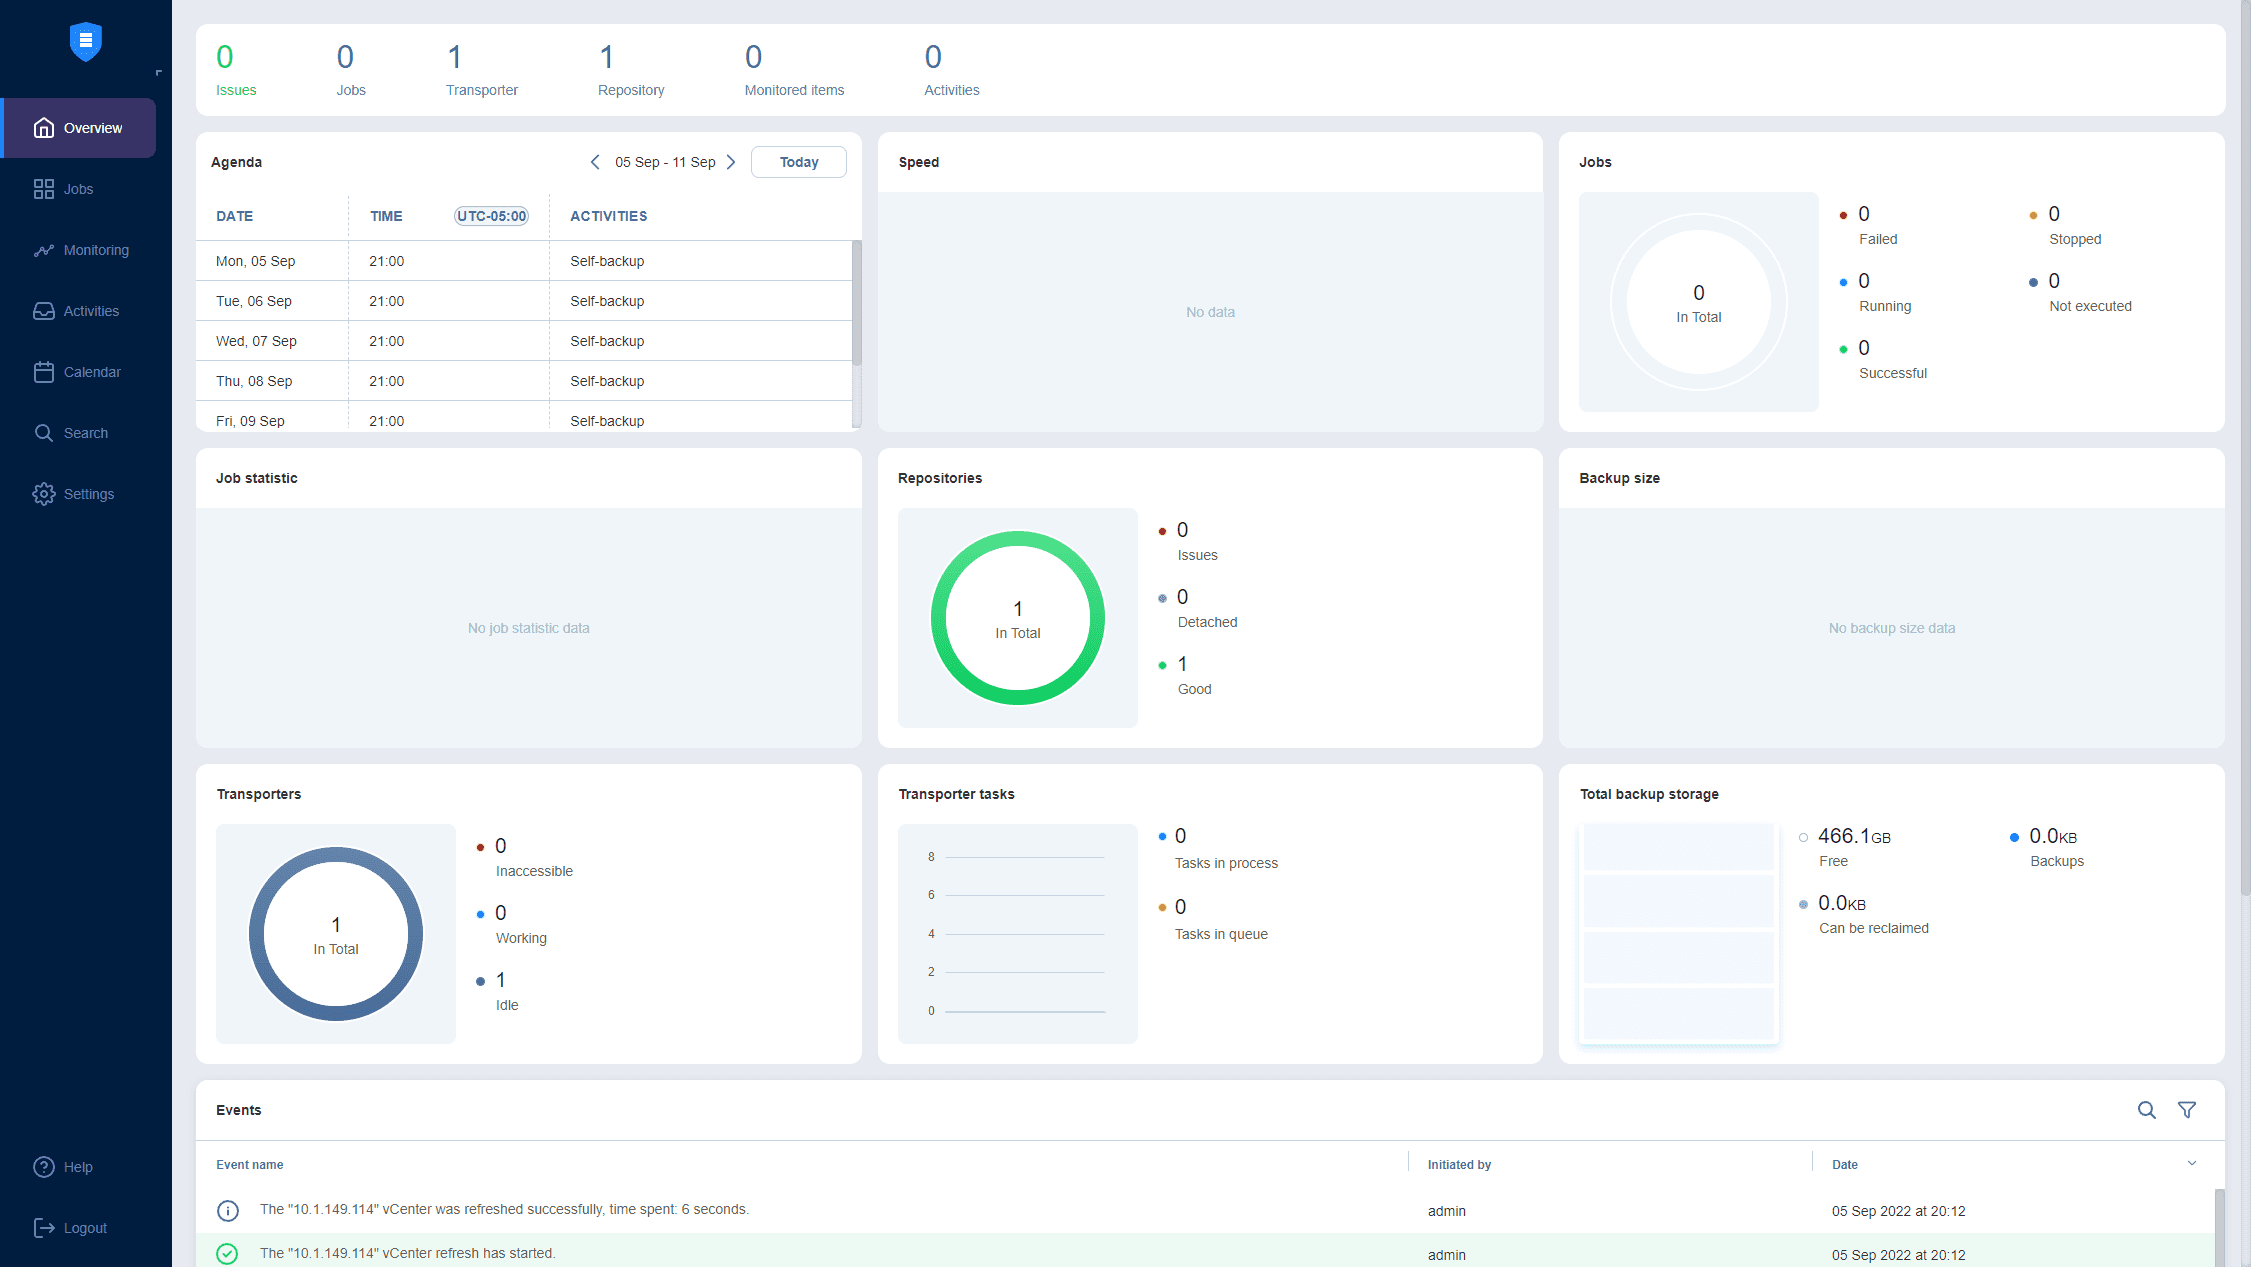
There is certainly more to disaster recovery than simply backing up your data. Backups are the integral part of ensuring your data is safe. However, backups are only a small portion of an overall disaster recovery strategy. Thinking about disaster recovery, it is contained within the realm of business continuity. Disaster recovery really contains all the technical processes and procedures that allow businesses to recover their IT infrastructure from a technical prospective including all the other additional aspects of protecting data and meeting the agreed upon Restore Point Objective and Restore Time Objective SLAs. As you can imagine, the entire disaster recovery plan could included numerous technical and procedural operations that not only allow recovering data, but also getting end users, customers, and other business systems connected back up to that data where business continuity is not affected. One of the key aspects of disaster recovery is ensuring recovery and availability of data even if an entire site fails. There is much more than meets the eye when it comes to taking a production environment one one location and restoring it or making it available in another location and make sure details such as network addressing is taken care of so that connectivity is restore. NAKIVO Backup & Replication starting in v8.0 added site recovery orchestration and DR testing to the list of features. Let’s take a look at how to Automate Network Changes in DR for Replicated VMs with NAKIVO and the importance of network automation when it comes to DR.
Importance of Network Automation with DR
You might say to yourself
It might seem a bit non intuitive to think about network details when thinking about disaster recovery. Disaster recovery deals with data and not network right? Well, yes, when you are talking about the backups of your data only. Before delving into the details of why the network matters, let’s take a closer look at some of the components of true disaster recovery. As alluded to above, disaster recovery includes much more than a simple data backup. True disaster recovery follows the 3-2-1 best practice methodology which has a key focus on multiple copies of your data that states you have at least (3) copies of your data, stored on at least (2) kinds of media, with (1) copy offsite.
Site Recovery is an extremely important part of the overall 3-2-1 disaster recovery best practice. If you only have a localized data disaster affecting files or one or two virtual machines needing to be recovered, this can easily be taken care of with a File Level Restore (FLR) or virtual machine restore. However, if there is a widespread disaster that affects an entire site, such as a natural disaster that may disrupt a facility in a specific geographic region, you potentially need to be able to failover all of your data access, services, and network access to a different facility. Although data is at the heart of disaster recovery from an IT perspective, in practice, this involves much more than the data.
Generally speaking in most disaster recovery plans, replication is the process that protects organizations from a “site-level” failure. Replication takes a production copy of the running virtual machine in the production location and recreates it in the DR facility. This replicated copy is identical in every way at the time of replication. NAKIVO Backup & Replication utilizes changed block tracking to copy only the incremental changes across to the DR facility to be as efficient as possible. This means that after the intial full copy, only incremental block changes are replicated. Additionally, you can take advantage of a seed copy of the virtual machine as well to alleviate replicating the initial copy across the WAN.
The complexity with replication comes into play when the replicated virtual machines are powered on. Generally speaking from a network perspective, there are different subnets that exist from one site to another. There are ways to cheat this or to extend layer 2/layer 3 addressing spaces across sites, but it generally involves a product like VMware NSX or more complicated network extending at the router level.
For most, changing the IP addresses on the virtual machines that are replicated will be the approach that needs to be taken when failing resources over to a different site. If you are only replicating 5 or 10 servers to a different location, this may be doable to accomplish by means of manually changing IP addresses. However, can you imagine doing this manually for 100 or 200 servers, or maybe more? This just simply would not be feasible or possible for most, especially when trying to meet RTO SLAs that may be in play. An automated approach is required for reconfiguring the network on the replicated virtual machines.
Let’s see how NAKIVO Backup & Replication v8.0 and higher makes this super easy to accomplish as well as to test when running through a DR test.
Automate Network Changes in DR for Replicated VMs with NAKIVO
NAKIVO Backup & Replication now has network automation features in both the replication and site recovery features that allow handling both the IP addressing of the replicated virtual machines as well as changing or managing the virtual port groups of the virtual machines that have been replicated. Along with the network automation, the Site Recovery Orchestration job allows orchestrating the operations on the virtual machines themselves to automate the failover process as well as the failback process. Let’s take a look at how this is configured in NAKIVO Backup and Replication.
The Site Recovery Orchestration functionality operates off the VM replication capability within NBR. Once a VM is replicated to another site, you have the options available to configure the orchestration and site recovery automation tasks.
NAKIVO Virtual Machine Replication
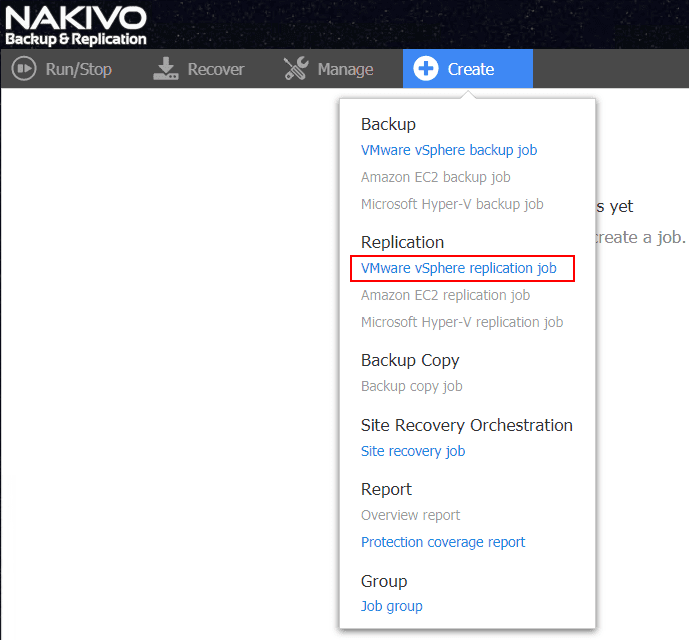
Let’s step through the process to replicate a virtual machine in NAKIVO Backup & Replication v8.1. Below, we are configuring replication and site recovery based on a VMware vSphere environment. To begin the replication process, choose the Create button Replication > VMware vSphere replication job.
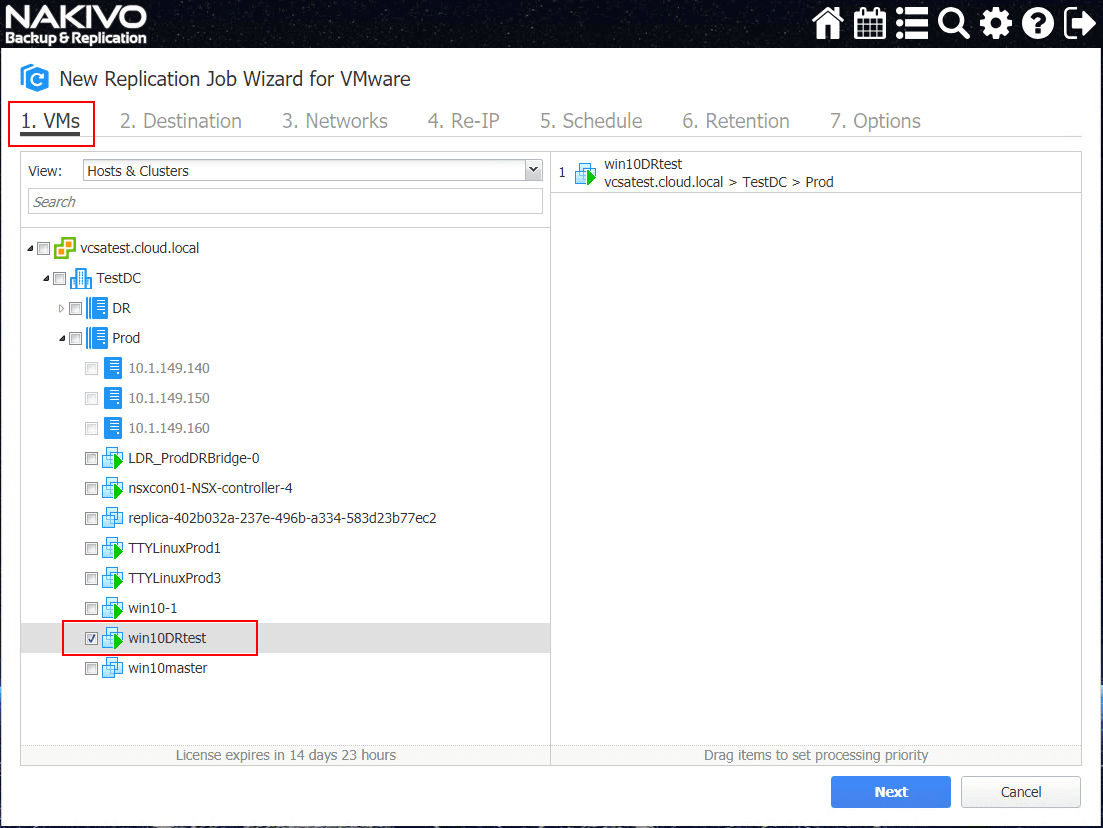
This will begin the New Replication Job Wizard for VMware. The first step in configuring the new replication job is choosing the virtual machine from inventory to be replicated. Place a check mark by the box next to the VM or VMs you want to replicate. Keep in mind that a single replication job may contain several virtual machines.
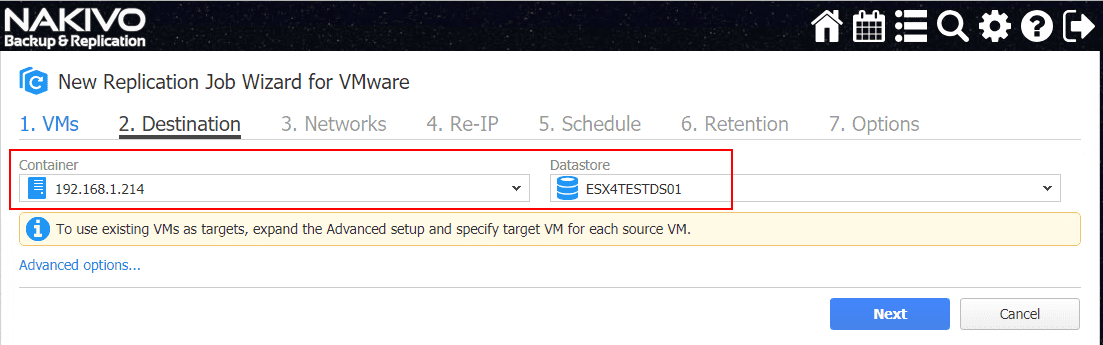
Step 2 is the Destination configuration. Here you configure the destination container and the destination datastore.
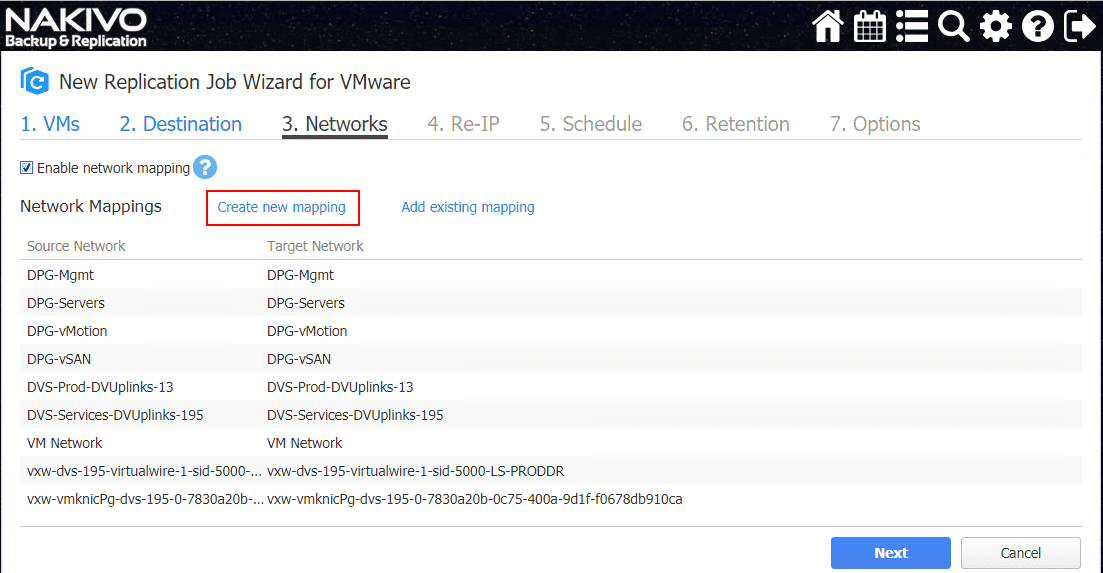
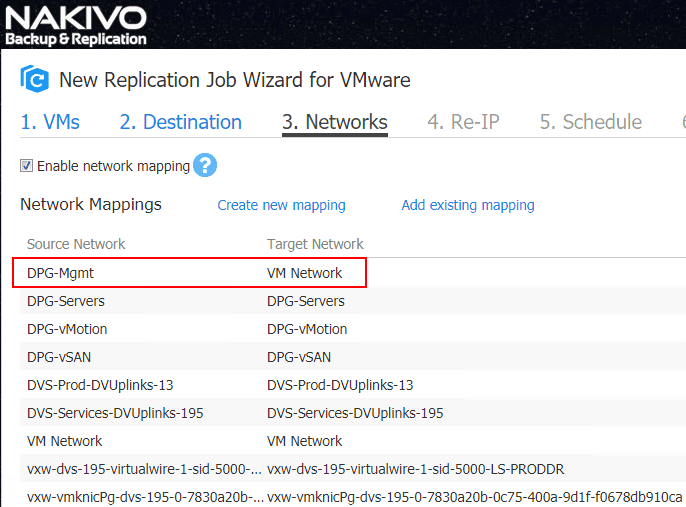
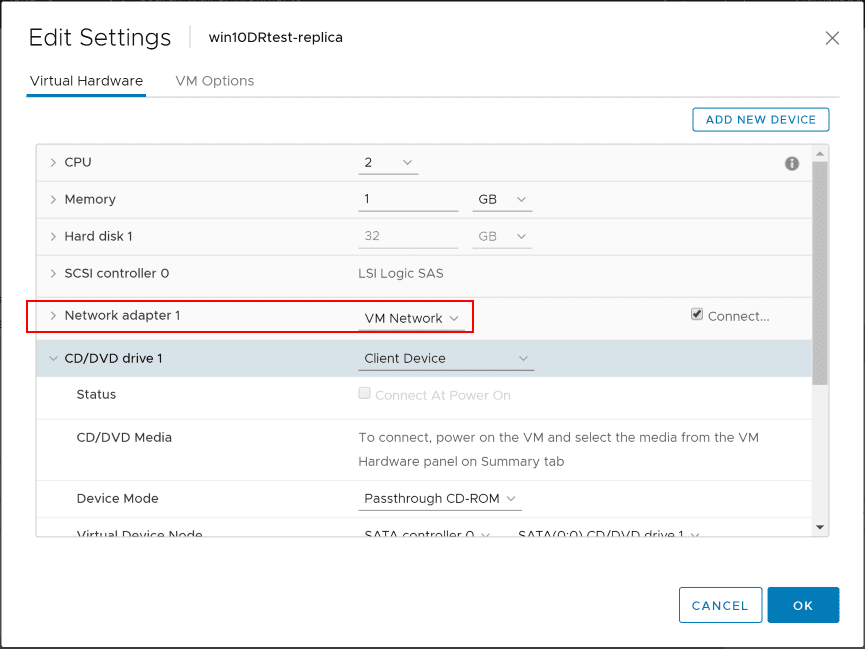
On the third step of the wizard, we get into the powerful functionality of the replication job itself. The Networks configuration allows creating a networks mapping of the virtual switch port groups from the source network to the destination network. The vSwitch port groups may be different between the production VMware environment and the DR VMware environment. NAKIVO will automatically pull the source and destination networks that align between the two environments automatically. This saves a lot of work in creating mappings. However, you may want these to be configured differently. You can simply click a mapping and delete it or hit the edit button and edit the mapping.
Also, you can create new mapping to provision a new network mapping of your own configuration.
The New Network Mapping dialog box is simple in that you have a source network and a target network. Simply click the drop down button for each and choose the networks as you want them mapped.
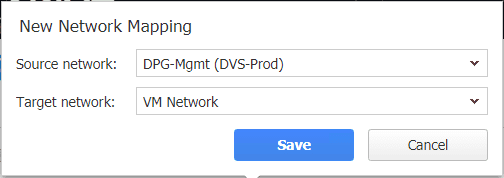
Here we have the Network Mappings configured as we want. Here we are saying that if a virtual machine is replicated from the source environment and is connected to the DPG-Mgmt port group, we want to map it in the target environment to the VM Network port group. There is no limitation here between vSphere Distributed Switch or vSphere Standard Switches. Also, as you can see, NAKIVO also recognizes NSX Logical Switches as well.
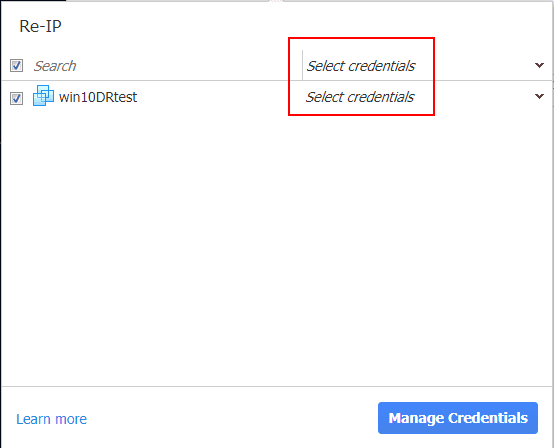
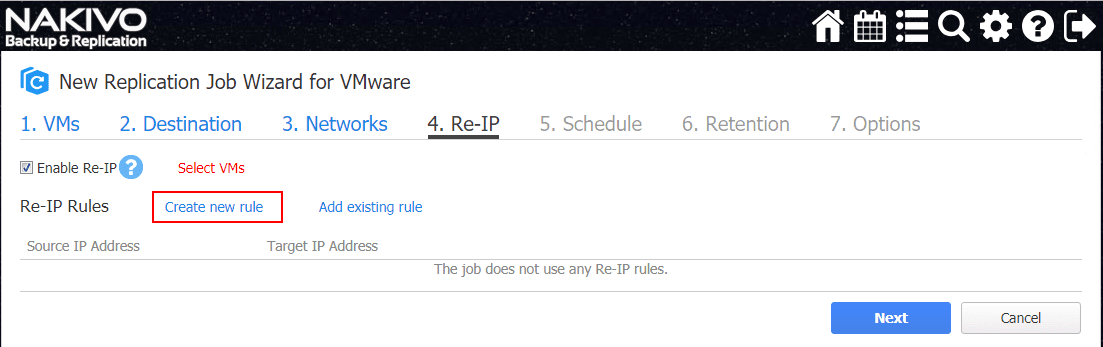
The second part of the configuration of network automation in virtual machine replication is the automatic reassigning of IP addresses. This is extremely important. As described above, the networks that exist in a DR site are most likely different than the production site. Reassigning IP addresses for failed over virtual machines is required to allow the replicated virtual machines to be brought online at the DR location. Without network automation to perform this task, the reassigning of IP addresses would have to be performed manually, which would be extremely labor intensive with more than a few virtual machines.
Choose the Select VMs link to choose the virtual machines to perform the Re-IP operation.

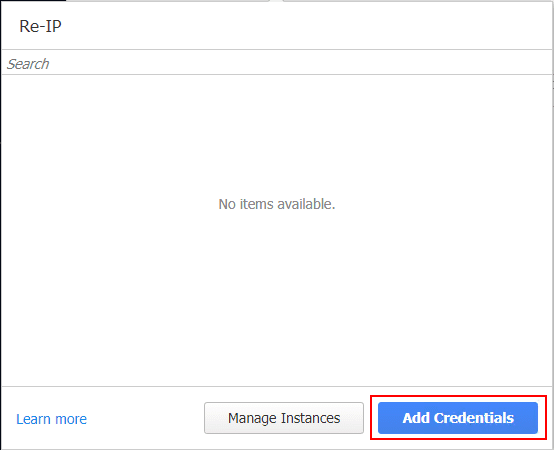
Since the Re-IP operation will need to interact with the guest operating system, the Re-IP configuration needs to have credentials configured. As you see the Select credentials this means no credentials are currently configured. Click the Manage Credentials button.
Click the Add Credentials button.
Choose the Type of account credentials and then set the username password, and confirm the password. Click Save.
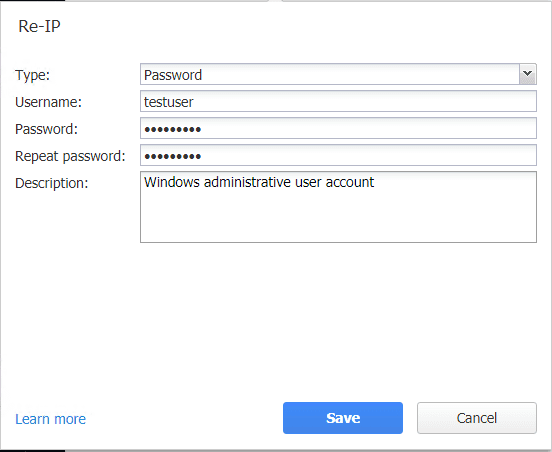
Now, we see the credentials to be used for the selected virtual machine.

Now that credentials are configured for the selected virtual machine, we can create the actual Re-IP rule. Click the Create new rule link.
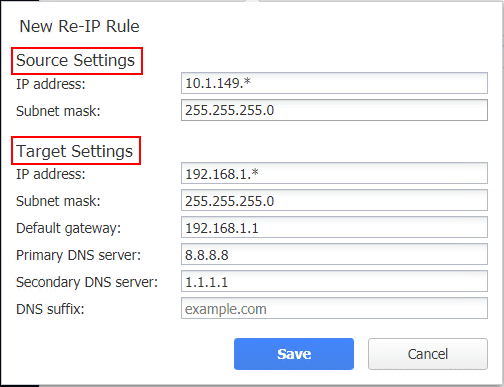
This will launch the New Re-IP Rule dialog box. Here you can configure the source settings and the target settings. NAKIVO Backup & Replication will reconfigure the source IP address to the network of the target subnet. The last octet of the source IP address will be kept and the other octets will be replaced with the target network settings.
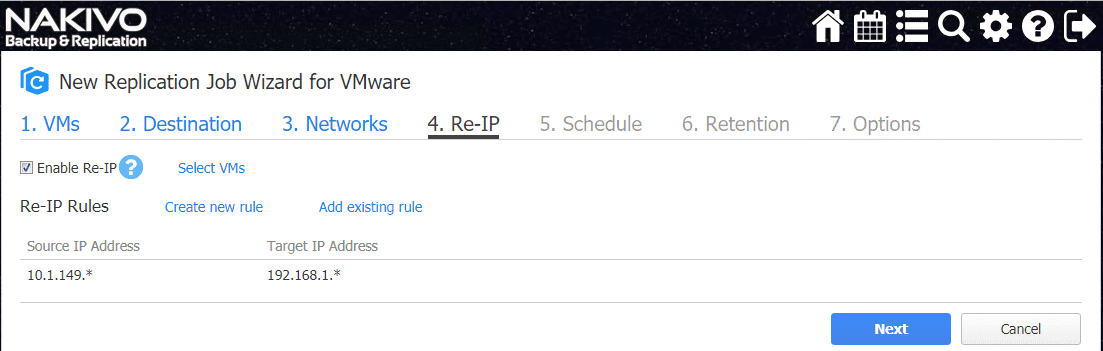
The new Re-IP rule has been configured.
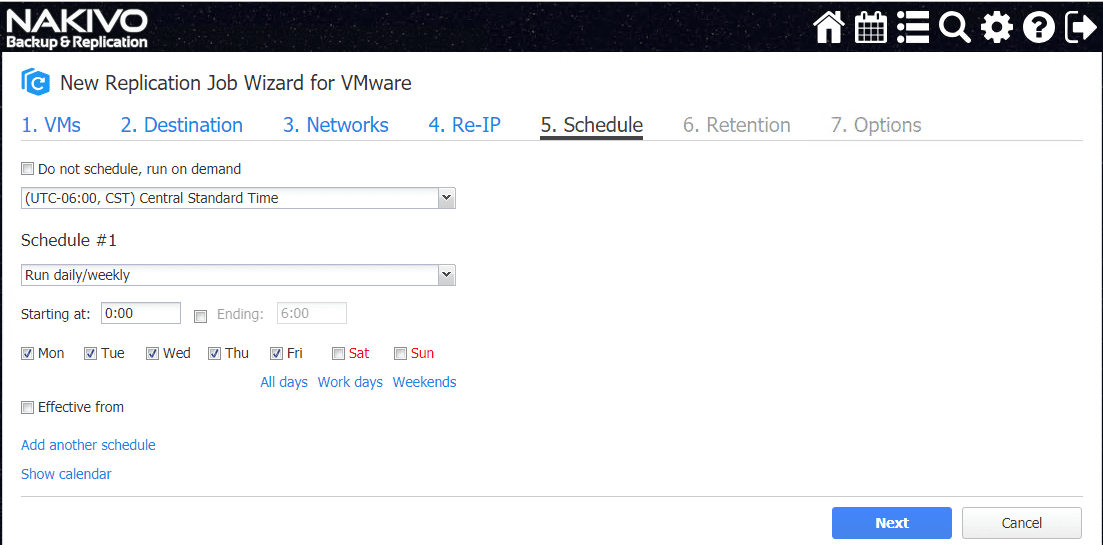
Set the Schedule options for when the replication job will run.
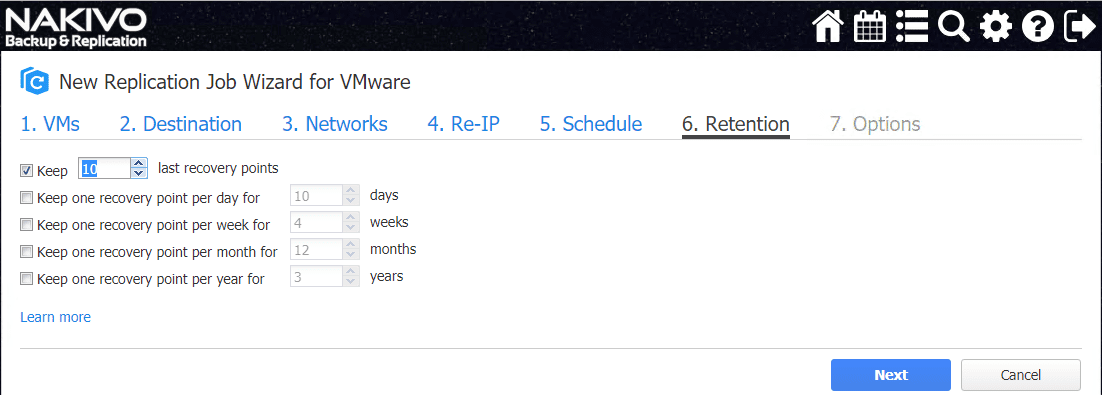
Configure the Retention settings for the replication job.
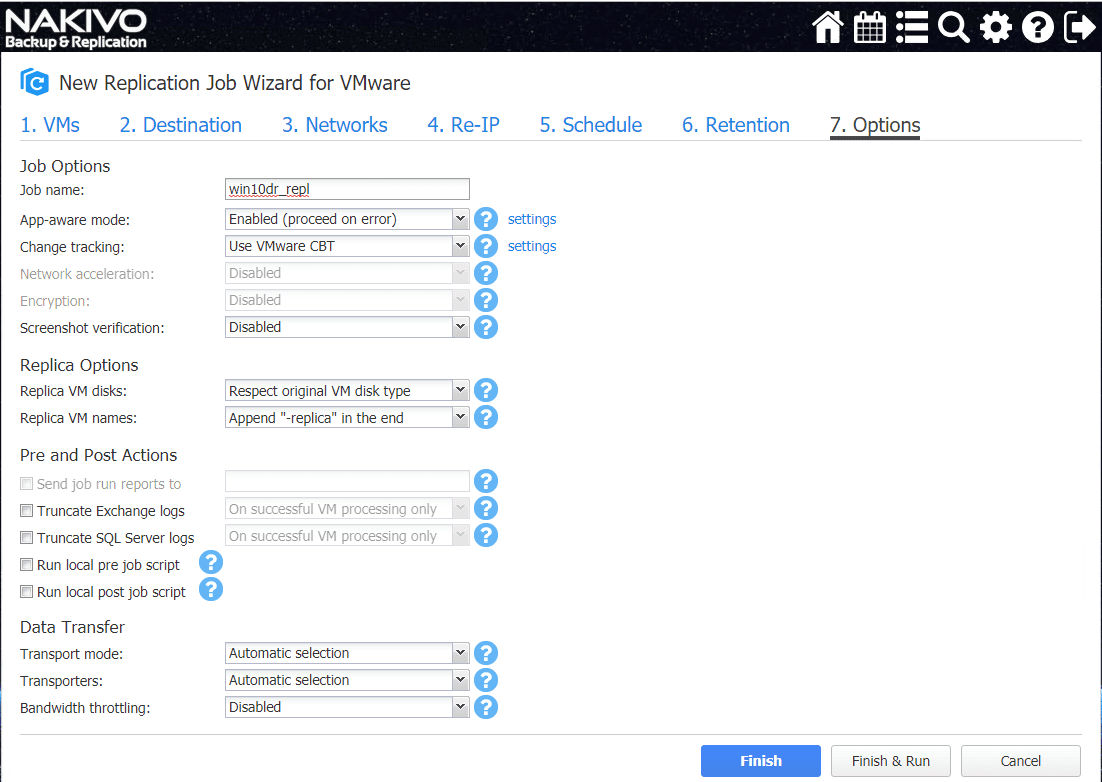
Configure the other Options available for the replication job. These include app-aware mode, screenshot verification, replica options, log truncation, etc.
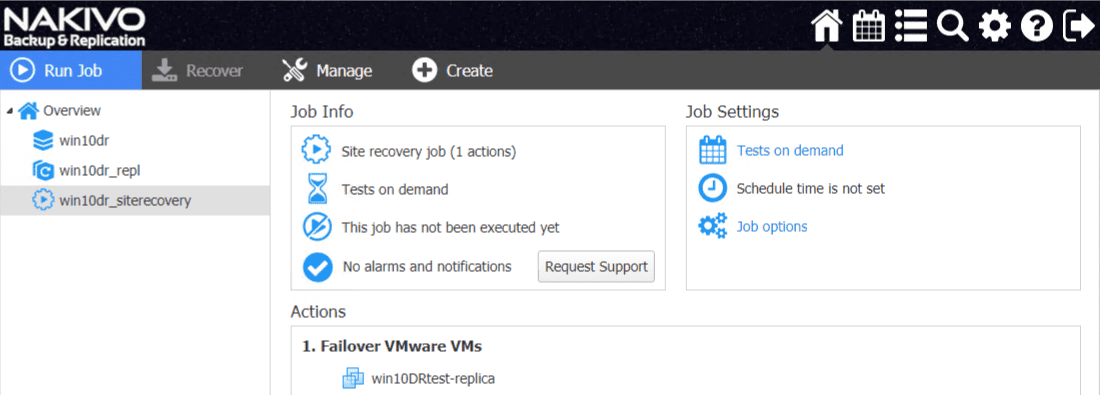
Site Recovery Job for Orchestrating DR Failover and Testing
The new Site Recovery Job is easily configured by selecting the Create button and then Site Recovery Orchestration > Site recovery job.

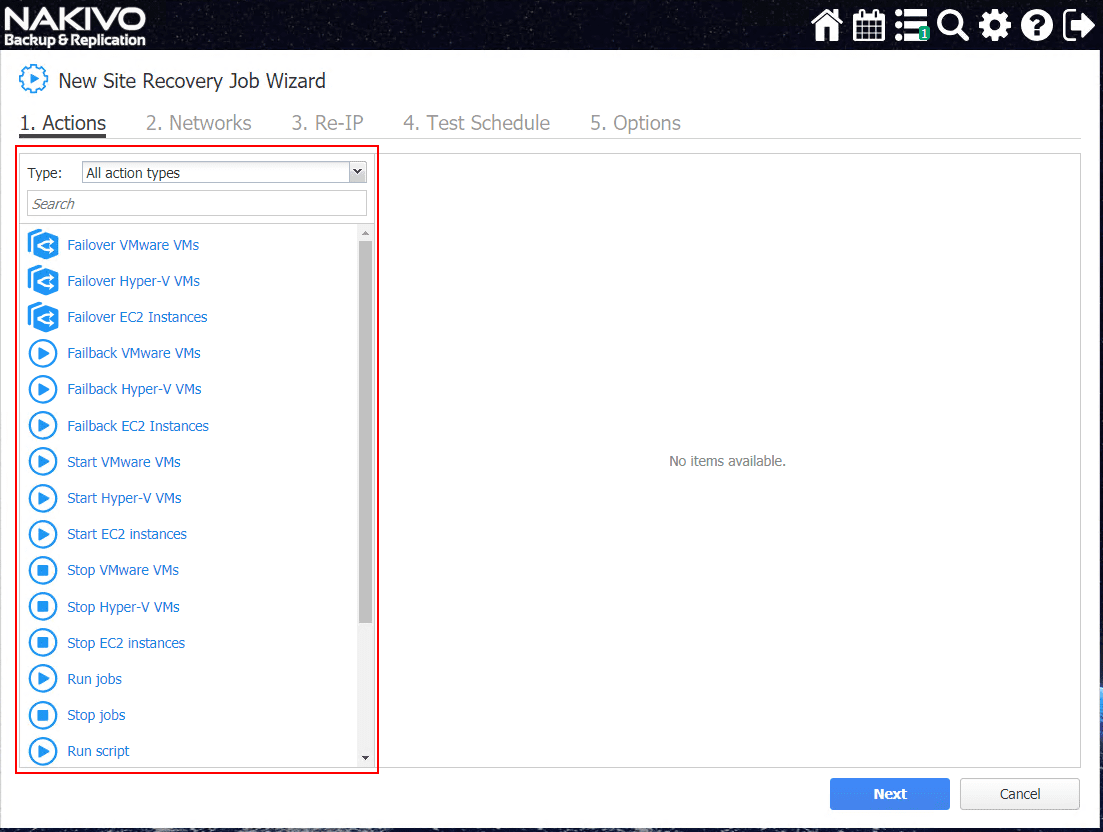
The NAKIVO New Site Recovery Job Wizard has a wealth of preformed action types that allow you to easily configure the type of site recovery orchestration you want to perform. These can be chained as well.
Here, we have selected to Failover VMware VMs. The first part of the configuration for the Failover action is to select a VM and the replica that you want to failover to. You won’t have the option to failover if you don’t currently have a replica associated with the VM.

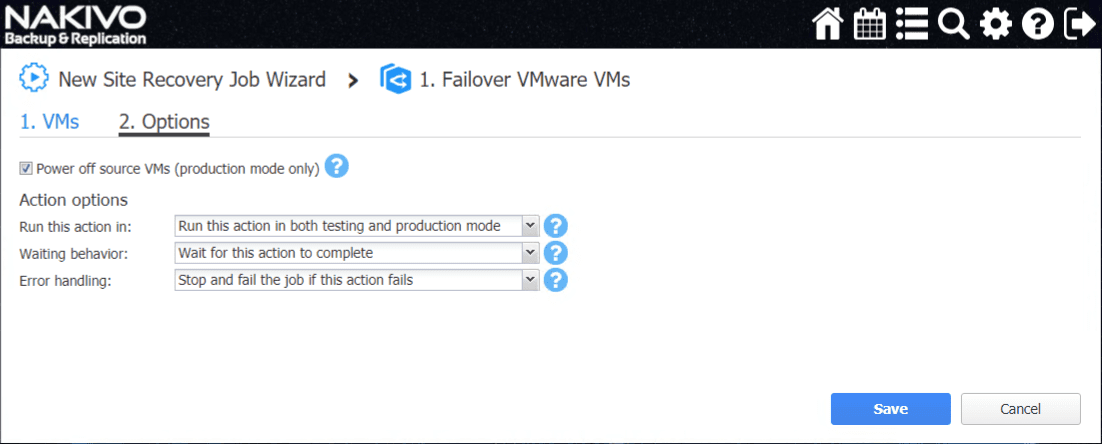
The Failover VMware VMs action Options screen allows configuring the Power off options as well as Action options, error behavior, etc.
The VM is now selected for Failover.

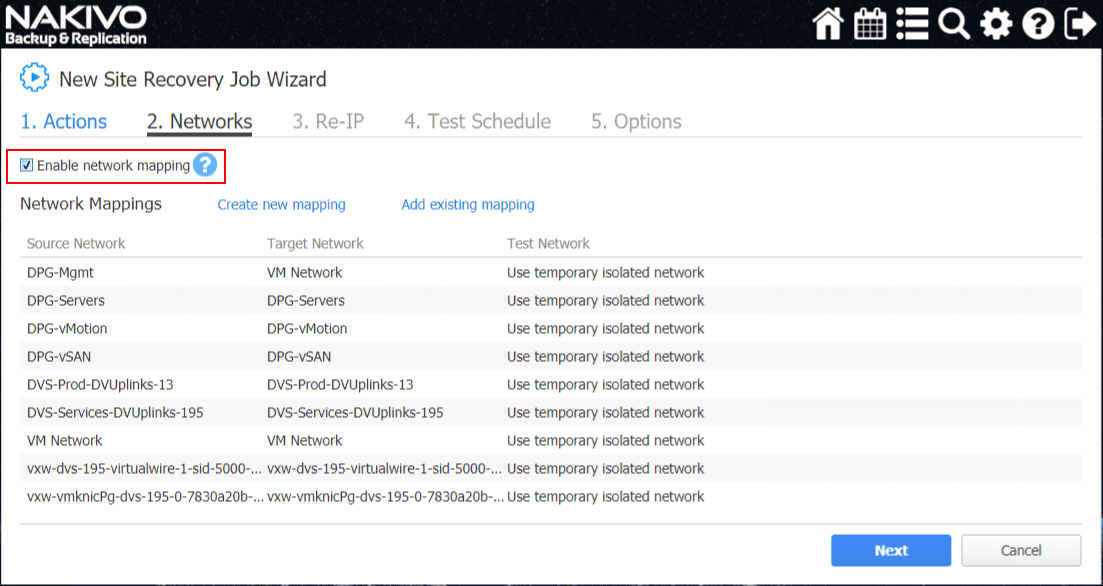
On Step 2, the Networks configuration allows mapping the vSwitch portgroups between locations. NAKIVO will pull the currently configured network mappings. Place a checkbox in the Enable network mapping if you want NAKIVO to perform the network mapping action.
Since we have already created the Re-IP rule in the replication wizard, you can simply Add existing rule and select the existing

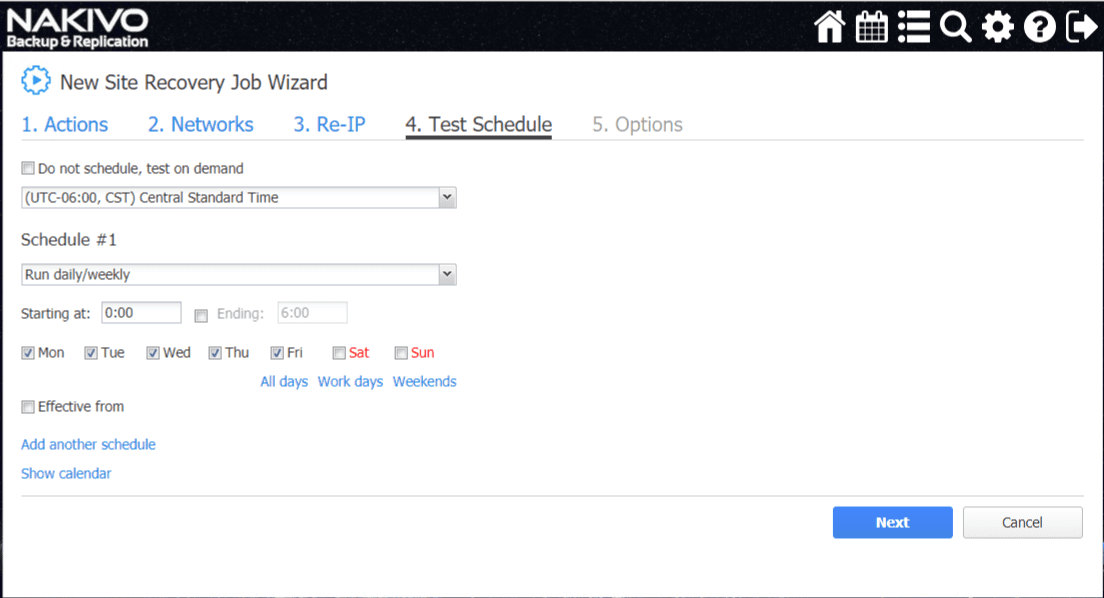
The really great thing about the Site Recovery Job is the ability to setup a Test Schedule. One of the often most overlooked aspects of disaster recovery is testing. The Test Schedule allows setting up scheduled tests of the failover or other Site Recovery Job operations.
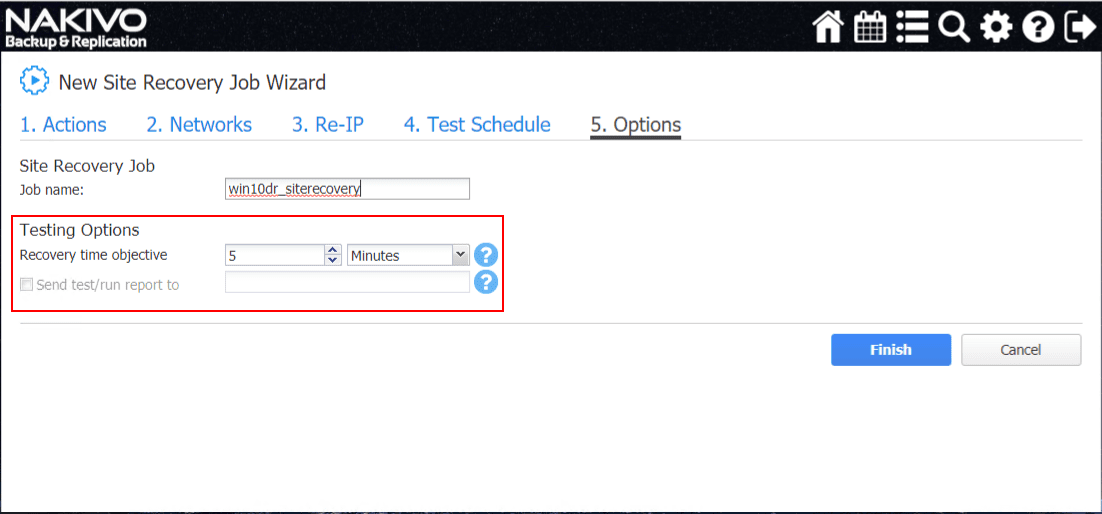
The Options screen allows configuring the Site Recovery Job name as well as a very powerful option called the Recovery Time Objective. The RTO setting allows configuring an acceptable RTO value according to the SLA needs of the business. This is a great way to test the SLA against an actual test failover.
The new failover job is created and is ready to be ran, either as a real failover, or a test failover.
Looking at a few spot checks, as you can see, the port group for the replicated VM has been correctly mapped for the DR environment as I had the mapping setup to map from DPG-Mgmt to VM Network.
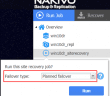
When you right-click on the Site Recovery job, you will see two options here.
- Test site recovery job
- Run site recovery job
Here, you can differentiate between an actual site recovery job action in production and a test of the site recovery job operation.

I selected to Run site recovery job. The next option presented is the Failover type. The options here and explanation:
- Planned failover – If you want to perform a planned failover where you have a reason to move a production workload from the primary site to your replicated environment, the planned failover is the option you want to choose. This performs a final data sync before switching over workloads from production to the failover location.
- Emergency failover – Workloads are switched to the replica immediately.

After selecting the Planned failover, the various operations start kicking off in vCenter.

Taking a look at the network reconfiguration, did the network configuration get automatically reconfigured? Below is a screenshot of the network settings on the production VM before failover.
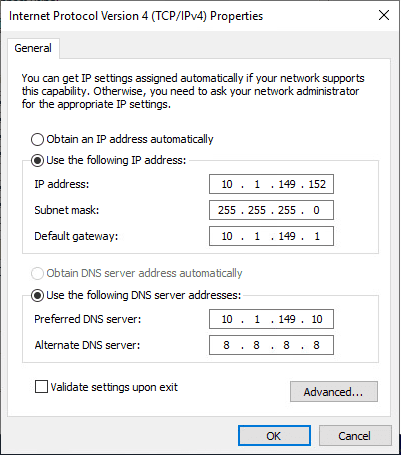
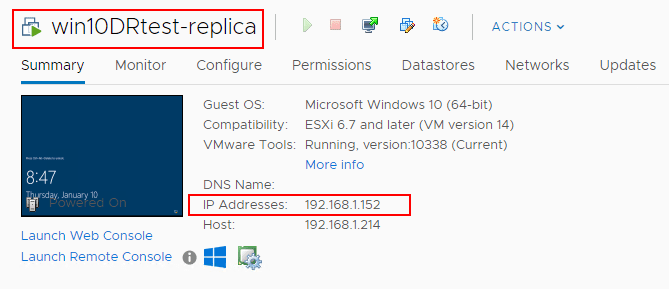
After the Site Recovery Job failover operation is completed the replica VM has been correctly reconfigured with the subnet that exists in DR. As you see below, the last octet (host bits) have been maintained with only the network bits replaced.
Takeaways
The process to Automate Network Changes in DR for Replicated VMs with NAKIVO is extremely easy and powerful. The great thing about the solution is all the components are contained within the NAKIVO solution. You don’t have to deploy replication appliances or solutions at both sides to perform the replication, test, and failover operations.
Having an automated way to handle the network reconfiguration from both a vSwitch portgroup perspective and an IP reconfiguration perspective takes the heavy lifting out of one of the most potentially arduous tasks of a failover or failback operation.
Effective Disaster recovery includes much more than simply backing up your data. It encompasses ALL the technical mechanisms needed to successfully maintain business continuity and is part of this overall umbrella of processes and procedures. Incorporating automated mechanisms such as found in the NAKIVO Site Recovery Job configuration is essential to meeting RTO SLAs when disaster strikes.
Be sure to check out NAKIVO Backup & Replication for a free trial of the software to run in your lab or test out in production.
Google is updating how articles are shown. Don’t miss our leading home lab and tech content, written by humans, by setting Virtualization Howto as a preferred source.
About The Author