How to configure Port Forwarding in Sophos UTM
There was a question in the comments on a recent blog post on how to configure port forwarding in Sophos UTM. While a little less intuitive than other UTM firewalls such as Untangle, it is still very easy to figure out. I want to show a quick post on how to configure a popular port forward rule – RDP to an internal workstation.
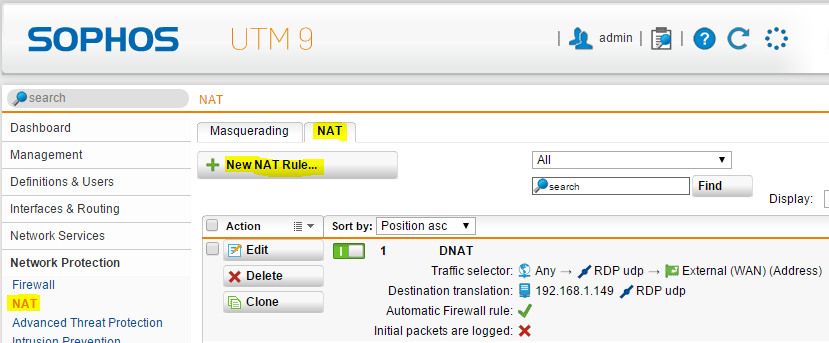
In the Sophos UTM world, you don’t see port forwards, rather it is considered a destination NAT or DNAT in the appliance. It is found under the Network Protection link in the appliance under the NAT configuration. The NAT configuration has two options once you drill in – Masquerading and NAT tabs. Click under the NAT tab and this is where you will setup the “port forwarding” options.
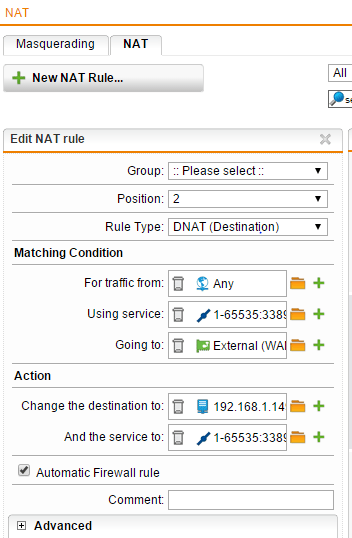
In the below NAT rule that we have created, we will go through a few of the options here and what these need to be set to.
- On the rule type set this to DNAT (Destination)
- Under the Matching Condition – For traffic from – This is set to Any because we want any host to be able to connect to the RDP session. If you wanted to restrict this to a specific IP address, you can do this here.
- Under the Using Service we have created a service rule by clicking the “+” sign next to the rule field to add these ports. So a service connecting from any port 1-65535 destined for TCP port 3389.
- The Going to field is set to the External (WAN) network since anyone who would be connecting to the RDP host would use the WAN IP address.
- Under the Action heading and change the destination to we have specified the internal host here 192.168.1.149 that we intend to accept requests for RDP traffic.
- And the service to we specify the same port range here that we did in the “using service” under the matching conditions.
- Be sure to select the Automatic Firewall rule check box as this will automatically add any needed firewall rules that may be necessary to make the NAT rule work which is a convenient feature.
After you setup the rule as specified above, make sure you save. The comment field is also handy as this will help you easily identify a specific NAT rule from others if you have others in the list. Also, once you save the rule, make sure that you have the green slider slid to the right, which effectively turns the rule on. If you don’t do this, you will basically have a rule sitting there that is present but not being processed, so it won’t work.
This is a feature that can be frustrating when you don’t remember to turn it on, however, once you get the hang of doing this in Sophos UTM, it becomes second nature. It is convenient as well in testing, to be able to not have to rip a rule out to test in troubleshooting, you can simply “deactivate” the rule using the green slider.
The above process in general should work for just about any service you are looking to have accessed from the outside into your network. Just keep in mind that the NAT/port forward will essentially make a particular host visible to the outside world.
Troubleshooting
In troubleshooting any NAT or other rules relating to the firewall, you can easily see in the Live firewall log what is going on and if your NAT rule is working or not. In fact, if you don’t have a NAT rule setup quite right, you will see it getting blocked in the firewall log.
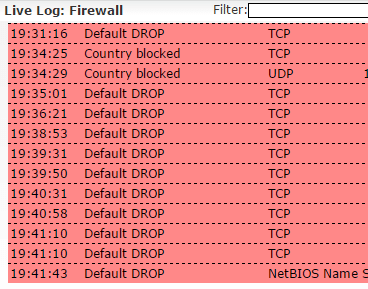
You can see the live firewall log by clicking Network Protection >> Firewall >> Open Live Log and you will see real time logs of blocked network traffic. This is an extremely powerful and easy to find log that I use is just about any troubleshooting of blocked traffic with Sophos UTM.
Final Thoughts
The Sophos UTM is an extremely powerful and easy to use UTM appliance that offers tons of customizable settings for securing your network. Hopefully this post will shed light for any who are looking to setup a port forward/NAT rule to allow access to specific hosts and services inside your network. More posts will follow on specific Sophos UTM functionality. Also, be sure to post a comment below if you have particular questions on how to make something work in the Sophos UTM or how it compares with other UTMs and firewall appliances as we test and play around with many of them out there.


Nice article – helped me get my DNS publishing working. Thanks!
Thanks, that was very clear and easy to follow. I’m new to Sophos so I often need help translating other real world configurations into how Sophos does it.
Thanks jfindley!
I don’t have the option under networks for “External (WAN)”. Did Sophos change something? I have “WAN (Address)” or “WAN (Broadcast)” or “WAN (Network)” but nothing under External.
rodspode,
This naming comes from the “Interfaces” names under the “Interfaces & Routing” section of the console. There you can edit these to be named whatever you would like. I can’t remember but during setup, it may ask what the names of the Interfaces are and this may be what I had designated, but as I mention above they can be changed. With that said, with your naming convention, you would choose “WAN Address”.
I need to connect from outside a Several internal machines using RDP would be like Rule ?
when I think for a machine works. when I create a group of machines it does not work. and when I think different rules changing the destibo ( IP machine that I want to connect the rule does not work ) it seems that only it could be for a single machine
hello from Live Log i see
NAT rule #1 TCP
10.0.1.57 : 57932
→
196.218.167.4 : 3389
[SYN] len=52 ttl=128 tos=0x00 srcmac=40:a8:f0:5b:4c:1c dstmac=64:66:b3:01:19:e2
but the remote connection not established