Vagrant Boxes Create Virtual Machines in Seconds on VirtualBox, Hyper-V, and VMware

Virtualization technologies are front and center in software development, testing, and deployment. One of the best tools for spinning up quick and easy development environments is a tool from Hashicorp, called Vagrant. Let’s look at how, using Vagrant boxes, we can create and manage virtual machines (VMs) in mere seconds in VirtualBox, Hyper-V, and VMware.
Table of contents
What are Vagrant boxes?
Vagrant boxes are pre-packaged development environments containing all the necessary virtual machine components and packages to spin up your server. You can think of the Vagrant boxes as blueprints for your virtual machines or an image. They provide the foundation for VMs running on VirtualBox, Hyper-V, or VMware.
Vagrant boxes save time by eliminating the need to install and configure an operating system and other software from scratch by hand. Using Vagrant, these provide automation for deploying your VMs. On top of that, Hashicorp and the community provides a catalog of Vagrant boxes that are ready to use, much like containers found in Docker hub. The catalog allows you to search for boxes you want to deploy for your infrastructure.
There are many Linux Vagrant boxes provided by the community. These are open-source distros and include Ubuntu, CentOS, Fedora, etc. However, there are also Windows Vagrant boxes on there as well. You can look at the description and documentation for each box and decide which one you want to use.
Understanding the Vagrant file
The Vagrantfile is written in Ruby. It provides instructions on how each virtual machine environment should be create and how the VM should be managed. Also, as part of the vagrant init command, the Vagrant file is created for you.
When you run the vagrant init command with the vagrant box file you pass in as a parameter, it automatically creates the default vagrant file needed. Once this is created, you can edit the vagrant file with additional parameters. However, it will work perfectly fine without modification.
Key Characteristics of the Vagrantfile:
- Configuration Script: The Vagrantfile is a script where you specify the parameters for your VMs, such as which base box to use, network settings, synced folders, and provisioning scripts.
- Ruby Syntax: Despite being a Ruby script, you don’t need deep knowledge of Ruby to use it. The syntax is straightforward and mainly involves modifying predefined variables that are fairly well-documented for each provider.
- Version Control Friendly: The Vagrantfile is meant to be checked into version control. This way, anyone working on the project can replicate the VM setup. This way, developers can have consistency across different development environments.
What Can You Configure in a Vagrantfile?
- Box Selection: Specify the base box (like ‘ubuntu/bionic64’) that serves as the starting point for your VM.
- Provider Configuration: Customize settings for providers like VirtualBox, Hyper-V, or VMware. This can include allocating memory or setting up network configurations.
- Network Settings: Configure network options, such as forwarded ports, private networks, or public networks. This configuration defines how the VM connects to the Internet and other machines.
- Synced Folders: Define folders that are synchronized between the host machine and the VM, enabling you to work on files on your host machine and have those changes reflected in the VM. This setting is great for developers who are developing locally.
- Provisioning: Automate the setup process with scripts that install and configure software within the VM when it’s created or provisioned.
Example of a Basic Vagrantfile:
Vagrant.configure("2") do |config|
  config.vm.box = "ubuntu/bionic64"
  config.vm.network "forwarded_port", guest: 80, host: 8080
  config.vm.synced_folder "./host_folder", "/vm_folder"
  config.vm.provider "virtualbox" do |vb|
    vb.memory = "1024"
  end
end
What are Vagrant providers?
Those familiar with Hashicorp tools will quickly understand the Vagrant provider. It is similar to Terraform providers, etc.
A Vagrant provider is a plugin that allows Vagrant to control and interact with different virtualization platforms. When you run a Vagrant command to manage a VM, the provider translates this command into actions specific to the hypervisor being used. The choice of provider depends on which virtualization solution you are using.
Common Vagrant Providers
- VirtualBox: The default provider for Vagrant that is popular due to its open-source nature and compatibility with multiple operating systems. It is ideal for development and testing environments.
- Hyper-V: If you have a Windows desktop Pro license, you have access to client Hyper-V. It provides better integration and performance on Windows systems than VirtualBox.
- VMware: VMware is usually preferred in production environments. The VMware provider for Vagrant is a separate plugin you must download along with a VMware utility. It offers high performance and advanced features for configuring your virtual machines.
Setting Up a Provider in Vagrant
To use a specific provider, you need to specify it in your Vagrantfile or when you bring up a VM. For instance, to use VirtualBox, the Vagrantfile may include the following configuration:
Vagrant.configure("2") do |config|
  config.vm.box = "ubuntu/bionic64"
  config.vm.provider "virtualbox" do |vb|
    vb.memory = "1024"
  end
end
You can also specify specific providers when bringing up a guest machine, using the –provider flag:
vagrant up --provider=virtualboxCustomizing VMs with Provider-Specific Settings
Each provider allows for certain customizations to the VM. For example, with VirtualBox, you can alter network settings, allocate memory, and set up shared folders. These settings are adjusted in the Vagrantfile, allowing you to tailor the VM to your specific needs.
Why Choose a Specific Provider?
Your choice of provider may be based on the specific environment and hypervisor you have access to. Consider factors like:
- Compatibility: Ensure the provider supports the OS you’re using.
- Performance: Some providers offer better performance, like Hyper-V and VMware. However, these are paid solutions (Hyper-V requires Windows Pro license, VMware is a paid license)
- Features: Different providers come with unique features that may benefit your project.
- Ecosystem: Using a provider that aligns with your existing tech stack can lead to smoother integration and fewer compatibility issues.
Vagrant Box Commands
The true power of Vagrant lies in its commands. Let’s look at the most common vagrant commands containing core functionality:
- vagrant init
- Initializes a new Vagrant environment. The process creates a new vagrant file which is ready for the vagrant up command. After the file is created, it can be customized.
- vagrant up
- Starts and provisions the Vagrant environment as defined in the Vagrantfile. It can also resume a suspended machine.
- vagrant suspend
- Suspends the machine, saving the current running state and stopping it. This is useful for temporarily pausing your work.
- vagrant halt
- Gracefully shuts down the running machine. Unlike suspend, this turns off the machine and will require a full boot when started again.
- vagrant reload
- Restarts the machine, loading new Vagrantfile configuration changes without having to halt and up the machine again.
- vagrant destroy
- Stops the running machine and destroys all resources that were created during the machine creation process.
- vagrant status
- Displays the current status of the machine, such as running, suspended, or not created.
- vagrant ssh
- Connects to the machine via SSH. It allows admins to connect to the SSH port with the machine’s command line.
- vagrant provision
- Provisions the machine according to the configuration specified in the Vagrantfile. This is typically used to apply changes in the provisioning scripts.
- vagrant box add
- Adds a box to your Vagrant installation, making it available for use in your environments.
- vagrant box remove
- Removes an existing box from your Vagrant installation.
- vagrant box update
- Updates the boxes to the latest version, respecting the constraints in the Vagrantfile.
- vagrant box list
- Lists all the boxes installed on your system.
- vagrant share
- Shares your Vagrant environment with anyone in the world, typically used for collaboration.
- vagrant plugin install
- Installs a Vagrant plugin to extend Vagrant’s functionality.
- vagrant plugin uninstall
- Uninstalls a previously installed Vagrant plugin.
- vagrant plugin list
- Lists all the plugins currently installed in your Vagrant environment.
- vagrant push
- Deploys code in your Vagrant managed machine to a configured destination, useful for deployment workflows.
- vagrant snapshot push
- Takes a snapshot of the current state of the machine. This command allows reverting to the point in time snap later.
- vagrant snapshot pop
- Restores the state of the machine to the last pushed snapshot.
- vagrant global-status
- Provides a global status of all active Vagrant machines across all projects.
VMware provider requires a plugin and utility
To use Vagrant with VMware Fusion or VMware Workstation, you will need to install a couple of software packages. These include:
- The vmware-desktop plugin
- The Vagrant VMware Utility
Installing the vmware-desktop plugin
The process to install the vmware-desktop plugin is straightforward.
vagrant plugin install vagrant-vmware-desktop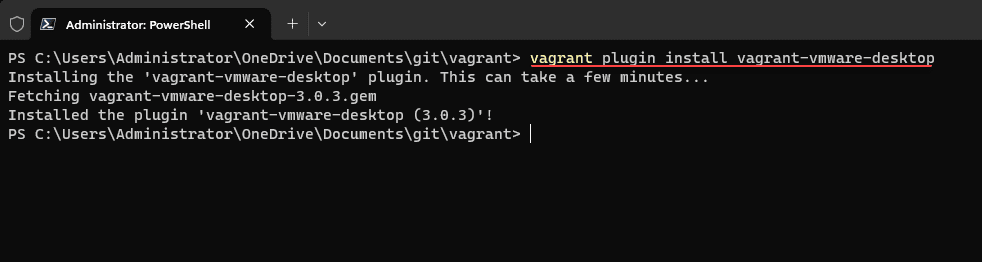
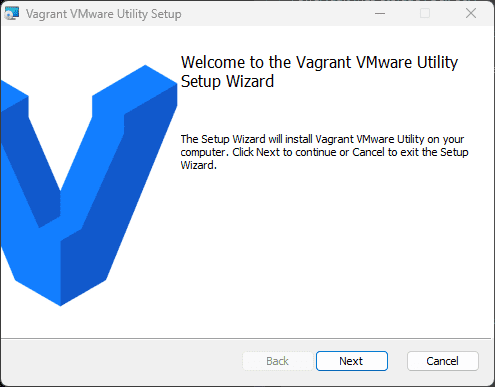
Installing the Vagrant VMware Utility
The Vagrant VMware Utility is a separate download you need to download and install. If you don’t install it, in addition to the vmware-desktop plugin, you will see the following error:
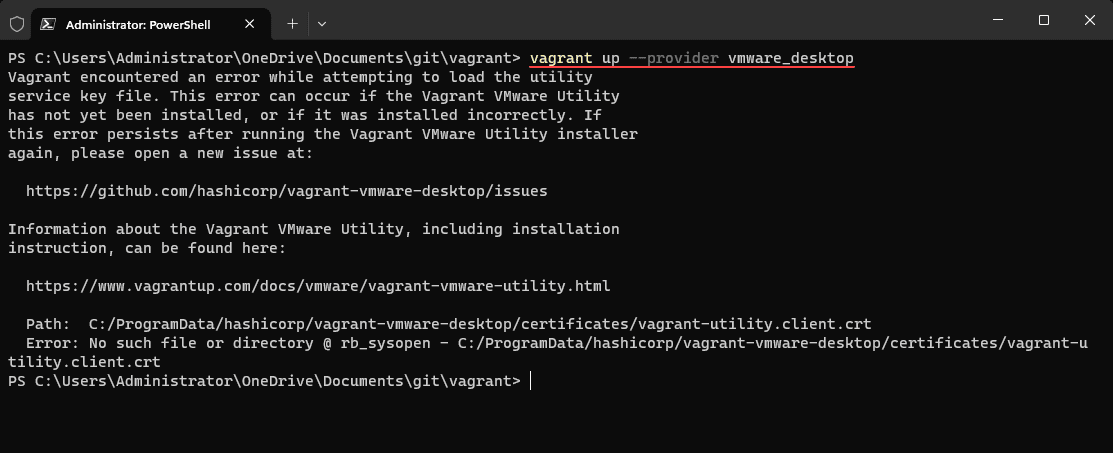
You can download the Vagrant VMware Utility here: Install | Vagrant | HashiCorp Developer. Once downloaded, the installation process is a simple “next, next, finish” type install.
Creating your first VM in seconds with Vagrant init and Vagrant Up
Let’s look at creating your first virtual machine in just a few seconds, using the two most important commands with vagrant, vagrant init and vagrant up.
First, we need to run the vagrant init command. This creates the vagrant file, which is the blueprint for the virtual machine.
In the example below, we are running the command:
vagrant init hashicorp/bionic64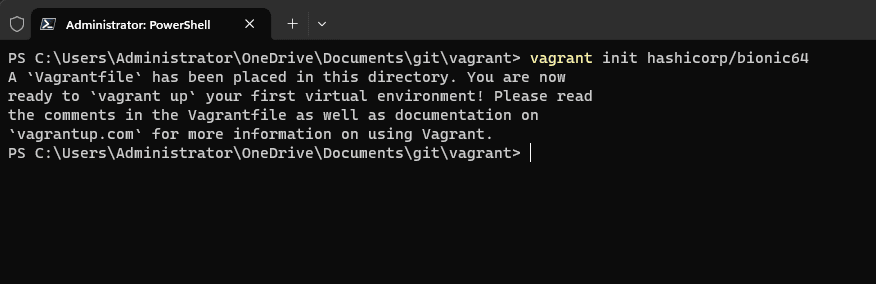
After running the vagrant init command, we run the vagrant up command. This command starts the virtual machine, including pulling down files and starting it. If you want to specify a specific provider, you can do that using the –provider flag.
Once you use the command, it will create a new folder with the virtual machine files and other Vagrant-specific files. Not the following commands:
vagrant up --provider vmware_desktop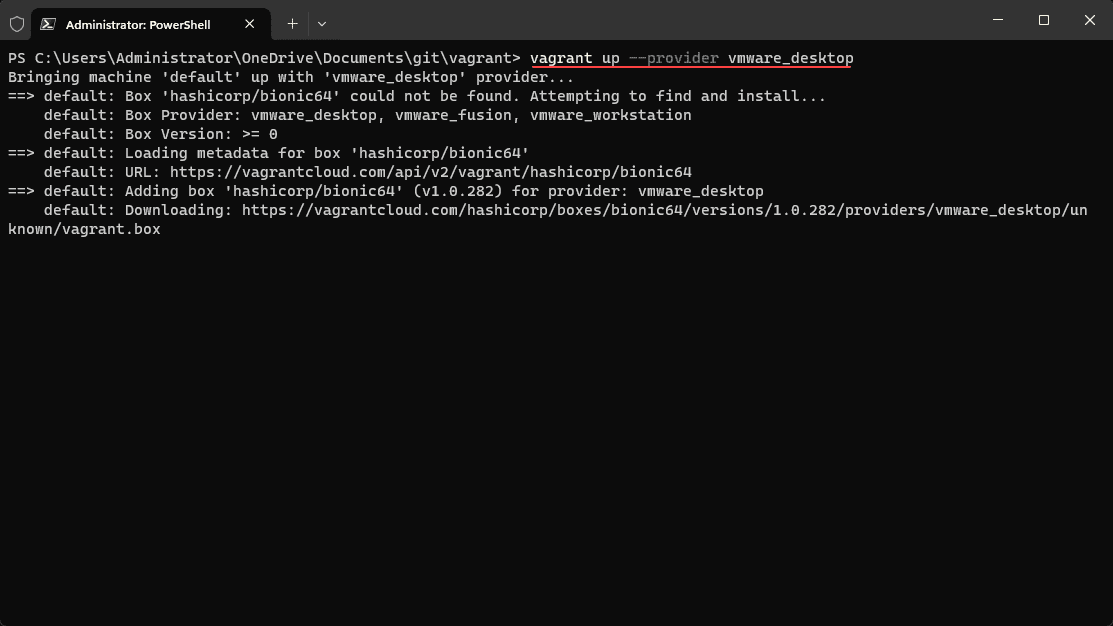
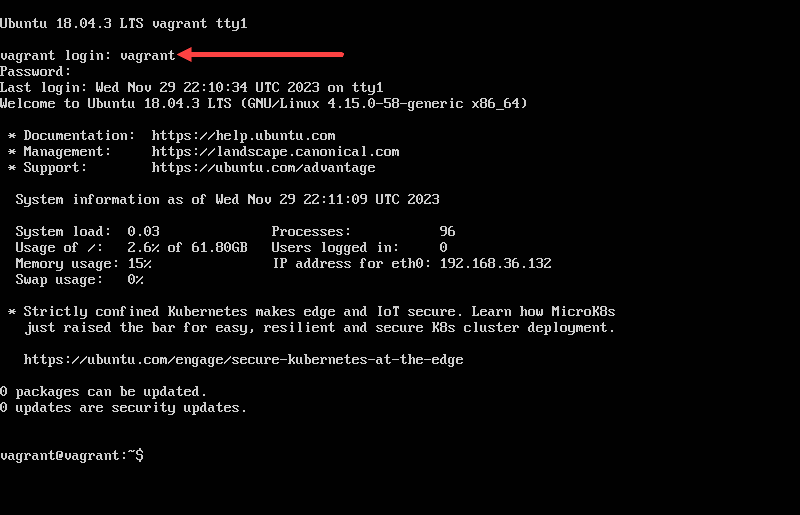
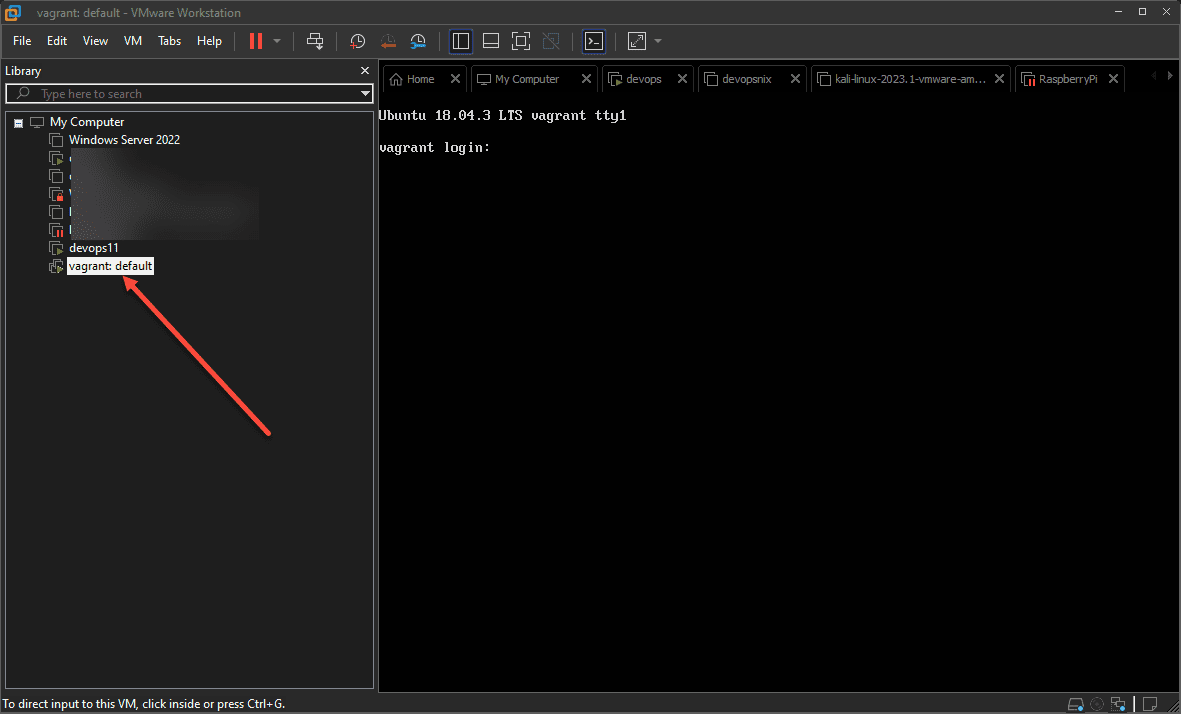
Below, we are logging into the new Vagrant VM, using the default vagrant/vagrant credentials in the VMware Workstation window.
See the virtual machine in the GUI
If you are using VirtualBox or VMware, you won’t see the VM displayed in the GUI of the solution by default. They run as a headless VM. However, there is a bit of configuration you can add to the vagrant file for this.
Vagrant.configure("2") do |config|
  config.vm.box = "my-box"
  config.vm.provider "vmware_desktop" do |v|
    v.gui = true
  end
end
After adding the configuration, the VM appears in the VMware Workstation GUI after we issue the vagrant up command.
You can also see the status of your Vagrant VM using the command:
vagrant status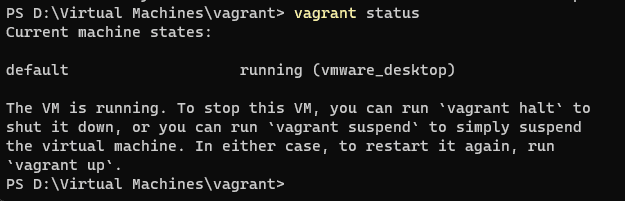
At this point, you can also create an SSH session to your Vagrant box and test connectivity.
Destroying a virtual machine
If you want to get rid of the virtual machine after you are done, you can issue the following command:
vagrant destroy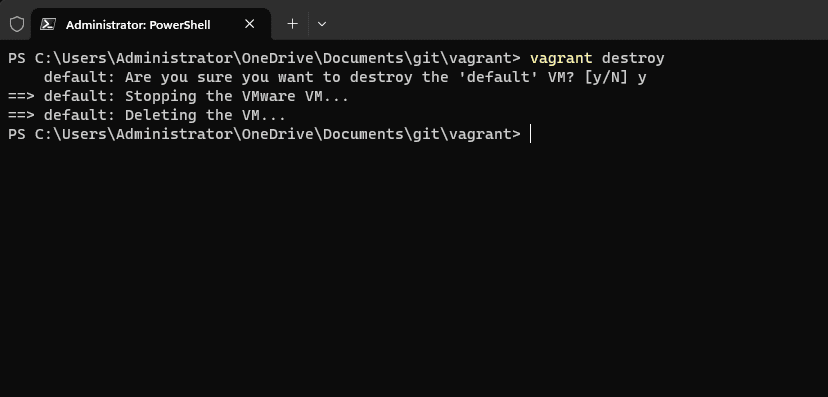
If you want to get rid of the Vagrant boxes, you can use the commands below:
#Remove the box file for a specific provider
vagrant box remove <box name> --provider <provider name>
#Remove the box file for all providers
vagrant box remove <box name> --all-providers

Another tool for VM automation
Wrapping up Vagrant Boxes
Vagrant makes the process of creating a virtual machine and management much easier. It is a great tool for developers. DevOps engineers, and home labbers can also benefit from using the tool. Since it can be used with VirtualBox, Hyper-V, and VMware, most users will find the main hypervisors they use for client virtualization are supported. Vagrant boxes are definitely worth trying as they greatly simplify and speed up deploying test instances in your environment.