
There are many great Linux operating systems that I have used in the home lab for running containers. You may have seen my recent post on Lightwhale in my home lab which was an amazing experience. However, another name that kept coming up in these circles is a distro called Flatcar Linux. It is the successor to CoreOS which many of us remember as one of the original immutable container-first operating systems. So, I wanted to see what it would take to get this up and running in my Proxmox home lab. I expected it to be just another Linux VM with a slightly different feel. That assumption did not hold up for very long.
What Flatcar Linux actually is
Flatcar Linux is not your typical Linux distribution. Like other distros out there that are container-first, it is designed to be an immutable. That means you do not install packages on it in the traditional way. Instead, you treat the OS as a stable base and run everything through containers.
There are a few key ideas with Flatcar Linux to take away to understand the nature of what it is and what its purpose is. Note the following that it has:
- Immutable root filesystem
- Automatic updates with rollback capability
- Minimal attack surface
- Designed primarily for container workloads
- Configuration driven by Ignition or Butane
So, if you are used to running a full Linux OS like Ubuntu, Debian, or even something like Rocky Linux, this type of container operating system means that you have to think differently about things like logging in or installing your normal tools.
It is very declarative in the way it works. You define how the system should look at boot time and then let it configure itself basically. So, this is where I wanted to try this out in Proxmox and where things get interesting.
Why I wanted to try it in Proxmox
My home lab has entirely shifted over to Proxmox and not looking back and other platforms like VMware. I wrote an article on how to run CoreOS on VMware, so knowing that Flatcar is the successor to CoreOS and now that I have moved over to Proxmox, it seemed natural to try Flatcar on Proxmox.
But there is a lot of gaps I think in the information out there on running Flatcar on Proxmox in my searching. So a few questions that I wanted to answer in my home lab:
- Can Flatcar be used as a general purpose container host in Proxmox?
- How difficult is it to get up and running compared to a normal Linux VM?
- Where does it fit compared to other lightweight options?
Those questions led me to download the Flatcar image and start testing.
Installing Flatcar in Proxmox
After putting things together after researching the install process, this is the flow I came up with to get a new Flatcar Linux VM up and running in Proxmox:
- Download the Flatcar raw image
- Create a new VM in Proxmox
- Import the raw disk into the VM
- Attach it using VirtIO SCSI
- Set the proper boot order
- Use Butane and Ignition for first-boot configuration
Download the Flatcar raw image
Here is the command I used on my Proxmox VE Server to download the Flatcar raw image for getting things up and running:
Update: Flatcar now publishes a Proxmox-specific image called
flatcar_production_proxmoxve_image.img. My tested workflow using the generic raw image still works perfectly, but new deployments may prefer the Proxmox-specific image documented by the Flatcar team.
wget https://stable.release.flatcar-linux.net/amd64-usr/current/flatcar_production_proxmoxve_image.imgOtherwise, the following works as well.
wget https://stable.release.flatcar-linux.net/amd64-usr/current/flatcar_production_image.bin.bz2
bunzip2 flatcar_production_image.bin.bz2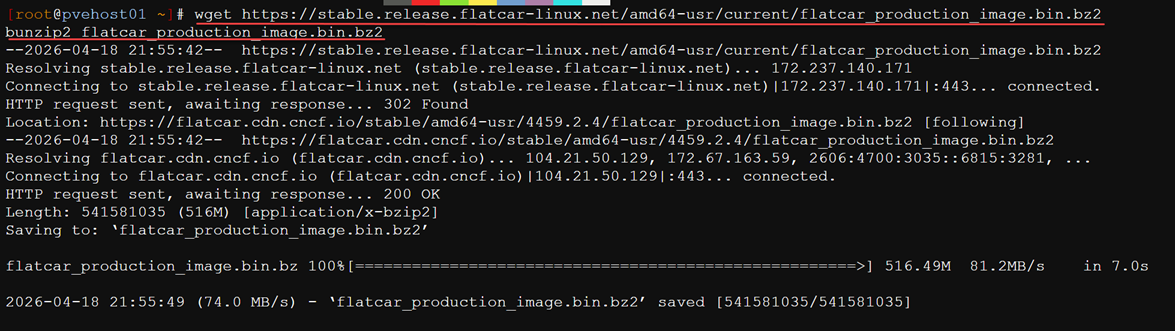
Create a new VM in Proxmox
Now, we need to create a new virtual machine in Proxmox. Since I downloaded the image from the command line, I decided to do the create steps from the command line as well. In the below, change out the ID 142 for the VM ID you want to use in your environment and also the network bridge:
qm create 142 --name flatcar-template --memory 4096 --cores 2 --net0 virtio,bridge=vmbr149
Import the raw disk into the VM
Now, we import the Flatcar raw disk to our target storage. Be sure to change out the “rbd-vm” storage for the storage you want to use in your environment.
qm importdisk 142 flatcar_production_image.bin rbd-vm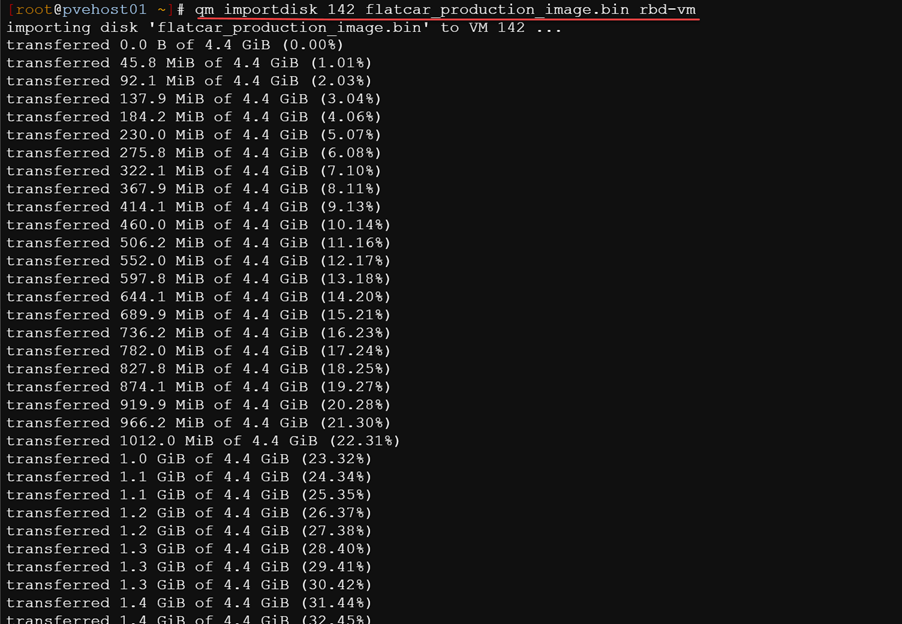
Attach it using VirtIO SCSI and setting boot order
After that, attach the imported disk as a SCSI disk and use the VirtIO SCSI controller:
qm set 142 --scsihw virtio-scsi-pci --scsi0 rbd-vm:vm-142-disk-0Then set the boot order to use that disk:
qm set 142 --boot order=scsi0The disk is really small at first
Another thing I noticed right away was that the Flatcar disk is very small out of the box. The raw Flatcar image starts off around a few gigabytes, which is enough to boot the OS but not what most of us want for actual home lab usage.
So, the easy thing to do next is to extend the disk that it defaults with in Proxmox.
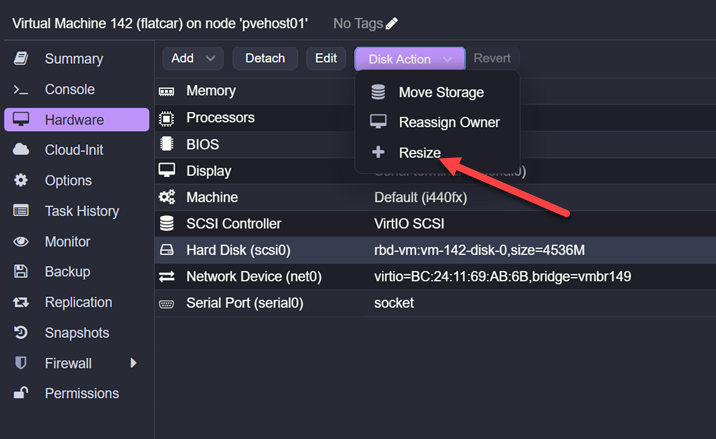
When we run our ignition file, Flatcar will magically consume all of that extra space the way a normal Linux VM does after a simple grow operation. But from my testing, I found this operation to be automatic as part of the first provisioning process.
Creating your Ignition file using Butane
Flatcar is like CoreOS in that it is customized using what is called an “Ignition” file. To create and work with these ignition files, you need to have Butane and Ignition tools installed. You can get those from here Ignition and here Butane.
Butane is really the one that is important to get your VM going. You will write the configuration in Butane that looks like standard YAML formatting. Then convert it using Butane command line to an Ignition file is JSON format.
Create this file with the .bu extension. Replace with your SSH authorized keys and usernames you want to use. Also, you can set the hostname using the /etc/hostname file as shown at the bottom of the file. This is a simple ignition file that will get things going easily for us to at least show you want you can do. You can define a static IP address as well as you see in the bottom network section.
storage:
  files:
    - path: /etc/hostname
      mode: 0644
      contents:
        inline: flatcar-proxmox

    - path: /etc/systemd/network/10-eth0.network
      mode: 0644
      contents:
        inline: |
          [Match]
          Name=eth0

          [Network]
          Address=10.1.149.154/24
          Gateway=10.1.149.1
          DNS=10.1.149.10
          DNS=1.1.1.1
Once you have your file created in the Butane YAML format, we use the butane command line tool to convert it to the ignition format:
butane flatcar.bu > flatcar.ign
What do we do with this file?
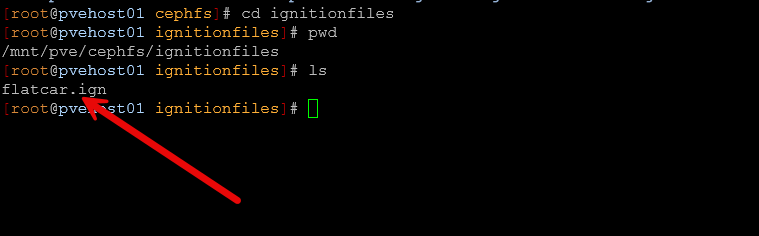
So, we need the ability to have Proxmox have access to our ignition file. So, what I did in my setup was hosted the ignition file in my CephFS pool since this is accessible to all my hosts. I created a folder called ignitionfiles in the root of my CephFS pool:
Setting the ignition file argument on the Flatcar VM
Now, all we need to do is run one more command to configure the ignition file option using -fw_cfg:
qm set 142 --args '-fw_cfg name=opt/com.coreos/config,file=/mnt/pve/cephfs/ignitionfiles/flatcar.ign'
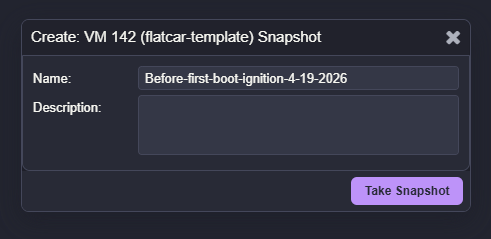
Take a snapshot before your first boot
I will pass along some helpful advice here as well. Be sure to take a snapshot of your Flatcar virtual machine before you power it on. The ignition file is only read the first time the VM boots. This way with a snapshot, if you have issues with your ignition file or need to change something in your testing, you can simply rollback the snapshot as the VM is powered off and then power it on again after you make your ignition file changes.
Verifying your ignition file ran
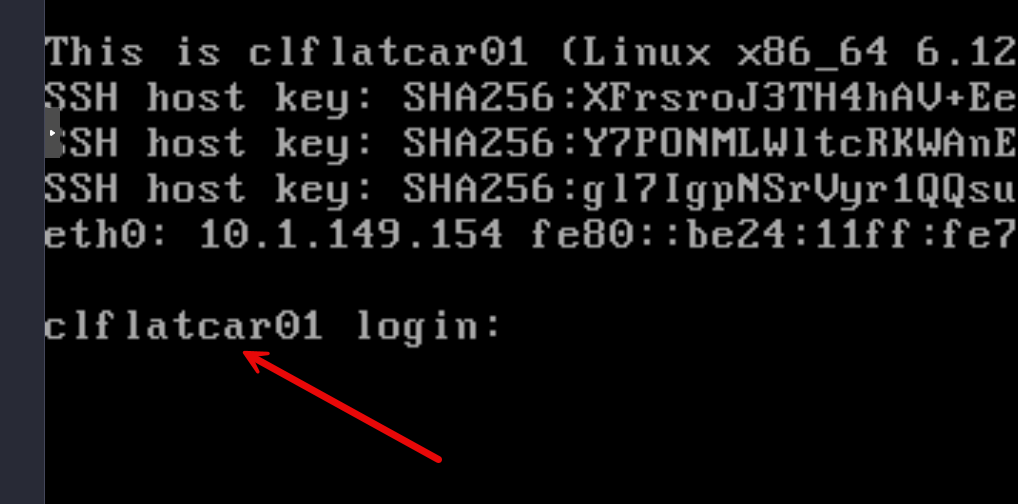
At this point, once you have your ignition file in place and you have taken a snapshot, you can power on the virtual machine and verify the ignition file is injected into Flatcar. After powering my Flatcar VM on, after just a few seconds after boot it gets to a prompt and I see the hostname has been customized which is a good sign.
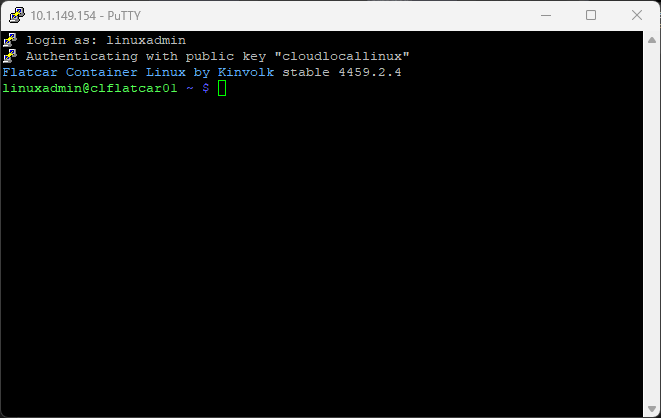
Also, at this point, you should be able to SSH into the virtual machine.
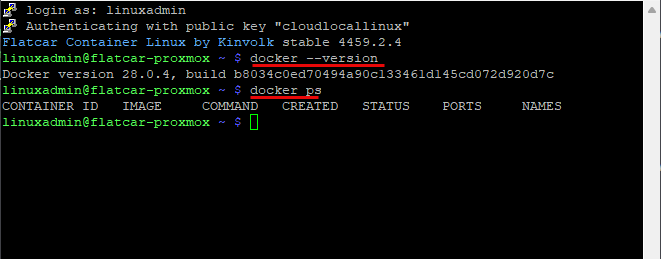
Also, I wanted to check out docker after getting flatcar spun up. It looks like the current stable release contains Docker version 28.x which is recent and it looks like all the docker related commands work as expected with Docker already installed and ready to go.
Checking for and applying updates
The updating of Flatcar shines as well. It is immutable by nature so updates are applied in the inactive partition by default. The workflow looks like this:
- You check for updates
- Updates are applied to the inactive partition
- You reboot to activate the new partition (kind of like a network switch)
sudo update_engine_client -check_for_update
sudo update_engine_client -status   # watch progress
sudo reboot                         # when ready
Where Flatcar can be used in a Proxmox home lab
So, these are just my thoughts here, but I think Flatcar is a production ready Linux release that fits with a lot of the things many of us are wanting to do with our lab environments. You can have a very declarative flow with provisioning your Docker hosts with Flatcar and it has a very mature feel about it.
Here are the use cases where I think it fits and those it might not:
| Use case | Fit for Flatcar | Why |
|---|---|---|
| Kubernetes worker or control plane nodes | Yes | It’s built specifically for container-native and Kubernetes workloads |
| Dedicated container hosts | Yes | Minimal, secure, and optimized for running containers |
| Immutable lab templates | Yes | Works with Butane and Ignition for repeatable builds |
| Repeatable test environments | Yes | Declarative configs |
| Learning cloud-native deployments | Yes | Encourages infrastructure-as-code workflows |
| General-purpose Linux servers | No | It lacks traditional package management |
| VMs you want to constantly tweak by hand | No | Immutable design |
| Workloads requiring frequent package installs | No | No apt or yum workflows available |
| One-off utility servers | No | It’s less flexible for this role compared to Ubuntu or Debian |
Wrapping up
There seemed to be a lot of gaps in information out there on getting Flatcar Linux up and running inside Proxmox. Hopefully my recent home lab experiment to stand up Flatcar and work with customizing it in the home lab in Proxmox will be helpful to others who want to try it out. This would make a great platform for anyone looking for a low maintenance, immutable Docker container operating system. All you need to do is download the raw image, import it into a fresh Proxmox VM, attach it with VirtIO SCSI, let it resize the disk and then apply your Butane and Ignition config. What about you? Have you tried out Flatcar Linux in your home lab environment or are you using it in production? I would love to know what your thoughts are on this OS.
More in this topic


Google is updating how articles are shown. Don’t miss our leading home lab and tech content, written by humans, by setting Virtualization Howto as a preferred source.
About The Author

checkout Nebraska
https://github.com/flatcar/nebraska
this is how you control patching flatcar servers in your own Cadence. It’s awesome 👍
Mike,
I did check this out now and I have to say that it is awesome. This has really given me the push to migrate all of my Ubuntu hosts over to Flatcar with all the enterprise tools it provides, immutability, and now even update management. Very cool.
Brandon
Why didn’t you use the flatcar proxmox specific disk image?
Apologies – I was thinking of something else.
This is the qemu file I was thinking of. I think this should be used for Proxmox instead of the file listed in the tutorial:
flatcar_production_qemu_image.img
ilium007,
Good to note. I didn’t know this was available. Great to see we have something purpose built for Proxmox here.
Brandon
ilium007,
No worries! Thank you for the comment and feedback!
Brandon
I got an error running the Butane conversion:
butane flatcar.bu > flatcar.ign
Error translating config: error parsing variant; must be specified
I had to add the missing the required top-level variant and version to the top of the Butane file:
variant: flatcar
version: 1.0.0
storage:
files:
– path: /etc/hostname
mode: 0644
contents:
inline: flatcar-proxmox
– path: /etc/systemd/network/10-eth0.network
mode: 0644
contents:
inline: |
[Match]
Name=eth0
[Network]
DHCP=yes
So… a couple of notes.
I haven’t used Windows as a sysadmin for over 25 years. To run Butane on a non windows system the easiest way is via docker:
docker run –rm -i quay.io/coreos/butane:release –pretty –strict flatcar.ign
I also had to make a few changes to get the QEMU Guest Agent running in Proxmox.
In the qm create command enable the agent and fstrim:
qm create 700 –name flatcar-template –memory 4096 –cores 2 –net0 virtio,bridge=vmbr0,firewall=0 –agent enabled=1,fstrim_cloned_disks=1
The Butane config file really should specify RSA keys and the QEMU Quest Agent config required to get it running:
variant: flatcar
version: 1.0.0
kernel_arguments:
should_exist:
– console=ttyS0,115200n8
passwd:
users:
– name: core
ssh_authorized_keys:
– ssh-ed25519 AAAA…[email protected]
storage:
files:
– path: /etc/hostname
mode: 0644
contents:
inline: flatcar-proxmox
– path: /etc/modules-load.d/virtio.conf
mode: 0644
overwrite: true
contents:
inline: |
virtio_console
– path: /etc/systemd/network/10-eth0.network
mode: 0644
contents:
inline: |
[Match]
Name=eth0
[Network]
DHCP=yes
– path: /etc/systemd/system/qemu-guest-agent.service.d/override.conf
mode: 0644
overwrite: true
contents:
inline: |
[Unit]
# Remove the rigid systemd physical hardware block mapping requirements
BindsTo=
After=
ConditionPathExists=/dev/virtio-ports/org.qemu.guest_agent.0
[Service]
# Clear out upstream ExecStart and instruct the binary to execute cleanly
ExecStart=
ExecStart=/usr/bin/qemu-ga -m virtio-serial -p /dev/virtio-ports/org.qemu.guest_agent.0
systemd:
units:
– name: qemu-guest-agent.service
enabled: true
ilium007,
Great notes here and thank you for sharing what has worked well for you outside of Windows. Thank you for sharing this!
Brandon