
Having redundant DNS servers in a home lab is a great idea and helps to shore up one of the single points of failure that we can have in the home lab or production. That is DNS. If DNS breaks, then so many other things break as most apps and services rely on it for things to work right. If you are like me you have used multiple Pi-Hole servers with sync tools like Gravity sync (pre 6.x release), and then Nebula Sync (post 6.x release) to keep two Pi-Hole instances synced up. However, in case you haven’t heard Technitium introduced native clustering in v14 recently and it is a game changer. Let’s see what this new feature in Technitium can do, how you configure it, and if it might change how we approach DNS HA.
Why home labbers start syncing Pi-Hole in the first place
There is a reason in enterprise environments why there are multiple DNS servers in production. This allows one to be taken down for maintenance, fail, or some other problem occur and you still have DNS functional DNS resolution with multiple servers.
In the home lab, most of us start with one of everything, including DNS server. One DNS server is ok until it is not. You have to reboot your Pi-Hole instance, you have a power outage, maintenance windows, etc. When DNS goes down, then nothing works.
Outside of multiple Windows DNS servers with something like Microsoft Windows Active Directory and AD-integrated DNS, Pi-Hole has long had open-source projects like Gravity Sync and now Nebula Sync that have allowed standing up another Pi-Hole instance and syncing configurations between them, since Pi-Hole doesn’t support this natively. With these projects, you can sync blocklists, allowlists, local DNS entries, DHCP reservations, and custom settings.
Sync tools, as good as they are, are not clustering. They do not have a shared state or coordinated management. They copy files and settings after changes occur. If a sync job fails, nodes drift apart. If you change something on the wrong node, you may overwrite newer data. Troubleshooting becomes about figuring out which copy of the truth is correct. For many home labs, that is acceptable. For others, it starts to feel fragile.
What Is Technitium DNS?
You may have not heard of Technitium DNS server. But, let me tell you, if you haven’t heard of it, you are missing out. It is a super powerful DNS server. In fact, I have heard an arguably good comparison of Technitium with Pi-Hole that says Pi-Hole is an ad-blocker first and DNS server second, and then Technitium is a DNS server first and ad-blocker second. It feels like an extremely mature DNS server with all the features and functionality you would need/want in most situations and surpasses what Pi-Hole can do when it comes to purely DNS features.
Technitium is freaking awesome if you ask me:

At its core, Technitium DNS is a full recursive DNS server with authoritative zone support. It can act as your primary internal DNS, a forwarding resolver, or a combination of both. Beyond basic name resolution, it also has things like advanced filtering, blocklists, conditional forwarding, split horizon DNS, and support for custom DNS applications that extend functionality without modifying the core server.
It has enterprise features like role based access, API driven management, DNS over HTTPS and DNS over TLS. It also has detailed query logging and it includes all of this for free without a lot of heavy infrastructure required.
Technitium has introduced a native clustering feature
Technitium DNS Server v14 has now introduced something that we have all wished Pi-Hole would have released by now and that is native clustering that totally eliminates the need for open-source synchronization tools. Instead of copying configuration between independent servers, Technitium treats multiple DNS servers as members of a single cluster.
Technitium DNS server has one node act as the primary node and then additional nodes join the cluster and receive configuration updates automatically. All cluster members share configuration like DNS zones, settings, applications, users, and policies.
Also, what is great is this is not a file copy process. It is a true cluster-aware system where changes are made once and distributed to the other nodes in the cluster automatically. I love the open source projects with Pi-Hole that sync, but I am all about reducing complexity and having features natively built-in. It simplifies things. You have one source of truth, one management interface, and one configuration state.
Read the official blog post here: Technitium Blog: Understanding Clustering And How To Configure It.
How Technitium DNS Clustering works
Technitium clustering uses a catalog zone to manage cluster configuration. When clustering is enabled, the primary server maintains the authoritative cluster data and pushes updates to secondary nodes.
Your Technitium nodes communicate over TLS, with support for DANE based certificate validation. This makes sure your cluster traffic is encrypted and authenticated, even inside a home lab environment.
This means you can:
- Configure DNS zones once
- Manage blocklists and policies in one place
- Install DNS apps one time
Secondary nodes continue serving DNS even if the primary node goes offline. Clients can be configured with multiple DNS server IPs for your primary and secondary nodes, and these will be identical with the new clustering feature.
Comparing Pi-Hole sync tools with native Technitium clustering
Take a look at this high-level comparison of Pi-Hole sync tools and Technitium DNS clustering.
| Area | Pi-Hole Sync Tools | Technitium DNS Clustering |
|---|---|---|
| Changes and how these are handled | Changes are copied after they happen using sync jobs | Changes are coordinated and distributed in real time using the cluster catalog |
| Configuration management | Each node has its own configuration that must be kept in sync | All nodes share a single centralized configuration |
| When a node fails | Sync failures can cause configuration to drift between servers | Cluster nodes remain consistent even when a node fails |
| How conflicts are resolved | Conflicts have to be identified and resolved manually | A primary node defines the authoritative configuration |
| Day to day managment | Administrators manage settings on multiple servers | Administrators manage DNS settings once from the primary interface |
| Is it complex and does it scale? | Becomes harder to maintain as features and nodes increase | Designed to scale as more features and nodes are added |
| Advanced features | Advanced may be difficult to keep synchronized reliably | Advanced features work within the clustered model |
Installing Technitium DNS server
You can read my full post on spinning up Technitium here: Technitium DNS Server in Docker: Is this the Best Home Server DNS?.
Below is an example docker-compose.yml file that will give you a starting point. You can update this according your own needs. Note how I have uncommented the port 53443 as this will be the port used for cluster communication.
services:
  dns-server:
    container_name: dns-server
    hostname: dns-server
    image: technitium/dns-server:latest

    ports:
      - "5380:5380/tcp"  # Web console (HTTP)
      - "53:53/udp"      # DNS service
      - "53:53/tcp"      # DNS service
      # Optional ports - uncomment as needed:
      - "53443:53443/tcp"  # Web console (HTTPS)
      # - "853:853/udp"      # DNS-over-QUIC
      # - "853:853/tcp"      # DNS-over-TLS
      # - "443:443/udp"      # DNS-over-HTTPS (HTTP/3)
      # - "443:443/tcp"      # DNS-over-HTTPS (HTTP/1.1, HTTP/2)
      # - "67:67/udp"        # DHCP service

    environment:
      - DNS_SERVER_DOMAIN=dns-server
      # Uncomment and set for production:
      # - DNS_SERVER_ADMIN_PASSWORD=your_secure_password
      # - DNS_SERVER_PREFER_IPV6=false
      # - DNS_SERVER_RECURSION=AllowOnlyForPrivateNetworks
      # - DNS_SERVER_FORWARDERS=1.1.1.1,8.8.8.8

    volumes:
      - config:/etc/dns

    restart: unless-stopped

    sysctls:
      - net.ipv4.ip_local_port_range=1024 65000

volumes:
  config:
After creating the docker-compose.yml file, issue the docker compose up -d command to bring up the stack.
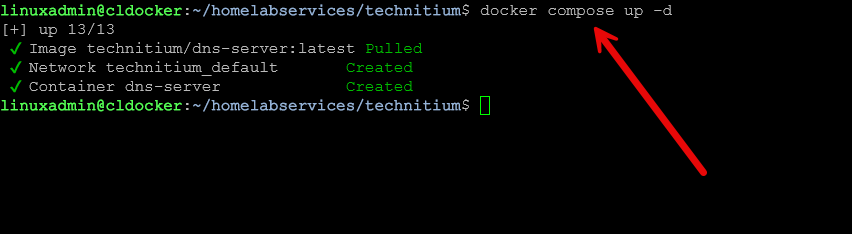
Create another Technitium instance on a different Docker host. Bring this instance up as well with docker compose up -d.

Changing the name of your Technitium DNS Server if needed
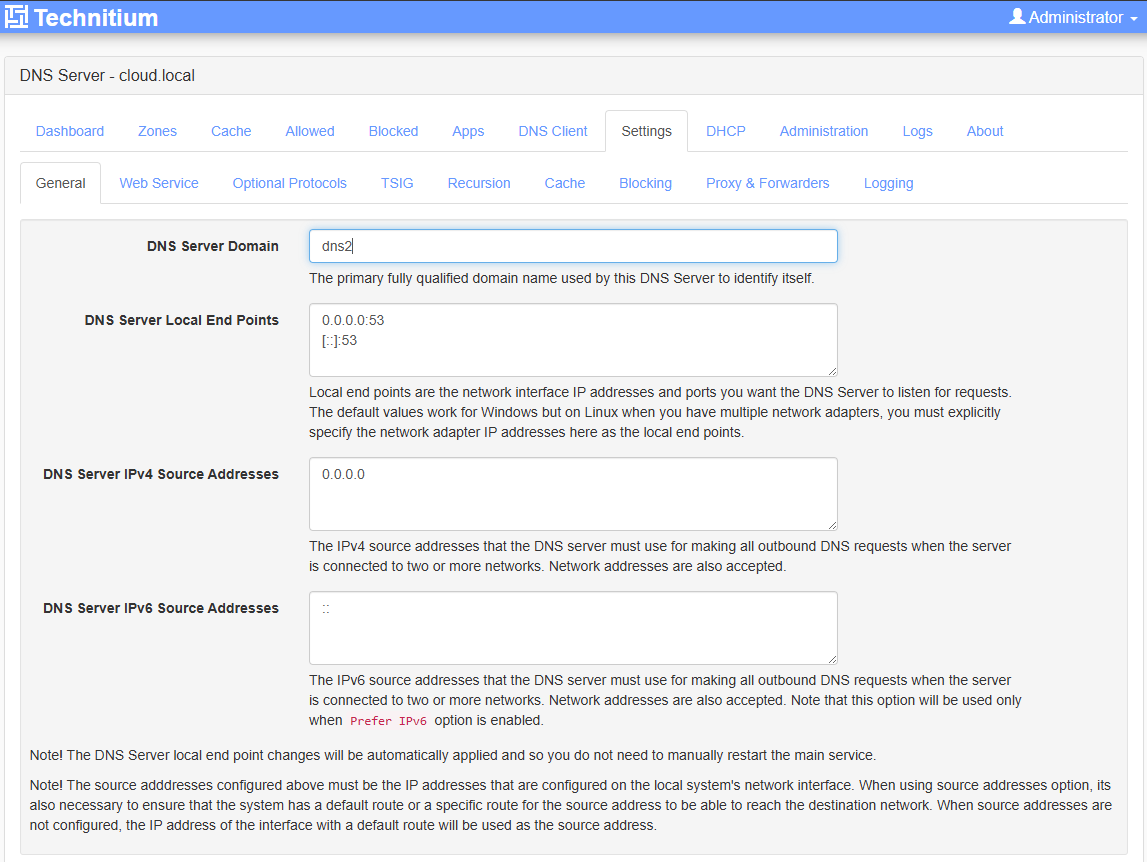
Next, one step I found that I needed to do is change the name of the DNS server. Out of a fresh install, even using the above compose code, my container installed as cloud being the hostname. Not sure if this was from a failed first bring up as I tested a few things out. I would suggest you look at your hostname here and then change to what you want it to be. For my first server, I used dns1 and for the second server used dns2.
Below is what I saw under Settings > General > DNS Server Domain.
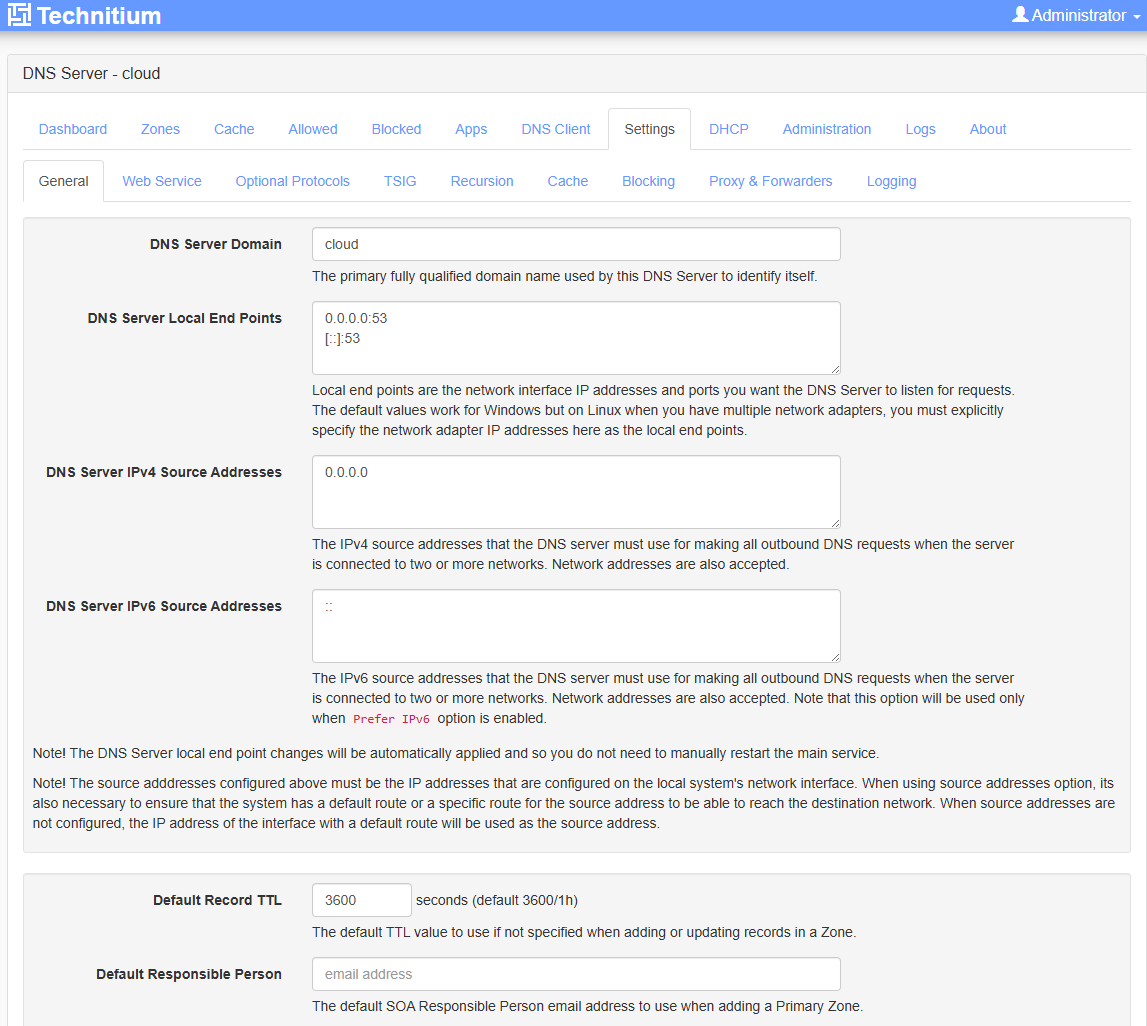
I changed to the names of each respective DNS server. Here I am on the second server and setting the DNS server domain as dns2. The reason for this as you will see, the clustering process will take this name and prepend it to the domain name you enter for the cluster.
Creating the Technitium DNS Server cluster
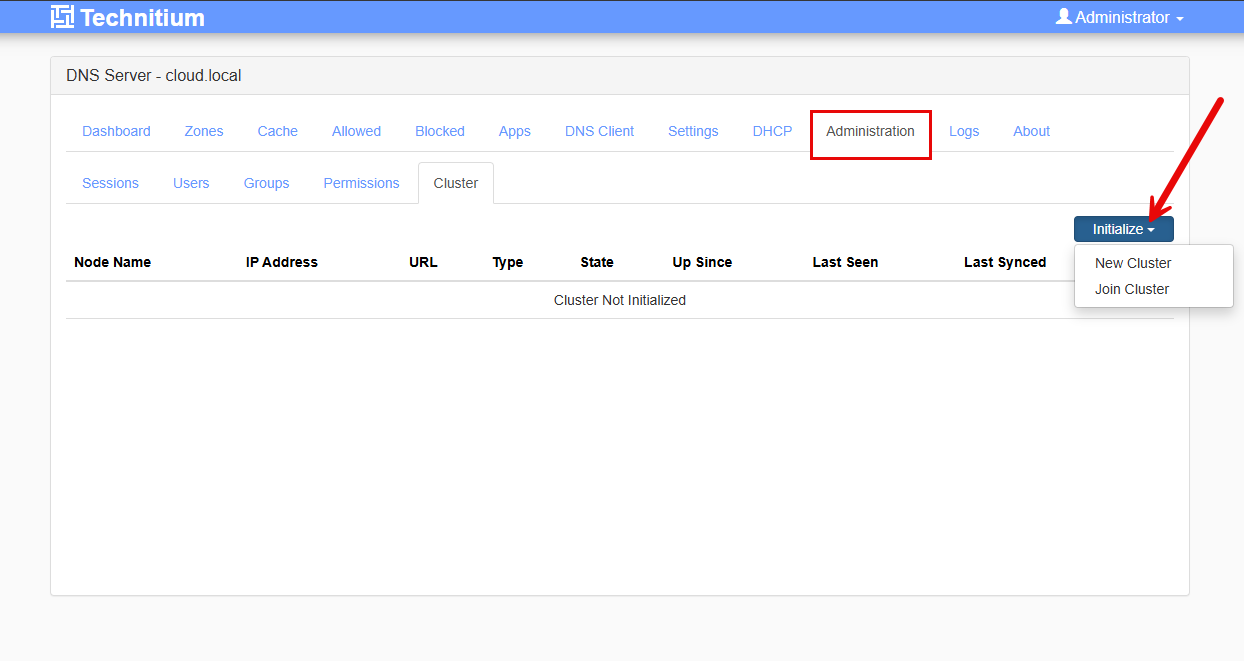
In the node that you want to designate as the primary node, navigate to Administration > Cluster > Initialize > New Cluster.
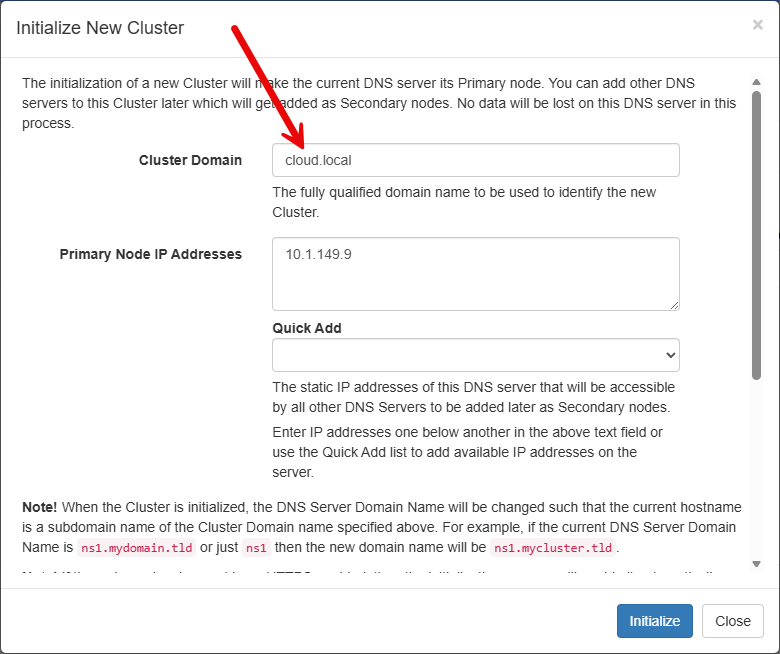
Below we are taken to the Initialize New Cluster screen where we put in:
- Cluster domain
- primary Node IP Addresses
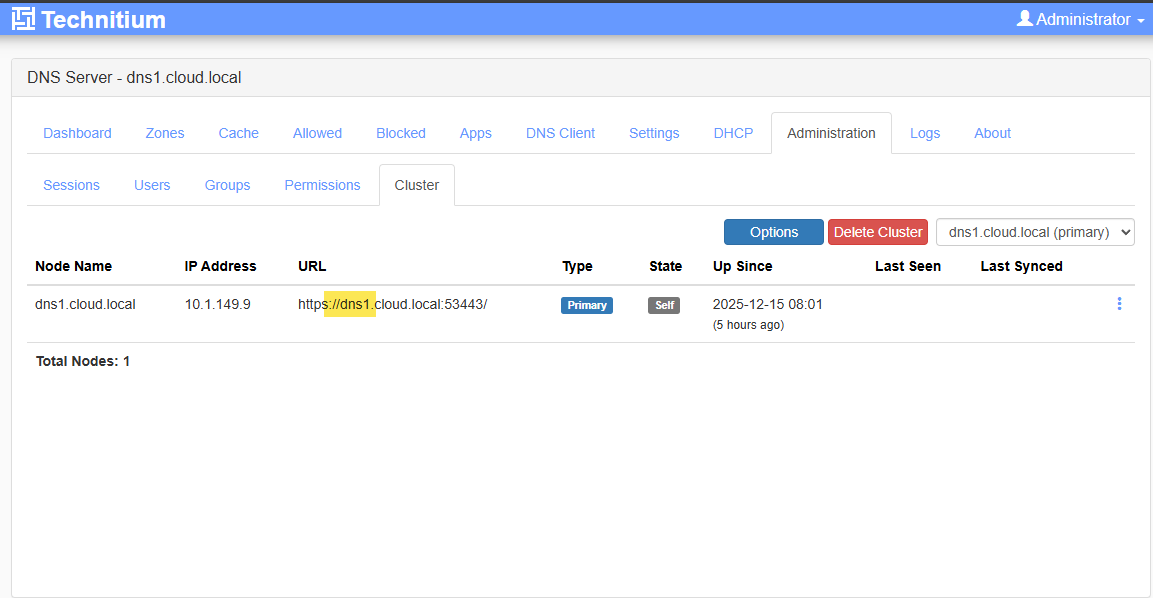
So, as you can see below, I have created the cluster and the first node is listed. You see the URL that is used internally for synchronizing data.
Joining the cluster on the second node
It is straightforward on the second node we navigate to Administration > Cluster > Initialize > Join Cluster.

This launches the Join Cluster dialog. Here we enter the secondary node IP address, and then the Primary Node URL which is displayed in the first nodes cluster screen as we saw.
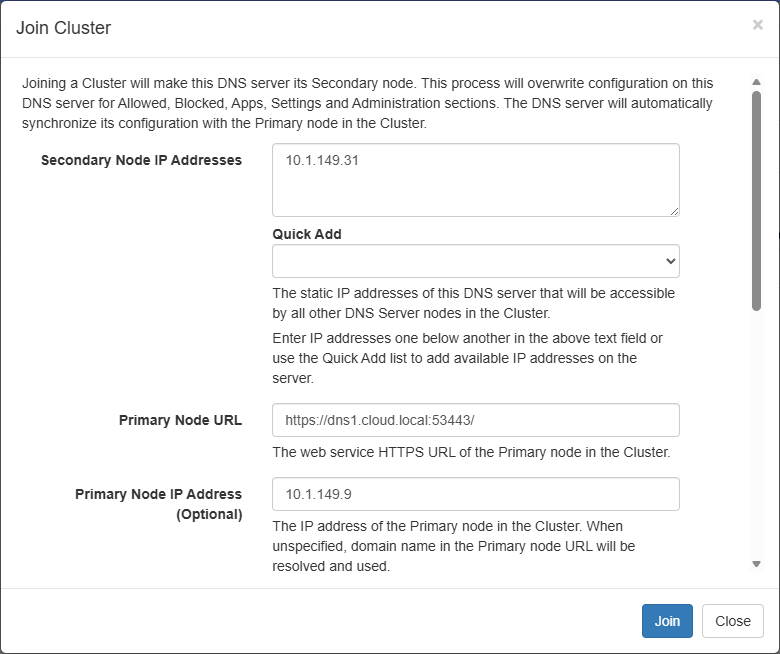

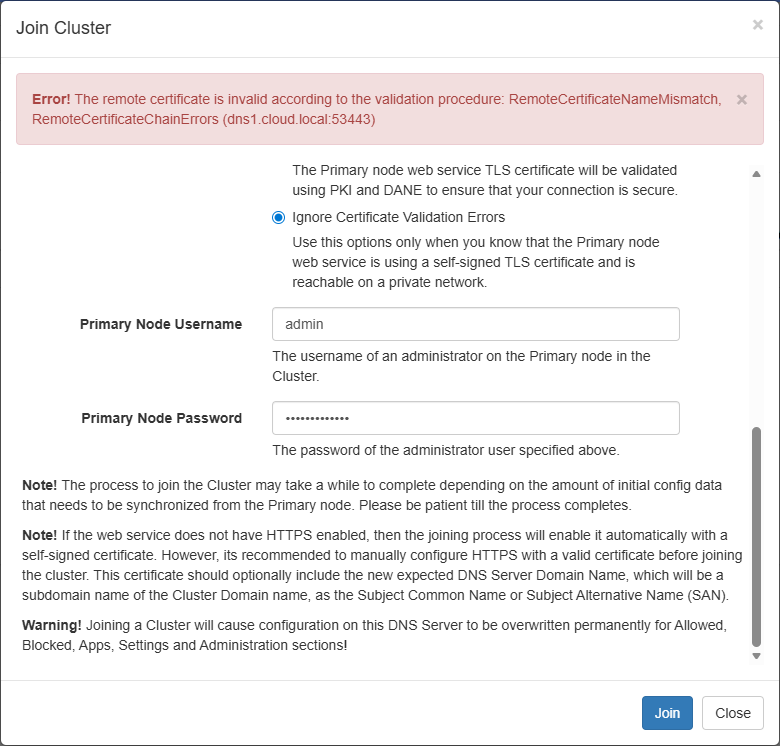
Check the radio button to Ignore certificate validation errors or you will see the error below. Then click Join.
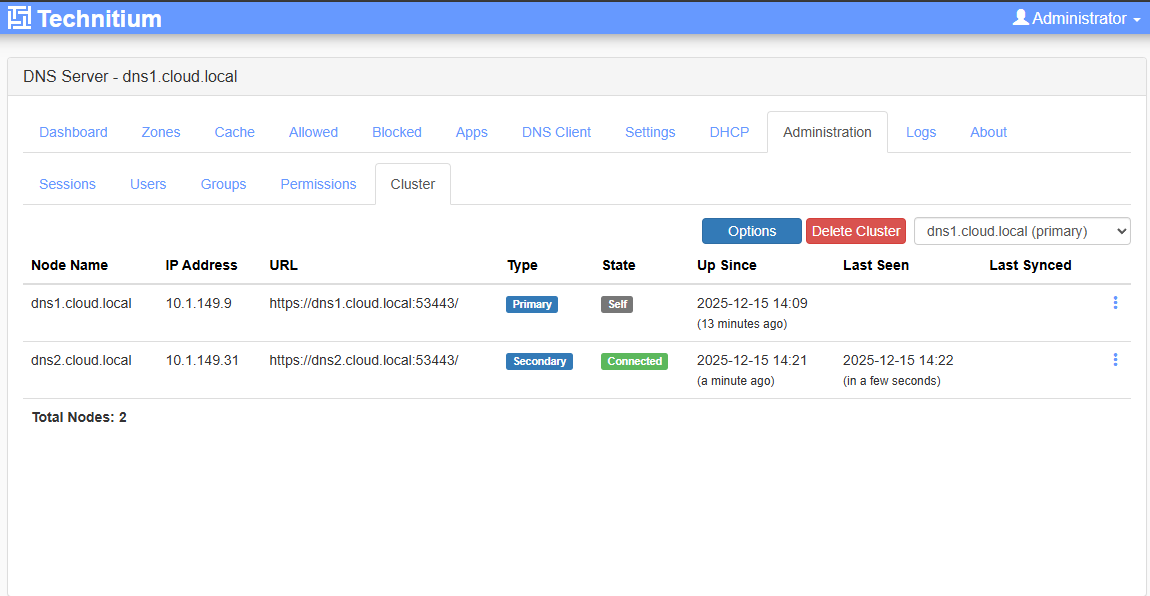
On the primary server, we can see the secondary server is connected and reachable.
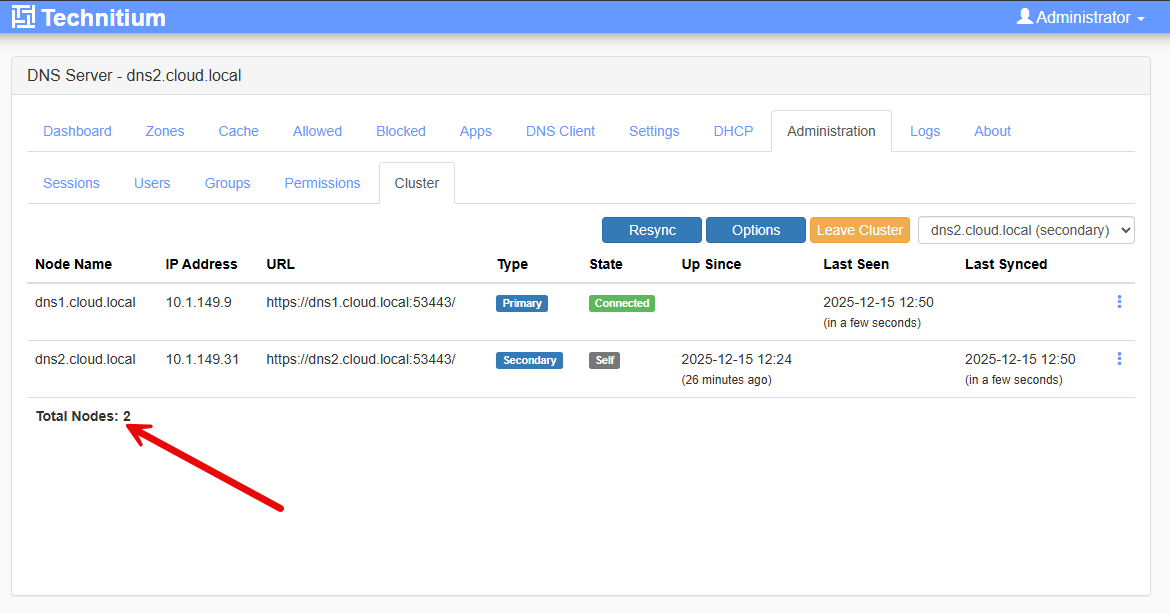
One the secondary server, we see the primary server is connected and reachable.
How well does it replicate and how quickly are changes there?
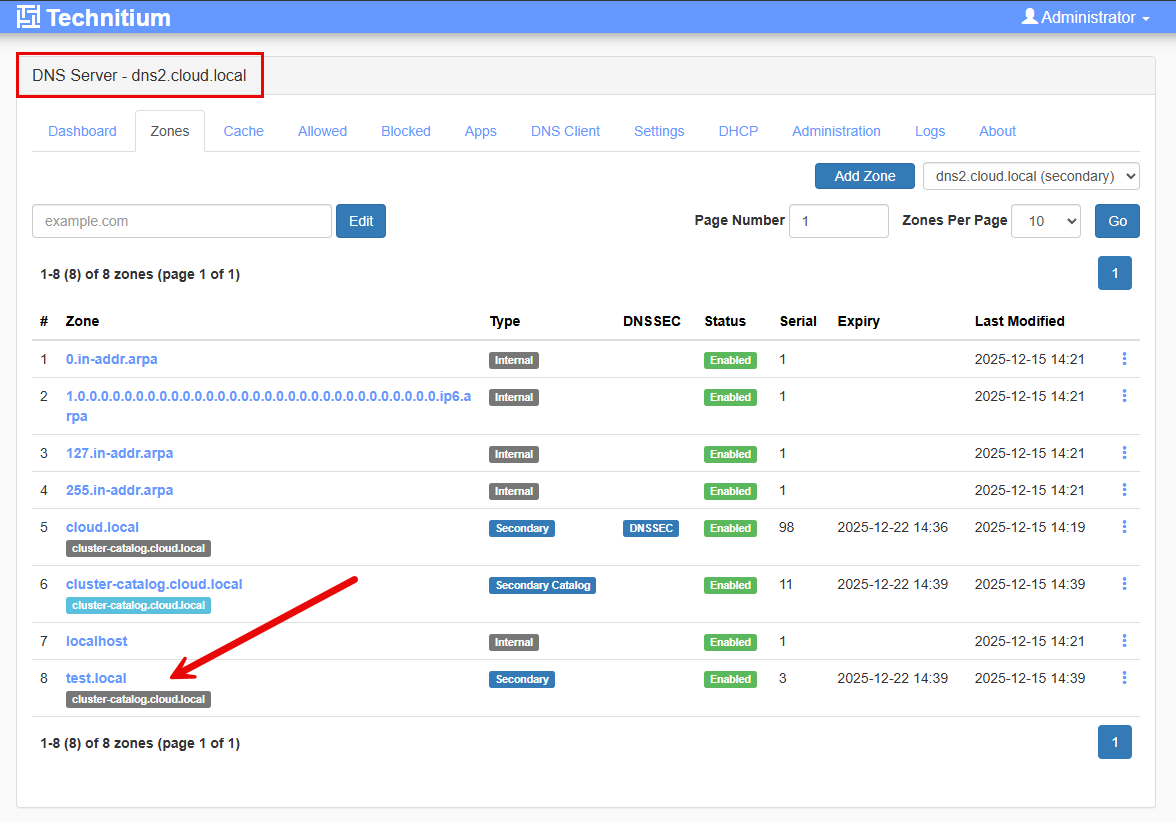
This part to me was absolutely what I hoped for. I added a zone to the primary node to test this out. I added a test zone on the primary server called test.local.

One the secondary server, we can see the zone is successfully replicated over.
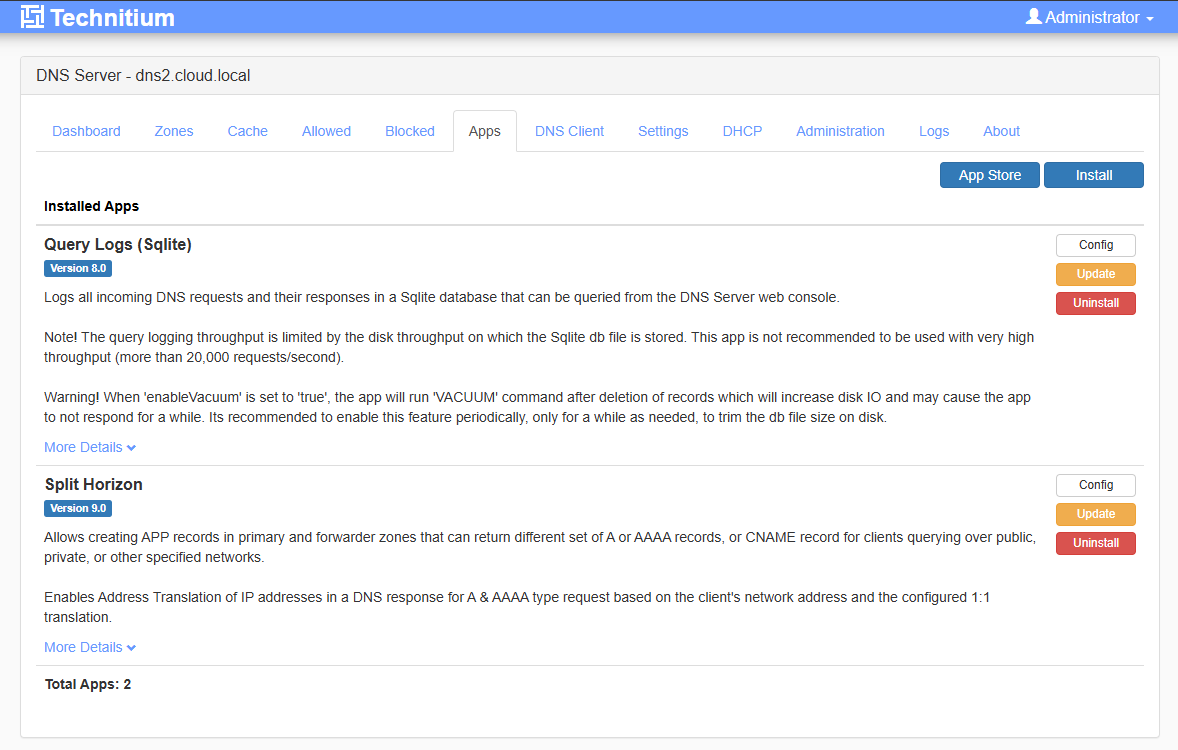
This even applies to things like “apps” which you can install in Technitium. Here, on the primary server, I have installed the Split Horizon app.
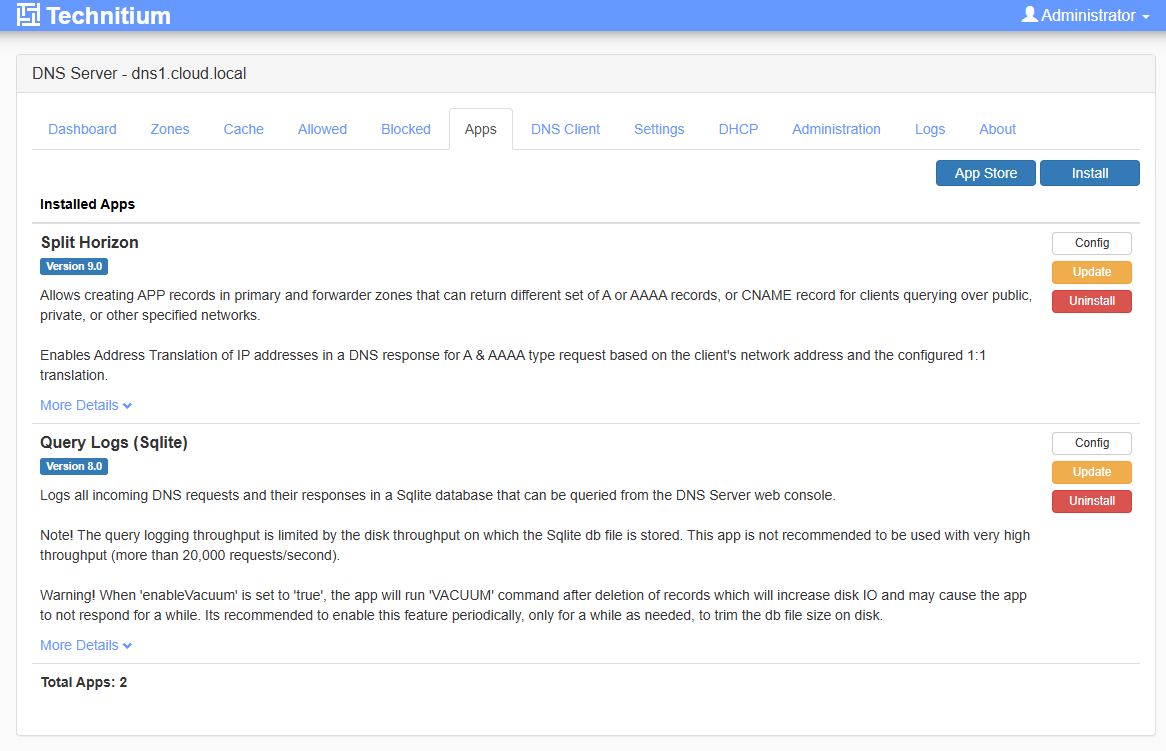
On the secondary server, as soon as I could flip over to the interface there and refresh the page, it already had the app installed. Pretty cool!
A few limitations to note
There are a few things to note, although I don’t think any of these would necessarily be a deal breaker and knowing how this will mature makes me feel even better about using the new feature. One thing to note replication is one-way. So you make changes to your primary and then it will replicate to the secondary, but not the other way around. I tested this and it was true. When you create a zone on the secondary server, it doesn’t replicate to the primary.
You should also think about where your primary node lives. While secondaries continue serving DNS if the primary goes offline, administrative changes require access to the primary. However, worst case, you could leave the cluster on the secondary and then create a new cluster where the secondary becomes the new primary if the first node is down or gone.
Technitium clustering is also focused on DNS configuration. At this point DHCP clustering is not fully supported yet. So if you rely heavily on DHCP features, that is something to consider.
That said I am super excited about this new development for DNS servers in the home lab and even production environments with Technitium. Having the ability to cluster and synchronize settings in almost real-time without a third-party script or bolt-on solution I think is a game changer.
Video
Check out my video covering the new clustering feature:
Wrapping up
Do you currently use Pi-hole sync tools to synchronize two Pi-Hole servers? If you are like me, I am grateful to have had these tools available and they are still great if you want to stick with Pi-Hole. However, I have always thought Technitium was a superior DNS solution from a purely DNS features perspective. This new clustering feature I think has swayed me back to using Technitium as my primary DNS solution in the home lab. What about you? Have you tried out Technitium? Are you using it currently? Are you going to try out this new clustering feature?
Google is updating how articles are shown. Don’t miss our leading home lab and tech content, written by humans, by setting Virtualization Howto as a preferred source.
About The Author


I currently have Pi-Hole in LXC’s on clustered Prox Nodes, with Unbound to avoid external forwarders.
Does Technitium provide that same ‘Unbound’ recursive effect?
I just wondered, when I saw reference to including 1.1.1.1 and 8.8.8.8 in your config.
Peter,
Great question! Technitium DNS does include a full recursive resolver built in. So you can run it in the same way you are using Pi-Hole with Unbound today. In that mode, Technitium performs recursive resolution by itself by querying the root servers directly, rather than forwarding requests to public resolvers.
The references to 1.1.1.1 and 8.8.8.8 in the post were just examples of optional forwarders, not a requirement. You can absolutely configure Technitium with no external forwarders at all and let it handle recursion end-to-end as you are doing with Unbound.
In fact, many people run Technitium in a “no forwarders” configuration for the same reasons you mentioned, privacy, control, and avoiding reliance on third-party DNS providers. You still get caching, DNSSEC if you have this enabled, and full control over DNS queries. So in concept at least, Pi-Hole + Unbound and Technitium running as a recursive resolver are solving the same problem. The difference is in my testing that Technitium combines recursive DNS, filtering, policy control, and now clustering into a single service.
Brandon
I have two Pihole servers synchronized with Nebula Sync. I think this option is neat, but it’s not for me, personally. I think I’ll stick with Pihole for now.
By the way, Pihole supports DoH, DoT, and DNScrypt if you use dnscrypt-proxy. I have that set up to use Quad9 as my recursive resolver and it works great!
I used to do my own recursive lookups with unbound, but it was so slow!
Ben,
Thanks for the comment and insights here! I think a lot will still like to stick with Pi-Hole. I am encouraged that projects are catching onto the concept of “clustering”. Maybe one day Pi-Hole will have this as a native feature. I too have been running (2) Pi-Holes with Nebula-sync and has been rock solid for me. Definitely giving Technitium a go in the lab currently to get a longer term feel for the solution. I will keep you guys posted. 👌
Brandon
Just a note that pihole does not support natively neither DoH, DoT or DoQ (as of December 2025).
Well, it supports DoH and DoT via 3rd party tools like cloudflared or dnsproxy
Great points here Giedrius! Are you currently running Technitium?
Brandon
I wasn’t using any Pi-Hole sync tools at all. However, I prefer this solution over Pi-Hole or AdGuard Home as I consider the cluster option a more ‘native’ DNS solution. This would make this solution fully suitable for corporate environments too as I consider this a ‘native’ solution (primary zones, stub zones etc.). It gives me some thoughts how this may potentially replace solutions like BIND9, Windoes/AD DNS or even a solution like Infoblox.
This solution reduces my setup from managing two packages (Pi-Hole and Unbound) to one (Technitium).
I was able to fully reproduce this guide for my home lab. The only difference is I use 2 LXC’s so i didn’t use Docker. I don’t use forwarders like 1.1.1.1 or 9.9.9.9, but I can imagine use cases for conditional forwarding (i.e. Private DNS Zones for Private Endpoints in Microsoft Azure).
Thanks, will subscribe to your YouTube channel!
mwesterink,
Thank you for the comment. I totally agree. I don’t like to overcomplicate things in the home lab if I can keep from it. Switching from the sync tools with Pi-Hole to native clustering with Technitium reduces complexity overall. I am all about that. Also, I have been running the cluster now for a couple of weeks and it has been rock solid, so have built up confidence in it and haven’t seen any issues so far. Thank you also for the support and sub! Much appreciated. Keep us posted on your experience with Technitium also.
Brandon
Can you create a tutorial on how to set up DNS over HTTPS/TLS with Technitium using a domain you own on Cloudflare? And another question: if you have DNS over HTTPS set up on dns1.domain.tld, do you also need to install and configure the certificate on the other Technitium server in cluster mode?
Sorry, but I just cannot get behind a .[dot]NET project for critical infrastructure like DNS. If you look at the underlying binary structure, its a Windows executable and DLL that runs under mono in Linux.
Hi Branden,
Nice introduction to a powerful product, but not really useful for us mere mortals. Unfortunately, we’re not all at your level when it comes to setting up this stuff. Which is why we bother to watch in the first place. 😉 I tried for a couple of days to get this going, but this program is a beast and you don’t really go into any real detail here. Do you think you might do a complete walkthrough of what is needed to make the transition from multiple pi-holes to a Technitium cluster on a home network? I’ve noticed that no such tutorial exists at this time on YouTube, so you could be the first to make this a popular home solution.
nice article. I’m trying this out in my lab. nebula-sync has been doing its job well enough, but I’d like to try a more integrated solution. I have the pair of new DNS servers setup and I’d like to copy over my blocklist and allowlist from Pihole. The StevenBlack blocklist I use in Pihole was easy enough to add as that was the list named Default in Technitium. I’m having more trouble finding an easy way to get my list of allowed domain overrides out of Pihole and into Technitium. LMK how you did it.