One of the most powerful features of running a virtualization cluster is being able to have high availability features that are built into the solution. High availability features allow you to run virtual machines in a way that makes them resilient to a host failure. Proxmox has these features built-in to the HA cluster features it contains. However, there are definitely some pitfalls to note with Proxmox HA to be aware of. Let’s take a look at the do’s and don’ts of HA clustering in Proxmox and see what we can learn.
What is Proxmox HA?
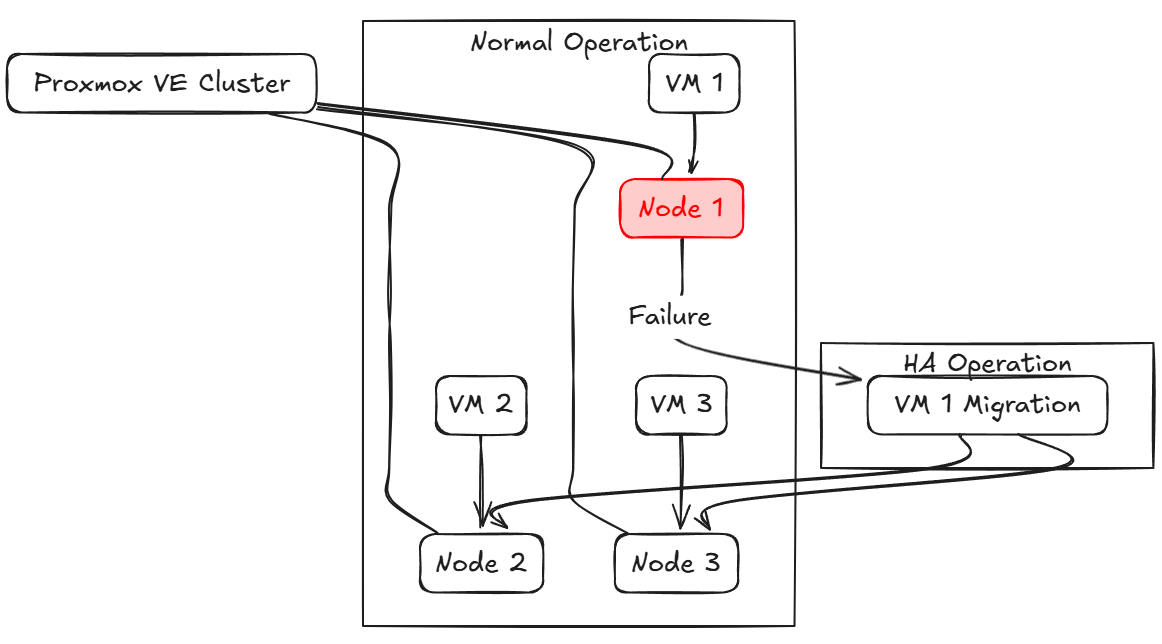
First of all, let’s talk about what Proxmox HA is exactly. With HA, it means that you have more than one cluster host in the Proxmox cluster that has some type of shared storage for your virtual machines between them. If one of the cluster hosts goes down unexpectedly, the VMs configured with HA will be brought up on a healthy host left in the cluster.
Also, this gives you the ability to proactively take Proxmox nodes down for maintenance and patching when needed as well. This is great as it means we no longer have to have maintenance windows outside of business hours to patch the underlying hosts. We can do this without anyone even noticing.
Helps even in a home lab
Even in a home lab, you might be running services you don’t want to go offline, like Home Assistant, or your media server. You may also run a self-hosted Git server for your DevOps code or learning, or testing environments that must stay up during CI/CD runs.
If you have 3 mini PCs running in your HA cluster in Proxmox, if one of those fails, the VMs will be restarted over on either of the two healthy mini PCs.
Planning a Proxmox HA cluster
There are a few things that you need to be aware of and requirements that need to be met when you are planning your Proxmox HA cluster. Note the following:
- Three-node minimum: To maintain quorum and avoid split-brain, Proxmox recommends at least three cluster nodes. They do have a two-node cluster that can work with an external quorum device but 3 nodes is still the recommendation here.
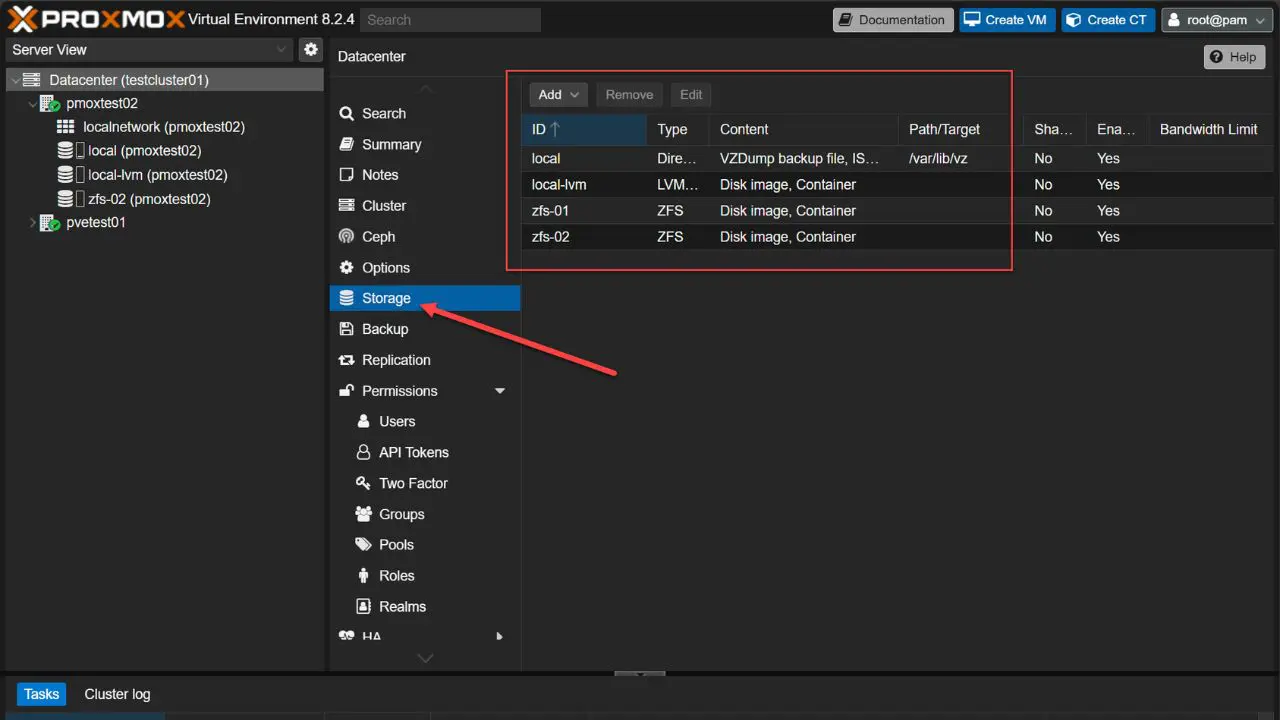
- Shared storage: HA relies on all nodes seeing the same underlying storage. You can use NFS, iSCSI, or Ceph HCI storage as shared storage that allows you to have an effective HA configuration for your cluster.
- Stable network for the corosync process: The Proxmox cluster communication (corosync) needs a reliable, low-latency network. Packet loss or high jitter can lead to node evictions or other unreliable cluster behavior.
- Time synchronized: Make sure all nodes run NTP (or chrony) against the same time server configuration. Time drift can break fencing and HA decisions.
With these basics out of the way, you are ready to dig into the do’s and don’ts.
What “To do” with Proxmox HA Clusters
Here are a few “dos” when it comes to configuring and setting up Proxmox HA clusters.
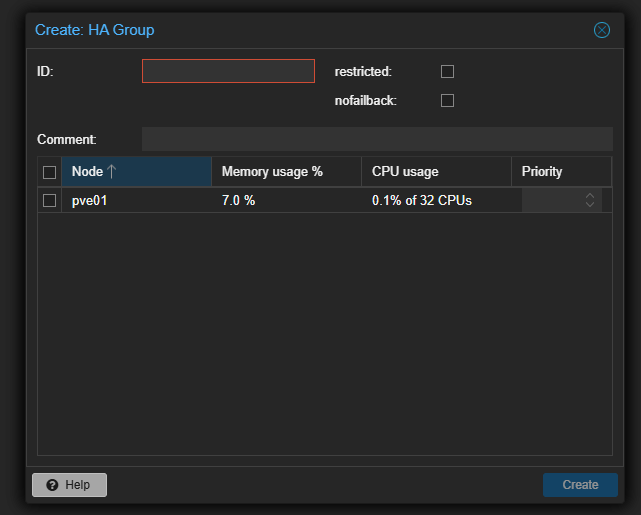
Organize VMs into HA groups and set priorities
First of all, what is an HA group? In Proxmox, an HA group is a collection of VMs or containers that share similar HA requirements. By assigning VMs to HA groups, you can do the following:
- Control startup order: Make sure that critical services like database servers always start before dependent VMs, like application servers
- Apply anti-affinity rules: Prevent two replicas of the same service from running on the same physical host—reducing risk of simultaneous failure.
- Set failover priorities: Define which VMs get resources first if multiple hosts fail simultaneously.
Best practice: Create groups like critical-core for your most important systems, and low-priority for non-essential test VMs. Then, in Datacenter → HA → Groups, you can assign each VM and configure the “Max Relocate” and “Order” fields to match your recovery plan.
Do configure fencing
Fencing is an odd term, but it means (“Shoot The Other Node In The Head”). It allows you to isolate or power off a failed node so it can’t corrupt shared data. Without it, two nodes might both believe they own a VM’s disks. This is really bad and can lead to split-brain and corrupted or lost data.
- All fencing configuration is under
/etc/pve/ha/and is managed by the fence-proxy service. In the GUI you’ll find it at Datacenter → HA → Fencing, and any changes are automatically pushed to every node Proxmox VE. - The cluster no longer uses
cluster.conffor fencing (that was only in Proxmox VE 3.x or other legacy versions).
1. Install fence agents
On each node, install the standard Debian package to get OCF fence agents:
apt update && apt install fence-agents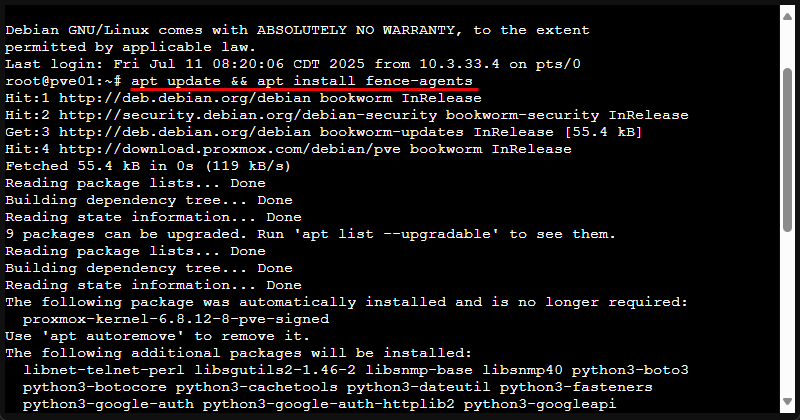
This provides agents like fence_ipmilan, fence_drac5, fence_apc, etc.
2. Add a fence device via GUI or API
- GUI: Go to Datacenter → HA → Fencing → Add, choose your agent, supply the IP address, credentials, and a friendly name.
- CLI/API:
pvesh create /nodes/<node>/fence \ --device agent=fence_ipmilan,lanplus=1,ipaddr=10.0.0.30,login=admin,passwd=secret,power_wait=10This writes your device into/etc/pve/ha/fence.cfgand this replicates it across the cluster.
3. Verify fencing mode
Open /etc/pve/datacenter.cfg (or view Datacenter → HA → Options) and confirm the fencing: setting—options are watchdog (default), hardware, or both. Hardware mode uses your configured fence devices.
4. Test your fence action
Always simulate a fence to ensure proper operation:
pvesh create /nodes/<node>/fenceWatch the target node power off (or reset) and check /var/log/syslog or use journalctl -u pve-ha-lrm to confirm the action succeeded.
Do integrate proactive monitoring
HA actions only complement your ability to detect problems. Proper monitoring can help to catch an issue before it escalates. Corosync partitions, storage latency spikes, or host hardware issues can cause issues, but can be monitored. Consider monitoring the following things in Proxmox:
- Corosync health: Number of cluster nodes, round-trip latency, packet loss
- Storage metrics: IOPS, read/write latency, network throughput to shared storage
- Host resources: CPU load, memory pressure, disk saturation
How to implement:
- Hook Proxmox’s built-in notifications to email or Slack.
- Use a tool like Prometheus + Node Exporter with Grafana dashboards focused on cluster and storage metrics.
- Configure alert thresholds (e.g., corosync latency >10 ms for >1 minute) to catch early signs of trouble.
Do schedule failovers to test
Automation only works if it’s been tested under real conditions. When is the last time you intentionally failed over? Run a test this way:
- Pick a maintenance window.
- In the Proxmox GUI or CLI, disable HA on one node or simulate a power failure
- Note your VM evacuation. Are they restarting on the other hosts?
- Check the HA log (
/var/log/pve-ha-manager.log) for errors or any other issues - Document any manual steps or problems you noticed
Do keep cluster software versions in sync
Corosync is the clustering services that runs Proxmox HA. It is sensitive to mismatched Proxmox versions. Even minor patches can change things that break communication. This can cause problems with failover or falsely trigger it.
- Plan your Proxmox upgrades so that you upgrade all nodes within the same maintenance window
- Keep a check on package versions (
apt list --installed pve-cluster corosync) before and after upgrades - Use a rolling upgrade approach – Do drain one node at a time, upgrade, make sure of your cluster health, then move to the next
Best practice I like to do: Maintain a change log that records upgrade dates, package versions, and any post-upgrade steps (e.g., restarting pve-ha-manager).
What “Not to” do with Proxmox HA
Keep the following “don’ts” in mind as you configure and manage your Proxmox HA cluster.
Don’t rely on flaky networks for cluster communication
Proxmox’s HA relies on corosync for heartbeat messages between nodes. If packets get dropped or delayed even for just a short time on a healthy node, these can cause unnecessary failover or node eviction. Here are things to avoid:
- Wireless or power-line adapters: This might be used in a home lab environment, but definitely don’t use wireless if you can avoid it
- Single network cable: A cut or bad port takes your corosync link offline instantly so definitely consider bonding
- Mixed speeds on a bond: Avoid combining 1 GbE and 2.5 GbE interfaces in the same bond. Slower links or mismatched links can cause weirdness.
Use at least two, identical, wired connections for corosync, and configure them in an active/backup bond so one failure never interrupts the cluster bus. Check out my post on Proxmox networking best practices here:
Don’t ignore your storage performance
During failover, VMs migrate live or restart on new hosts. Both of these can cause heavy read and write operations on your shared storage. Make sure your array isn’t saturated when VMs are restarted. A few things to watch out for that may indicate storage is a bottleneck:
- Live-migration hanging at 1%–5% for minutes
- “Timeout waiting for migration” errors in the HA log
- Latency spikes that trigger false node failures
Be sure to benchmark your storage solution with a tool like Fio. Target latency under 10 ms and throughput that exceeds your worst-case scenario (e.g., 5 simultaneous VM moves).
Don’t take nodes offline without adjusting quorum
Proxmox uses a majority-voting system (quorum) to know that cluster health is good. In a three-node cluster, losing two nodes at once drops quorum to 33%, forcing the remaining node to relinquish cluster control.
- Graceful maintenance: Use
pvecm expected 2or the GUI’s “Shutdown” action, which tells corosync you’re intentionally removing a node so it can adjust quorum. - External tie-breaker: In two-node clusters, configure a QDevice or a third “witness” server to maintain quorum if one node goes down.
Don’t overload hosts
If your healthy nodes are already at 90–100% CPU, RAM, or network utilization, they won’t be able to take on additional VMs or containers from a failed host. Be sure to plan for this headroom that would be needed to run workloads if a host has failed. Also you can do things like the following:
- Set HA limits: In the HA settings for each VM, define a “Max Relocate” count so only a safe number of VMs can move simultaneously.
- Set aside capacity as a buffer: Aim to run your cluster at no more than 70% overall load, leaving 30% in reserve for failover events.
You can use the “Resources → Summary” view in Proxmox to track cluster utilization and plan capacity upgrades before you hit critical thresholds.

Don’t skip log reviews after any HA event
When a failover happens even during corosync hiccups you can find clues in /var/log/pve-ha-manager.log and /var/log/syslog. Be sure to look at these files as you don’t want to miss repeated failures or misconfigurations that may be happening. There are several things to look for in there:
- Corosync split-brain warnings (“Heartbeat lost from node…”).
- Migration errors (“migration to node failed: timeout”).
Wrapping up
Definitely one of the strengths of running a virtualization cluster is the ability to configure high availability for your virtual machines and LXC containers. If you have a node fail, you don’t want to be dead in the water. You want to have a way to be able to have resiliency for your apps and workloads you are self-hosting in the home lab or apps you are running in production. As with anything, there are dos and don’ts when running Proxmox VE Server HA to be aware of. Hopefully this checklist of sorts will help key in on important areas to key an eye on.
Google is updating how articles are shown. Don’t miss our leading home lab and tech content, written by humans, by setting Virtualization Howto as a preferred source.
About The Author