If you are an administrator with a few, hundreds, or even thousands of computers and users, the beauty of group policy is a central point of managing your environment. One of the headaches that we have as administrators is managing settings in Internet Explorer. If you need to add settings, websites, etc, to Internet Explorer, then group policy is definitely your friend.
A typical need for group policy when it comes to Internet Explorer is adding websites to different zones which determines how IE handles the webpage either locking things down or allowing certain things to run such as Active X, etc. A great key to look at in Group Policy is the “Site to Zone Assignment List” GP setting found under either your User Configuration or under your Computer Configuration settings in GP.

When you enter into this setting you will see the following configuration screen:

So the documentation provided with the setting help is as follows:
This policy setting allows you to manage a list of sites that you want to associate with a particular security zone. These zone numbers have associated security settings that apply to all of the sites in the zone.Internet Explorer has 4 security zones, numbered 1-4, and these are used by this policy setting to associate sites to zones. They are: (1) Intranet zone, (2) Trusted Sites zone, (3) Internet zone, and (4) Restricted Sites zone. Security settings can be set for each of these zones through other policy settings, and their default settings are: Trusted Sites zone (Low template), Intranet zone (Medium-Low template), Internet zone (Medium template), and Restricted Sites zone (High template). (The Local Machine zone and its locked down equivalent have special security settings that protect your local computer.)If you enable this policy setting, you can enter a list of sites and their related zone numbers. The association of a site with a zone will ensure that the security settings for the specified zone are applied to the site. For each entry that you add to the list, enter the following information:
Valuename – A host for an intranet site, or a fully qualified domain name for other sites. The valuename may also include a specific protocol. For example, if you enter https://www.contoso.com as the valuename, other protocols are not affected. If you enter just www.contoso.com, then all protocols are affected for that site, including http, https, ftp, and so on. The site may also be expressed as an IP address (e.g., 127.0.0.1) or range (e.g., 127.0.0.1-10). To avoid creating conflicting policies, do not include additional characters after the domain such as trailing slashes or URL path. For example, policy settings for www.contoso.com and www.contoso.com/mail would be treated as the same policy setting by Internet Explorer, and would therefore be in conflict.
Value – A number indicating the zone with which this site should be associated for security settings. The Internet Explorer zones described above are 1-4.
If you disable this policy setting, any such list is deleted and no site-to-zone assignments are permitted.
If this policy is not configured, users may choose their own site-to-zone assignments.
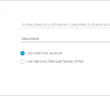
For the purposes of adding a site to the trusted sites tab, you would enable the policy on either the user or computer configuration setting depending on how you want to implement the policy and then click the “Show” button beside the “Enter the zone assignments here” option. You will see the following the screen:

Google is updating how articles are shown. Don’t miss our leading home lab and tech content, written by humans, by setting Virtualization Howto as a preferred source.
About The Author