



Many home labbers are starting to experiment with AI in the home lab and are using things like GPU passthrough on their Proxmox hosts. But passthrough is not just something for GPUs. You can do this for network adapters, storage controllers and other types of hardware in the home lab where you want the VM to have direct access to the hardware. For the longest time, I configured passthrough the way I think most of us do when we get started. I found the PCI address of the device on the Proxmox host. Then, I added that address directly to the VM and then completed the configuration. It works. Once I started thinking about passthrough from the perspective of an actual Proxmox cluster, though, Resource Mappings made a lot more sense. What are these and how are they setup?
PCI passthrough challenges
For a long while, as mentioned, I configured passthrough the way most of us do. The problem with this configuration is that it is tied to that particular piece of hardware on that specific Proxmox node.
So, something like this looks normal doing it this way:
hostpci0: 0000:01:00.0,pcie=1But 0000:01:00.0 does not really mean “my GPU”, but rather it means “the PCI device located that that specific address on the server.” This is important to realize, especially if you have more than on Proxmox server.
So let’s say that you have a GPU on pvehost01 and a GPU on pvehost02 and those devices are at different hardware addresses like the following:
- pvehost01 – 000:01:00.0
- pvehost02 – 000:03:00.0
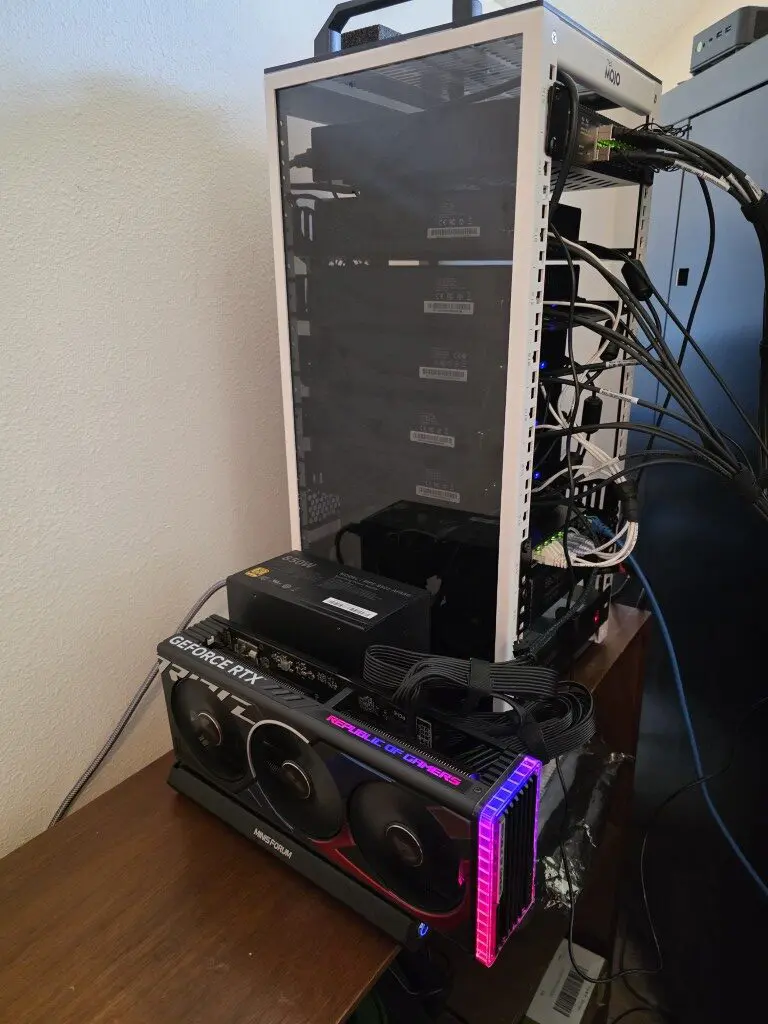
Below is a picture of my mini lab running Proxmox that has an eGPU configuration with Minisforum Deg2 dock. You can see my review of that unit here: I Added an eGPU to My Proxmox Mini PC Home Lab Using OCuLink (Here’s What Happened).
What are Resource Mappings?
If a VM with an ID VM100 has the PCI device passed through on pvehost01 and then the VM is moved to pvehost02, that hardware address no longer works on pvehost02 so this passthrough would fail. So what Resource Mappings allow you to do is setup a resource allocation for VM100 like:
hostpci0: mapping=AI-GPUThe AI-GPU Resource Mapping config then contains the details for the hardware addresses on each physical Proxmox host:
AI-GPU
pvehost01
  NVIDIA GPU
  PCI address: 01:00.0

pvehost02
  NVIDIA GPU
  PCI address: 03:00.0
This lets you remove some of the host configuration from the Proxmox VM config. So, instead of you telling the virtual machine exactly which PCI address to use, you can create a “logical resource” instead. You will have something like GPU, AI-GPU, HBA, or 10G-NIC. Then you tell Proxmox which physical device “address” provides that resource on each node.
What Proxmox Resource Mappings actually do
So in terms of technically what Proxmox resource mappings actually do, they create an “abstraction layer” between your virtual machine and a physical hypervisor host. So instead of you creating the low level PCI addresses and having these passed through to your VM like:
hostpci0: 0000:01:00.0,pcie=1You have that abstraction layer
hostpci0: mapping=AI-GPU,pcie=1This makes it where the VM doesn’t really need to know that the VM lives at that hardware address. It simply needs to call for the resource “AI-GPU” or whatever alias we have setup in the resource mappings.
Proxmox associates the mapping with the physical hardware on the nodes where the resource lives. This is a lot better model for a Proxmox cluster when you have devices that are passed through. Creating the passthrough to the actual hardware address means that you have essentially locked that VM to only be able to use that hardware on one host. Now you may only have one host with a GPU and this is fine. But if you have another host with a GPU, you can take advantage of the resource mapping and have both referenced.
Creating a Resource Mapping
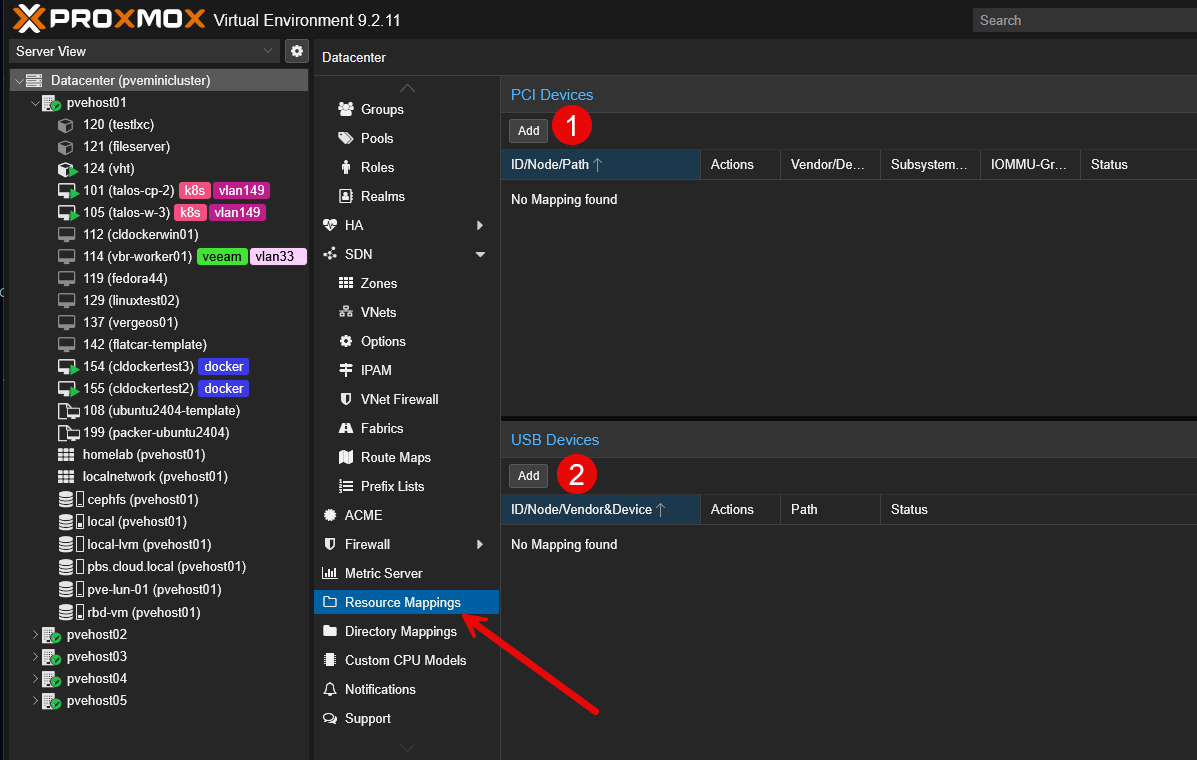
The resource mappings are exposed in the web UI of the Proxmox web interface under the Datacenter > Resource Mappings node menu. As you can see below, you can add PCI Devices and USB devices to the resource mappings which is cool.
The box that opens is the Create: PCI mapping box and here is where you select the device that you want to create the mapping on as well as the “Name” that will be referenced by the VM.
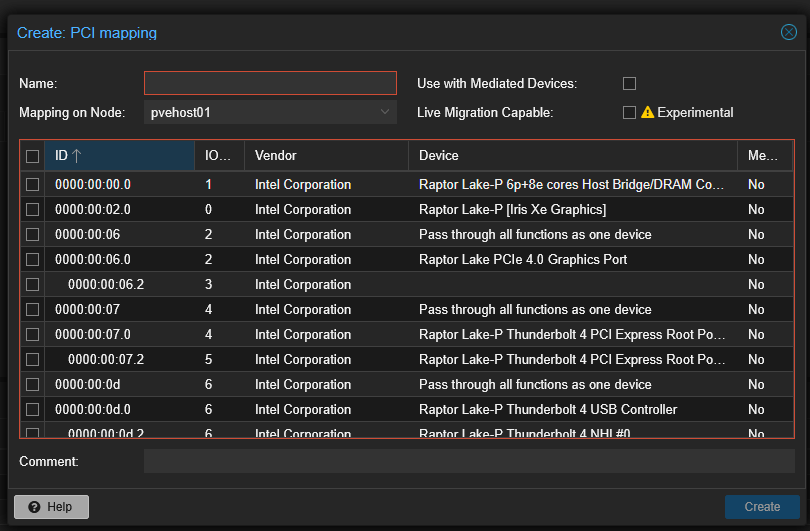
You may wonder what the checkbox is above for Live Migration Capable “Experimental” is exactly. I got excited seeing this, but it isn’t exactly what you think it is. But, it does go beyond simply mapping equivalent PCI hardware between nodes, especially for Proxmox high availability.
With supported hardware and drivers, Proxmox can potentially migrate the state of a passed through PCI device and the running VM connected to it and then reconnect the VM to the equivalent mapped device on the destination node.
What this is not though is an option you can check off and then it is able to migrate any GPU backed VM to another node. The device that is passed through and its driver have to support VFIO. So you need both hardware and driver support for this. And, it is “experimental” so that means your mileage may vary on this setting.
Adding the device to a virtual machine
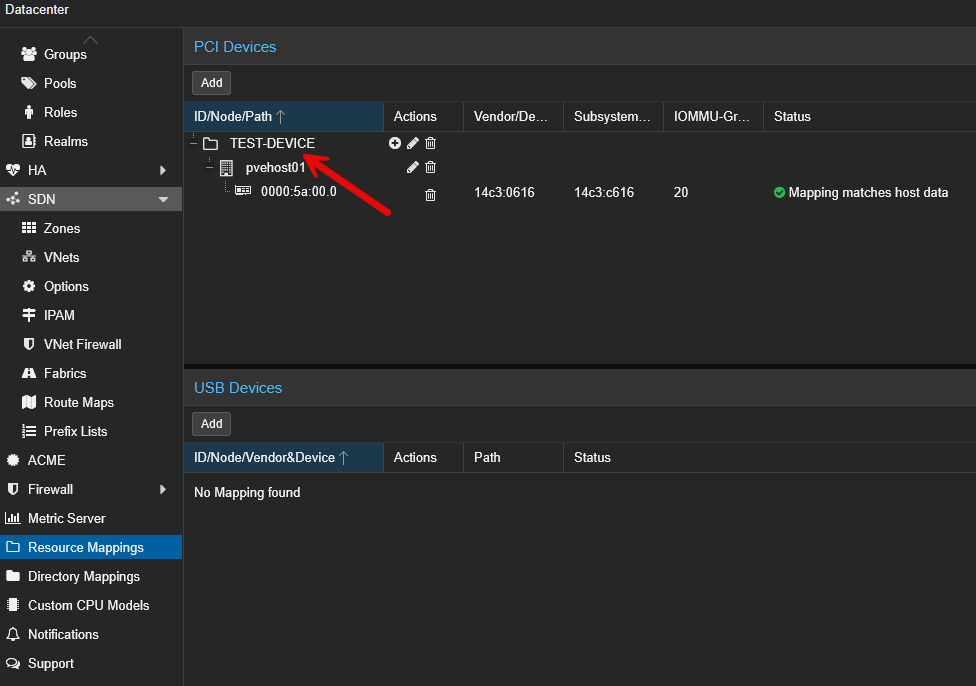
Below we see after choosing the Device to pass through and the Name we want to use, it is listed in the resource mappings:
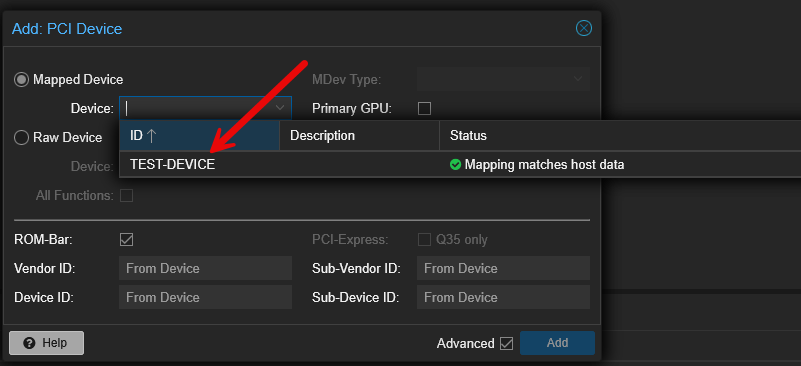
Once you have the resource mapping created, then when you go to Add > PCI Device to your VM, you will see it listed under the devices to be passed through. Notice the friendly name is now listed instead of the low-level device address.
I think we will continue to see these options under the resource mapping configuration evolve and become part of the foundation of how Proxmox deals with modern GPU management. But this is just worth mentioning.
Resource mappings make configs easier
This is a low-hanging fruit item benefit that you get with the resource mappings as well. Like me, you have probably looked at plenty of Proxmox VM configurations where you see something like:
hostpci0: 0000:03:00.0
hostpci1: 0000:04:00.0
Six months later, you don’t remember which device is which based on the resource identifiers. Then you are asking questions like: Was 03:00.0 the GPU or was it the NIC, or was 04:00.0 the 10 GbE NIC or the GPU?
Now, we can google and AI and learn which commands to run like lspci and find which card is which resource address, but this is labor intensive and cumbersome. But with the resource mappings, you can create names around the purpose of the hardware:
OLLAMA-GPU
WAN-NIC
HBA-TRUENAS
So, this allows you to turn this obscure hardware address that is not very intuitive into something that you can much more easily understand. Any area of your infrastructure that you can make more intuitive, you will benefit in time spent in management and administration.
Live migration is not enabled magically with resource mappings
We have already touched on this a bit, but this is a caveat that I want to make sure and spend a bit more time on. Resource mapping doesn’t make it where you can magically live migrate a VM to another Proxmox host while it is attached to a Resource Mapping.
Resource mappings are abstractions to that hardware address. The hardware only physically exists inside one server. So, just because you create a resource mapping, it doesn’t mean that you can just automatically live migrate the running VM from the physical GPU in node one to another node.
Also, the experimental feature that we looked at above does get us a little closer to this, but there are still all the caveats that apply. You have to have compatible hardware and drivers and this normally gets you out of the consumer grade GPU market and into enterprise grade hardware.
Troubleshooting commands to know and run
If you have a VM that does not start after moving from a raw PCI device over to a resource mapping, then you can run a few commands for troubleshooting. The first command that I would probably run is this one:
lspci -nn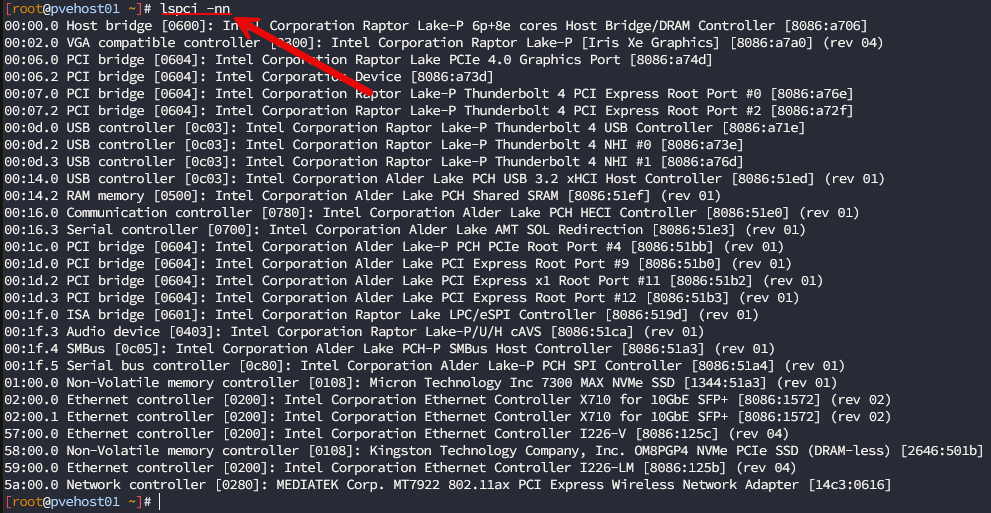
A few other things to check here include:
IOMMU:
dmesg | grep -Ei 'DMAR|IOMMU'Driver check:
lspci -nnk -s 01:00.0Also, you can check the mapping configuration:
/etc/pve/mapping/pci.cfgI also check the VM configuration which will show you devices configured:
qm config <VMID>So, what you would want to see with the VM configuration with your resource mapping is something like this:
hostpci0: mapping=AI-GPU,pcie=1General passthrough troubleshooting should include the normal suspects. What are those? IOMMU groups, VFIO binding, BIOS settings, device reset behavior, and making sure the host hasn’t claimed that process.
Below we are blacklisting drivers so that the Proxmox host won’t claim these.

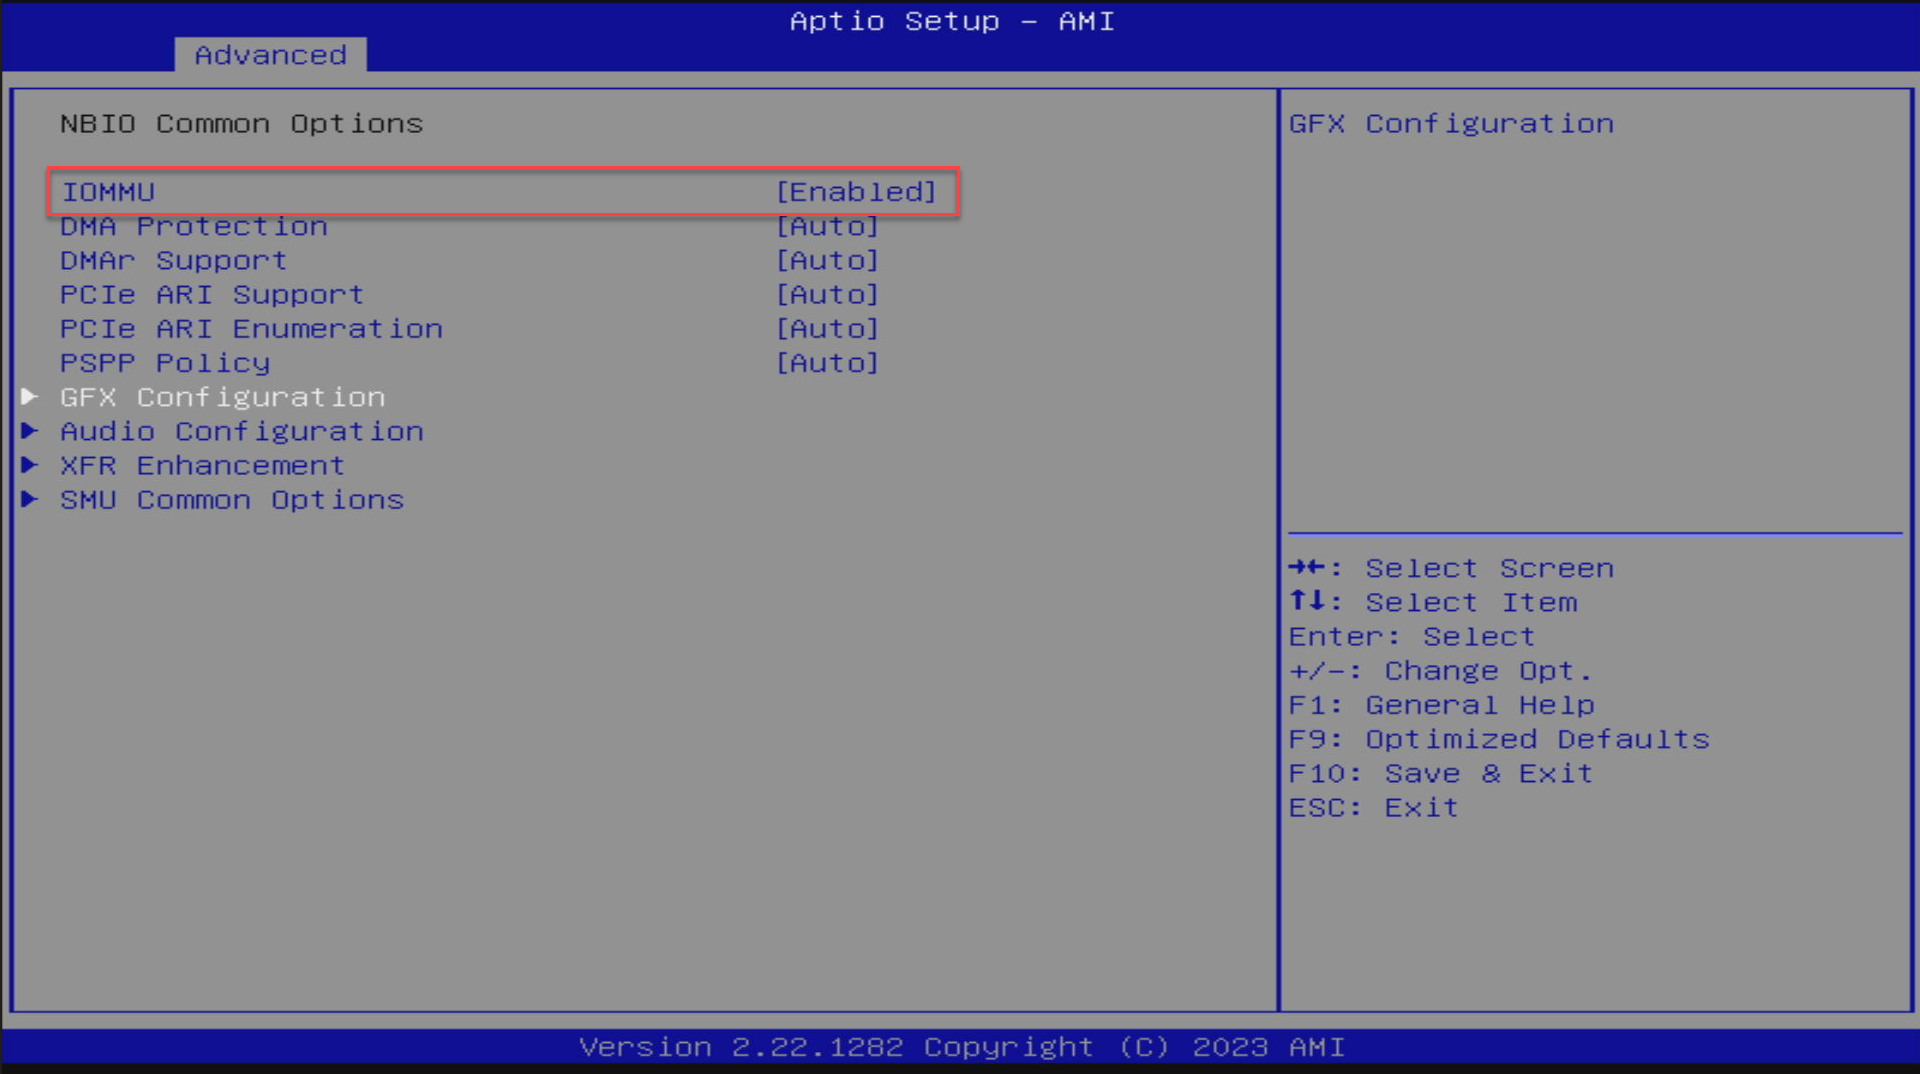
Also, in the BIOS, making sure IOMMU is enabled on the mini PC:
Wrapping up
PCI passthrough is the way we allow a virtual machine to have direct access to a GPU, NIC, HBA, or some other physical device attached to the Proxmox host. As we know, you can hard code PCI addresses for device passthrough and this definitely works. But it makes things very non-intuitive when it comes to hardware that is passed through. The Proxmox Resource Mapping feature is the better way to do this since they give you a logical resource that abstracts having to know that very low level hardware address. How about you? Are you using Resource Mappings in your home lab? Let me know in the comments.
More in this topic


Google is updating how articles are shown. Don’t miss our leading home lab and tech content, written by humans, by setting Virtualization Howto as a preferred source.
About The Author
