I am always looking at what I think might be the simplest way for ones to get into running a home lab. There are definitely simple ways to do it. However, I stumbled onto a solution the other day that I wanted to test out and see if this might be the simplest way to run a home lab. It is a solution called Wolfstack. It is pretty neat and allows you to have an easy path to running lots of popular services and get these spun up quickly and easily. Let’s look and see if this project is worth paying attention to especially if you are trying to simplify how you run infrastructure in the home lab.
What is Wolfstack?
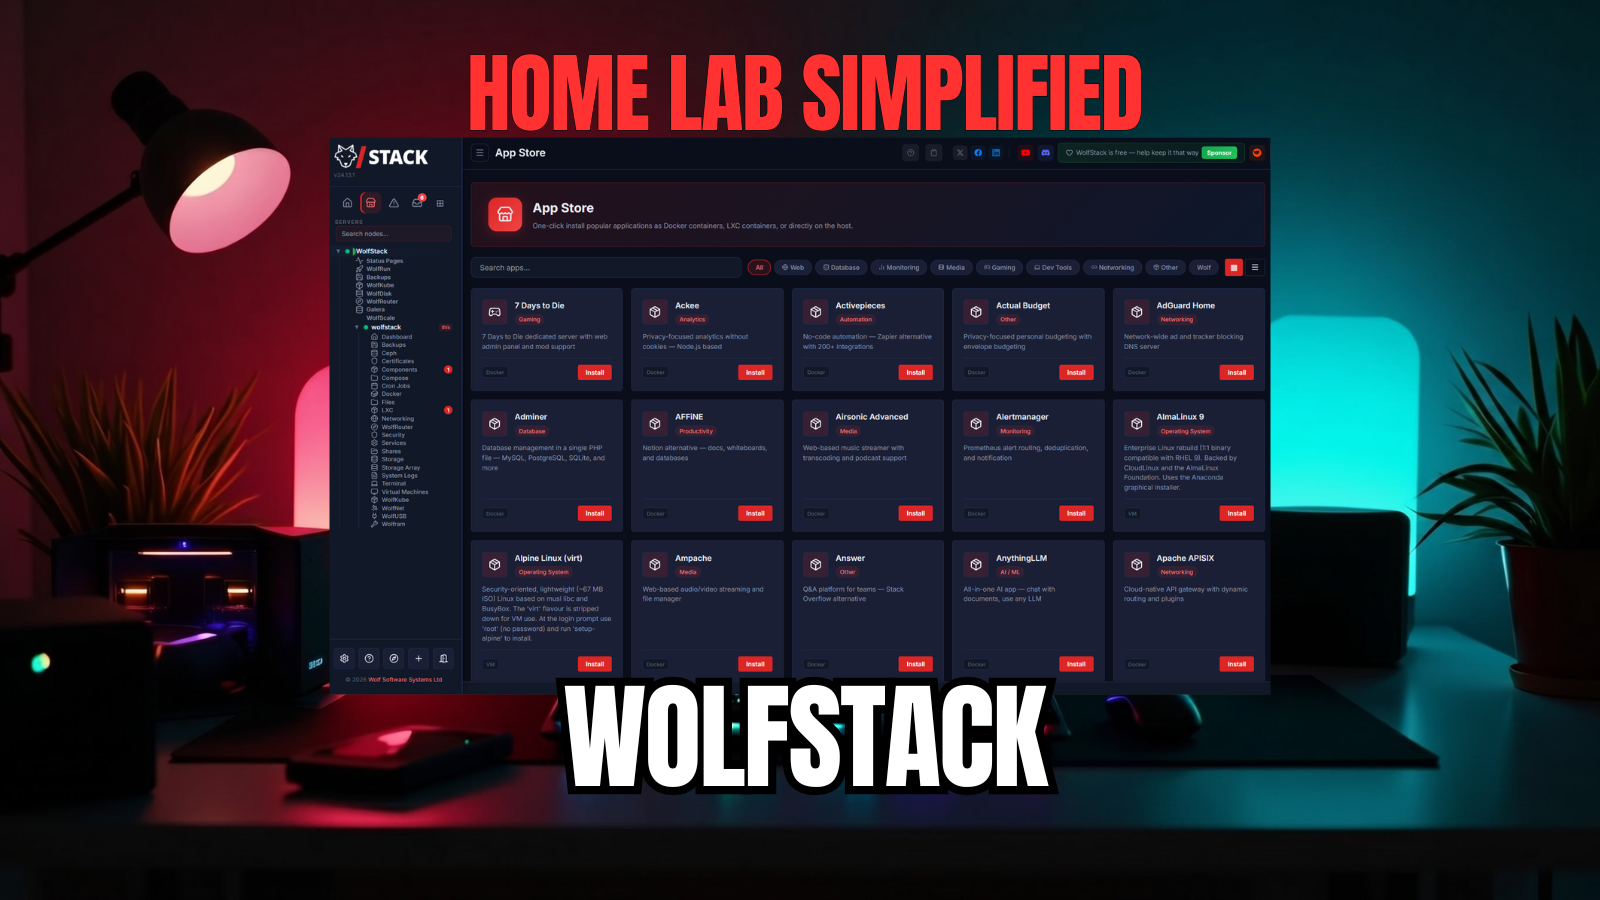
One of the simplest ways that I can describe WolfStack is this. It feels like someone looked at a modern home lab and asked: “What if we stopped gluing together ten different management tools?” Instead of installing separate platforms for managing things like containers, dashboards, status monitoring, automation, infrastructure visibility, and service management, what if we consolidate this into one platform? Out comes WolfStack.
WolfStack is designed around a single binary deployment model which is super simple and that was one of the main things that caught my attention to begin with. As someone who spends time deploying services in Docker, maintaining Kubernetes clusters, experimenting with automation pipelines, and spinning up infrastructure in Proxmox, I appreciate anything that lowers the barrier to entry, especially as a recommendation to those who are just getting started and looking for the easy path to successful self-hosting.
WolfStack is also not trying to replace the infrastructure you may already be running. For instance, if you are running Proxmox VE Server, it works with that as well.
The below is from the official getting started guide:
WolfStack is a control panel for your servers. It sits on top of the Linux machine you installed it on and gives you buttons for the things you’d otherwise type long commands to do:
- start and stop apps
- create containers and virtual machines
- take backups
- watch for problems
- open a terminal
That’s it. It doesn’t replace your server. It doesn’t lock you in. It’s a friendlier front door to a machine you already own.

One of the things with the architecture that I think will be appealing to many is that you don’t have an underlying database for WolfStack. You don’t need a container runtime requirement. You can install it on multiple platforms as well. These include:
- Ubuntu
- Debian
- Fedora
- RHEL
- openSUSE
- aRCH
- Proxmox VE
- Raspberry Pi
It is not a hypervisor replacement, or a replacements for Docker or Kubernetes. It works more like a management layer that sits above your infrastructure and attempts to make those systems easier to consume.
Components of WolfStack
There are several components of Wolfstack that allows it to use a peer-to-peer architecture. Each node connects to a database it manages and communicates with other WolfScale nodes for changes that are synchronized between them:
- Replication Engine – Reads binlog events and forwards to peers
- Peer Discovery – Auto-discovers nodes via WolfNet or manual configuration
- Load Balancer – Routes queries to healthy nodes
- Health Checker – Monitors node liveness and replication lag
- Conflict Resolver – Handles concurrent writes to the same rows
Can you run it along with Proxmox?
This is one of the questions that I had initially when looking at WolfStack is how do I use it alongside something like Proxmox VE Server that many are already using in the home lab? Well, according to the documentation, you can install WolfStack on each Proxmox node and it adopts what is already there, including your:
- VMs
- LXCs
- Storage
It then just adds Docker management, unified backups, networking, and a single dashboard for your cluster. I didn’t test out this method of installation to see how it interacts directly with Proxmox. But you cand read their official documentation of what you get with installing alongside Proxmox here: WolfStack alongside Kubernetes, Proxmox, and Docker. You can also run it alongside other tech stacks, like Kubernetes, bare-metal servers, Docker hosts, etc.
Where I tested WolfStack
In case you are wondering where I tested Wolfstack, I spun up an Ubuntu Server 26.04 VM to treat the WolfStack installation as a “bare metal” installation of course running inside a VM in Proxmox. For performance and other reasons, if you are serious about using WolfStack, this isn’t the way to run it. But, this is typically how I test out solutions like this.
I also ran the CPU in host mode to get the most realistic experience there performance wise that I could get running it inside a nested VM installation.
Installing WolfStack
You will like the installation steps for WolfStack as there is only one command that you will run, regardless of the platform. Note the following commands and my notes:
Some of the installation docs noted the following URL for installing the solution, but this didn’t work as it returns a web page instead of a script:
curl -sSL https://wolfstack.org/setup.sh | sudo bashInstead use this script location:
curl -sSL https://raw.githubusercontent.com/wolfsoftwaresystemsltd/WolfStack/master/setup.sh | sudo bash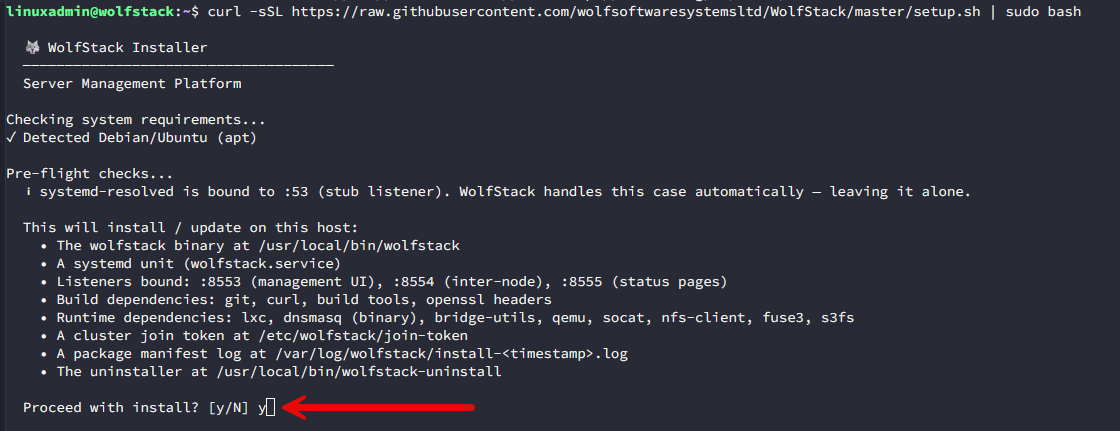
While you don’t have to install any dependencies, know there are a LOT of things that the installer will install as part of the installation process.
My first impression after spinning it up
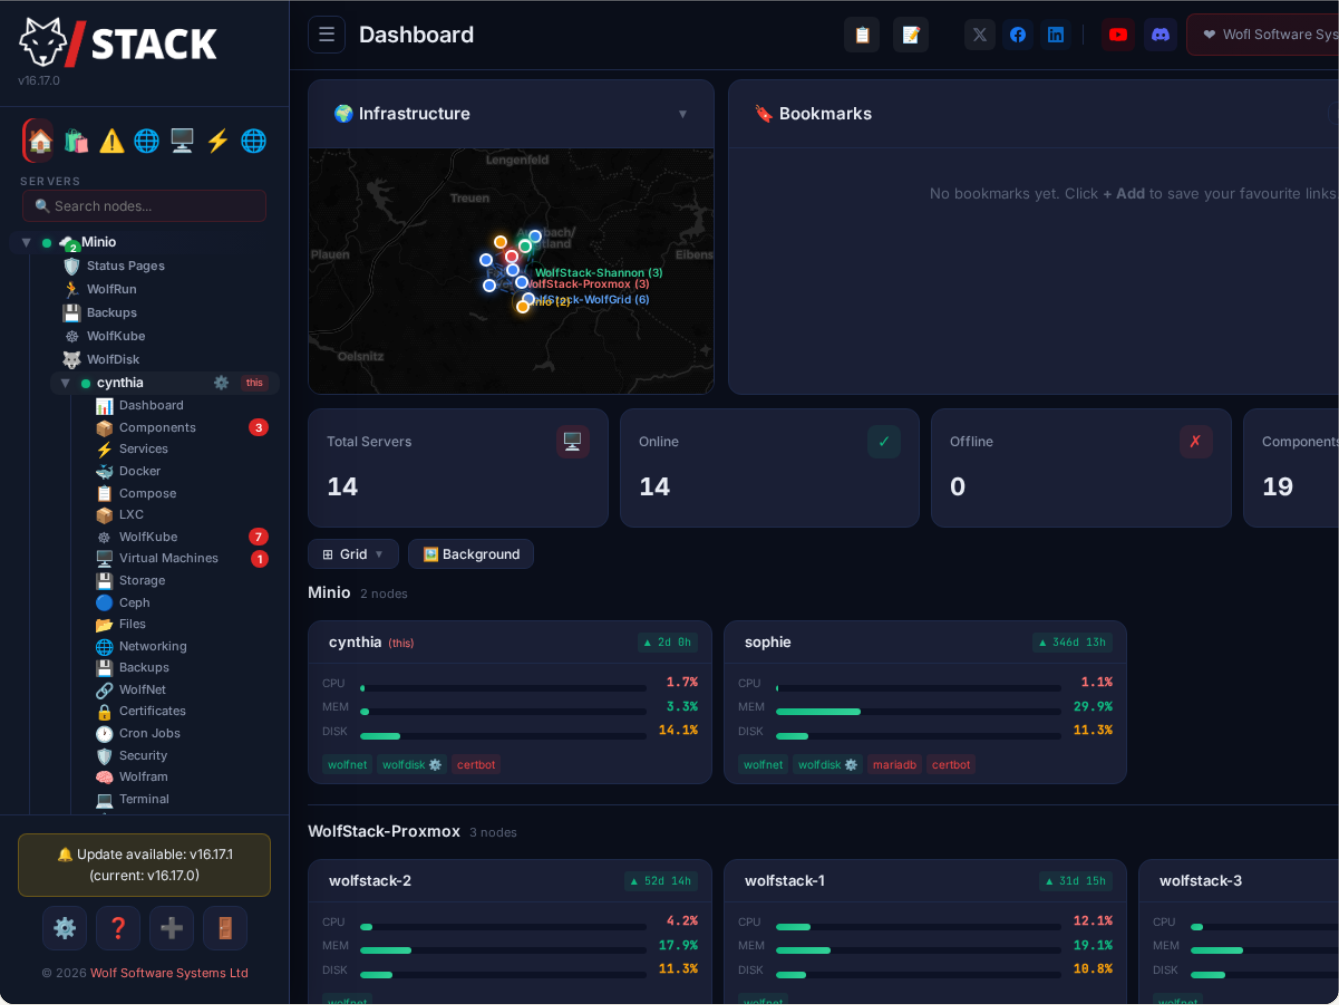
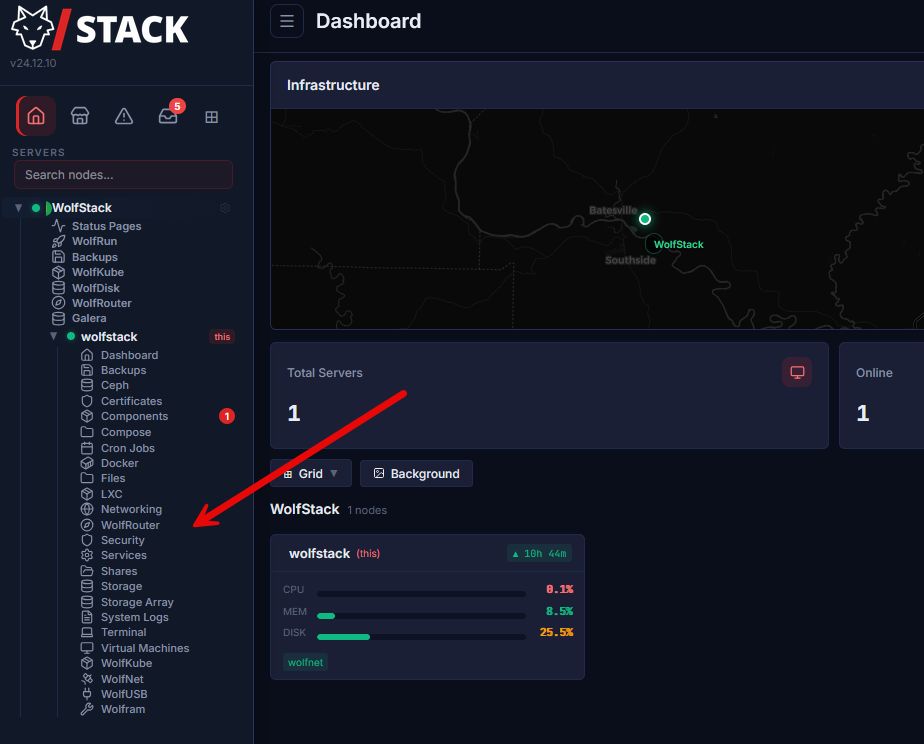
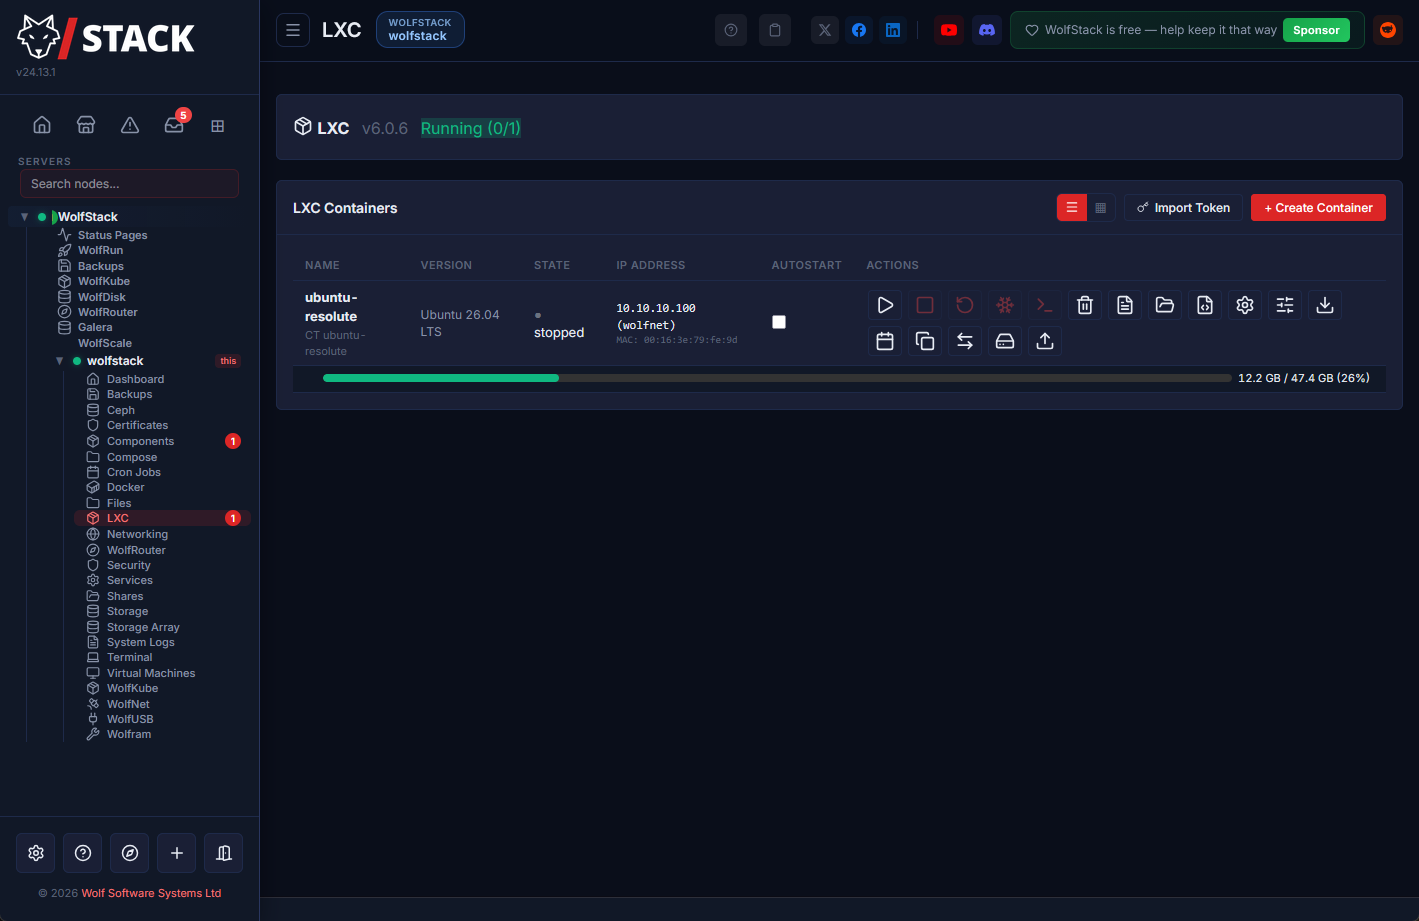
The first thing I noticed is how streamlined and put together everything is in the interface. You will see the WolfStack menu on the left-hand side with all of the options that you have available under the stack for creating home lab resources.
Below you can see after I expanded the “wolfstack” menu, you see all of the resources that are available in the WolfStack. You see everything listed that most will want to see:
- Ceph
- Certificate
- Components
- Compose
- Cron Jobs
- Docker
- Files
- LXC
- Networking
- WolfRouter
…etc tons of other things.
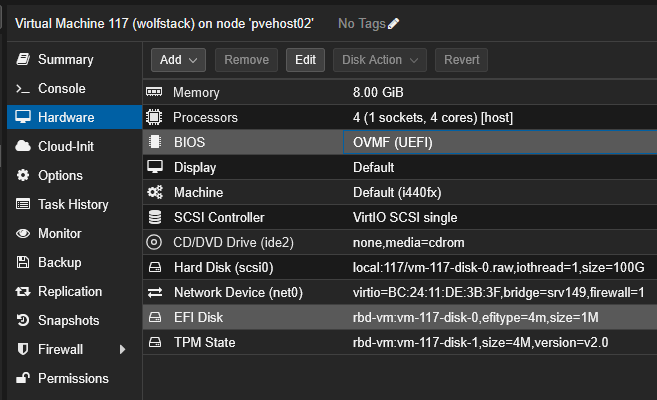
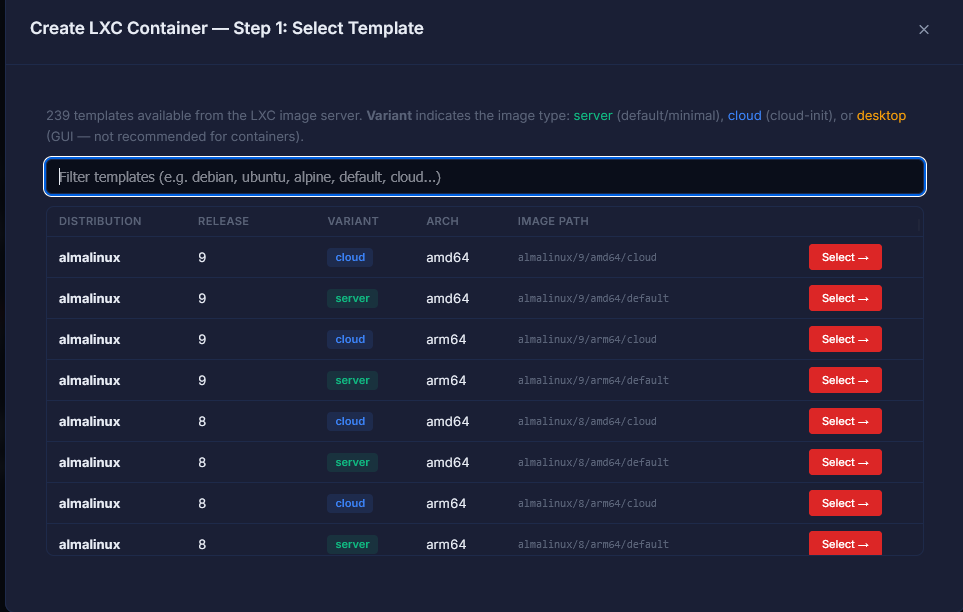
Below is me clicking through the workflow of creating a new container (LXC).
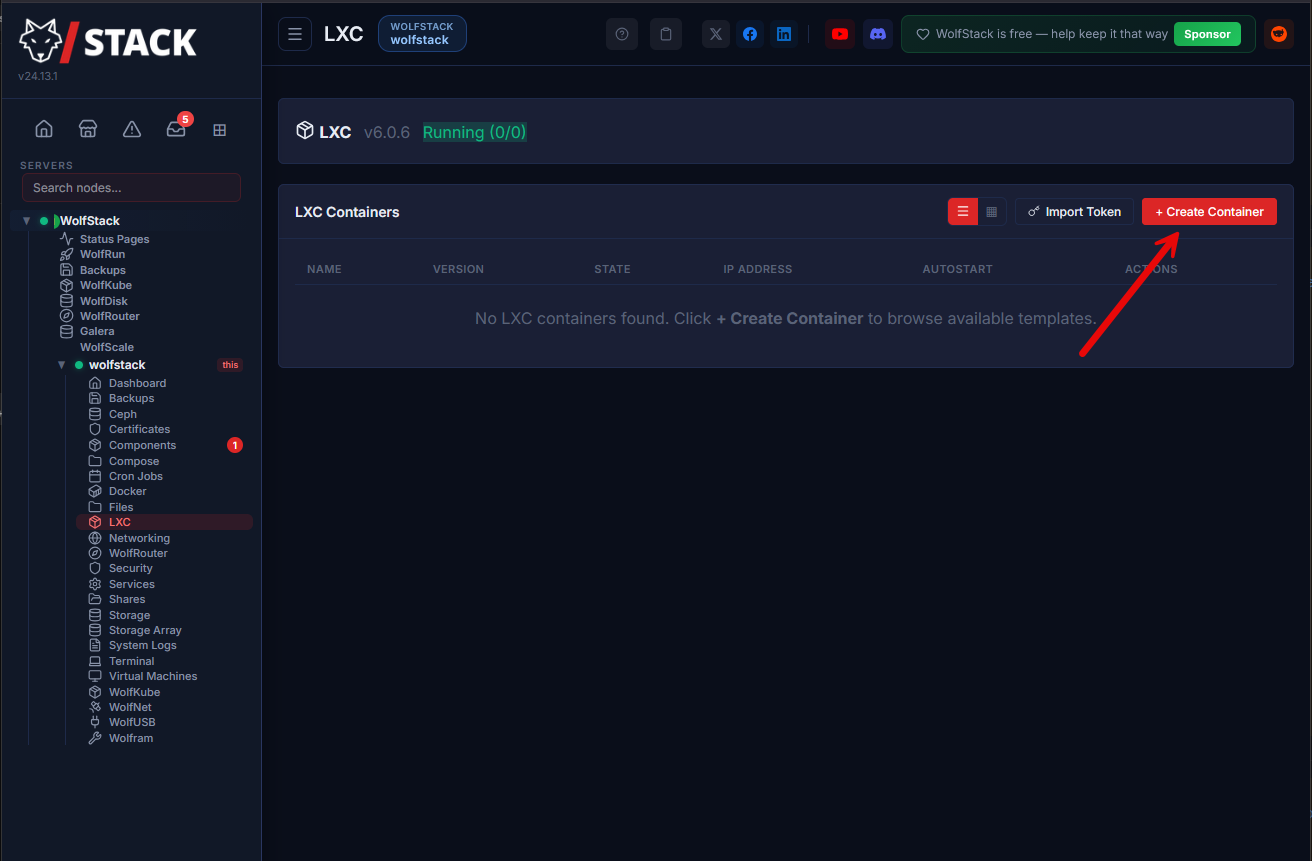
Like a Proxmox flow, you download the template you want to use.
Step 2 is configuring the container, you can see the settings, here.

Finally, the new LXC container is created successfully inside WolfStack.
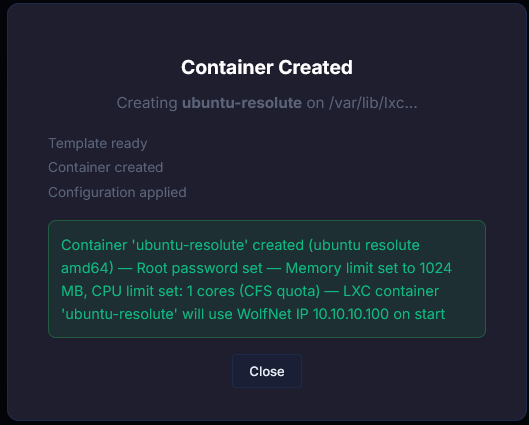
Here you can see the LXC container has been created and ready to start.
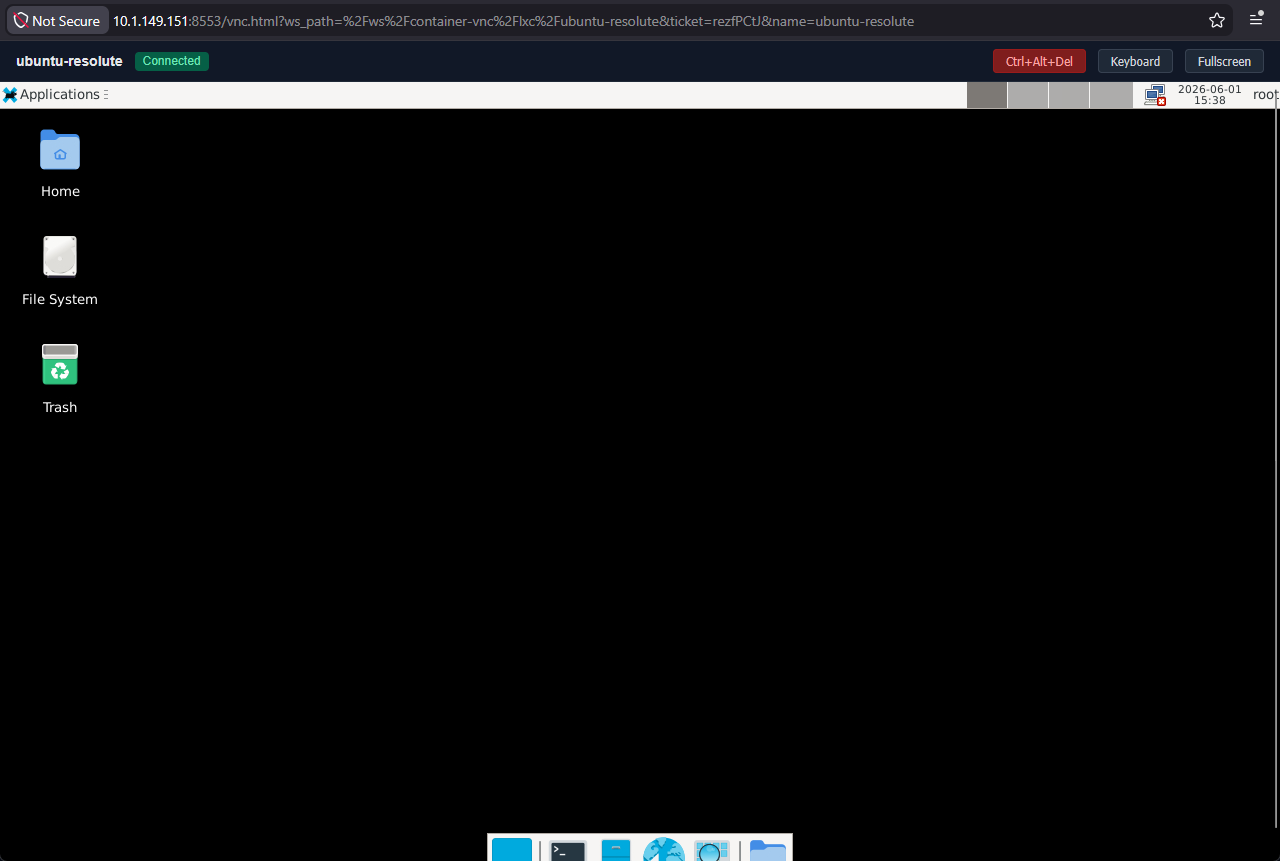
After starting the LXC container, the VNC plugin was installed and I could access the desktop of the Ubuntu 26.04 desktop.
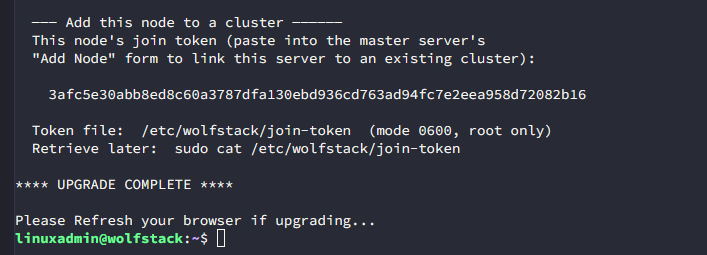
Multiple nodes and clustering
WolfStack is not just a “single-node” home lab platform like many other home lab OS’es. One of the cool things about it is that it can function as a cluster as well. You can see this as you install WolfScale on a node. You can see the node’s join token at the end of the install process.
CLI commands for Wolfstack
You can also operate things in a basic way from the CLI as well. Note the following commands that you can use in your testing. Run these on the machine where you are running WolfStack.
Start WolfScale:
wolfscale startGetting the status of WolfScale
wolfscale statusGetting the status of WolfScale peers:
wolfscale peersFailing over WolfScale:
wolfscale failoverWhere does Wolfstack fit best?
After spending time with it, like any tool out there, I do not think WolfStack is for everyone. But, I do think it has some real strengths when it comes to getting up and running with a home lab that you don’t want to piece together components and solutions to manage everything. I think also in beginner home labs, it has some real strengths:
- If someone is just starting and wants to avoid immediately assembling a giant collection of disconnected tools
- Instead of learning ten platforms at once, you get a more centralized experience
- You don’t have to be an expert configuring any one thing to get up and running
These strengths I think lower the barrier to entry when it comes to getting up and running with a home lab environment.
There are a few others as well that will benefit:
| Environment | Why WolfStack fits | Benefit |
|---|---|---|
| Small Proxmox environments | Centralizes management across a few VM and container hosts | Less interface switching and simpler operations |
| Docker-heavy labs | Helps manage growing numbers of containers and supporting services | Easier visibility and day-to-day container management |
| Overly complicated labs | Reduces dashboard sprawl and operational complexity | Less browser-tab chaos and lower management overhead |
Wrapping up
I went into testing WolfStack thinking this may just be another dashboard of sorts that wrapped around the tools that I was already using. I was pleasantly surprised though that this is a real viable solution for creating very robust home lab environments. In terms of management and the tech stack underneath, it works as a standalone solution or it can work alongside what you are already running like Proxmox, Kubernetes, or Docker. Is it perfect for everyone? I don’t think it is, but, this is no different than any other tool out there. Some use cases make better sense than others. If you like to work with the direct components and build out your home lab like we have always done, Wolfstack may not be the best fit there. But if you ware just getting started, or want something that is “push button” in the approach, it has a strong fit for those cases. What about you? have you used WolfStack before?
Google is updating how articles are shown. Don’t miss our leading home lab and tech content, written by humans, by setting Virtualization Howto as a preferred source.
About The Author


This looks interesting. I just spun up an Ubuntu VM in Proxmox to give this a spin.
Very nice Steve! I think you will like it. I couldn’t believe that I hadn’t heard of it before I did. It is a great project from the looks of it. Keep us posted on what you think about it 👍
Brandon
This 100% looks like AI vibe coded thing. Not intrested its the default frontend that Gemini gives you.
So the front end is coded with our CodeWolf AI that we developed over a few years and inject other AI’s but trust me this deals with massive amounts of complex networking storage and more. So it’s a mixture.
Doesn’t look like it’s compatible with XCP-ng servers. I would love to have a unified interface for Proxmox AND XCP-ng, instead of having to run a separate Debian VM just for Xen Orchestra, whose interface is still in a childlike phase. I wish I could fully migrate to Proxmox, but I have machines on which it flat out refuses to either install at all, or to run properly. So I am stuck with running both.
Mike,
Great to note on the XCP-ng front. Which solutions are you running that won’t run in Proxmox out of curiosity?
Brandon
What’s great? I think you misread my comment. Proxmox is the thing that won’t run, on some of my hardware.
So we are working on XCP-ng compatibility, funnily enough. That should be out soon.
Try Dockhand [ https://dockhand.pro and https://github.com/Finsys/dockhand ] if you really want to centralize Administering a Dockerized Home Lab environment