There is a good chance that if you are running Proxmox VE Server in your home lab today, you feel pretty good about your backup solution. Most are running Proxmox Backup Server which is a great solution and is totally free to run. You probably feel good about the fact that your virtual machines are protected and your containers are as well. The problem is that most of us stop here. I know I did for a long while running Proxmox in the home lab. However, there is an aspect of your Proxmox disaster recovery you aren’t protecting. That is the Proxmox environment itself, including the Proxmox VE Server hosts and Proxmox Backup Server.
A false sense of security when unprotected on the host side
When people talk about “backups” they are almost 99% of the time talking about virtual machines and containers with their Proxmox disaster recovery strategy. This makes sense as this is where your services live, applications, and critical data. But Proxmox is more than just a hypervisor that runs those workloads. Over time, your Proxmox hosts include tweaked configs, custom networking settings, storage layouts, cluster configurations, permissions, certificates, and automation just to name a few of those.
None of these live inside your virtual machine backups obviously. If your Proxmox host fails and you reinstall the OS with Proxmox, you are not restoring your environment. You would be rebuilding things from scratch with all of those tweaks, and tuning, configurations, etc.
Think about these scenarios:
- A boot drive dies unexpectedly
- A host refuses to boot after an update
- You replace hardware and reinstall Proxmox
- A cluster node needs to be rebuilt
- Your Proxmox Backup Server itself goes down
I don’t know about you, but that doesn’t sound fun at all. We need a better way to protect our Proxmox hosts and Proxmox Backup Server environments.
Why Proxmox Backup Server (PBS) is not the whole answer
Proxmox Backup Server (PBS) is a great Proxmox diaster recovery solution that is readily available for free and is what most are using for protecting their Proxmox environments. But, as good as it is, it wasn’t meant to protect the Proxmox Server itself. And, it can’t protect itself either!
That means things like the following go unprotected when you are just protecting your virtual machines and LXC containers.
- The Proxmox configuration directories
- Cluster and corosync configuration
- Network and storage definitions
- Authentication and permissions
- PBS configuration and settings
These pieces are critical to recovery and they are almost always forgotten about. This is also not specific to Proxmox environments. This is also the case in VMware environments I have been in as well. Folks think about the VMs, but not their host configurations. Most people rely on memory, notes, or hope that they never need to rebuild their hosts. But it happens!
Enter ProxSave
ProxSave is a community-developed solution that exists to solve this problem exactly. So, instead of backup VMs (as we already have that covered with PBS or another solution, Veeam, etc), it focuses on protecting the directories and config files that are critical to your Proxmox VE and Proxmox Backup Server systems. Also, it is free, open source, and purpose-built for Proxmox.
So, it does not replace Proxmox Backup Server. It complements it and helps to round out your disaster recovery solution for your Proxmox environment and production critical workloads.
What does it backup? Take note of the following key components that ProxSave allows you to protect:
Proxmox VE (PVE)
- Cluster configuration that includes corosync and cluster database
- Virtual machine and container configuration files
- Proxmox settings such as firewall rules, jobs, schedules, and ACLs
- Metadata about defined storages and backup targets
Proxmox Backup Server (PBS)
- Core PBS configuration under /etc/proxmox-backup
- Datastore definitions and backup schedules
- User accounts, roles, and access control rules
- Optional metadata reports for PXAR backups
System Level Configuration
- Network configuration that includes interfaces and DNS
- SSL certificates and custom certificate authorities
- SSH host keys and authorized keys
- Cron jobs and systemd service units
- ZFS pool and dataset configuration if these are enabled
- Script directories such as /usr/local/bin and /usr/local/sbin
- Optional collection of root and home directory files
- Any additional custom paths you want to add in there
Backup and Datastore Metadata (Optional)
- Metadata reports for backup files stored on Proxmox VE
- Optionally includes some of the small backup artifacts below a defined size
- PXAR backup metadata from PBS datastores without copying full backups
These are the pieces that are hardest to recreate under pressure, when things are down and you need to get a Proxmox VE Server host back up and running quickly.
Notifications
One of the strengths I think with ProxSave is the notification support it offers. The options are robust and range from traditional email alerting to modern webhooks.
- Telegram
- Gotify
- Webhooks
Installing ProxSave and running a backup
There are a few methods to install ProxSave, but the easiest is just running the installer script. You can do that with the following command:
bash -c "$(curl -fsSL https://raw.githubusercontent.com/tis24dev/proxsave/main/install.sh)"After you run the script above, you will be presented with a TUI environment of sorts that steps you through configuring the tool. Also, I didn’t pay attention at first, but these screens allow mouse clicks which allows you to navigate with a mouse through the setup.
As you can see below, there are several options to configure:
- Enable Secondary Storage
- Secondary backup path
- Secondary Log Path
- Enable Cloud Storage (rclone)
- Rclone Backup Remote
- Rclone Log Remote
- Backup Firewall Rules (iptables/nftables)
- Notifications
- Enable Telegram notifications
- Enable Email notifications
- Cron time (HH:MM)
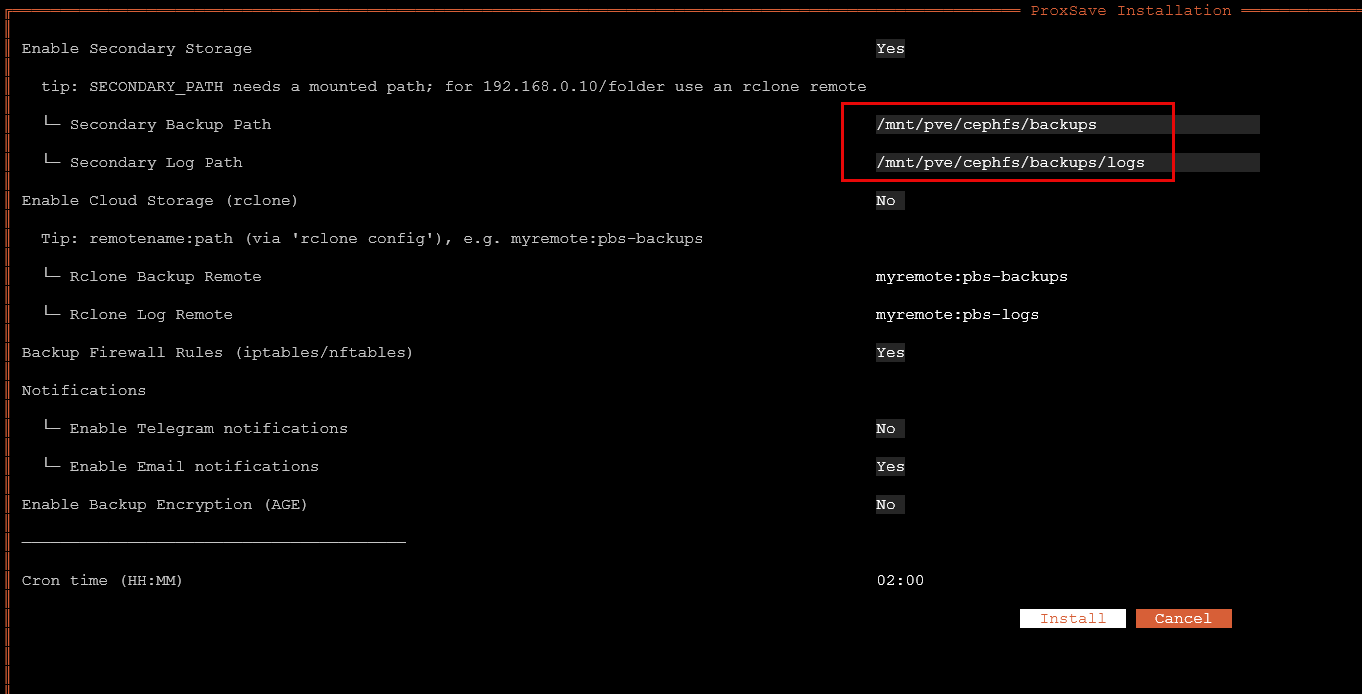
You may wonder where the primary backup location is? This is located at:
/opt/proxsave/backup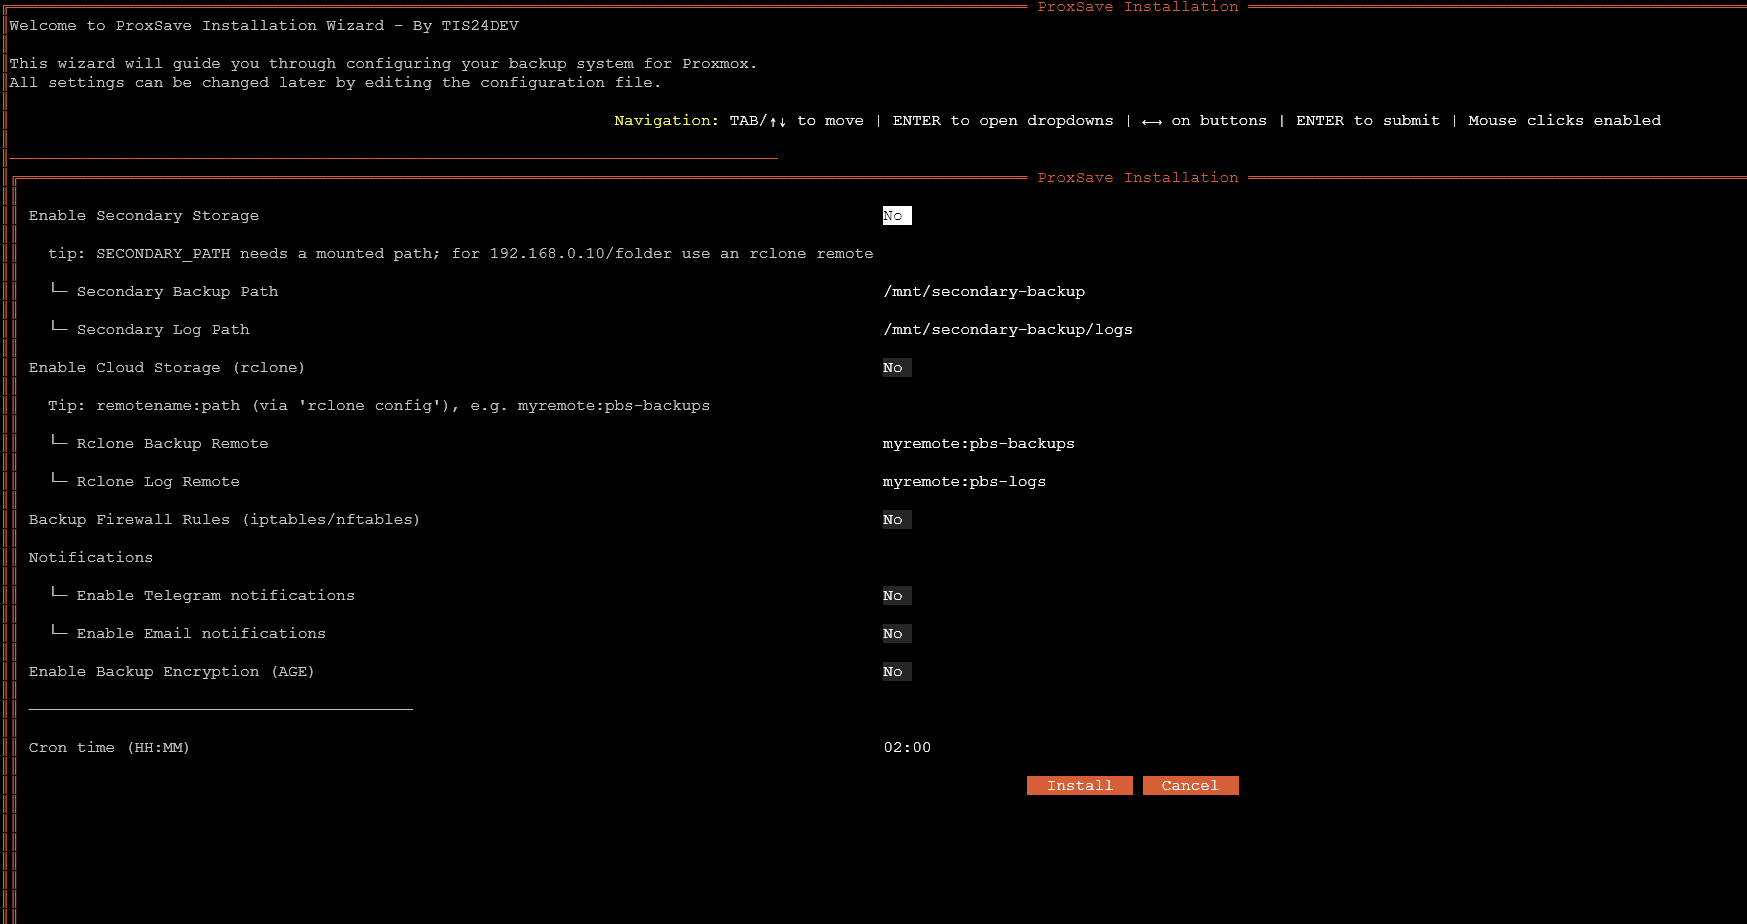
Here I configured a secondary location targeting my /mnt/pve/cephfs/ directory which is of course a CephFS file system volume that spans all of my Proxmox cluster nodes protected by Ceph. So this is a great place to store since the data is replicated across the environment.
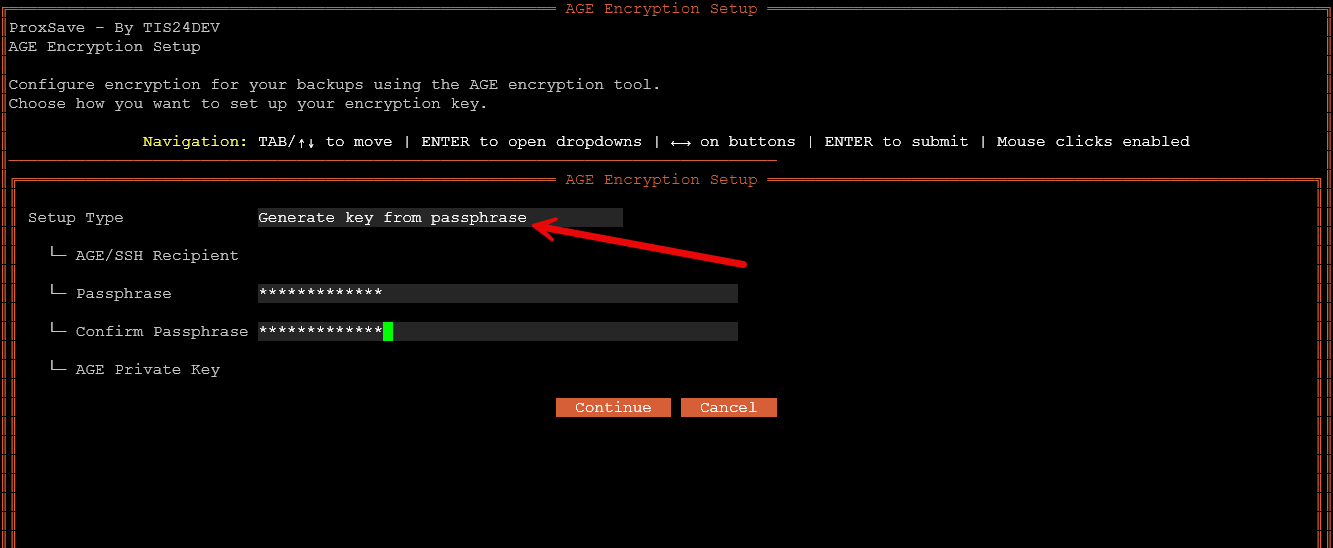
If you choose to encrypt your backup, you can use an existing key for AGE encryption, or you can generate a key from passphrase which is what I am doing below:
Running a backup
To run your first backup, just type proxsave and the command line. You will see the process of the backup begin.
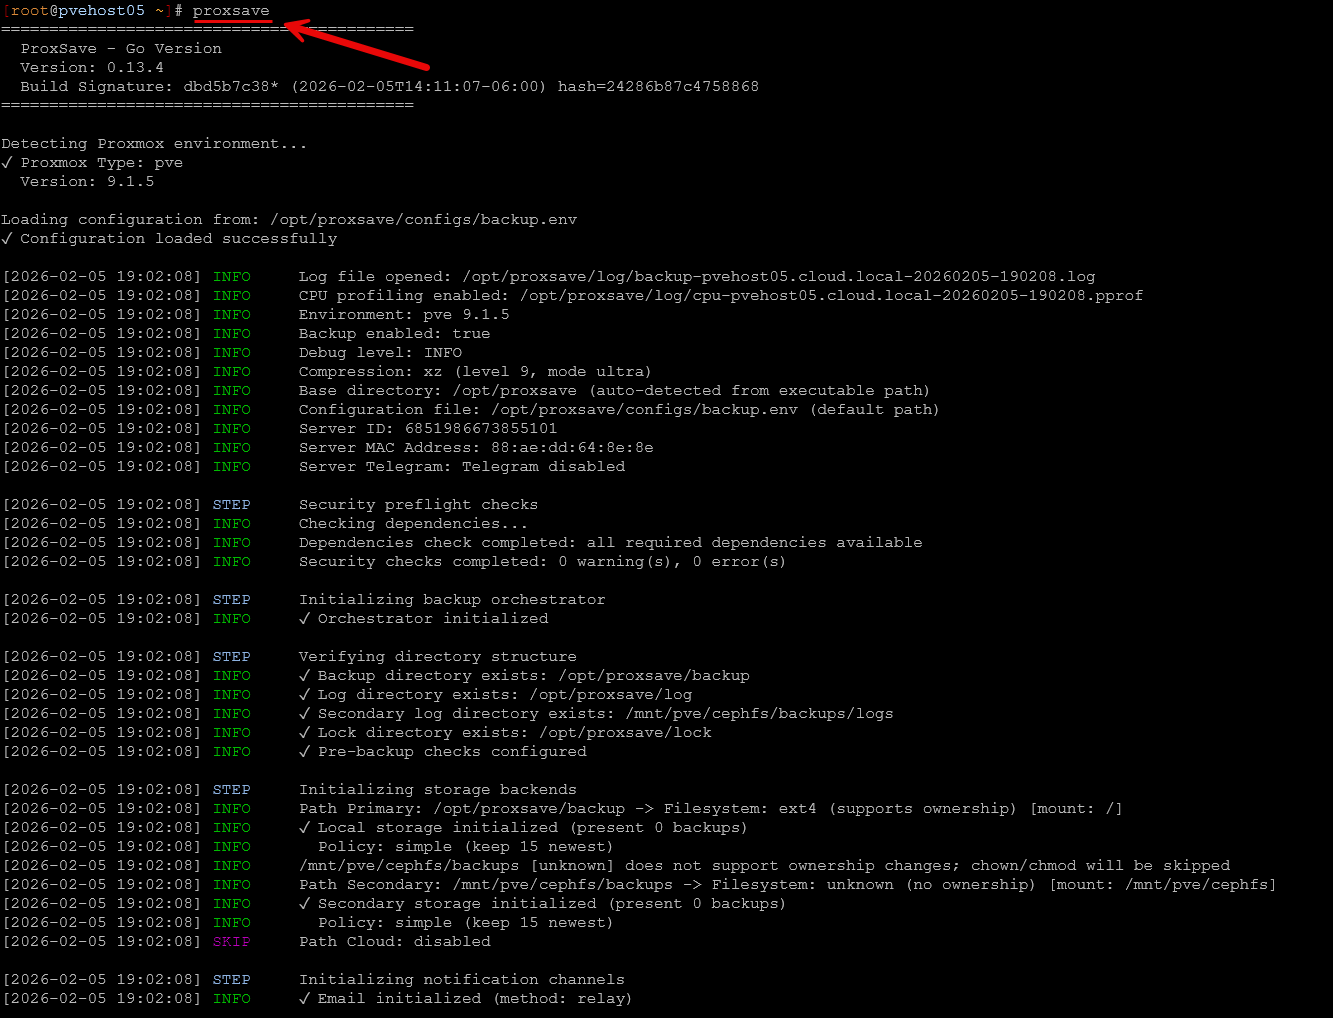
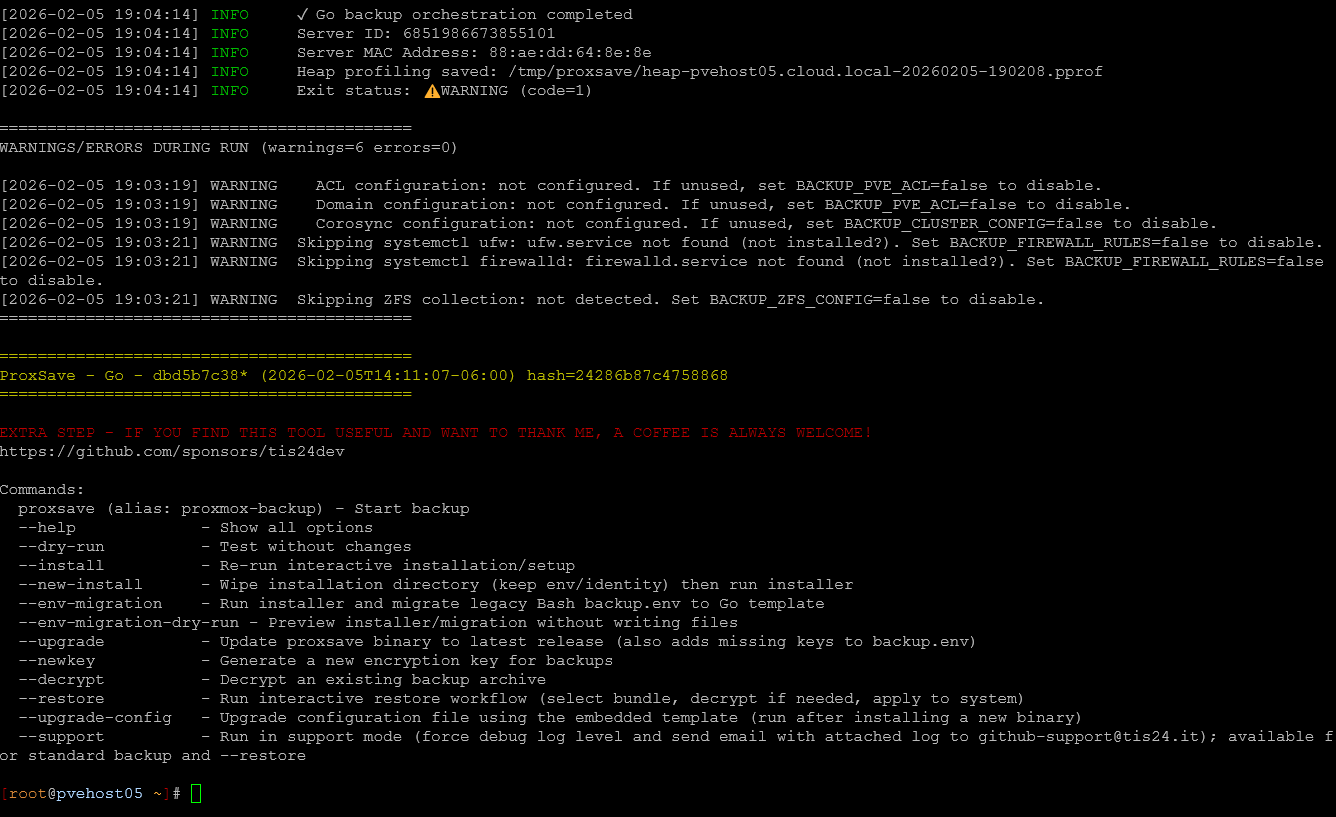
Below is another screenshot as the process was ending and you can see the results of the backup.
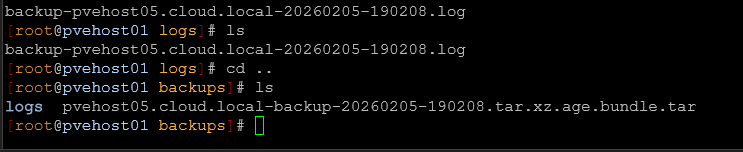
On another node with the CephFS mount, I navigated to my secondary backup location and checked to see that files were generated, which they were. Logs as well.
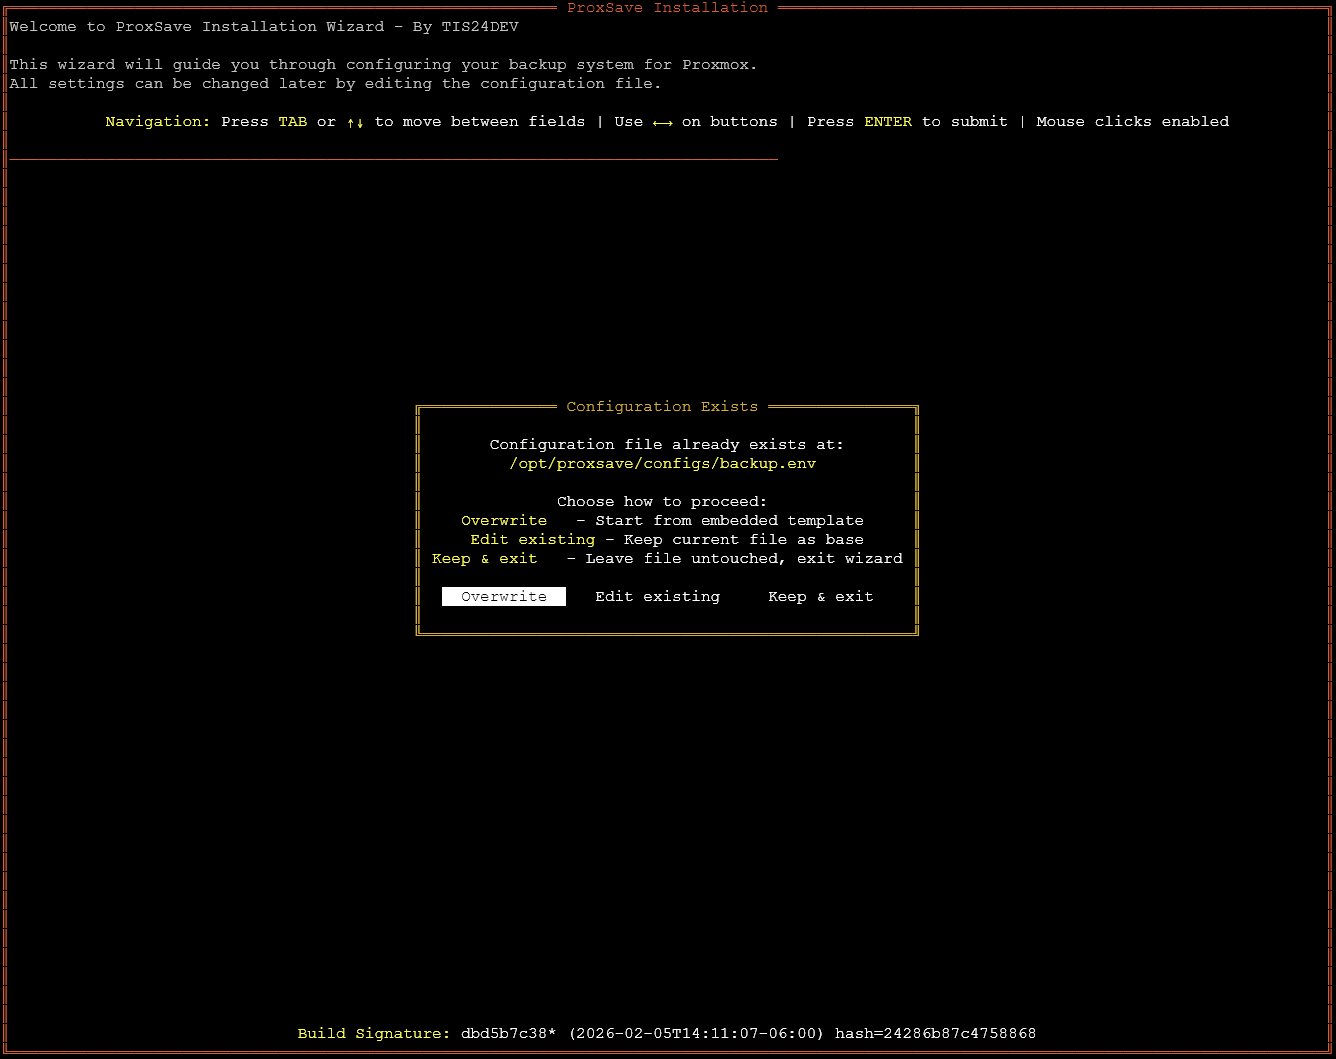
At any point if you want to reconfigure ProxSave, you can run:
proxsave --installThis will give you a screen that looks like the below. You can Overwrite, Edit existing, or Keep & exit. One thing I noticed with my install is that when I chose Edit existing, it didn’t see to show my existing configuration correctly. This may be a bug or something I missed here on the screen.
ProxSave options
Here are the full list of options when you look at the help on the proxsave command:
ProxSave

Options:
  -age-newkey
        Alias for --newkey
  -c value
        Path to configuration file (shorthand) (default ./configs/backup.env)
  -cleanup-guards
        Cleanup ProxSave guard bind mounts and directories (/var/lib/proxsave/guards). Use with --dry-run to preview
  -cli
        Use CLI prompts instead of TUI for interactive workflows (works with --install/--new-install/--newkey/--decrypt/--restore)
  -config value
        Path to configuration file (default ./configs/backup.env)
  -decrypt
        Run the decrypt workflow (converts encrypted bundles into plaintext bundles)
  -dry-run
        Perform a dry run without making actual changes
  -env-migration
        Run the installer and migrate a legacy Bash backup.env to the Go template
  -env-migration-dry-run
        Preview the installer + legacy env migration without writing files
  -h    Show help message (shorthand)
  -help
        Show help message
  -install
        Run the interactive installer (generate/configure backup.env)
  -l string
        Log level (shorthand)
  -log-level string
        Log level (debug|info|warning|error|critical)
  -n    Perform a dry run (shorthand)
  -new-install
        Reset the installation directory (preserving env/identity) and launch the interactive installer
  -newkey
        Reset AGE recipients and run the interactive setup (interactive mode only)
  -old-env string
        Path to the legacy Bash backup.env used during --env-migration
  -restore
        Run the restore workflow (select bundle, optionally decrypt, apply to system)
  -support
        Run in support mode (force debug log level and send a support email with the attached log to [email protected]). Available for the standard backup run and --restore
  -upgrade
        Download and install the latest ProxSave binary (also upgrades backup.env by adding missing keys from the new template)
  -upgrade-config
        Upgrade configuration file using the embedded template (adds missing keys, preserves existing and custom keys)
  -upgrade-config-dry-run
        Plan configuration upgrade using the embedded template without modifying the file (reports missing and custom keys)
  -upgrade-config-json
        Upgrade configuration file using the embedded template and print JSON summary to stdout (for internal use by --upgrade)
  -v    Show version information (shorthand)
  -version
        Show version information
ProxSave restore
Now, let’s look at the ProxSave restore workflow. This is a really intuitive process, again with a TUI and mouse driven input if you choose. Run the following command to start the ProxSave restore workflow:
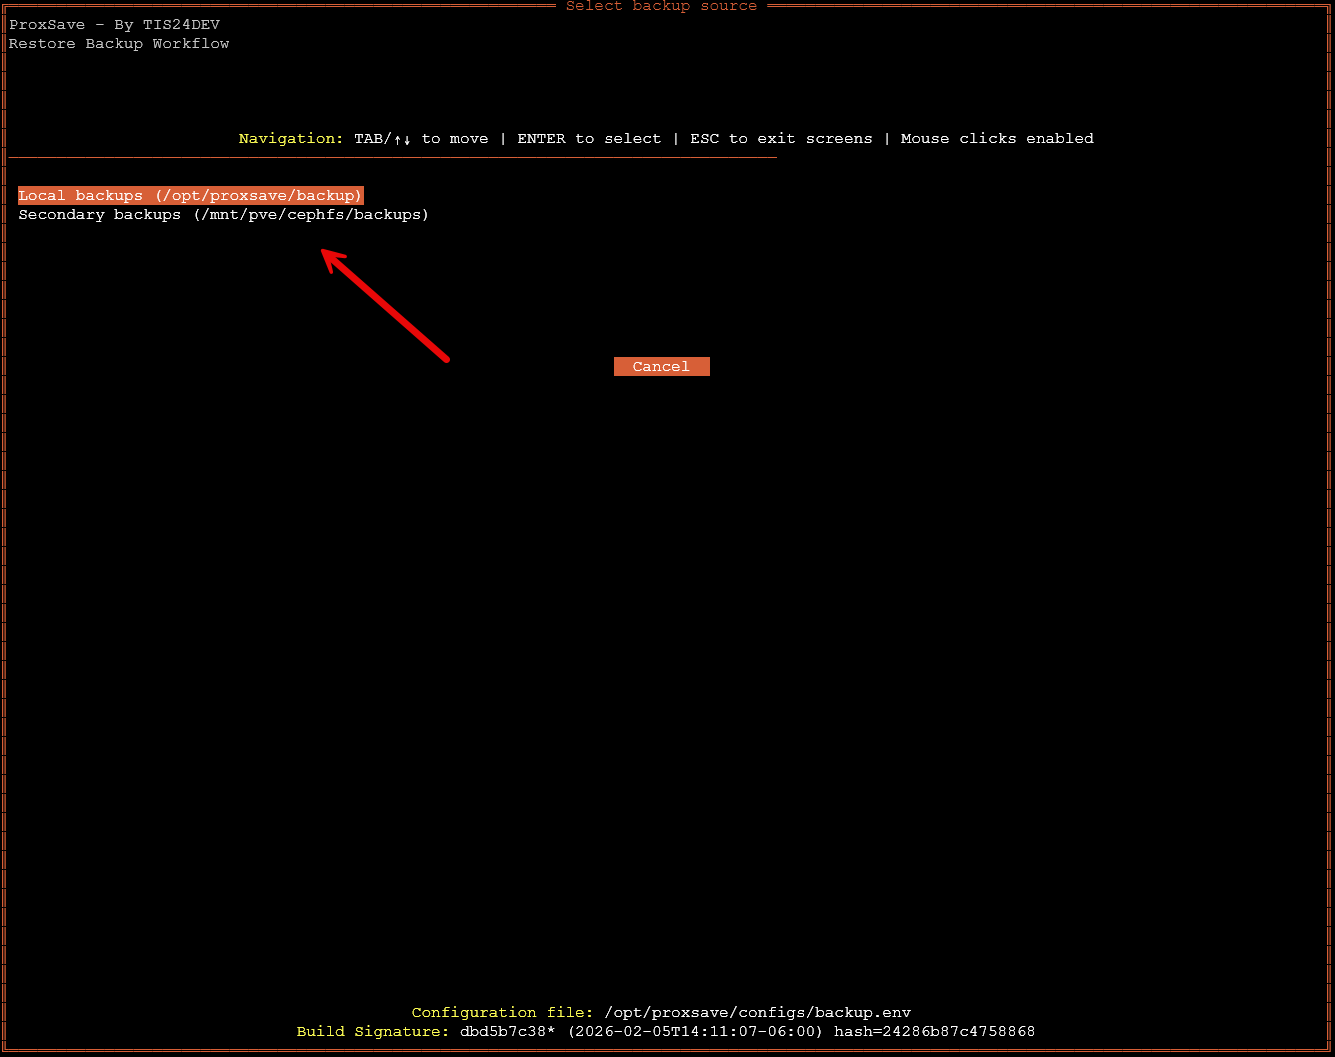
proxsave --restoreThis will begin the restore workflow. It will list out the backups you have in local backups (/opt/proxsave/backup) and Secondary backups (<your location you configured>).
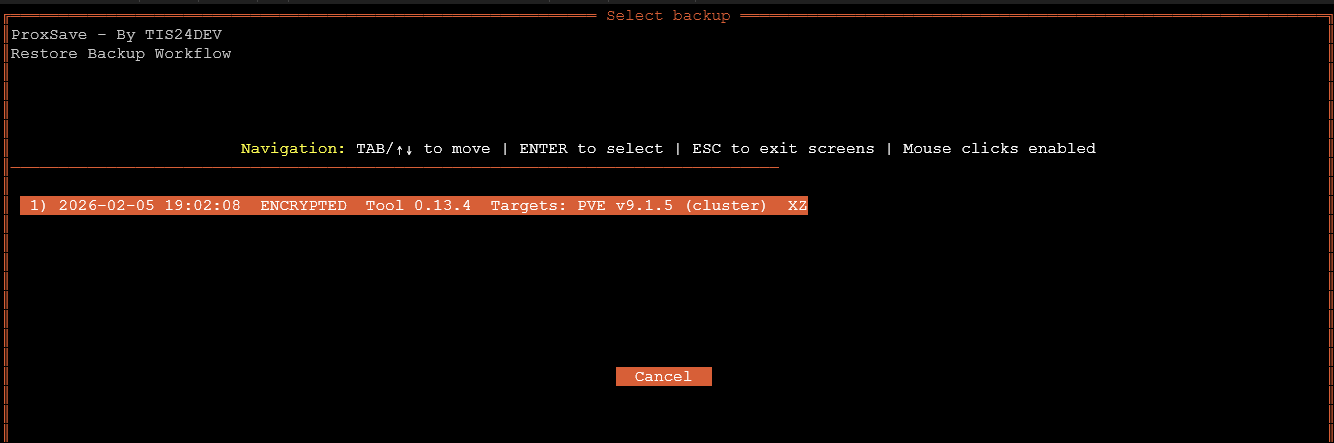
Once you select your backup storage you want to take a look at for backups, then it will have you select the backup you want to mount and pull from. I only have one backup that I created in the process shown above. So select your backup and then proceed forward.
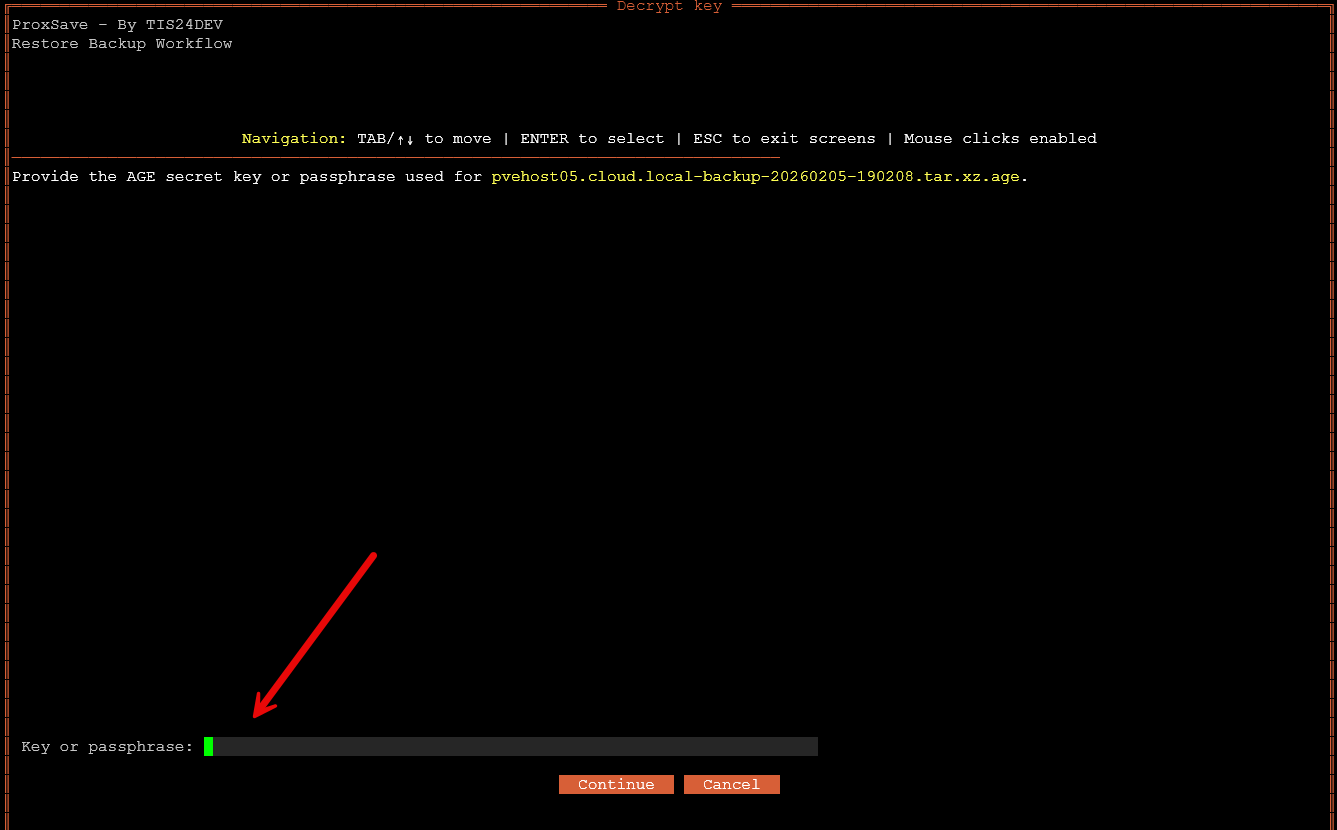
After I selected the backup, I was prompted for the AGE encryption password which is good. Enter your password here and then click Continue.
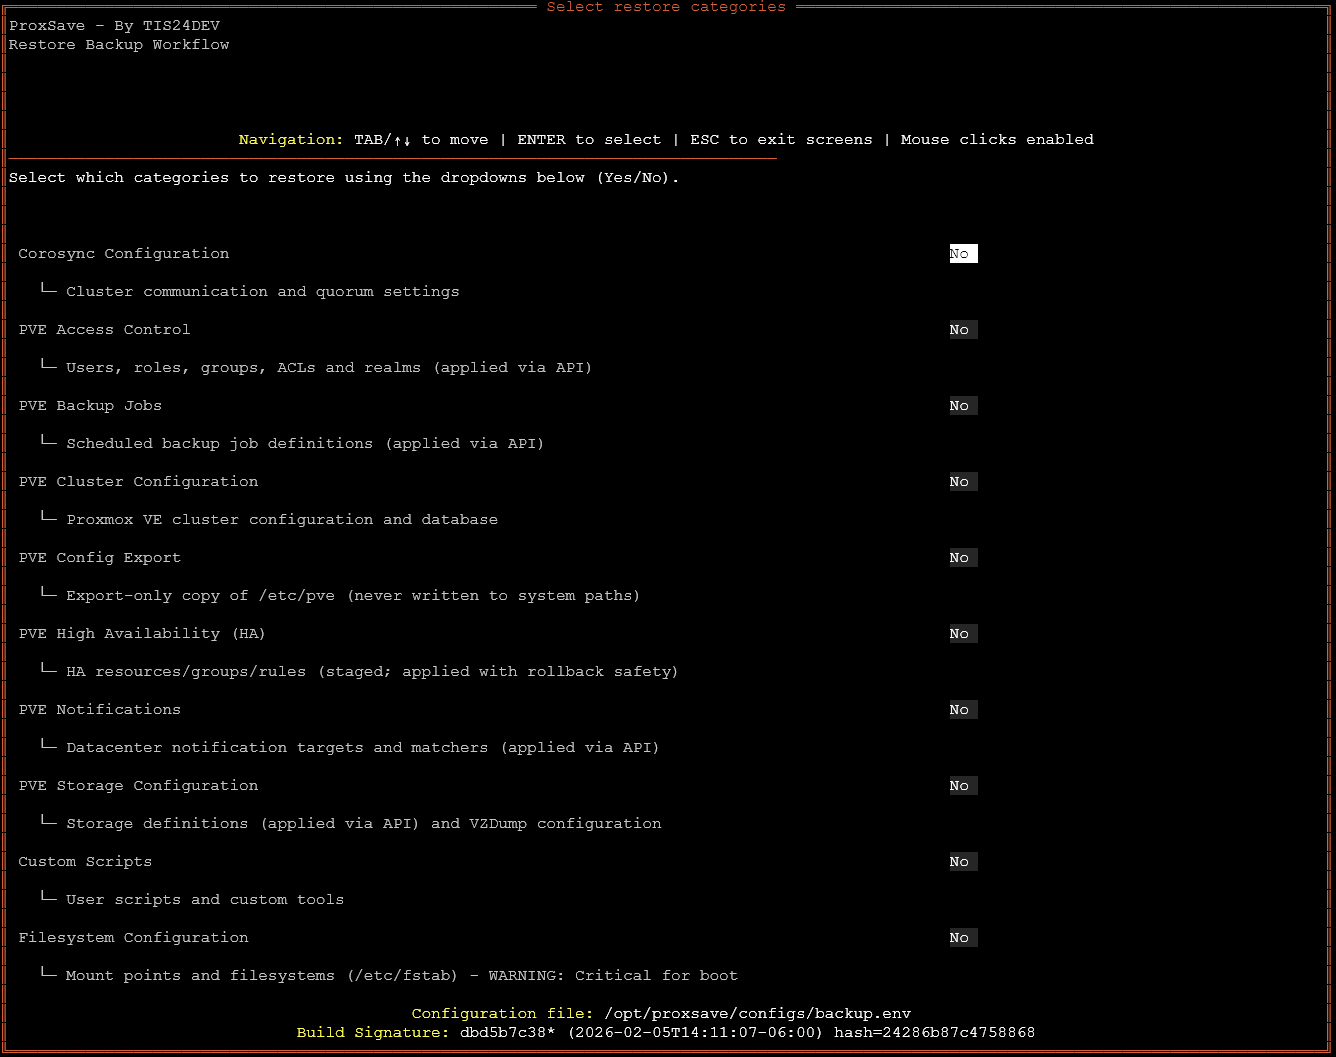
The next screen I came to had a few choices here:
- FULL restore – Restore everything from backup
- STORAGE only – PVE cluster + storage + jobs + mounts
- SYSTEM BASE only – Network + SSL + SSH + services + filesystem
- CUSTOM selection – Choose specific categorization
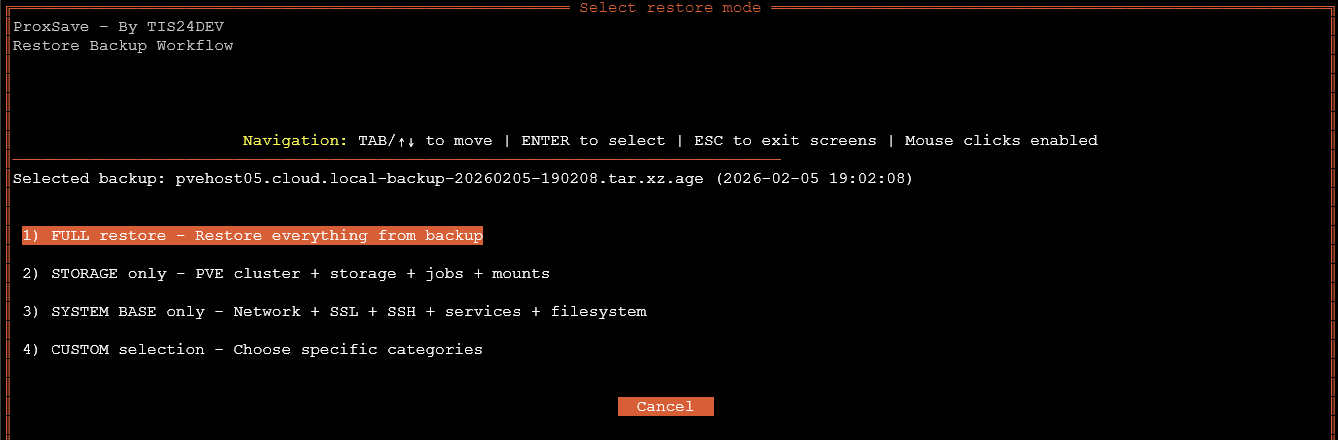
Just out of curiosity I chose the CUSTOM option. If you choose CUSTOM it allows you to set YES or NO for the various options to restore at a very granular level.
Storage tiers and offsite backups
With a simple config file with ProxSave, it allows you to create a very robust backup strategy for your Proxmox and Proxmox Backup Server configurations. This includes everything from local storage only, to secondary storage, to cloud storage and various combinations in between.
On the official ProxSave documentation, it gives several examples of the tiering you can do which allows you to effectively meet 3-2-1 backup best practice scenarios with your config data.
You can configure all of this in the /opt/proxsave/configs/backup.env file. Note the following configurations that come from the online documentation: Backup Tiers – ProxSave
Local storage only:
# configs/backup.env
BACKUP_PATH=/opt/proxsave/backup
LOG_PATH=/opt/proxsave/log

SECONDARY_ENABLED=false
CLOUD_ENABLED=false

RETENTION_POLICY=simple
MAX_LOCAL_BACKUPS=15
Local and Secondary (NAS):
# configs/backup.env
SECONDARY_ENABLED=true
SECONDARY_PATH=/mnt/secondary-backup
SECONDARY_LOG_PATH=/mnt/secondary-backup/logs

MAX_LOCAL_BACKUPS=7
MAX_SECONDARY_BACKUPS=30
Local + cloud storage:
# configs/backup.env
CLOUD_ENABLED=true

# rclone remote name from: rclone config
CLOUD_REMOTE=myremote

# Optional subdirectory within the remote
CLOUD_REMOTE_PATH=/proxsave/backup

# Cloud logs directory (path only; remote name comes from CLOUD_REMOTE)
CLOUD_LOG_PATH=/proxsave/log
Local + secondary + cloud storage:
# configs/backup.env
SECONDARY_ENABLED=true
SECONDARY_PATH=/mnt/secondary-backup
SECONDARY_LOG_PATH=/mnt/secondary-backup/logs

CLOUD_ENABLED=true
CLOUD_REMOTE=myremote
CLOUD_REMOTE_PATH=/proxsave/backup
CLOUD_LOG_PATH=/proxsave/log
Wrapping up
I think ProxSave adds a super important extra layer of Proxmox disaster recovery capabilities to home lab and production environments. Often it is easy to miss the recovery aspects of having to bring a new host online or restore a host that has gone down and has a corrupted or missing configuration. ProxSave makes it easy to grab all the directories that are really important for restoring your confgs like network, storage, VM configurations, backup configurations, and even custom locations. What about you? Are you doing something similar to what ProxSave does for backing up your Proxmox data? Let me know and also fi you are going to try out ProxSave.
Google is updating how articles are shown. Don’t miss our leading home lab and tech content, written by humans, by setting Virtualization Howto as a preferred source.
About The Author


What would be interesting is how to recover a system using a proxsave backup. Starting with a new computer, a blank ssd, a proxmox iso and a working backup server with current backups.
Notledim,
Definitely. I didn’t go the entire way as I had it loaded on one of my “production” lab hosts in the home lab, but this is on my list of things to do with a nested instance. Looks pretty solid though. I didn’t see any reason it wouldn’t work from what I have seen with the backup and recovery process.
Brandon
Hi Brandon, EXCELLENT FIND !!!! I wouldn’t call it a gap. I would say HOLE in the backup strategy :p.
I’ll set it up ASAP. I think VEEAM does back up its own config. PBS should definitely cover this (PVE and PBS)
THANK YOU !!!
Jorge,
Absolutely! It is definitely a hole/gap that I have seen in most environments for sure. Veeam does do a configuration backup which is great and I have seen this come in handy a few times. PBS definitely does need something like this. Thanks for your comment Jorge!
Brandon
This is where xcp-ng+XOA shines. All in one backup solution built into XOA. Regardless of new install or full backup, just restore the metadata and XO config. New install just restore XOA VM or run XOA on a separate computer using type 2 hypervisor like VirtualBox, one in XOA just load all backup config and .metadata, you are done.
Nice!
Brandon
I’ve been looking for a solution like this ever since I started with HomeLab. On several occasions I lost a node because I was “testing” something new. Thanks for the discovery. I’ve already implemented it in my cluster.
Anibal,
Thanks so much for the comment and glad this post/tool was helpful. This is one thing I love about the Proxmox ecosystem is how much momentum is behind it for very cool utilities like this!
Brandon
I may be going against the grain, here. But a Proxmox host should never NEED a backup.
If one of my hosts failed today, I’d be perfectly fine installing a fresh Proxmox on new hardware and simply copying and pasting my CLI configuration scripts and commands.
Document everything. Do everything via CLI. Never rely on the UI for configuration. This is the way.
Learn how to do it from the CLI and document it. It takes more time upfront, sure, but it pays off in the long run.
F.D.,
Thank you for the comment here and always interested in how others are backing things up like their configs. Do you do this manually though? The only problem I have with storing configs is keeping them in sync. I am the world’s worst about remembering to update my config in Git or elsewhere unless I have an automated process to do this for me.