One of the things that I really missed about going away from enterprise grade servers is the out of band management they have by default. Dell has iDRAC, Supermicro has their IPMI interface, HP has iLO, other vendors have their technologies. But at the end of the day, they all allow you to do the same thing. Manage your server infrastructure out-of-band and have power control, KVM, and other features at your disposal. If you have ever had a home lab node lock up or crash, you can’t just SSH in. Web UI is dead, and pings fail. However, if you have mini PC gear that has the Intel vPRO technology built in, like the Minisforum MS-01, you effectively have out of band management for your mini PC. Let’s walk through how I use an Intel vPro home lab powered access and how I configure AMT, run MeshCommander in Docker, and a few of the quirks you need to know.
What Intel vPro is and what it gives you
The Intel vPro technology is not just a marketing label. It is a technology that includes what they call Active Management Technology or AMT for short. Like an out of band tool, AMT runs below the operating system. This, like iDRAC or iLO gives you out of band management, which means you not only have remote KVM (which is important), but you also have the ability to control the machine at a low-level. This means power control, resetting, BIOS configuration, etc.
So think about a situation such as the following:
- Proxmox is completely crashed
- The kernel panics during boot
- The OS network stack is misconfigured accidentally and taken offline
- The machine is powered off
You can still do the following with an Intel vPro home lab:
- Power the system on or off remotely
- Access a remote KVM console
- Enter the BIOS remotely
- Mount an ISO over the network
- Do firmware updates, etc
So essentially, in practical terms, this is very similar to what Dell provides with iDRAC or what HPE provides with iLO. The difference is that with mini PCs like the Minisforum MS-01, you don’t have to have any kind of add-in card. This capability is built into the Intel platform itself instead of being provided by a dedicated BMC chip. For a home lab, this is huge.
Honestly, this was one of the more important things I felt like I was missing when I first went to mini PCs in general for running home lab workloads.
You can take a look at Intel’s documentation on vPro here and even a list of current CPUs that support it: Intel vPro® Platform Is Built for Business.
Features you get
It is not just a remote KVM to your server, which is incredibly powerful, but not everything. You get a lot of other helpful settings and tools. These include:
- Serial-over-LAN
- Hardware infromation
- Event log
- Audit Log
- Storage information
- Network settings (you can configure and control AMT network)
- Power Actions – this is one of the most important features I think, being able to reset the machine, especially after a crash, etc.
Using Intel vPro with the Minisforum MS-01
This is one of the reasons why with my recent Proxmox Ceph cluster build with five mini PCs that I chose the MS-01 among other reasons. It includes vPro capable Intel CPUs. In my opinion, this is just like getting a free KVM as part of the price of an MS-01. It gives you that out of band management that most of us want to have for our home lab nodes.
Before you assume your hardware supports vPro, make sure you verify:
- The exact CPU model (I am using the I9-13900H processor)
- That the BIOS exposes AMT settings (I’m running the current 1.27 version of the BIOS)
- That Intel ME is enabled
For my new server cluster, the vPRO capabilities are totally something that adds value to choosing this platform for the Proxmox nodes. So, instead of needing a dedicated KVM device for each of your mini PCs, the vPRO AMT interface serves that purpose. If I need to get into the BIOS or view the console without having a physical KVM hooked up to them, I can do this with the vPRO AMT interface. In my setup, each MS-01 node has:
- A dedicated management VLAN
- A static management IP for the AMT interface
- Segmented access so only internal systems can reach it
- I do not expose AMT directly to the internet. Ever.
Treat it like you would iDRAC in production. Out of band management can be dangerous if not secured properly.
Networking hardware and cabling
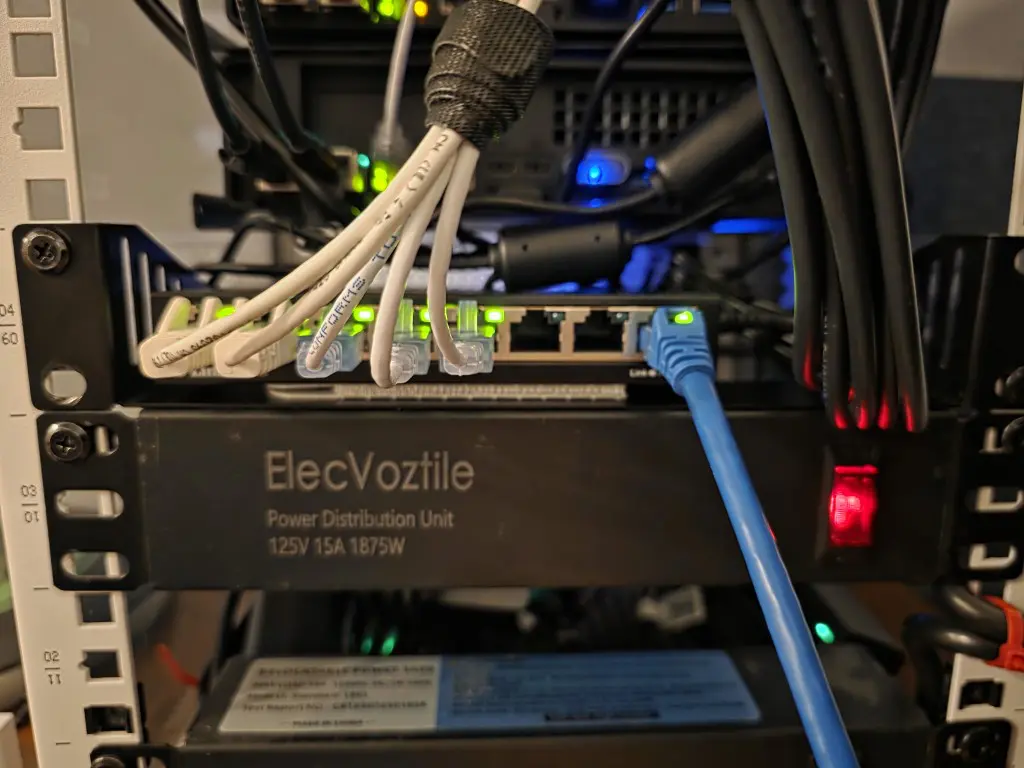
Since my MS-01s are in my 10-inch rack I wanted to keep the cabling connections contained to the rack itself. So, what I did was mounted an 8-port “dumb” switch for uplinking one of the 2.5 GbE connections from each MS-01. I think this turned out pretty well and keeps connections from “outside” to a minimum. So now, I just have the 1 DAC cable to uplink the 10 gig switch and 1 copper uplink to the dumb switch where I have the individual connections linked.
How I configured Intel AMT on each of my home lab nodes
On each of my home lab nodes comprised of my Minisforum MS-01s, let me step through the configuration that I implemented so I could have iDRAC like access to my home lab nodes, even though these are mini PCs.
Below, I have entered into the Minisforum MS-01 BIOS settings. You can do this by pressing the DEL key when you see the Minisforum logo appear during POST. Below, then you click Setup.
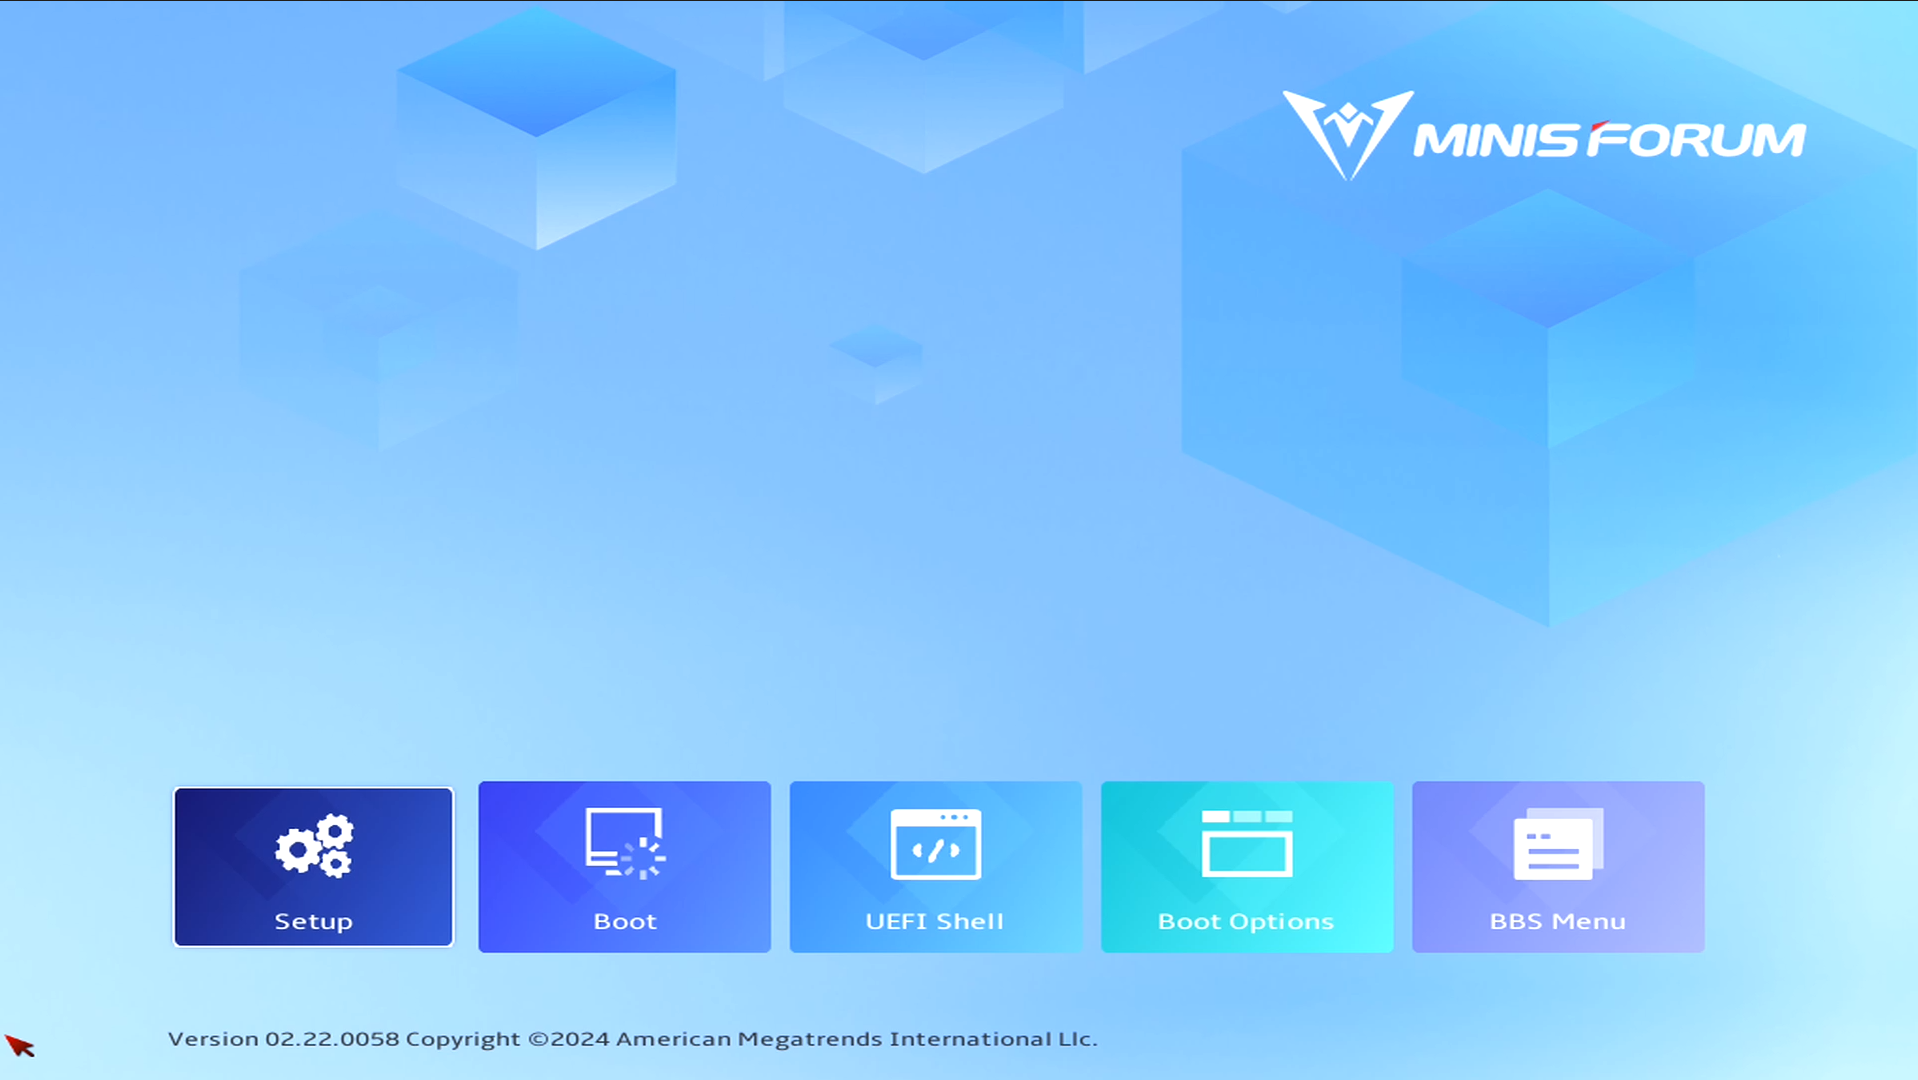
Once you click Setup you will then click the MEBx menu.
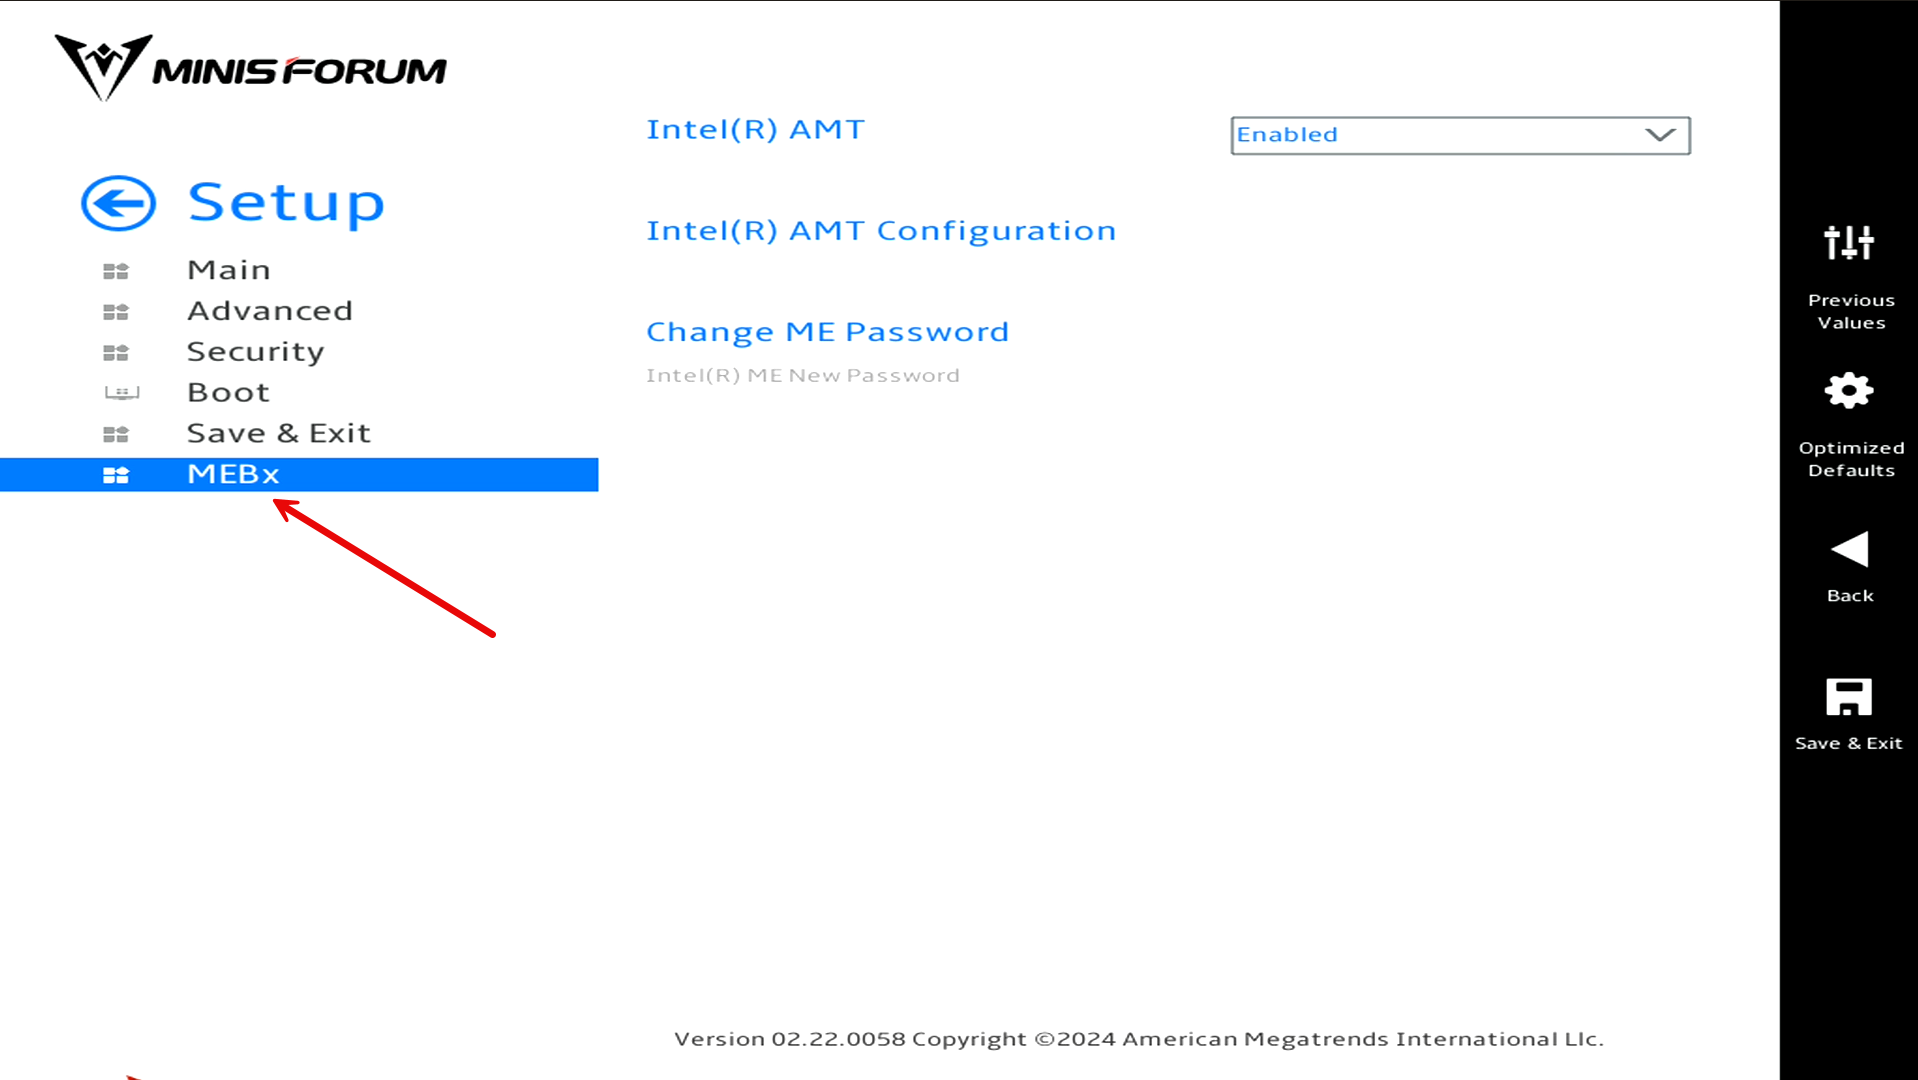
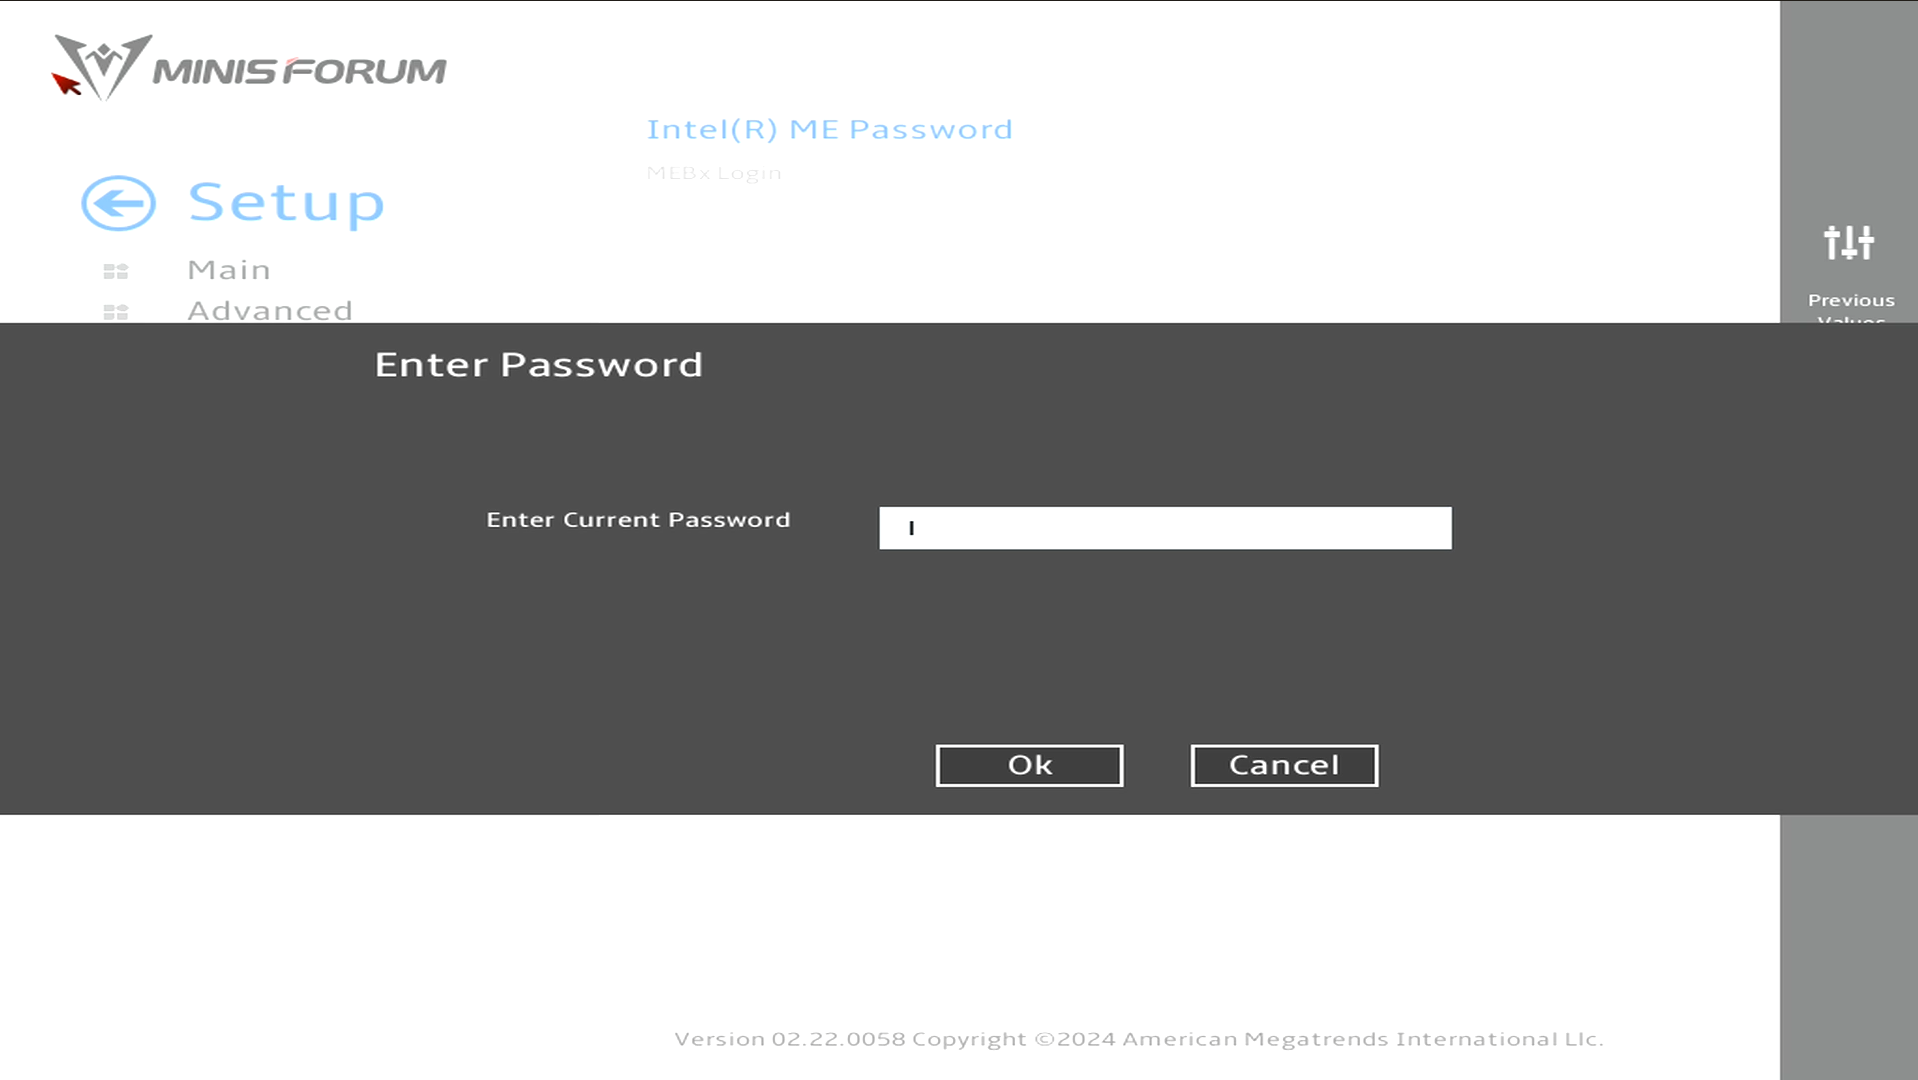
It will prompt you for your MEBx password. If you haven’t set a password as of yet, by default this is set to admin. If it is the default, it will ask you to change the password immediately after you have entered admin.
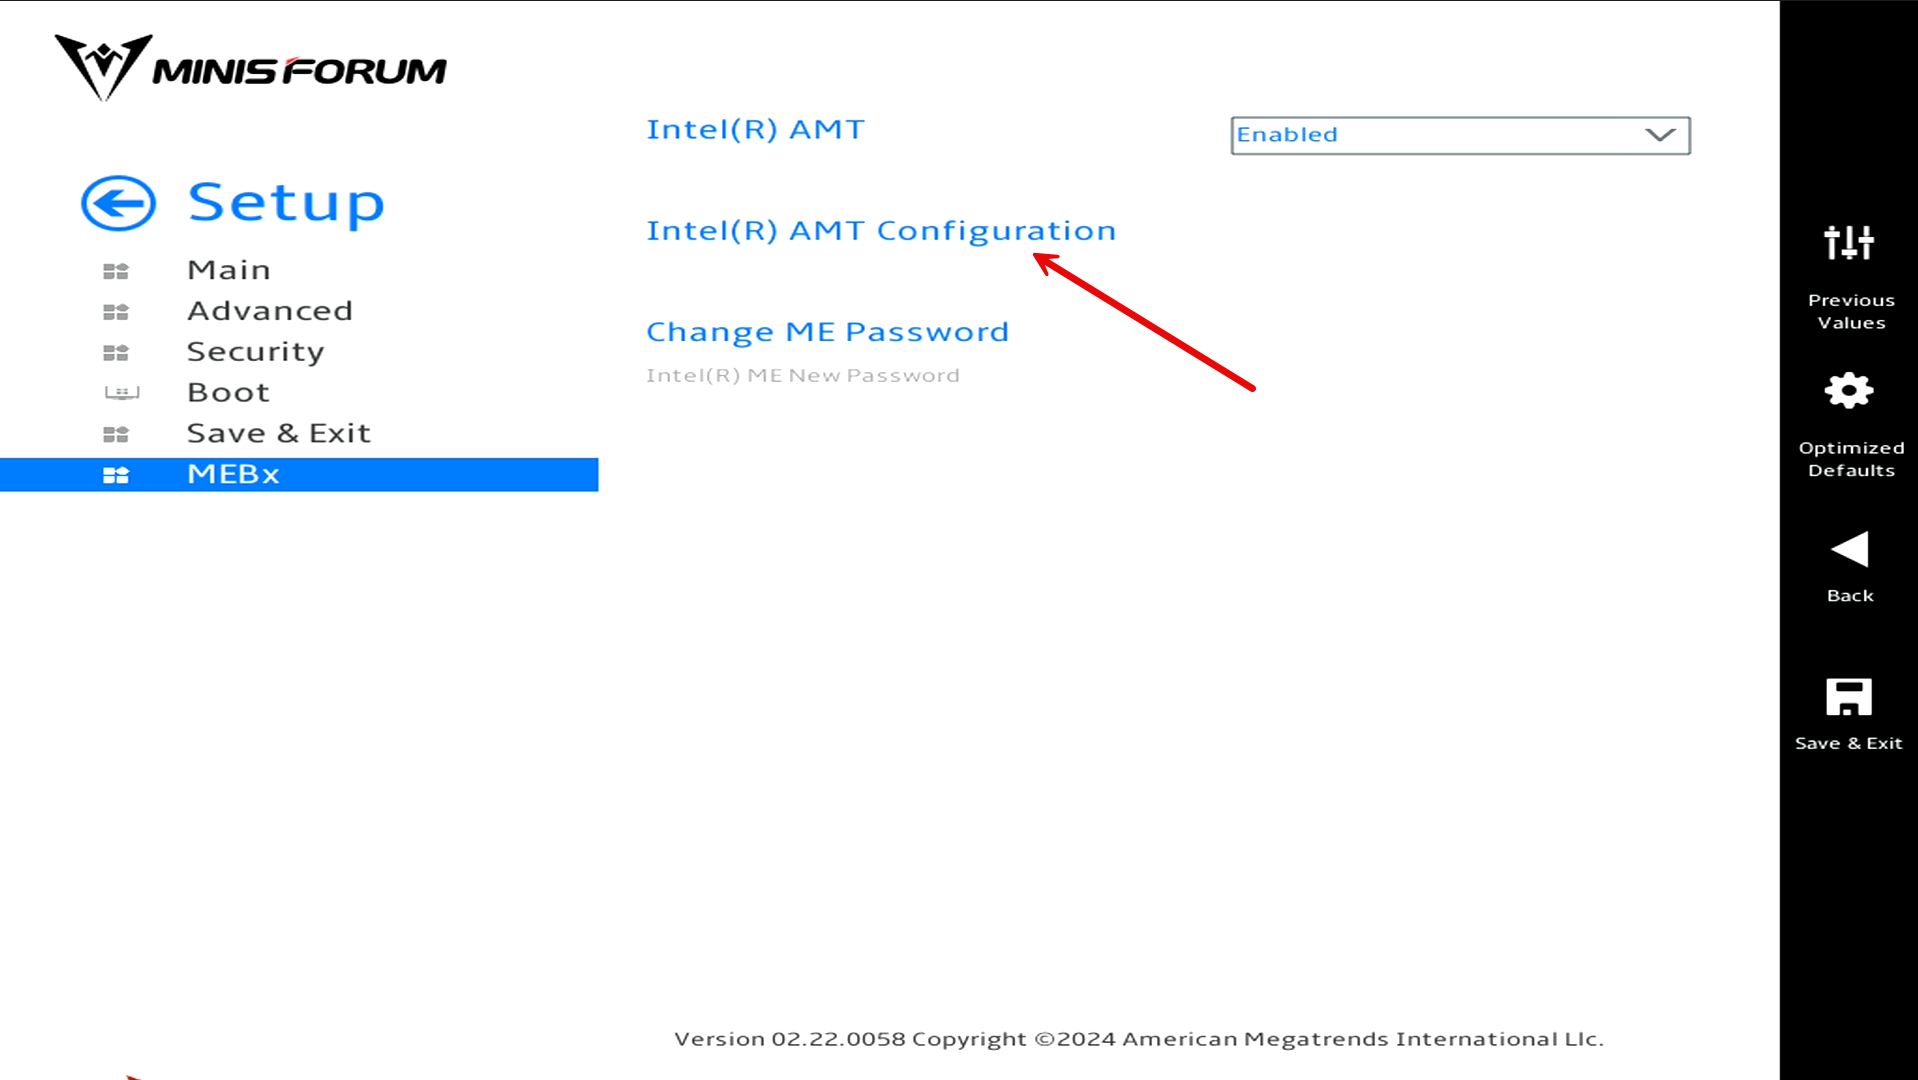
Now that we are on the MEBx menu, click the Intel AMT Configuration menu. In case you are wondering what MEBx stands for, it is:
- Management Engine BIOS Extension
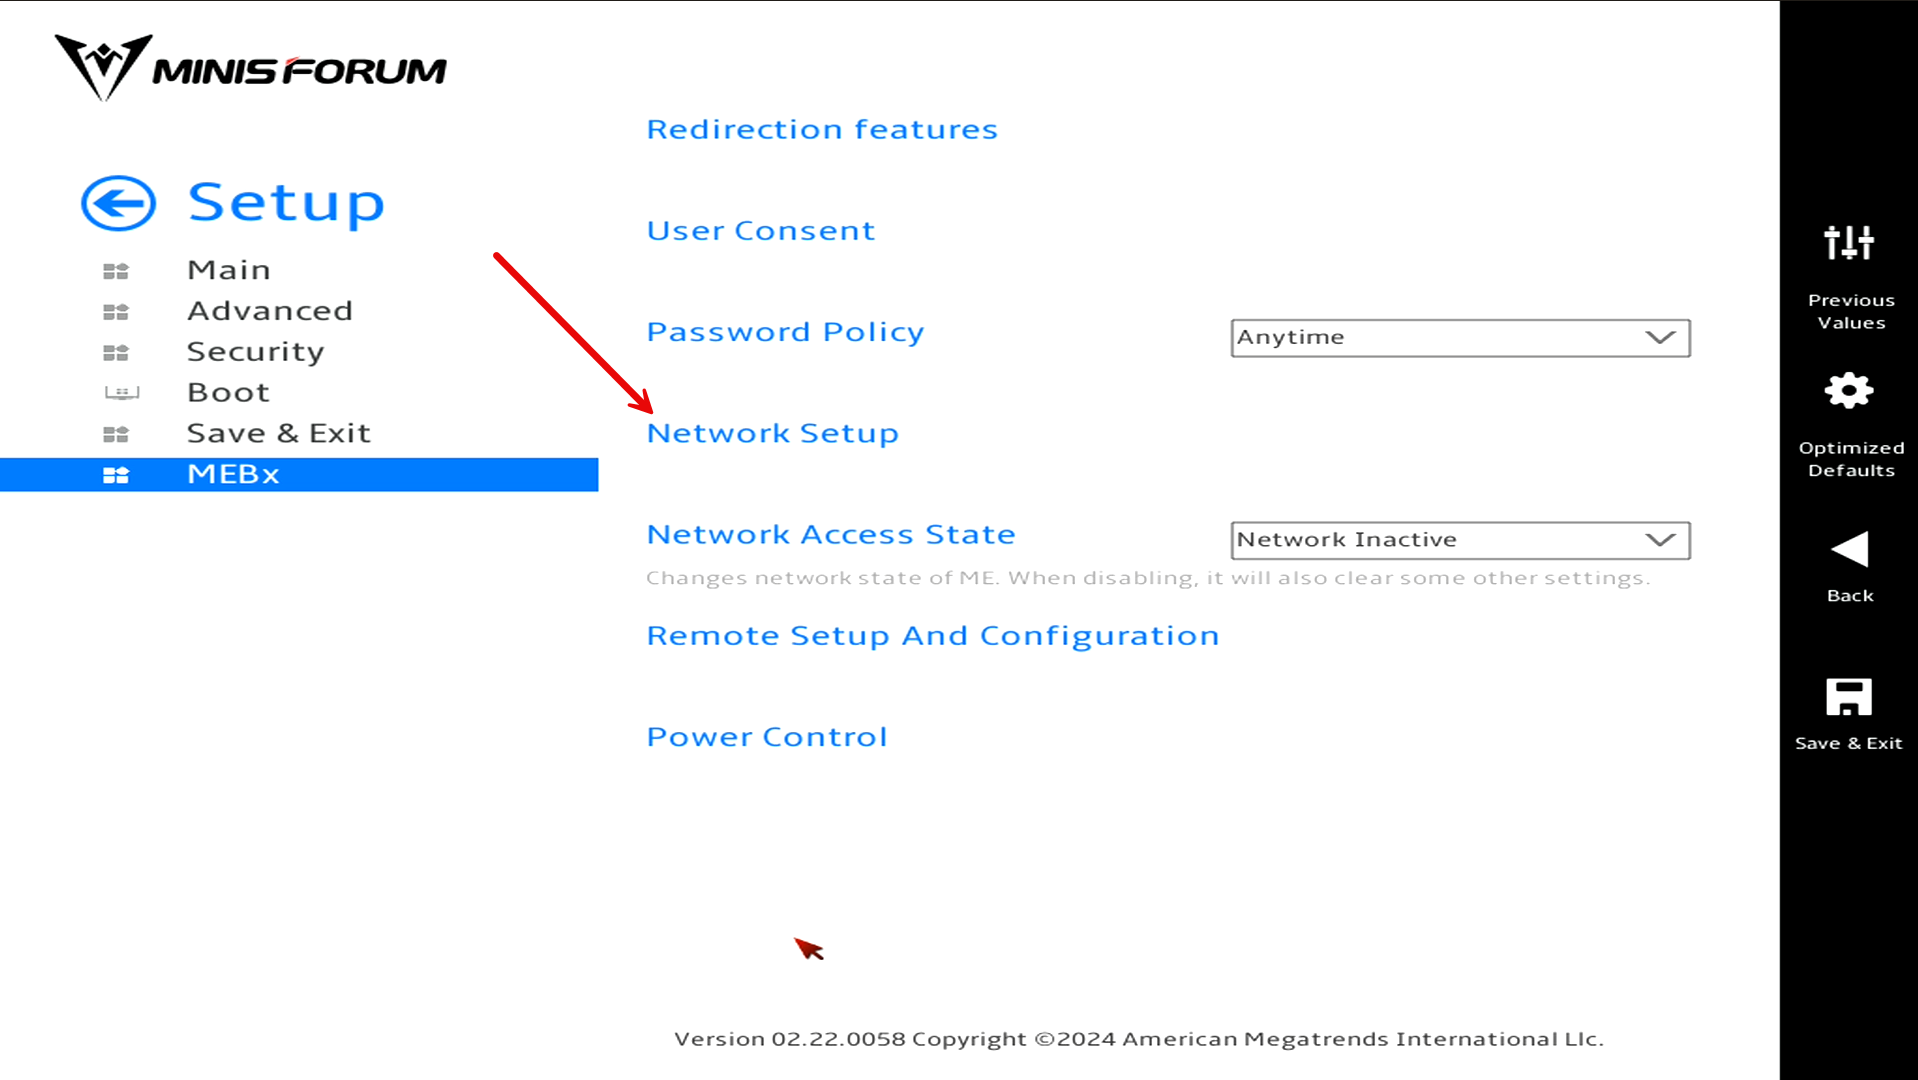
First, we will setup the network configuration. Click the Network Setup menu.
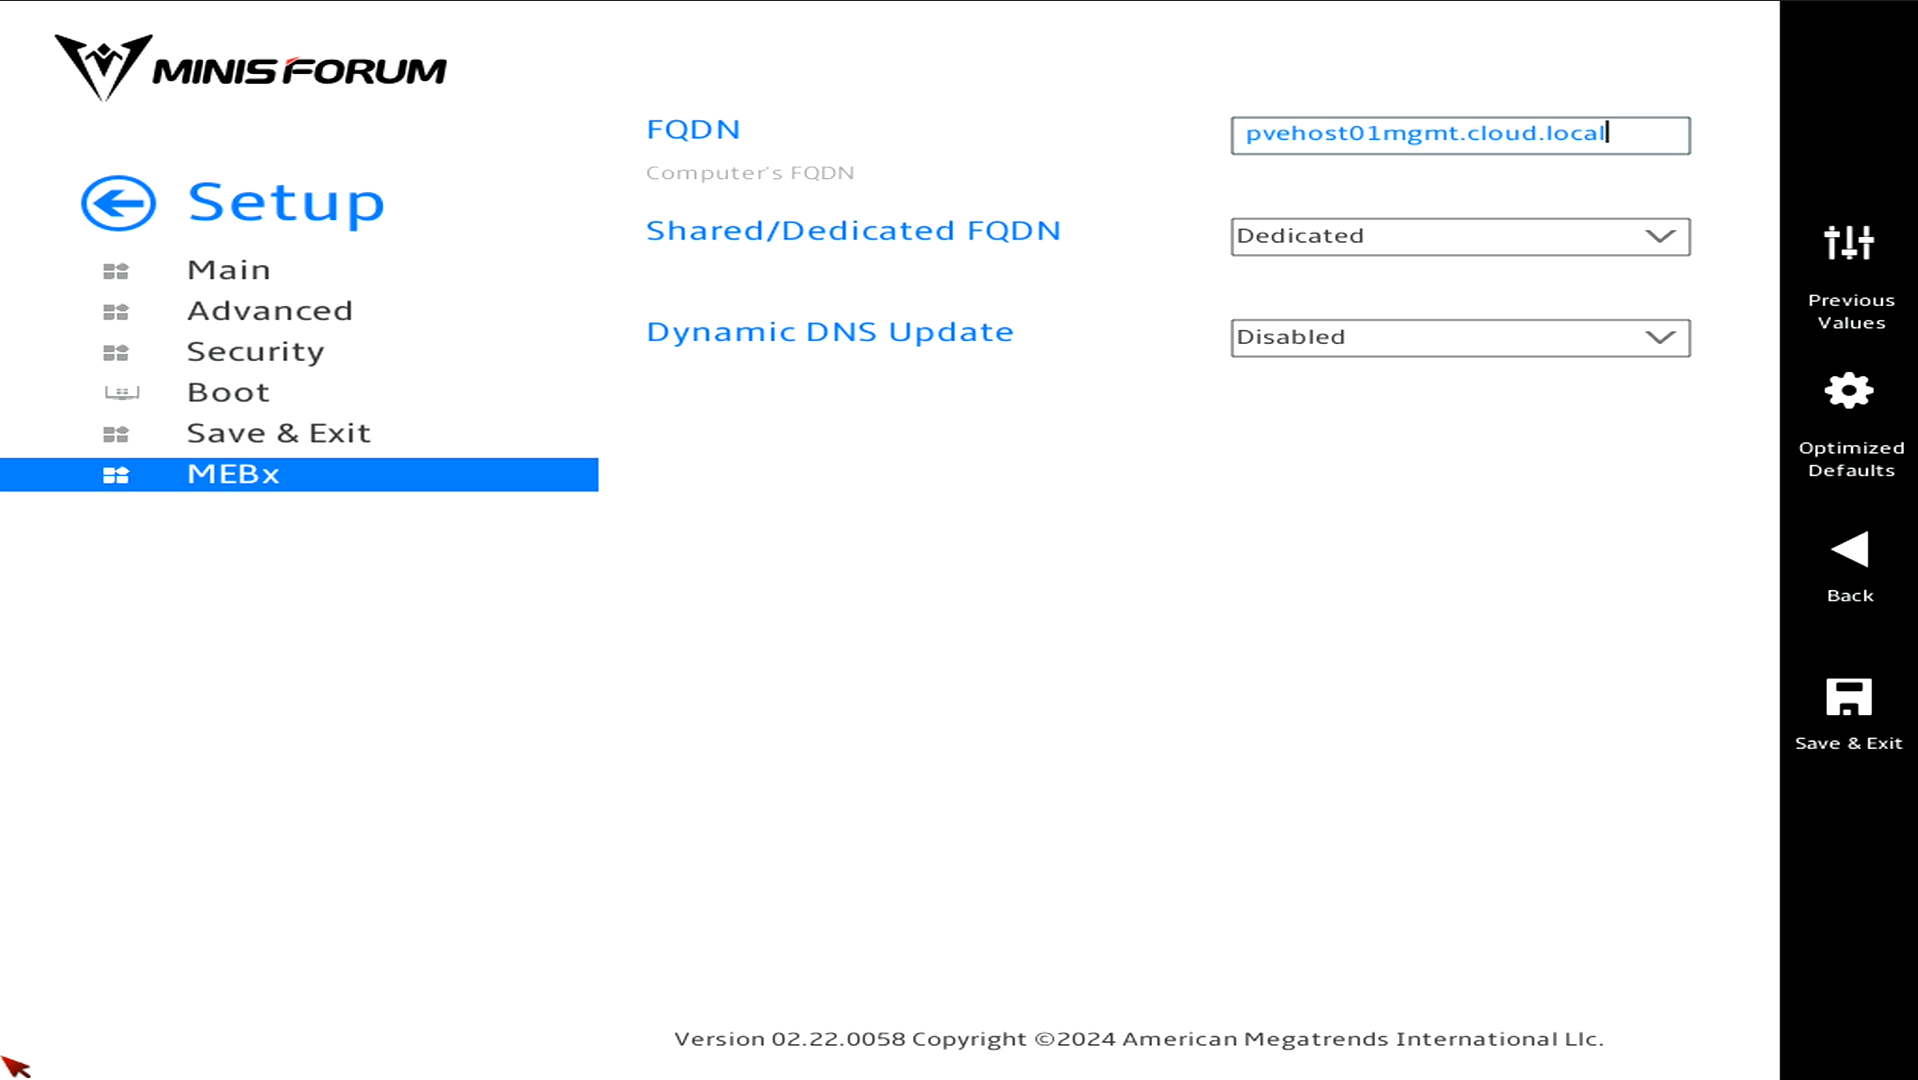
Then, we will click Intel ME Network Name Settings.
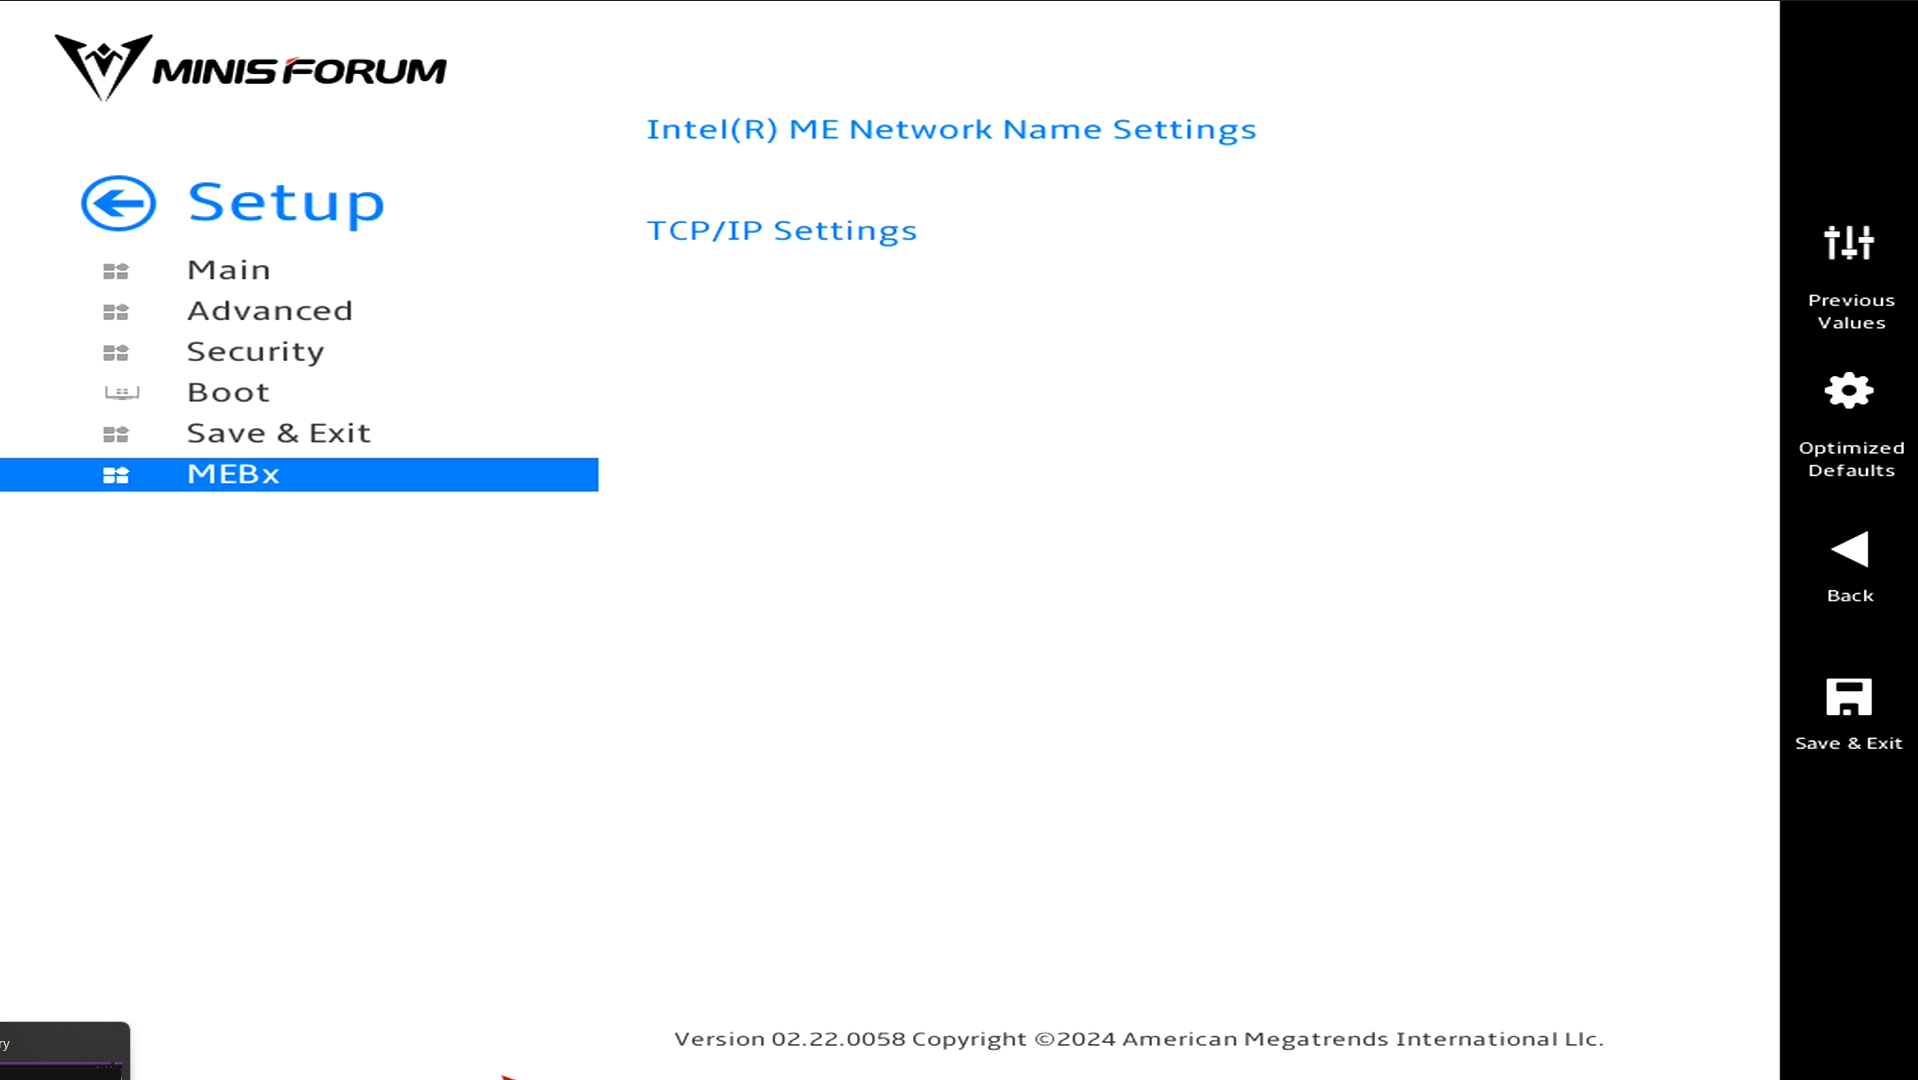
Set the network name you want to use for your configuration.
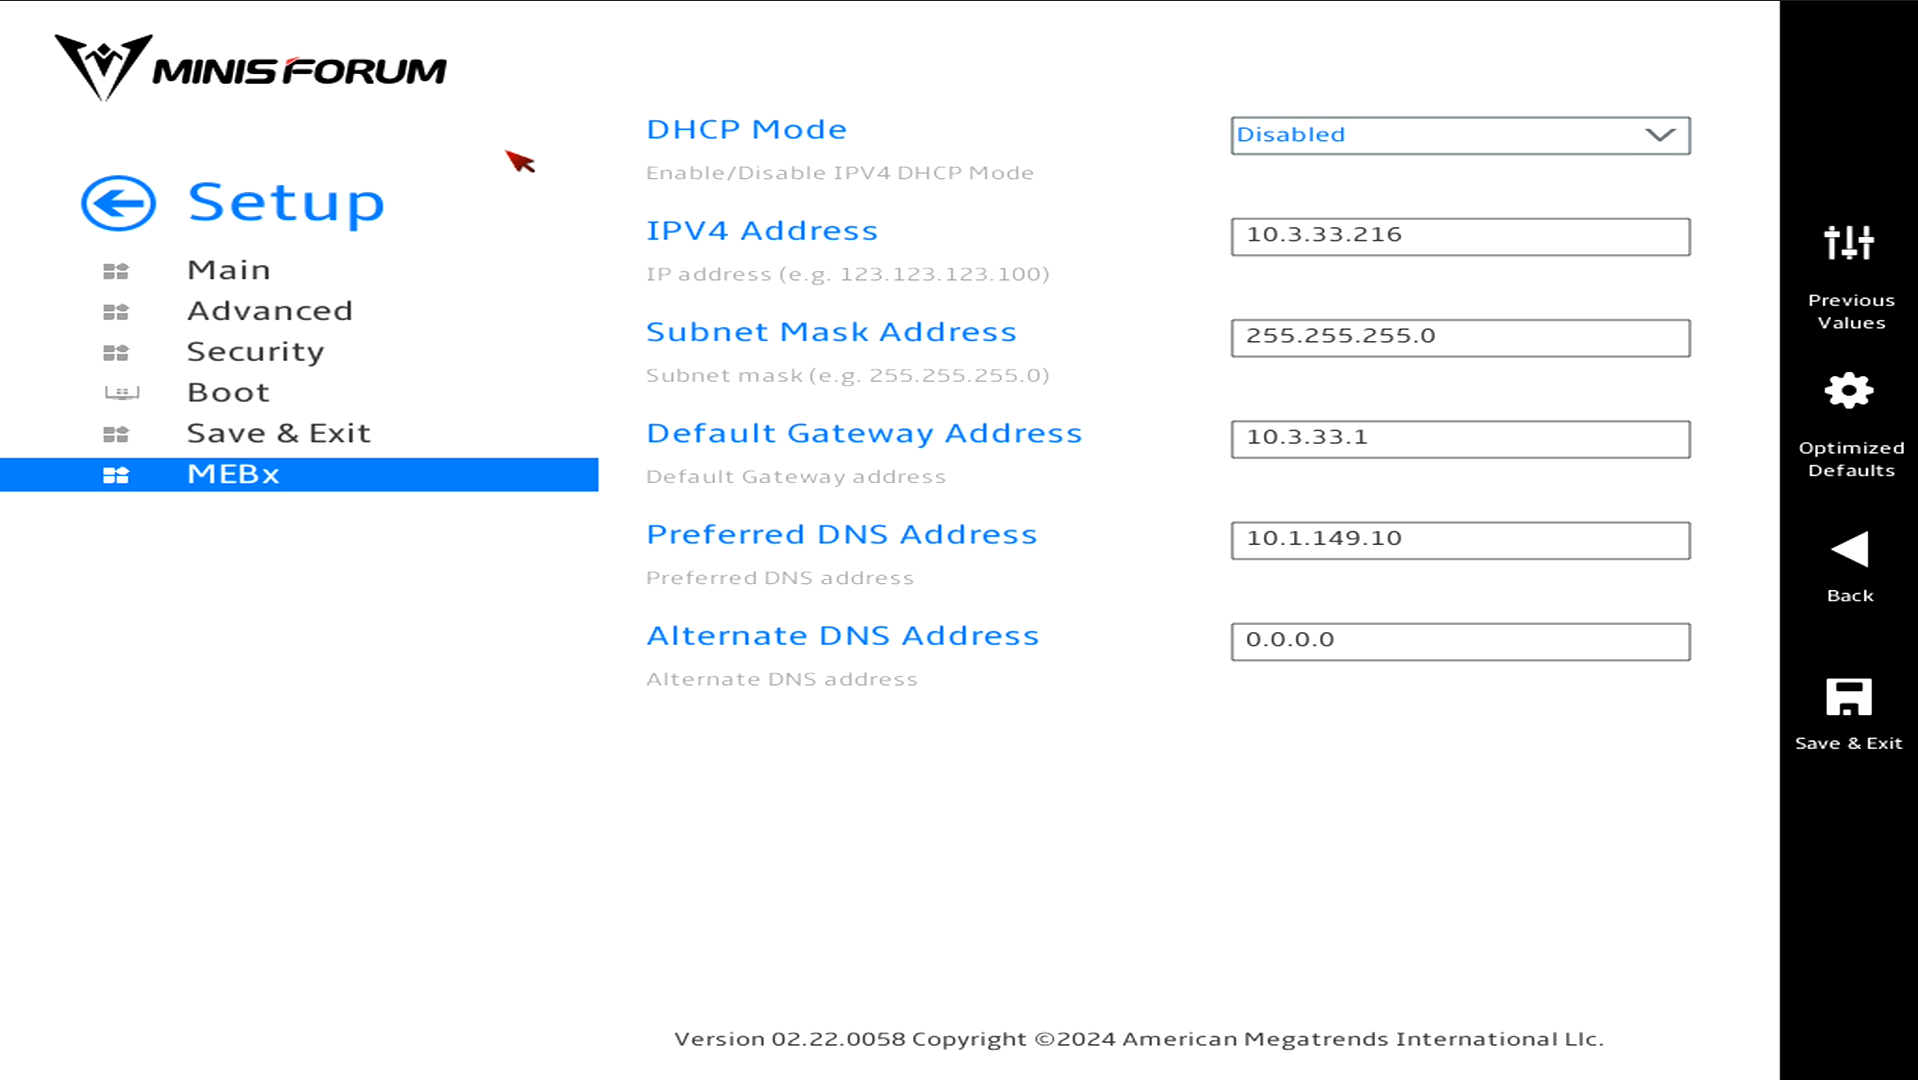
Then go back to the previous menu and click TCP/IP Settings. Enter the dedicated IP address you want to use here. Keep in mind, there isn’t VLAN tagging available in the network configuration, so you will need to set your untagged traffic to the VLAN you want to use for management.
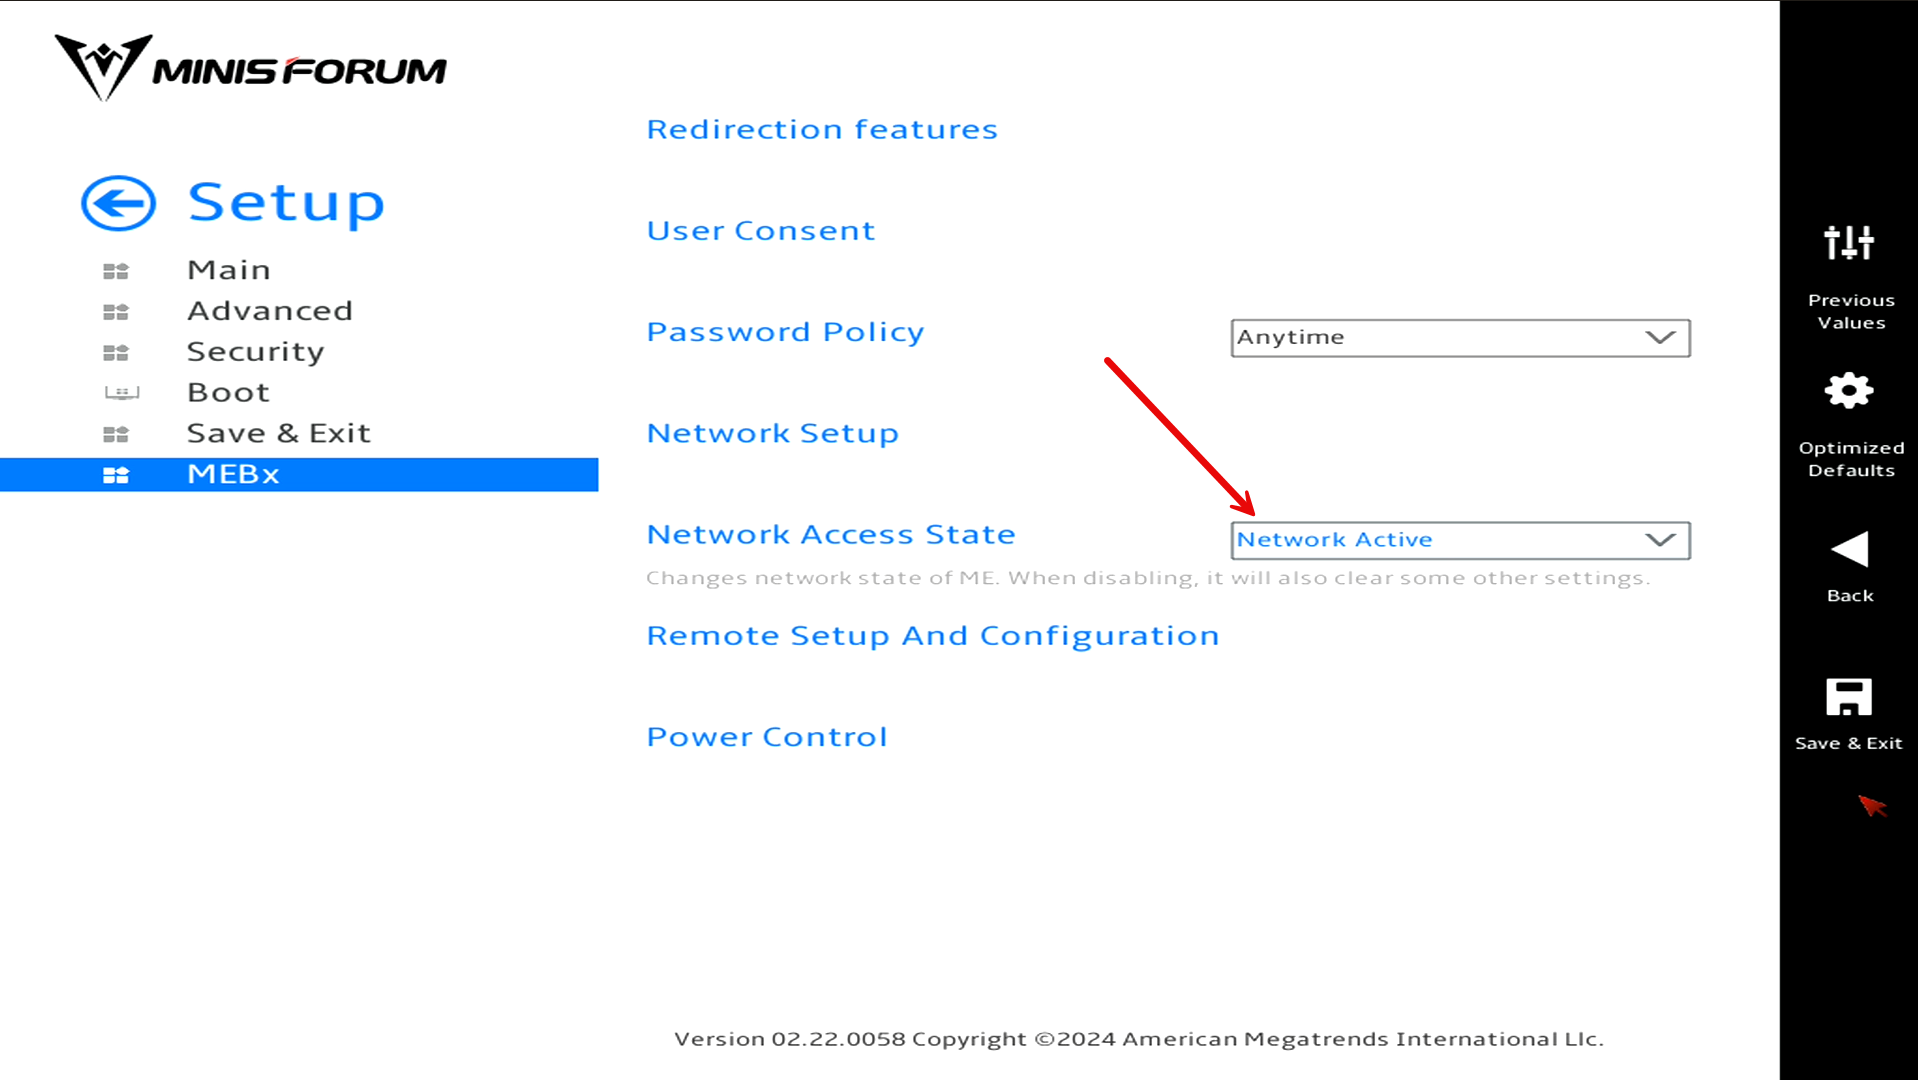
After you configure the IP address you want to use, go back to the parent menu for MEBx and set the Network Access State to Network Active.
Also, there are other specific settings that you will want to at least check. I found an incredible blog post that steps you through the settings you need to check for your configuration here: Step-by-Step Guide: Enabling Intel® vPro™ on Your Minisforum MS-01.
After you setup all your BIOS settings for your vPRO configuration, be sure to Save and Exit to save your BIOS settings configuration and then reset your MS-01.
Running MeshCommander in a Docker Container
One of the best tools for managing Intel AMT is MeshCommander. You can run MeshCommand in a Docker container for ease of use and this allows you to have it installed where you can reach it from anywhere in a browser.
Docker container
You can check out the Docker image I am using here: taskinen/meshcommander – Docker Image. Here is my full Docker Compose for those interested in running it this way.
- Be sure to first create the directory structure needed which is
services:
  meshcommander:
    image: taskinen/meshcommander
    container_name: meshcommander
    restart: unless-stopped
    volumes:
      - /home/linuxadmin/homelabservices/meshcommander/data:/app/data
    security_opt:
      - no-new-privileges:true
    ports:
      - 3000:3000
Once you have it up and running and make sure the container stays up, you can browse out to port 3000 on the Docker host where you brought it up.
Adding a node to MeshCommander
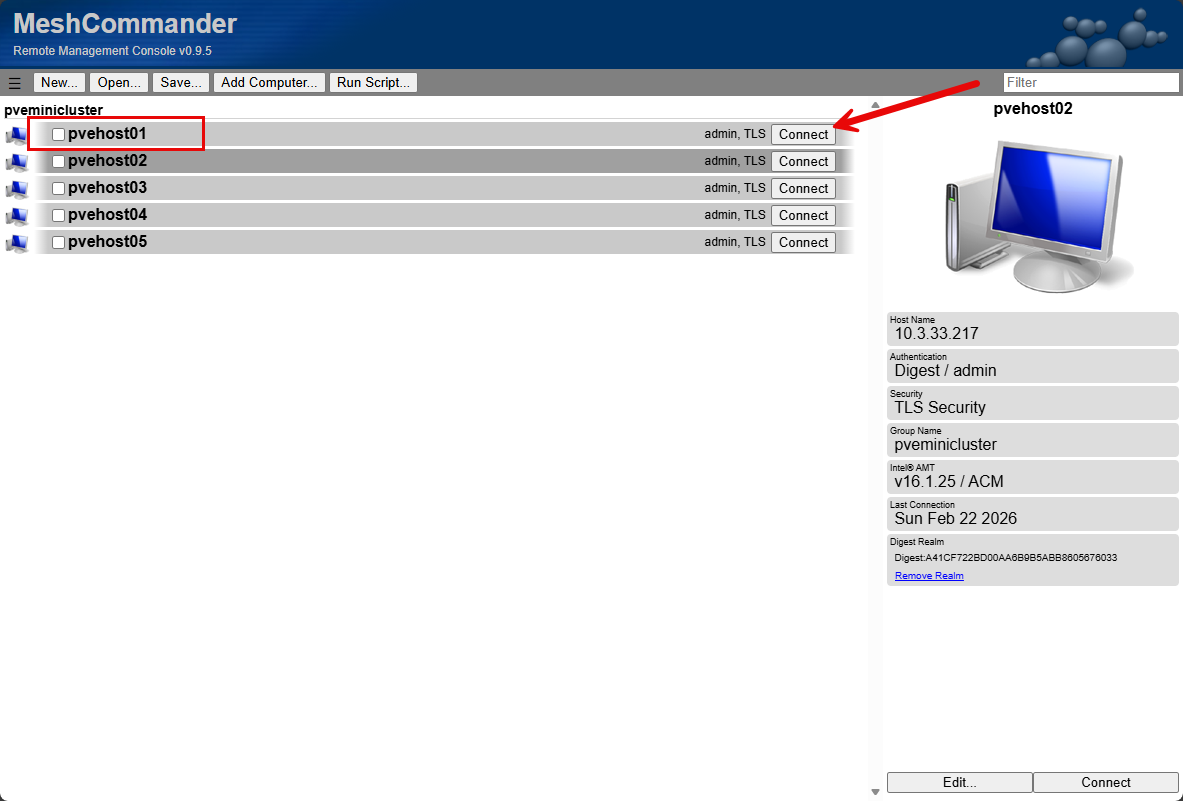
Below, after connecting, you can click the Add Computer button to begin the process to add a new connection.

It will pop up the dialog box to add your connection. Here we will match the configuration we configured in the MEBx settings shown earlier.

We have added the new host and it is ready to connect.
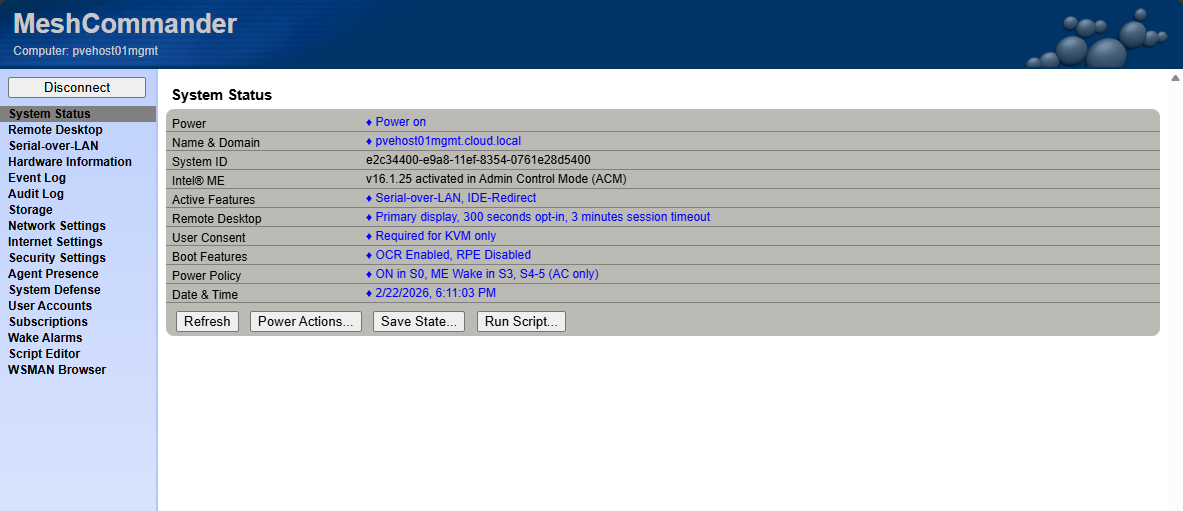
Here we see the detailed system status with MeshCommander and the menu options we have.
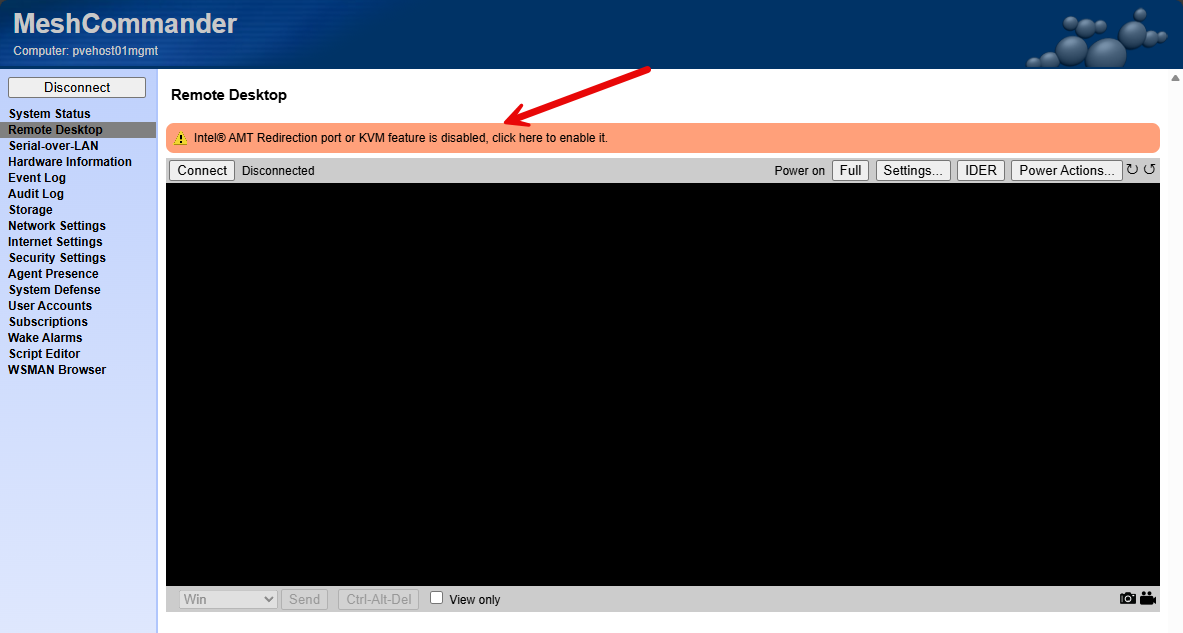
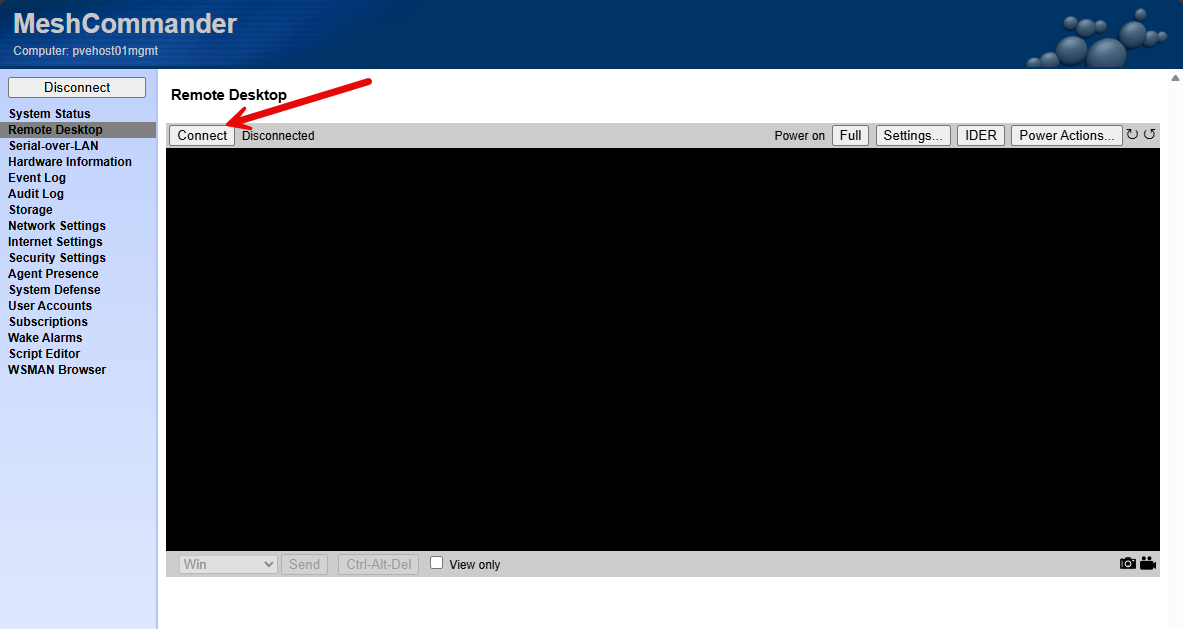
When you click the Remote Desktop option, you will see the request to enable the feature. Click the ribbon.
Select the Redirection Port and KVM Remote Desktop option.
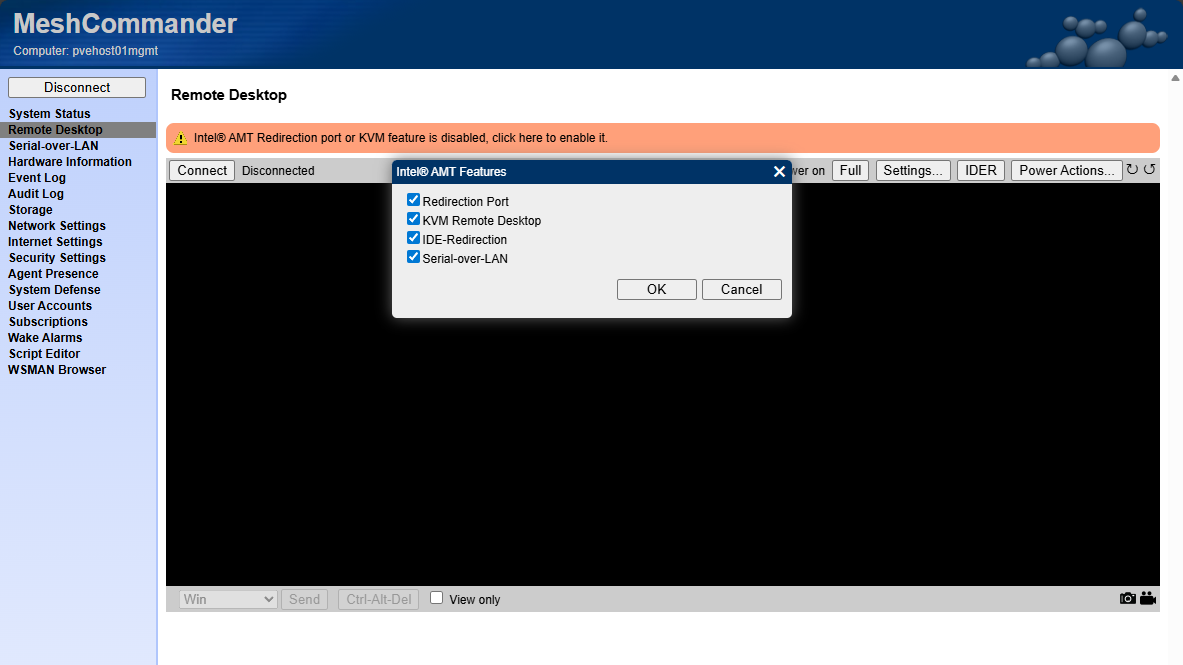
Now, we can click the Connect button to begin the KVM session.
Now I have console access just as if I had a monitor and keyboard connected directly to the host.
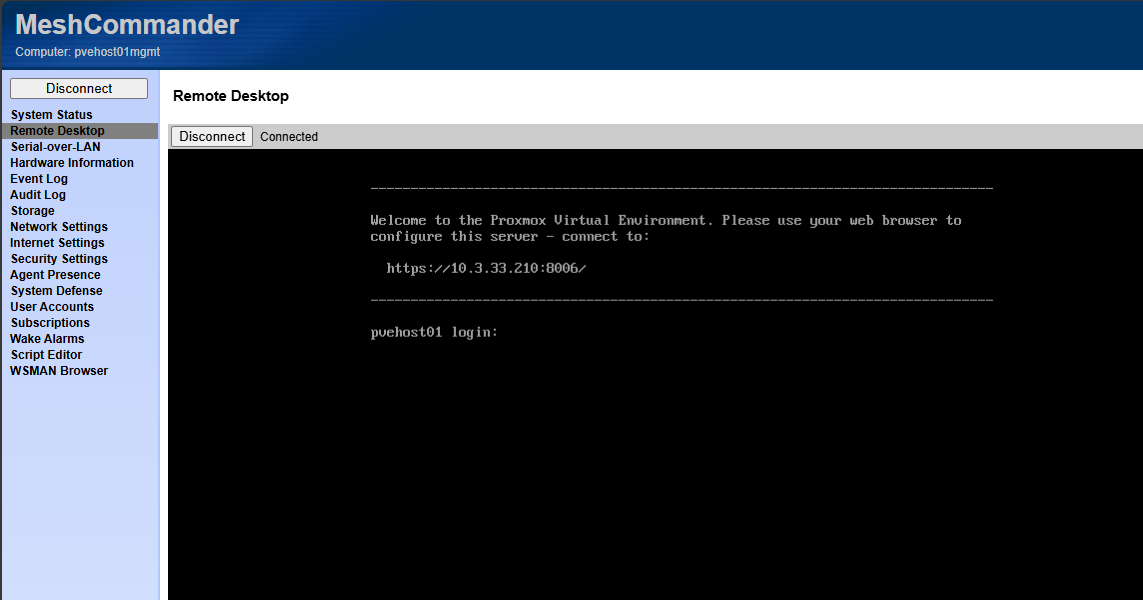
This gives you an idea of just how powerful the solution is allowing you to connect to and control your node just like it was connected to a KVM or as if you had a console monitor and keyboard connected.
Quirks and gotchas with Intel vPro
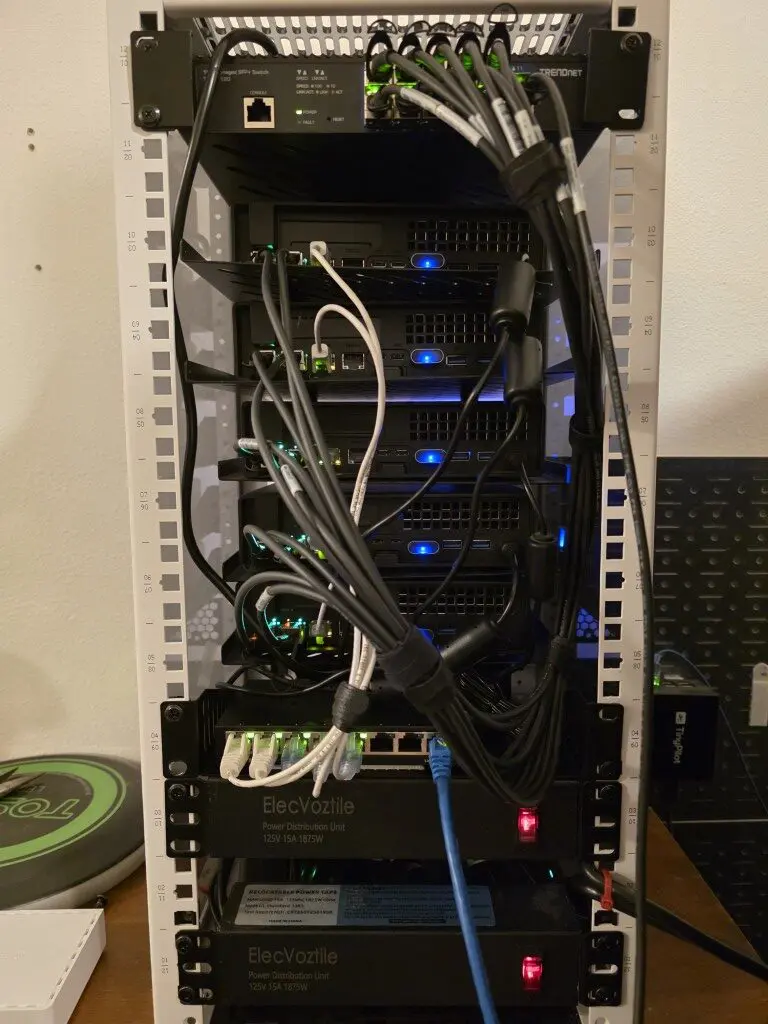
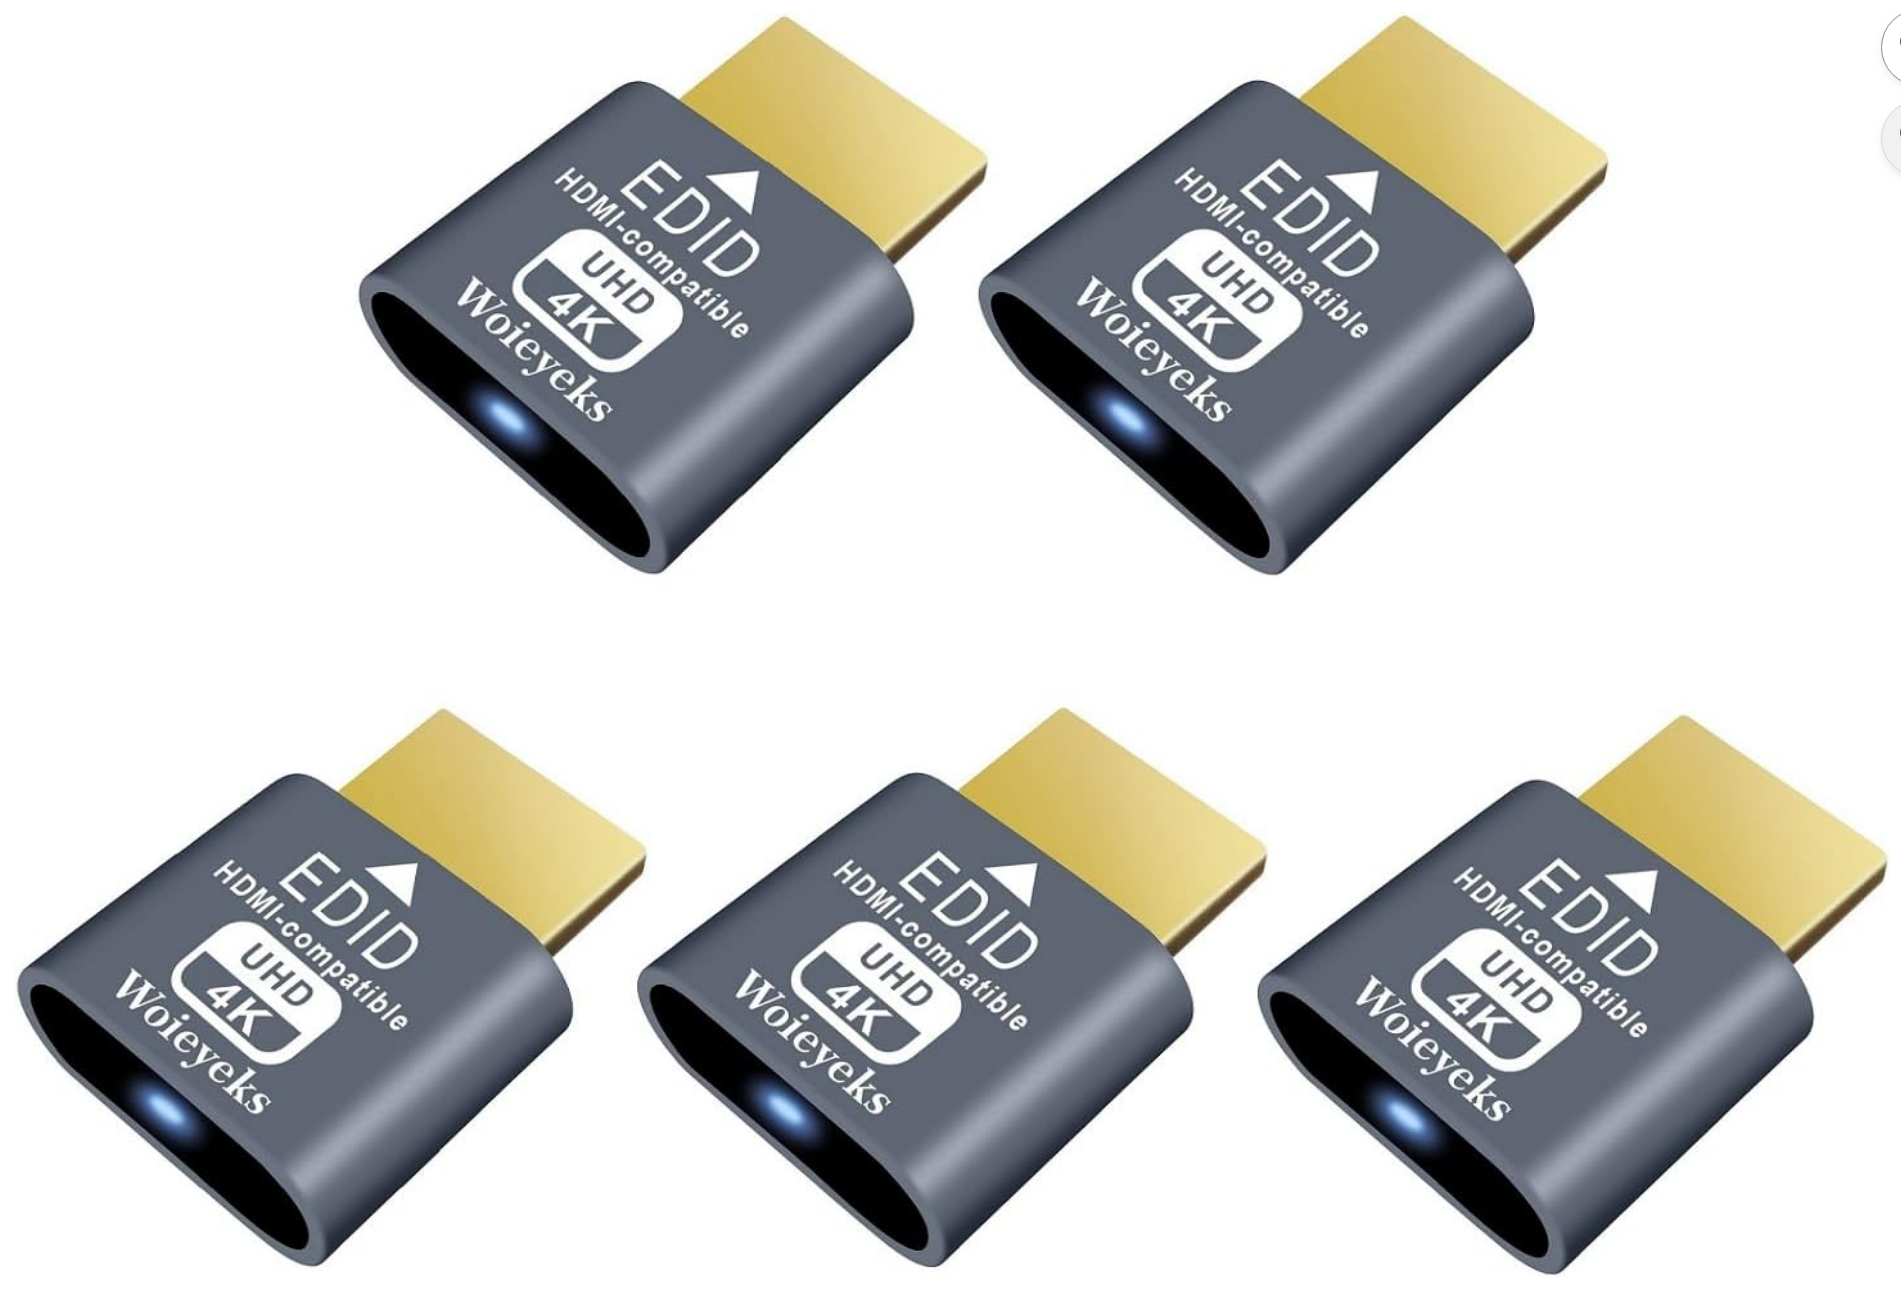
There are a few quirks to be aware of with the Intel vPro setup on the MS-01 and I am assuming other configurations with vPro. You will need an HDMI plug that keeps the video signal active on the unit so that vPro will allow you to “see” the screen past the BIOS screen.
There is a cheap workaround to this in the form of an HDMI “dummy” plug that you can buy on Amazon. These work perfectly and allow you to always have video presented when you initiate the KVM feature from MeshCommander. I learned about this from the same link I have noted above with the step-by-step instructions for the MS-01.
In the picture below, you can see the hdmi dummy plugs lit up with the blue light. You can also see the uplinks for the Intel vPro connection.
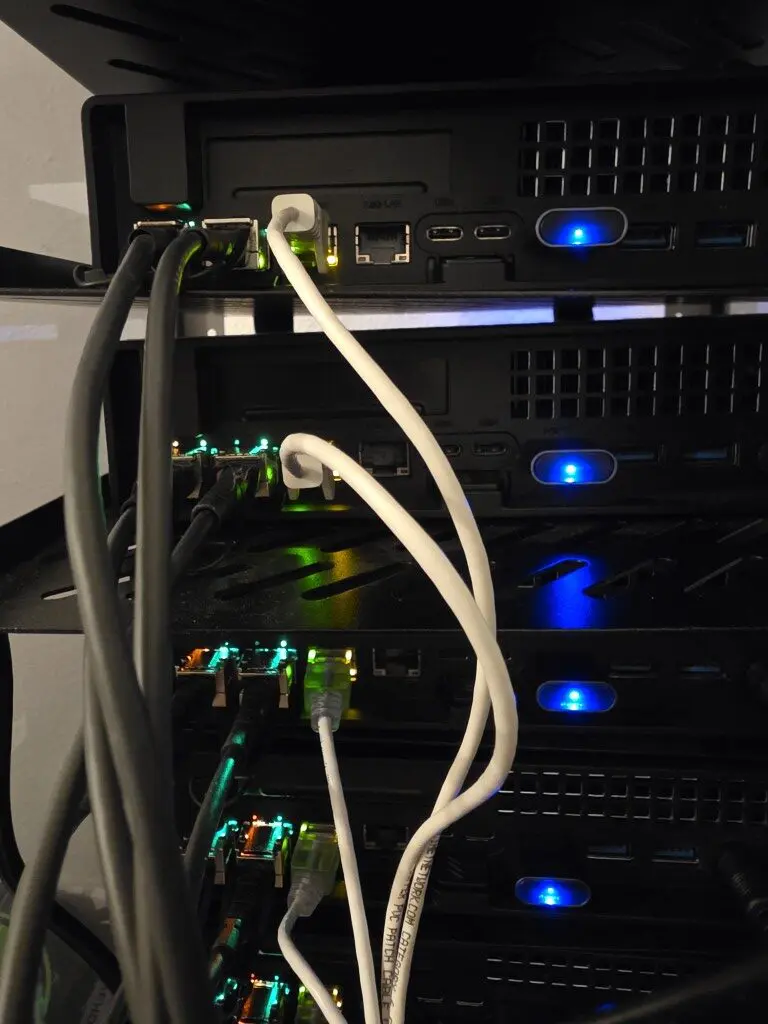
You will also need to dedicate a NIC to vPro which may be a drawback for some. The AMT connection only works with the 2.5 GbE connection from my testing. And of course you wouldn’t want to burn a 10 gig connection for just this purpose any way.
Also, as I already mentioned, the network configuration for Intel vPro at least with the MS-01 does not have VLAN tagging as a feature. So you will have to keep this in mind that you will need to make sure the untagged native VLAN is set to the VLAN you want to use for management traffic.
Wrapping up
Honestly, one of the major drawbacks to switching to mini PCs for me initially was the lack of out of band management. However, I was not well versed in the functionality and features of Intel vPro and the fact that you could do most of the same tasks with vPro that you can do with something like an iDRAC or IPMI card. This was the missing piece to getting back to the level of enterprise control for me that I had with servers and out of band management.
In my opinion, vPro is still not quite as powerful as those dedicated solutions, BUT, and this is important, it gets us super close to having all the same features and capabilities. Arguably, an Intel vPro home lab it is just as good for just strictly remote access and power management, which I think are the two most used features of all the mentioned platforms. How about you? Are you currently using Intel vPro in your lab or something else? Let me know in the comments.
Google is updating how articles are shown. Don’t miss our leading home lab and tech content, written by humans, by setting Virtualization Howto as a preferred source.
About The Author


You got me with the title picture, I thought it was a new snazzy super-deluxe version of the JetKVM!..
Just 1 suggestion for using MEBX, if you can, keep the interfaces dedicated for it, it avoids poitential conflicts, especially if the interface is tagged, its inconsistent, where host #1 works great, but host #2 would regularly flap (even though they had identicial configs). Also just 1 last gripe, it has no VLAN setting.
Unfortunately I sold my MS-01’s a few weeks ago, they are fantastic machines… I almost replaced them with the MS-02.. but I’ve let myself be led down the AI alley, and my got mugged, they emptied my account – But gracious left me with 3 of the EVO X2. Which I’ve been incredibly impressed with!
Great points here kelv1n. Definitely think these types of out of band management interfaces need to be protected. I agree on the gripe on no VLAN setting. Not sure why this isn’t included with the MEBx network configuration if there is some technical limitation there? Just not sure, but seems to make a lot of sense to make this VLAN aware. I just used one of the 2.5 GbE ports since I am all 10 GbE anyway on the cluster side, the 2.5 gig interfaces are fair game. So you are liking the EVO X2? Does is perform as well with AI as they market it?
Brandon