There are many great home server operating systems out there like TrueNAS, Unraid, Yunohost, CasaOS, Cloudron, and others. All of these are great in their own right. However, there is another option out there you may not have heard about. It is called Cosmos Server and allows easily running a home server, even if you don’t have much experience with networking, storage, or Docker containers. It allows you to run self hosted services without having to stitch together everything you need like reverse proxies, authentication, and management tools. Let’s dive into Cosmos Server, what it is, and my thoughts on using it.
What is Cosmos Server?
When you compare Cosmos Server with other server type operating systems out there, it is not a traditional OS in the sense of the word. It is not an all inclusive hypervisor that allows you to manage disks, fancy storage pools, or even run virtual machines. Instead it is a purpose-built home server operating system that is built for one thing. It runs Docker containers really well on the underlying Linux host.
You deploy Cosmos Server as a privileged container that integrates with your host system. It allows you to manage your container apps, routing, and lets you have a prebuilt authentication layer so you can setup access control from the management interface. You can think of Cosmos server as the “front door” so to speak to your server.
So, with that said, I don’t think it is trying to replace your hypervisor or NAS device per se. It is trying to be the glue that holds all the modern self-hosted apps that most run in the home lab or home server environment together.
Check out the official GitHub page here: azukaar/Cosmos-Server.
Why Cosmos Server exists in the first place
When most start self-hosting, they usually don’t understand or have the skill set to do everything they want to do. They may start with a Docker host, then learn about reverse proxies so services can be reached by name. Then ones may want to add authentication to things that you want to lock down. You then probably add other tools and monitoring to the mix.
Think of Cosmos Server as a way to “skip ahead” of this learning curve and get up and running the right way the first time with security baked into the solution. I see this as a way to definitely reduce or eliminate the normal complexity with self-hosting as ones get started. It allows you to have basic routing, authentication and a way to manage your services right out of the box.
Cosmos Server architecture
As we mentioned above, it runs as a Docker container that uses host networking and elevated privileges. You may think this is a security accident. But, I would say the way that Cosmos is designed, it is meant to function more like the native operating system instead of just a single container you have running on your Docker host. So, this architecture is not harmful if you design with this in mind as you start adding services.
When you spin up the Cosmos Server container it uses the host networking so you won’t see ports passed through from the host to the internal container networking. Instead it will bind to ports 80 and 443 when you spin it up, so keep this in mind. It is meant to be the primary gateway or ingress into your Docker host for the rest of the applications you spin up on the host.
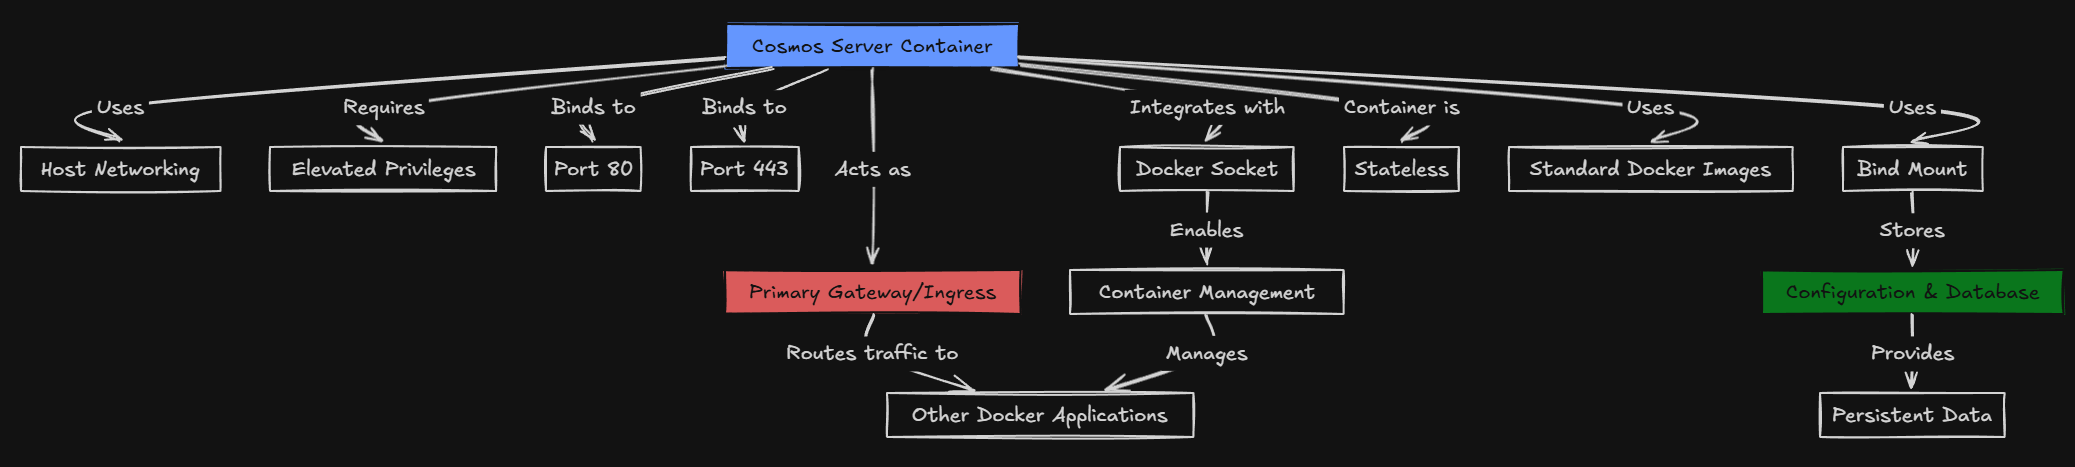
Cosmos also has integration with the host’s Docker engine. It does this by integrating with the Docker socket on the host. This allows it to manage other containers while it still uses standard Docker images underneath the hood. It uses a persistent bind mount on the host so that it keeps its internal configuration and database stored as persistent data. But the container itself is stateless.
How to install Cosmos Server
I have to say after going through the deployment process for Cosmos Server, I didn’t run into a single issue. You can use the Docker run command that is shown on the official Github or the Docker Compose example that I show below as well.
Docker run example:
Here is the Docker run command you will use to deploy Cosmos Server:
sudo docker run -d --network host --privileged --name cosmos-server -h cosmos-server --restart=always -v /var/run/docker.sock:/var/run/docker.sock -v /var/run/dbus/system_bus_socket:/var/run/dbus/system_bus_socket -v /:/mnt/host -v /var/lib/cosmos:/config azukaar/cosmos-server:latestHere is an example Docker Compose example that I used on my test host below. First I created a project directory and made sure permissions were set for my user.
sudo mkdir -p /home/linuxadmin/homelabservices/cosmos
sudo chown -R linuxadmin:linuxadmin /home/linuxadmin/homelabservices/cosmos
Docker compose code:
The bind mount I have bolded below is the one that you will want to customize for your environment.
services:
  cosmos-server:
    image: azukaar/cosmos-server:latest
    container_name: cosmos-server
    hostname: cosmos-server
    network_mode: host
    privileged: true
    restart: always
    volumes:
      - /var/run/docker.sock:/var/run/docker.sock
      - /var/run/dbus/system_bus_socket:/var/run/dbus/system_bus_socket
      - /:/mnt/host
      - /home/linuxadmin/homelabservices/cosmos:/config
Then, bring up the Docker container using the command:
docker compose up -d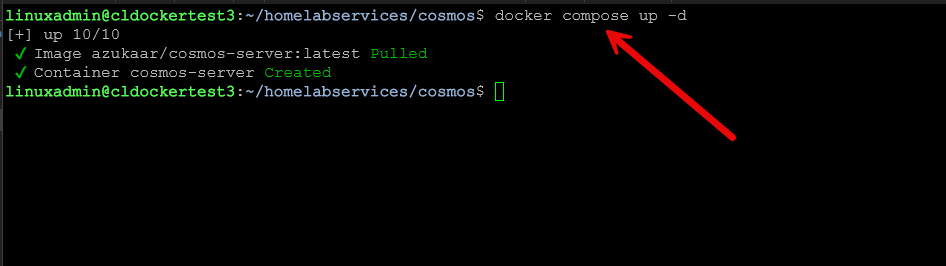
I like to make sure the compose stack is properly running with the command:
docker compose ps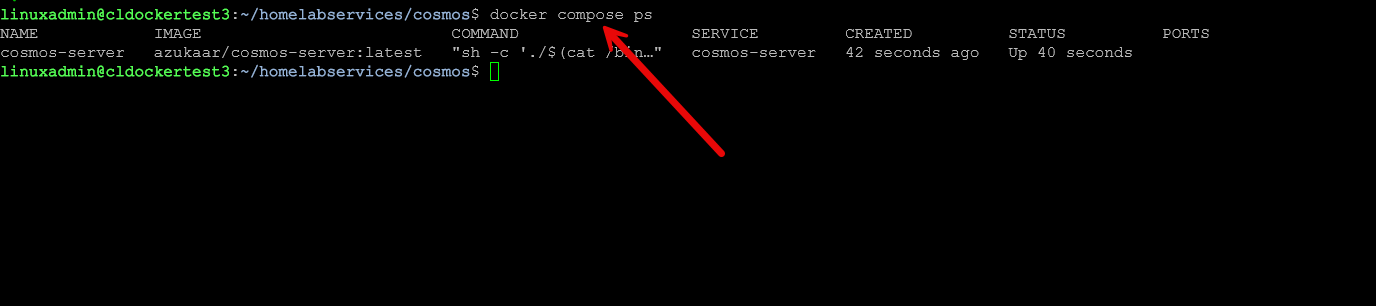
Once the container is running, Cosmos Server is accessible over port 80 on the host system. It first uses port 80 and then during the setup as you will see in the screenshots below, it asks how you want to setup HTTPS for your server. I think this is really great the developer walks you through several different options here for SSL.
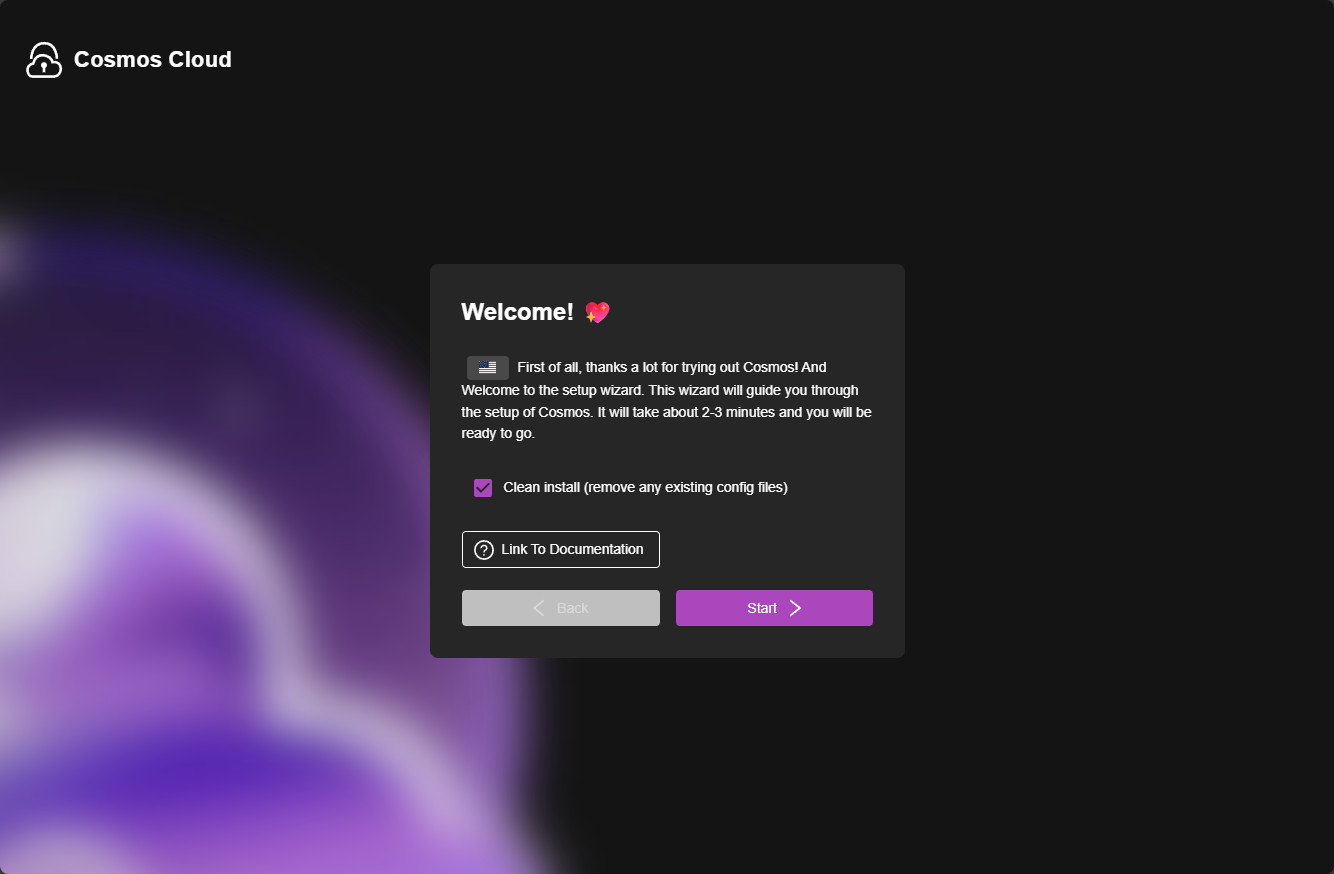
The initial setup wizard
Once you connect over port 80, you will be greeted with the following wizard. Click Start to begin.
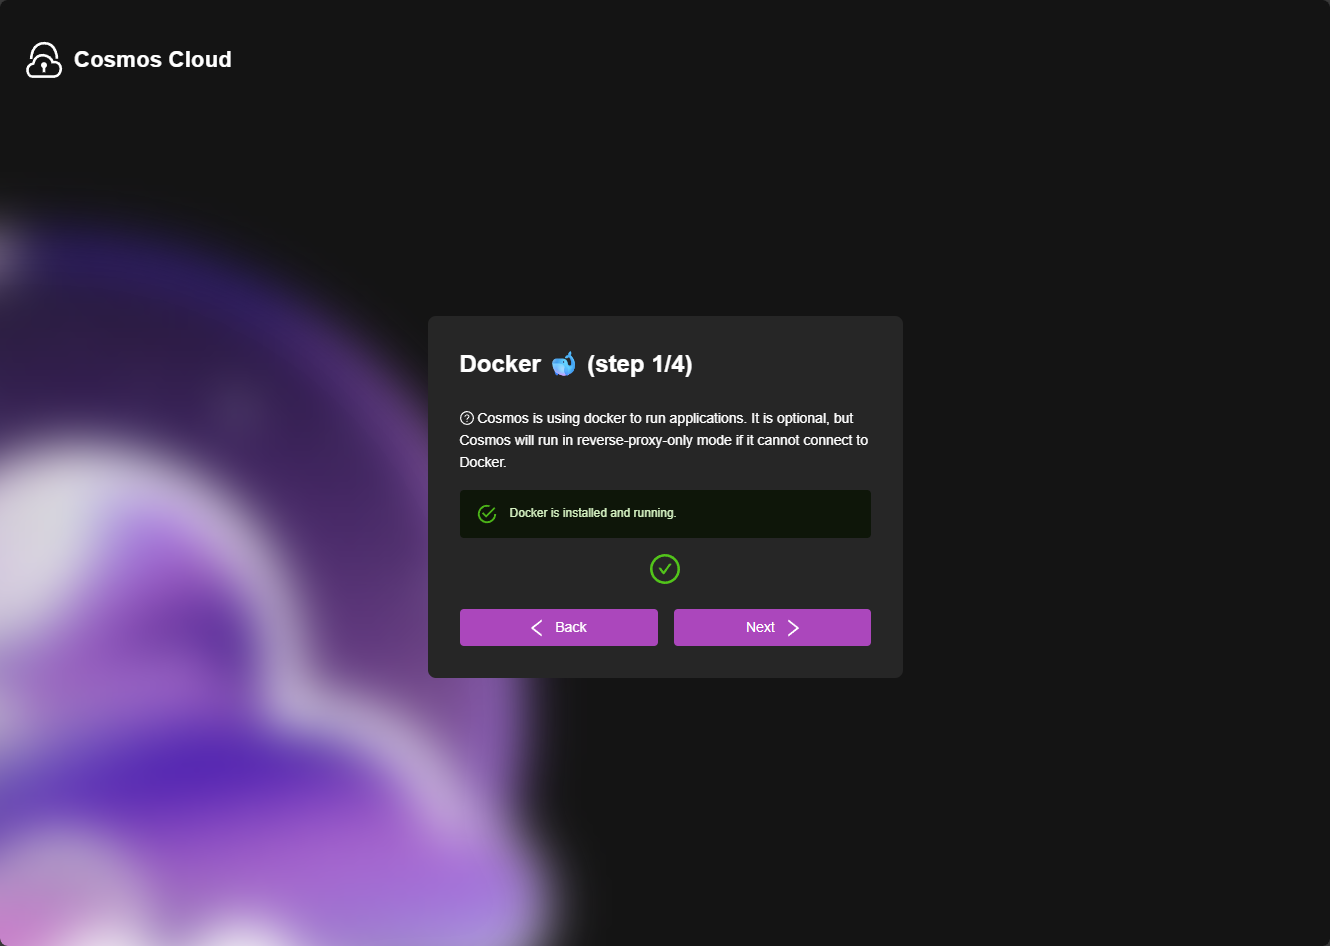
Step 1 of 4 is setting up Docker. It should recognize that you already have docker running on your host since you have set it up using docker. But it will check its connection here and only run in reverse proxy mode if it cannot connect to the Docker engine. Click Next.
Step 2 is the database setup. This screen might look like an error, but actually it is just saying the DB is not setup as of yet or connected. So you have options here to point it to your own DB server or you can leave the default selected which is Automatically create a secure database (recommended). Click Connect.
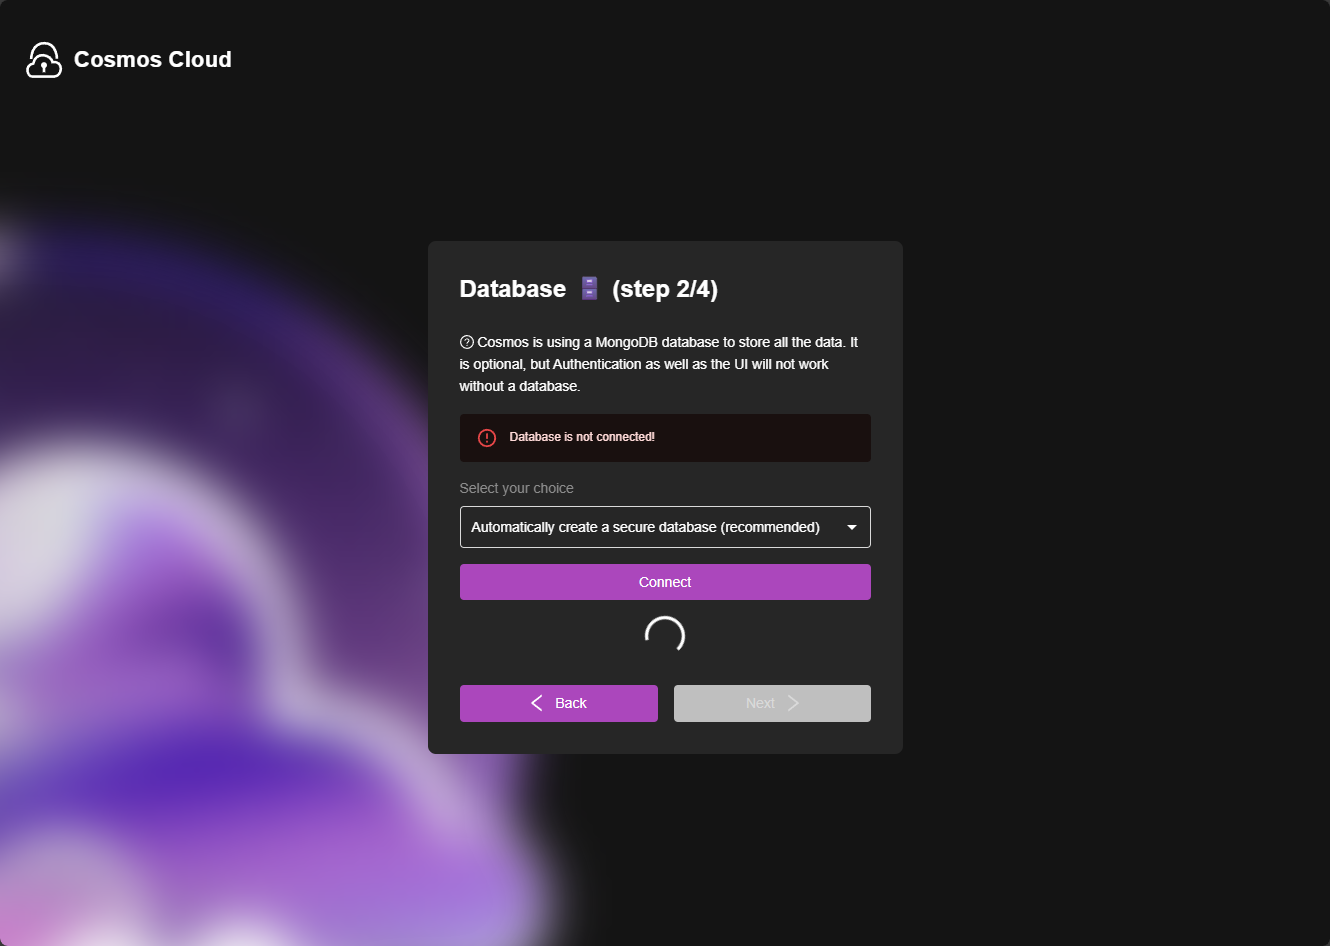
It will begin the process of spinning up the MongoDB container.

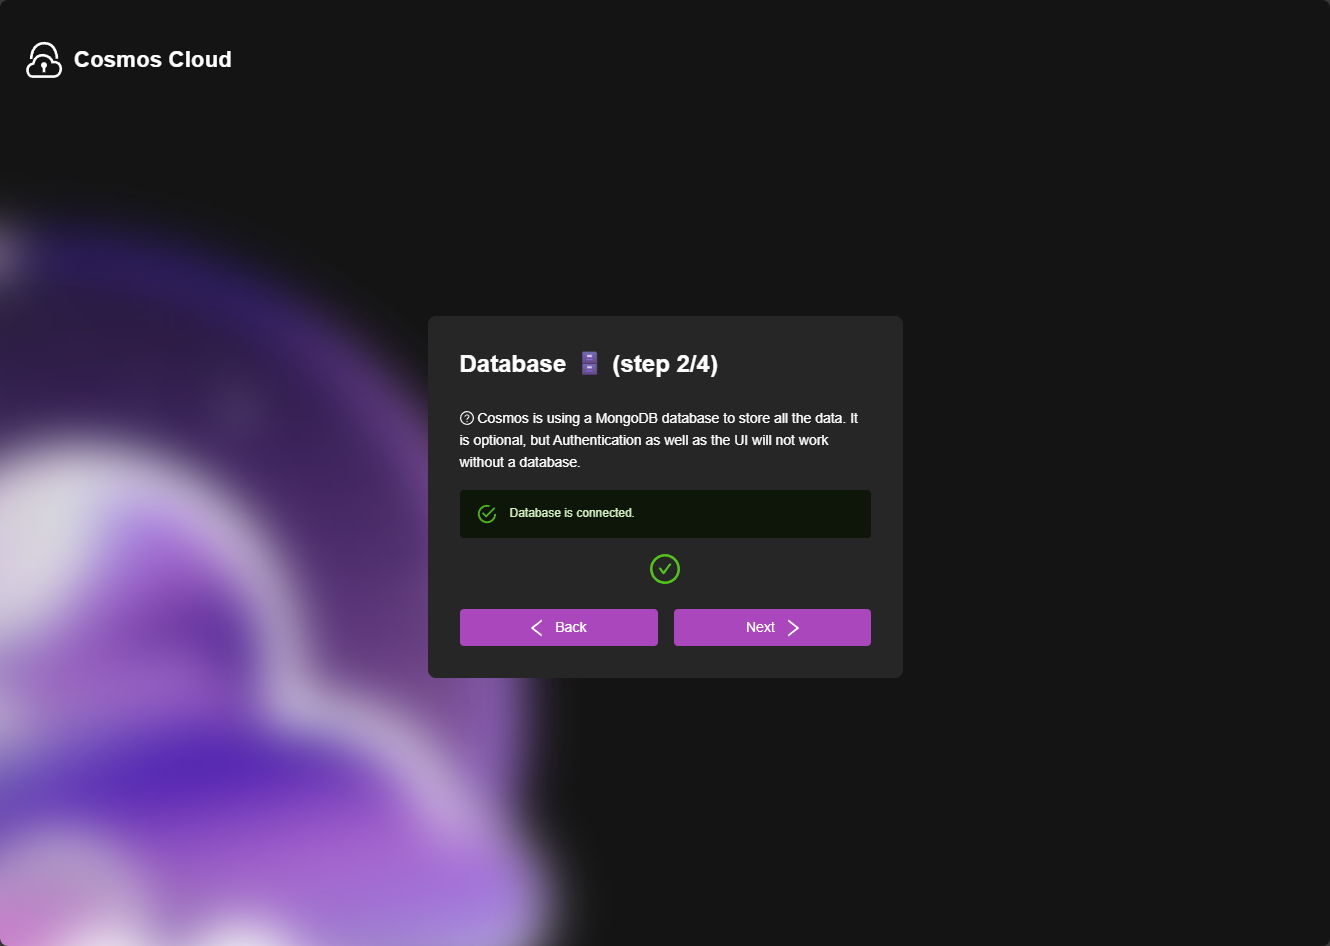
Once MongoDB is up and running it will show the Database is connected. Click Next.
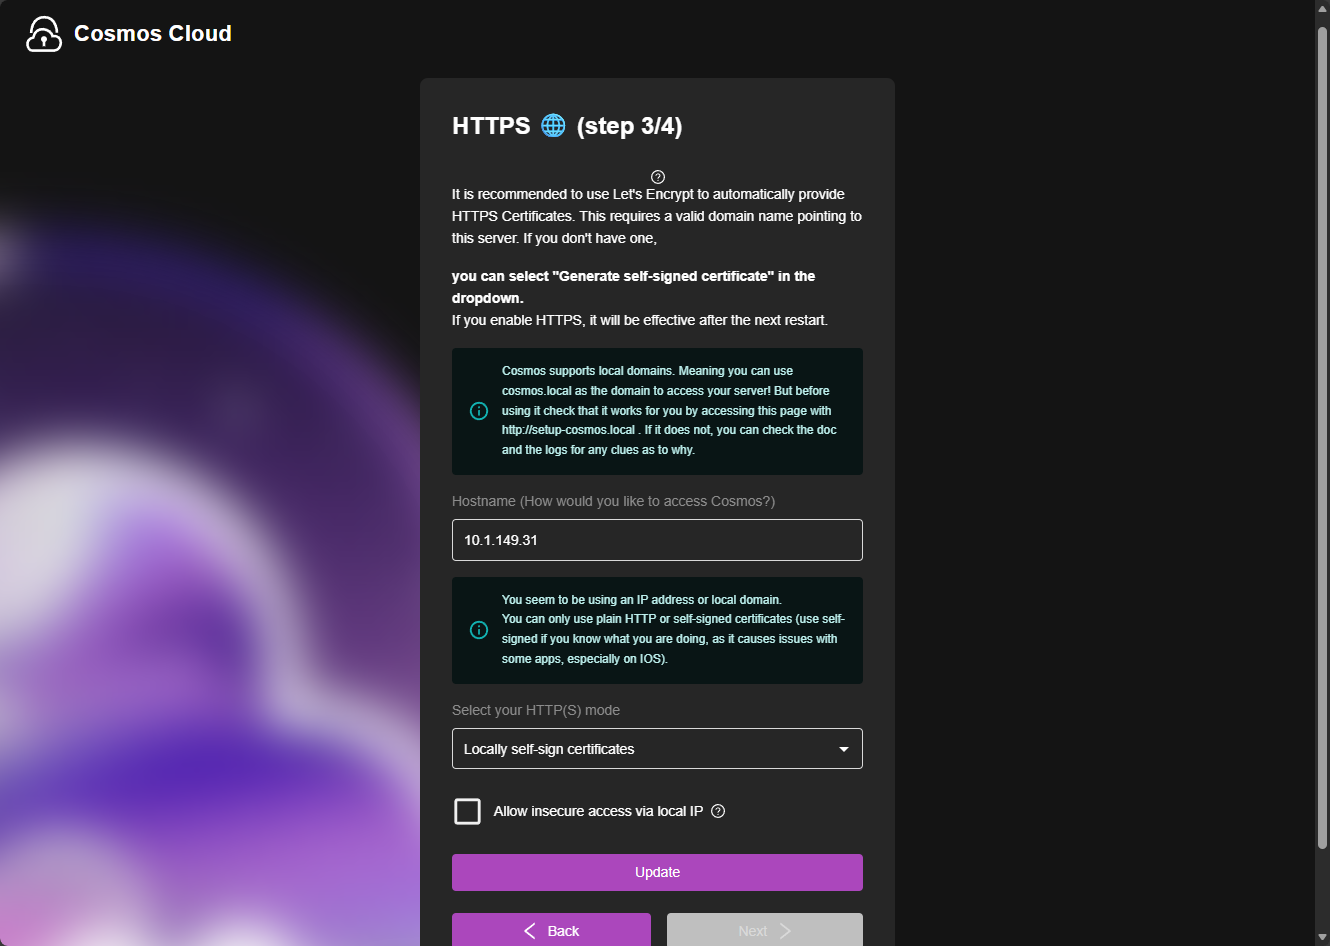
Step 3 is sets up HTTPS. I like how the developer here gives you options. You can use your own certificate or leave the default here to locally self-sign certificates. You will be able to setup Let’s Encrypt as well. Also, you can choose to keep the insecure clear-text transport if you check the box to Allow insecure access via local IP. Make your selection and click Update.
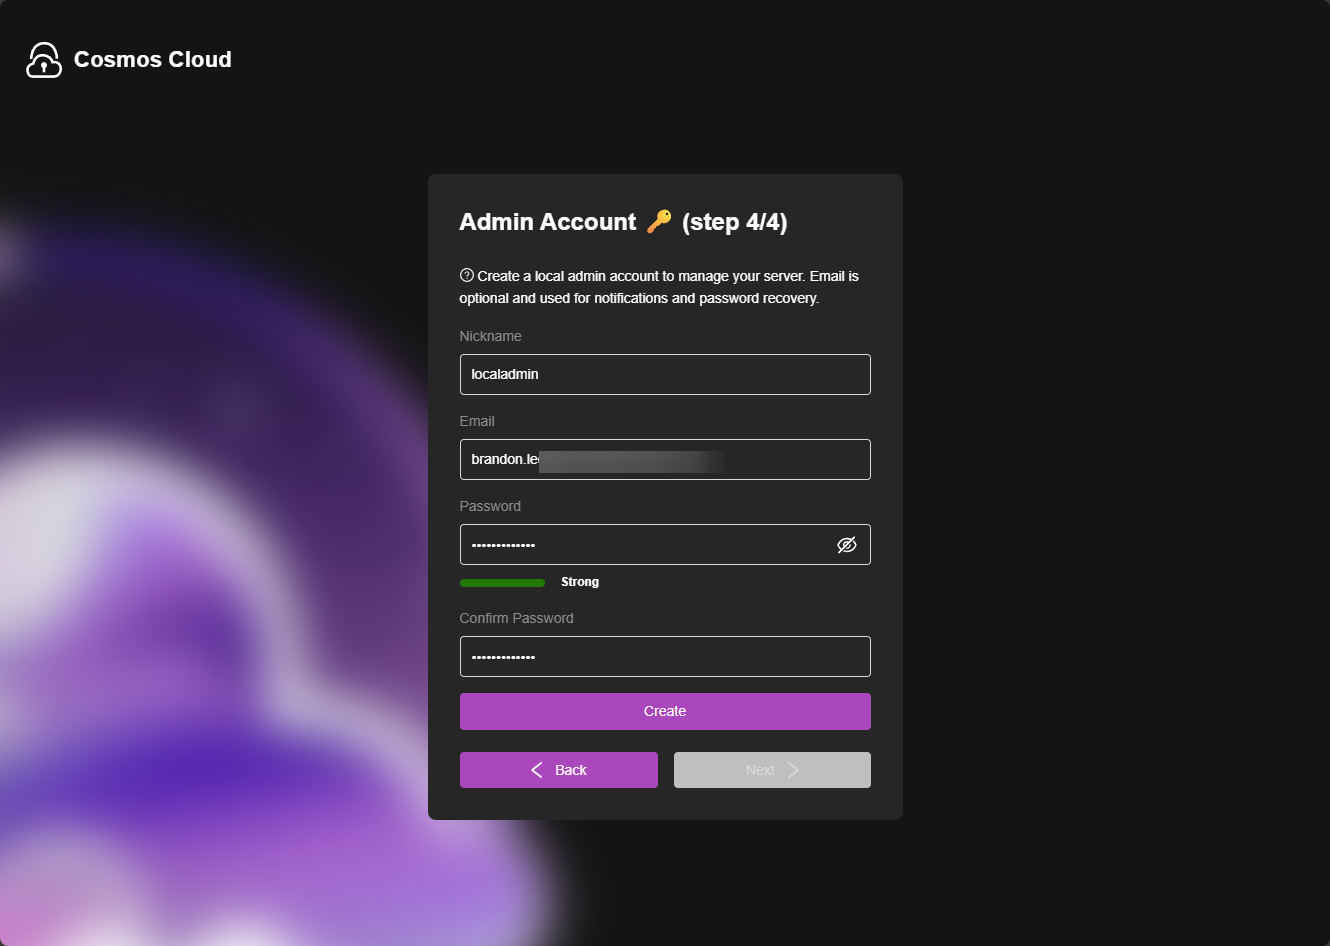
Step 4 is setting up your admin account. Type in your username, email address, password and confirm the password and click Create.
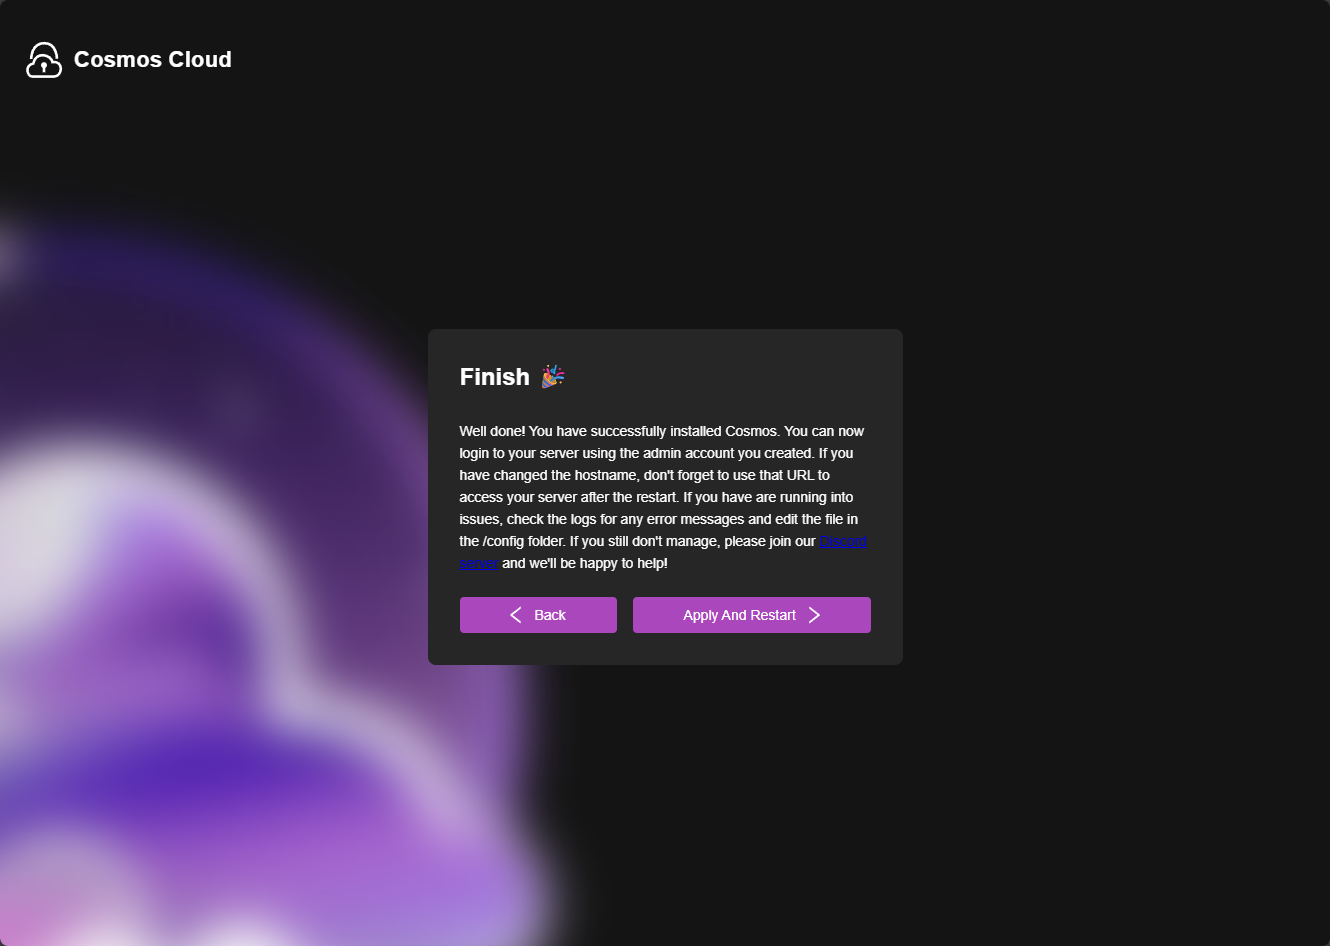
Finally, click Apply and Restart to finish the configuration.
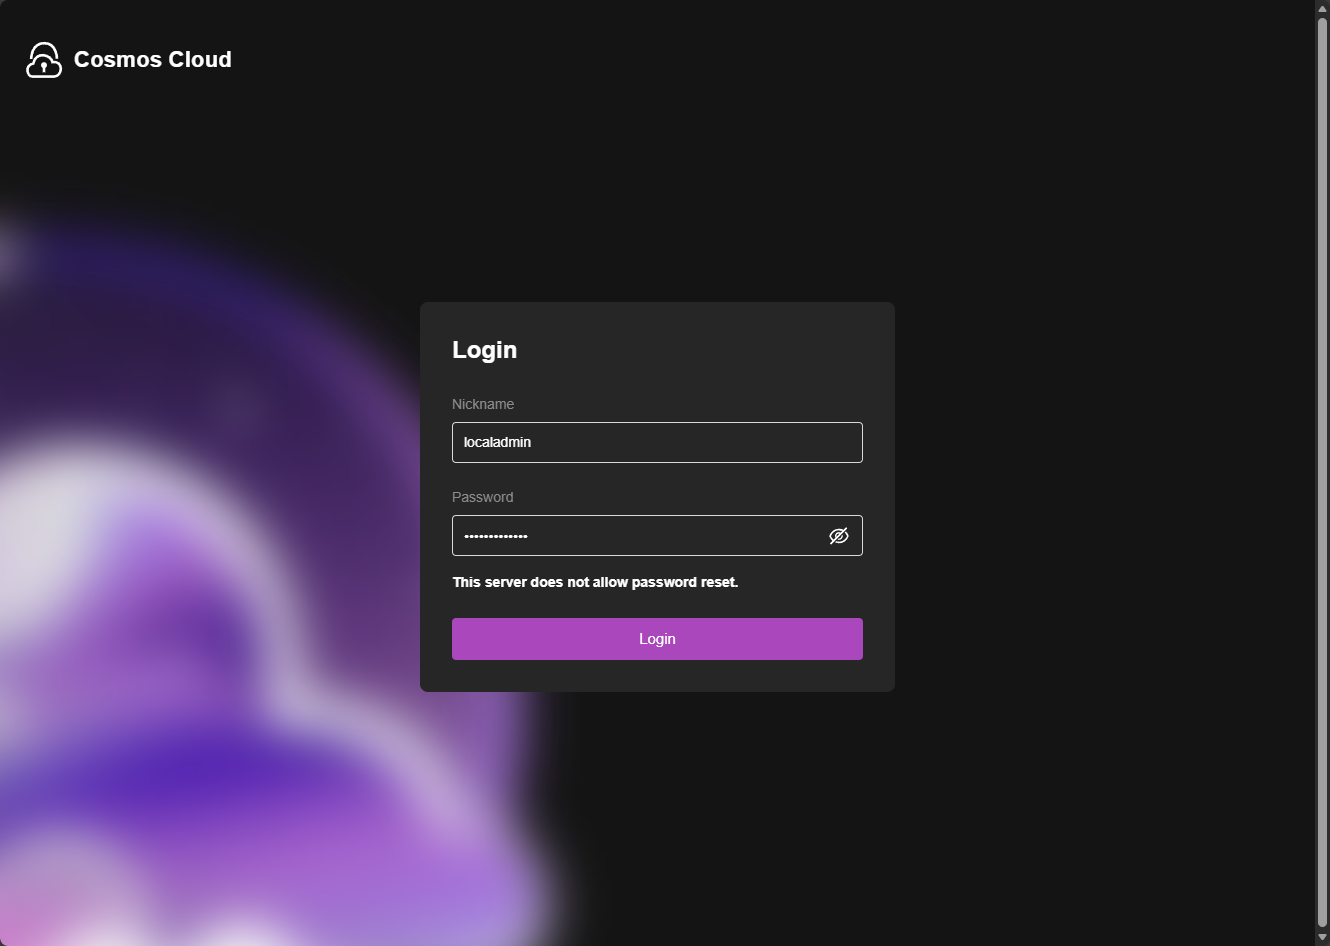
Logging into Cosmos Server for the first time
Now that the initial wizard is finished, you will log into the solution using the username and password you created.
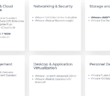
This is how my default dashboard looked, pretty plain. But you will see the little hamburger menu in the upper left-hand corner. You can click that to pop out the menu.

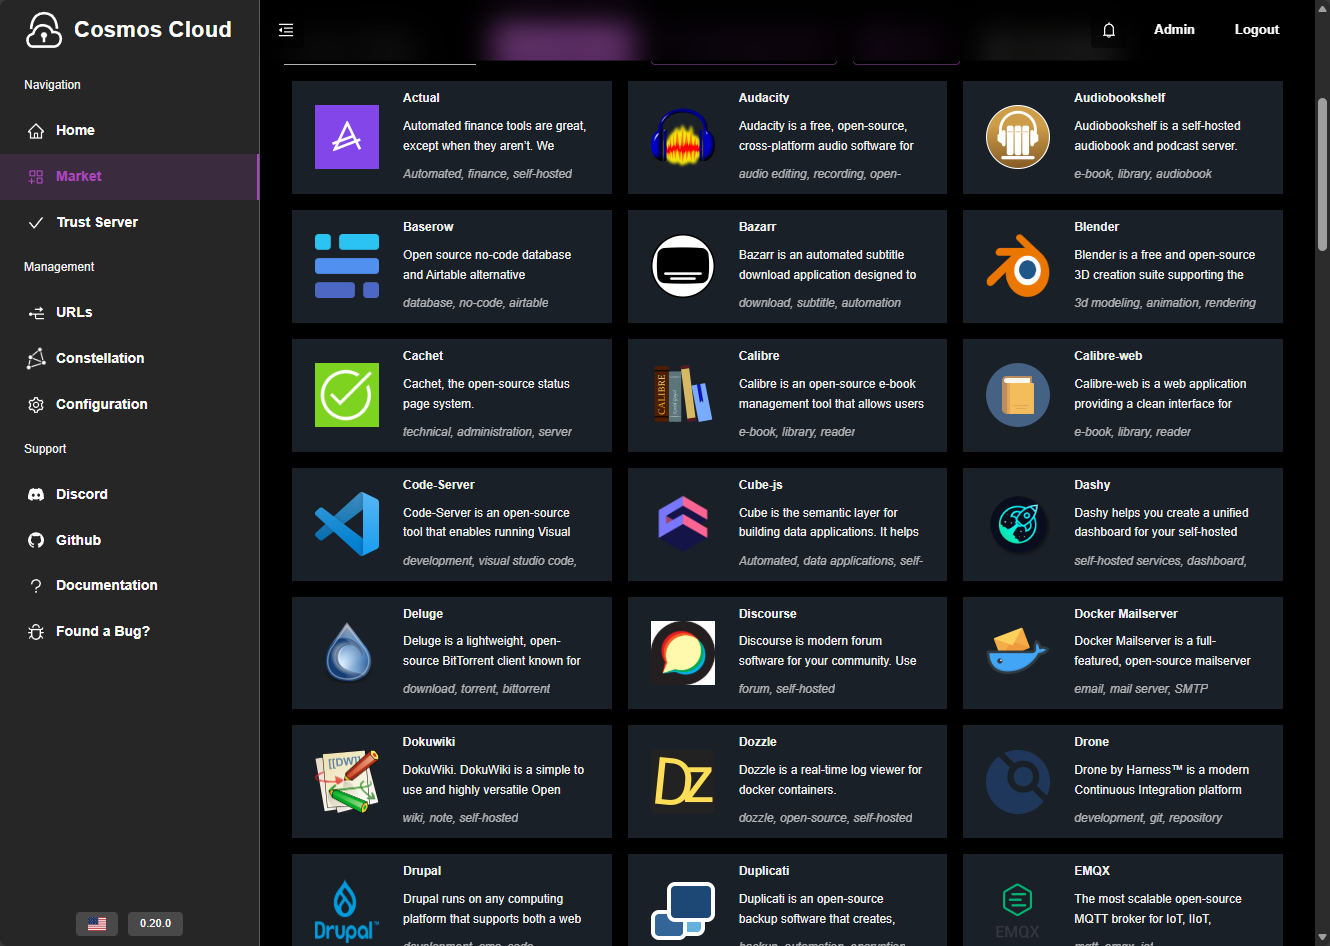
Now we see lots of options. The Market is where you can add from a whole catalog of applications that are common to self-host.
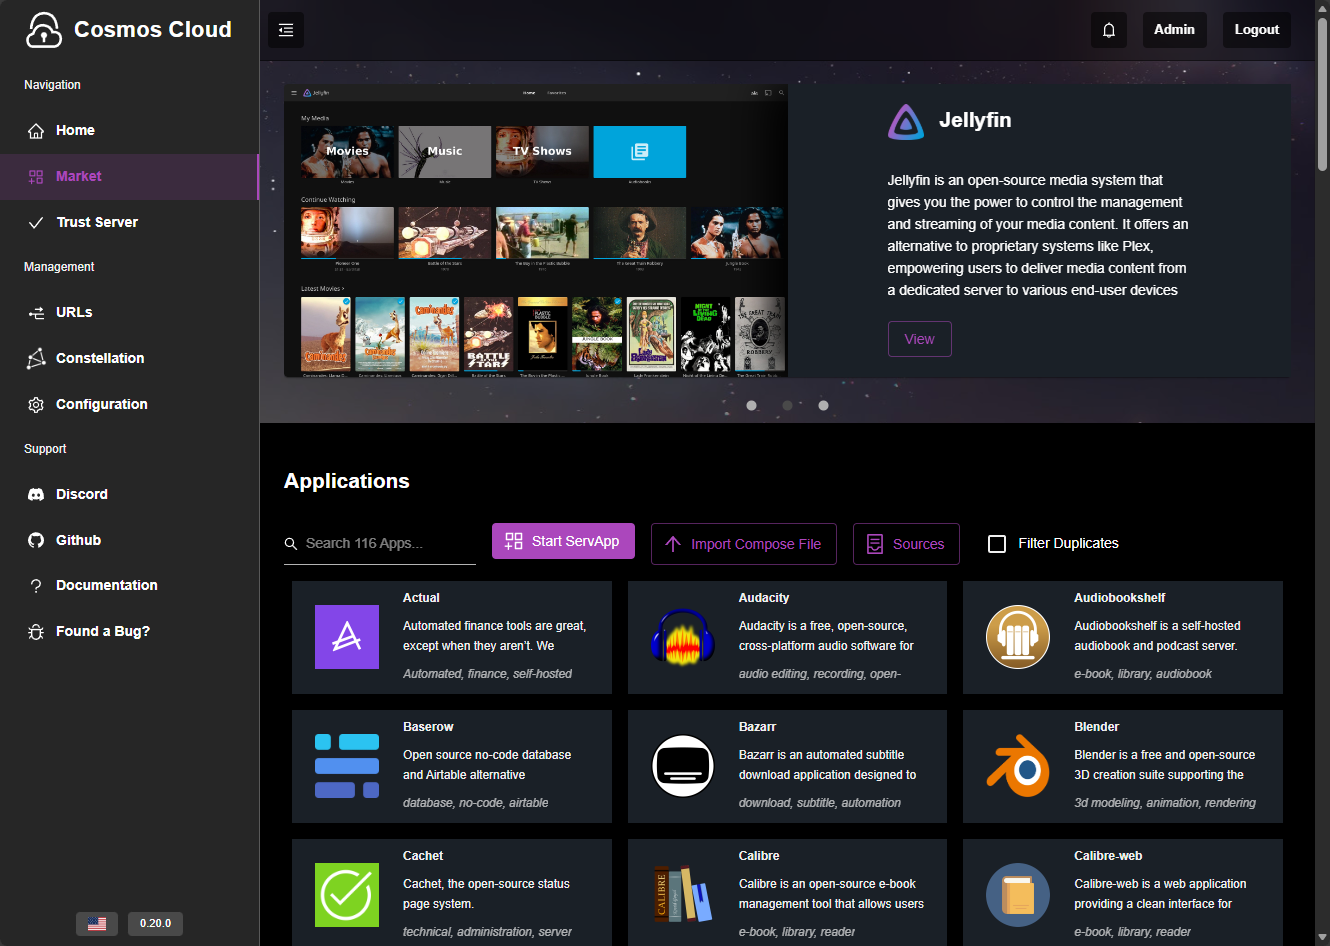
Here is a view after I scrolled down to show more of the catalog. I think a large portion of popular self-hosted apps are included. Are you limited to only these apps? No, ultimately Cosmos Server will interface with Docker so you can spin up any other apps that you normally would if these aren’t in the catalog, using Docker Compose, etc.
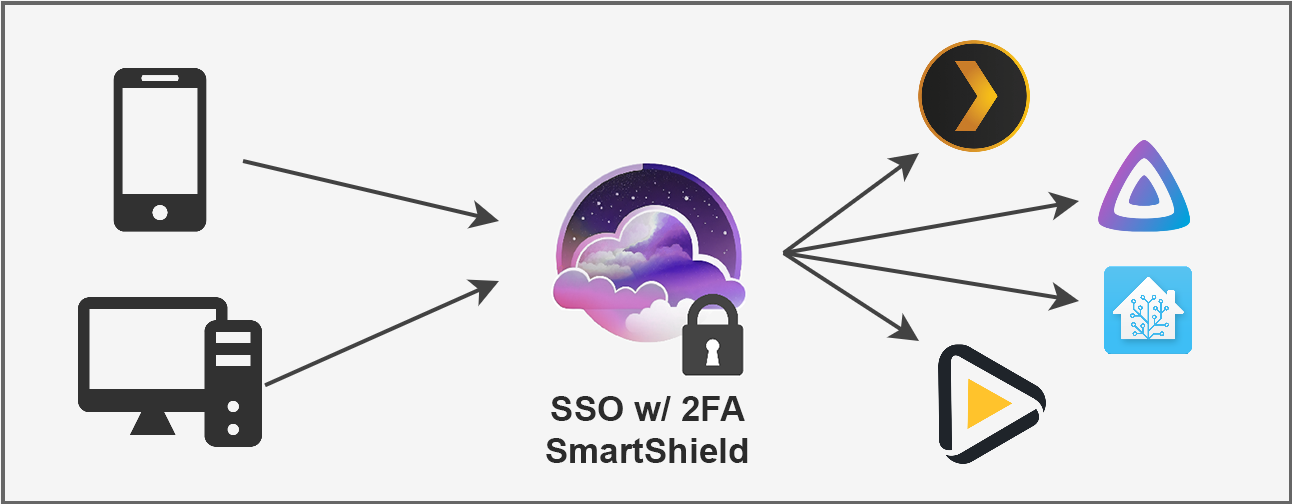
SmartShield is a cool security feature
I think one of unique features of Cosmos Server is something called SmartShield. SmartShield is Cosmos Server’s built-in protection layer for things like APIs and web services. So, instead of you having to rely on static rate limits or external tools, SmartShield watches how users and applications behave and adjusts its protections automatically. Pretty cool!
Here are a few of the features of SmartShield:
- Rate limiting – SmartShield does not rely on fixed request limits that you have to guess ahead of time. It watches how users interact with your services and adjusts limits dynamically so normal usage keeps working while abusive behavior is slowed down.
- It slows users down instead of breaking things – When someone sends too many requests, SmartShield does not immediately block them. Instead, it throttles their requests and slows them down. This helps protect your server without suddenly causing errors or failed requests.
- It issues strikes for repeat abusers – If a user or client keeps exceeding acceptable usage, SmartShield can automatically issue strikes or temporarily ban them. In extreme cases, permanent bans can be applied without you needing to step in manually.
- It limits total server load during spikes – SmartShield does not just watch individual users. It also controls how many requests your server handles at once by using internal queues. This prevents a single service or spike in traffic from overwhelming your system.
- Usage per user is tracked – SmartShield keeps track of how many requests users make, how much data they use, and how many connections they open at the same time. This gives Cosmos the context it needs to protect resources and gives you visibility into real usage.
- Trusted users will bypass limits – You can mark certain users or groups as privileged. These users are exempt from some restrictions so critical services and admin access continue working even during high load or abuse attempts.
- You can customize your protection rules – SmartShield ships with sensible defaults, but you can adjust limits, time windows, and behavior to match your environment. You do not need to rebuild your stack or add external tools to do this.
- Services are protected by default – As soon as you expose services through Cosmos, SmartShield is already working. You do not have to remember to add rate limiting or abuse protection later.
Admin mode
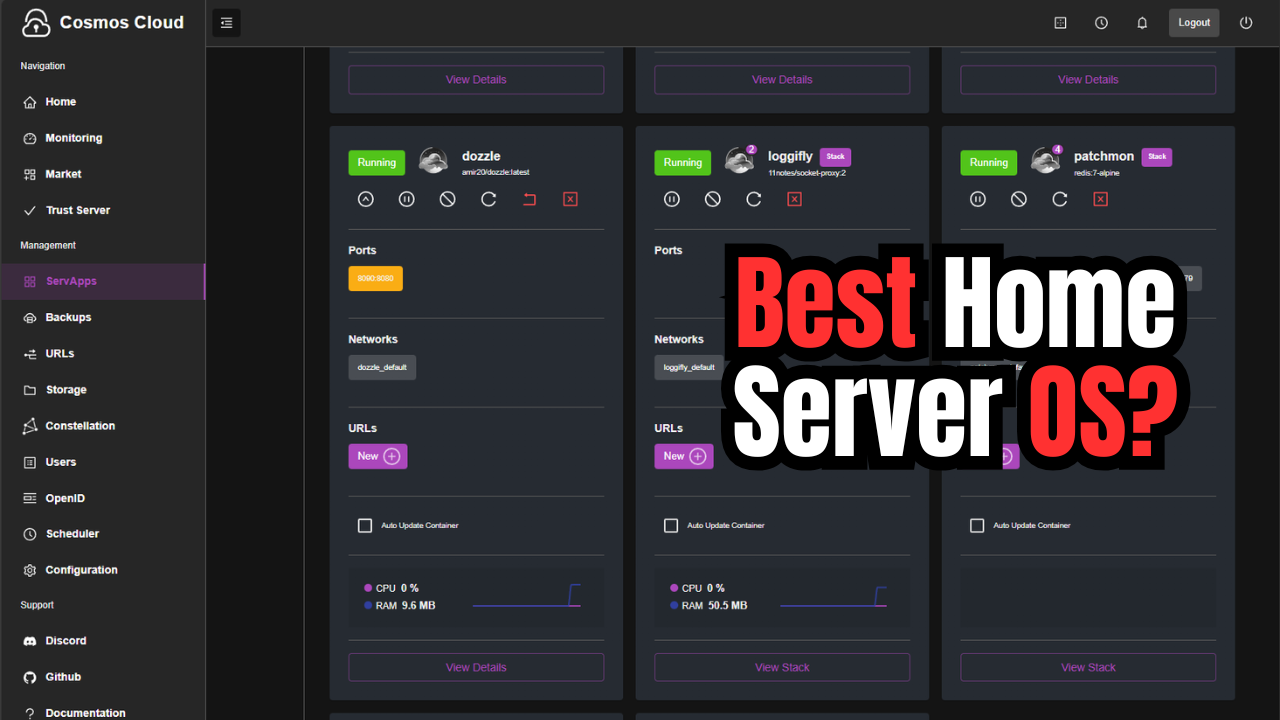
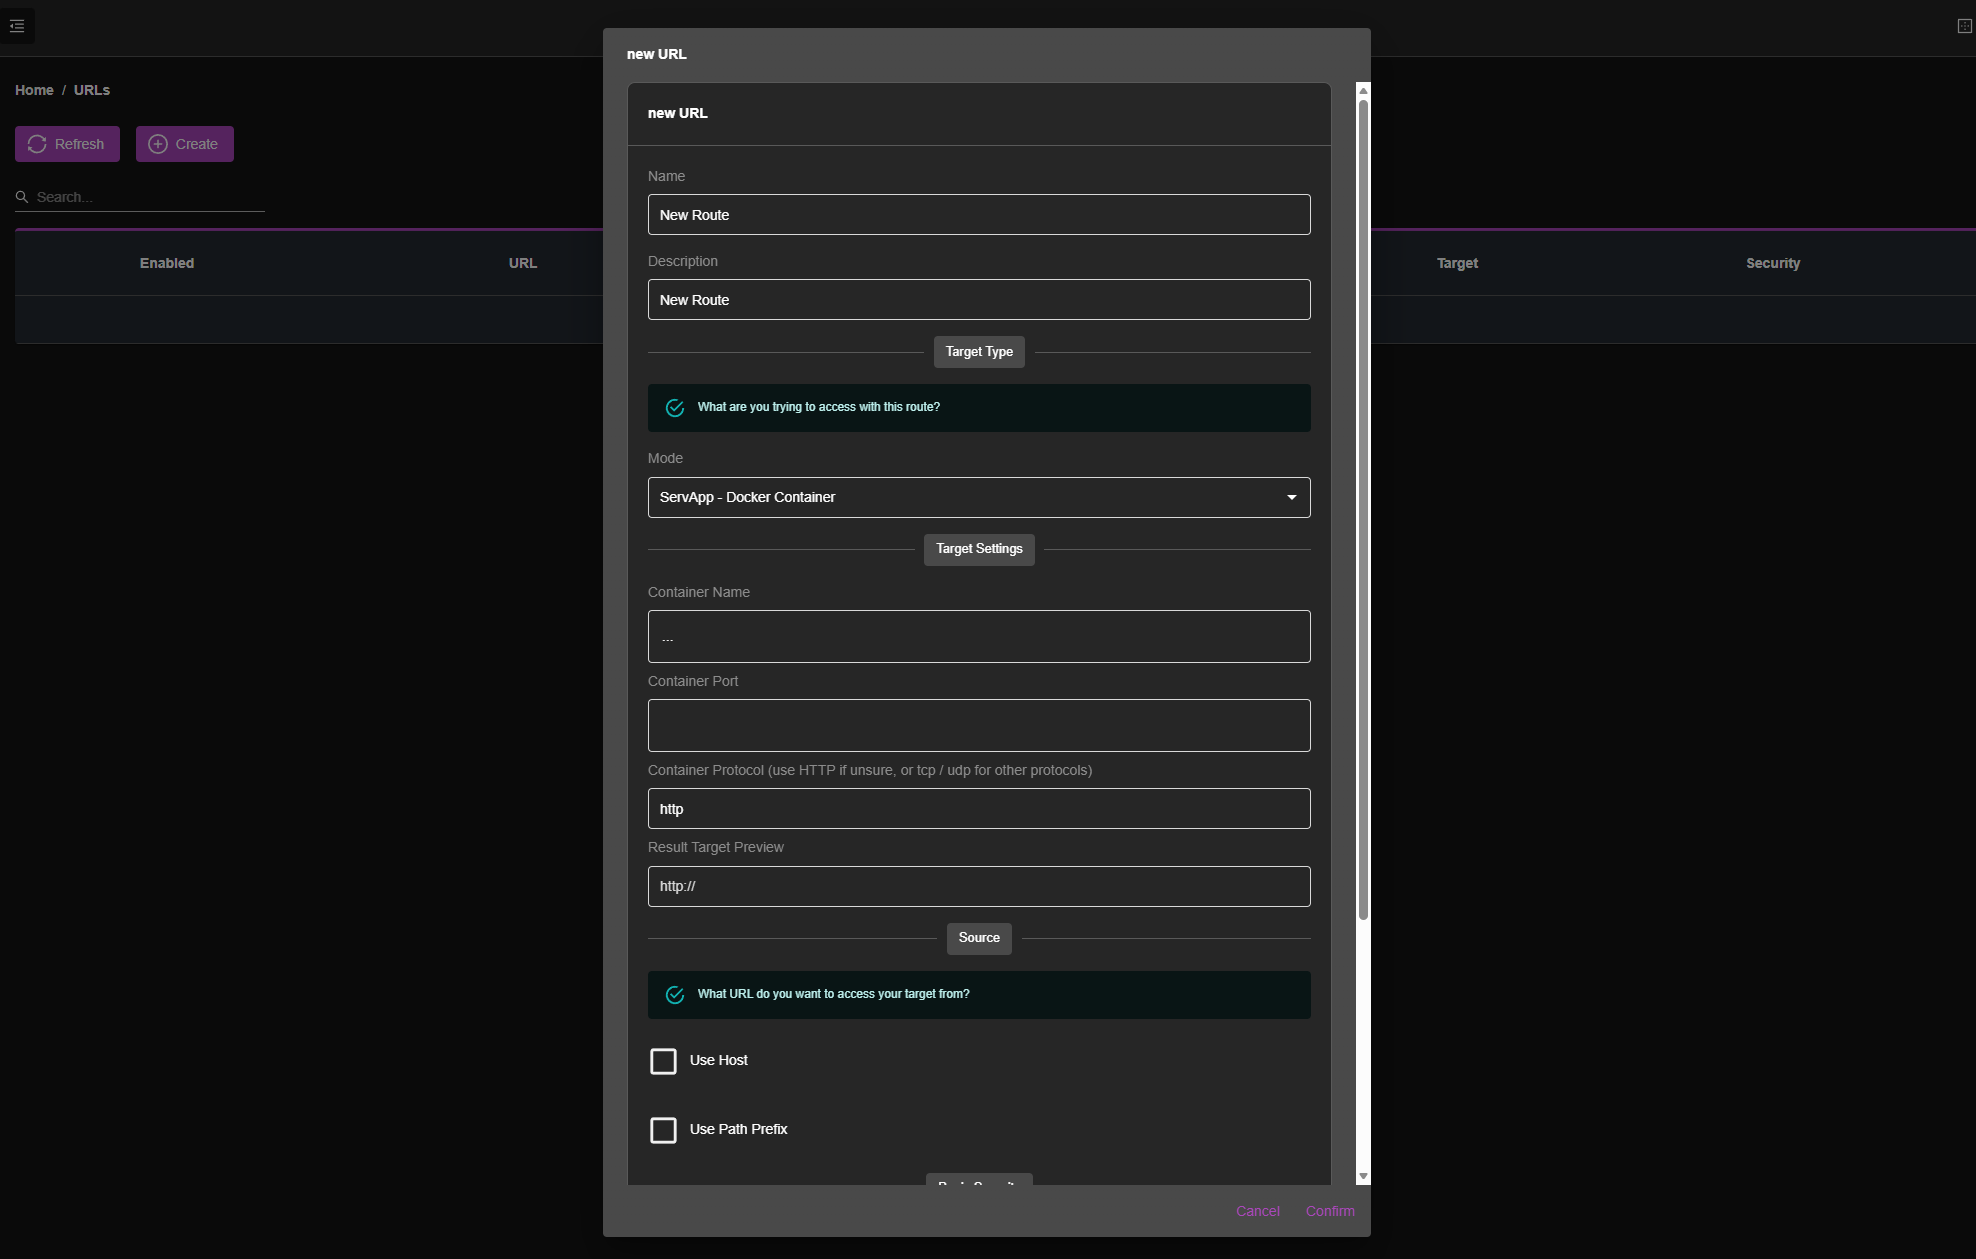
Showing its security by design, you have to intentionally enter “admin mode” to see deeper into the system (you see the extended menus in the screenshot below) and start administering things like exposing server apps. This is what Cosmos Server calls Docker containers that you have running on your Docker host that you want to expose. These can be containers you have manually stood up or your containers you pulled from the Market app in Cosmos Server.
What I think is cool about this, you can see the reverse proxy configuration that is built right into the server apps interface. You can click the URLs > New + and add a new URL to access that particular container from and Cosmos Server takes care of the rest. Also, you wills ee below, that it gives you basic controls over your containers and even allows you to check a box to Auto Update Container.
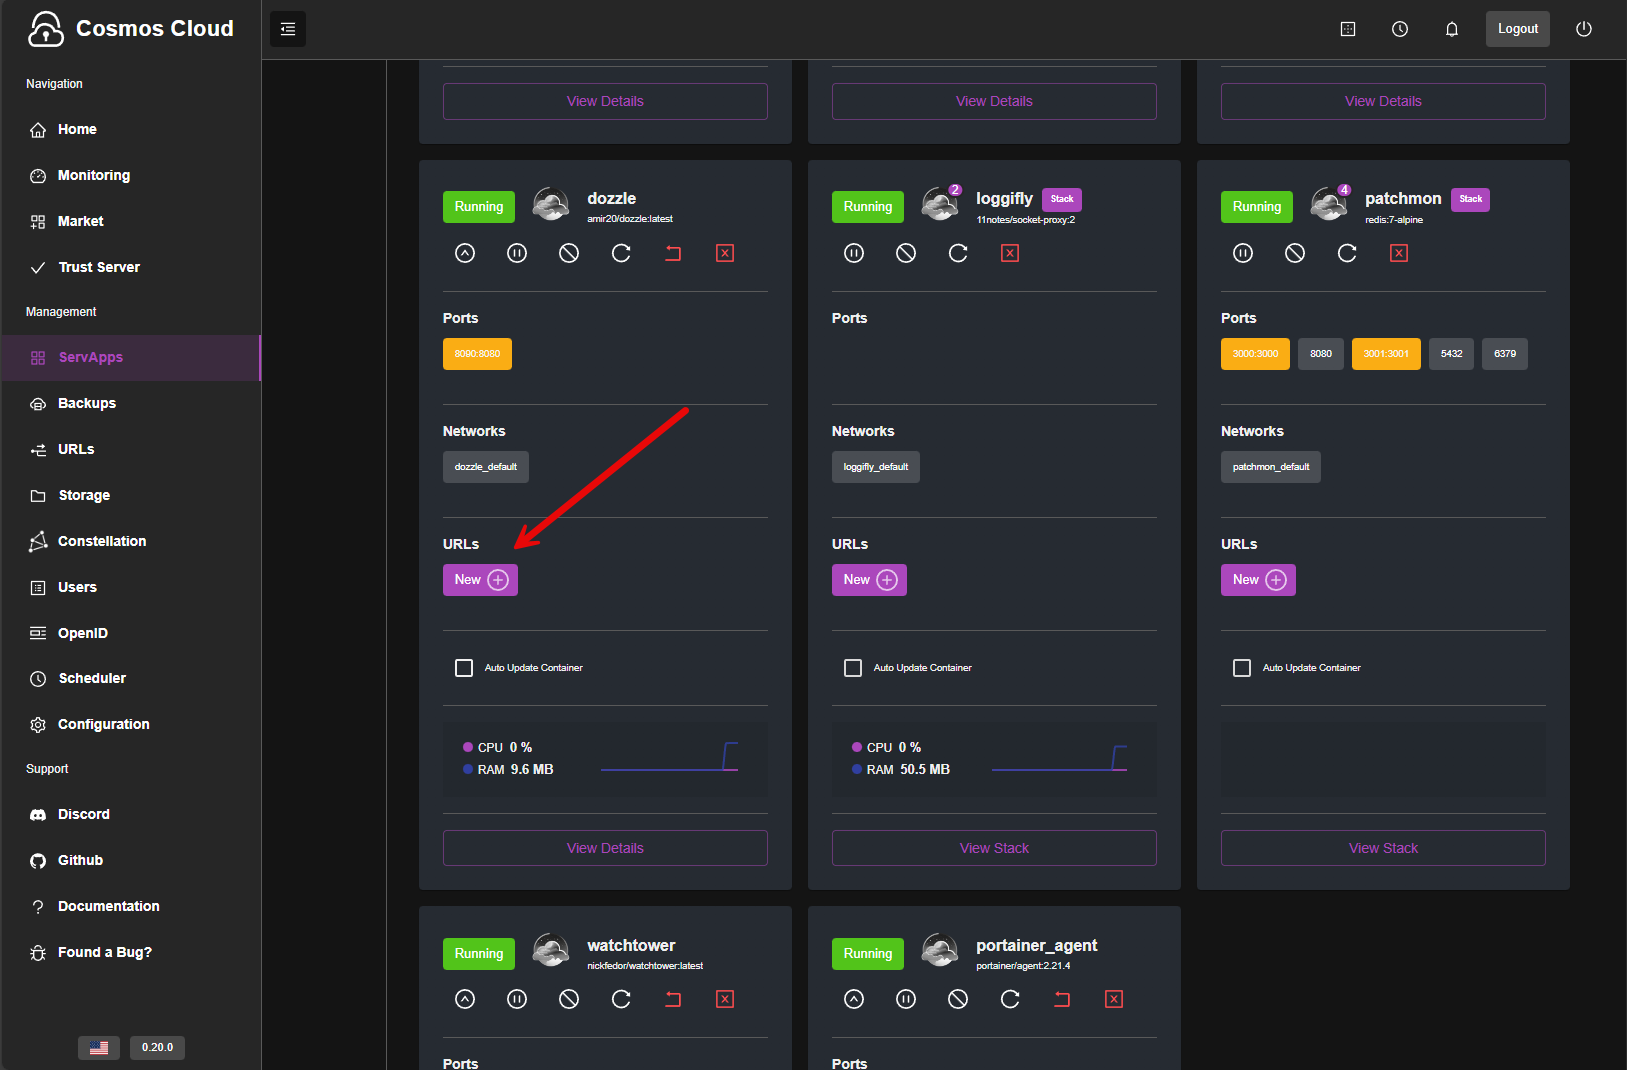
When you create a new URL rule there are a lot of options it gives you to configure these and how you want to have traffic routed to the containerized apps.
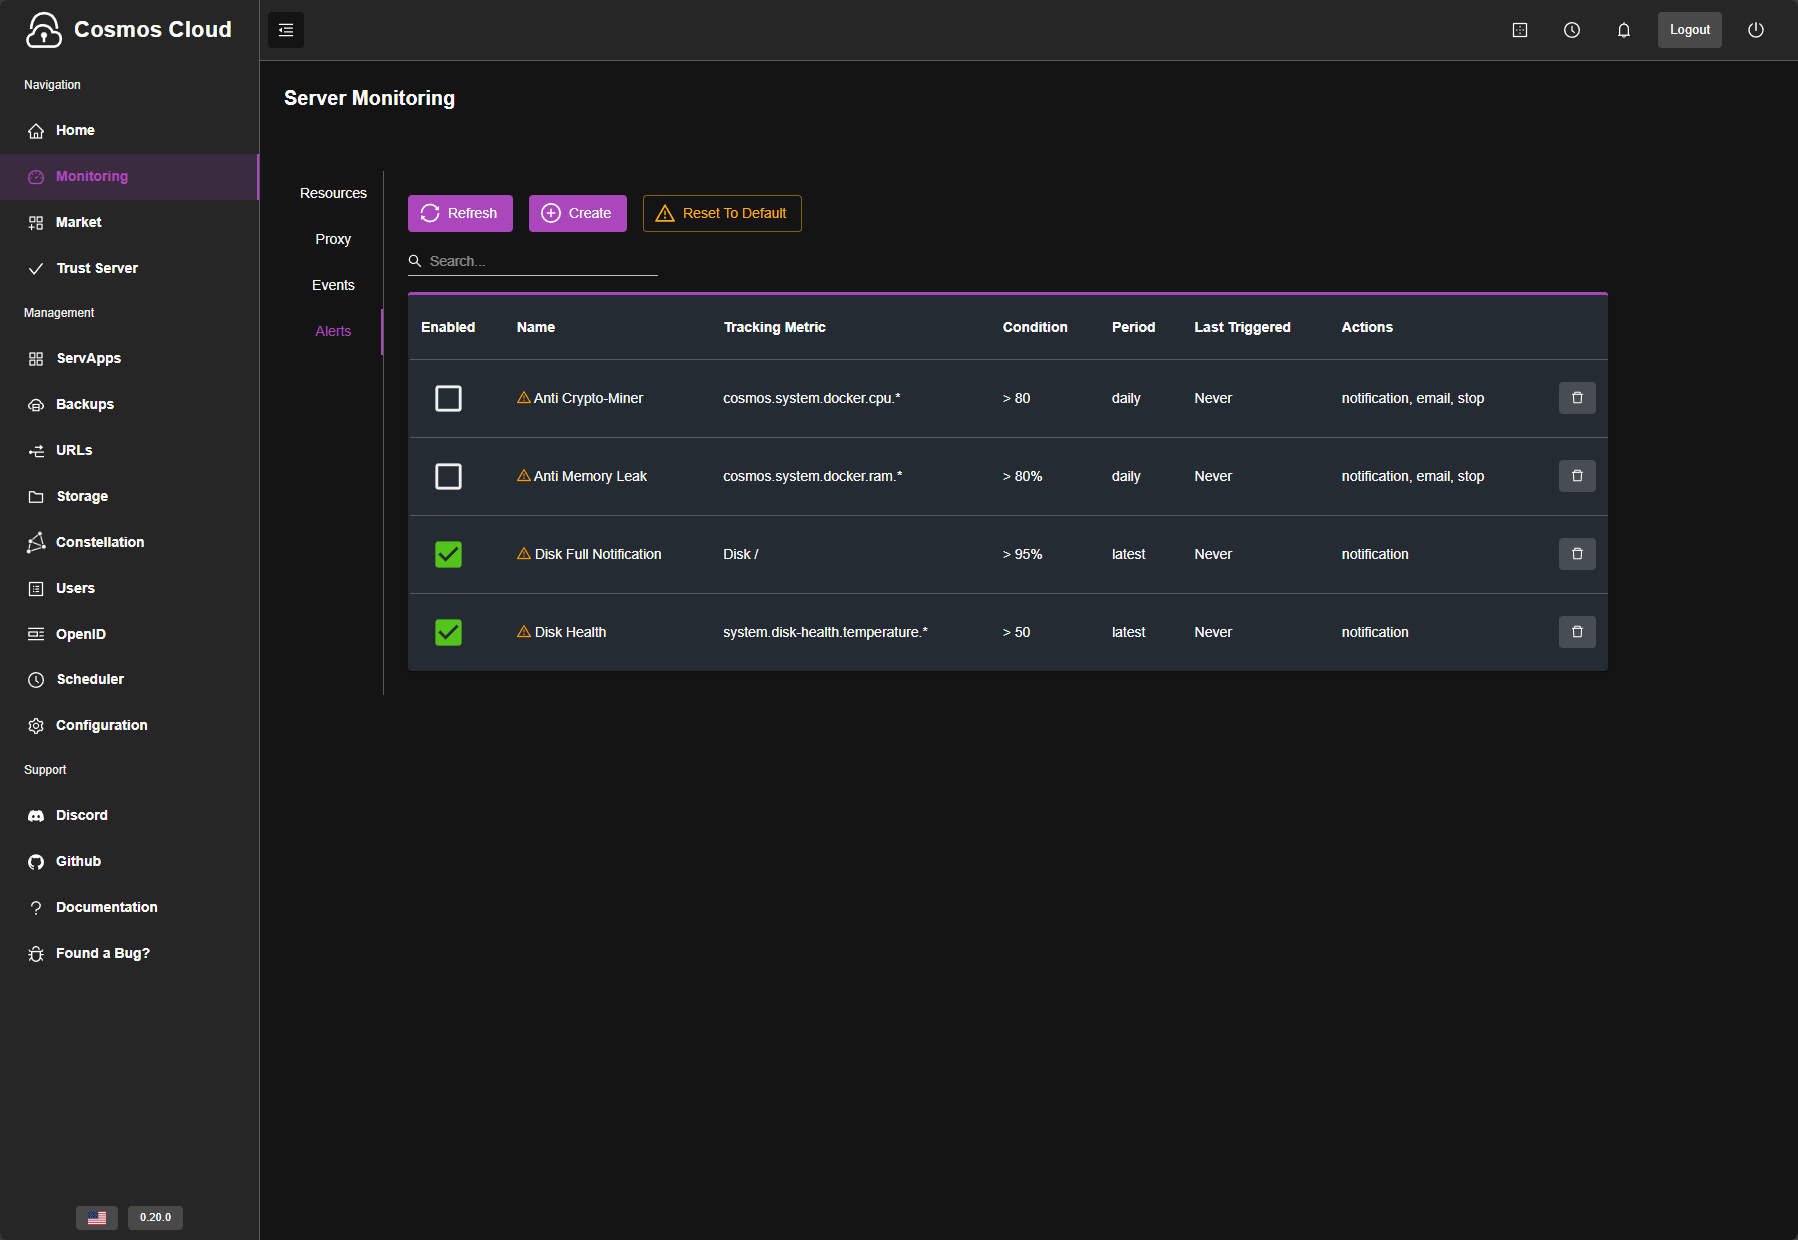
Monitoring and alerting
One of the things that Cosmos Server has that other solutions like it don’t have out of the box is monitoring and alerting that are built-in. This is huge I think especially for those starting out. Most won’t want to get into the weeds right away of Prometheus and Grafana when starting their self-hosting journey.
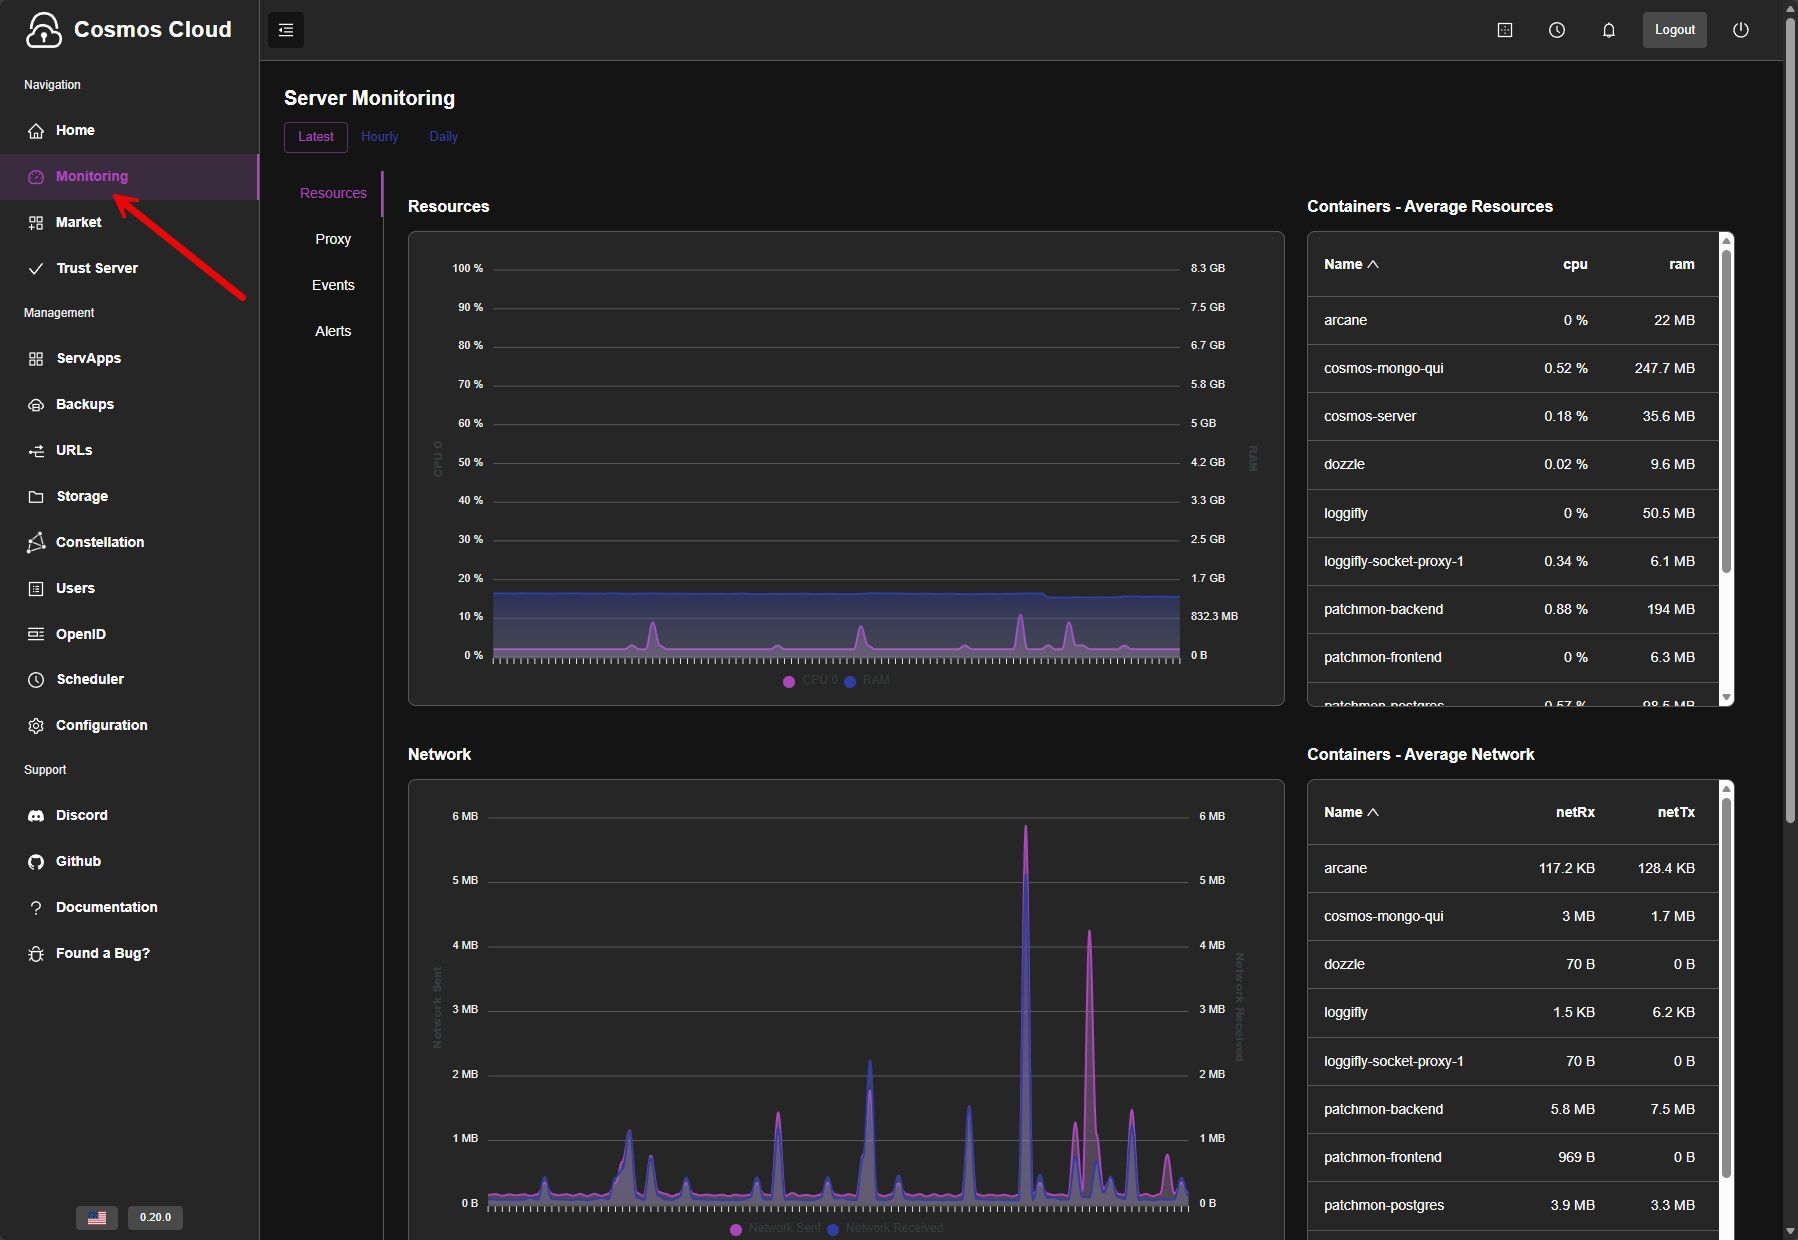
Cosmos Server gives you very capable monitoring and alerting right out of the box. There are built-in alerts already configured, but you can add custom alerts that you want to add to monitor the system.
How does it compare to other offerings out there?
Here is a comparison of how I think Cosmos Server compares with other beginner friendly home lab operating systems out there. As you can see, Cosmos Server is a very security-focused operating system that has many strengths along these lines:
| Feature | Cosmos Server | Unraid | TrueNAS | CasaOS |
|---|---|---|---|---|
| Focus | Secure service platform | Storage and VMs | Storage and data integrity | Simple home apps |
| Reverse Proxy | Yes, built in | No native proxy | No native proxy | No native proxy |
| Automatic HTTPS | Yes | No | No | No |
| Container Management | Native Docker mgmt | Partial via plugins | Limited | Basic Docker UI |
| Docker Compose Support | Yes | Yes | Limited | Yes |
| App Store | Yes | Yes | Yes | Yes |
| Multi-User Support | Yes | Yes | Yes | No |
| 2FA Support | Yes | No | Partial | No |
| OpenID / SSO | Yes | No | No | No |
| API Protection / Rate Limiting | Yes (SmartShield) | No | No | No |
| VPN Integration | Yes | Partial via plugins | No | No |
| Monitoring and Alerts | Yes, built in | No | Partial | No |
| File Manager | No | Yes | Yes | Yes |
| VM Management | No | Yes | Yes | Yes |
| Storage Management | External | Core feature | Core feature | External |
| Host Networking Control | Yes | Yes | Limited | Limited |
| Opinionated Security Defaults | Yes | No | Partial | No |
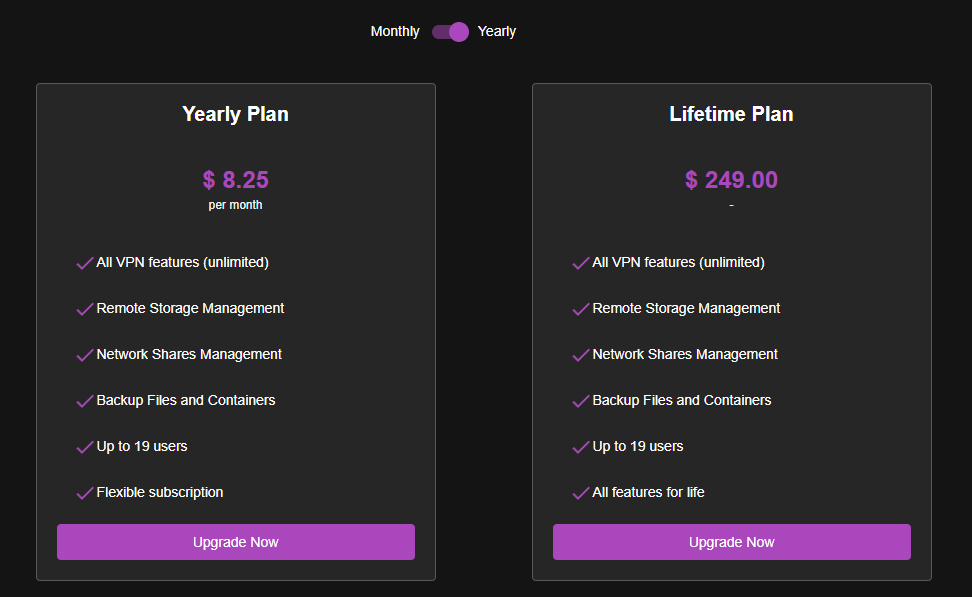
Free vs Paid
Cosmos Server does have a paid version. That may put ones off when they see that, but actually the core platform is totally unrestricted which is nice. All of the screenshots in this blog post are from the free tier. Also, the free version of Cosmos Server is not a demo or a crippled trial. You can install it, run services, expose applications, and basically benefit from all the core security and routing with no cost.
Free version gives you:
- The full Cosmos Server platform
- Container application management
- Built in reverse proxy and HTTPS
- User auth and access control
- SmartShield
- Docker Compose support
- Market apps
Paid version
The paid version of Cosmos Server unlocks a few other features and capabilities:
- Higher or unlimited user counts
- Advanced access control options
- More SmartShield capabilities
- Better support for multi user or shared environments
- Priority updates and long term feature development
There is a lifetime license that is listed that can be purchased, which might be hard to pass up if you decide you like the platform. The paid tier I would say would probably make the most sense if you are using it for a shared platform, a family server, or a semi-production type environment instead of just for home lab.
Wrapping up
All in all, I was really impressed with Cosmos Server. I only scratched the surface of features and capabilities with this post, but hopefully the highlights here will show you enough to get you up and running with a Cosmos Server install so you can kick the tires yourself and see if it is a good fit for your environment. I think this is a great solution for someone who doesn’t really want to have to put together all the different solutions it takes to successfully self-host and expose and share services. Also, the security features are really fantastic with Cosmos Server. Let me know in the comments if you have tried it out before or if you plan on taking it for a spin.
Google is updating how articles are shown. Don’t miss our leading home lab and tech content, written by humans, by setting Virtualization Howto as a preferred source.
About The Author


Thanks Brandon, definitely going to check this one out as well. I like these kinds of projects that make everything super easy for self-hosting. I am currently an Unraid fan, but will see if this little OS can sway my opinion.
Thanks for the post, Brandon. I thought the OS name implied a true cloud OS like K8s, but are they considering an actual cluster OS or just using the name?
Antonym,
Thank you for the comment! I am not sure they are considering a cluster OS per se. This “OS” is really a container that runs on your docker host, so you could essentially build out your HA and clustering underneath with orchestration for Docker/pods. But I think the use case for this OS is to make self-hosting easy with everything in the box once you install it.
Brandon
Hello! cosmos dev here, first of, thanks you so much for the article, I really appreciate it and it is well written!
Second, Cosmos right now is not categorized as OS, in fact it’s called Cosmos Cloud with Cosmos, not CosmOS (the fact that it ends in OS is purely coincidential). It’s more of a cloud manager.
But there are plans on releasing eventually a fully blown OS once the code platform will be feature complete
Hope that answers the question