GPUs are definitely no longer just for gamers or crypto miners. They are also now the essential hardware when it comes to AI, media encoding, and things like machine learning. Even in the home lab, we can use GPUs to supercharge our environments with many of the new and interesting workloads such as running locally hosted private AI. This includes running GPU acceleration in things like Kubernetes and Docker containers. When you are using containers, you can set up GPU-enabled containers in your home lab to have hardware GPU-accelerated containers. Let’s see why you want this and how to configure it.
Why worry about GPU acceleration in the home lab?
You can definitely multi-task and run some serious workloads with today’s modern CPUs. However, GPUs handle workloads that run in parallel a lot more efficiently. AI models rely on thousands of threads that run simultaneously and only GPUs can handle this task in a high-performance way. Most of us have experienced this even with a very fast modern CPU. If you run AI models only on CPU, chats are extremely slow in terms of “tokens per second” compared with using a GPU for local AI.
Note the following workloads that will benefit if you have a GPU:
- AI: This is probably the big one right now. Self-hosted AI is a great way to make sure you own and control your AI chat data
- Media servers: Solutions like Jellyfin, Plex, and HandBrake can take advantage of GPU for H.264, H.265, and AV1 encoding
- Machine learning experiments: You can use things like PyTorch and TensorFlow to offload compute-heavy operations to your GPU
- Parallel data processing: You can use tools like RAPIDS or CUDA-accelerated databases to test data workflows and not have to use cloud resources
Running GPU-enabled containers allows you to have the power of your GPU running in a lightweight container for your workloads. Let’s see how to configure this.
Step 1: Check your hardware and drivers
The first step depends on your hardware. Before you get into the nitty gritty of Docker or Kubernetes, make sure you have hardware that supports GPU passthrough.
These commonly include the following:
- NVIDIA GPUs: Most GTX, RTX, and data center cards (like the A2000 or A6000) support CUDA. NVIDIA drivers are available for Linux and Windows hosts.
- AMD GPUs: Many modern Radeon GPUs support ROCm, AMD’s open compute platform. AMD GPU container support has improved in 2025, and has official Docker integration that is now available.
- Intel GPUs: Intel Arc and integrated Iris Xe graphics support GPU acceleration using Intel GPU Tools and OneAPI runtime
The next thing to check is make sure your BIOS supports IOMMU and has virtualization extensions enabled. This makes sure the GPU can be isolated for passthrough or direct access.
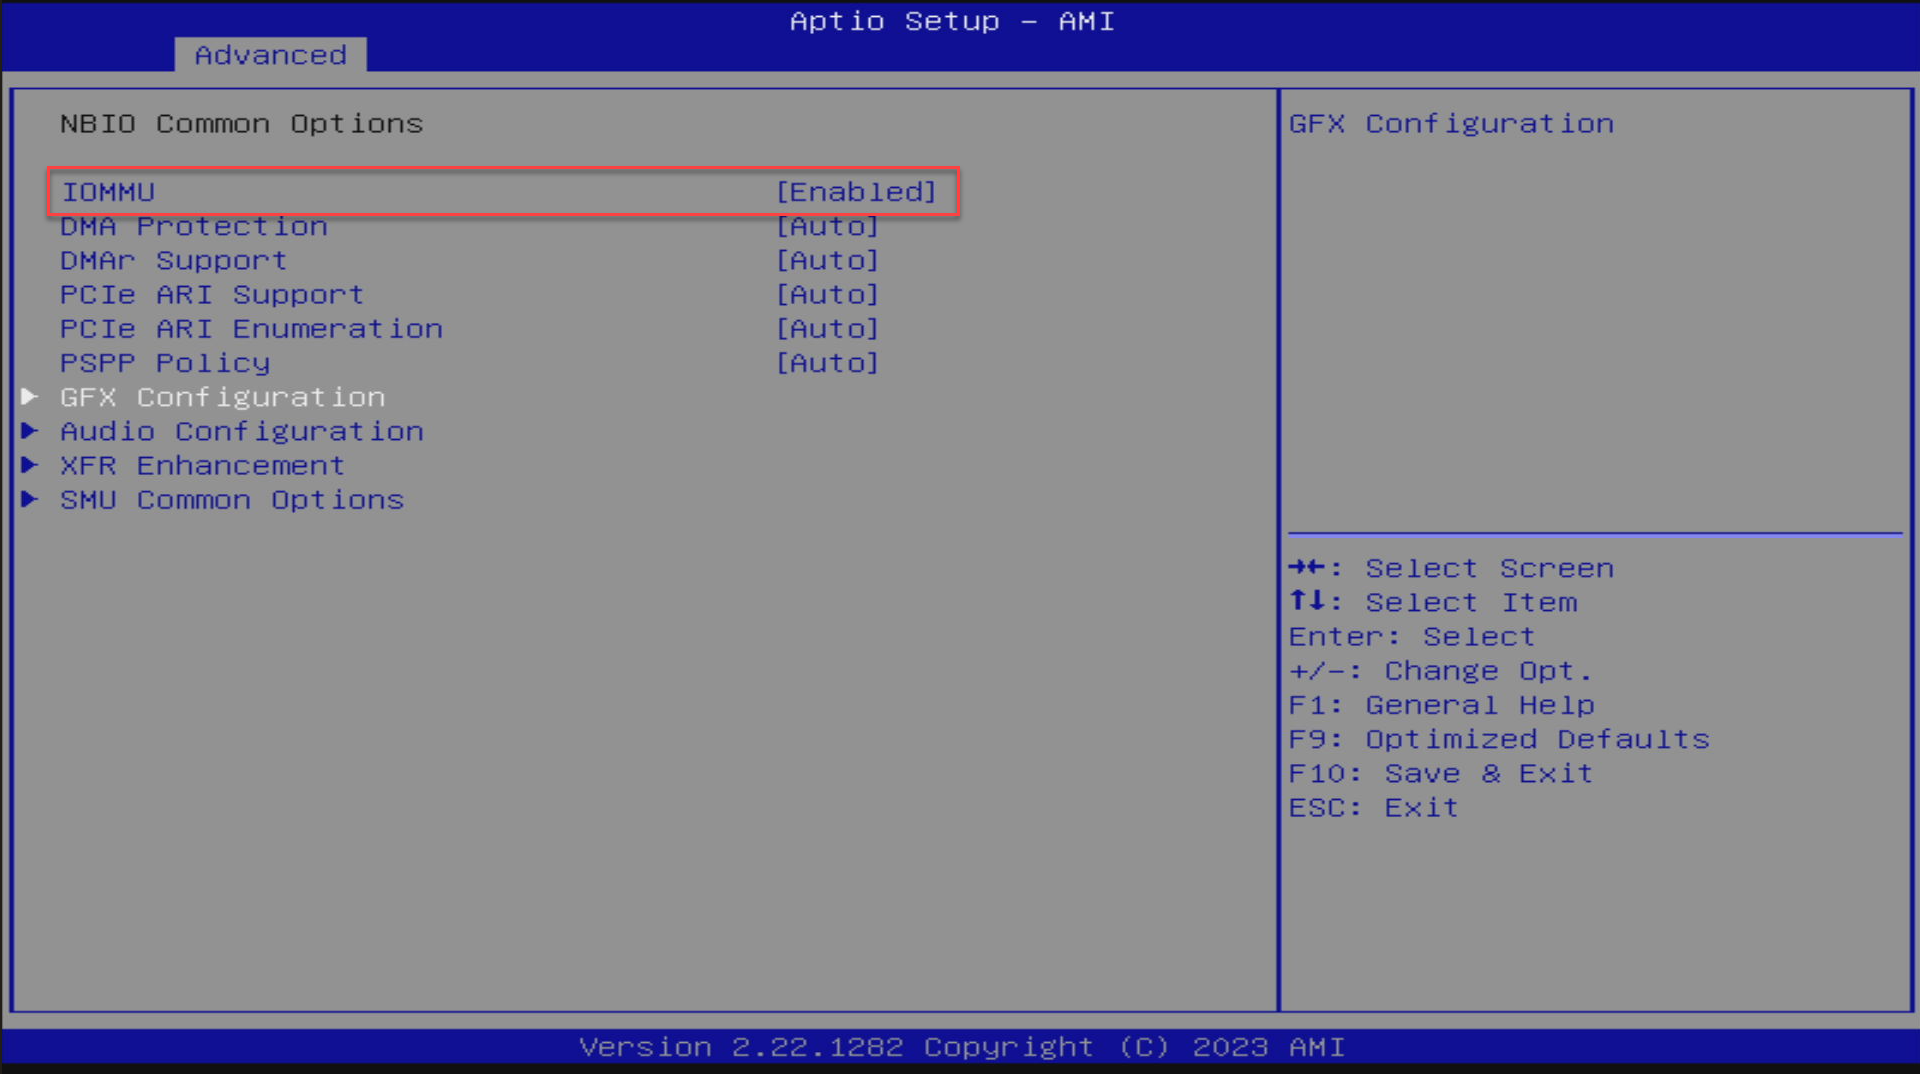
If you want to use the command line, you can check for IOMMU and virtualization instructions this way as well. Below, we are checking IOMMU and AMD virtualization for I/O has been enabled.
dmesg | grep -e IOMMU -e AMD-Vi
Step 2: Install the GPU drivers and runtime
For most home labs running on top of the Linux platform, you’ll need to install the right drivers on the host system. Take a look at the following overview if you are running Docker containers on a bare metal host with Linux installed or a Linux host virtual machine on a virtualization host.
NVIDIA:
Using the graphics-drivers/ppa and then specifying the nvidia-driver-latest, should always get you the latest driver.
sudo add-apt-repository ppa:graphics-drivers/ppa
sudo apt update
sudo apt install -y nvidia-driver-latest
sudo reboot
After you install the hardware drivers, you can check these are installed and the hardware is working with the nvidia-smi command:
sudo nvidia-smi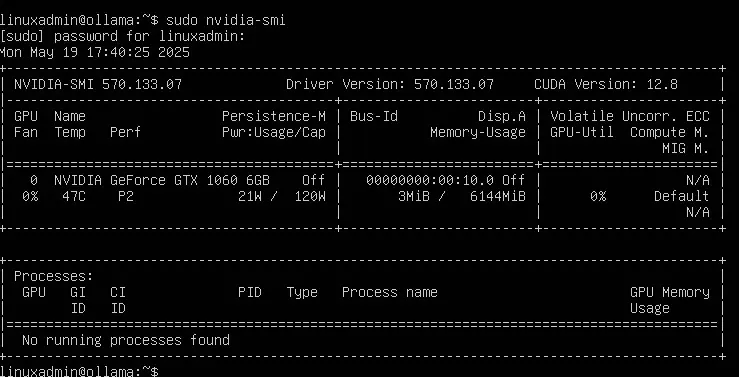
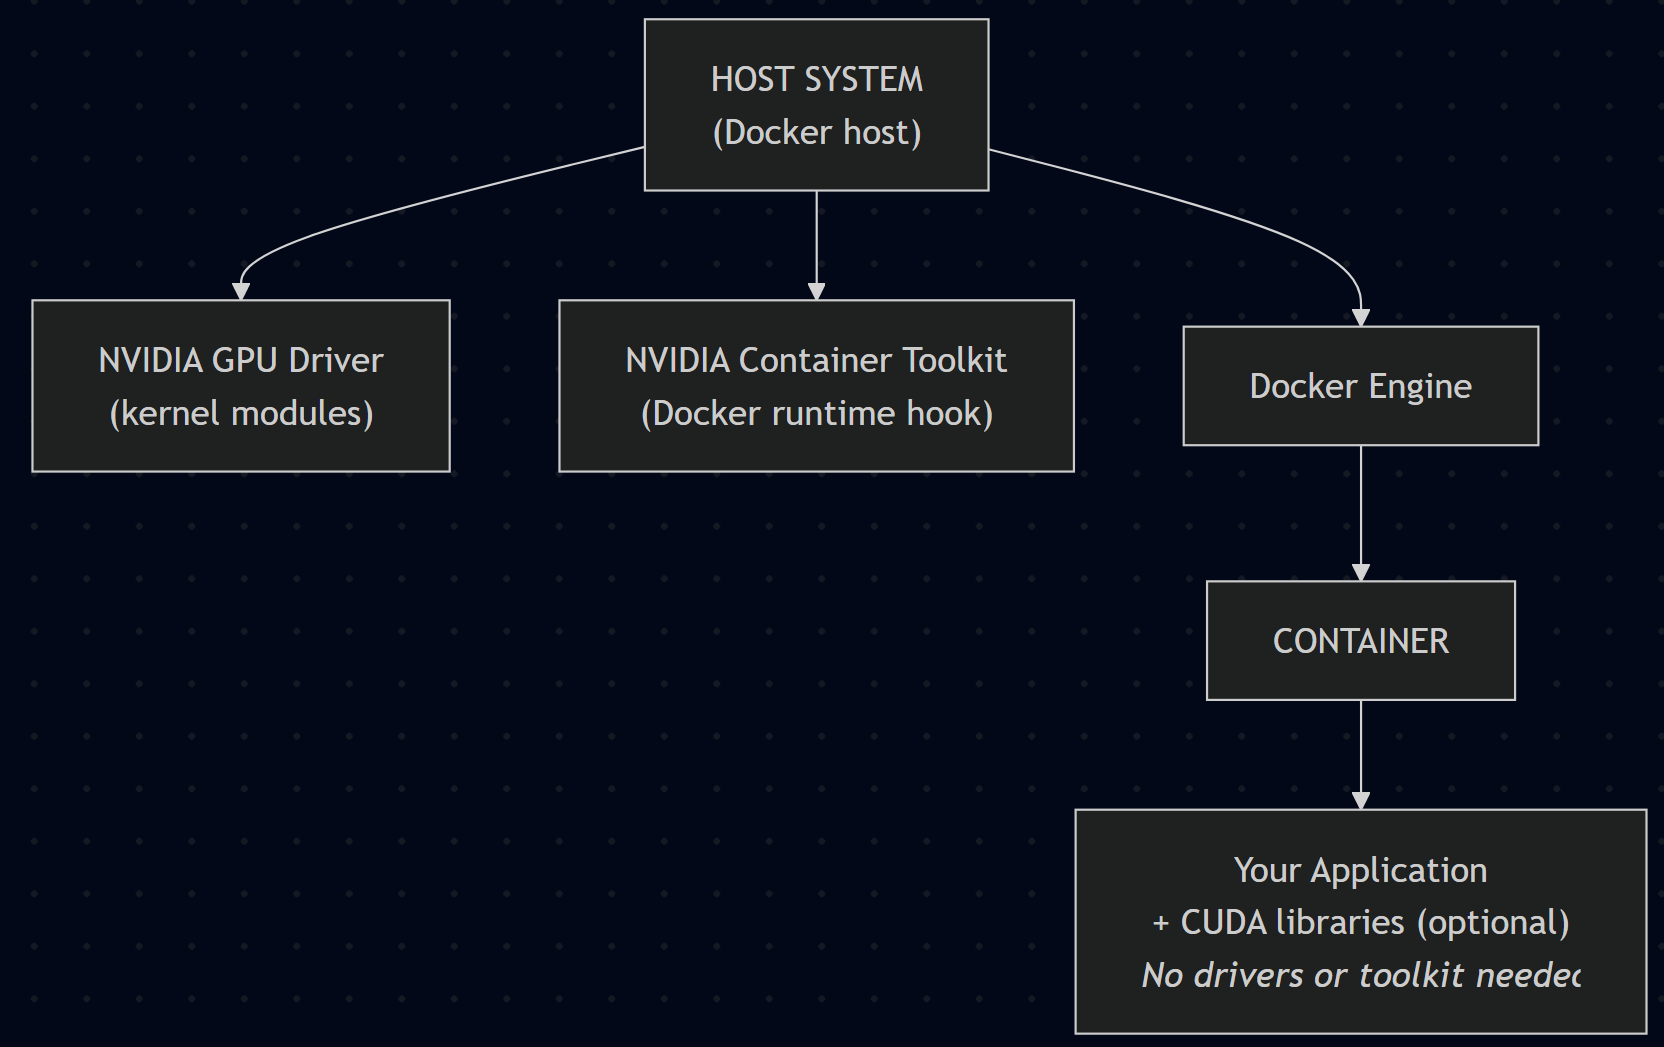
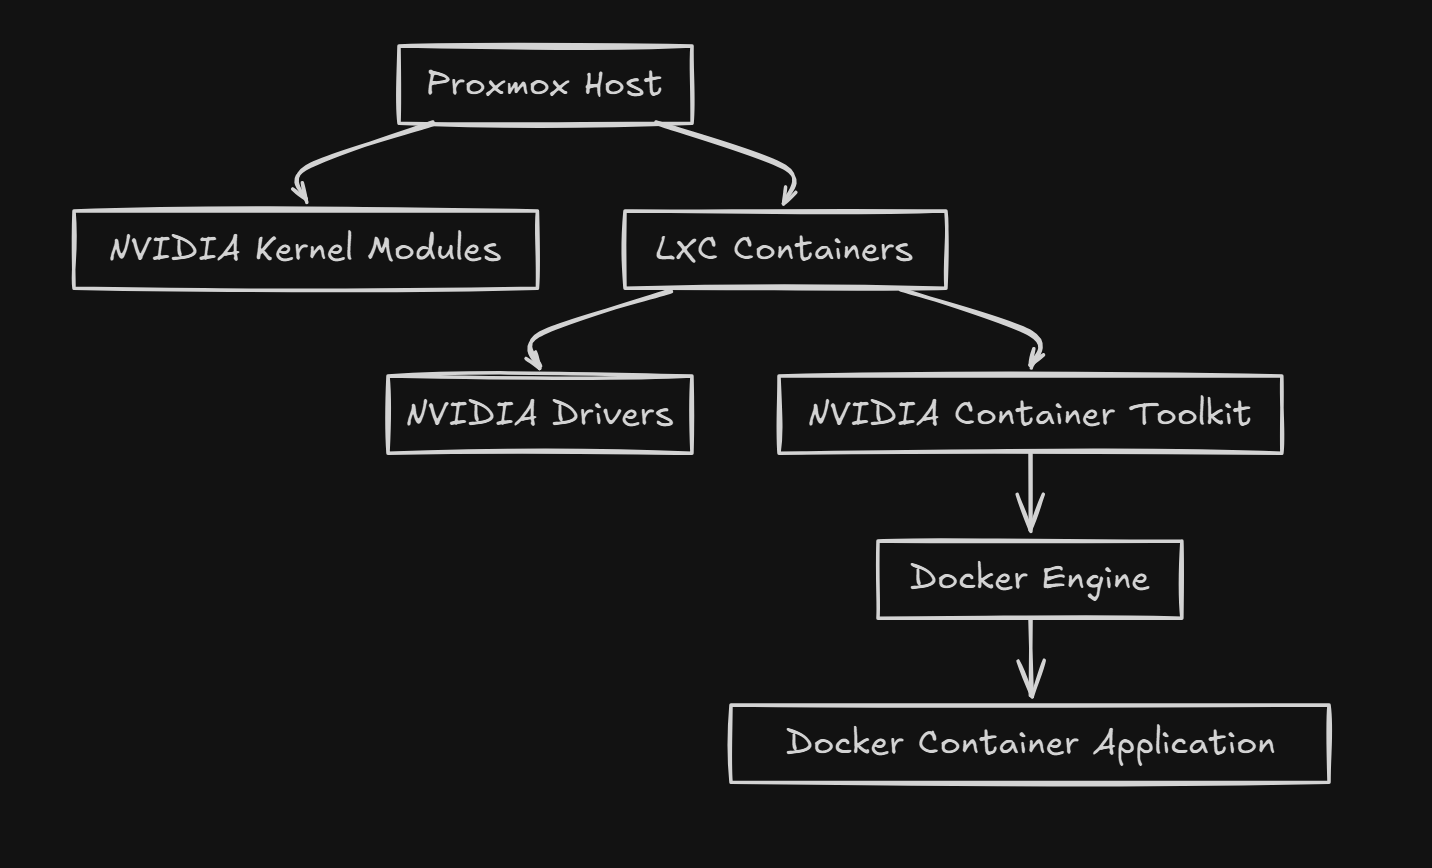
Important Note: The NVIDIA Container Toolkit is installed on the host system only (meaning Docker host), not inside your containers. This package acts as a bridge between Docker and your NVIDIA drivers. It allows your containers to access the GPU hardware. The containers will use the host’s GPU drivers automatically so you don’t need to install drivers inside the container. If your application needs CUDA libraries, you can use NVIDIA’s pre-built base images (like nvidia/cuda) which already include these.
Then install the NVIDIA Container Toolkit, which allows Docker to communicate with the GPU:
# Add the NVIDIA Container Toolkit repository
curl -fsSL https://nvidia.github.io/libnvidia-container/gpgkey | sudo gpg --dearmor -o /usr/share/keyrings/nvidia-container-toolkit-keyring.gpg

distribution=$(. /etc/os-release;echo $ID$VERSION_ID)
curl -s -L https://nvidia.github.io/libnvidia-container/$distribution/libnvidia-container.list | \
    sed 's#deb https://#deb [signed-by=/usr/share/keyrings/nvidia-container-toolkit-keyring.gpg] https://#g' | \
    sudo tee /etc/apt/sources.list.d/nvidia-container-toolkit.list

sudo apt update
sudo apt install -y nvidia-container-toolkit
sudo nvidia-ctk runtime configure --runtime=docker
sudo systemctl restart docker
You can make sure of the GPU access in your containers with:
docker run --rm --gpus all nvidia/cuda:12.5.0-base-ubuntu22.04 nvidia-smiAMD
Install ROCm and container support packages:
sudo apt install -y rocm-dkmsFor Docker integration, AMD provides a ROCm runtime image you can test with:
docker run --device=/dev/kfd --device=/dev/dri --group-add video \
  rocm/pytorch:latest rocm-smi
Intel
Intel Arc GPUs and integrated graphics need to have the Intel GPU runtime installed:
sudo apt install -y intel-opencl-icd intel-level-zero-gpu level-zeroYou can test GPU access using:
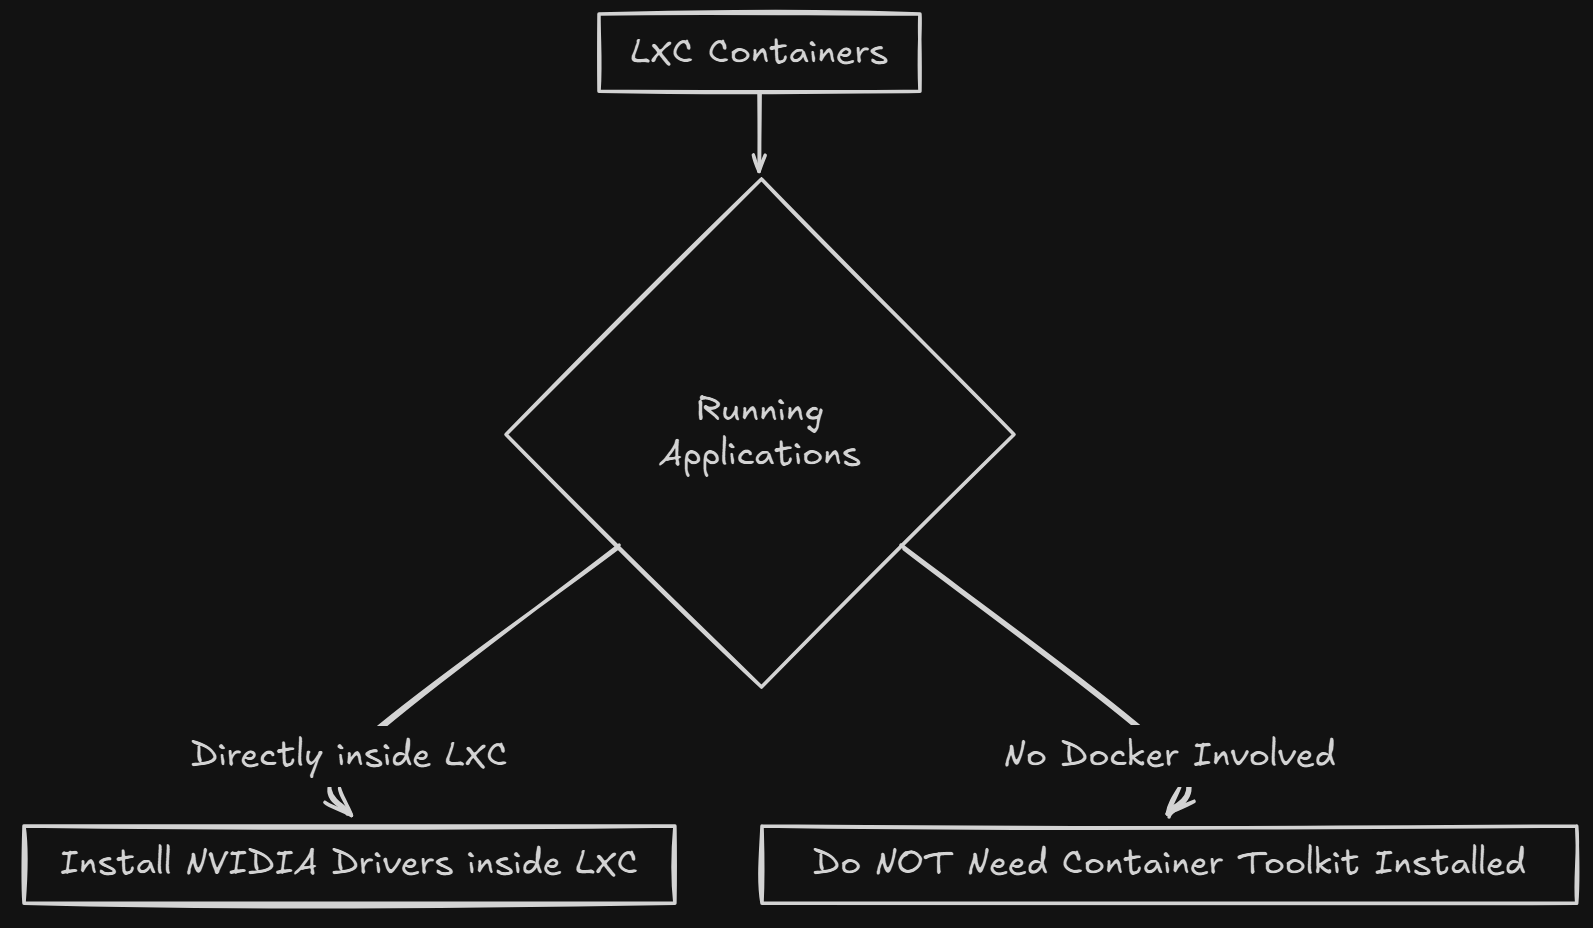
docker run --device /dev/dri intel/oneapi-basekitWhat about LXC containers?
When it comes to LXC containers, it depends what you are doing inside the LXC container. If you are running applications directly inside the LXC (no Docker involved) you need to install the NVIDIA drivers inside the LXC container but you do NOT need the container toolkit installed.
sudo apt update
sudo apt install -y nvidia-driver-latest
If you are running Docker inside the LXC container, then you do need to install both the NVIDIA driver and the Container toolkit.
Commands to run in that case:
# Install drivers
sudo apt update
sudo apt install -y nvidia-driver-latest

# Install Docker (if not already)
curl -fsSL https://get.docker.com | sh

# Install Container Toolkit
sudo add-apt-repository ppa:graphics-drivers/ppa
curl -fsSL https://nvidia.github.io/libnvidia-container/gpgkey | sudo gpg --dearmor -o /usr/share/keyrings/nvidia-container-toolkit-keyring.gpg
# ... (rest of Container Toolkit installation)
Step 3: Running GPU workloads
After you get past the steps of hardware and drivers, we can then work on configuring Docker to use yoru GPU as a runtime device. This part is fairly easy as we just simply need to pass flags to the Docker command to detect all available GPUs, or add this to Docker compose.
1. Ollama or OpenWebUI for local AI
If you’re experimenting with local LLMs like Llama 3 or Mistral, you can run them directly in Docker with GPU acceleration:
docker run -d --gpus all -p 3000:3000 \
  -v /opt/openwebui:/data \
  ghcr.io/open-webui/open-webui:latest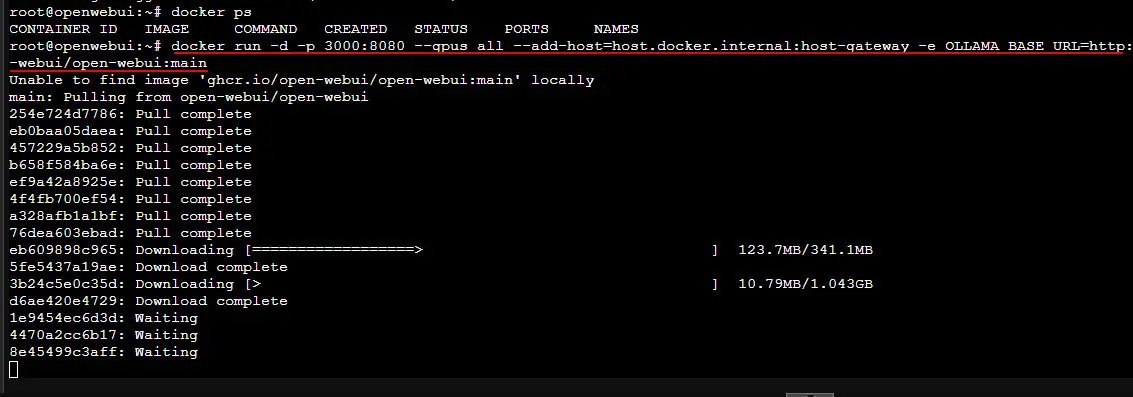
You can specify GPU access in your Docker compose file as well:
services:
  ollama:
    image: ollama/ollama
    deploy:
      resources:
        reservations:
          devices:
            - driver: nvidia
              count: all
              capabilities: [gpu]
    volumes:
      - /opt/ollama:/root/.ollama
    ports:
      - 11434:11434
2. Plex or Jellyfin for GPU transcoding
If you’re using your home lab as a media server, GPU acceleration majorly improves streaming performance and power efficiency. Note: Plex requires a Plex Pass subscription for hardware transcoding.
services:
  plex:
    image: linuxserver/plex
    container_name: plex
    runtime: nvidia
    environment:
      - PUID=1000
      - PGID=1000
      - VERSION=docker
      - NVIDIA_VISIBLE_DEVICES=all
      - NVIDIA_DRIVER_CAPABILITIES=all
    volumes:
      - /opt/plex/config:/config
      - /media:/media
    ports:
      - 32400:32400
    restart: unless-stopped
Here is an example of Plex with Intel QuickSync:
services:
  plex:
    image: linuxserver/plex
    container_name: plex
    devices:
      - /dev/dri:/dev/dri  # Intel QuickSync
    environment:
      - PUID=1000
      - PGID=1000
      - VERSION=docker
    volumes:
      - /opt/plex/config:/config
      - /media:/media
    ports:
      - 32400:32400
    restart: unless-stopped
Here is Jellyfin which is open-source and using NVIDIA devices:
services:
  jellyfin:
    image: jellyfin/jellyfin
    container_name: jellyfin
    # For NVIDIA:
    runtime: nvidia
    environment:
      - NVIDIA_VISIBLE_DEVICES=all
    # For Intel/AMD:
    devices:
      - /dev/dri:/dev/dri
    volumes:
      - /opt/jellyfin/config:/config
      - /opt/jellyfin/cache:/cache
      - /media:/media
    ports:
      - 8096:8096
    restart: unless-stopped
You can enable hardware acceleration in Plex’s settings under Transcoder. Enable “Use hardware acceleration when available“. In Jellyfin navigate to Dashboard > Playback > Transcoding. There you set hardware acceleration to NVIDIA, Intel QuickSync or VAAPI, etc.
3. Machine learning with TensorFlow or PyTorch
If you’re experimenting with ML models locally, using GPU-enabled containers are the way to go and gives you massive performance gains.
Quick TensorFlow GPU Test:
docker run --gpus all -it --rm tensorflow/tensorflow:latest-gpu bash
python -c "import tensorflow as tf; print('GPUs Available:', tf.config.list_physical_devices('GPU'))"
PyTorch with NVIDIA:
# Test PyTorch GPU access:
docker run --gpus all -it --rm pytorch/pytorch:latest bash
python -c "import torch; print('CUDA Available:', torch.cuda.is_available()); print('GPU Count:', torch.cuda.device_count())"
PyTorch with AMD ROCm:
# For AMD Radeon RX 7000/9000 series:
docker run -it --rm \
  --device=/dev/kfd --device=/dev/dri \
  --group-add video \
  rocm/pytorch:latest bash

python -c "import torch; print('ROCm Available:', torch.cuda.is_available())"
Step 4: GPU in Kubernetes or MicroK8s
If you’ve moved to Kubernetes in your home lab, you can use GPU scheduling with your workloads. Prerequisites: Ensure the NVIDIA drivers and Container Toolkit are installed on all nodes that will run GPU workloads (see Step 2 above).
NVIDIA
# Using kubectl (check for latest version)
kubectl create -f https://raw.githubusercontent.com/NVIDIA/k8s-device-plugin/v0.16.2/deployments/static/nvidia-device-plugin.yml
Or you can do this using helm:
helm repo add nvdp https://nvidia.github.io/k8s-device-plugin
helm repo update
helm install nvidia-device-plugin nvdp/nvidia-device-plugin \
  --namespace kube-system \
  --create-namespace
Then you can verify GPU detection using the following:
kubectl get nodes -o=custom-columns=NAME:.metadata.name,GPU:.status.capacity.'nvidia\.com/gpu'Then you can add GPU requests to your Pod spec:
apiVersion: v1
kind: Pod
metadata:
  name: gpu-pod
spec:
  containers:
    - name: gpu-test
      image: nvidia/cuda:12.5.0-base-ubuntu22.04
      resources:
        limits:
          nvidia.com/gpu: 1  # Request 1 GPU
      command: ["nvidia-smi"]
      args: ["-L"]  # List GPUs and exit (for testing)
For persistent workloads, you can use a deployment with a long-running container like the below:
resources:
  limits:
    nvidia.com/gpu: 1  # Or "2" for multiple GPUs
MicroK8s also includes a built-in GPU addon that automatically configures drivers for supported hardware, which makes it extremely easy. Note: This assumes you’ve already installed NVIDIA drivers and Container Toolkit on the MicroK8s host. The addon only deploys the device plugin, not the drivers themselves.
microk8s enable gpuAMD
AMD has a Kubernetes device plugin through ROCm:
kubectl create -f https://raw.githubusercontent.com/RadeonOpenCompute/k8s-device-plugin/master/k8s-ds-amd-gpu-dp.yamlThen you can schedule GPU workloads in a similar way:
resources:
  limits:
    amd.com/gpu: 1
Step 5: Troubleshooting
If containers don’t “see” the GPU, you can work through troubleshooting with a few commands at the host level.
# For NVIDIA:
nvidia-smi

# For AMD:
rocm-smi

# Check that devices exist:
ls -la /dev/nvidia* /dev/dri/
As a node if nvidia-smi fails on the host, then you have a driver installation issue. After checking the host level, if you need to test GPU access inside the container, run the following:
# For NVIDIA:
docker run --rm --gpus all nvidia/cuda:12.5.0-base-ubuntu22.04 nvidia-smi

# Verify devices are mounted:
docker run --rm --gpus all nvidia/cuda:12.5.0-base-ubuntu22.04 ls -la /dev/nvidia*
You can also use tools like watch nvidia-smi to monitor active GPU processes as containers start up so you can see if these are taking advantage of the GPU.
Step 6: Monitoring
Once your GPU workloads are running, monitoring helps optimize resource allocation and detect issues early. You can use the open source solution with Prometheus and NVIDIA DCGM Exporter which is recommended for scraping statistics and metrics:
NVIDIA
You can deploy DCGM Exporter on each GPU node to export the metrics.
docker run -d --restart=unless-stopped \
  --gpus all \
  --name dcgm-exporter \
  -p 9400:9400 \
  nvcr.io/nvidia/k8s/dcgm-exporter:3.3.5-3.4.0-ubuntu22.04

# Kubernetes
helm repo add gpu-helm-charts https://nvidia.github.io/dcgm-exporter/helm-charts
helm install dcgm-exporter gpu-helm-charts/dcgm-exporter --namespace gpu-monitoring
Then, you can configure Prometheus to scrape metrics:
scrape_configs:
  - job_name: 'dcgm'
    static_configs:
      - targets: ['localhost:9400']
AMD
Use the tool ROCm SMI exporter:
git clone https://github.com/platina-systems/rocm_smi_exporter
cd rocm_smi_exporter
python3 rocm_smi_exporter.py
Recommended GPU models
Take a look at a few of the recommendations for GPU-enabled containers for different workloads and tasks in 2025-2026 with models that we currently know.
For AI/ML workloads
| GPU | VRAM | TDP | Approx. Price | Best For | Availability |
|---|---|---|---|---|---|
| NVIDIA RTX 5070 | 12GB GDDR7 | 250W | $543 | Entry AI, claims RTX 4090 performance with DLSS 4 | Available Now |
| NVIDIA RTX 5080 | 16GB GDDR7 | 360W | $1194 | Serious AI workloads, 4K gaming | Available Now |
| NVIDIA RTX Pro 4000 SFF | 20GB GDDR6 | 70W | ~$1,100 | Compact servers, low power | Available Now |
| AMD Radeon RX 9070 XT | 16GB | 300W | ~$679 | ROCm AI workloads, open-source friendly | Available Now |
| AMD Radeon RX 9070 (48GB model) | 48GB | 350W | ~$1,200 | Large language models, massive datasets | Available Now |
| Intel Arc B770 | 16GB GDDR6 | 225W | ~$349–399 | Budget AI, media transcoding | Q4 2025 |
For media transcoding (Plex/Jellyfin, etc)
| GPU | VRAM | TDP | Approx. Price | Best For | Availability |
|---|---|---|---|---|---|
| Intel Arc B580 | 12GB | 190W | $299 | Best value, handles 10+ streams, AV1 encoding | Available Now |
| Intel Arc Pro B50 | 16GB | 70W | $349 | Low-profile, compact builds, SR-IOV coming | Available Now |
| Intel Arc A770 | 16GB | 225W | $299–350 | Mature drivers, proven performance | Available Now |
| NVIDIA RTX 5050 | 8GB | 130W | ~$249 | NVENC encoding, compact | Early 2026 |
For budget home labs
| GPU | VRAM | TDP | Approx. Price | Best For | Availability |
|---|---|---|---|---|---|
| Intel Arc B580 | 12GB | 190W | $299 | Best overall value for AI + transcoding | Available Now |
| AMD Radeon RX 7700 XT | 12GB | 245W | $349–399 | Solid ROCm support, gaming | Available Now |
| Intel Arc A380 | 6GB | 75W | $139 | Ultra-budget transcoding | Available Now |
Wrapping up
There is no question that GPU-enabled containers are one of the biggest evolutions in the modern home lab. With advanced workload needs like AI, machine learning, and media processing, we are going to see more and more need for these types of configurations. The setup process has become much simpler with the NVIDIA container toolkit and AMD’s ROCm integration, and then also Intel’s growing open-source support.
With a single GPU and just a bit of configuration, you can unlock a new tier of performance for AI and media workloads. Let me know in the comments, are you working with GPU enabled containers?
Google is updating how articles are shown. Don’t miss our leading home lab and tech content, written by humans, by setting Virtualization Howto as a preferred source.
About The Author


this is grea information. I am running more things in containers, so will be useful once I start passing through GPUs.