If you have spent any time in the home lab space, you have probably heard of BorgBackup. It is one of those tools that has an almost legendary reputation among Linux users. It is a fast and efficient solution that deduplicates data very well and is rock solid when it comes to reliability. The downside has always been the learning curve since it is a CLI interface only. What caught my attention was a project that offered a BorgBackup UI and I think it totally changes the experience with using borgui Borg backup home lab environments.
What is BorgBackup?
So, stepping back, let’s take a look at BorgBackup first of all. BorgBackup is an open-source backup tool that is designed to be not just a hobby-grade backup tool, but a tool that has an enterprise feel about it. It is known for its deduplication capabilities which can save you tons of space over time with your backups.
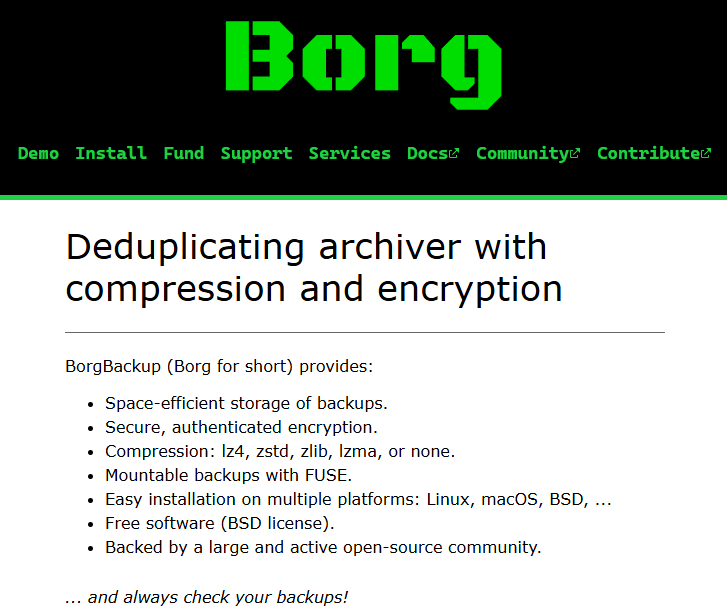
It saves versioned archives inside a repo for you to go back to specific points in time and restore files or even entire directories. It has encryption capabilities as well to secure your data, and this is both in transit and at rest.
Also, there isn’t an agent you have to push out to your backup sources. It does all of this over an SSH connection to remote systems. But, the barrier with it has always been the fact that it is a CLI-only tool that makes it more cumbersome to adopt for those that aren’t as comfortable with the command line or don’t want to manage and operate things at this level.
What borg-ui is and what it does
With the limitations of BorgBackup, borg-ui is a community developed and open-source UI that provides the missing grabphical interface for managing your Borg backups. So, instead of writing commands manually, you can interact with a modern brower UI that helps you with tasks like repository creation, setting up backup jobs, configuring retention, and also restoring data.
Also, what makes this powerful I think is that it isn’t just a frontend to BorgBackup. When you deploy the tool, it actually includes BorgBackup as part of the deployment when you deploy the container. So, when you deploy borg-ui, once you complete the step of deploying it, you have an all-in-one solution that is “one and done”.
The project is also very container-friendly since you deploy it as a Docker container on a container host you have running in your environment. You can spin this up alongside your other Docker or Podman workloads and start backing up your data.
The UI has a focus on the following:
- Repository management
- Backup job configuration
- Scheduling and automation
- Retention policies
- Restore operations
What types of data do you back up with this tool?
I like tools that fit in my existing workflows and I think realistically in the home lab or production environments, very rarely do you find a tool that does EVERYTHING, especially when it comes to backups. So you need layers of protection.
In my lab, I typically think about backups in layers of protection. These include the following for me:
- VM level backups using something like Proxmox Backup Server or Veeam
- Application level backups using Veeam
- File level backups for important datasets like my container bind mounts
borg-ui fits into this third category and is what it is designed to do. I think it would be ideal for the following use cases:
- Backing up Docker volumes (this is an extremely popular use case)
- Protecting configuration directories
- Backing up NFS shares
- Archiving important project data
BorgBackup is used by many home labbers for grabbing backups of Docker container bind mounts where you have the container’s persistent data housed in a folder on the file system of your Linux Docker host. Also, the backups are deduplicated and compressed so they are stored very efficiently in your BorgBackup server’s repository. As we know there are always blocks of data in common between backups, so BorgBackup understand this and doesn’t duplicate the same data if it already has this on disk.
Also, if you are running something like CephFS or NFS in your lab, borg-ui gives you a simple way to take consistent snapshots of that data without needing a full enterprise backup stack.
Deployment model and architecture
We have already mentioned that you can run the borg-ui solution as a container on a Docker container host that you already have in your environment. The container includes the borg-ui web app, a backend service for job execution and then it also has the BorgBackup binaries inside the container as well. You bring the persistent storage for your repositories and configuration.
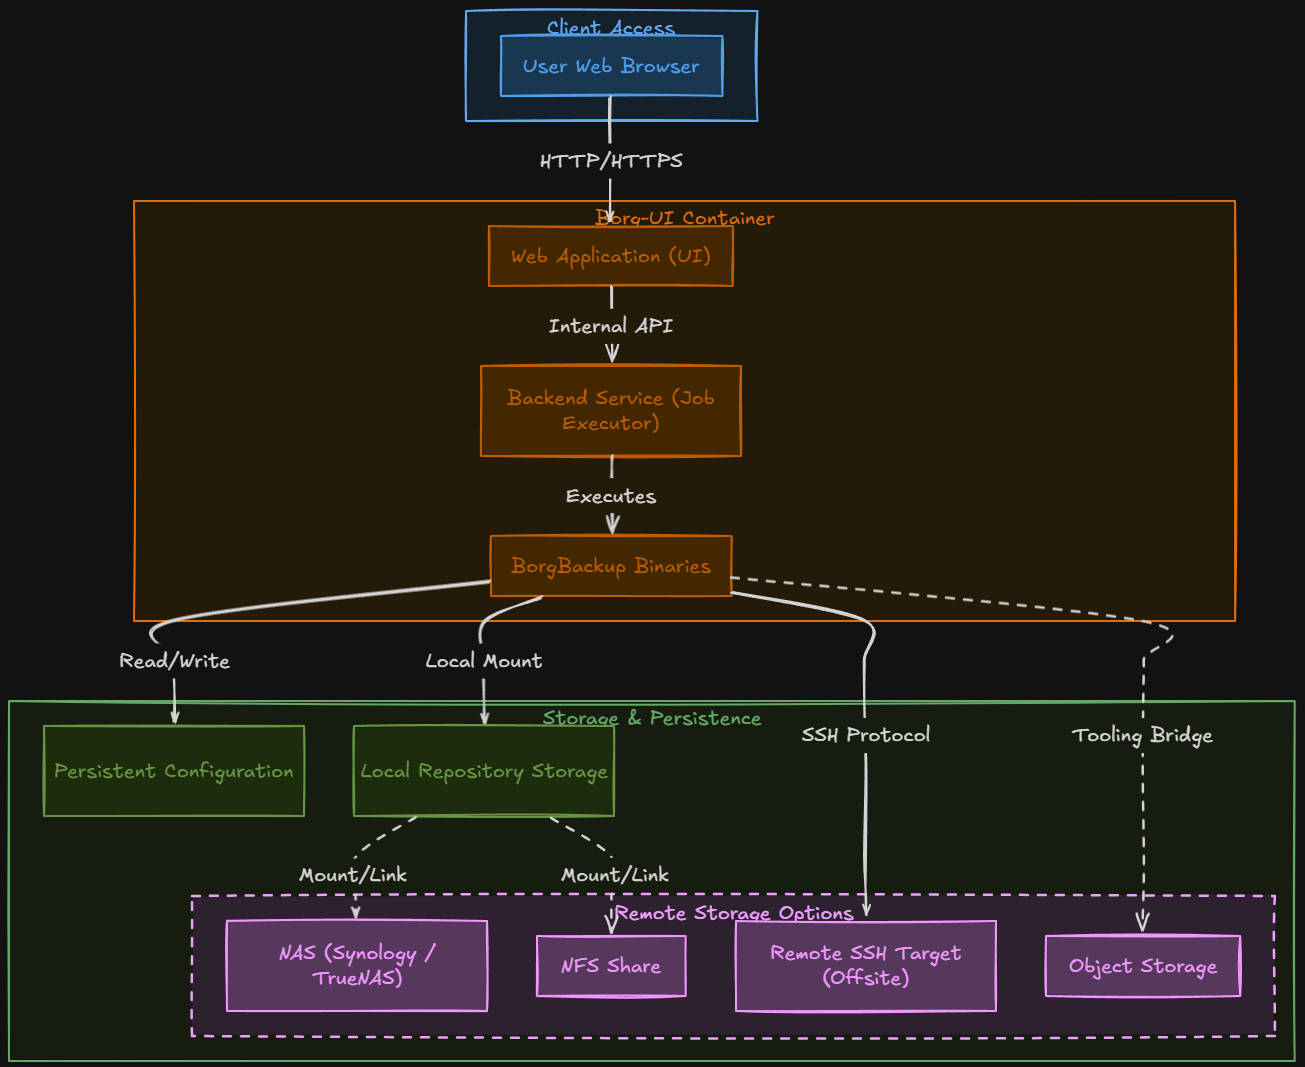
The part of your infrastructure that you will want to think carefully about is where your repositories for storing your data live at. Borg repos can be stored locally to your Docker container host that is hosting the borg-ui container. Or, a better solution, most likely, is to store the data on a remote repository on a NAS that you already have running in the environment. This way you have your data outside of the environment it is protecting.
Most NAS devices anymore can run full on Docker containers, so you could even consider running the borg-ui container on the NAS along with the storage. That way it is outside the “blast radius” if something were to happen to your running lab environment. The worst case scenario would be that your environment goes down, but also the tool you used to backup the environment is down too, due to where it is stored.
I like that it gives you options in where you can store your data. It simply orchestrates Borg which already has a range of storage options.
Installing borg-ui
You can easily spin up borg-ui using the following docker command line command:
docker run -d \
  --name borg-web-ui \
  -p 8081:8081 \
  -v borg_data:/data \
  -v borg_cache:/home/borg/.cache/borg \
  -v /home/yourusername:/local:rw \
  ainullcode/borg-ui:latest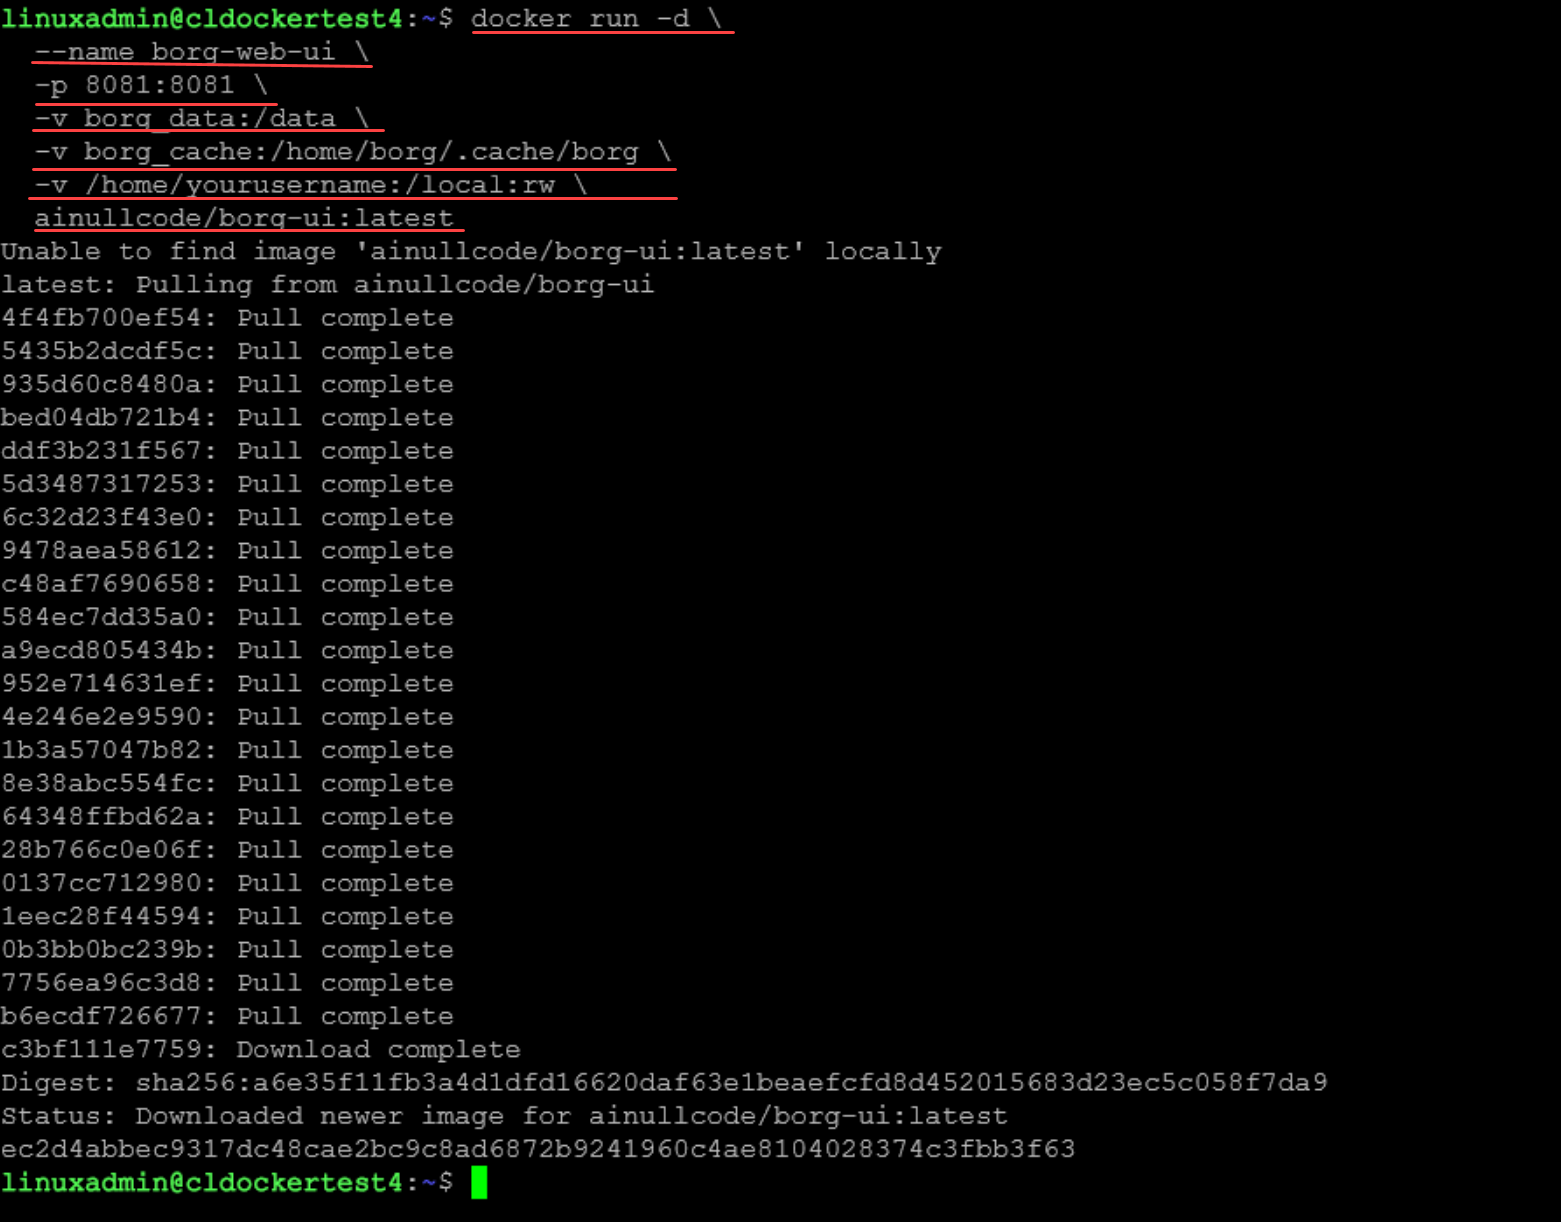
If you want to use Docker Compose which most will want in the home lab with bind mounts:
services:
  borg-web-ui:
    image: ainullcode/borg-ui:latest
    container_name: borg-web-ui
    ports:
      - "8081:8081"
    volumes:
      - /homelabservices/borg/data:/data
      - /homelabservices/borg/cache:/home/borg/.cache/borg
      - /home/yourusername:/local:rw
    restart: always
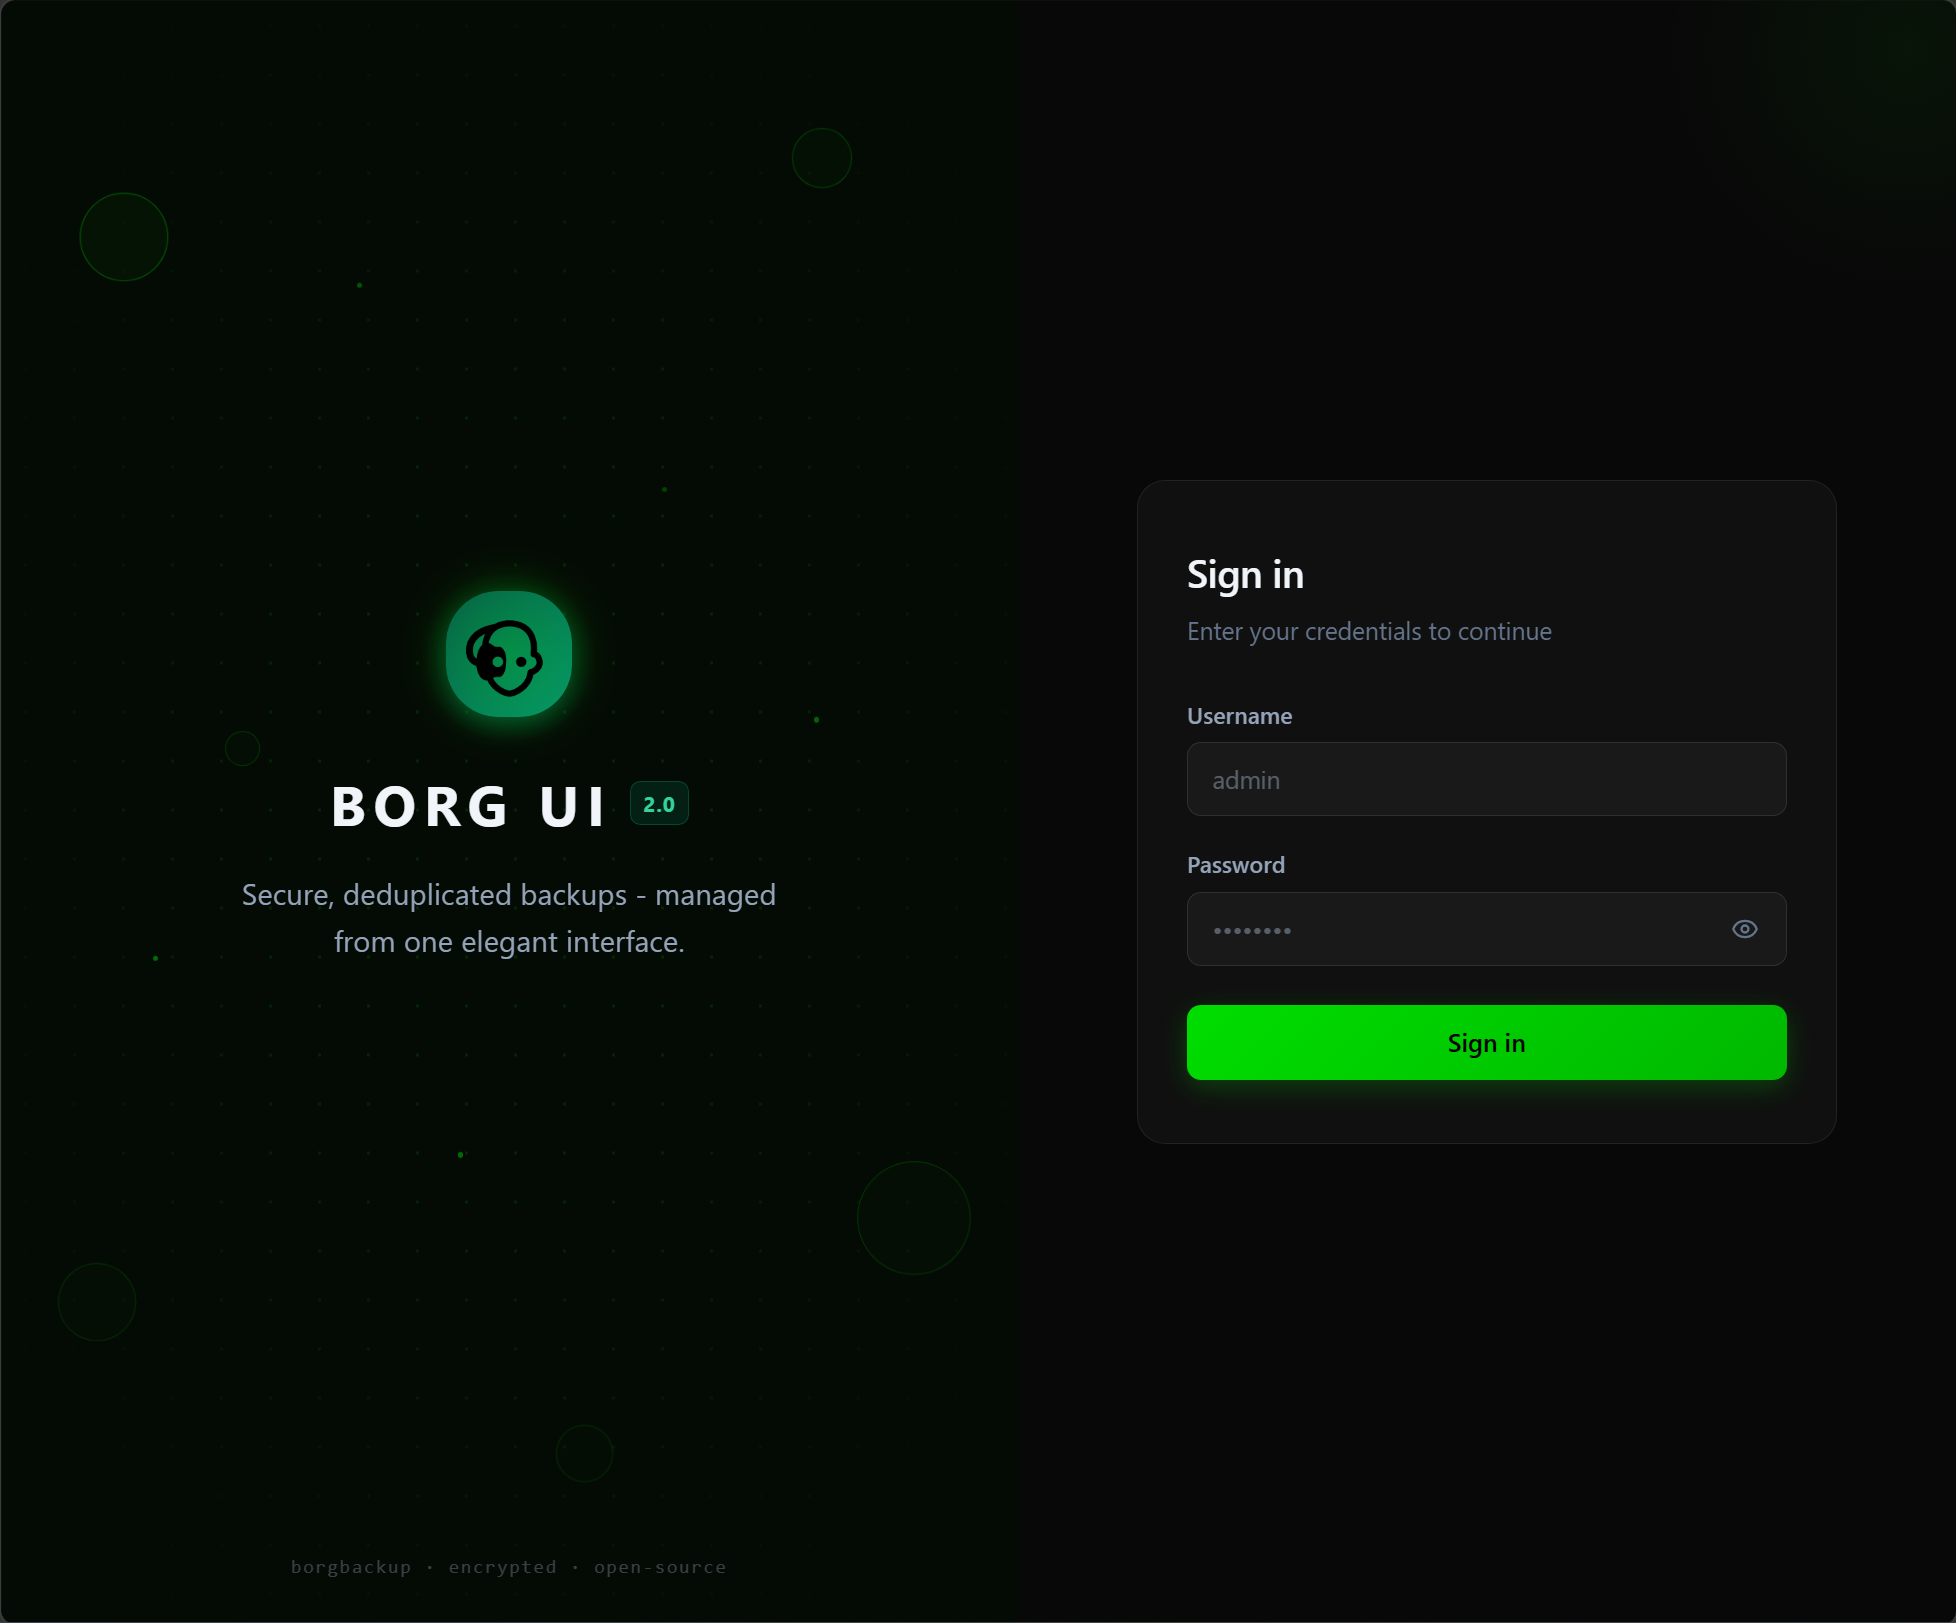
At this point once the container is up and running, you should be able to browse out to port 8081 in a web browser and pull up the login page. The default login is:
- username: admin
- password: admin123
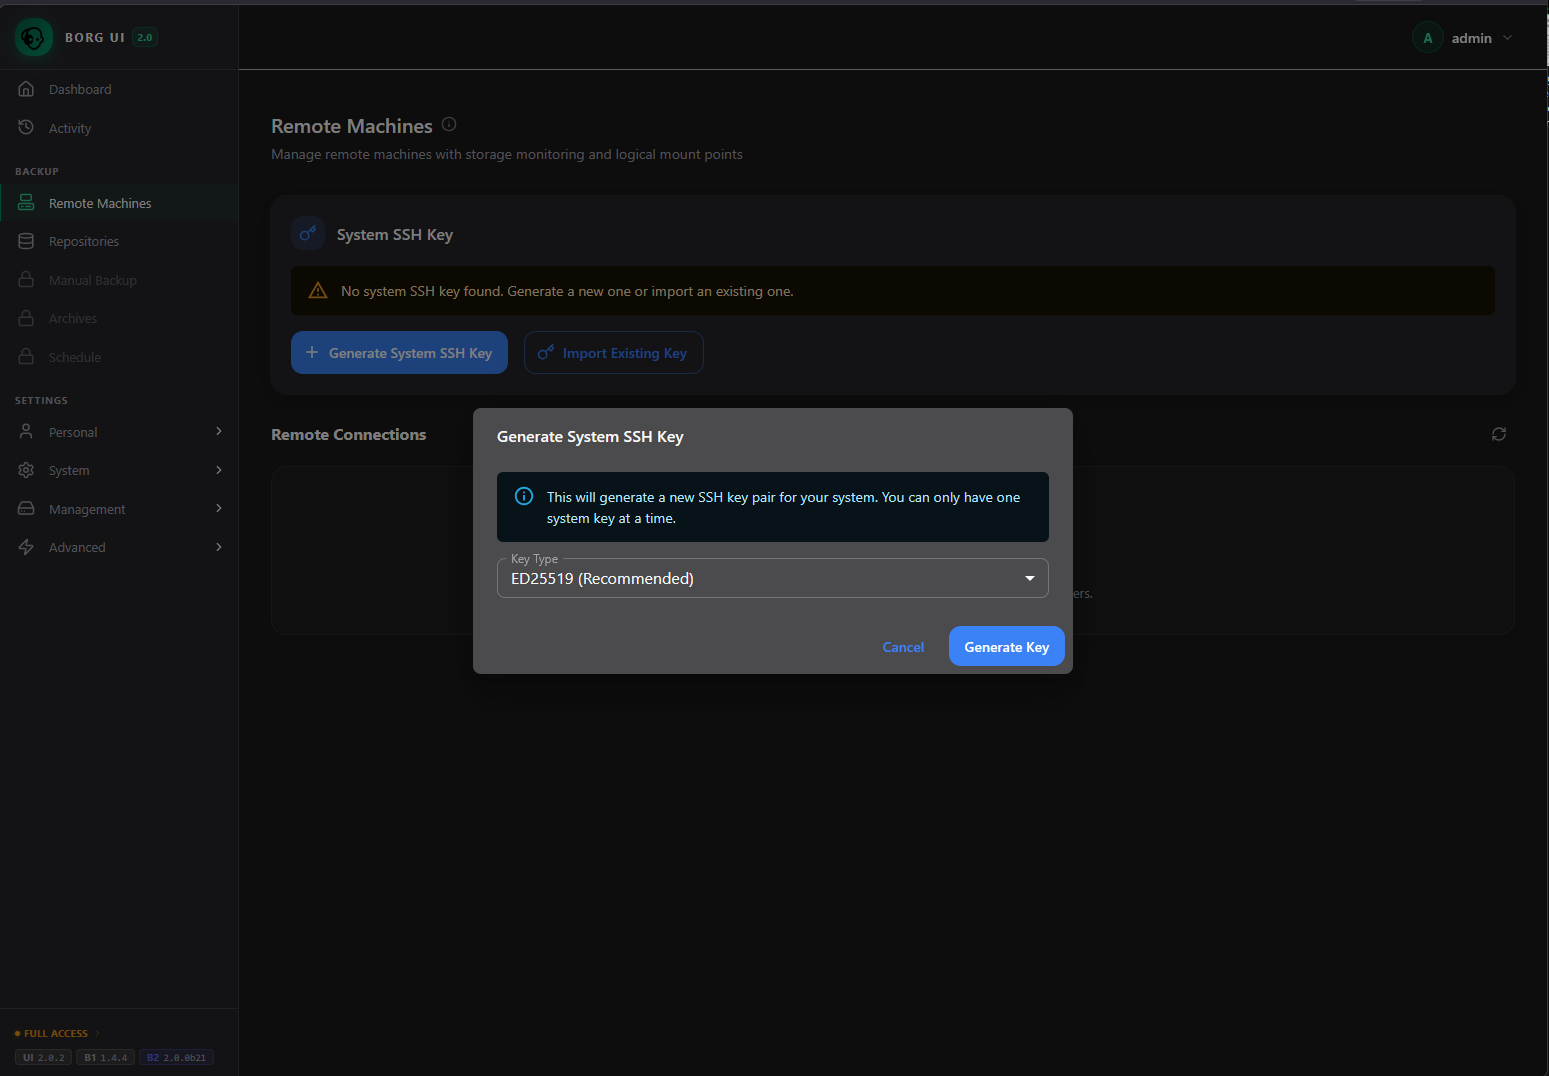
Setting up SSH keys
You will need to setup your SSH keys, either by importing keys you already have or by generating a new key from the borg-ui interface. Either way is valid.
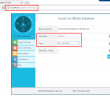
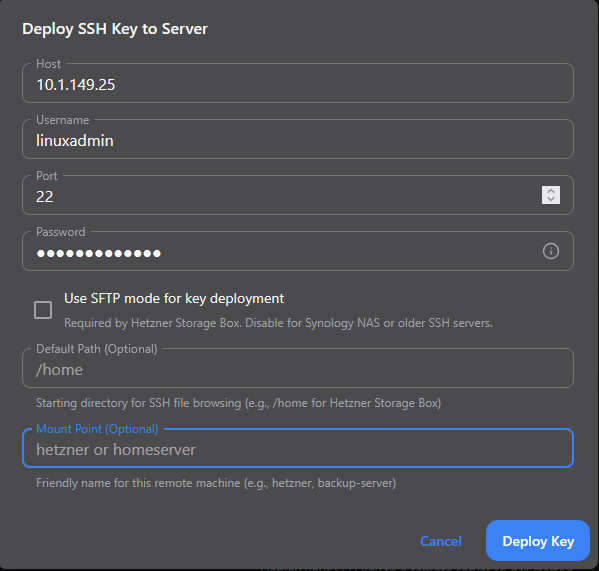
Here I have generated a new SSH key. Click the + Deploy to Server to deploy this to a specific server for backup connectivity.
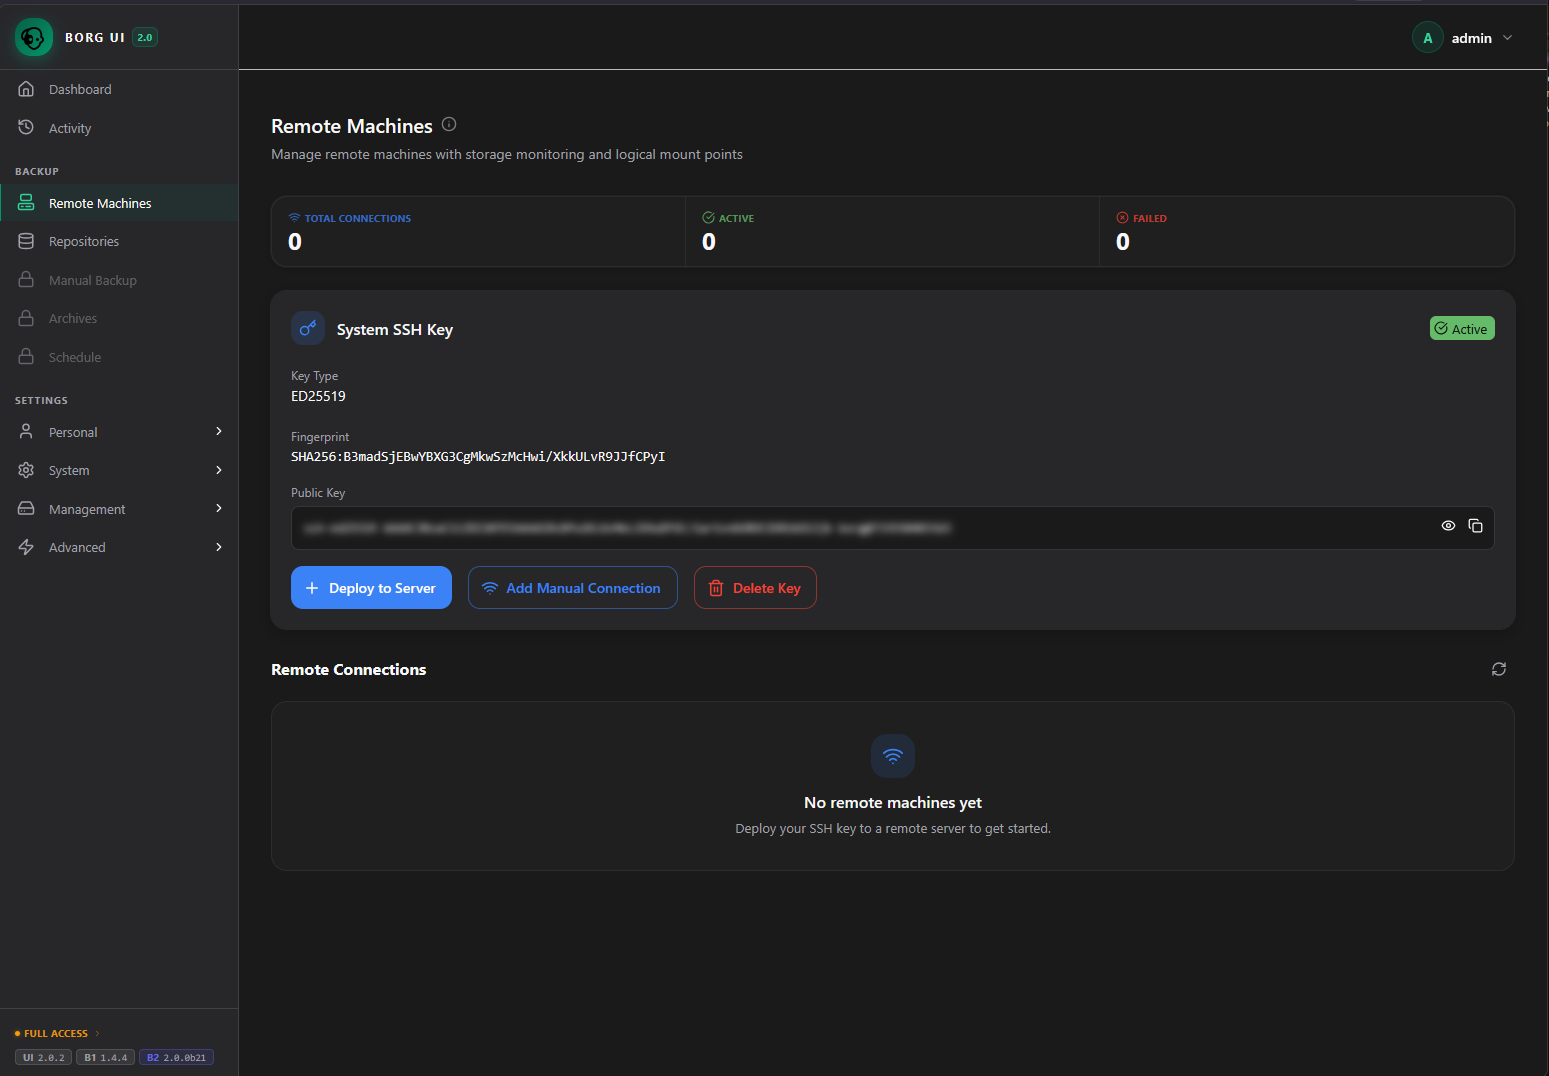
This will launch the Deploy SSH Key to Server dialog box. We enter the host, username, port, password, and you can change the default path and mount point if you want to, but these are optional. Click the Deploy Key button.
Now, we see the Remote Connections and see the tile that represents our new connection to the remote endpoint.

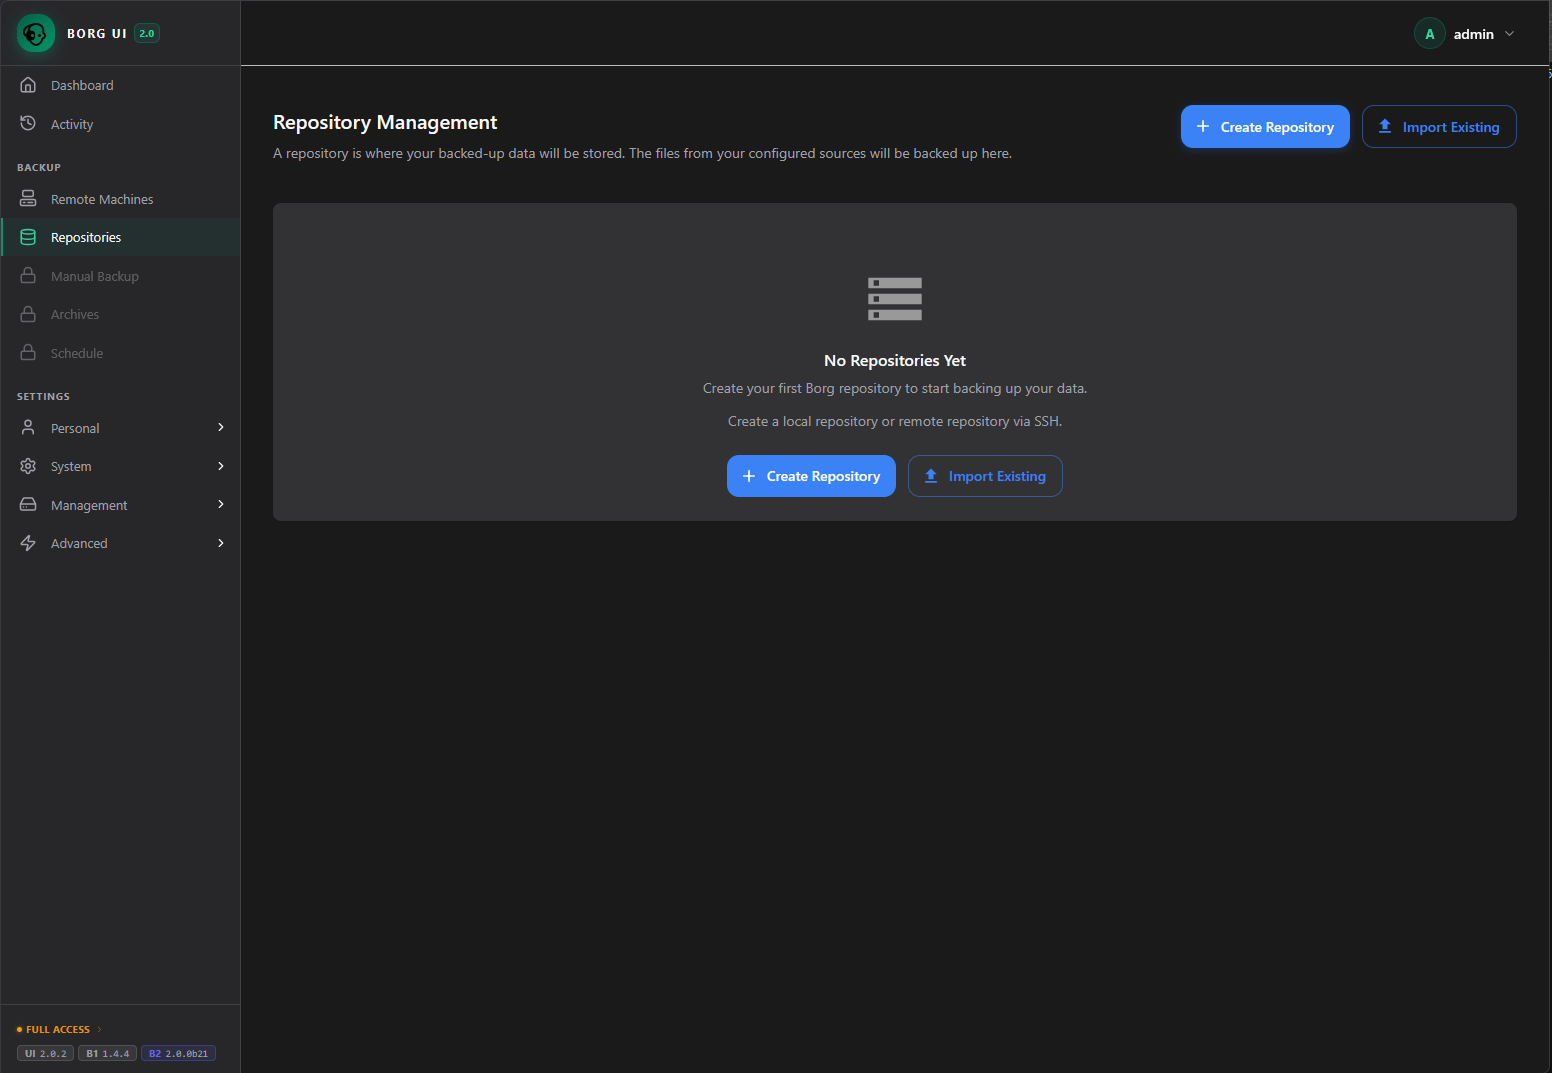
Setting up repositories
When I started setting up a “repository”, I had in mind that I was “just” setting up where the backups would be stored. But, as it turns out in the BorgBackup and borg-ui workflow, you are actually setting up more than that. You are setting up the backup target, source, and other details that basically equate to a “backup job” of sorts.
Click the Create Repository button.
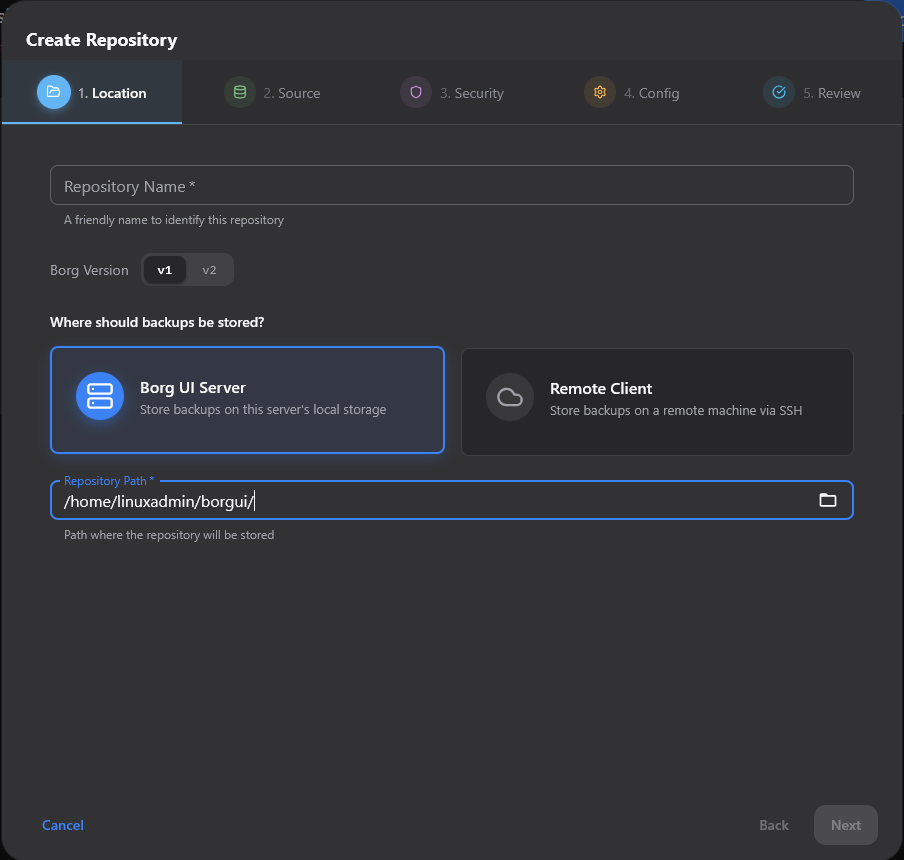
Select the location for the repository which is where you will store the backups.
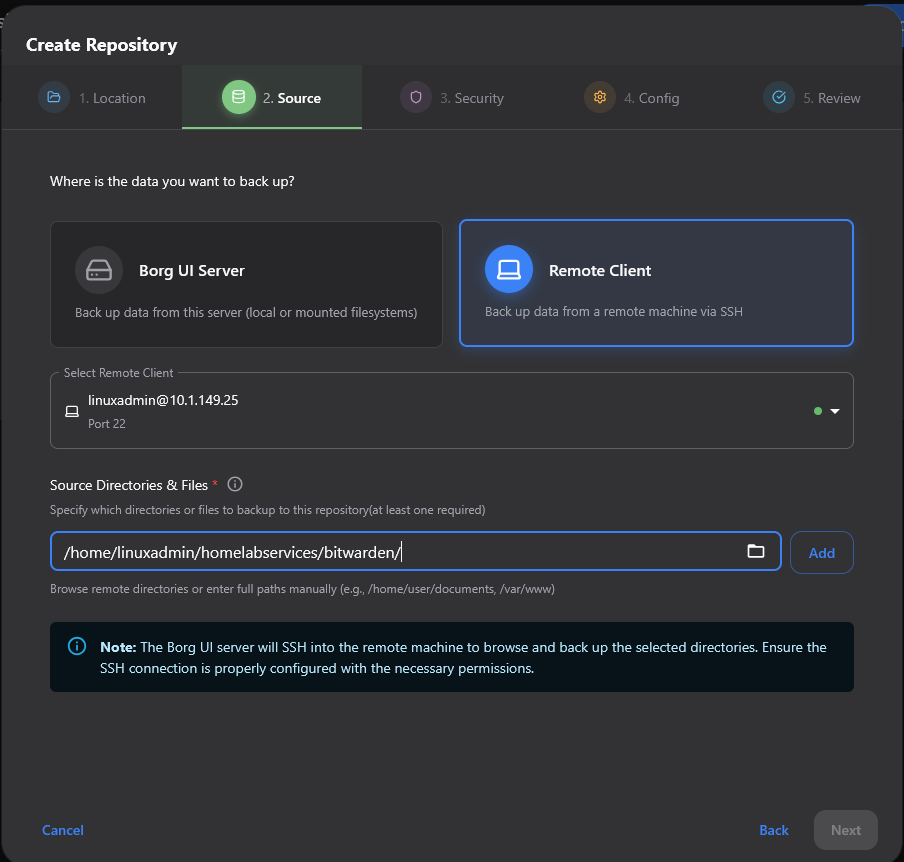
Next you setup the source. This is the source where you will be pulling files from.
The repository key encrypts the data.
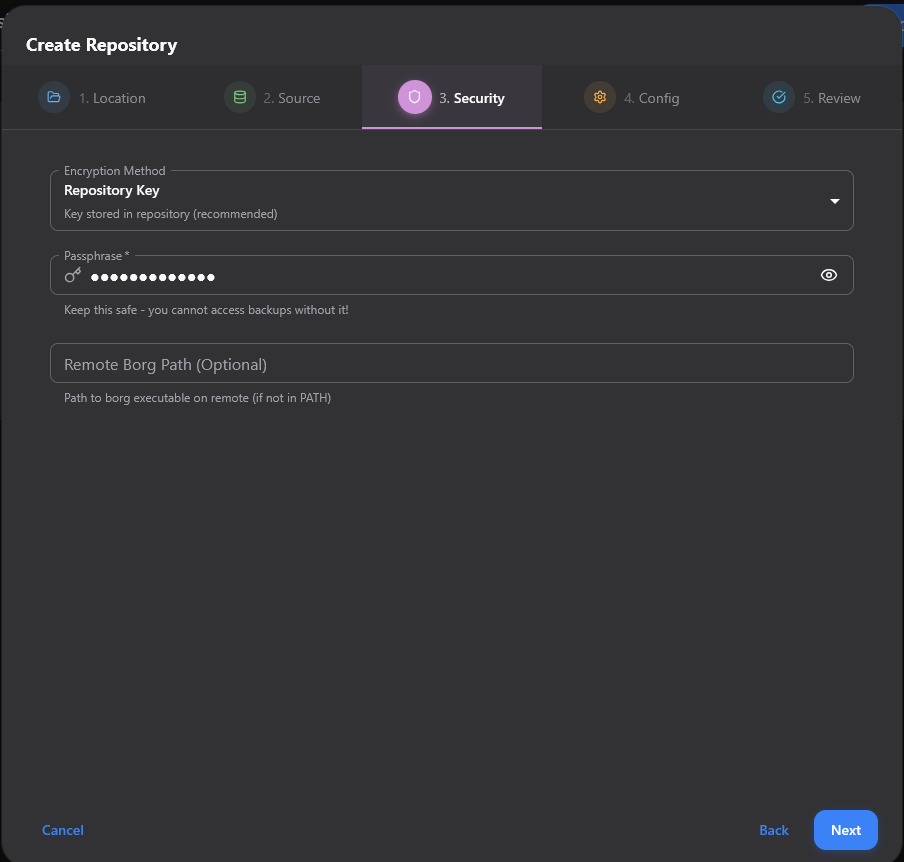
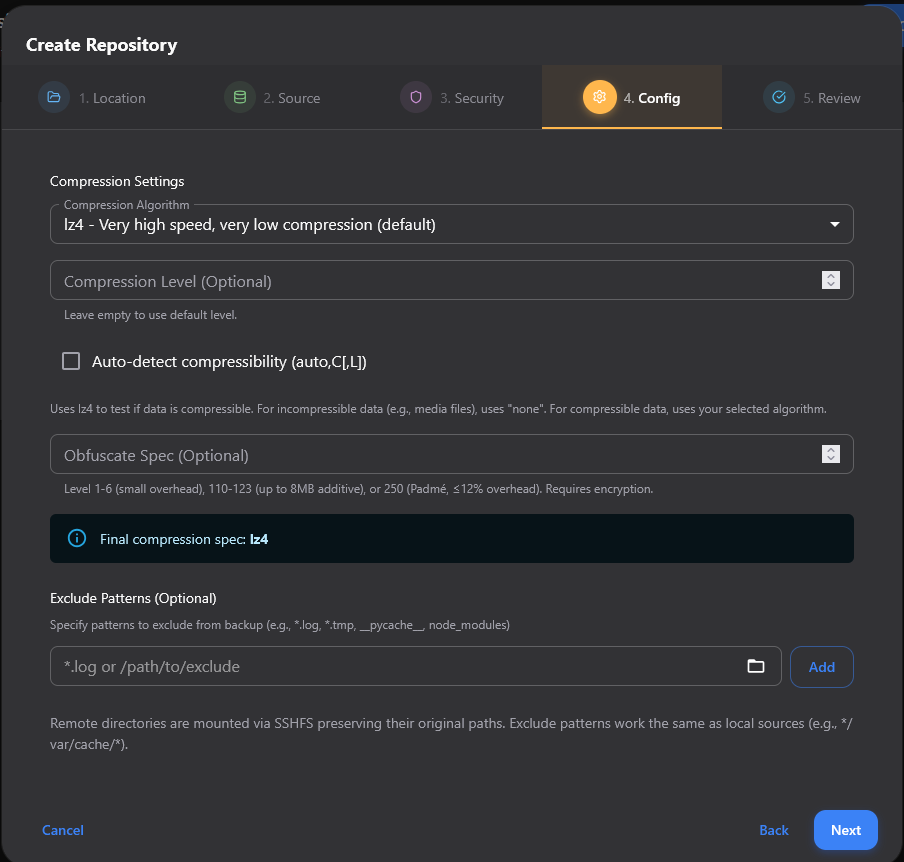
On the Config screen, you set the compression settings and other things like exclusions for things you don’t want to backup like log files, etc.
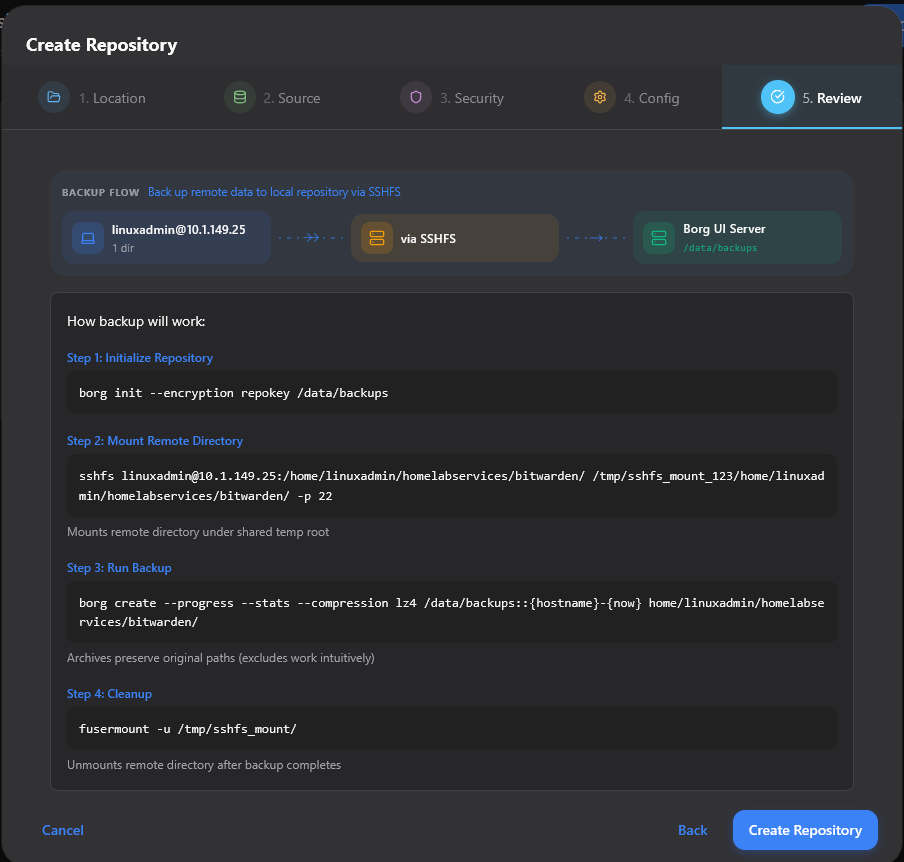
Finally, review your settings and create the Repository.
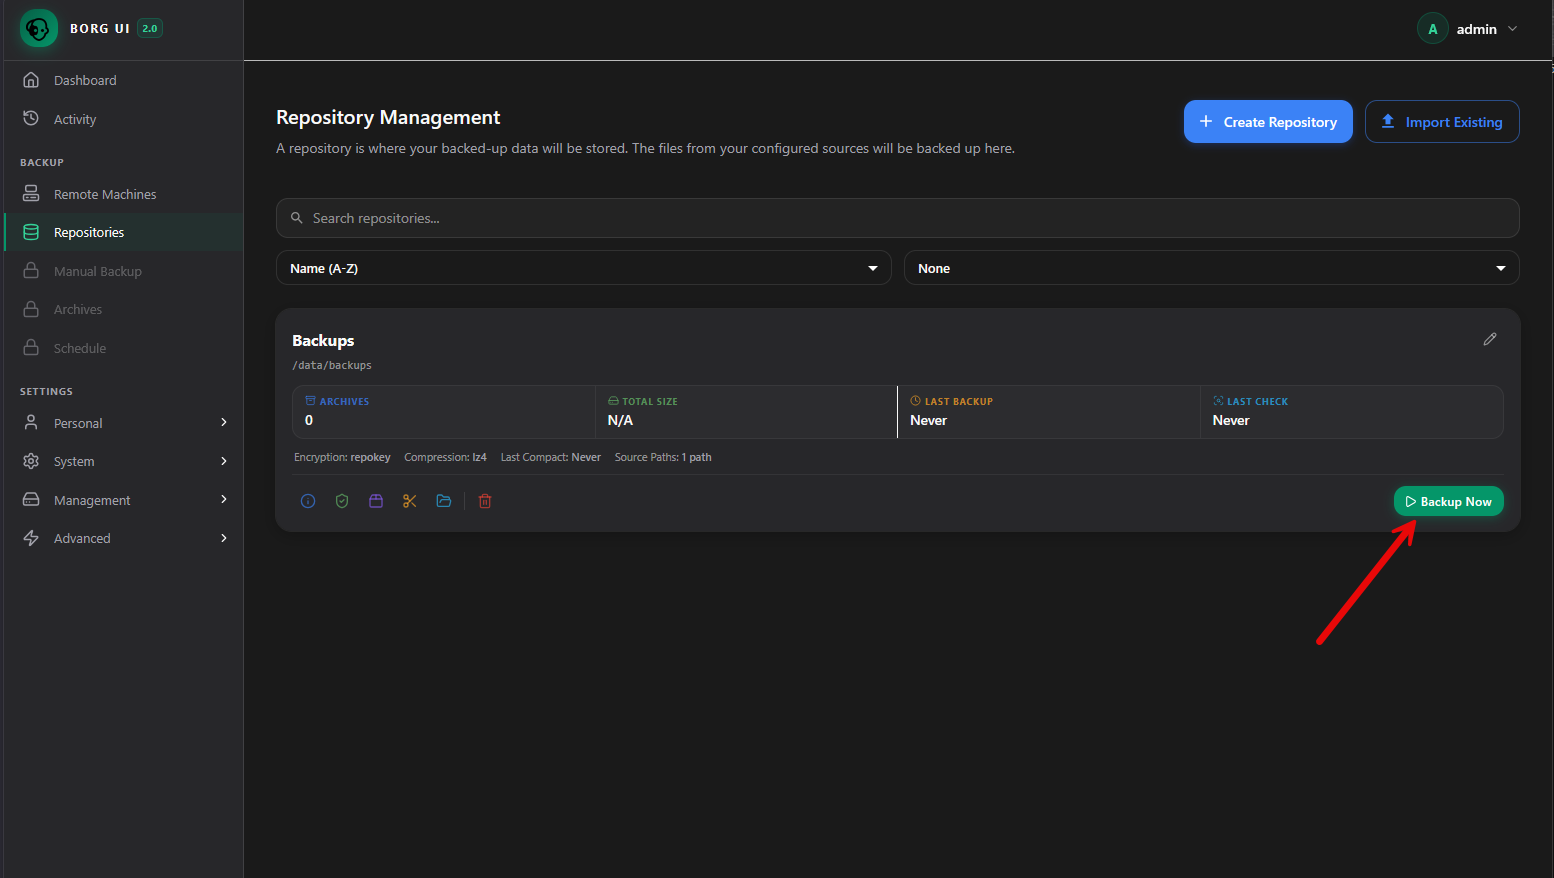
Creating backup jobs
When you create the “repository” this is essentially the backup settings along with the source and target so when the repo is created, you can run the Backup Now button to backup your source configuration. You can do this with a manual ad-hoc run like you see below.
Scheduling and automation
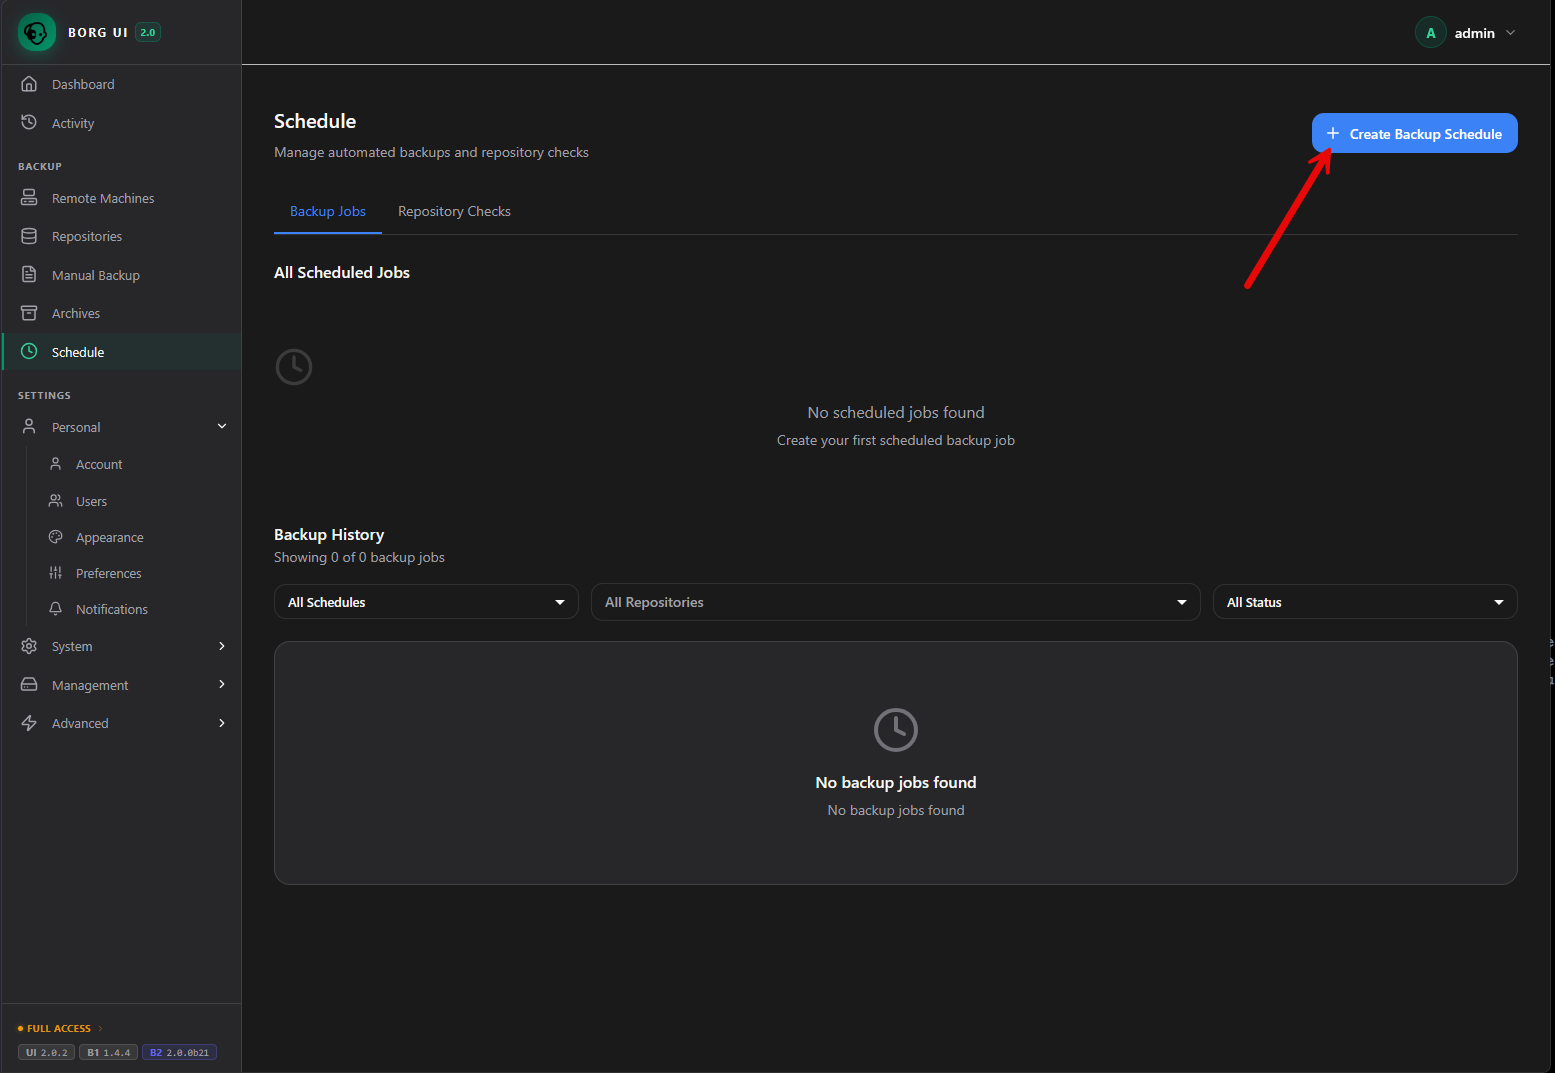
The borg-ui GUI makes it easy to create a backup schedule. Click the Schedule menu, and then click the + Create Backup Schedule.
This launches the same familiar wizardized workflow for scheduling. Here on the first screen you setup the name of the job, a description, and select the repositories you want to attach to the schedule. So again, you attach a “repository” to a schedule. The repository has all of the settings like source, target, settings, etc.

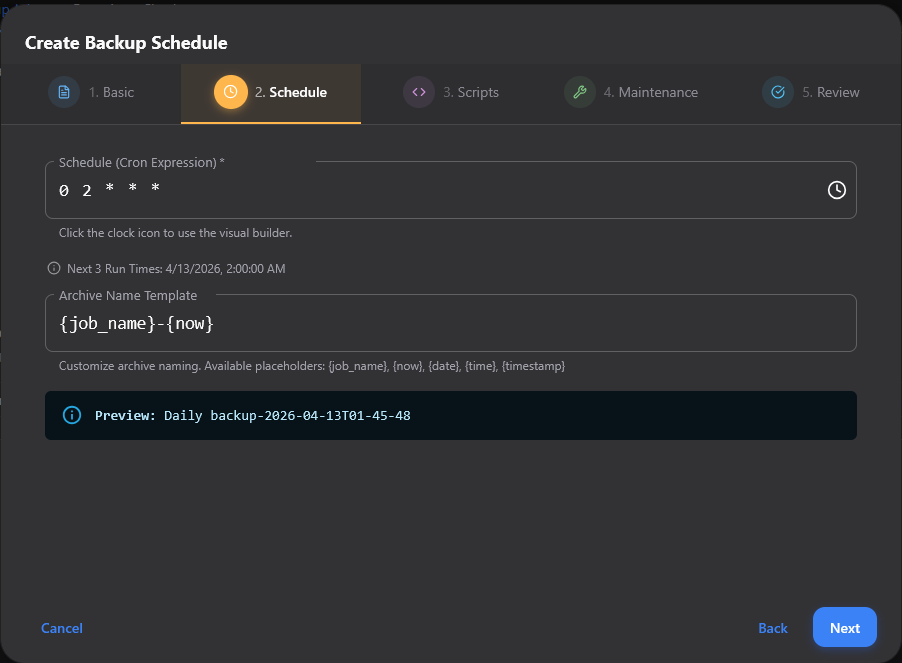
Under schedule, we see the familiar Cron expression format.
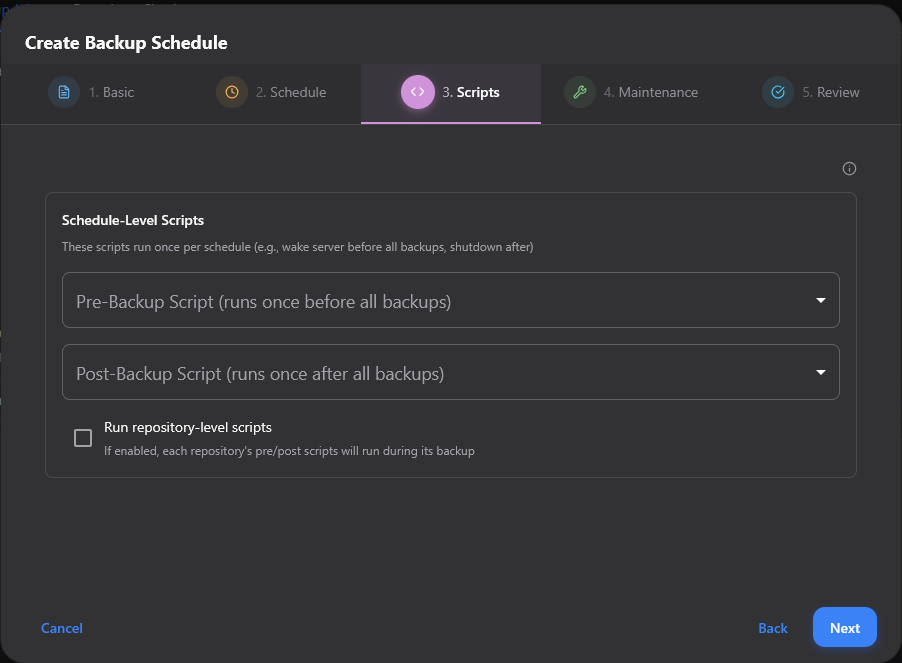
Step number 3 is the Scripts screen. Here you can setup pre-backup and post-backup scripts which are important for things like backing up databases, etc.
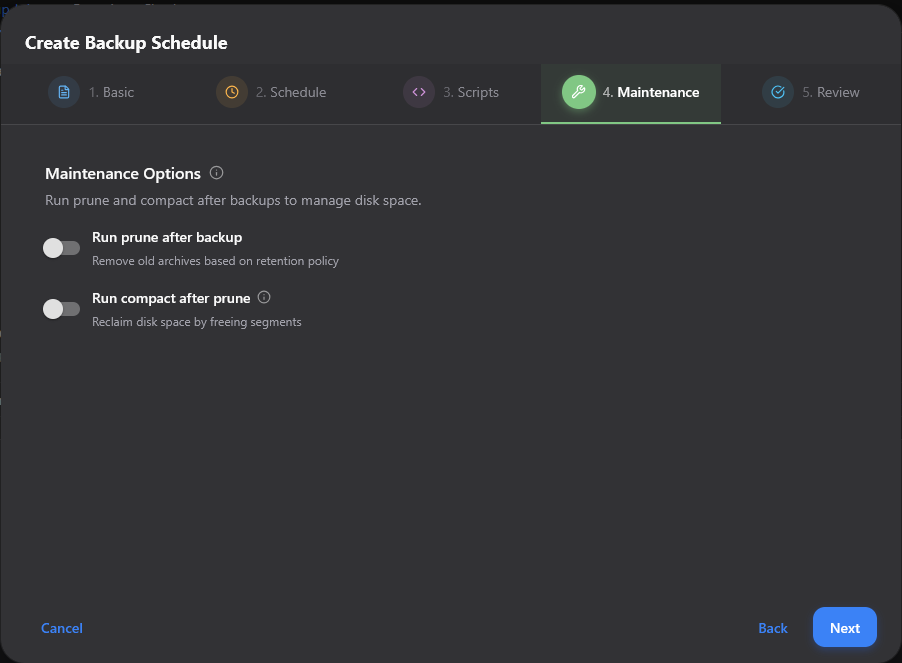
On the Maintenance step, you can toggle the job to run prune after backup nad run compact after prune.
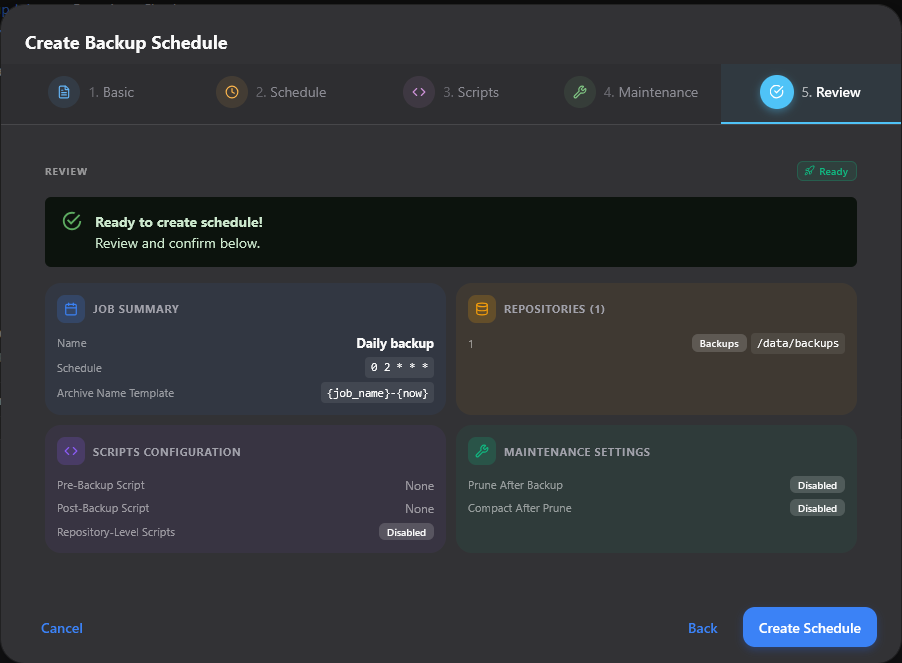
Finally, you can review the options and create the scheduled backup.
Restore workflow
The restore workflow is kicked off from the Archive Browser screen where you view the backups that have been taken and then initiate the restore from there.
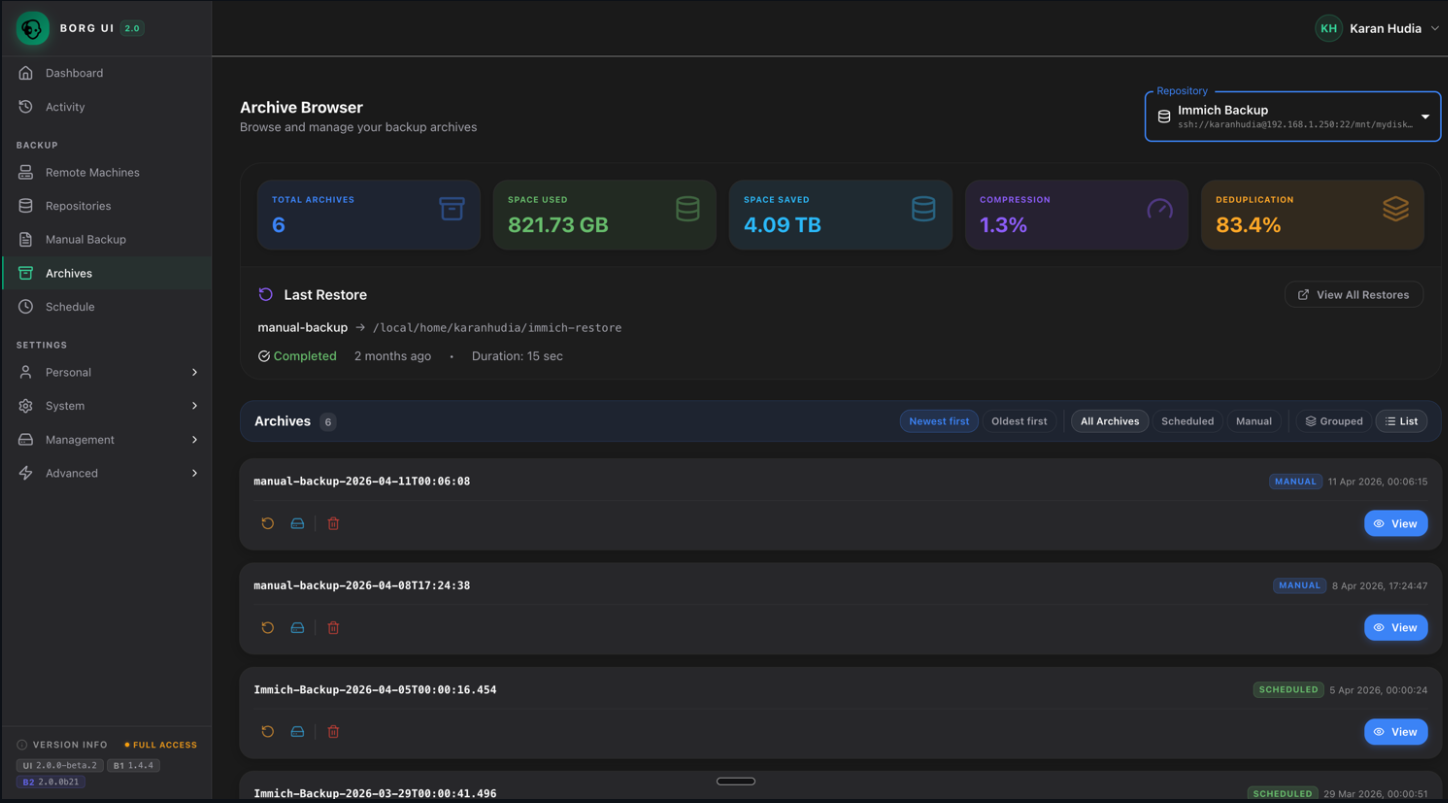
Instead of running borg extract commands manually, you can use the borg-ui to:
- Browse available snapshots
- Select files or directories
- Restore to a target location
Pros and cons of borg-ui with BorgBackup
Here are what I think are some of the pros and cons of the borg-ui using BorgBackup and things to note:
| borg-ui pros | borg-ui cons |
|---|---|
| Lowers the barrier to entry for BorgBackup | May not be needed if you are already comfortable with CLI workflows |
| Provides a much easier interface to BorgBackup | Multi-node management isn’t as slick as enterprise level tools |
| Integrates well with container-based environments | Not a full replacement for solutions like Veeam or Proxmox Backup Server but can be used as another layer of protection |
| Simple scheduling and management | Still evolving, so some features may feel incomplete or have errors |
| Makes restores easier for day to day use | This is a vibe-coded app it looks like so do note that and test thoroughly. But the source code is open and easy to audit and change |
Wrapping up
I think the borg-ui tool is a great addition to a backup tool that is legendary in the home lab community. It you don’t already leverage another backup tool as of yet, this is a great way to get started with backing up your data and getting it “off” your live environment and into a safe secondary storage location that can be used to recover your data. There are definitely tasks where a GUI makes a lot of sense, and I think backups and recovery of data is one of them. These are tasks that we want to make sure to get right and make sure we are in full control of those processes. So a “click ops” approach with backup and recovery is actually a good thing. How about you? Are you using BorgBackup currently from the command line? Are you using borg-ui or going to try it out? Let me know in the comments.
Google is updating how articles are shown. Don’t miss our leading home lab and tech content, written by humans, by setting Virtualization Howto as a preferred source.
About The Author