Many users when they first switch over to Proxmox, they have a tough time with the networking side of things or understanding what tasks are best to do when they first stand up a Proxmox VE Server on the networking configuration. The default networking config is actually pretty decent out of the box for basic connectivity. However, it is usually not the configuration that you always want across the board for performance, segmentation, or scaling in the future. If you are setting up a new Proxmox server, these are the first seven network configurations I recommend implementing and are things that I usually do when I stand up a new host for the first time.
Make the default bridge vmbr0 VLAN aware
One of the first things that I like to do after installing Proxmox is to make sure the default Linux bridge, vmbr0 in Proxmox, is VLAN aware. The vmbr0 bridge is like vSwitch0 in VMware ESXi. It is the first networking you get configured from a default installation.
Out of the box though vmbr0 is not configured as being VLAN aware. This is something you need to do to pass VLAN traffic. Enabling VLAN awareness on the default bridge or any other bridge you create for that matter allows you to carry multiple VLANs across those bridges and is what you want to have in place most of the time to be able to tag your network traffic properly.
You can create separate bridges, which I will get into below and are usually what you want to do otherwise, but for a lot of environments that have simple requirements, you can just allow the default bridge to carry all VLAN traffic and then assign VLAN tags to the individual VMs.
To enable VLAN awareness, edit the network configuration file:
/etc/network/interfacesYou will typically see something similar to this:
auto vmbr0
iface vmbr0 inet static
    address 192.168.10.10/24
    gateway 192.168.10.1
    bridge-ports eno1
    bridge-stp off
    bridge-fd 0
You can make your default bridge VLAN aware by adding this to the configuration:
bridge-vlan-aware yesYou can also do this in the web GUI, by checking the box VLAN aware in the edit Linux bridge dialog box.

After you do this, your configuration will look similar to the following:
auto vmbr0
iface vmbr0 inet static
    address 192.168.10.10/24
    gateway 192.168.10.1
    bridge-ports eno1
    bridge-stp off
    bridge-fd 0
    bridge-vlan-aware yes
Once this is enabled, you can simply add a VLAN tag to the network configuration of your individual Proxmox virtual machines. This approach avoids the need for creating multiple separate bridges and makes your network design simple and easy.
For home lab environments where you may run dozens of VMs across multiple VLANs, this single setting makes management much easier and it makes sense for most.
Separate management traffic from VM traffic
The next network configuration that I always configure with Proxmox is separating management traffic from VM traffic. When Proxmox is first installed, the management interface and all virtual machine traffic share the same network bridge. This works when you are first getting started, but it is definitely a configuration that you will want to change for security and management purposes.
When you separate these networks, it gives you a few advantages. These include:
- It improves security by letting you isolate management access to each of your Proxmox nodes
- It keeps VM traffic from mixing in with cluster communication
- It give you better performance when workloads and resource pressure increases
In my home lab environments, I usually use a dedicated management VLAN. For example, you can use any VLAN numbering that makes sense in your environment, but something like the following:
Management VLAN 10
VM VLAN 20
The Proxmox host itself gets an IP address only on the management VLAN. VMs then will use their own VLANs as needed. This keeps administrative access isolated. You definitely want things configured this way in production environments and I want my home lab to mimic this configuration.
Also, if you want to setup firewalling to help restrict traffic and access to the Proxmox interface from specific networks, by having things segmented, this makes this much easier. Even in small environments like a home lab, separating management traffic is one of the best habits you can develop.
Configure a static manmagement IP and DNS
One of the simplest but most important configurations I think is making sure the Proxmox host uses a static management IP with proper DNS settings. In many environments or home labs, ones may deploy Proxmox with DHCP enabled. While this works to get things up and going, it creates problems later if the address changes.
Cluster communication, backups, monitoring systems, and automation tools rely on consistent host addresses. A typical management configuration may look like this:
auto vmbr0
iface vmbr0 inet static
    address 192.168.10.10/24
    gateway 192.168.10.1
    bridge-ports bond0
    bridge-stp off
    bridge-fd 0
    bridge-vlan-aware yes
DNS servers can also be specified in the configuration:
dns-nameservers 192.168.10.2 192.168.10.3This makes sure that the host can resolve internal services that are super important like:
- Backup servers
- Monitoring systems
- Cluster nodes
- Automation tools
Using static management addresses also makes it easier to document your infrastructure and troubleshoot connectivity problems. It is a small step that helps prevent many headaches later.
Configuring network bonding with LACP
If you have a Proxmox server that has multiple network interfaces, like a lot of the modern mini PCs do, you want to be able to take advantage of these. So, instead of leaving these unused, I like to configure these in a network bond so that you can have the multiple interfaces work together to carry traffic.
There are two ways you can configure your traffic:
- Active/backup mode
- LACP aggregation
Active backup mode is the bonding mode that provides simple redundancy. If one NIC fails, the other takes over automatically. It is great to have this configuration to make sure if you accidentally unplug one of your uplinks, the other picks up and takes off. But you don’t get the advantage of the bandwidth of using both together. You only have the bandwidth of one at a time.
But, we can also create bonds that use the link aggregation protocol (LACP) to create “active” bonds. This means that both interfaces work together simultaneously which not only provides the resiliency against a failed NIC or upink getting pulled, but both links can work together and carry traffic. This increases your available bandwidth. Applications that are multi-threaded will be able to use both pipes for network traffic.
To create LACP bond configuration you might configure something that looks like this in your network interfaces configuration. Note the bond-mond 802.3ad which notes LACP:
auto bond0
iface bond0 inet manual
    bond-slaves eno1 eno2
    bond-miimon 100
    bond-mode 802.3ad
    bond-xmit-hash-policy layer2+3
This creates a bonded interface using two physical NICs. Then you can configure your bridge to use the bond instead of a single interface:
bridge-ports bond0Using bonds helps you to improve the reliability and throughput of your Proxmox host. This is how I have the network configured in my Proxmox cluster where I have storage traffic (Ceph), VM traffic, and migrations running across the network. These can generate a lot of traffic. LACP helps you to have more bandwidth available for all the different types of traffic.
Create a dedicated storage network
When you run a clustered storage technology like Ceph, iSCSI, NFS, etc, creating a dedicated storage network is definitely the best practice and the recommendation for Proxmox and most other hypervisor technologies.
Storage traffic generates a lot of high bandwidth usage. If this traffic shares the same network as VM traffic, it can create congestion that can impact application performance. So you want to keep these separated from one another. Creating a dedicated storage network keeps your storage communication separate from your virtual machine traffic.
In many Proxmox clusters, you can implement this with a dedicated VLAN.
Example design:
Management VLAN 10
VM VLAN 20
Storage VLAN 30
Your storage bridge config may look similar to this:
auto vmbr1
iface vmbr1 inet static
    address 10.10.30.11/24
    bridge-ports bond0
    bridge-stp off
    bridge-fd 0
    mtu 9000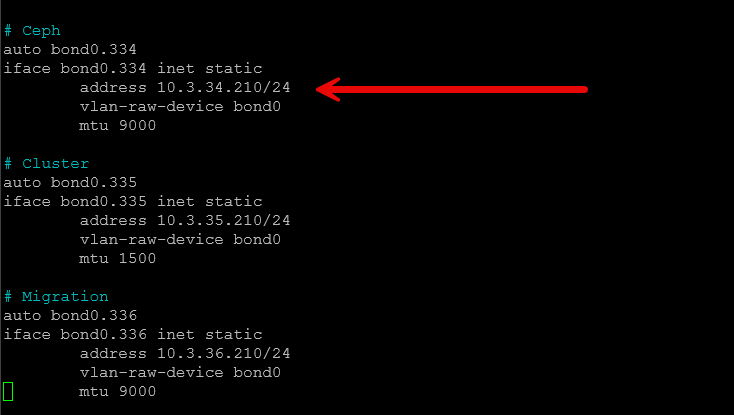
Each node with be configured with an IP address on the storage network. Ceph can then be configured to use this network for replication and data transfers. This type of design will greatly improve your storage performance and help avoid network contention with any virtual machines you have running.
In environments with multiple nodes and NVMe based storage like I have running in my current mini rack Proxmox home lab, a dedicated storage network is one of the most beneficial networking tweaks you can implement.
Enable jumbo frames for storage networks
Another network setting that I always configure having to do with storage (Ceph, iSCSI, NFS) is turning on jumbo frames. When you enable jumbo frames, this helps to improve the performance of your storage traffic and it will help to lower the CPU use at the same time.
This is because standard Ethernet frames use an MTU of 1500 bytes. Jumbo frames give you a much larger packet size, which is usually around 9000 bytes for the MTU. This keeps the CPU from having to do as much work and allows more efficient traffic flows.
Setting up jumbo frames is fairly simple in the Proxmox network configuration settings. You can add a simple MTU value to the interface like in the following example:
auto bond0
iface bond0 inet manual
    bond-slaves eno1 eno2
    bond-miimon 100
    bond-mode 802.3ad
    mtu 9000
And you can add this on the bridge as well:
auto vmbr1
iface vmbr1 inet manual
    bridge-ports bond0
    bridge-stp off
    bridge-fd 0
    mtu 9000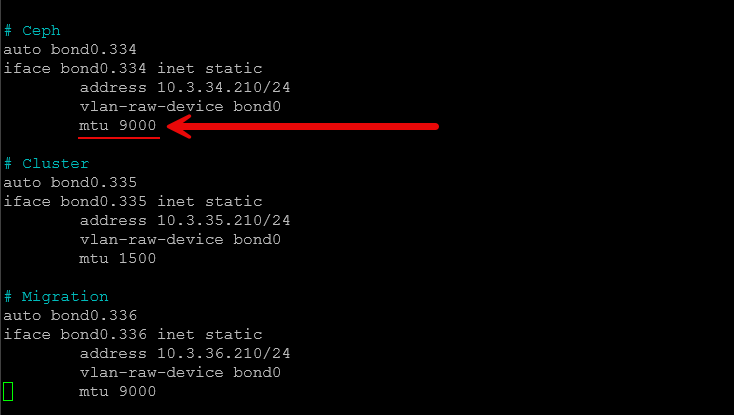
One thing I will say is that it is extremely important that you make sure that jumbo frames are consistent across the entire network path. This includes the following:
- Switch ports
- NIC configuration
- Virtual bridges
- Storage network interfaces
If any device in the path does not support the larger MTU, you will get packet fragmentation or dropped traffic can happen as well. I have covered this recently as well that jumbo frames can definitely be something that you want to be careful with. Also, do not enable them on virtual machine networks. Be warned that this can cause you to pull your hair out trying to figure out super weird network issues happening.
But, when configured correctly, jumbo frames can improve throughput and reduce CPU usage in storage heavy environments and it is definitely a setting I always configure for that particular network.
Configure a dedicated migration network
Another network that benefits from being separated from other types of traffic is migration traffic. Live migration is one of the core features of Proxmox clusters. It lets you have virtual machines move between your Proxmox nodes without downtime. This is great when you need to perform maintenance on a node, you can migrate those VMs to another node in the cluster and take the physical Proxmox node down to do what you need to do without any disruption to your VMs and applications.
Live migration traffic can generate large bursts of network traffic. When you move a VM with tens of gigabytes of memory, this can easily saturate a network interface if migrations occur on the same network as VM traffic. To avoid this, I configure a dedicated migration network.
You can do this by using another VLAN and bridge. For example:
Migration VLAN 40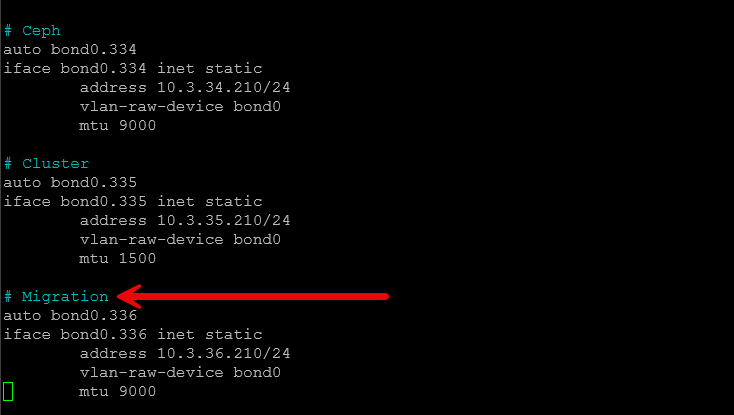
Like with the storage network, each of the nodes receives a migration network IP address. Then, in Proxmox, under the datacenter settings, you can configure the migration network that you want to use so that live migrations use this network instead of the main interface that would compete with management, storage, etc.
This way, it isolates migration traffic and keeps it from affecting running workloads. In larger clusters, this configuration can dramatically improve the speed of your migrations while it keeps application performance stable.
Wrapping up
These 7 Proxmox network configuration settings are ultimately small changes in the grand scheme of things, but they are some of the most impactful changes that you can make in my experience. Networking in any hypervisor or server configuration is something you want to get right. Proxmox is no exception here. Most of these network settings are common sense items that give you better security, separation of traffic types, and more performance when they are implemented in the right way. How about you? What network settings do you implement on your Proxmox servers? Let me know in the comments.
Google is updating how articles are shown. Don’t miss our leading home lab and tech content, written by humans, by setting Virtualization Howto as a preferred source.
About The Author