If you are running a Proxmox VE Server environment, you will want to set up backups as soon as possible. Proxmox Backup Server is the obvious choice for this since it is free to download and use with Proxmox. However, you need a place to run it. And, running and keeping your backups outside your Proxmox environment is the best for protecting your data. A piece of gear that basically all of us wind up with at some point is a NAS device. What I have found is today’s NAS devices are super capable and are basically very performant mini PCs. In my case, I want to show you how I am using my recently acquired Beelink ME Pro as a Proxmox Backup Server. Let’s see why your NAS is the perfect Proxmox Backup Server.
Proxmox backup needs are different than file storage
Proxmox backups involve large sequential writes, deduplication, compression, frequent metadata updates, and periodic verification jobs. That is a very different workload than browsing files over SMB or NFS.
A NAS is already designed for sustained disk activity. It is also designed for data integrity, and predictable performance. When you run Proxmox Backup Server on a NAS, it is a great pairing of the solution with hardware that was built for exactly this kind of job.
Why you need to separate your backups from the cluster
One of the most important principles when thinking about your backups is isolating your backups from the environment or workloads they are protecting. Many when they first start just simply use part of their cluster resources to house their backups. This is better than not having backups at all, but it is also dangerous in itself to do.
This is one of the first areas that running your backups from a NAS shines. Running Proxmox Backup Server (PBS) on your NAS device gives you the physical and logical separation you need to make sure your backups are safe. If you have Proxmox hosts that are down or misconfigured, or if they go completely offline, then your backups and, more importantly, your data is still accessible on your NAS device that is separated from your cluster.
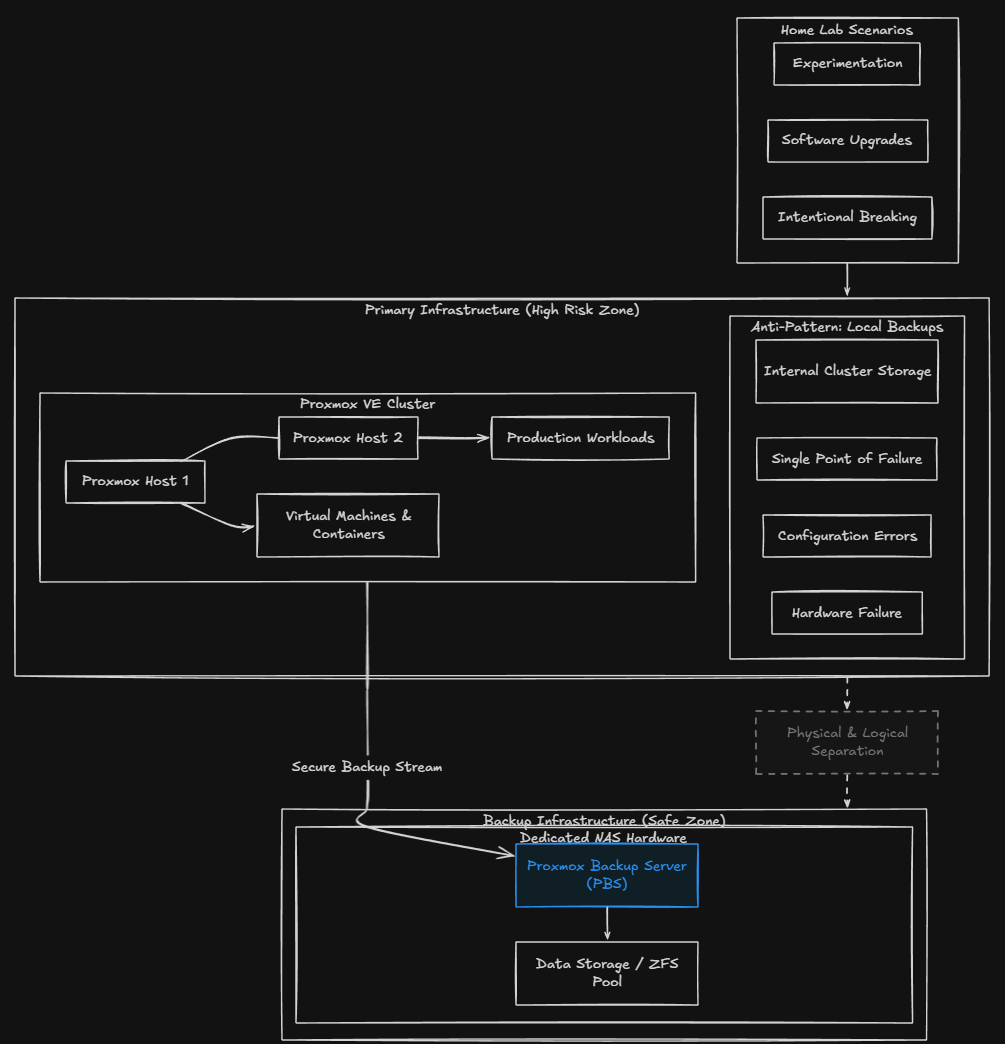
In a home lab situation, we are experimenting, changing things constantly, upgrading software, hardware, and many other things. And, we break things on purpose! Having backups that are outside the blast radius of your immediate home lab infrastructure helps to give you confidence to try new things knowing you have the safety net of backed up data.
Why NAS hardware fits Proxmox Backup Server so well
I have always thought that NAS hardware is one of the best devices so to speak that you can run your backups from. They are by default a self-contained unit and don’t depend on getting anything else from your cluster or other parts of the environment. They have compute, storage, and networking all in the same chassis. So you essentially have a ready-made backup appliance of sorts.
Proxmox Backup Server doesn’t really need anything special, like a GPU. It does not need massive CPU horsepower. What it needs is reliable storage, decent memory, and a system that can stay online 24 hours a day. That is exactly what NAS hardware is good at. You also can equip them with NAS tweaked hard drives that are made for running 24x7x365.
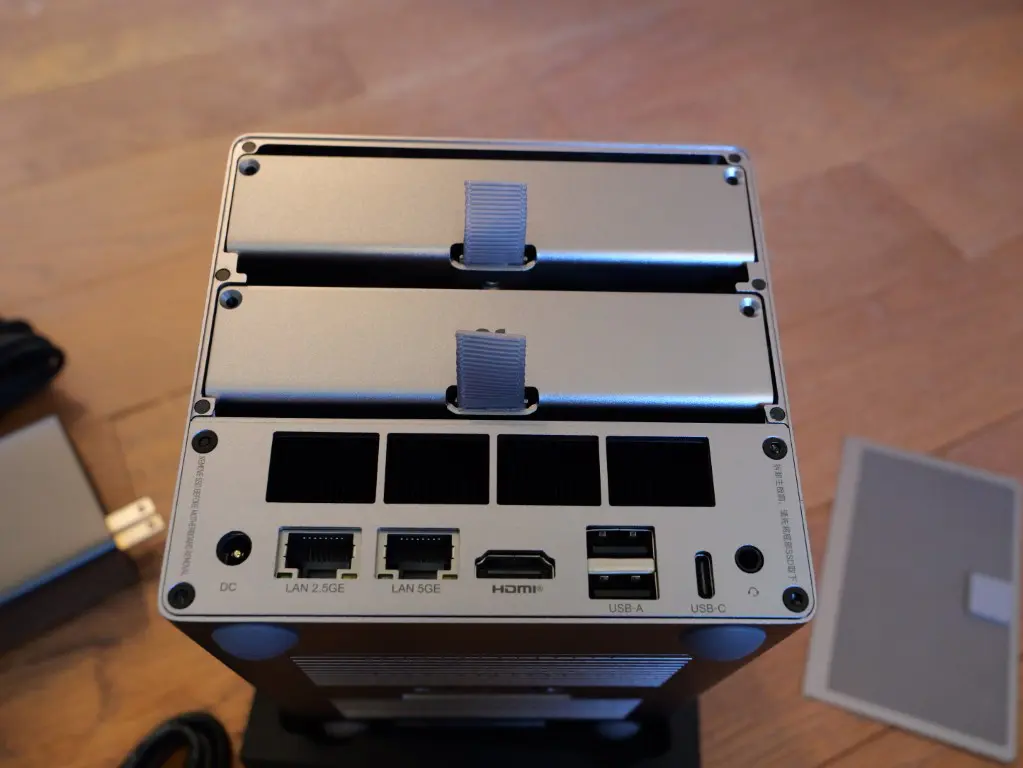
I’m using the Beelink ME Pro
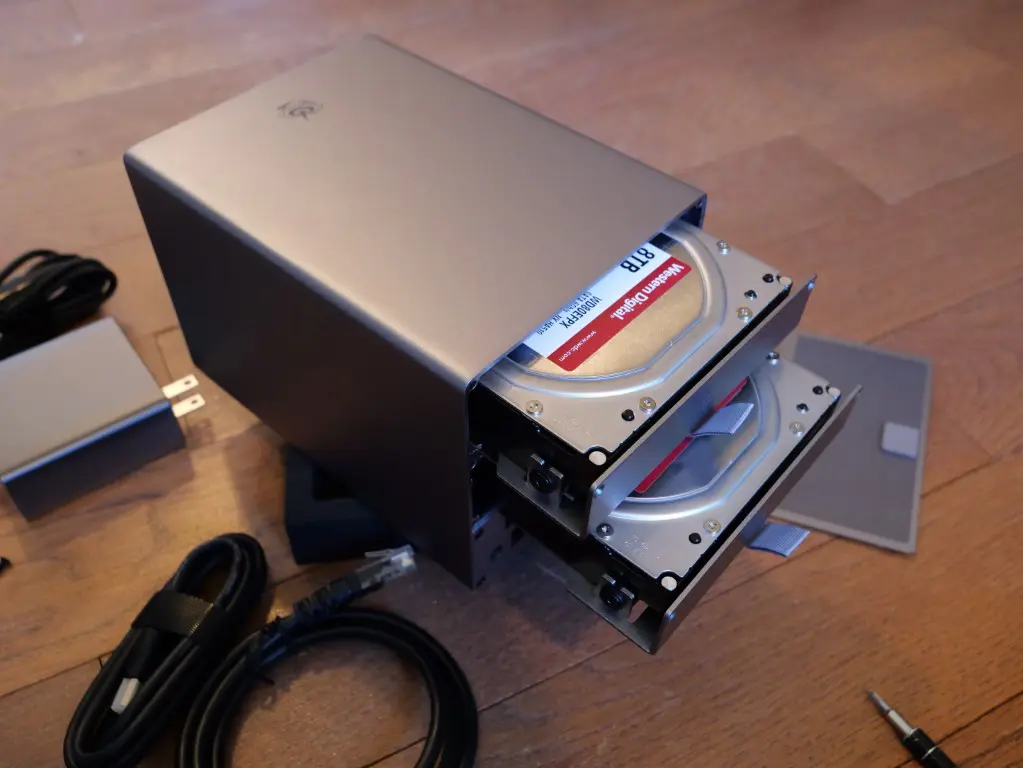
I decided to use my Beelink ME Pro as a great little NAS box that suits my needs extremely well for Proxmox Backup Server. It is super power efficient with the N95 processor at 4 cores, has 12 GB of memory, and you get the best of both worlds with the ability to add spindles and NVMe drives both.
Check out my full review of this little NAS box here:
The ME Pro also fits beautifully into a compact minirack or shelf based home lab. It does not need special cooling, it does not sound like a jet engine, and it does not consume a lot of power, which is exactly what you want from a backup server.
So, you can dedicate this particular NAS to Proxmox Backup Server without worrying that it is being wasted or underutilized.

Proxmox Backup Server is great for home lab backups
I think since arguably most are moving towards Proxmox in the home lab, PBS is one of the tools that is just a no brainer in your Proxmox environment. You don’t have to worry about licensing or renewing some type of trial or NFR, etc. It also supports enterprise-type features like deduplication, incremental backups, backup encryption, and verification jobs.
What are these features exactly?
- Deduplication removes identical blocks of data across your VMs so that you are not rewriting the same data in efficiently
- Incremental backups are great as they mean you will have much faster backup jobs and less load on your network. Incremental backups only copy across data “that has changed” since the last backup, so much more efficient
- Verification jobs actually test your backups and give you proof they are usable.
- S3 backup locations! – New with Proxmox Backup Server 4.x is the ability to target S3 or S3 compatible storage to add your “cloud tier” for archives or the “1” for your offsite storage in 3-2-1 backup methdology
Running this on a NAS lets you take full advantage of all these features without impacting or taking away resources from your Proxmox cluster. AND, best of all, it let’s you know you have another copy of your important data.
Simple deployment of PBS
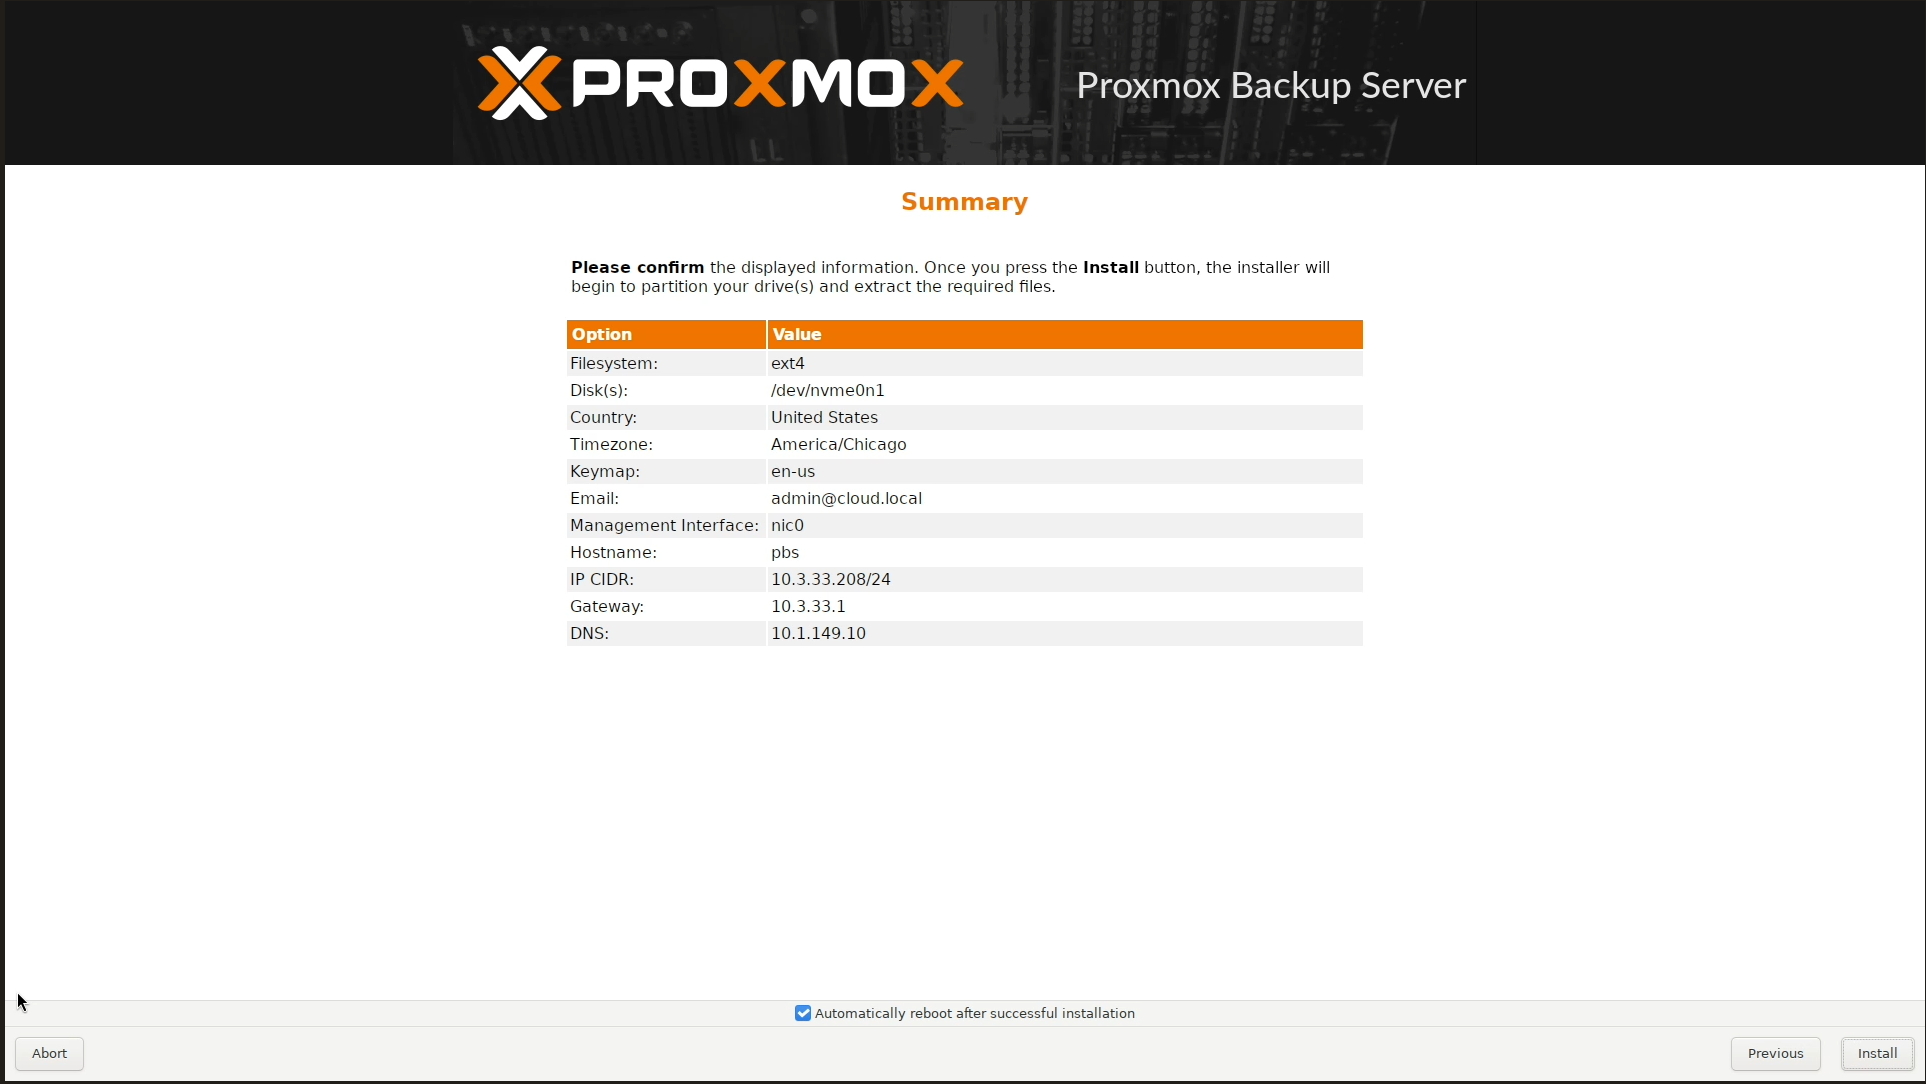
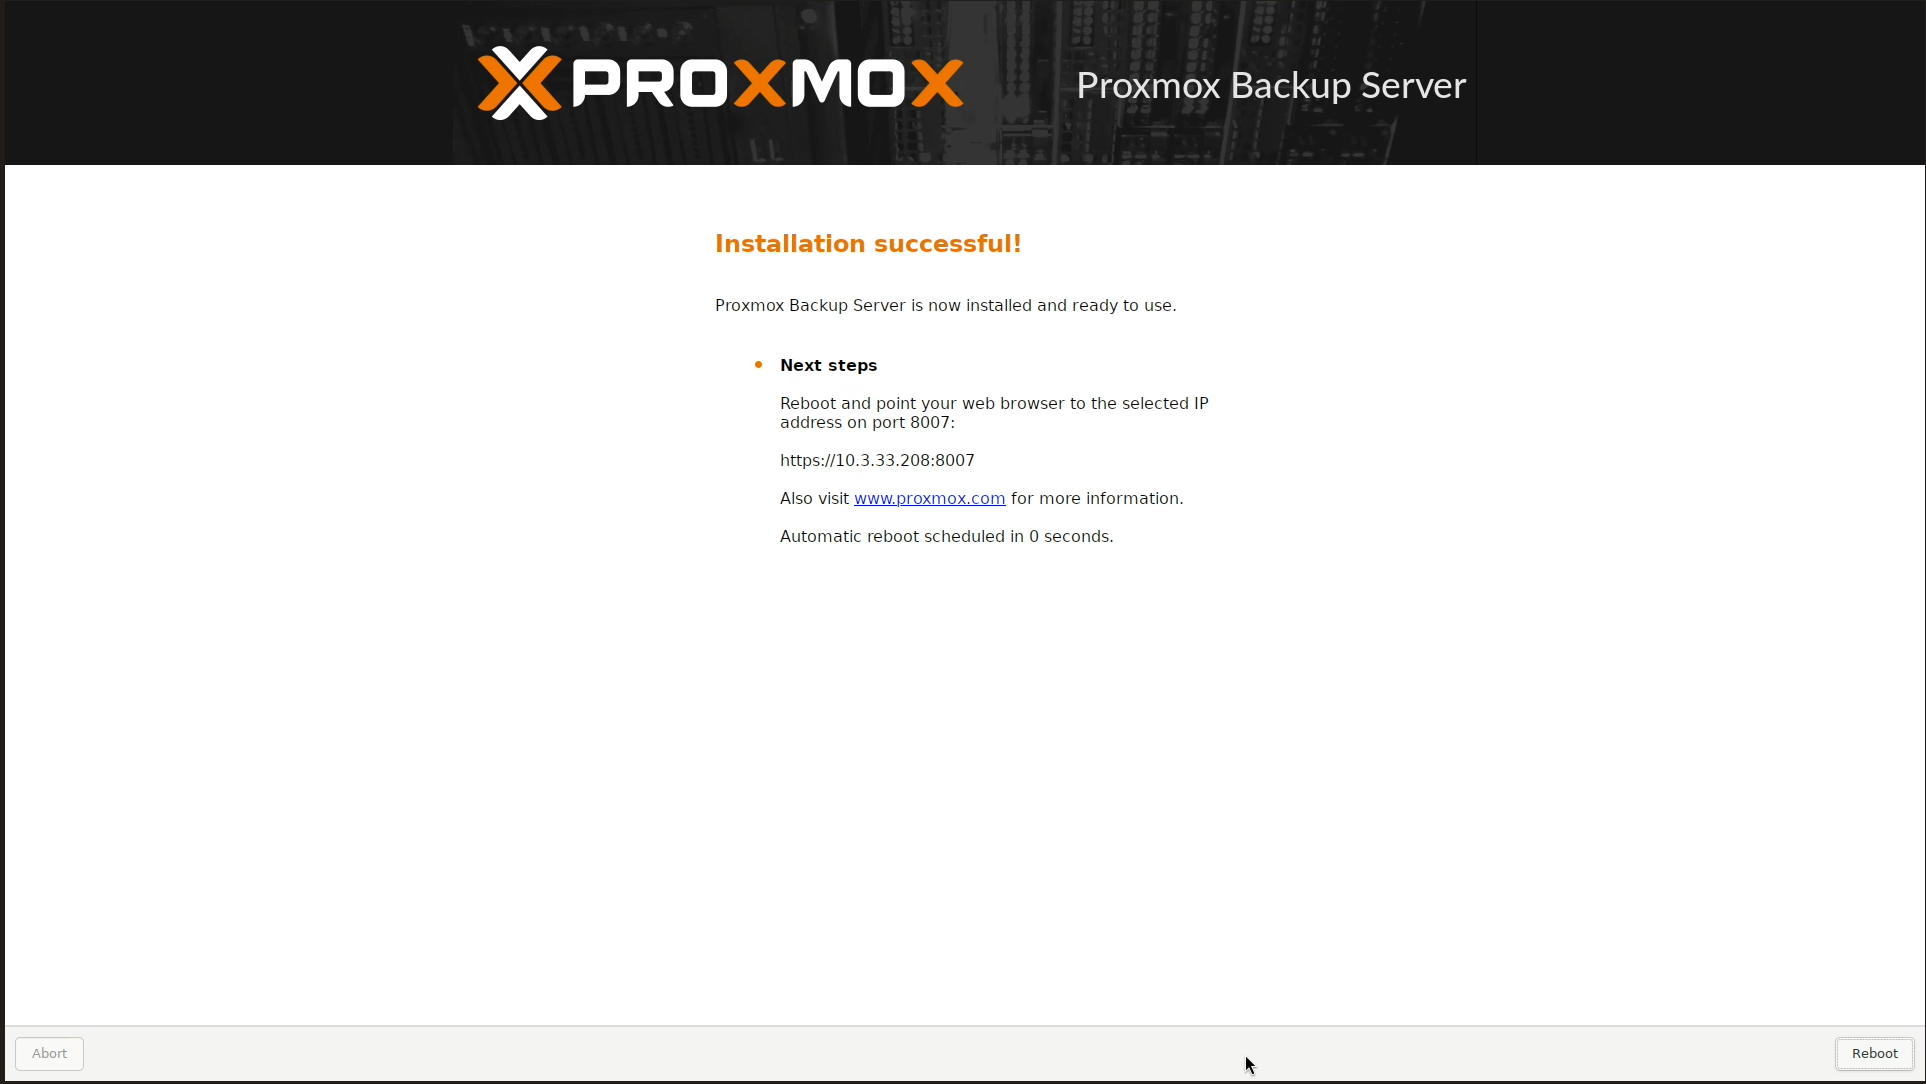
PBS is pretty flexible in how you can deploy it on a NAS box. There are really two viable ways that it can be installed. The first option is to install Proxmox Backup Server directly on the NAS hardware as the primary operating system. This is what I have done. I think this is the cleanest option for running PBS. You get the full power of running it bare metal. And, I think on a lower-powered NAS like the Beelink ME Pro, it is arguably the best option.
The second option is to run Proxmox Backup Server as a virtual machine or container if your NAS OS supports virtualization. Running as a virtual machine gives you a lot of flexibility and makes the most sense if you want to use your NAS hardware for other roles outside of running PBS. You may want to use your NAS for running other VMs as an example.
Networking considerations for backup traffic
Backups are a type of operation that generate a LOT of network traffic. Especially if you are testing a LOT of VMs, you will see a lot of data that needs to cross the network during backup runs. This again is where incremental backups help you as well since it only copies changed data and not ALL data.
Modern NAS devices usually have multi-gig connections or even 10 GbE. PBS can take advantage of these multi-gig and high-throughput connections. Faster networking means that you have shorter backup windows. It also helps to offset any other busy periods in network traffic. This means NAS devices are great for this purpose.
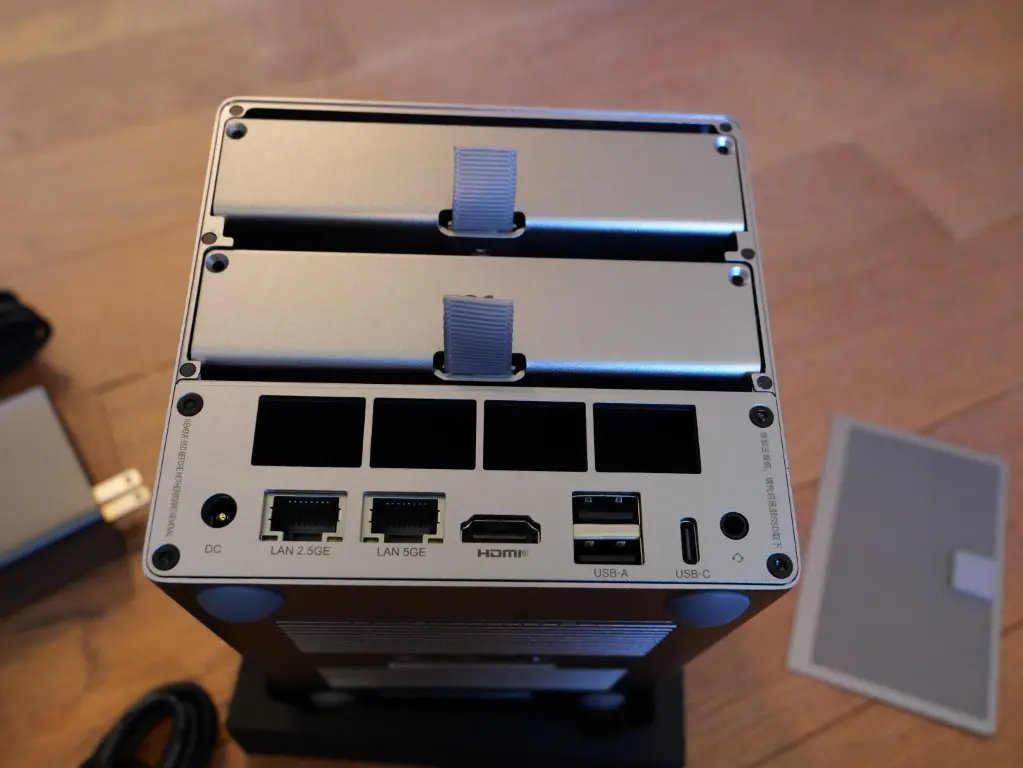
Many NAS devices now like mini PCs come with multiple network adapters. The ME Pro for instance comes with not only a 2.5 GbE connection but also a 5 GbE connection. This means you have more options when it comes to how your backup traffic flows and how much overall bandwidth and throughput you have to play with.
However, even if you have an older NAS that is limited to 1 GbE, this is still fine for home lab backups and honestly with backups, consistency is more important than raw throughput and speed.
Power efficiency
When you think about a “backup server,” its intent and purpose is different from other “servers” you may be running. They run continuously, and perform scheduled jobs and tasks even when you are not actively using the lab environment.
Your NAS is designed for exactly this scenario. They sip power compared to full sized servers and are basically now built on top of the same type of architecture that is used in mini PCs. That means they generate less heat and over time this makes a big difference in both power cost and heat generation.
This is also one of the reasons that I chose the Beelink ME Pro for housing Proxmox Backup Server. It has the characteristics that are great once again, including power efficiency. And it has the good mix of drive capabilities and power profile characteristics.
I wanted to get a real-world power efficiency test on the ME Pro in this role and with PBS installed and outside of a backup job it is idling at around 22 watts with 2 spindles and 2 NVMe drives running. Not bad.
My notes on getting the ME Pro configured with Proxmox Backup Server
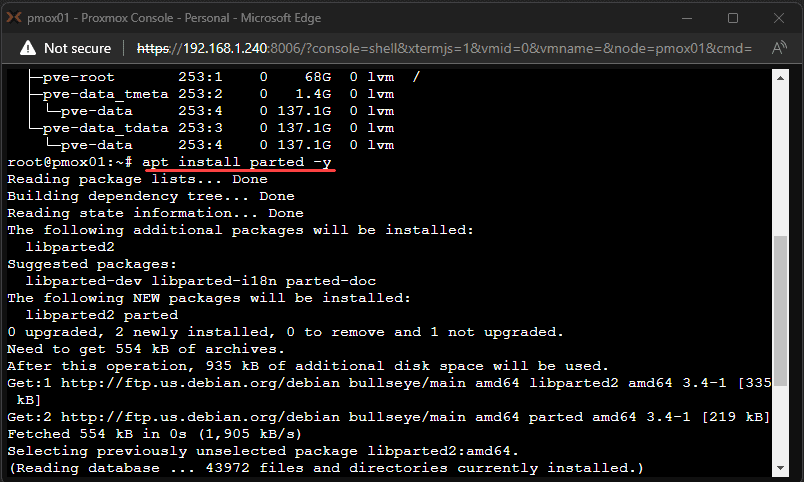
I had the two WD Red drives in my ME Pro along with a single additional NVMe drive. Here are the command line commands I used to get everything up and running. First let’s look at the steps for the spindles.
You can view your disks with:
lsblk -o NAME,SIZE,MODEL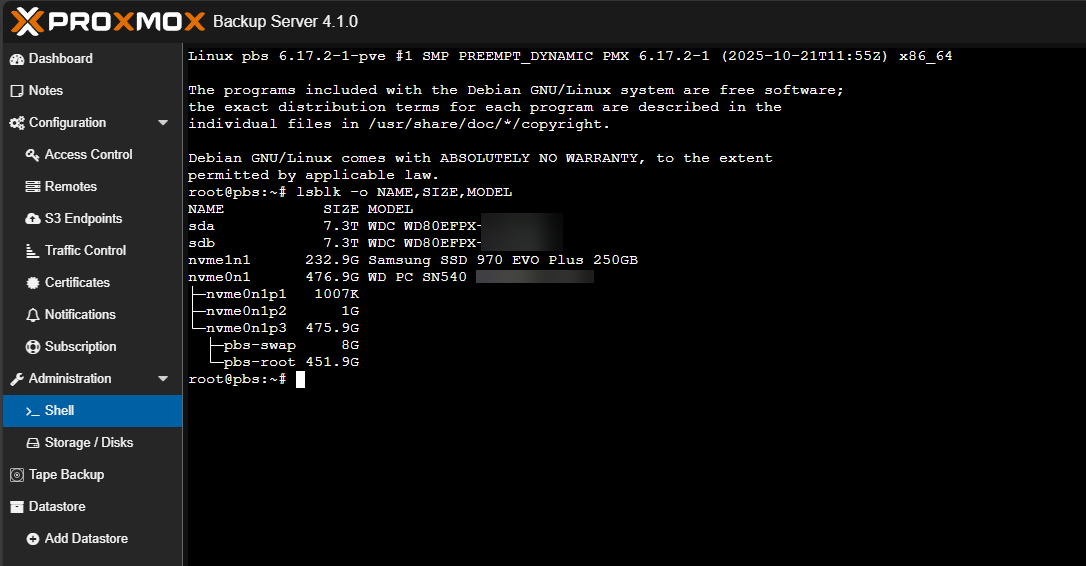
Wipe the disk:
wipefs -a /dev/sda
wipefs -a /dev/sdb
sgdisk --zap-all /dev/sda
sgdisk --zap-all /dev/sdb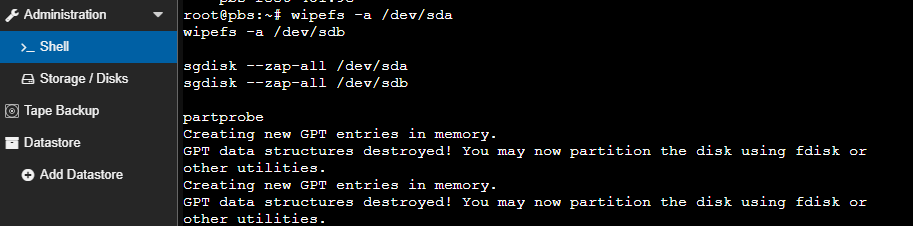
List out the disks
lsblk -f /dev/sda /dev/sdbCreate a ZFS mirror
zpool create -f
-o ashift=12
-O compression=lz4
-O atime=off
-O xattr=sa
-O normalization=formD
-O mountpoint=/mnt/pbs-archive
pbs-archive mirror /dev/sda /dev/sdb
Check the zpool status after that:
zpool status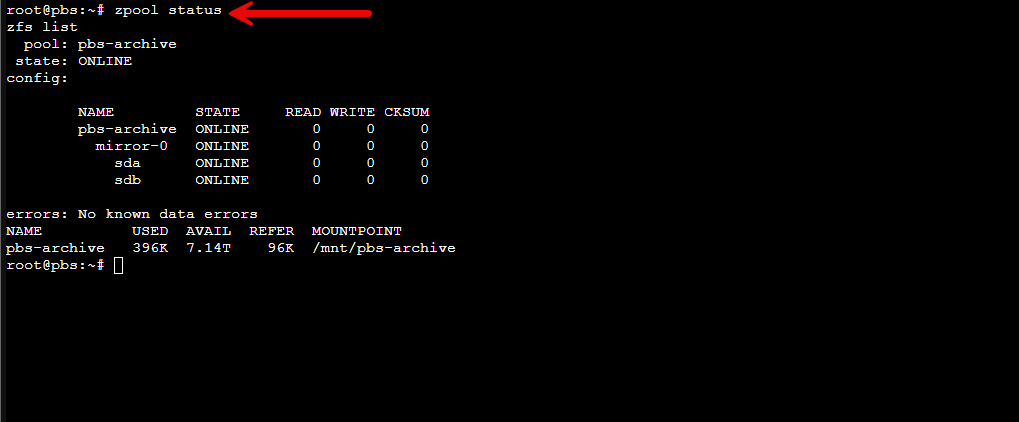
Create the datastore:
zfs create pbs-archive/datastoreCreate the mountpoint:
zfs set mountpoint=/mnt/pbs-archive/datastore pbs-archive/datastoreApply PBS tuning
zfs set recordsize=1M pbs-archive/datastore
zfs set atime=off pbs-archive/datastore
Verify everything:
zfs list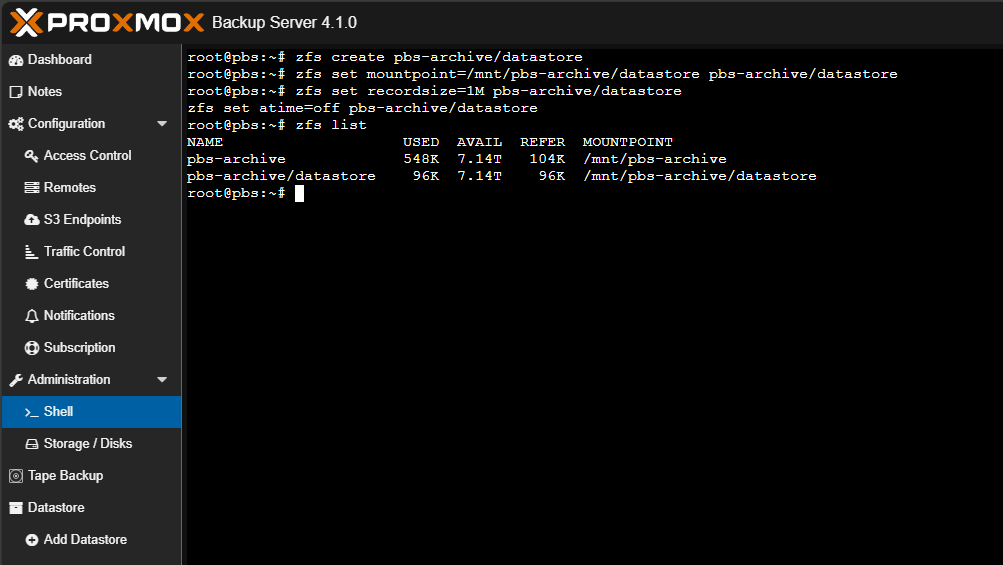
Set permissions for PBS:
chown -R backup:backup /mnt/pbs-archive
chmod 750 /mnt/pbs-archive/datastore
Now register the ZFS backed datastore in PBS:
proxmox-backup-manager datastore create archive /mnt/pbs-archive/datastore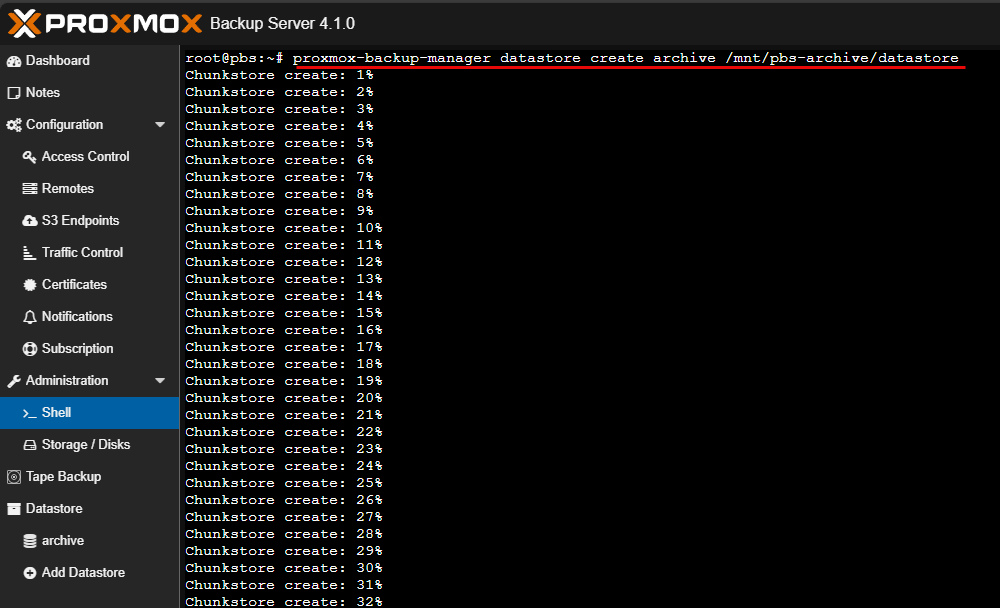
Confirm everything:
proxmox-backup-manager datastore list
Run a quick health check:
df -hT | grep pbs-archive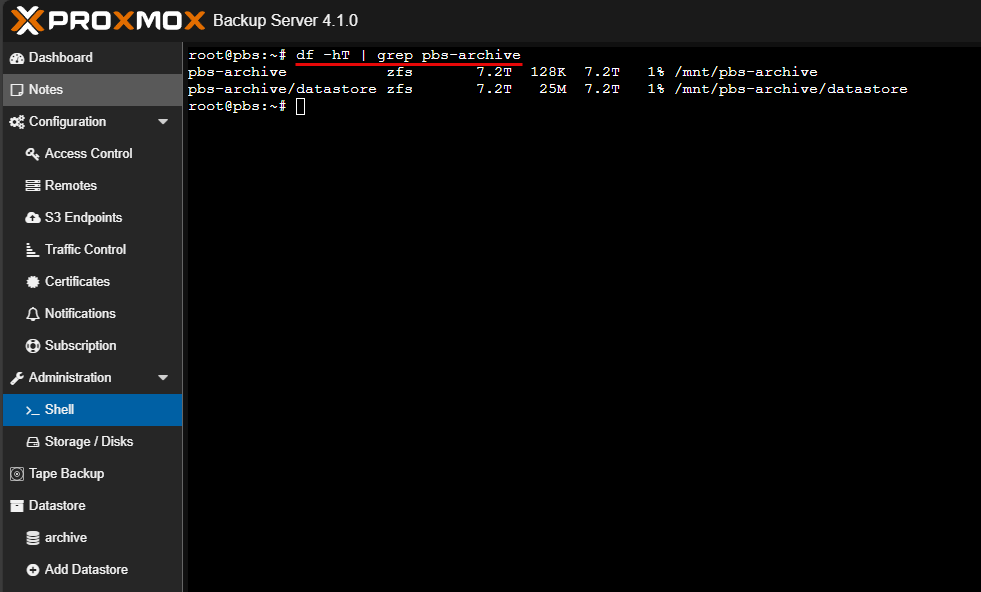
NVMe disk provisioning
Now let’s look at the commands with provisioning the NVMe disk:
sgdisk -n 1:0:0 -t 1:8300 -c 1:pbs-fast /dev/nvme1n1
Format the partition:
mkfs.xfs -f -L PBS_FAST /dev/nvme1n1p1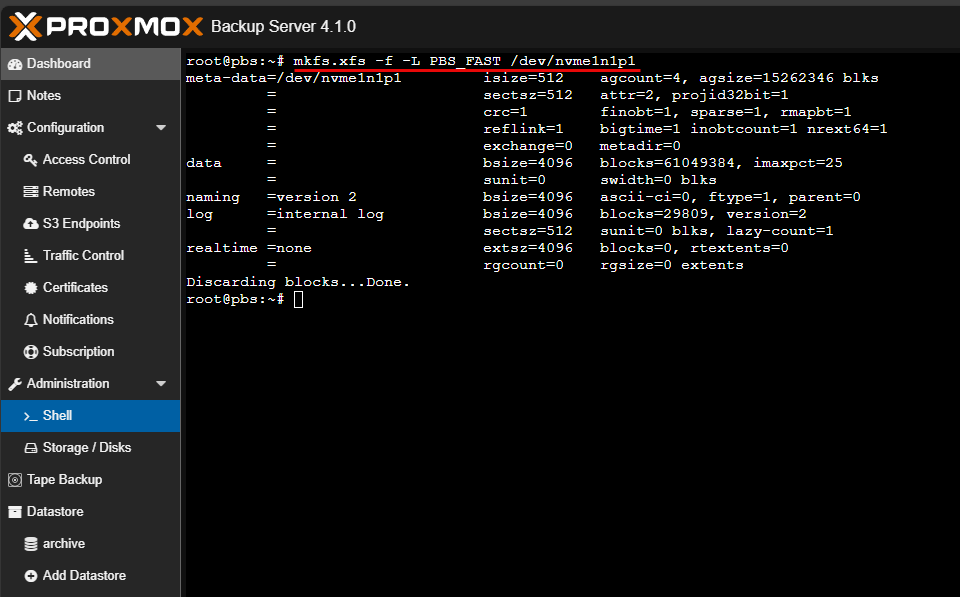
Persist the mount in fstab:
blkid /dev/nvme1n1p1Find the UUID:
blkid /dev/nvme1n1p1Persist it in /etc/fstab
echo "UUID=436e12d7-3a55-4c47-84b9-b4d5b800d286 /mnt/pbs-fast xfs defaults,noatime 0 2" >> /etc/fstabTest it
umount /mnt/pbs-fast
mount -a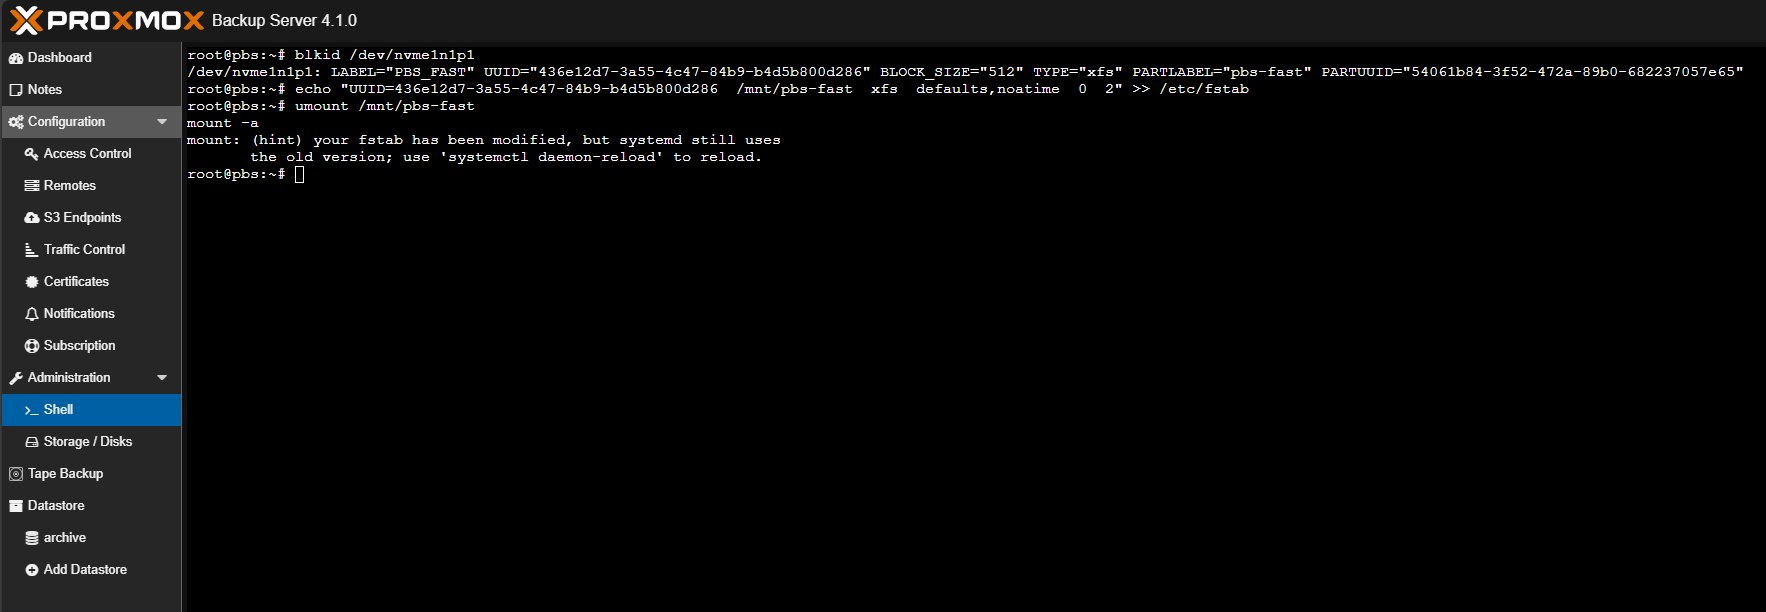
Register the NVMe datastore in PBS:
proxmox-backup-manager datastore create fast /mnt/pbs-fastViewing all the datastores created and listed in Proxmox Backup Server:
proxmox-backup-manager datastore list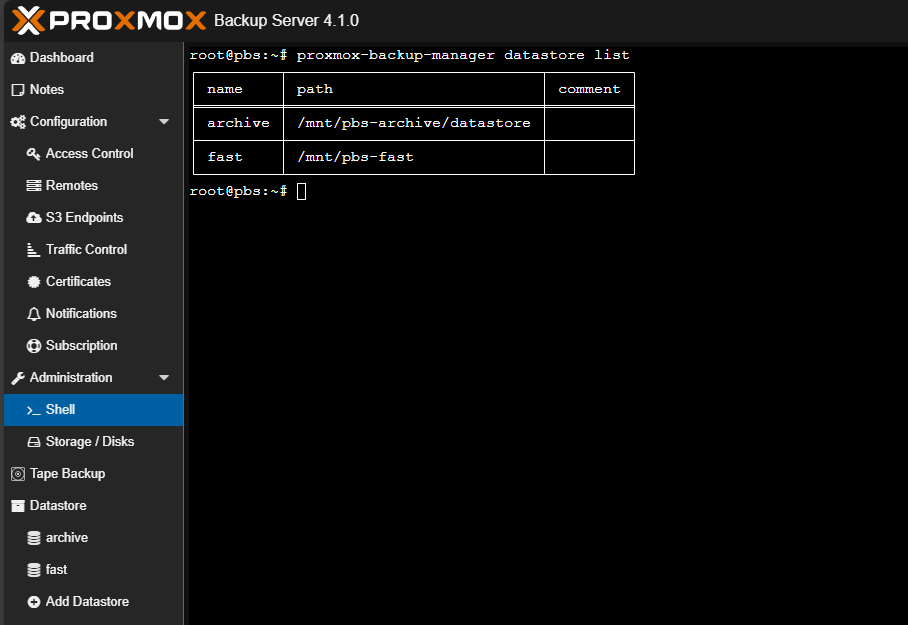
Operational simplicity
Running Proxmox Backup Server on a NAS also simplifies how you think about your environment. Your Proxmox cluster handles compute and virtualization. Your NAS handles backups.
That separation makes troubleshooting easier. It makes upgrades safer. It makes failures easier to reason about.
When something goes wrong, you know exactly which system to look at. That clarity is incredibly valuable in a home lab where time is often limited.
Wrapping up
I think using your NAS or an extra NAS you may have lying around for Proxmox Backup Server is a great way to take advantage of all the benefits that a NAS brings to the table. This includes the fact that it is a self-contained compute, storage, and networking node that is separated from your Proxmox environment. Also, Proxmox Backup Server is totally free and is very good backing up Proxmox as we can imagine it is purpose-built for the platform. It has lots of enterprise features already built in like dedup, incremental backups, and verification jobs. If you are running Proxmox in the home lab and backups are still something you have kept as an afterthought, do yourself a favor and get Proxmox Backup Server up and running, if not on a NAS device, somewhere in your environment. How about you? Are you running PBS currently or looking to stand it up soon?
Google is updating how articles are shown. Don’t miss our leading home lab and tech content, written by humans, by setting Virtualization Howto as a preferred source.
About The Author