I have been playing around with and using OPNsense for a while now and it is a rock solid open-srouce firewall that can do just about anything you want to do with it. Out of the box, it has quite a few features. However, you can add plugins to the mix to bring enterprise grade features to your home lab or business environment if you are using it there. There is one plugin that definitely is one to note if you are serious about next-gen firewall features. There are a couple of catches with it though in the free form. Let’s take a look at what Zenarmor is, how you install it, and compare its features in free vs paid.
What is Zenarmor and “next generation” firewall?
You may not have heard about Zenarmor before, but this is its new name. It used to be known as Sensei and is a next generation firewall plugin that adds “next-gen” features to OPNsense. It is developed by a company called Sunny Valley Networks.
The term “next-generation” is definitely abused in marketing for most solutions. However, this just means in this case that it adds full OSI layer functionality all the way up to layer 7 and allows you to do things past the general Layer 3/4 of a traditional firewall (just blocking ports and services).
It also means you have things like deep packet inspection, TLS visibility, and also includes things like detailed network analytics. So you can se what applications and services are used on your network.
This allows you to do things like allowing web browsing, but blocking gaming or streaming services. That kind of granular control is difficult or impossible to really do with the default firewall functionality alone (layer 3/4).
Do you need next gen features?
Well, this may depend on your use case. One factor I think that will apply is, are you using OPNsense as your main firewall? For instance, some may use OPNsense as just a virtual router on a segment of their home lab network to test and experiment with things. If so, you may not care bout the next generation firewall features.
However, if you want to use OPNsense as your main firewall/router, having this kind of visibility is a great capability to have. In 2025, most of us are using more networked devices than ever before, including smart devices, IoT, remote connections, AI apps, etc. So, for having the visibility and control you want to have with OPNsense, you probably want to have the next gen features in the appliance.
Also, while I don’t consider this really “next gen”, there are a few gotchas in OPNsense that out of the box it doesn’t have that might be surprising. One is web filtering. I was surprised to learn that there wasn’t a web filter installed by default when I first spun up OPNsense. Learn about the other gotchas with it here: 5 Things You Should Know About OPNsense Before You Install It.
Zenarmor features
There are definitely features to note about Zenarmor that I think are really good for filling the gap in capabilities of OPNsense by default. What are those?
- Application control – you to create rules based on known apps. These include the big ones from productivity tools like Zoom or Slack to services like Netflix or gaming platforms
- Web filtering – web filtering lets you block categories of websites such as adult content, gambling, or social media
- User and device based policies – you can tie rules to specific user devices or users themselves instead of just IP addresses
- Advanced reporting – dashboards and reports show what is happening in real time. You can see top talkers, bandwidth usage by application, and trends over time
- TLS inspection – allows you to inspect encrypted traffic to enforce policies at the application level. This can be great for blocking malware command and control traffic or enforcing compliance in business environments.
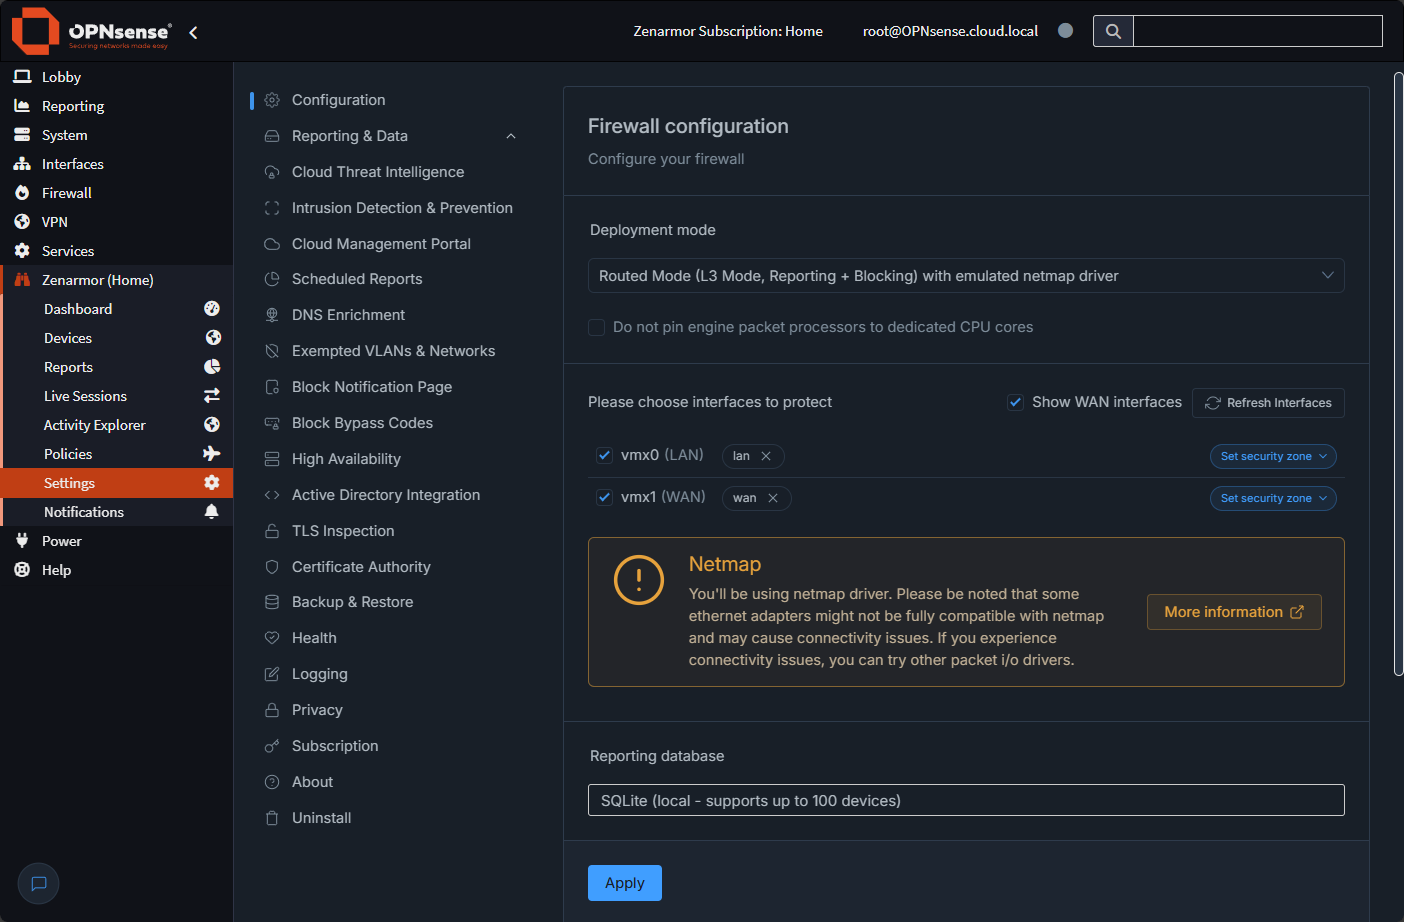
You get an idea from the Settings page the various capabilities of the Zenarmor plugin in general.
How to install OPNsense Zenarmor plugin
Let’s step through the process to install the OPNsense Zenarmor plugin. Since Zenarmor is a plugin, it is simple to get it installed using the normal OPNsense plugin workflow.
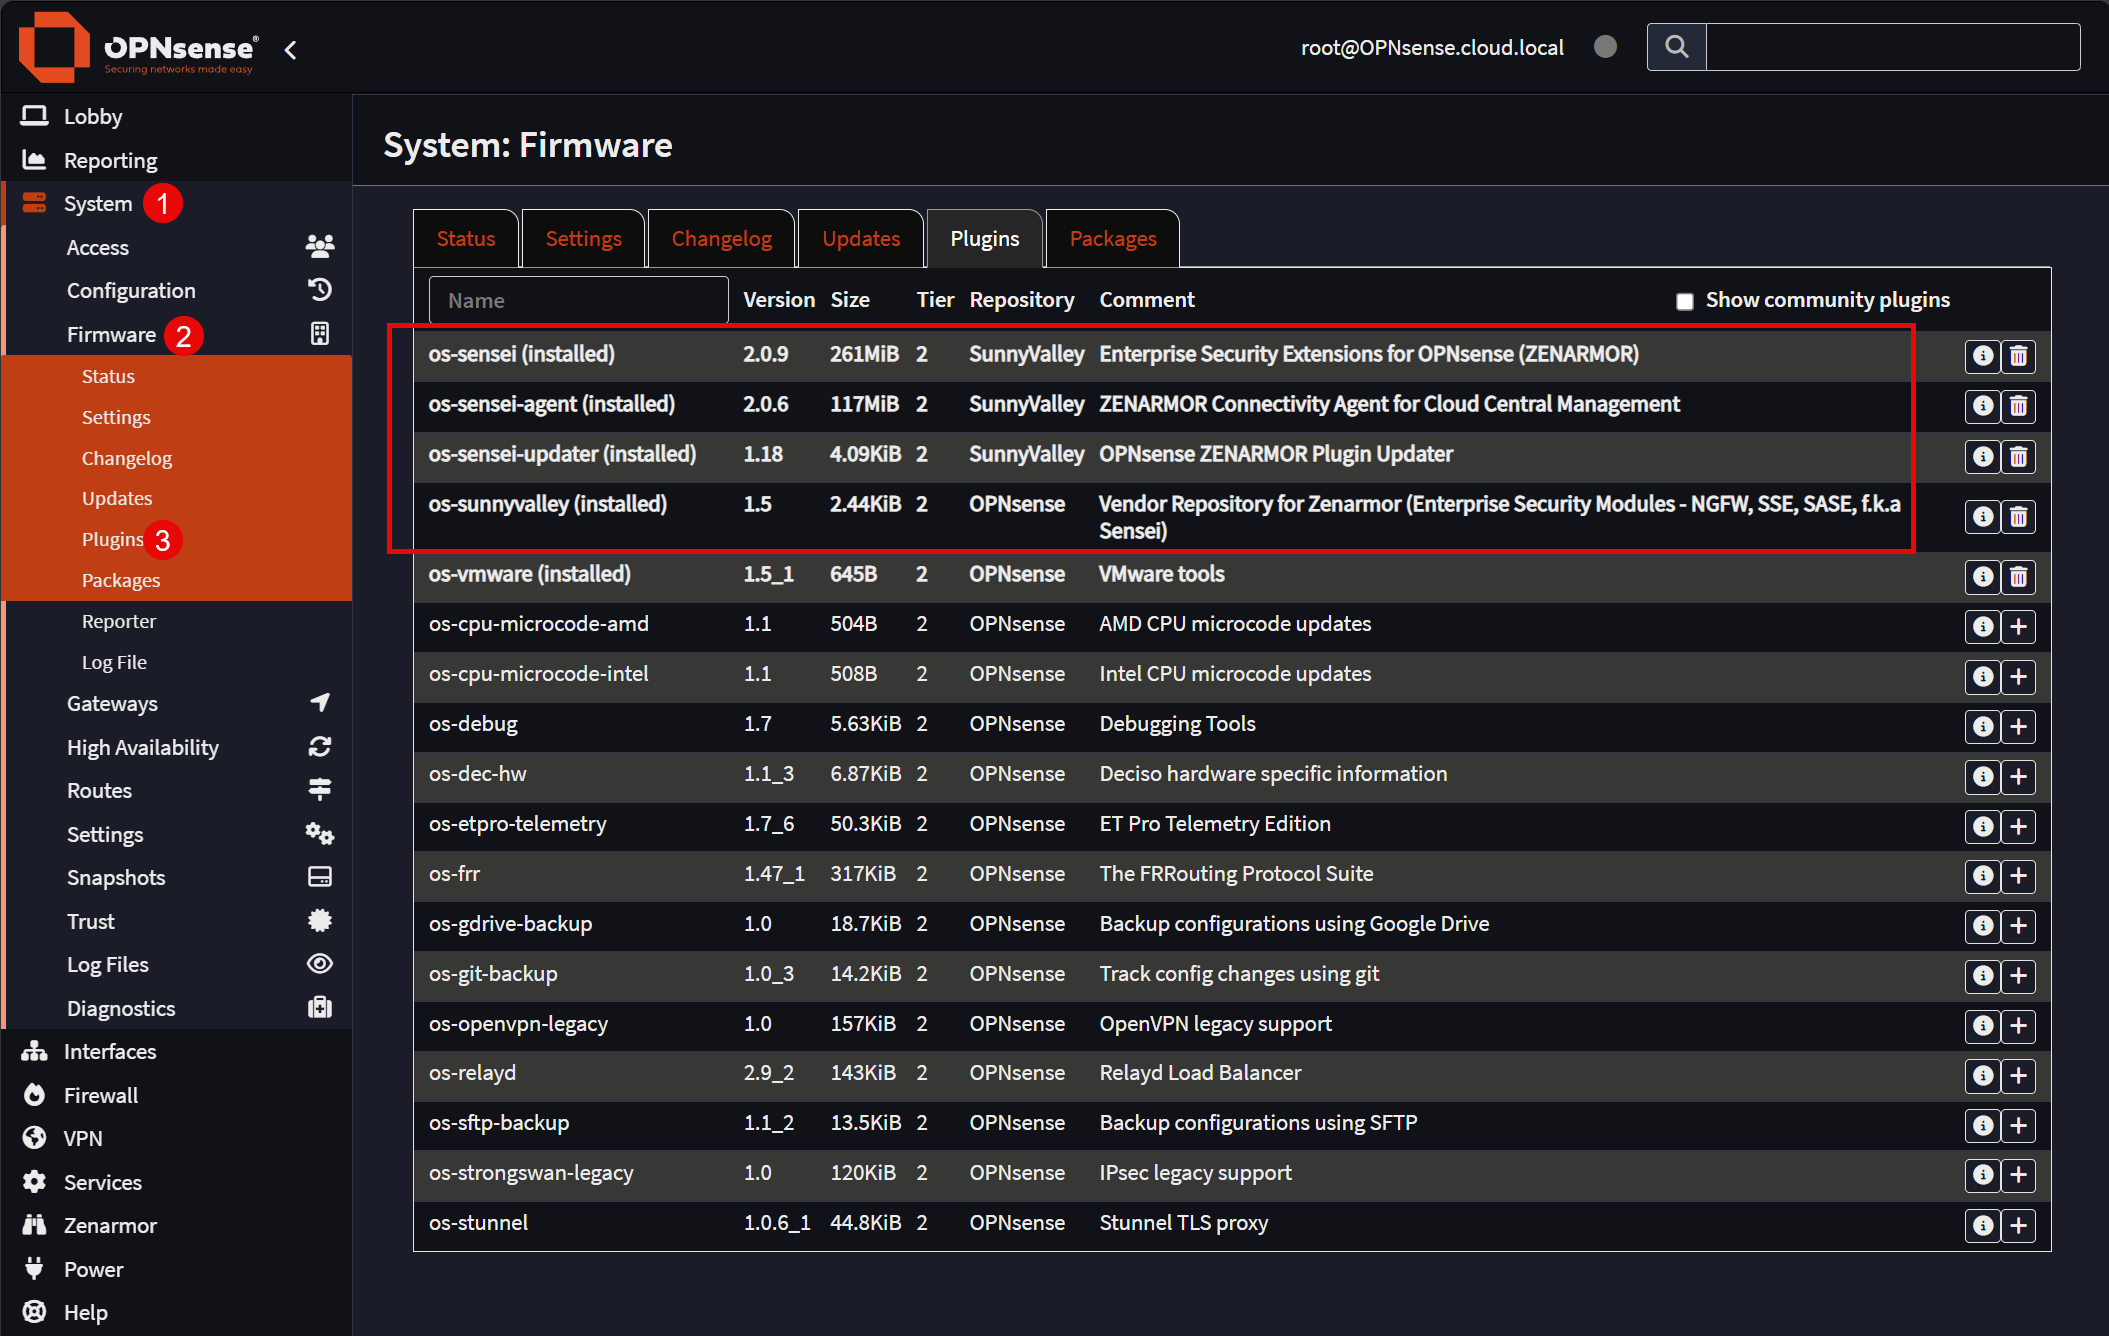
Below is a look at the OPNsense plugin install screen. Here I already have the Zenarmor plugins installed. You will need to install the following. For each of these, you will click the “plus” next to the plugin line at the right and this will install it.
- os-sensei
- os-sensei-agent
- os-sensei-updater
- os-sunnyvalley
Once you install the modules, you should see the Zenarmor menu now listed. When you click it, you will see the following 5 step wizard. The first step is just agreeing to the EULA.

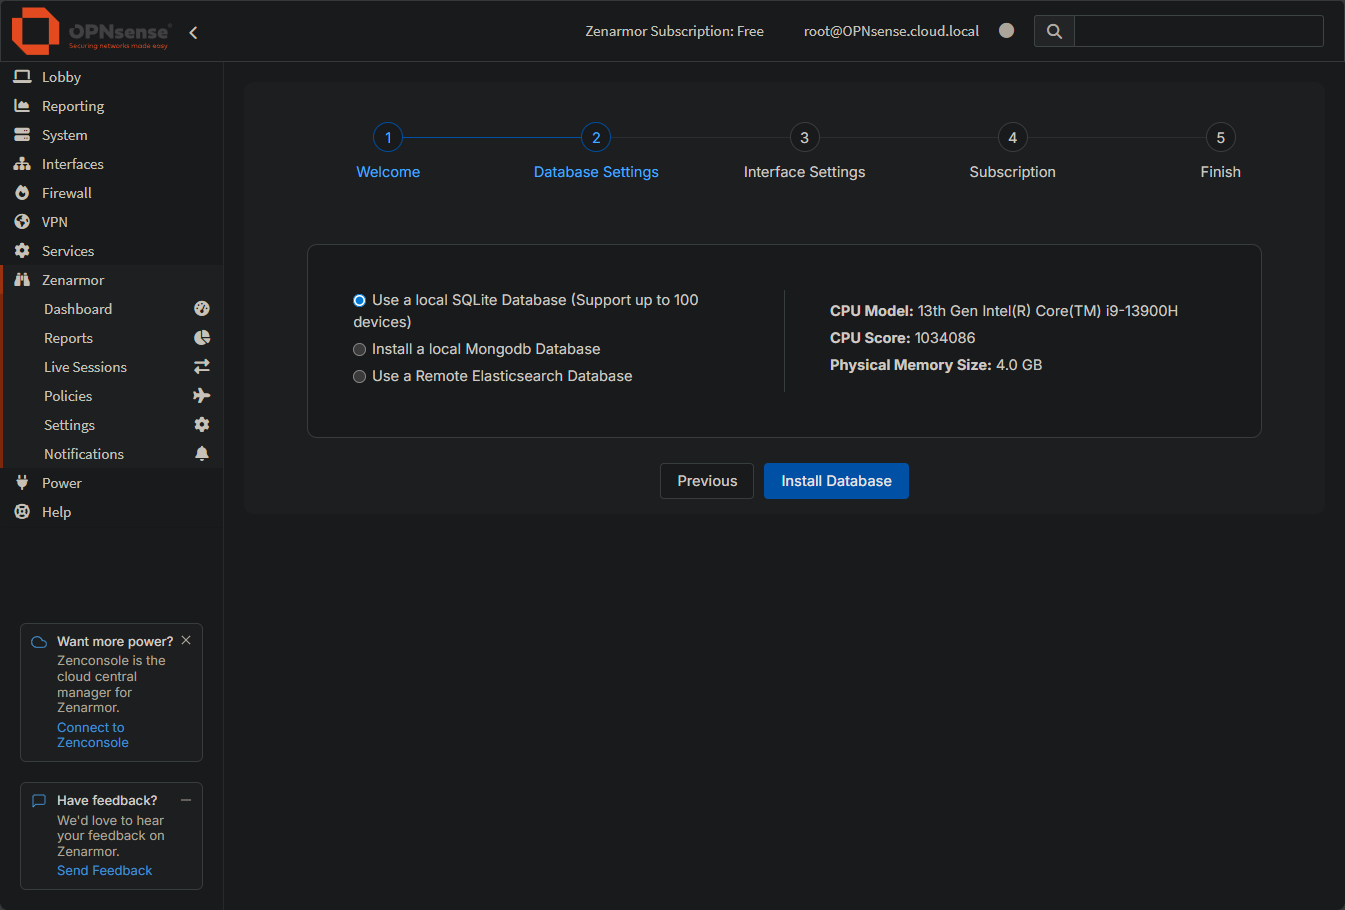
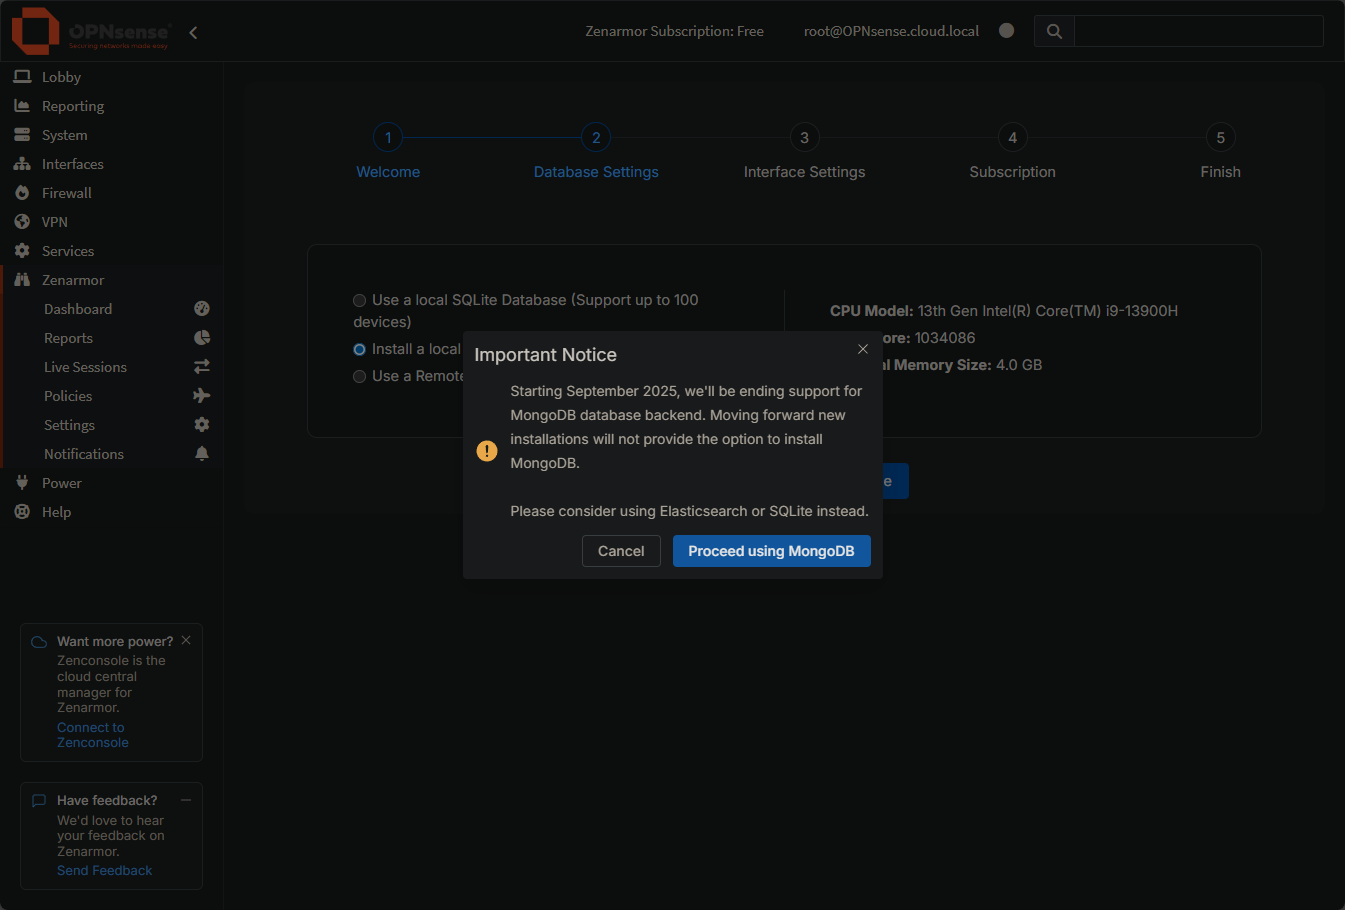
Next, it will ask you to install the database. There are three options here:
- Use a local SQLite Database (Support up to 100 devices)
- Install a local Mongodb Database
- Use a Remote Elasticsearch Database
One odd thing I think when I selected to install MongoDB, it gave me the informational/warning message below that starting September 2025, the support for MongoDB database backend is being deprecated. Moving forward they will not provide the option for MongoDB. There isn’t much other explanation. So, not sure what option will be used to support more than 100 devices? So I punted and went back to the SQLite DB option.
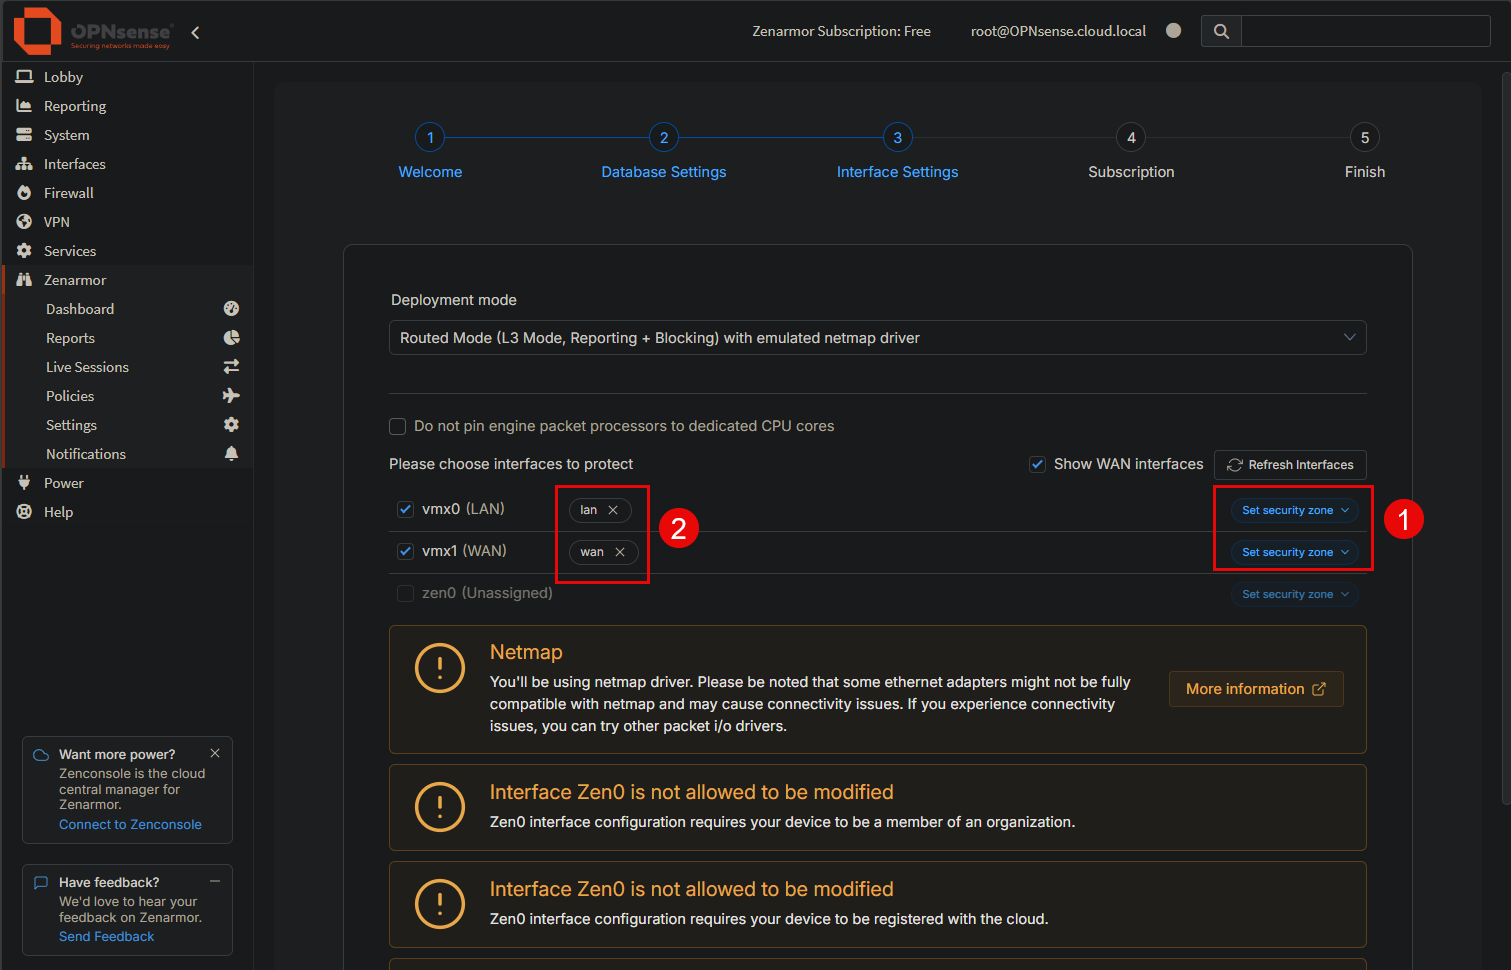
The next step is Interface settings. here you will set the security zone for your detected interfaces. My configuration here is pretty simple. I just have a WAN and a LAN.
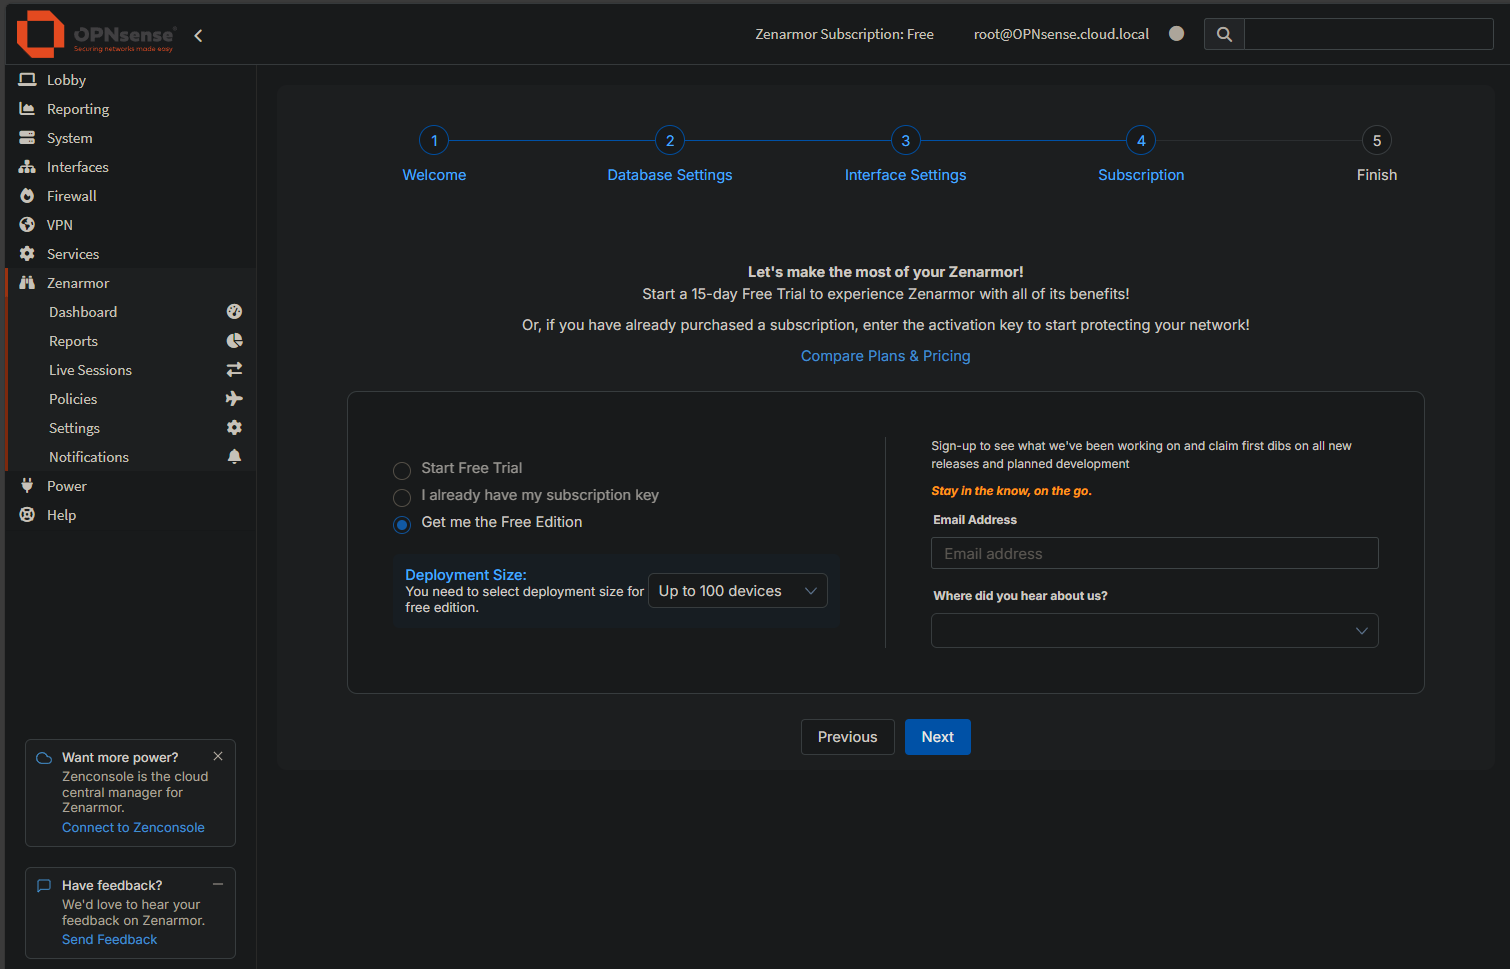
The next step is where you select your subscription status. You can leave it at the Free Edition or you can plug a key in or start a trial.
Finally, we complete the installation of Zenarmor. Click Complete.

Zenconsole gateway integration
There is another piece to this if you want to have your OPNsense firewall integrated with the Zenarmor web console. They call this ZenConsole. So, this is a handy piece if you have multiple OPNsense firewalls that you want to manage. It gives you a single pane of glass web console you can log into and view logs, reports, devices, policies, etc.
But, even for a home lab, you don’t have to be on the same network as the firewall. You can essentially pull up management from the ZenConsole which is a nice tool to have.
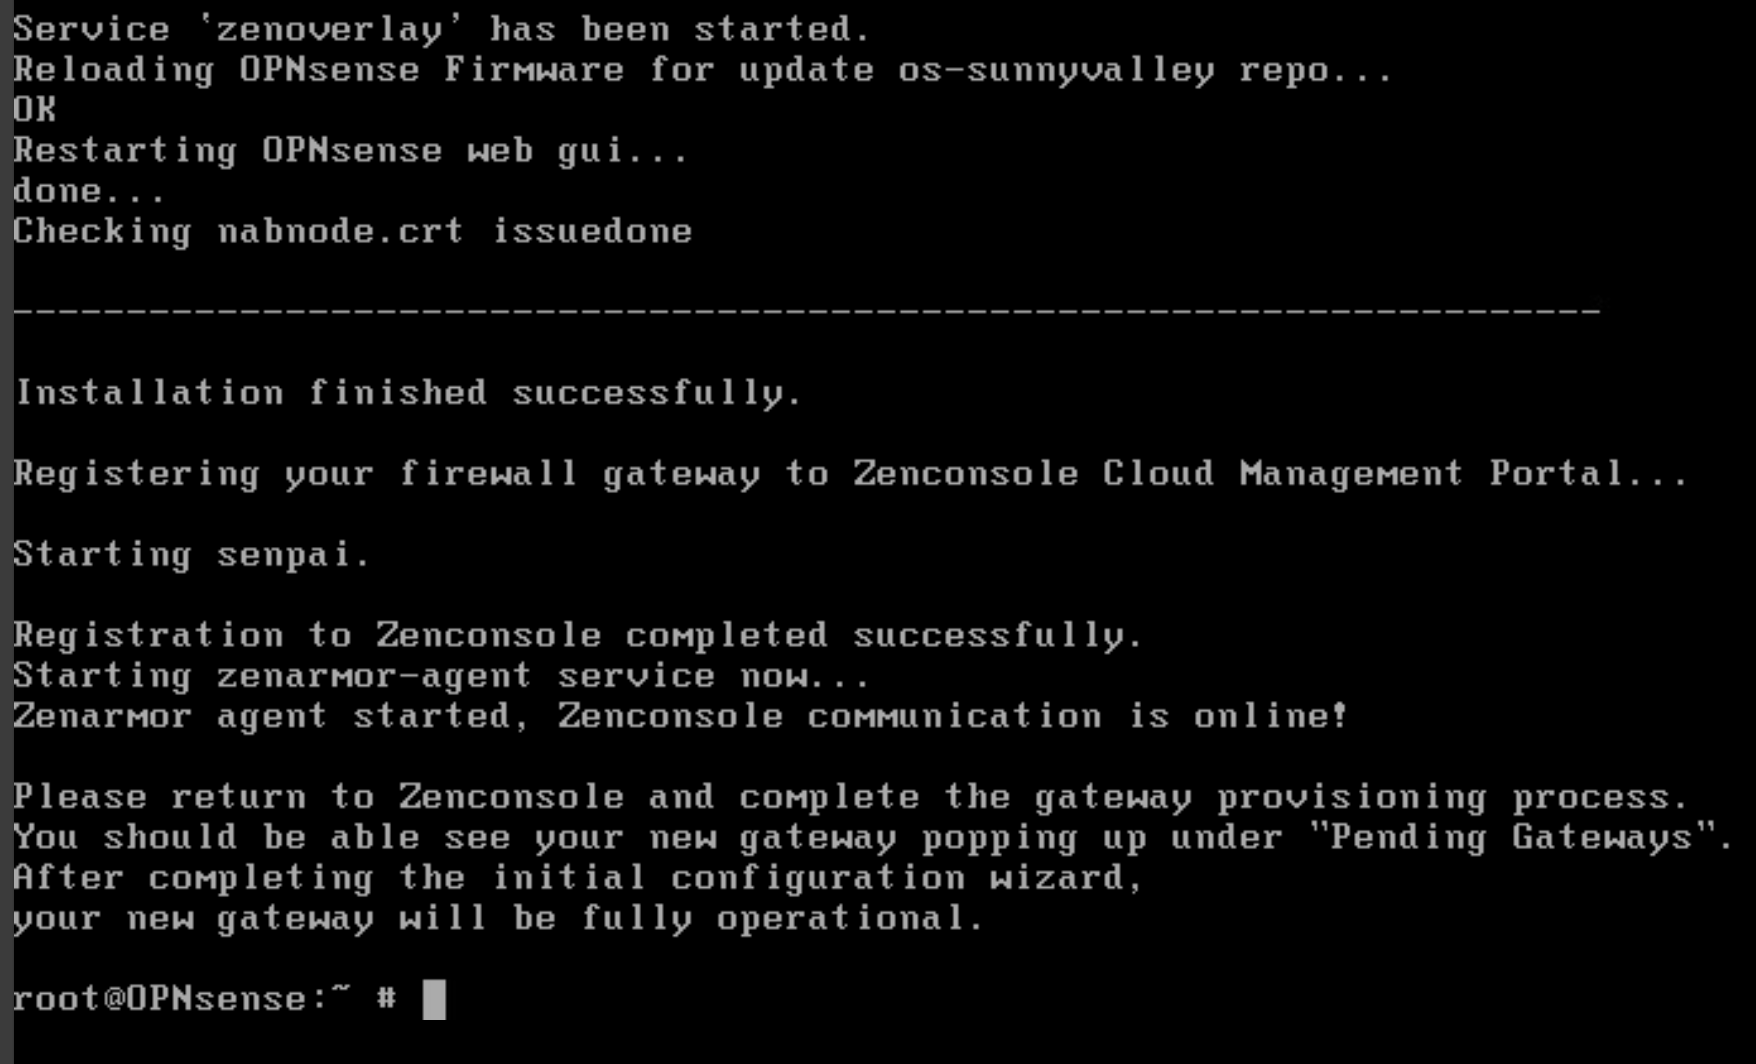
They provide a script to run on your OPNsense box to integrate it with the web gateway:

After running the script locally on the OPNsense firewall, you are prompted to return to the web gateway console and confirm “pending gateways” and confirm the onboarding of your gateway.
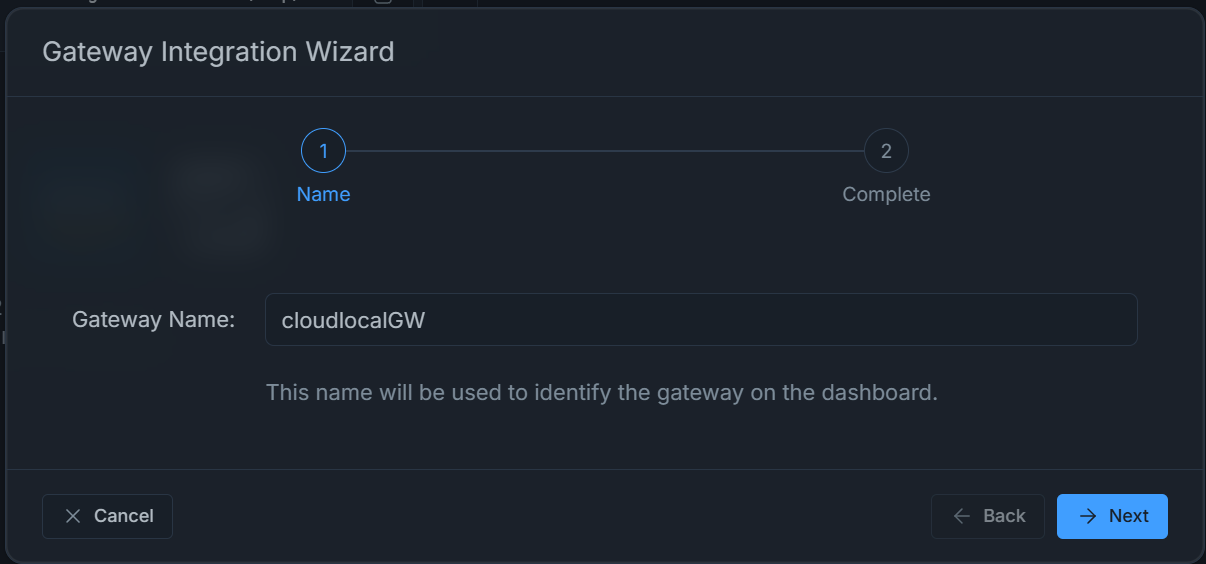
Next, you will need to name your gateway.
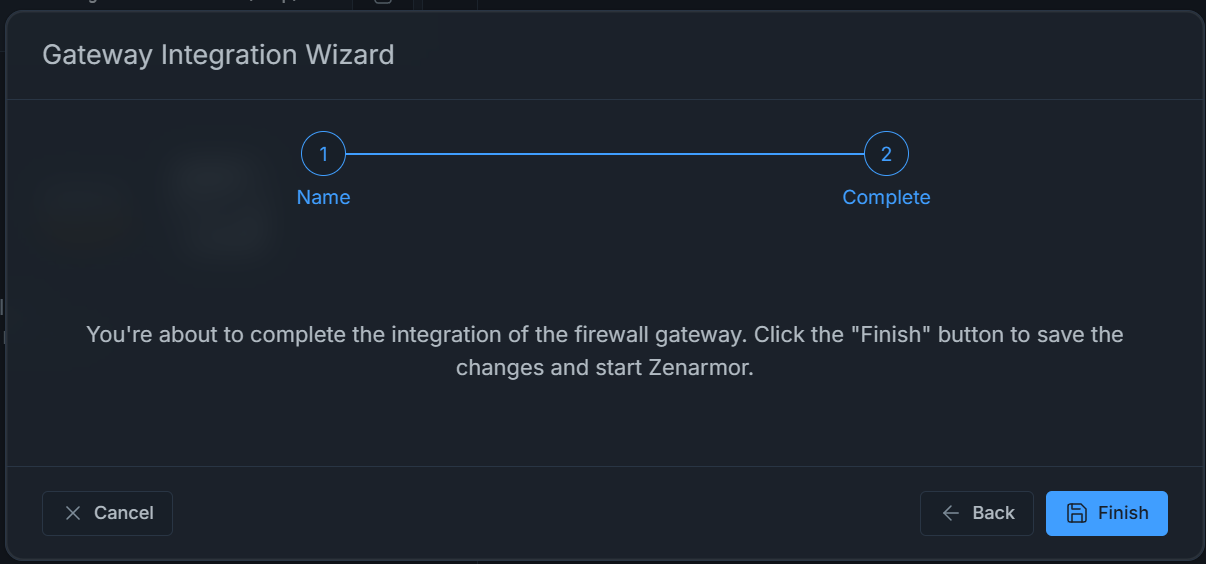
Complete the setup by clicking Finish.
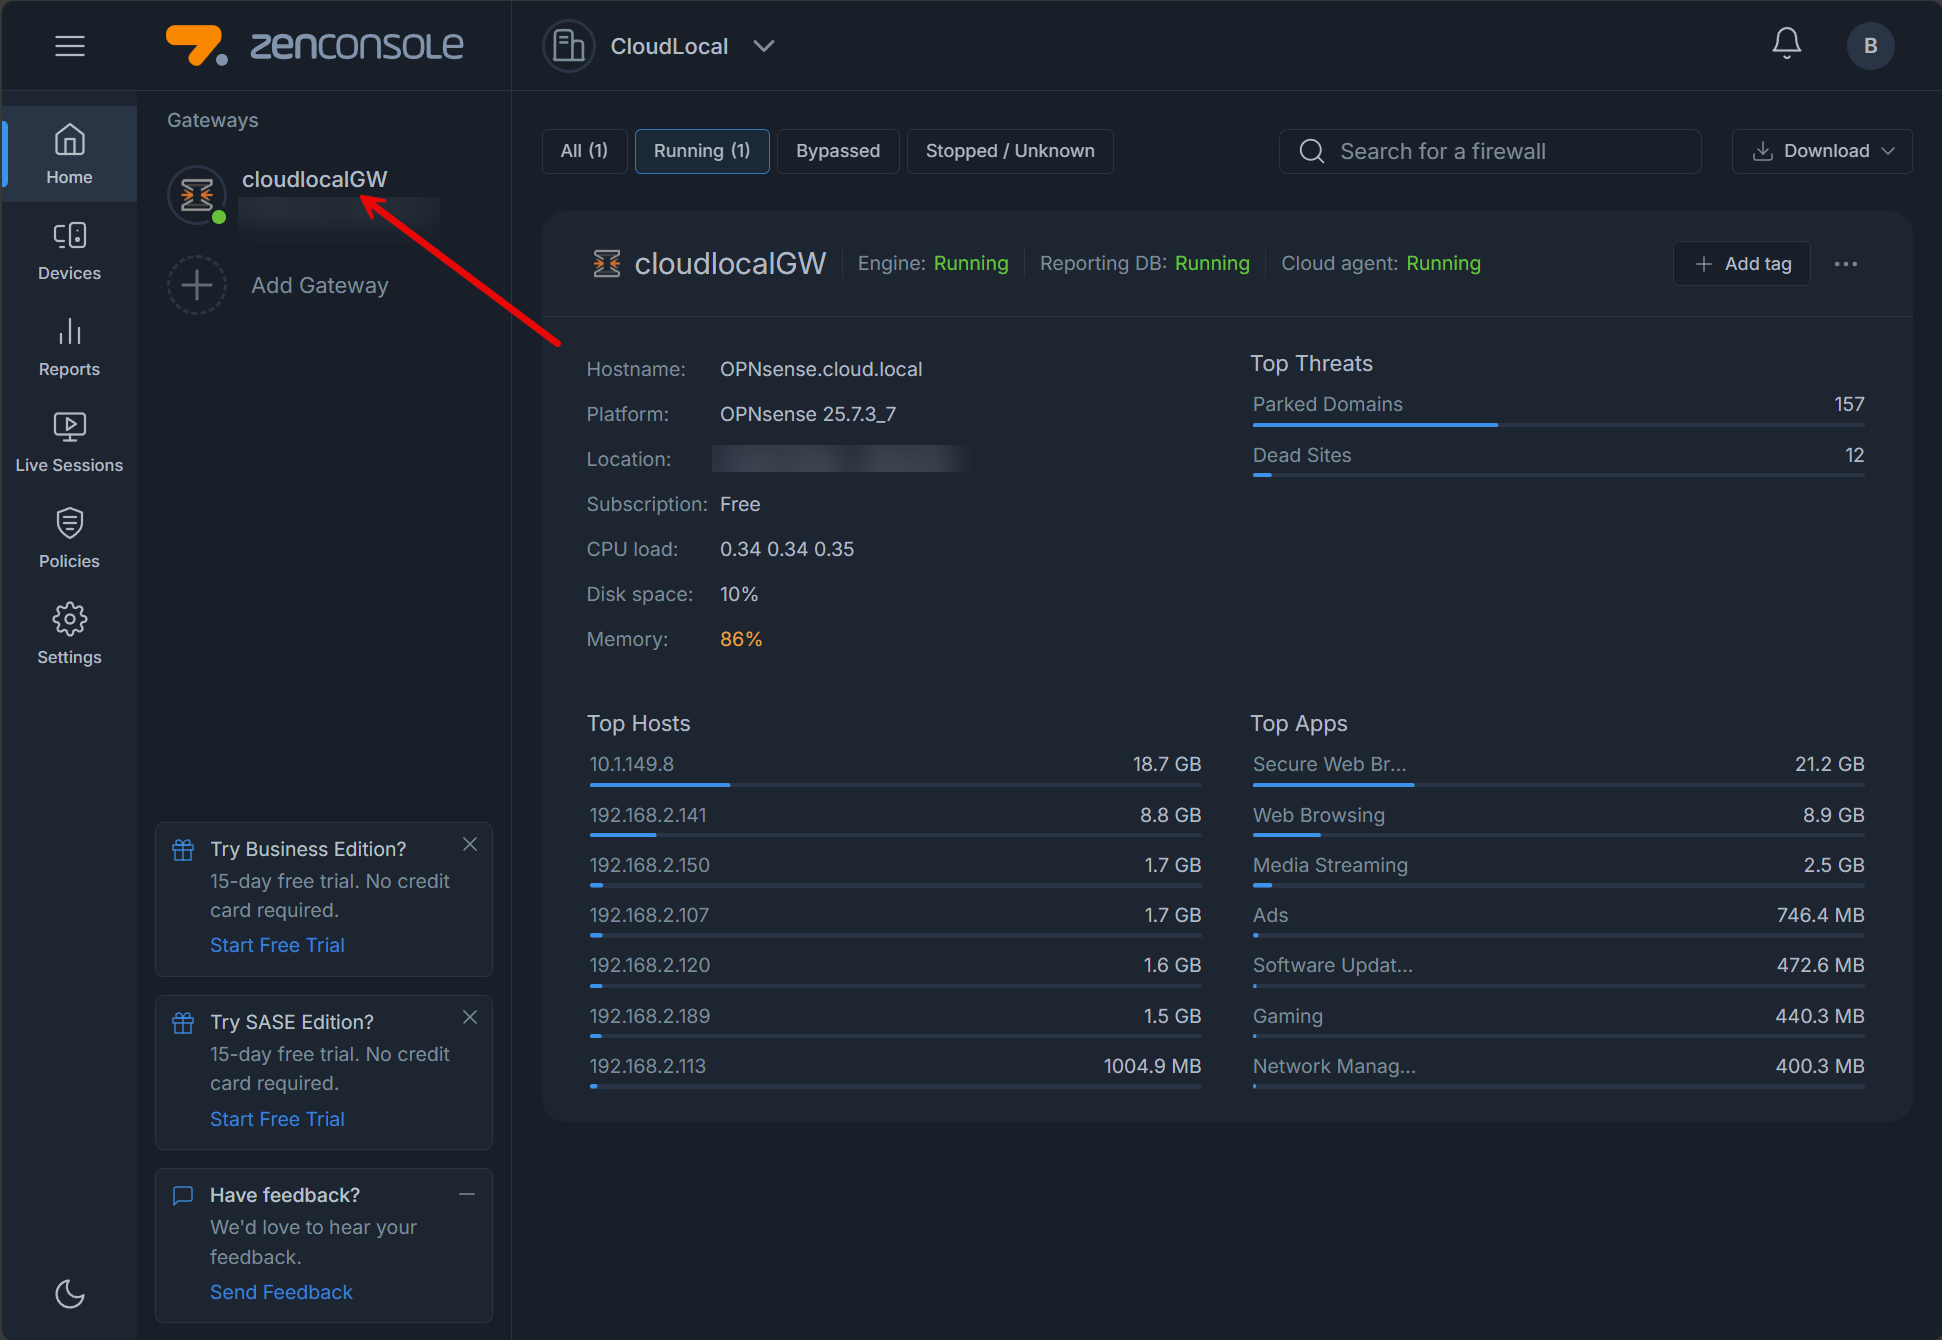
The OPNsense firewall is now added to the ZenConsole web console.
Dashboards, visibility, and control
Let’s look at a few of the dashboards and see what kind of visibility and control you get with Zenarmor.
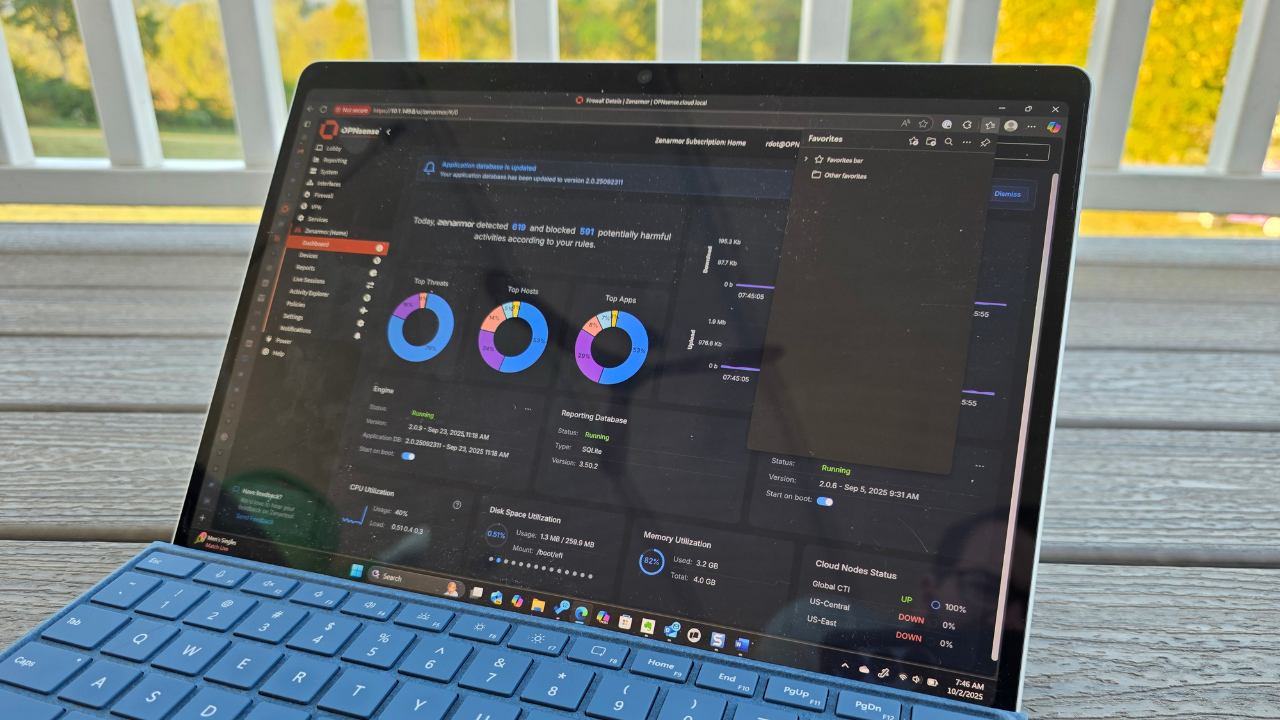
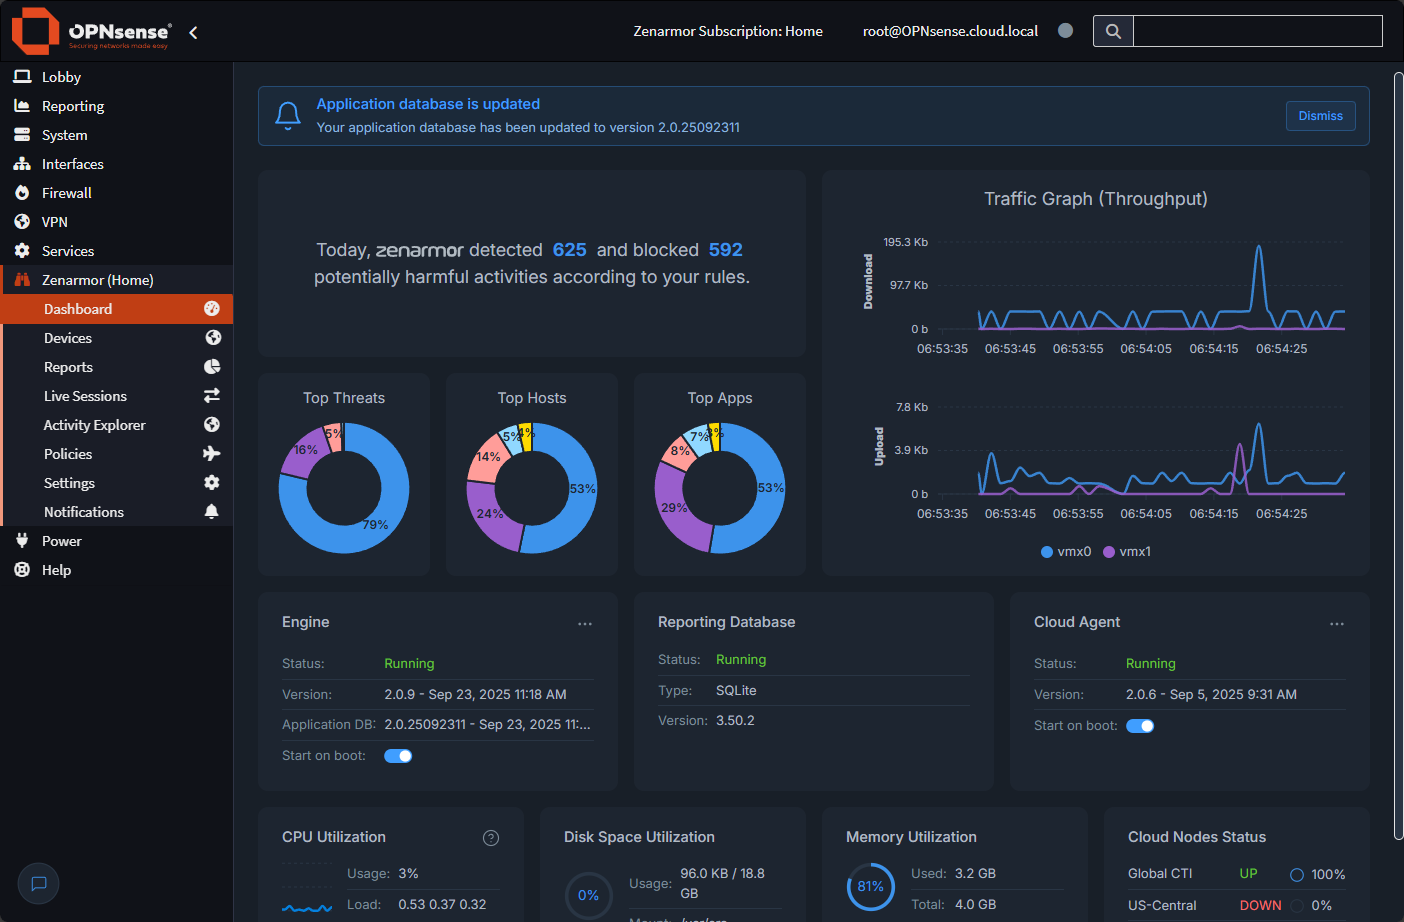
Overview dashboard
The overview dashboard is like your overall view of the environment where you can see various details about the traffic, apps, etc, and also details about your OPNsense host.
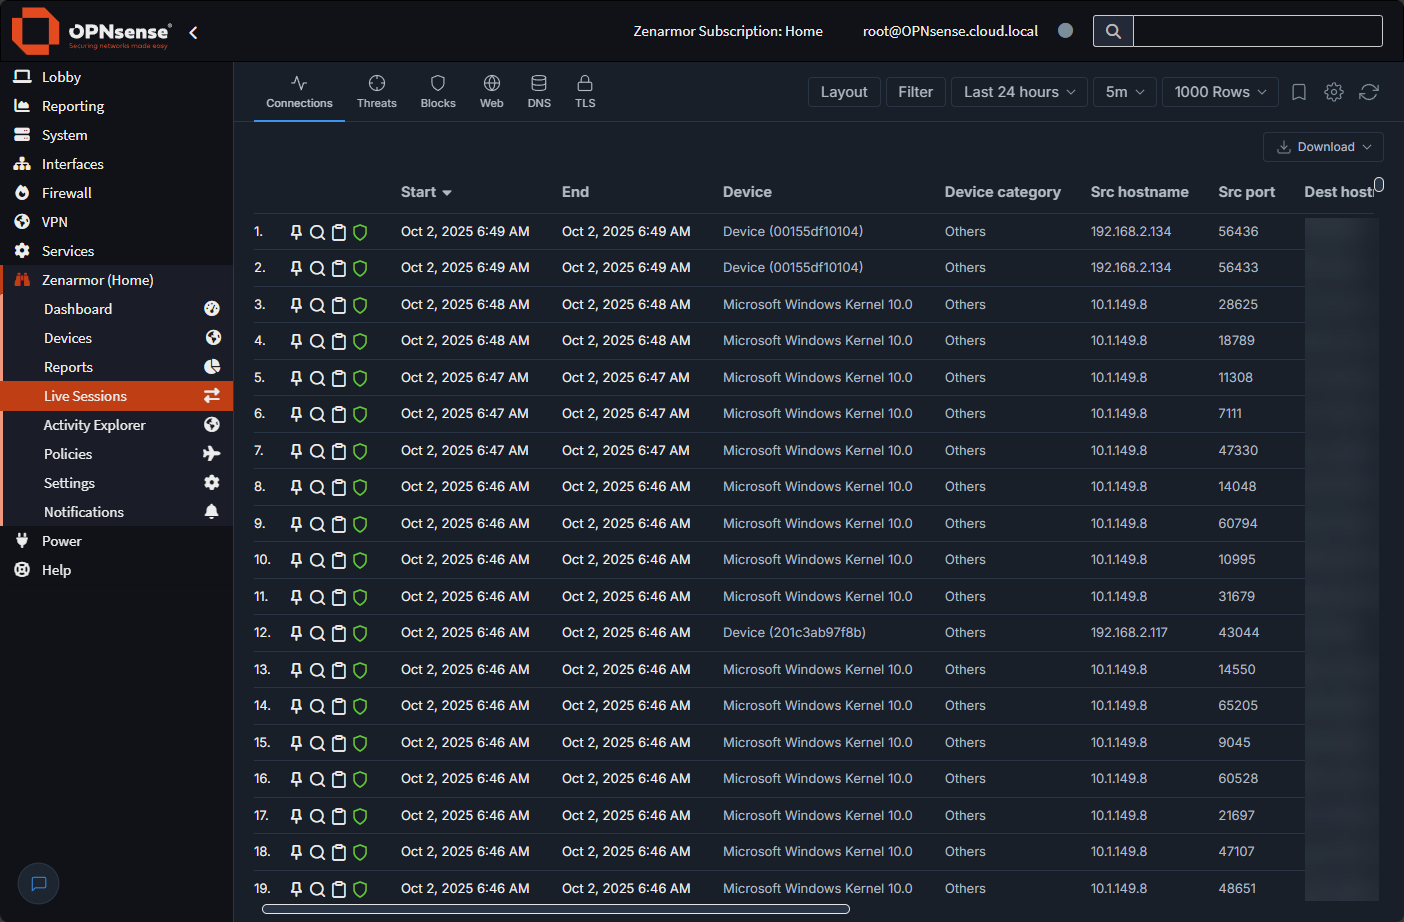
Reporting and live sessions
I think one of the strong features of the solution is that you get visibility on your network traffic in a very detailed way. The Live Sessions view allows you to view network traffic in real-time. This can be filtered in various ways to pull out the information needed.
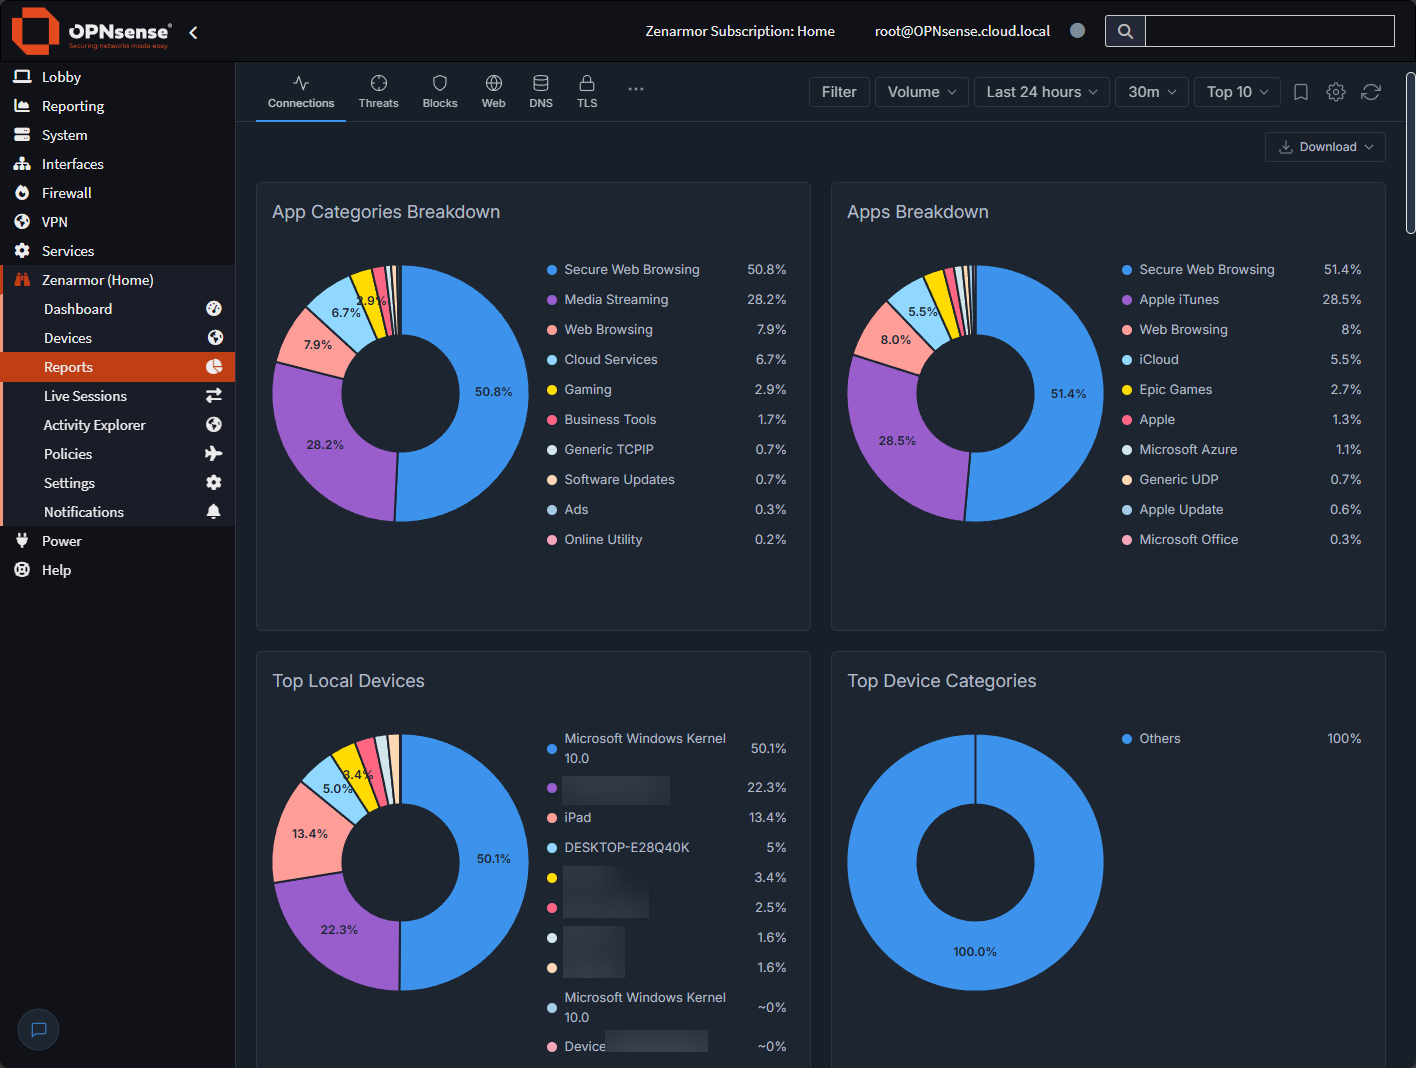
The Reports dashboard, shows information like app categories, apps breakdown, top local devices, device categories, etc.
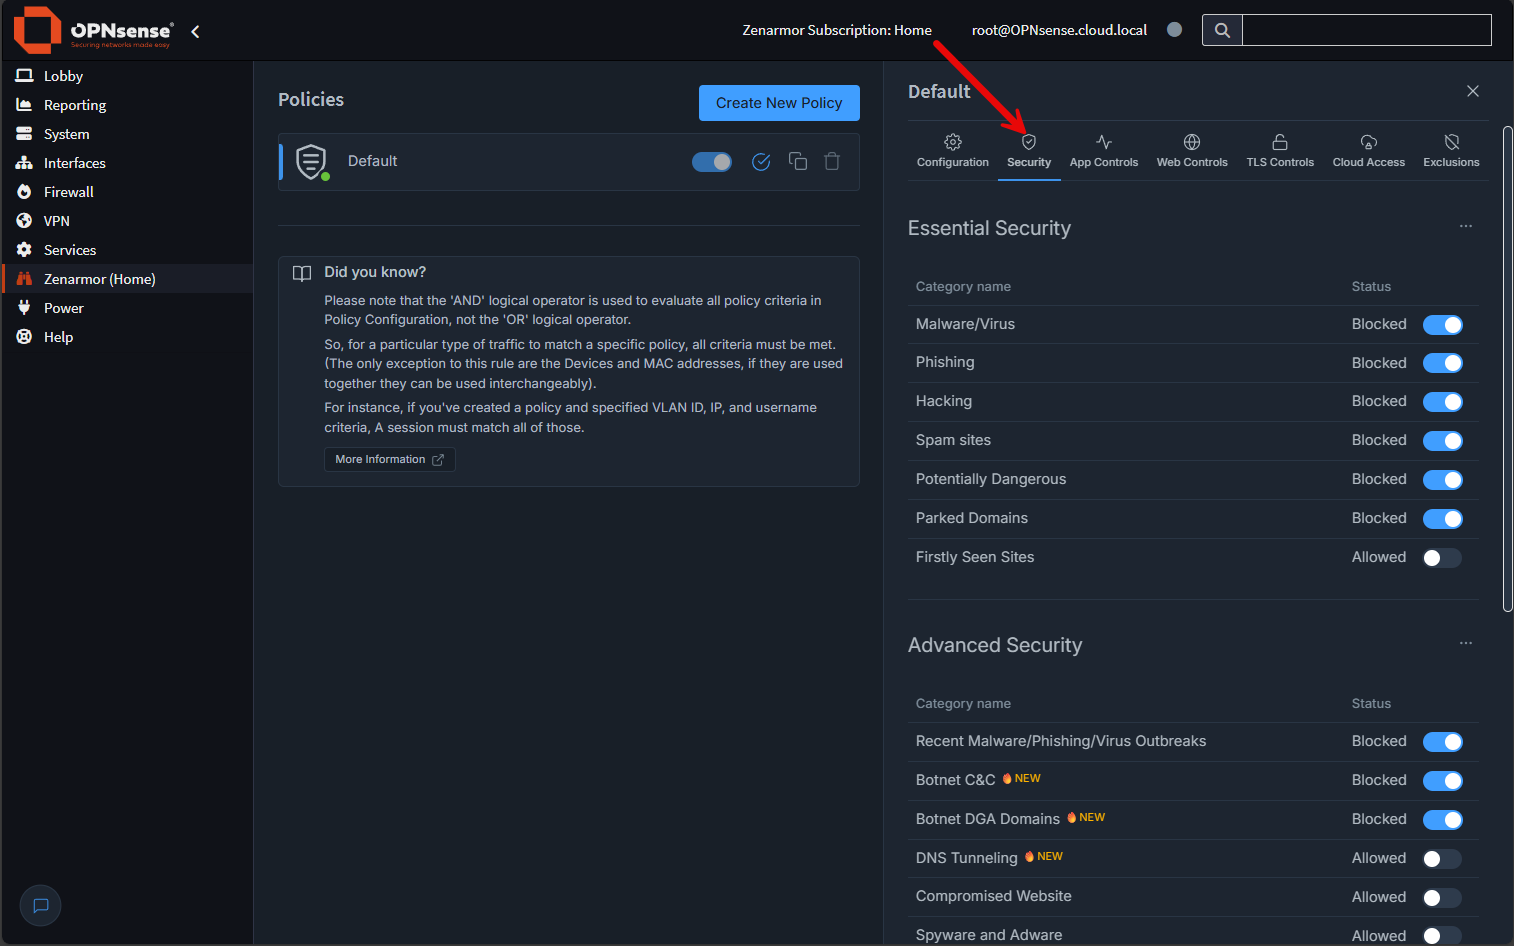
Security configuration
The security configuration settings for Zenarmor allow you to toggle on things like blocking malware, phishing, SPAM, PUPs, parked domains, etc.
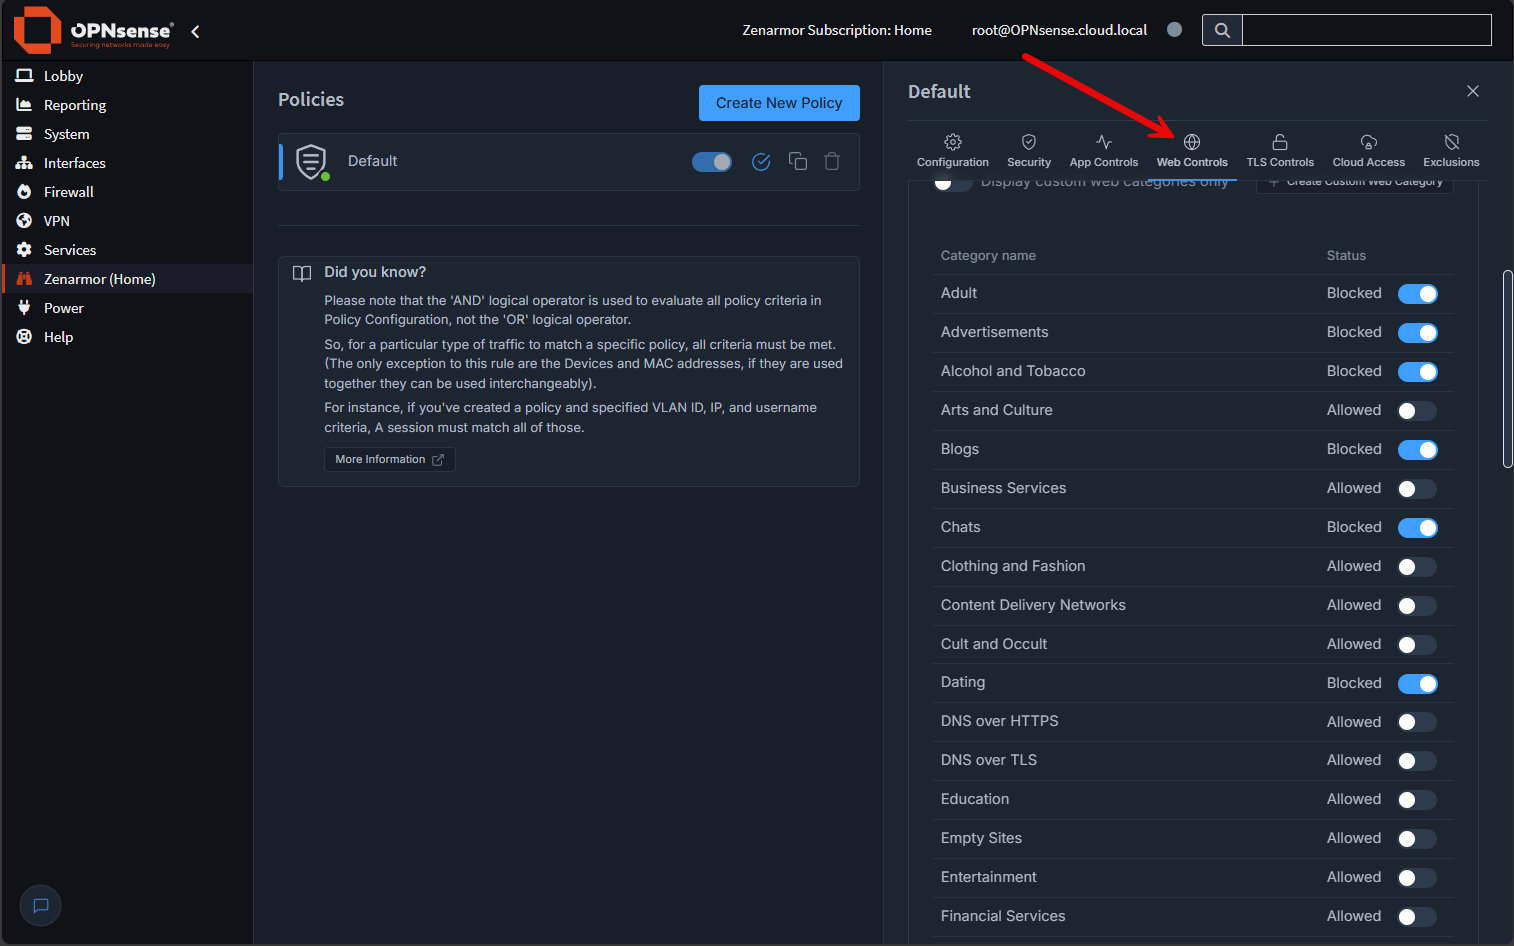
Web filter configuration
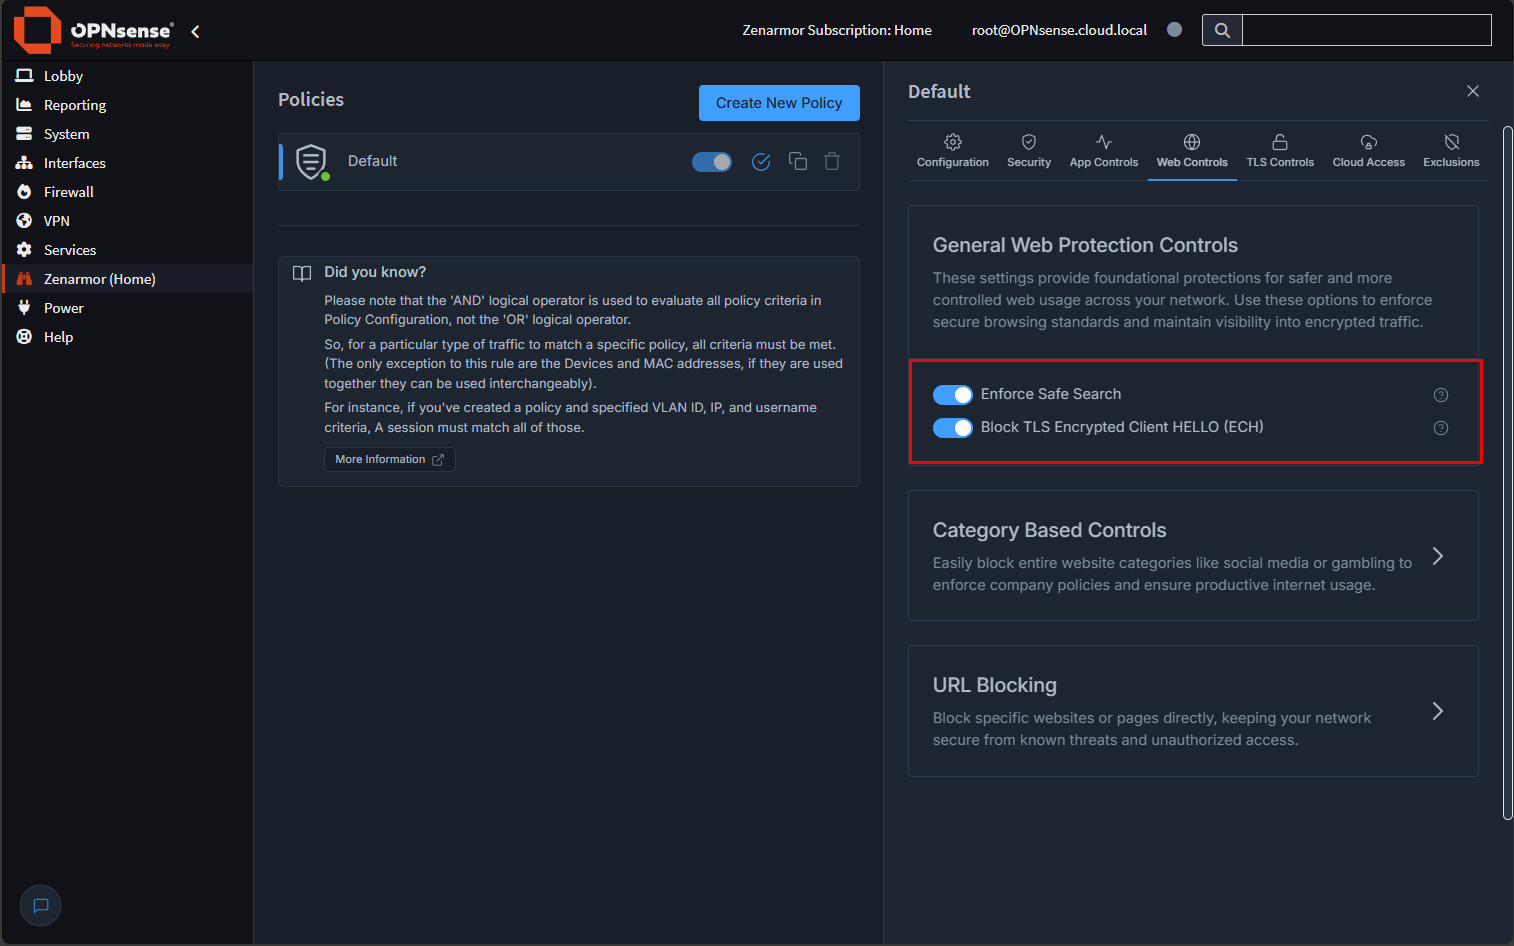
Under the Policies menu, you can set your policy configuration for things like app controls, web controls, etc. Zenarmor gives you a fully featured web filter that does what you would think most modern web filters should do.
- You get category-based filtering
- Ability to force safe search
- Control application traffic
Below is a look at the screen to force safe search and other blocking configuration.
Free versus premium & home lab license
So, the big story you need to know with the OPNsense Zenarmor plugin is that it is great, but a lot of the features that you will want to have are in the paid version. For instance, with the web filter. In the free version of Zenarmor, you can only have the default policy.
With the default policy in the free version you cannot modify any of the categories that are turned on by default. Let’s say you want to not block games. With the default policy you can’t turn the blocking of games policy off and leave the rest on. You will get an error that the free version does not allow you to modify the default policy. Also, you can’t create any new policies. You have to use only the Default policy with no other option there.
The Zenarmor premium edition also unlocks things like advanced features including cloud based threat intelligence and additional reporting options. For a home lab where you are experimenting and learning, the free version is a great way to get started.
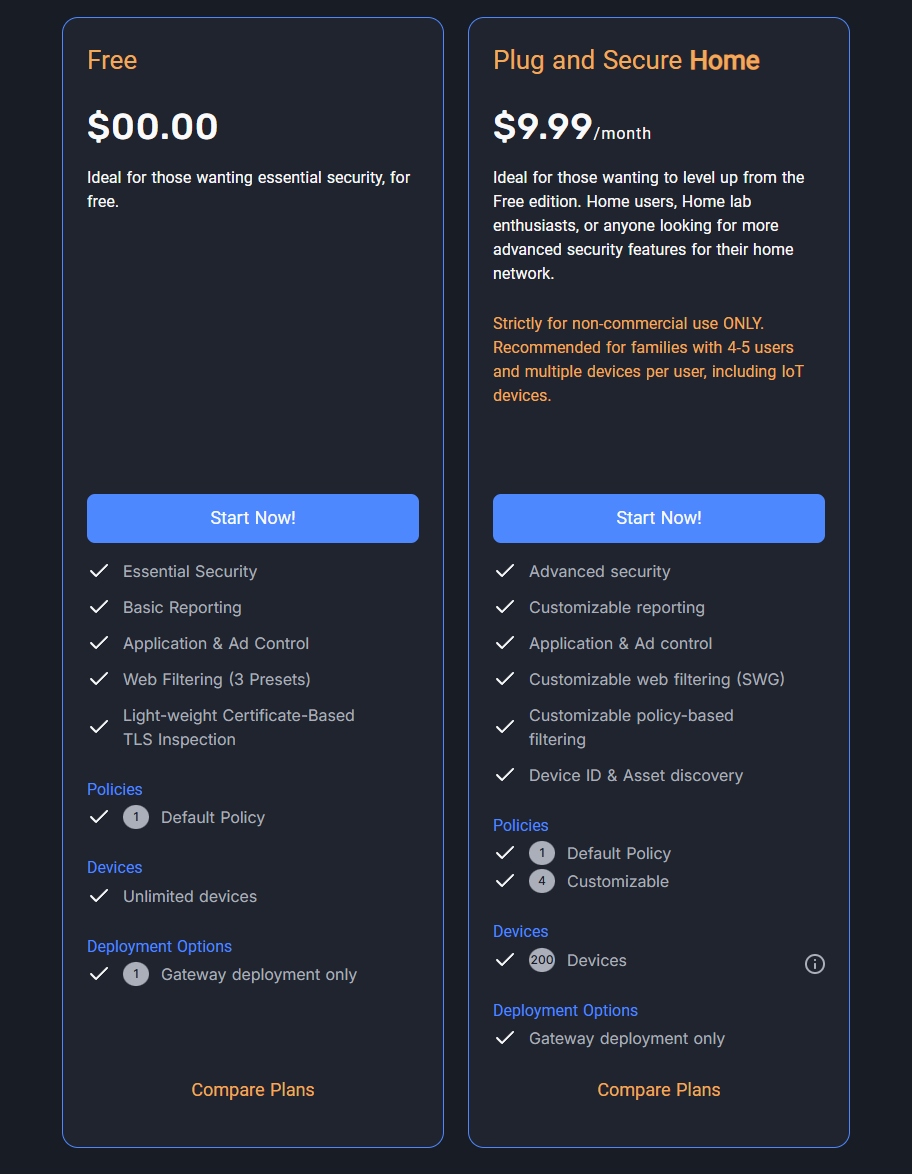
If you click the Personal licenses, these are the two options that you get:
- Free – essential security, basic reporting, application & ad control, web filtering, with 3 presets, light-weight certificate-based TLS inspection
- Plug and Secure Home – $9.99/mo. This is noted for home users, or home lab enthusiasts. It Includes advanced security, customizable reporting, application & ad control, customizable web filtering (SWG), customizable policy-based filtering
I really like the “Plug and Secure Home” option for use in a home lab or for use as a family web filter on like a kid’s network. This is similar to the home license for Untangle that I was paying for, but after the Arista acquisition, they have removed this license option unfortunately. I think many Untangle home users will like the Zenarmor Plug and Secure Home option with the web filtering and other options like Safe Search, and OpenDNS integration.
Wrapping up
All in all, the OPNsense Zenarmor plugin is the plugin to install if you are running OPNsense in 2025. It does add the features that you wish were in OPNsense by default and turns the default out of the box installation into a next-generation firewall. In my opinion, there are three features of the plugin that make it worth it. The web filter, the application control, and the enhanced reporting and real-time view of hits. How about you? Are you using OPNsense with Zenarmor installed? What are your thoughts?
Google is updating how articles are shown. Don’t miss our leading home lab and tech content, written by humans, by setting Virtualization Howto as a preferred source.
About The Author


I have been using OPNsense for several years, but haven’t tried Zenarmor. This makes me want to try it out.
I am really liking it myself
Excellent article, Zenarmor is shaping up to be a great product.
Michael,
Thanks for the comment! I am really loving Zenarmor and the features and capabilities it contains. The Business edition features look pretty amazing too with the SASE capabilities.
Brandon
I have OPNsense and want to check this out as well. Looks like it has great functionality.