There are so many great tools that you can use to automate provisioning a virtual machine in your home lab when running on Proxmox. However, if you are using manual methods still, there are great tools you can use to automate, including Packer. However, there is also one that you may not be taking advantage of like you should be. You can use the same technology used in AWS, Azure, and Google Cloud with a technology called cloud-init. Proxmox natively supports cloud-init. Once you understand how it works, you will never go back to manual VM creation again.
What is cloud-init?
First of all, let’s talk about what cloud-init is exactly and what it can do. It is an initialization tool that doesn’t depend on the platform. It can automate the early configuration of Linux virtual machines and cloud instances.
This is a tool that was developed by Canonical for Ubuntu but it is now supported across most Linux distros. So, when you have a virtual machine boot for the first time, cloud-init can look for the metadata provided by the hypervisor or cloud platform. These metadata entries have details in them like:
- Hostname
- Networking configuration
- SSH keys
- User accounts, passwords
- Other configuration options
One of the nice things about Proxmox is that it includes native support for cloud-init out of the box. This allows you to inject these configuration details into your VMs when you are creating new VMs or cloning a virtual machine template as we will see below.
So, each time, instead of having to build and customize each VM manually, you can generate the image once, then apply the cloud-init settings. This enables you to spin up new VMs very quickly and in a consistent way, which I love in the home lab. It means your Proxmox environment is much more like a cloud environment in your own data center.
The reasons to use cloud-init with Proxmox
There are several reasons to use it that we have already touched on. But at the end of the day, it provides a consistent apporach for turning out machines that follow a standard build. Each VM that is created from the template, is started with the same base configuration. It saves you time once your template is built. New virtual machines can deploy in seconds and not hours of manual processes.
Also, it scales with you in your lab or production environments as you can easily spin up many new machines for testing or production environments. You can also customize it as you need to. If you have had to clone a machine and then rename it, change IP addresses, or manually update SSH keys, then the cloud-init process eliminates all of that leg work.
Building a Proxmox cloud-init template
The first step is creating a base image that supports cloud-init. Most Linux distributions allow you to have official cloud images with cloud-init preinstalled. Ubuntu, Debian, Fedora, Rocky Linux, and AlmaLinux all provide it in ready-to-use downloads or images. Take a look at the full catalog of cloud images from Ubuntu here: Ubuntu Cloud Images.
So, what I am doing below is downloading the “Noble” cloud image directly to my Proxmox server as this will allow me to use the disk on a new virtual machine.
wget https://cloud-images.ubuntu.com/noble/current/noble-server-cloudimg-amd64.img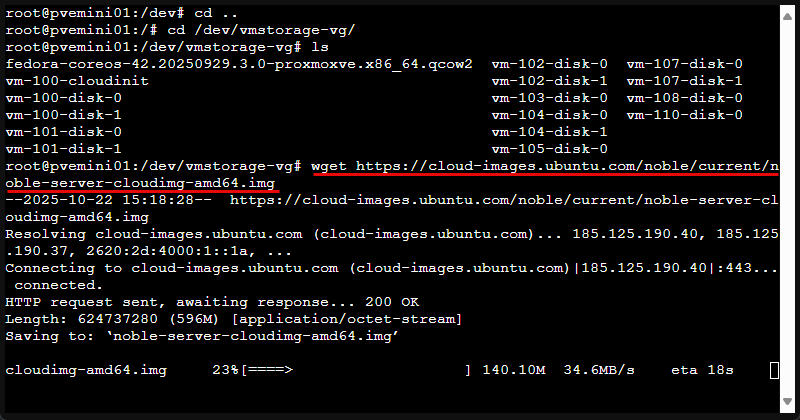
Next, we use the commands below to import the image into Proxmox. You can convert it and import it into your local-lvm storage using the following commands. The tag parameter below is for the VLAN tag, so either remove this or change it to what you need in your environment.
qm create 9000 --name ubuntu-cloud --memory 2048 --cores 2 --net0 virtio,bridge=vmbr0,tag=149
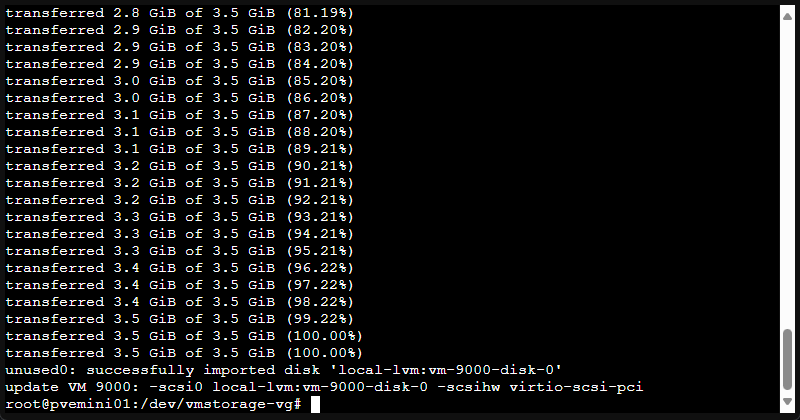
qm importdisk 9000 noble-server-cloudimg-amd64.img local-lvm
qm set 9000 --scsihw virtio-scsi-pci --scsi0 local-lvm:vm-9000-disk-0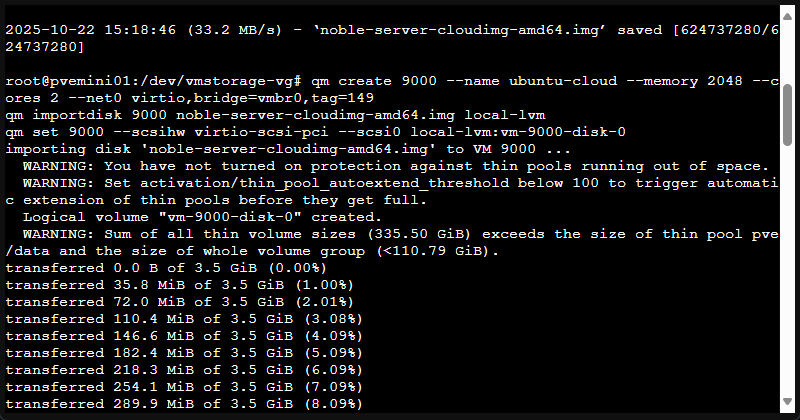
Next, we need to attach a special cloud-init drive so Proxmox can use this to inject configuration data:
qm set 9000 \
  --ide2 local-lvm:cloudinit \
  --boot c \
  --bootdisk scsi0 \
  --serial0 socket \
  --vga serial0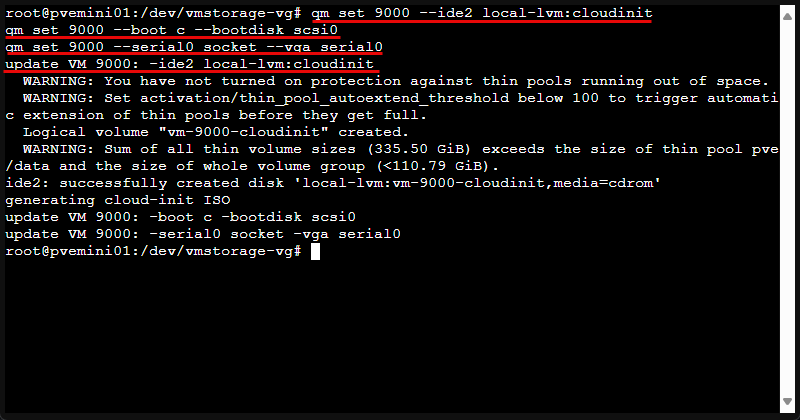
Once that is done we can move on to configuring our cloud-init parameters.
Configuring cloud-init parameters
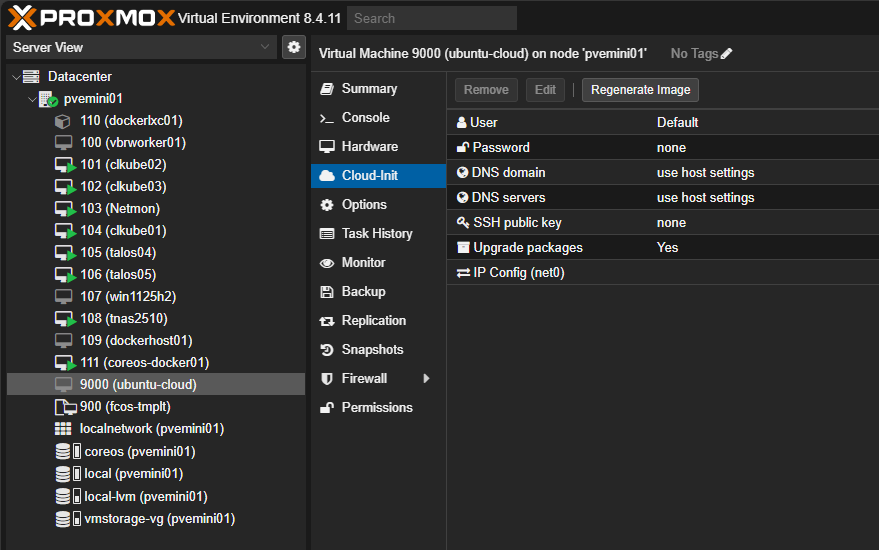
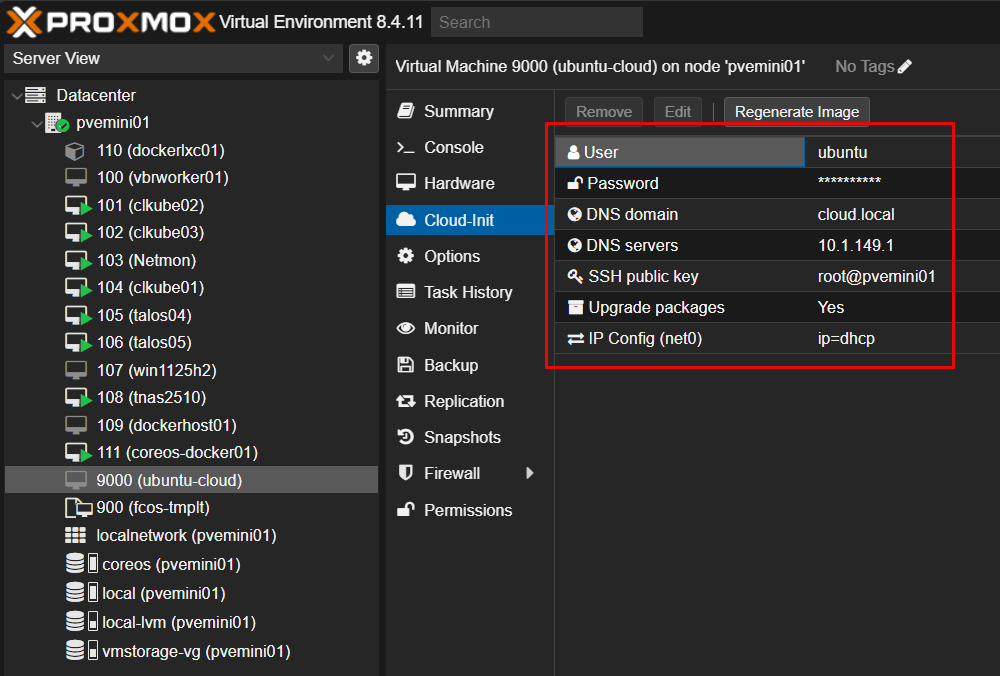
With the template in place, you can define cloud-init parameters from the web interface or command line. These include hostname, IP configuration, user credentials, and SSH keys.
In the Proxmox web UI, select your template and open the Cloud-Init tab. You can specify a username, password, and SSH key for access. You can set networking to DHCP or static and define DNS domain and server information. Proxmox stores these settings as metadata to inject into the VM at first boot.
You can also set these values from the CLI. For example:
qm set 9000 \
  --ide2 local-lvm:cloudinit \
  --ipconfig0 ip=192.168.1.50/24,gw=192.168.1.1 \
  --ciuser=ubuntu \
  --sshkey ~/.ssh/id_rsa.pub \
  --cipassword 'Letmein1$' \
  --searchdomain cloud.local \
  --nameserver 10.1.149.1 \
  --ciupgrade 1
Or, if you want to configure it with DHCP, it will look something like this:
qm set 9000 \
  --ide2 local-lvm:cloudinit \
  --ipconfig0 ip=dhcp \
  --ciuser=ubuntu \
  --sshkey ~/.ssh/id_rsa.pub \
  --cipassword 'Letmein1$' \
  --searchdomain cloud.local \
  --nameserver 10.1.149.1 \
  --ciupgrade 1
Below I am using the command line to configure it with DHCP.
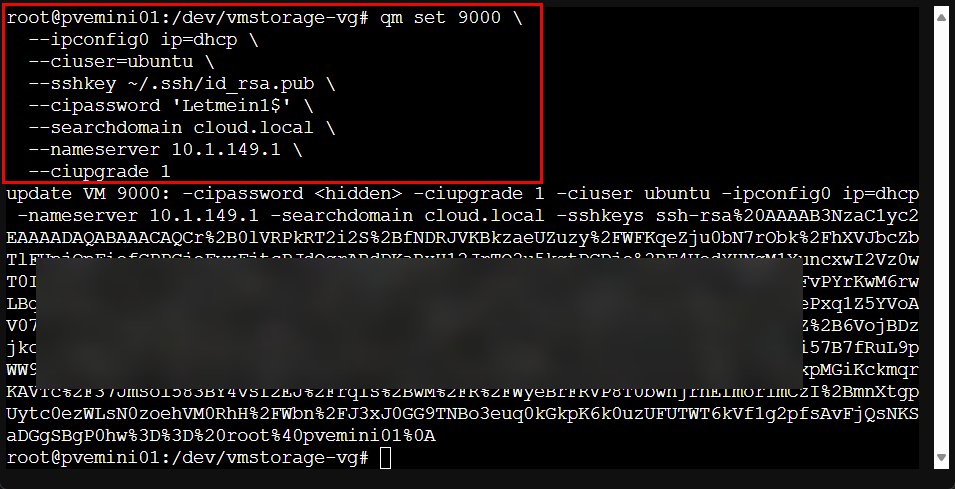
These commands add a cloud-init disk and define network, SSH, and user settings. On first boot, cloud-init reads them and applies the configuration automatically.
Convert the VM to a template
Once the base VM is ready, shut it down and convert it to a reusable template. The reason you want to do this is that it basically eliminates the need to go through the first steps to import the .img file and attach the disk to the initial VM. Turning the initial VM into a template means you have that as the starting point for each deployment.
Here is the command line command to convert the VM to a template. Here “9000” is the VM ID, so replace that with the one specific for your environment. You can also do this from the web UI.
qm template 9000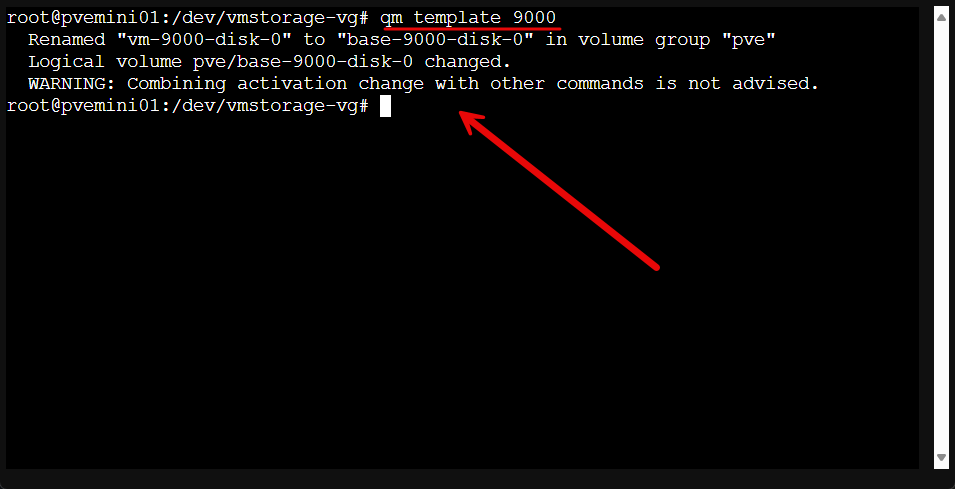
You now have a Proxmox cloud-init template that can be cloned for new VMs.
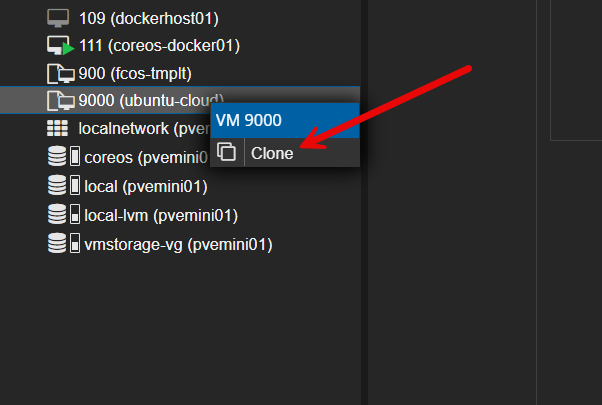
Deploying a new VM from your template
Once your base template is configured, spinning up new VMs is simple. You can just right-click the template and clone from the web UI:
Also, if you don’t clone from the web UI, you can use the command line to do this as well. For example:
qm clone 9000 101 --name ubuntu-node1 --full
qm set 101 --ipconfig0 ip=192.168.1.51/24,gw=192.168.1.1
qm start 101
Within a minute, you have a fully configured VM that automatically sets its hostname, IP, and user. If you want it to remain configured with DHCP, you wouldn’t have to specify the IP address as we have done here.
This just gives you an idea on how you can do it. You can even include a startup script to install software or run setup commands (will show below). This is the same type of workflow cloud providers use if they need to deploy thousands of VM instances per day and you have this power in your home lab network. Pretty cool!
Using custom cloud-init scripts
Cloud-init also supports custom “user data” scripts that execute commands during first boot. If you have used Hashicorp Packer before, this script will be familiar to you. If not, it isn’t required if you just want to do the basics. But if you want to automate more advanced configurations, including package installs to service configuration. For example, create a simple YAML file named user-data.yaml.
In the below configuration script, we are telling it to deploy the QEMU guest agent, Docker, and set the QEMU services to enabled and started. Also, we are running a simple hello-world container. This should give you an idea of the power of this configuration.
#cloud-config
package_update: true
packages:
  - qemu-guest-agent
  - docker.io
runcmd:
  - systemctl enable qemu-guest-agent
  - systemctl start qemu-guest-agent
  - docker run hello-world
You can load this script from the Proxmox web UI or with a command like:
qm set 101 --cicustom "user=local:snippets/user-data.yaml"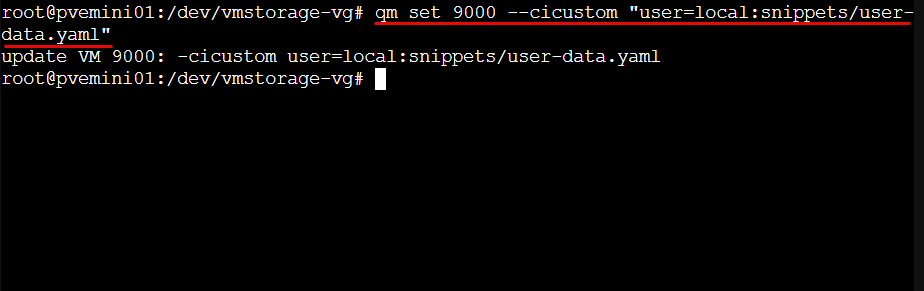
At first boot, cloud-init runs the commands and configures your VM exactly how you want it. This is a very powerful tool for home lab automation. You could use it easily for deploying Kubernetes worker nodes, Docker hosts, or monitoring agents.
Automating cloud-init VMs with Terraform
Proxmox and Terraform go hand in hand and work well in conjunction with cloud-init. The Proxmox Terraform provider lets you use your cloud-init templates to deploy VMs automatically with dynamic values for IPs, hostnames, and SSH keys. A simple Terraform configuration might look like this:
resource "proxmox_vm_qemu" "ubuntu_vm" {
  name        = "terraform-node"
  target_node = "pve01"
  clone       = "ubuntu-cloud"
  cores       = 2
  memory      = 2048

  ipconfig0 = "ip=192.168.1.60/24,gw=192.168.1.1"
  ssh_user  = "ubuntu"
  sshkeys   = file("~/.ssh/id_rsa.pub")
}
Running terraform apply provisions a new VM automatically from your cloud-init template. This setup works great for building multiple machines from code.
Cloud-init and qemu-guest-agent
It is a good idea to have the QEMU guest agent installed in your base image. This enables Proxmox to communicate with the guest for accurate IP reporting, shutdown commands, and other integration tasks. You can add it in your template before converting it or include it in your user-data script as we saw above in the custom script example. If you want to install it manually, you can do that with the following commands:
apt install qemu-guest-agent -y
systemctl enable qemu-guest-agent
Once active, Proxmox will display real network information and handle clean shutdowns or reboots properly.
Troubleshooting common issues
There are a few issues to be aware of when you are using cloud-init. What are some of these?
| Issue | Possible Cause | How to Verify / Fix |
|---|---|---|
| Cloud-init settings not applying | The operating system image doesn’t include the cloud-init package | Boot the VM and check that cloud-init is installed (dpkg -l) |
| Cloud-init disk not being read | The cloud-init disk isn’t attached or is on an unsupported bus | In Proxmox, ensure the cloud-init drive is attached as IDE or SCSI (ide2 or scsiX) |
| Connection or configuration errors | You have a bad static IP or gateway syntax | Double-check the format: ip=192.168.1.10/24,gw=192.168.1.1 |
| No sign of cloud-init activity | Cloud-init service didn’t run properly inside the guest | Check your /var/log/cloud-init.log inside the VM for detailed logs |
| VM still not applying any settings | The VM was cloned from a normal image, not a cloud-init-enabled template | Clone from your cloud-init template, boot it, and make sure of the hostname and user creation behavior |
Workflows you can use it for
In a home lab, cloud-init saves tons of time. You can do the following by using it:
- Automatically deploy Kubernetes worker nodes with predefined IPs and SSH keys
- You can build CI/CD environments where build agents are created and configured in seconds
- You can deploy web servers that install Nginx or Apache automatically and register with monitoring
- For testing environments, you can preinstall Ansible, Docker, or Terraform tools on first boot so that everything is ready to go.
I love this as it keeps you from having to restore snapshots or manually reinstall VMs, you can redeploy everything in just a few minutes using your cloud-init templates and automation scripts.
Wrapping up
If you get familiar with how you can leverage the Proxmox cloud-init configuration, it will change how you manage and deploy VMs in your Proxmox environment. It will bring a cloud-like experience to your home lab. I am all about taking manual tasks and automating these like user creation, networking, SSH keys, software installs, service configs, etc. Once you get comfortable using it, you can then add Terraform and Ansible on top of it and these work in conjunction with the cloud-init configs. What about you? Are you already using cloud-init as part of your home lab automation?
Google is updating how articles are shown. Don’t miss our leading home lab and tech content, written by humans, by setting Virtualization Howto as a preferred source.
About The Author