Every spring many like to take a look around the house and see things they could get rid of, donate, or just downsize. This is usually beneficial and keeps things tidy and much better organized. But, what about home labs? I have also found that having a “Spring cleaning day” for your home lab is also a good idea as it gives you time to take a look at the resources you are running in the lab and see perhaps things you can downsize, get rid of if unused, and free up resources like storage, CPU, memory, etc. Let’s look at home lab optimization tips and what you can reclaim.
Why spring clean your lab?
It’s just a lab environment right? Yes true, for most, we don’t have to worry about our home labs the same way we would production. However, even with a lab environment, it is good to take a look at the resources you are running and possibly resources that you could reclaim. For instance, you may think you need to upgrade your storage, when all you may really need to do is get rid of several stale VMs that are sitting in your VM storage or tons of unused containers that have just been sitting idlilng.
Without this regular maintenance, it’s easy for your lab to become bloated with stale virtual machines, unused containers, volumes that may need to be pruned or old backups.
1. Prune old docker containers running and images
I haven’t regretted getting more into running Docker in the home lab. It is one of the best moves you can make is self-hosting apps and other services inside containers as opposed to virtual machines. The reason for this is containers are just much more efficient. If you want to run your home lab environment in the most efficient way possible without needing tons of physical compute, storage, and network resources, containers will allow you to do this.
However, especially while you are beginning to learn docker, you will accumulate many exited containers, dangling container images, volumes that may no longer be used and orphaned Docker networks..
Even when your Docker stacks are rebuilt, all of the stale images and other artifacts will linger around until you explicitly get rid of these with a pruning process.
To clean up safely:
- I use the
docker system prune -a -fcommand - ***warning*** this command might delete data you would want for later, like unused container images, not just dangling ones. Also, networks, etc. For the most part it has been fine to use this in my environment, just test your environment.
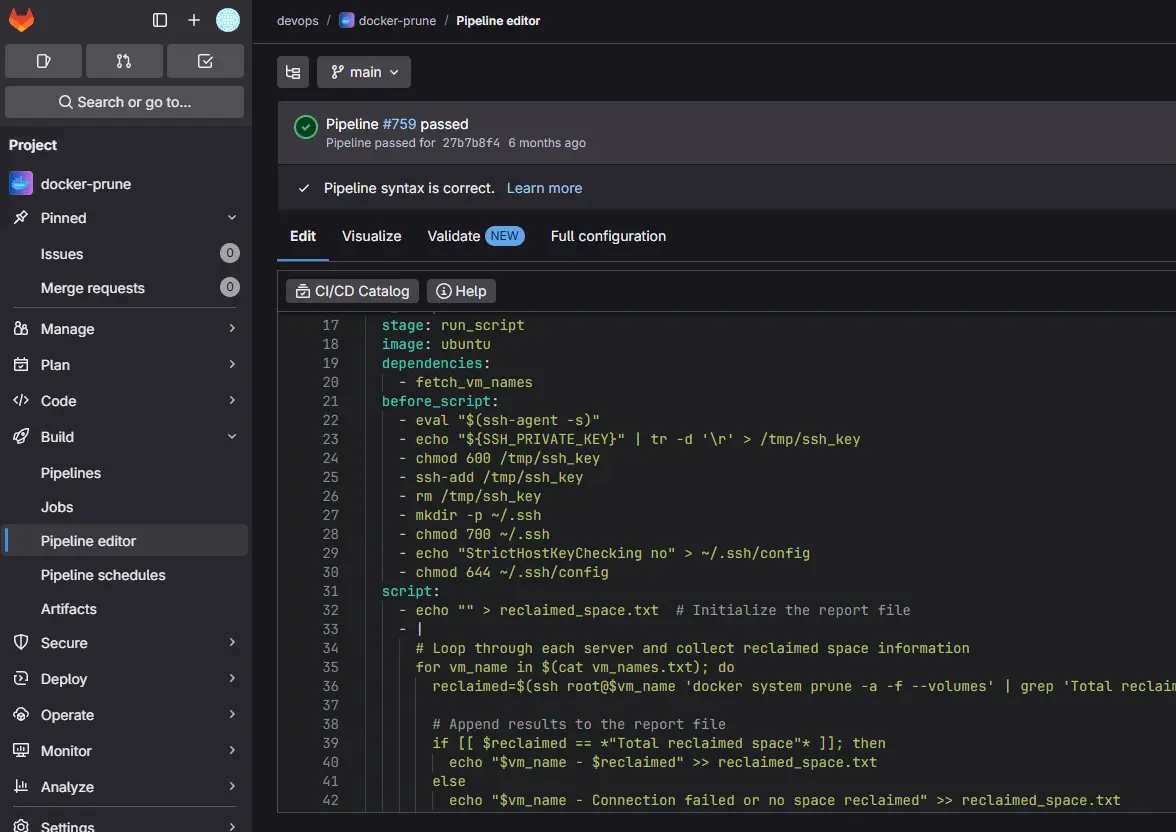
- Using a Gitlab CI/CD pipeline I have the prune command run against my docker container hosts each night to cleanup unused images, networks, etc.
See my detailed blog post on this topic here:
If you’re running Docker Swarm across multiple nodes, you can use something like Ansible playbooks or scheduled scripts if you don’t want to setup a CI/CD pipeline for this. Just make sure you’re not removing active data volumes or persistent volumes used by running services.
Home lab tip: If you’re using Portainer Business Edition, which I highly recommend, it can now schedule automatic container updates.
If you see disk pressure on a Docker host, chances are, you can run this prune command and you will be surprised at just how much unused data you have on disk that you can free up.
2. Remove or Archive Stale Virtual Machines
I like to run an inventory report using PowerCLI in VMware or command line in Proxmox to see which VMs are powered off in my environment.
In VMware, you can use something like the following:
get-vm | Where-Object {$_.PowerState -eq "PoweredOff"} | Sort-Object Name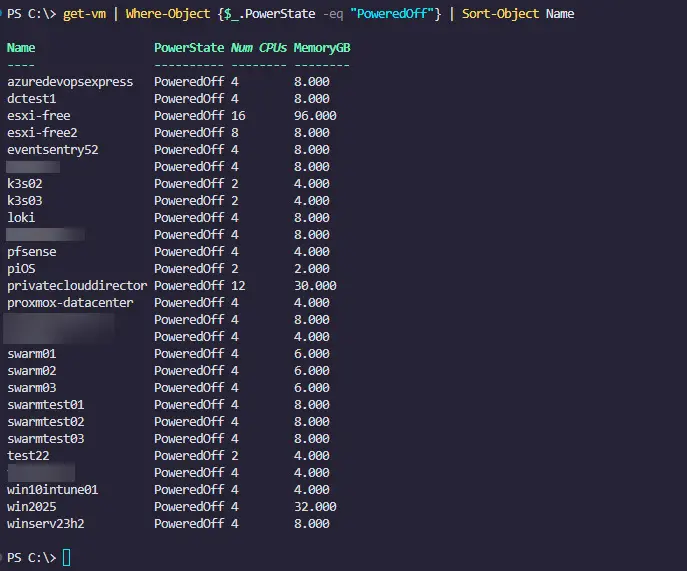
In Proxmox, a command like this will work as well:
qm list | grep stoppedI know in my home lab environment, VMs can stack up over time. I might spin up a VM for a blog post I am writing or other tests I am doing and then power these off after I finish creating content. Then I may forget about the VM altogether. Doing this a dozen or tens of times can lead to dozens or even hundreds of VMs on disk. Even with thin provisioning, this will add up over time.
Here are a few tips for home lab spring cleaning around your virtual machines:
- Audit your VM inventory: In Proxmox, ESXi, or your platform of choice, list all VMs, as we have shown above with the code snippets. Look for VMs that haven’t been powered on in 60-90 days as a good starting point.
- Backup before deleting: Before you delete anything, it is always a good practice to make sure you have a backup of a VM. 9 times out of 10 you may not need it, but it is that one time when you delete something and if you are like me you are kicking yourself for all the time you just dumped down the drain by deleting something you may not have wanted to delete.
- Get rid of snapshots: If you are using snapshots in your home lab on VMs which you likely are if you are like me, if you don’t delete the VMs themselves, just looking at snapshots you may have lingering a long time on a VM will often save tons of space as well.
- Get rid of old or outdated templates: If a template is old and outdated, it defeats the purpose of having them any way in my honest opinion. So, delete the old ones and build new ones.
Deleting stale VMs and snapshots will reclaim tons of space if you thoroughly take a look at what you are using and see what VMs may no longer be needed along with snapshots.
3. Clean up unused storage volumes and shares
This is another cleanup item closely related to freeing up space in your home lab. Be sure to take a look at and review the NFS exports, SMB shares, Ceph pools, and Docker volumes.
Here’s a quick checklist:
- Docker volumes: We have already covered this above, but it is worth mentioning again. Getting rid of unused Docker volumes leads to tremendous space savings overall
- NAS shares: If you are creating NAS shares to go along with another workflow or task you are performing in the home lab, be sure to look at these with an inventory and see if there are ones you can get rid of
- GlusterFS or Ceph volumes: Scan for unused bricks, subvolumes, and also pools that you can get rid of
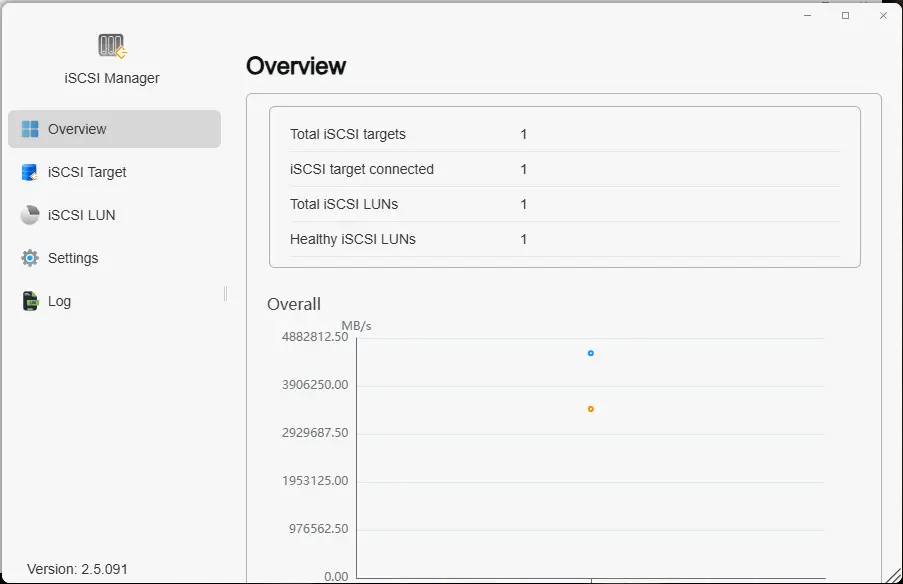
- iSCSI targets: If you have LUNs that are associated with lab VMs that might now be powered off, get rid of these LUNs as part of your cleanup
Again, before deleting anything storage related, make sure you have a backup or that you are 100% sure it isn’t critical data.
Automation Idea: You can script regular volume audits and get a list of mount points and volumes across your storage in the home lab.
4. Review and get rid of old backups
This is a big one for me on my NAS storage. I use my Synology NAS device as the target of Veeam, NAKIVO Backup and Replication, Duplicati, Portainer, and several other technologies and tools in my environment.
I have several of my home lab backups pointed to the home lab host and it will automatically add VMs to the backups for that host. This is a great way to backup with Veeam and others since it makes sure you won’t miss anything. However, the downside is, if you have a lot of churn in your lab like I do, you will get old backups that stack up over time. Usually when i get to doing this on my NAS, I will be able to reclaim many terabytes of space on my NAS device.
Steps to review and think about:
- Review your retention policies for backups: If you are not taking note of retention policies, you may be keeping many days, weeks, months, or even a year’s worth of backups that you may not need
- Delete backups: In line with the process I mentioned above for backups, go through your backups and delete backups for VMs that are old or have long been deleted that you will never need again
- Move cold backups to slower, cheaper storage: If you need to keep around old backups, why not shift these to even slower disks in an array you may have lying around and leave your faster NAS or other newer storage targets free for more active data
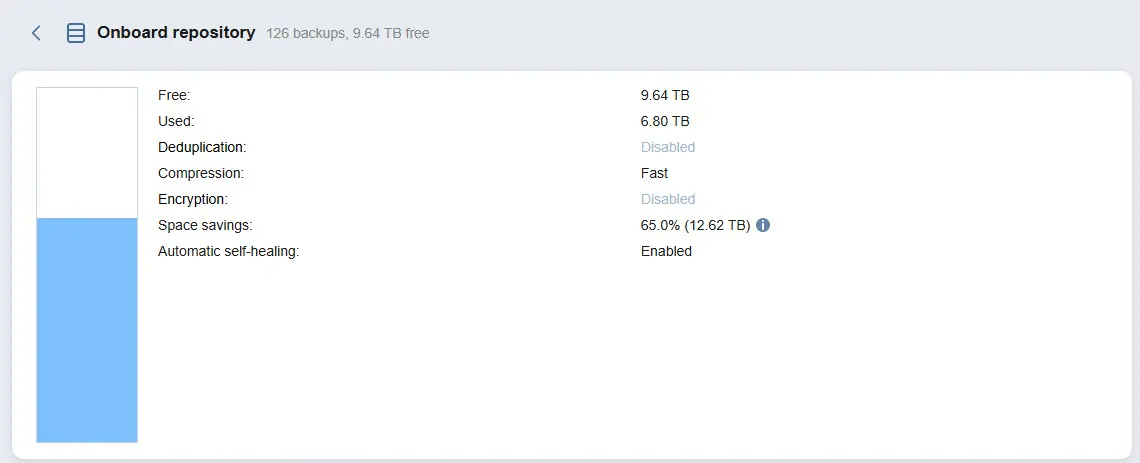
If you have ZFS as your backup storage, you can perform a scrub and clean the datasets for your backups. Scrubbing makes sure of data integrity and it can spot early signs of failing disks. I think keeping your backups optimized is a great item on your list of home lab optimization tips.
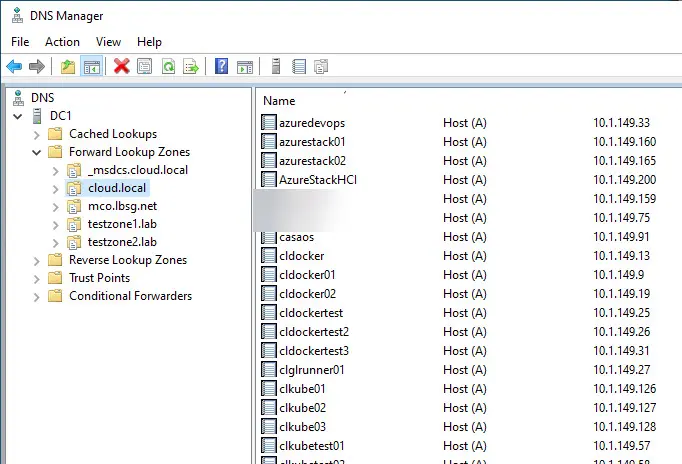
5. Clean and Update Your DNS Records
It’s always DNS right? All jokes aside, DNS is another area of your home lab to give attention to. DNS records can accumulate over time. You may have 25 records even for the same IP address of different servers in your lab environment that held that address. These add up. They not only cause confusion, they can even cause weird issues with your name resolution if old stale records are being picked up, especially for reverse DNS.
Cleaning DNS offers two major benefits:
- Faster resolution times (no waiting on failed lookups)
- Tighter security (less surface area for misrouting traffic)
Steps for DNS cleaning:
- Scan your zones: List all DNS records and match these against your active devices and services.
- Delete dead records: If an IP or hostname is no longer used, delete it
- Update TTLs: Set more appropriate TTL values — shorter for dynamic services, longer for static hosts.
- Consider scavenging: Scavenging is an automated process that gets rid of DNS records that are old
Keeping your internal DNS clean and optimized are great home lab optimization tips in general and it makes sure that things will resolve correctly and also makes troubleshooting much easier.
Wrapping Up
Your home lab will thank you when you perform home lab spring cleaning. Over time home labs become bloated and lead to wasted resources, bad performance, and makes it much more difficult to troubleshoot without home lab optimization tips we have discussed.
Spring cleaning your home lab might not be as satisfying as organizing your garage or washing the windows — but it’s arguably more important. A bloated, chaotic home lab leads to wasted resources, sluggish performance, and more administrative headaches over time.
Home lab cleaning and maintenance will make sure you have a lab that grows smarter, not messier. Let me know in the comments if you have any yearly or other routine maintenance and cleanup you perform in your lab environment or production environments you take care of.
Google is updating how articles are shown. Don’t miss our leading home lab and tech content, written by humans, by setting Virtualization Howto as a preferred source.
About The Author