Like most hypervisors, some of the best features of Proxmox are not the obvious ones when you first start using it. Some features and capabilities are buried deep inside and are also buried deep inside the official Proxmox documentation, especially the Proxmox admin guide. We all know the obvious core features of Proxmox, but the admin guide reveals many other advanced capabilities that can improve how you run your cluster. These are things you can implement in your environment today and make your lab or production more resilient, easier to manage, and more efficient. Let’s take a look at seven hidden Proxmox features documented in the admin guide that many home lab users never discover.
Build your own offline or local Proxmox repository mirror
Did you know one of the most interesting capabilities described in the admin guide is the ability to create your own Proxmox offline repository mirror. What is this? Well, it allows you to host a local copy of the Proxmox package repos and point your nodes to that mirror instead of pulling updates directly from the Internet.
I think there are several scenarios where this can be useful. In enterprise or even home lab networks, this allows your clusters to operate in an air gapped network where they don’t have to have Internet connectivity. Many who are security conscious or under compliance restrictions in production need this to cotrol how upgrades and updates are deployed to their servers.
Also, this is more efficient if you have more than one node. Instead of every node downloading packages from the public Proxmox servers, you can efficiently store a local copy inside your network. Then, all of your Proxmox nodes can pull the updates from that local mirror instead of across the WAN.
So if you are keeping score on this one:
- Updates pull much faster since they are on the LAN
- Bandwidth usage is minimized because the packages are only downloaded once
- You control when the updates are available to your cluster
So to use this feature, your workflow may look something like this:
- Create a system that mirrors the Proxmox repositories
- Synchronize packages from the upstream repositories
- Configure your Proxmox nodes to use the internal mirror
- Apply updates across the cluster from the local source
Setting this up is super simple. If you already have a Proxmox host that has a repository pointed to a repository already, you can install the Proxmox offline mirror using the following:
apt update
apt install proxmox-offline-mirror
Automated Proxmox installs using answer files
Did you know that you can perform an automated installation of Proxmox using an answer file? Yes you can. This feature allows you to install Proxmox automatically instead of manually stepping through the installation process each time a node is provisioned.
Normally, when you install Proxmox, the installation process has several manual steps. This can be tedious to deploy servers at scale. You have to select the storage options, configure networking, choose hostnames, and set passwords. Again, for small home labs, this may not be an issue, but if you are running multiple nodes and need to deploy more than one installation of Proxmox, this is a great feature.
Like other automated operating system installs, this process uses “answer files” that provide the installer with predefined installation parameters. The installer then reads from the config file and applies the settings to Proxmox during the install.
Below is a look at the answer files which are in TOML format:
[global]
keyboard = "us"
country = "us"
fqdn = "pveauto.testinstall"
mailto = "[email protected]"
timezone = "America/Chicago"
root-password = "password"
root-ssh-keys = [
    "ssh-ed25519 AAAA..."
]

[network]
source = "from-dhcp"

[network.interface-name-pinning]
enabled = true

[network.interface-name-pinning.mapping]
"24:8a:07:1e:05:bc" = "lan0"
"24:8a:07:1e:05:bd" = "lan1"
"b4:2e:99:ac:ad:b4" = "mgmt"

[disk-setup]
filesystem = "zfs"
zfs.raid = "raid1"
disk-list = ["sda", "sdb"]

[post-installation-webhook]
url = "https://my.endpoint.local/postinst"
cert-fingerprint = "AA:E8:CB:95:B1:..."

[first-boot]
source = "from-iso"
ordering = "before-network"
What can answer files define as part of the automated process? These files can define things such as:
- Storage configuration
- Network settings
- Hostname and domain information
- Installation options
- Administrative credentials
Proxmox provides a tool that is used to help with this process: proxmox-auto-install-assistant. You can learn more about the automated installation with this tool here: Automated Installation – Proxmox VE.
This comes in handy for instance if you are building a three or five node Proxmox cluster in your home lab, you can install each node with identical configuration settings and make sure your nodes are installed consistently and without human errors being accidentally introduced.
Also, if you need to rebuild a node if something crashes or you have some type of hardware failure, when you reinstall the hypervisor, the answer file allows you to redeploy the system quickly with the exact same configuration that it had before, especially if you had used the automated deployment the first time.
I love these types of solutions as well as you can store the automated deployment config files and answer files in a git repo. This let’s you version control them, and have a history of any changes and the ability to roll them back to a previous version if needed.
Pin network interface names to prevent broken networking
If you saw my previous post on how to keep Proxmox from renaming network connections, you may have heard about the new ability for Proxmox 9 to pin network interface names with a built-in command line command.
Network names for interfaces are generated by default from PCI identifiers and other numbering by the system. If you introduce a new PCI device for instance in your Proxmox host, the identifier can change and Proxmox will rename the interface.
This will cause you grief since the /etc/network/interfaces file has your bridge, bond, and VLAN information for those bridges tied to the physical network addresses by their identifiers. The config file doesn’t automatically update if the interface names change.
The pve-network-interface-pinning command that is documented in the Proxmox admin guide provides an automated way to setup static network interface names that reference the hardware addresses instead (think MAC address that never changes).
With this command, you can define specific names for interfaces such as:
nic1
nic2
storage0
cluster0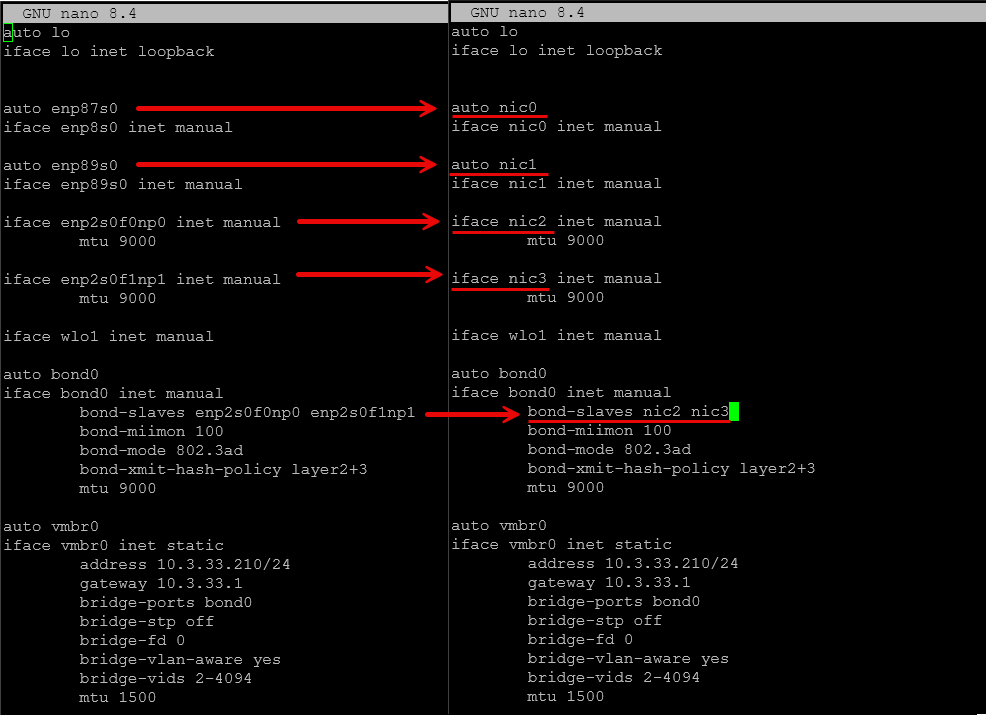
These names remain consistent even if new hardware is added or the PCI ordering changes. If you are like me and are a home labber that is frequently experimenting with hardware upgrades like additional PCI devies or external GPUs, network pinning allows avoiding issues where the network names change after a reboot and this prevents huge headaches as a result.
Install Proxmox over the network using PXE boot
The next one is closely related to using answer files and it is booting Proxmox using PXE boot. PXE boot allows systems to load an operating system from the network instead of physical media. Most of us are familiar with using Rufus or Ventoy to take advantage of the Proxmox ISO, but PXE is also a great way to load operating systems, including Proxmox.
You can check out the official documentation on the steps found on the Proxmox forum:
In a home lab, PXE installation can simplify the process of installing new Proxmox nodes. If you are like me, I am constantly blowing away USB drives and get tired of having to find the USB drive, format it to blow away the previous project or experiment I have been working on, and then copy over the ISO. So instead of doing all that, you can boot from the network instead. This has a lot of advantages.
Some of the advantages I can think of are:
- You can install nodes faster
- The installer is delivered over the network
- You can more easily rebuild a node without physical access to the server
- You can provision multiple systems at once using the same installation media
So, this can save you a lot of time during experimenting with Proxmox installs and building nodes and tearing them down, etc. A solution you can use is the netboot.xyz solution as the way to have the means to boot with PXE. Check out their docs here:
Mirror your Proxmox boot drives using ZFS
We are all pretty familiar with using ZFS for storing our virtual machines. However, the admin guide highlights another really cool capability that goes unnoticed in the home lab. The Proxmox installer can create mirrored boot drives using ZFS during installation. Did you know this?
This means the hypervisor itself can be installed on redundant disks. If one boot drive fails, your Proxmox server can continue running from the other disk. Pretty cool. This is definitely useful for servers that run continuously in a home lab environment. Boot drive failures are not super common, but when they do happen they can bring down an entire node.
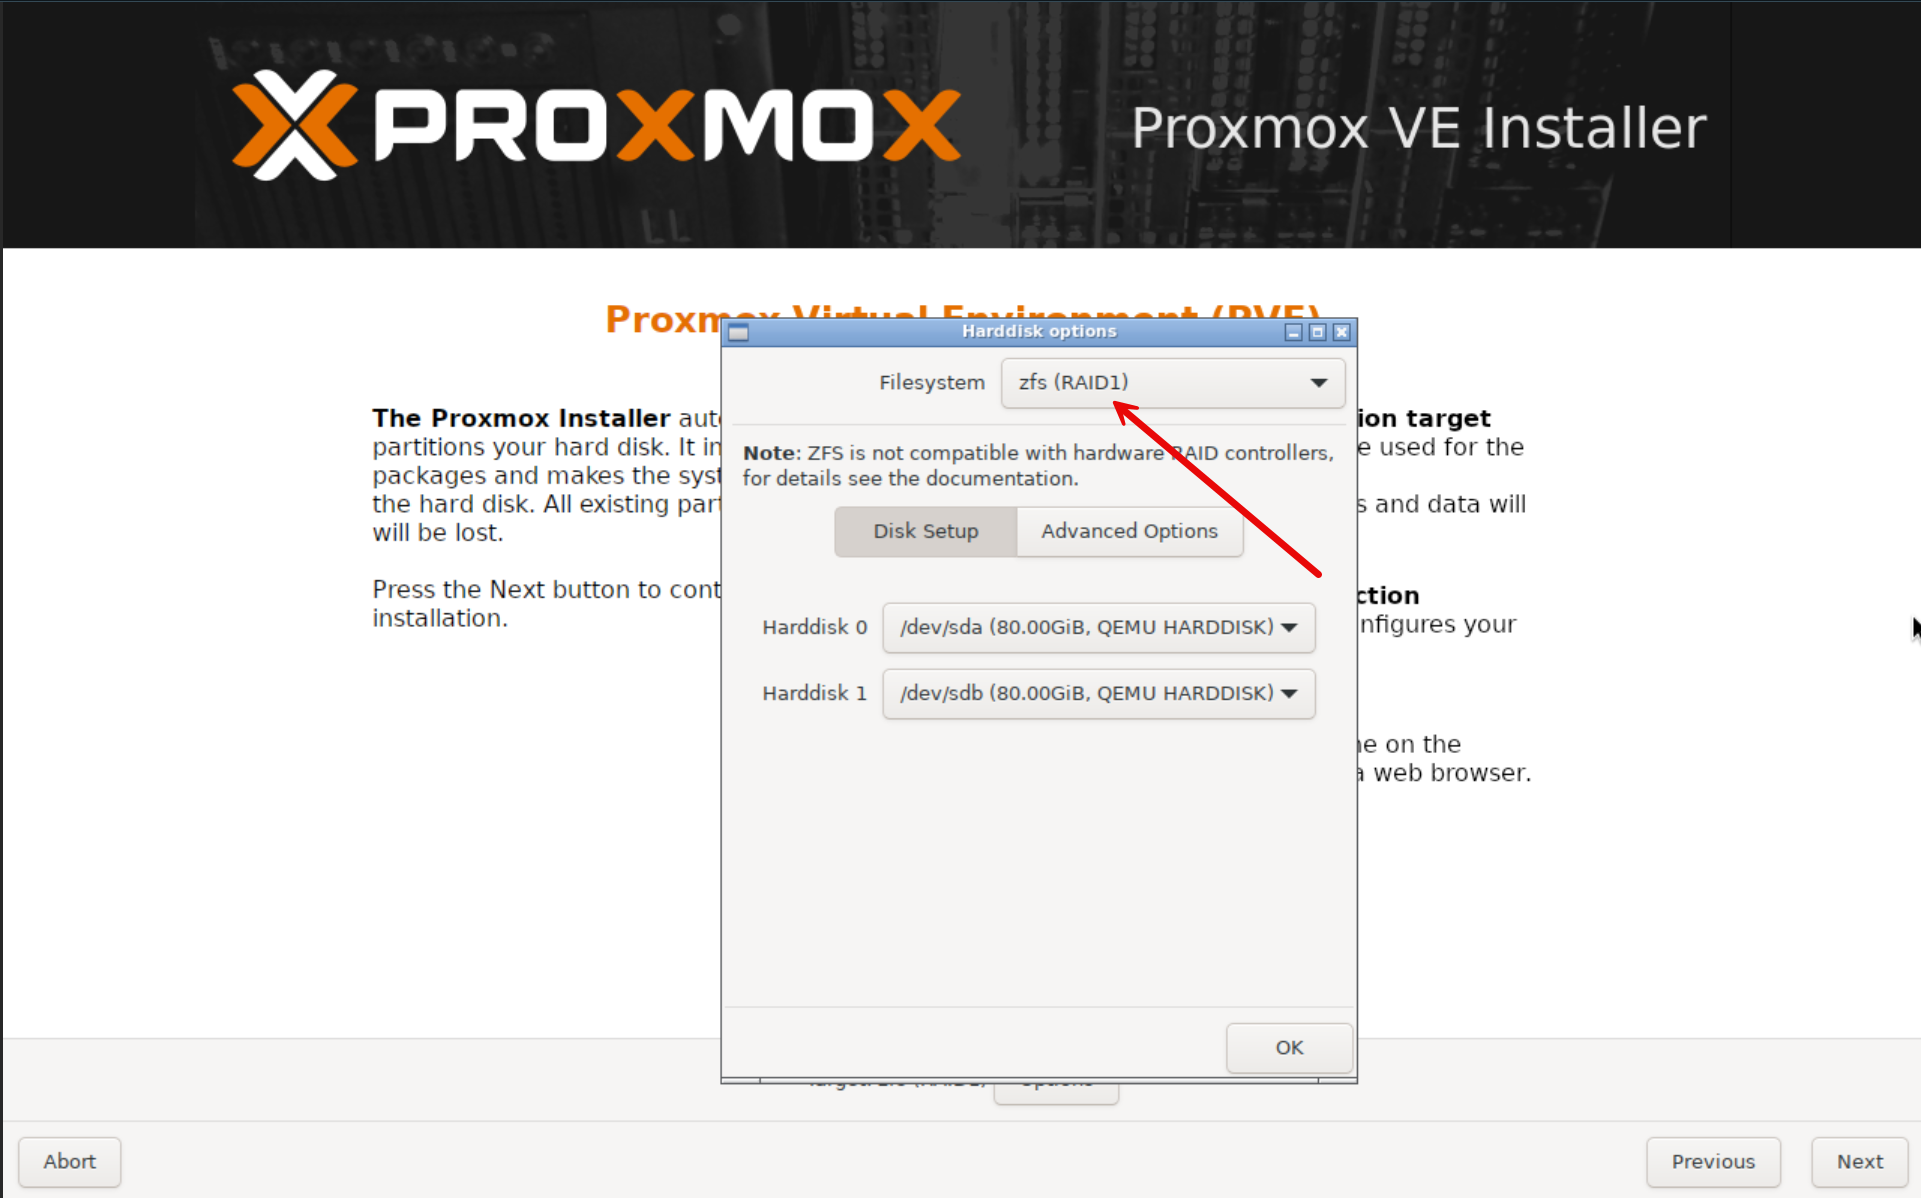
By configuring a ZFS RAID1 (mirror), you get added resilience for the hypervisor itself. Note the following benefits:
- Protection from single disk failure
- Simple disk replacement
- Better reliability for cluster nodes
Especially in the home lab when we use systems with inexpensive SATA or NVMe drives for boot storage, this extra layer of redundancy can give you peace of mind in your home lab environment.
Use Proxmox hook scripts to automate VM actions
One of the most powerful and underused features buried in the Proxmox admin guide is the ability to use hook scripts to automate virtual machine actions. This is one of those capabilities that feels more like something you would expect in a full blown enterprise automation platform. But the really cool thing is, it is built right into Proxmox.
So what are hook scripts? The hook scripts feature allows you to attach custom scripts to the lifecycle events of a virtual machine or container. Instead of manually running tasks before or after certain actions, Proxmox can automatically execute your script at the exact moment you need it to be executed.
You can hook into several key lifecycle events, including:
- VM start
- VM stop
- pre-start
- post-stop
How do you set a hook script for a virtual machine? You use the –hookscript parameter to set the script for that particular resource like the following:
qm set 100 --hookscript local:snippets/hookscript.plThis gives you a huge amount of flexibility. For example, a pre-start hook can run before a VM powers on, while a post-stop hook can run after it shuts down. With this, you can insert your own logic directly into the VM lifecycle.
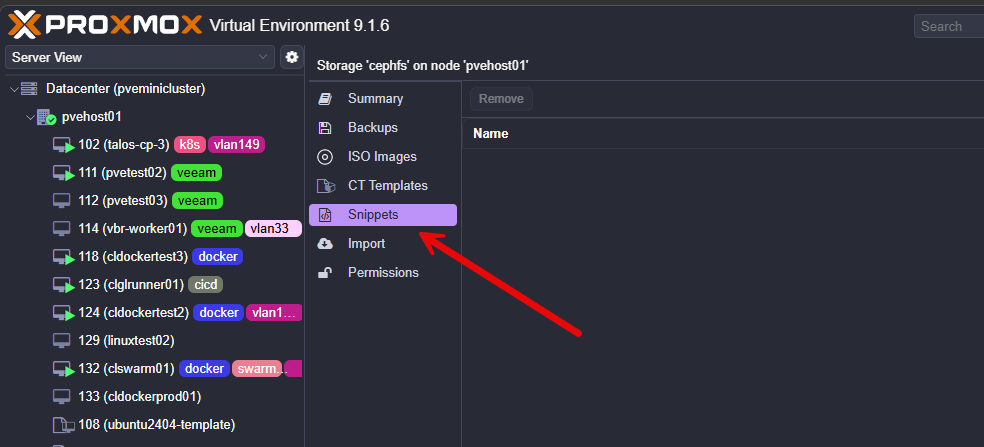
Hook scripts are stored in the storage you have designated for snippets storage.
So, as with anything, I see the benefit with real-world examples given. What are some concrete examples of what you might do with hook scripts?
1. Prevent a VM from starting if Ceph storage is unhealthy
This one fits your environment perfectly since you’re running Ceph. You don’t want critical VMs starting if your Ceph cluster is degraded. You could have a pre-start hook check Ceph health before allowing the VM to boot.
The example pre-start hook script:
#!/bin/bash
PHASE=$2

if [ "$PHASE" = "pre-start" ]; then
  if ! ceph -s | grep -q "HEALTH_OK"; then
    echo "Ceph is not healthy. Blocking VM start."
    exit 1
  fi
fi
2. Send a notification when a VM stops
Imagine this scenario. You want to know when critical VMs shut down. You can seutp a post-stop hook that sends a webhook or alert
An example post stop hook script:
#!/bin/bash
VMID=$1
PHASE=$2

if [ "$PHASE" = "post-stop" ]; then
  curl -X POST https://your-webhook-url \
    -H "Content-Type: application/json" \
    -d "{\"text\":\"VM $VMID has stopped\"}"
fi
You could setup integrations with any of the following:
- Slack
- Discord
- Teams
- custom dashboards
3. Automatically back up a VM when it shuts down
Think about this scenario. You want a backup every time a VM is gracefully stopped. You can create post-stop hook triggers backup.
The example post-stop hook script:
#!/bin/bash
VMID=$1
PHASE=$2

if [ "$PHASE" = "post-stop" ]; then
  vzdump $VMID --storage local --mode snapshot
fi
Use firewall groups and aliases to simplify network security
The Proxmox firewall system is quite powerful, but many users only implement basic rules. The admin guide explains a feature that can definitely help to make firewall management simpler across multiple nodes and virtual machines.
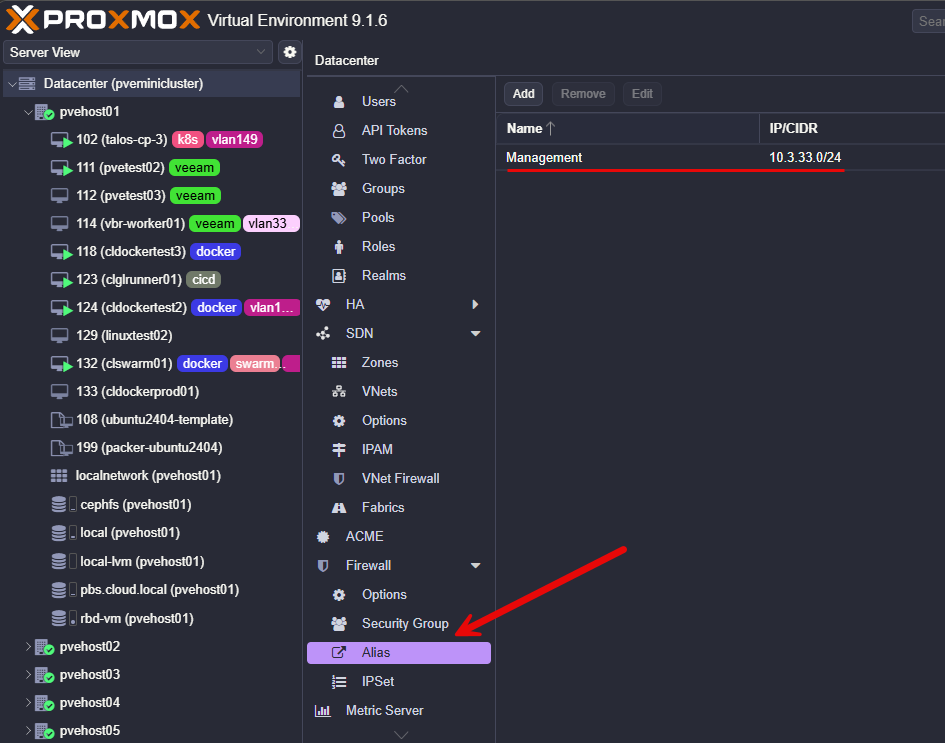
Proxmox supports firewall groups and aliases. These allow you to define reusable objects that can be used by multiple firewall rules.
Aliases can represent networks or IP ranges. For example, you can create aliases for:
- management network
- storage network
- monitoring network
Firewall groups allow you to create sets of rules that can be applied to multiple systems. For instance you might have rules that you always apply to certain types of servers like web servers, SQL servers, etc. You might have a group of firewall rules for a web server that allows HTTP and HTTPS, and then you might have a rule that allows SQL port 1433 and other ports for a SQL server.
If that is the case, you can create firewall groups that contain all the rules for that specific type of workload.
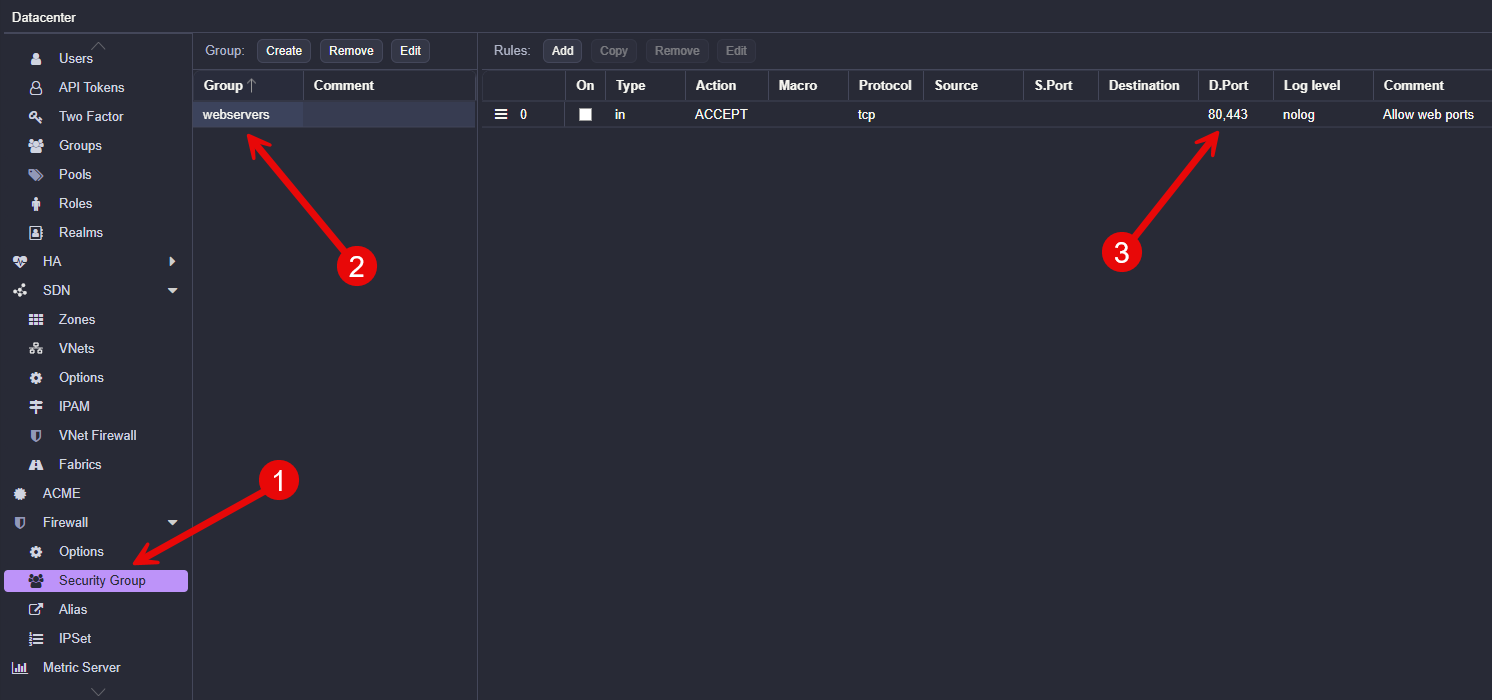
So this helps you instead of repeating the same rule configuration on every virtual machine, you can create a group once and apply it wherever needed. This makes firewall policies easier to manage and helps with preventing human errors.
Wrapping up
I really like going through the admin docs of various solutions, including Proxmox, as these are often treated as reference documentation. But, I have found that many times you learn about pretty cool features that are not always obvious from the web interface alone. Features like repository mirrors, automated installs, interface pinning, and PXE deployments can improve how we manage our home labs and production environments. How about you? Have you used any of these features mentioned or is there another obscure feature that you are making use of?
Google is updating how articles are shown. Don’t miss our leading home lab and tech content, written by humans, by setting Virtualization Howto as a preferred source.
About The Author