As many are shifting to Proxmox for both home lab and even production workloads and operations, there are several “day-to-day” operational activities that you probably want to know how to do on the platform. VMware vSphere has had this down to a science for quite some time now with updates being fairly hands off if you trusted the fully automated rolling updates it provided. In Proxmox, this is still a bit more hands on with a multi-node cluster running things like Ceph for production services. But, it isn’t too difficult and once you know the steps, it can be accomplished pretty easily. Let’s look at how I perform zero-downtime rolling updates on my Proxmox cluster and the steps involved.
My home lab setup
In my current setup, I am running a 5-node Proxmox cluster built on Minisforum MS-01 mini PCs inside my TecMojo 12U mini rack. Each node has NVMe OSDs backing a Ceph cluster, dual 10Gb LACP bonds, VLAN segmentation, and real workloads running on top. I feel like this is not a toy lab anymore running Proxmox. It is production now for my home lab services and I treat it like I would any other production environment that I manage.
Why rolling updates matter in Proxmox
Proxmox makes it very easy to update a node. From the web UI, you can check for updates and apply them in minutes. But in a clustered environment, as of yet, we don’t have a native “Update Manager” of sorts that orchestrates these operations from start to finish.
So, we need to be a bit more hands on with the process but its not rocket science. First of all, to level set, depending on how many nodes you have in your cluster, most will want to work through this in a serial fashion. If you reboot multiple nodes at once, you will risk:
- Losing quorum in Corosync
- Triggering Ceph recovery storms (if running Ceph storage)
- Degrading pools (Ceph)
- Interrupting HA services
- Causing unnecessary VM downtime
Rolling updates in Proxmox are no different than any other hypervisor. We are simply trying to control the blast radius. You update one node at a time by moving workloads off of it, running the updates, rebooting, validating it to make sure everything is ok and then letting the cluster settle and then moving on to the next node.
In a 3 to 5-node cluster, like the one I am running, this gives you the comfort of knowing you can take a node down without issue, perform the maintenance, and move on.
My pre-update checklist
There are a few things I would recommend doing before you getting into rolling through your cluster will rolling updates. Before I touch a single node, I verify the cluster is healthy. First, if you have a Ceph-enabled Proxmox cluster, you will want to make sure that Ceph is healthy and everything is working as expected.
First, I check Ceph:
ceph -s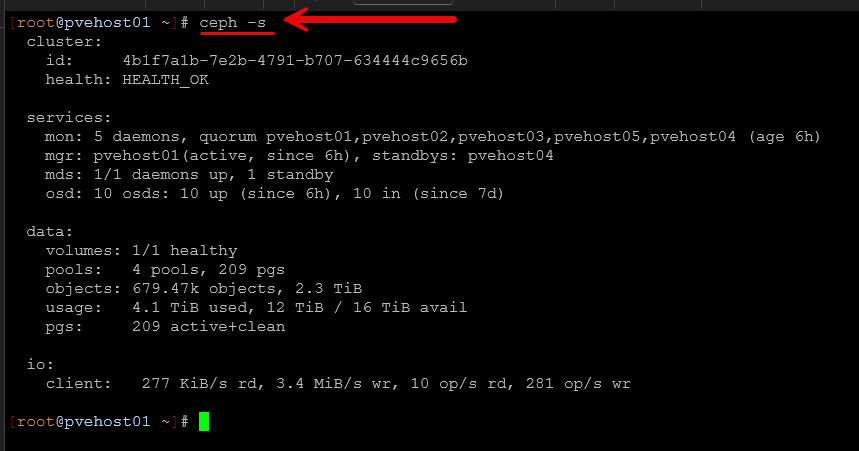
I want to see:
- HEALTH_OK
- All OSDs up and in
- No backfill or recovery in progress
- All PGs active+clean
If Ceph is recovering or rebalancing, I wait. Updating during active recovery is asking for trouble or just increasing the chances of something not working like you would want.
Next, I check cluster quorum. This is an easy one and can be checked with:
pvecm status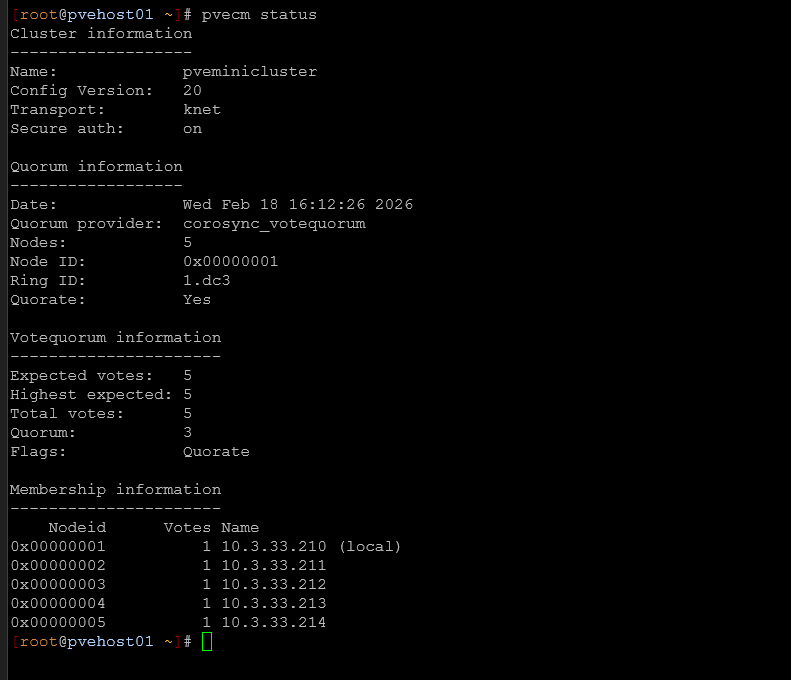
All nodes should be present and in quorum stable. If a node is showing down, or having an issue, investigate that first. Like the earlier comment with Ceph, you don’t want to start out taking down nodes if there is already an issue going on.
Enter Proxmox maintenance mode
Many do not realize that Proxmox actually has a maintenance mode. I think this would be some low-hanging fruit the Proxmox developers could add to the GUI to be able to right-click a node and have this more obviously exposed. But, to enable maintenance mode on a node, you issue the command:
ha-manager crm-command node-maintenance enable <node name>
Like VMware, when you enable maintenance mode on a cluster host, it then starts the process of getting workloads off the cluster node. In Proxmox, you will see the “little blue wrench” on a host when it is in maintenance mode.

Applying updates in Proxmox
There are many ways to apply updates in Proxmox, either from the GUI or the command line. One of the easiest ways since you are doing these one at a time is just to do this from the GUI.
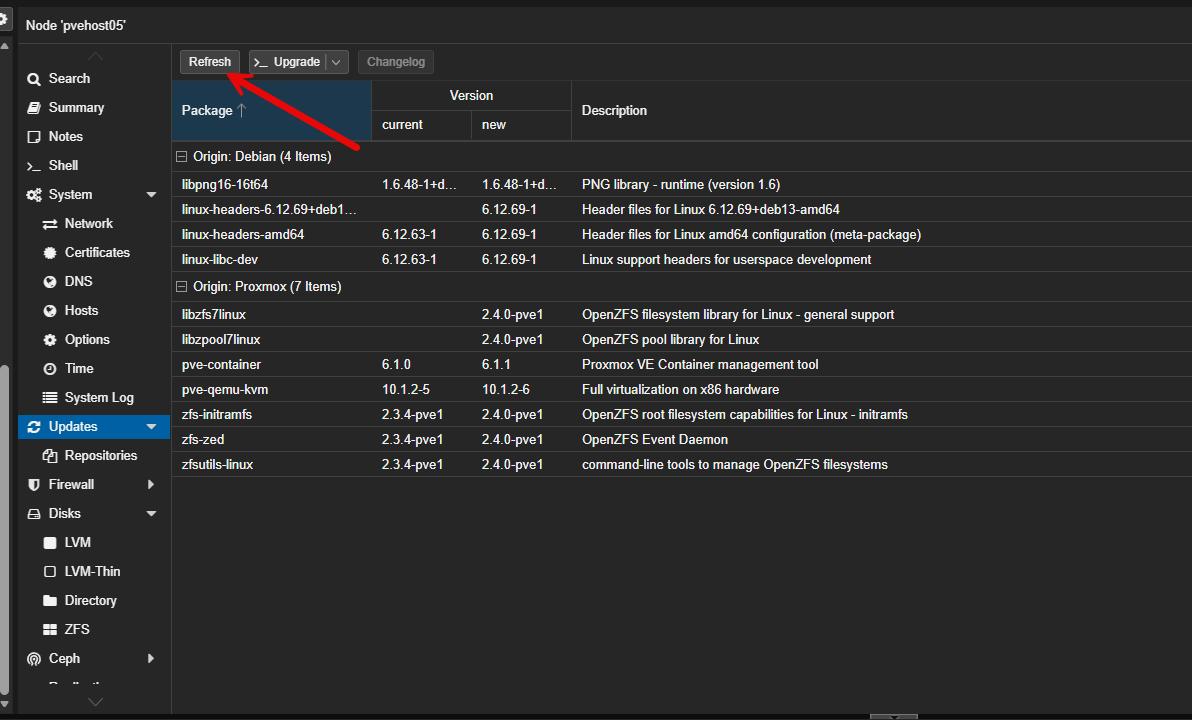
Then click the Upgrade button.
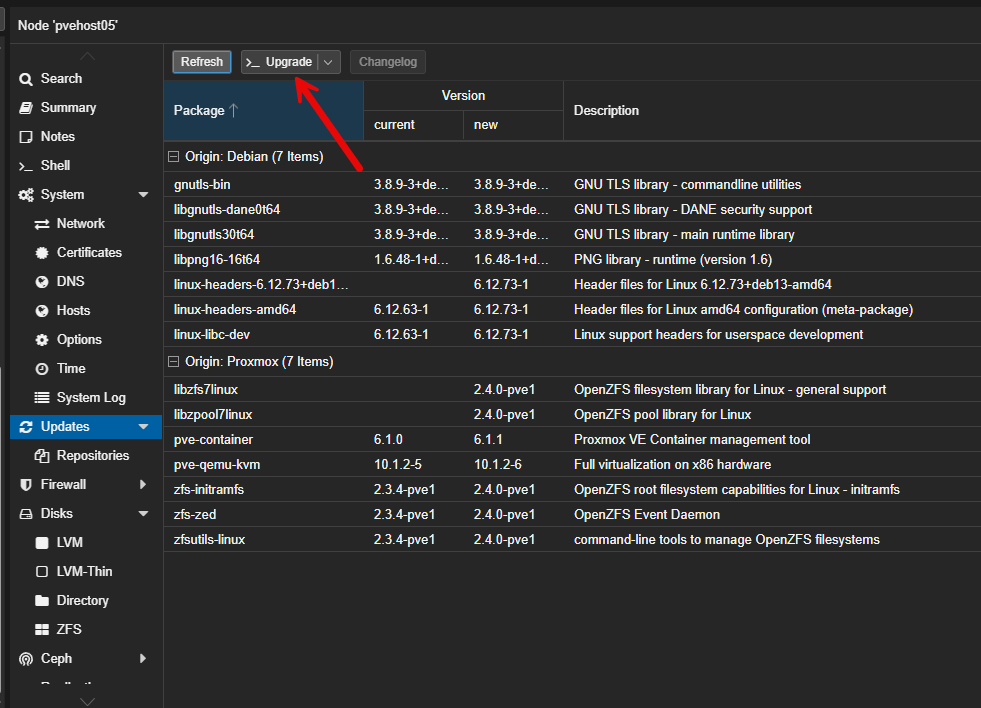
This usually opens another small web UI window for you to confirm with a Y that you want to install the updates.
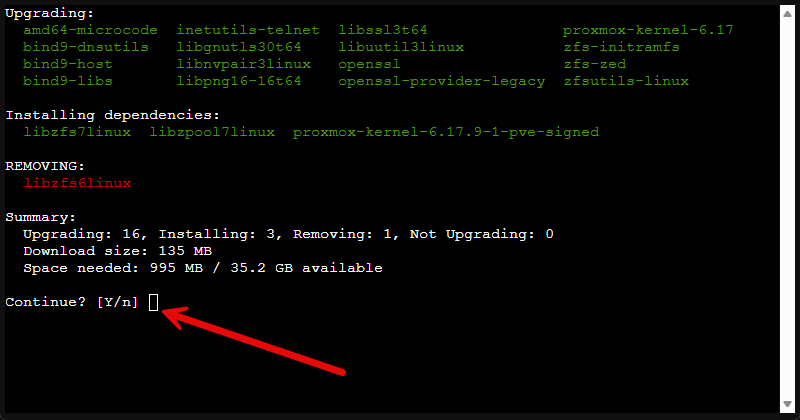
Using the command line is simple as well. You would prepare and get ready just like we have done above, but just connect via SSH or using the Console button in the web UI and then you would type the following:
apt update
apt full-upgrade
After the updates, either web UI or command line, are finished, you will likely need to reboot. You can do that with the simple command:
rebootWhen the node comes back online, I do not immediately move to the next one. A good sanity check is to run the command:
pveversion -vThis allows you to confirm the new version that was installed.
Also, it is a good idea to do the quick sanity checks on Ceph if you are running it and on the cluster quorum:
ceph -s
pvecm status
Exiting maintenance mode
After you have confirmed everything is ok with the node and the cluster, then you are good to exit maintenance mode.
ha-manager crm-command node-maintenance disable <node name>The really awesome thing that Proxmox does that VMware ESXi doesn’t do is that it will migrate all the VMs that were on the same node back to that node. This I think is pretty cool.
Additional Ceph considerations you may make
Every Proxmox node in my cluster runs OSDs. When I reboot a node, those OSDs temporarily go offline. Ceph tolerates this, but only within reason.
If you reboot multiple OSD hosts simultaneously, you risk:
- Dropping below min_size
- Triggering heavy backfill
- Creating unnecessary data movement
- Increasing write latency
I never reboot more than one OSD host at a time. Also, if you are going to take down a host for more extended maintenance operations. Perhaps you are adding or changing a component, you may want to set the noout flag. This tells Ceph to not remove the OSD once it passes the default threshold of time before that happens normally.
To set the noout flag, you use the following command:
ceph osd set nooutIf I use it, I unset it immediately as soon as I can after a maintenance operation:
ceph osd unset nooutPersonally, I prefer short, controlled maintenance windows per node rather than leaving flags set.
Other tools that can help with rolling updates
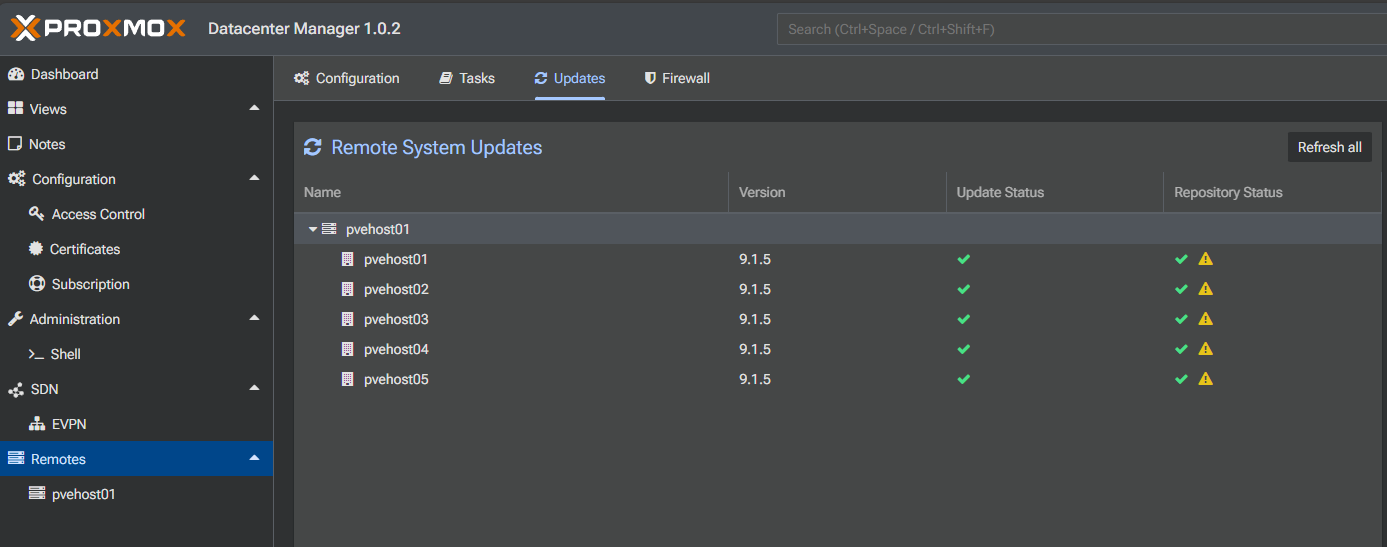
There are other tools that you can use to help with visibility to updates across your nodes as well as actually performing rolling updates. One of the first tools that comes to mind is the Proxmox Datacenter Manager tool. It shows you all the updates in one place across all nodes. This is hard to see in just the default Proxmox VE Server web UI in such as uniform way.
Under the Remotes > Updates you will see the remote system updates available.
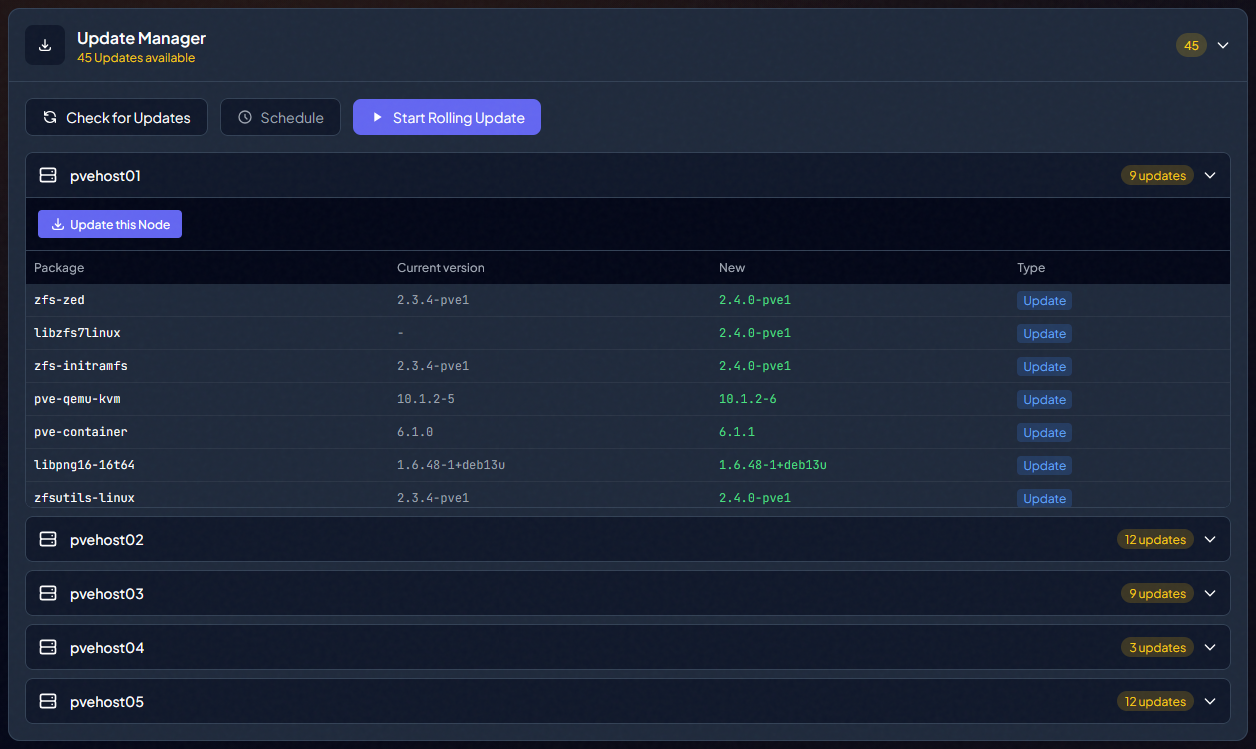
Another really awesome tool that I have reviewed and took a look at lately in the home lab is the PegaProx project. PegaProx has a rolling updates feature where it orchestrates all of these activities for you and rolls through your cluster hosts automatically. Pretty cool!
In PegaProx under the settings of your cluster, at the bottom, you will see the Update Manager and then the Start Rolling Updates button.
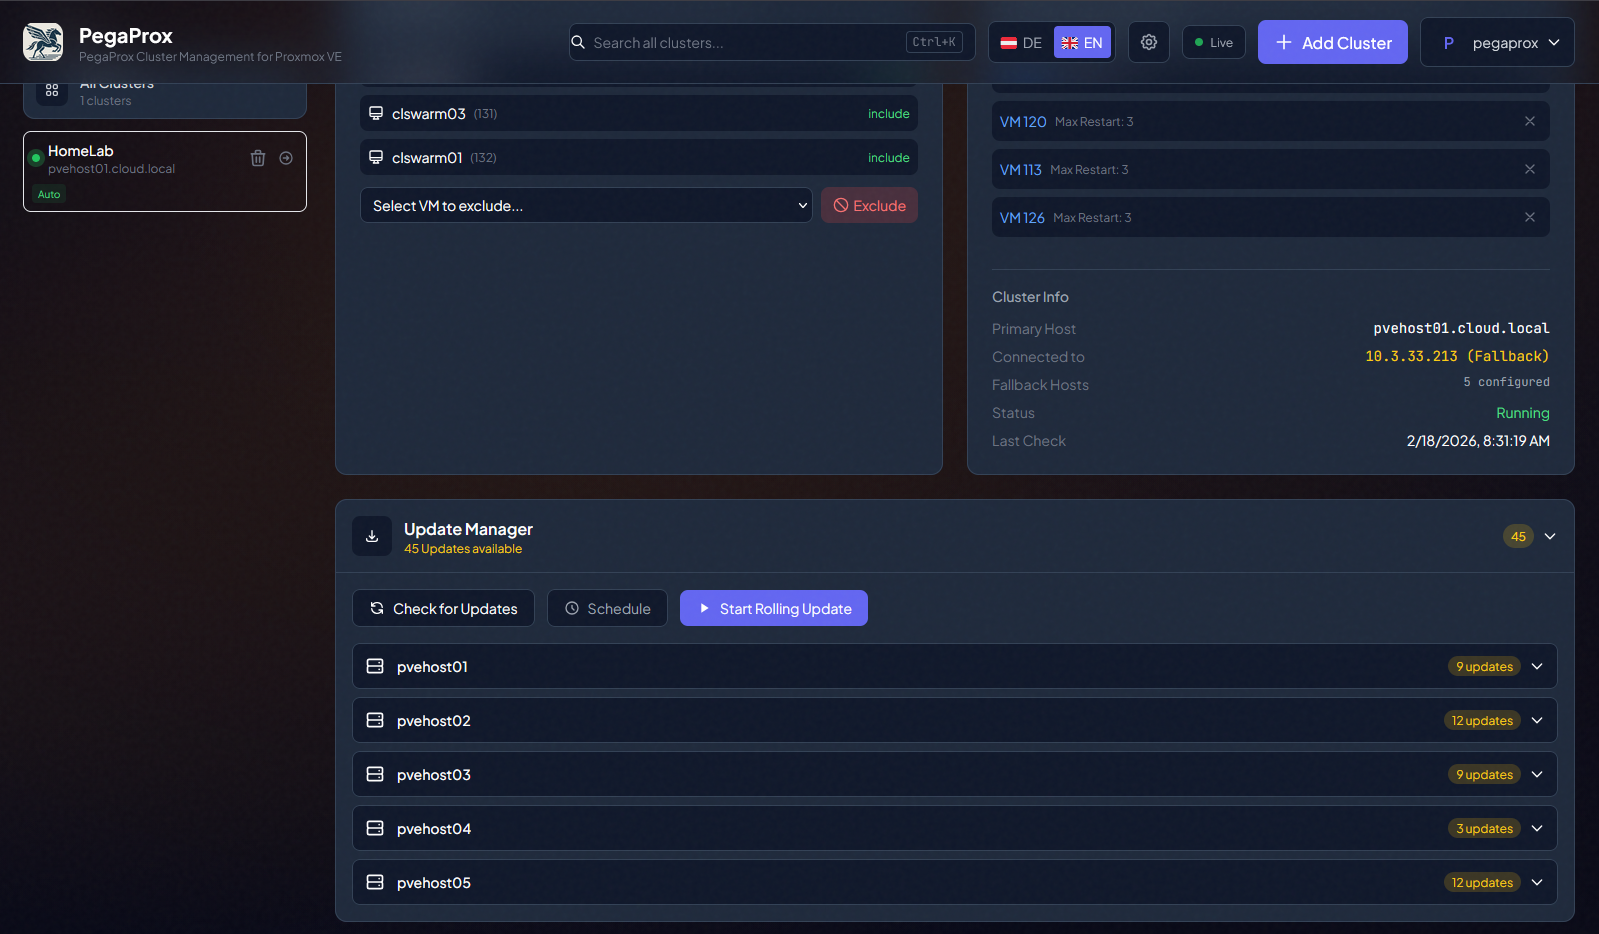
You can expand each host and see the specific updates available for each one.
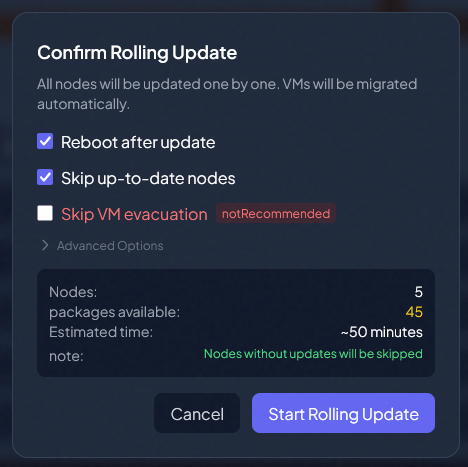
After clicking the Start Rolling Updates button, this launches the Confirm Rolling Update dialog box. You see the options listed here to:
- Reboot after update
- Skip up-to-date nodes
- Skip VM evacuation
- Advanced options
Things I don’t do when updating
There are a few rules I always follow:
- I never update multiple nodes at the same time
- I never update when Ceph is already in a degraded or recovering state
- I never skip backups before major updates
- And I never start cluster maintenance late at night when I am tired. That is when mistakes happen.
Rolling updates are not about how fast you can get done but about completing them safely and without inadvertently taking things down.
Wrapping up
Proxmox has a lot of nice built-in tools for performing rolling updates across your cluster. The tooling and processes are getting better and better. As I have shown here though, performing updates in a very serial and methodical way is always the safest way to patch your cluster. If you are also running Ceph HCI storage in your cluster, this adds an additional complexity that you need to make sure you handle with care but in general, you will be fine unless you reboot 2-3 nodes at once. Proxmox Datacenter Manager is showing promise in its ability to give visibility to updates, and I suspect it will get even more functionality around this in a future release. Also, third-party tools like PegaProx have great tooling to handle true rolling updates that are orchestrated by the tool itself. How about you? How do you handle your Proxmox updates?
Google is updating how articles are shown. Don’t miss our leading home lab and tech content, written by humans, by setting Virtualization Howto as a preferred source.
About The Author