I have been super geeking out on my home lab this week going all in on some nerd knobs of Proxmox clustering and Ceph storage between my cluster hosts. I have been a big fan of Ceph for quite some time since I have successfully used it in Docker Swarm the past two years or so and have gained a lot of respect and confidence in the solution. However, I have only used replicated data and not erasure coding with Ceph. So, with my new mini lab, I wanted to get my feet wet there. I wanted to see what happened if I took a small cluster of mini PCs, gave each one a dedicated NVMe drive and ran Ceph erasure coding in a real home lab environment. Let’s dive in!
The problem(s) I am trying to solve
As I mentioned I have used Ceph in a three-node configuration using replication only. A replicated pool with a size of 3 is simple to do, it protects your data, and it is predictable. The downside with this is space efficiency. You immediately lose two thirds of your storage! That is a pretty hard hit to take from your raw capacity. One small cluster with “now” expensive NVMe storage is pretty painful to lose that much storage right off the bat.
At the same time, modern mini PCs are pretty incredible in what they can handle from a CPU perspective. NVMe latency is low enough that the parity calculation cost of erasure coding is less noticeable as well that on spinning disks.
Also, I recently in this post showed the community how for me, Ceph storage won as my choice for Talos Kubernetes storage. I wanted to see if I could finally blend the two storage ideas and have local Ceph RBD storage for VMs and also from the same Ceph pool create a CephFS pool for Talos storage.
Also, another benefit – Ceph is “shared” storage between your hosts, so it gives you a “vSAN” like capability of software-defined storage and storage that allows you to have shared storage between your cluster nodes.
With all the developments in the area of mini PCs, fast storage, and Proxmox with Ceph, could erasure coding finally make sense in a small home lab if the hardware is fast enough? Could erasure coding finally make sense in a small home lab if the hardware is fast enough? For me, it was time to give it a try in the home lab.
The hardware layout
To make this even more interesting, I didn’t have 5 mini PCs that were all the same, but in true home labber fashion, we roll with the hardware we have. And, I intentionally wanted to see how viable this would be in a Proxmox cluster that had a lot of different hardware as we have to use most of the time building our lab and self-hosting environments.
The cluster consists of multiple mini PCs, each with its own dedicated NVMe drive that is used exclusively for Ceph. No OS partitions, no LVM sharing, no mixed workloads. Each node contributes exactly one OSD backed by NVMe. This design helps to keep latency predictable. Mixing Ceph OSDs with OS or VM workloads on the same disk would distort results.
Here are my current mini PCs that make up the cluster:
- Minix EU715-AI mini PC with 128 GB RAM, 22 cores, (2) NVMe drives: 1 OS and 1 OSD for Ceph
- Minisforum MS-01 with 128 GB RAM, 20 cores, (3) NVMe drives: 1 OS, 1 local NVM thin volume, and 1 OSD for Ceph
- Minisforum MS-01 with 96 GB RAM, 20 cores, (3) NVMe drives: 1 OS, 1 local NVM thin volume, and 1 OSD
- Trigkey S7 mini PC with AMD, 48 GB RAM, AMD Ryzen 7 7840HS with 16 cores, (2) NVMe drives: 1 OS and 1 OSD for Ceph
- Asus NUC 14 Pro, 96 GB RAM, 22 cores, (2) NVMe drives: 1 OS and 1 OSD for Ceph
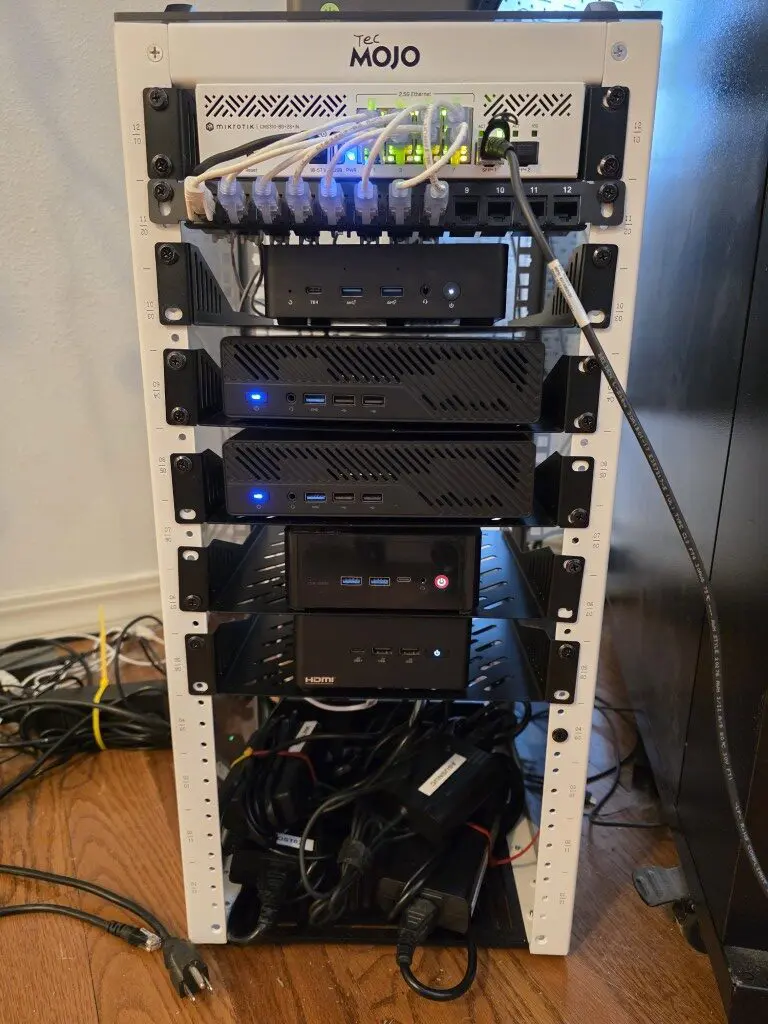
Networking is equally important. This cluster uses multi-gig networking. Right now, due to the mini PCs I am using, I am sitting on 2.5 GBps. I would rather have 10 Gbps networking for sofltware-defined storage. But that is just not possible with 3 of the 5 mini PCs that I currently have in the cluster. Also, I only have (2) 10 Gbps SFP ports on the Mikrotik switch that I am using in the mini rack.
However, three of the machines have (2) 2.5 GBps connections. I don’t currently have them bonded but that is the plan as part of my next project. Fast networking helps avoid bottlenecks in rebalance traffic and other traffic. Erasure coding amplifies network usage, so slow links are not good. I consider the 2.5 Gbps networking to be the bare minimum. Right now the performance is acceptable though as I continue to test.
Why erasure coding was worth considering with Ceph
Well, the main reason is this, space efficiency as I mentioned earlier. Replication with Ceph is very simple and you can do this with just 3 nodes. Erasure coding though is not simple in terms of how it works, but the useable space you gain is absolutely worth it in the home lab.
To give you a comparison, with five NVMe drives, replication gives you roughly two drives worth of space. Erasure coding with a reasonable k and m profile can give you three or more drives worth of usable storage.
My configuration
- Five hosts
- One dedicated 2 TB NVMe drive per host
- Raw capacity: 10 TB total
- Replicated pool uses size=2, which is common in home labs
- Erasure-coded pool uses a 3+2 profile
| Storage Model | Configuration | Fault Tolerance | Usable Capacity | Capacity Efficiency | Write Performance |
|---|---|---|---|---|---|
| Replicated Pool | 2 replicas | 1 node or drive | ~5 TB | 50% | Excellent |
| Replicated Pool | 3 replicas | 2 nodes or drives | ~3.3 TB | ~33% | Excellent |
| Erasure Coded Pool (my choice) | 3+2 (k=3, m=2) | 2 nodes or drives | ~6 TB | ~60% | Moderate |
How Ceph erasure coding behaves in my home lab
With Ceph erasure coding it is important to understand the tradeoffs between it and replication. The most important thing to realize is that there is write amplification with erasure coding, meaning writes are more expensive. Reads are usually fine. Recovery can be slower with erasure coding.
In Ceph erasure coding, data is split into k data chunks and protected by m parity chunks. You will see these written as k+m. The value of k determines how much usable data each object has, while m determines how many failures that happen at the same time the pool can handle. Increasing m boosts the fault tolerance but also increases write amplification and overhead so that will affect your performance.
In this cluster, I intentionally chose a profile with k=3 and m=2 instead of a more conservative m=3 configuration that you see in production.
With this layout, the pool can tolerate the loss of two NVMe drives or two entire nodes while still giving me better usable space than higher parity options. By lowering the parity count, it also lowers writes and helps keep latency low, which is great for mixed workloads. Below is a table that compares my choice with others.
| Configuration (k+m) | Data Chunks (k) | Parity Chunks (m) | Fault Tolerance | Usable Capacity Efficiency | Write Overhead |
|---|---|---|---|---|---|
| 3+1 | 3 | 1 | 1 node or drive | High | Low |
| 3+2 (my choice) | 3 | 2 | 2 nodes or drives | Very good | Moderate |
| 3+3 | 3 | 3 | 3 nodes or drives | Lower | Higher |
But, the saving grace is when you run a home lab with Ceph erasure coding on NVMe drives. The write amplification is less noticeable on NVMe. Parity calculations do use CPU, but with modern CPUs that I have in the mini PCs I am using, they barely notice the extra load.
How I Installed and Configured It from the Command Line
I following the official guidance from Proxmox on configuring Ceph erasure coding. You can read that documentation here: Proxmox VE Administration Guide.
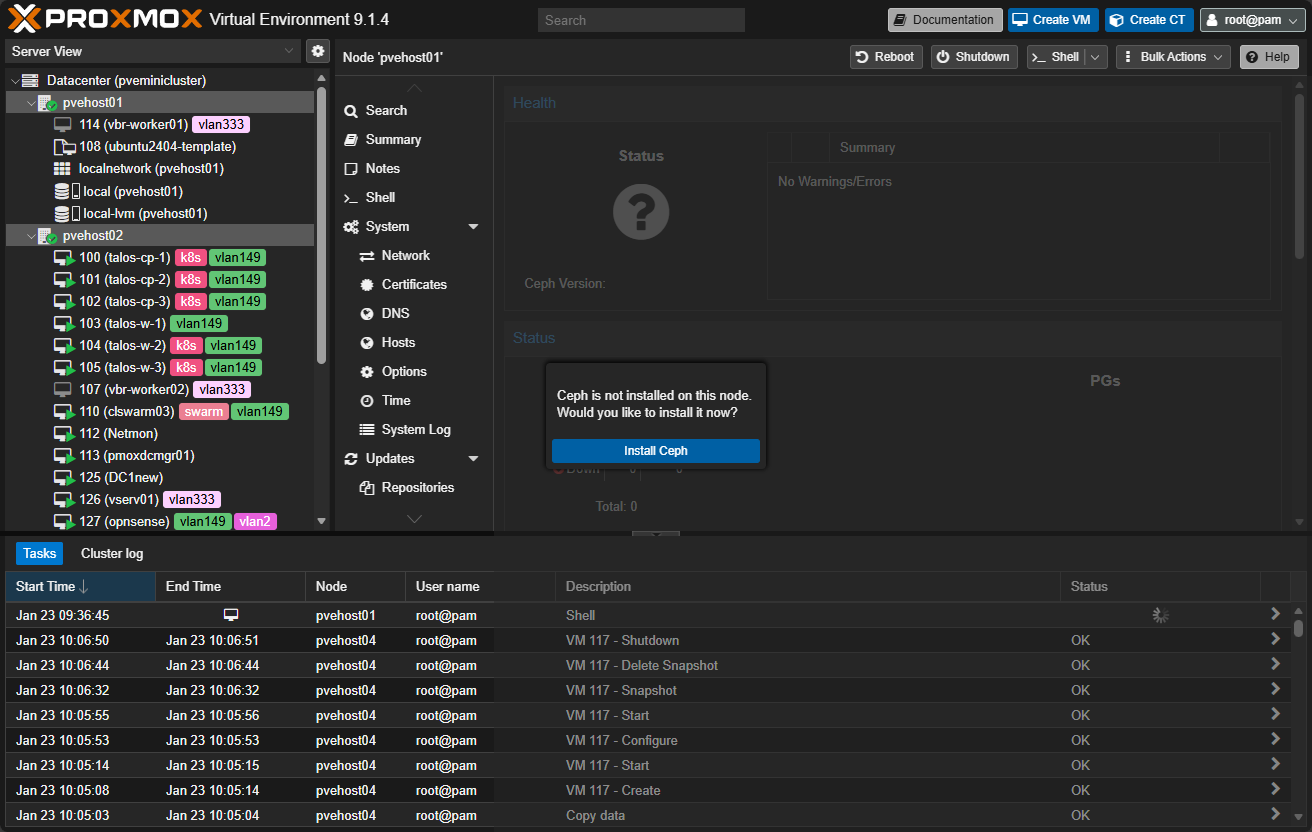
First of all, you will need to install Ceph on your Proxmox nodes. I have a detailed write up on how to do that here: Mastering Ceph Storage Configuration in Proxmox 8 Cluster.
Step 1: Prepare the NVMe Disks
On each node, identify the dedicated NVMe device and wipe it completely.
lsblk
wipefs -a /dev/nvme0n1
sgdisk --zap-all /dev/nvme0n1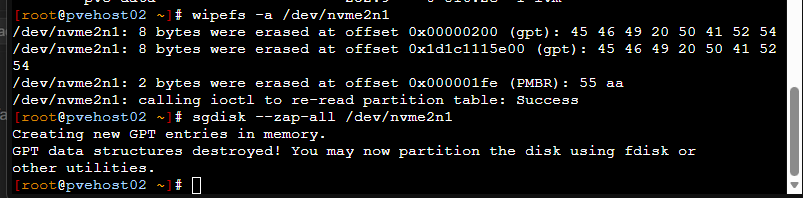
Confirm the disk has no partitions or signatures remaining.
Step 2: Create OSDs
Create one OSD per NVMe device.
ceph-volume lvm create --data /dev/nvme0n1Repeat this on each node. Verify OSDs are up.
ceph osd tree
ceph -s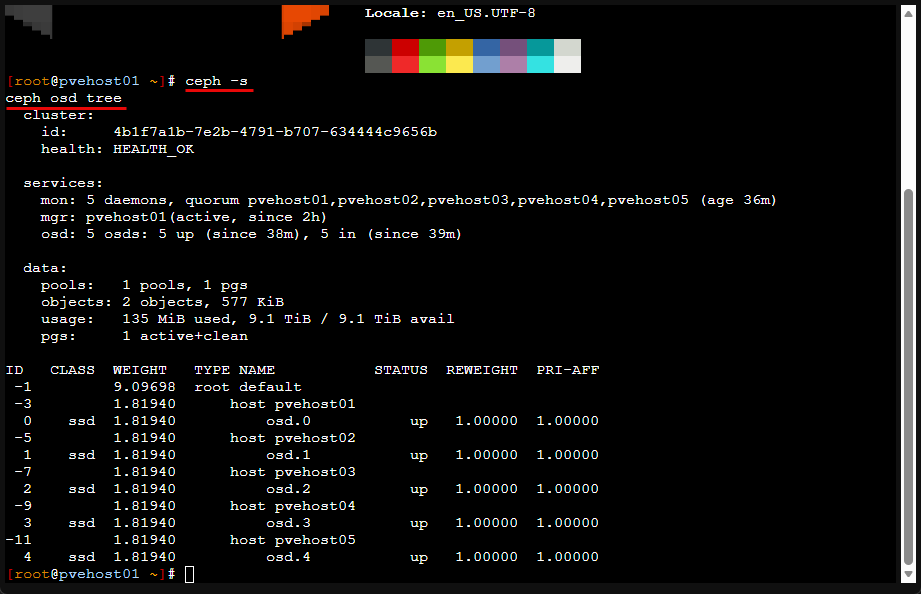
Step 3: Create an Erasure Coding Profile
Choose a k and m value appropriate for your node count. For example, with five nodes, a 3+2 profile works well.
ceph osd erasure-code-profile set ec_nvme_profile k=3 m=2 crush-failure-domain=hostThis ensures parity chunks are spread across hosts, not just disks.
Step 4: Create the Erasure Coded Pool
Create the pool using the erasure coding profile.
ceph osd erasure-code-profile set ec-3-2 k=3 m=2 crush-failure-domain=host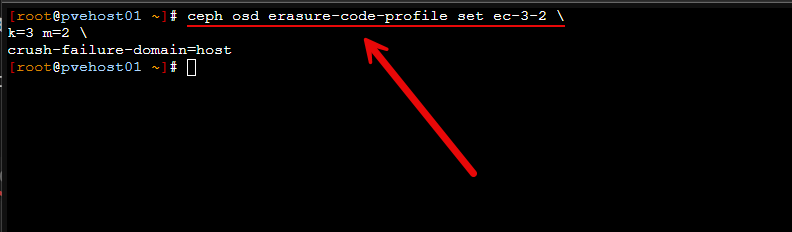
You can check that it actually set by running the command:
ceph osd erasure-code-profile get ec-3-2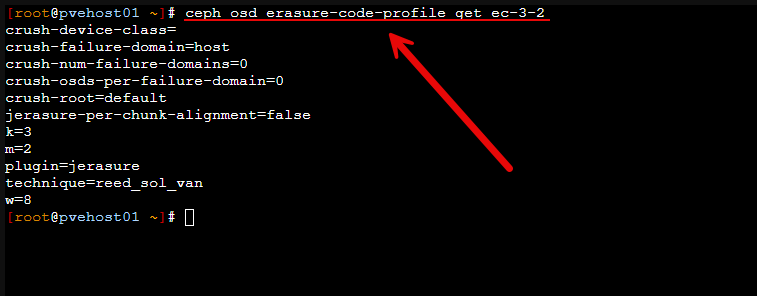
Next, create the actual pool that ceph rbd will use, and set the m= size. Here I am setting a size of 2. Then enable the application.
ceph osd pool create rbd_vm 64

ceph osd pool set rbd vm size 2

ceph osd pool application enable rbd_vm rbd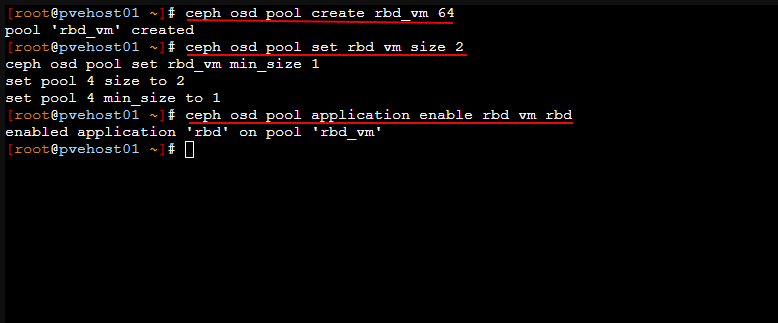
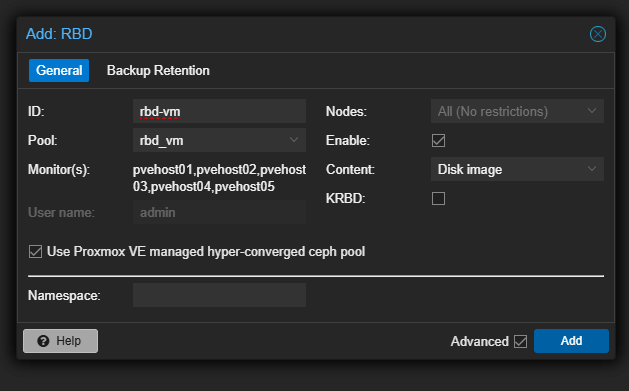
The final bit that we have to do is actually adding this pool in the GUI for each host. Navigate to Datacenter > Storage > Add > RBD. You need to set:
- ID
- Pool name (will be the name you created from the command line command above)
- Monitors should be selected from your Ceph installation
- Leave Use Proxmox VE managed hyper-converged ceph pool selected
- Enable (checked)
- KRBD (unchecked)
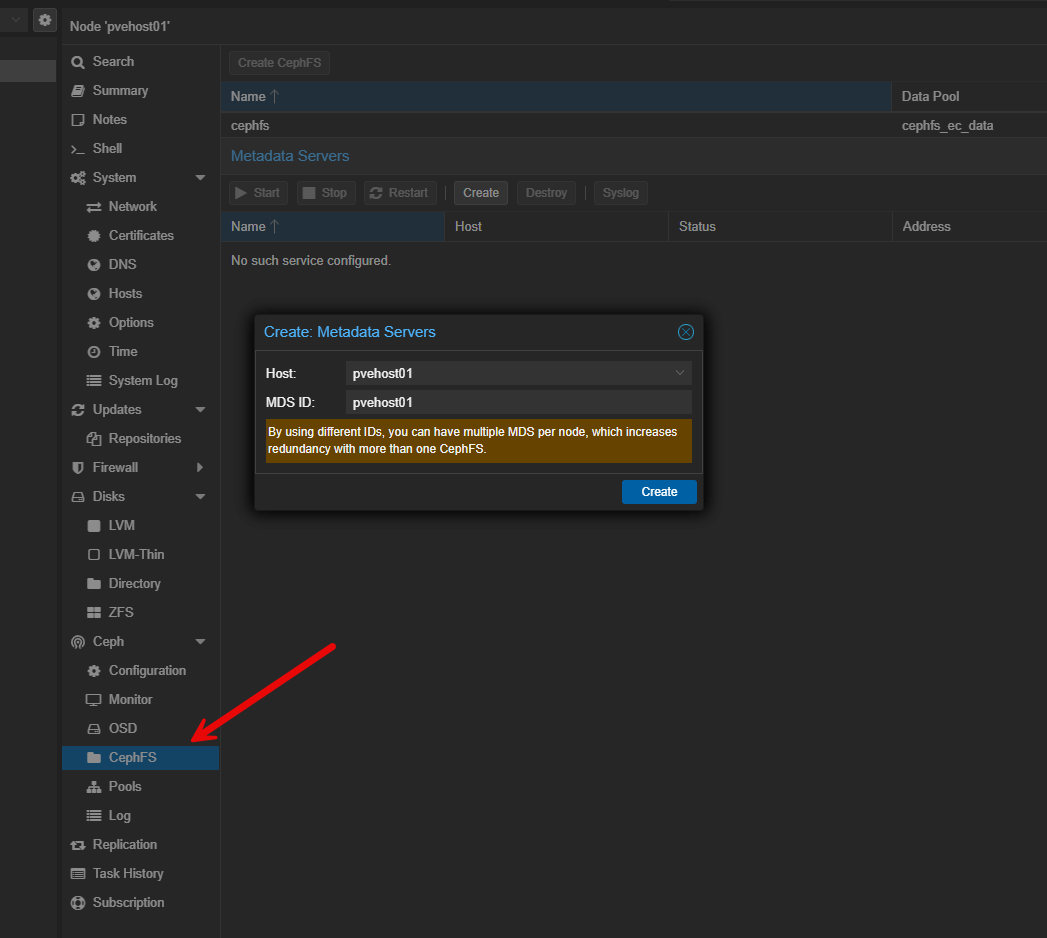
Step 5: Create a Replicated Metadata Pool if Using CephFS
CephFS requires a replicated metadata pool. Do not use erasure coding for metadata. The second command below allows an erasure-coded pool to accept overwrite (in-place write) operations. If you want to run CephFS on top of CephFS data pools and have these work right.
ceph osd pool create cephfs_ec_data 128 128 erasure ec-3-2

ceph osd pool set cephfs_ec_data allow_ec_overwrites true
After you create your CephFS pool, you need to add metadata servers which is required for CephFS. You need two servers, an active, and a standby. Just add a couple and Ceph will take care of designating which one is active and which is standby.
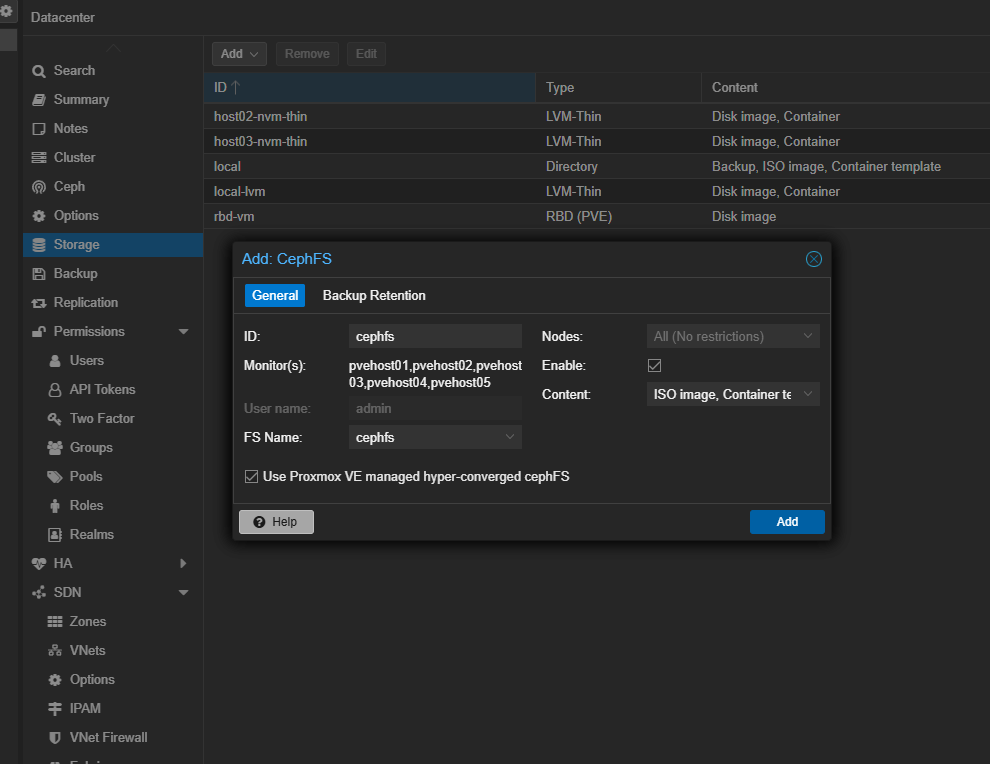
Finally, add your CephFS pool like you did for the Ceph RBD pool.
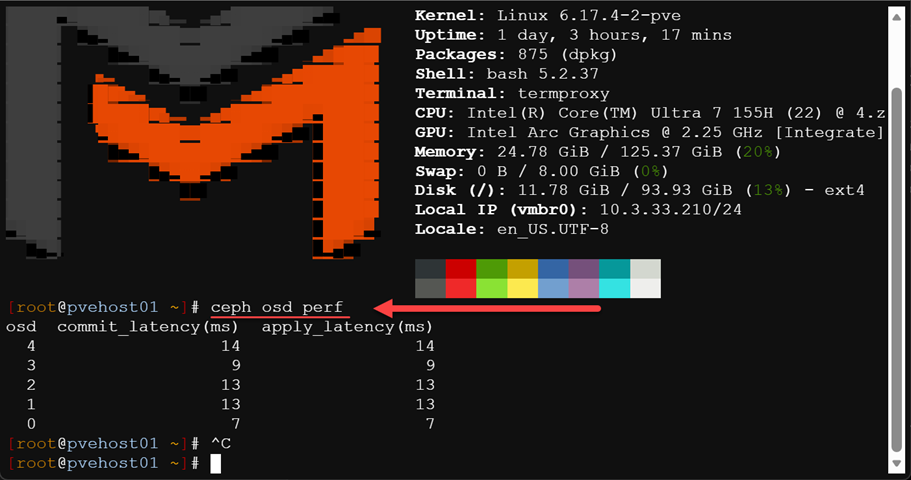
Performance so far?
Performance has been very good so far. You can take a quick look at the commit and apply latencies and these should be close together. Here we can see latency in the low teens which is good for erasure coding in the home lab.
Wrapping up
I am super excited to have a full Ceph erasure coding home lab setup now in my mini cluster and move forward with this for my main shared storage. I think with the power of today’s mini PCs and fast NVMe drivers, this is no longer just an option in the enterprise. If you have shied away from running Ceph in the home lab due to the amount of storage space you lose, erasure coding makes this doable without losing the majority of your space like you do with only replication. Let me know your thoughts. Is this something you want to give a try in your lab?
Next steps, I am going to pivot my Talos Cluster to use the native Ceph storage for the target of my Ceph CSI installed in Talos. Stay tuned!
Google is updating how articles are shown. Don’t miss our leading home lab and tech content, written by humans, by setting Virtualization Howto as a preferred source.
About The Author