Since I have been playing around a LOT lately with Proxmox and software-defined storage, there was another configuration that I wanted to test in my Proxmox environment. That was LACP on the networking side. Networking is extremely important when ti comes to home lab performance, especially on the storage side. LACP is a technology that has been around forever that allows you to bond together multiple links for faster throughput. Let’s look at LACP in Proxmox home lab configurations and see how you can set this up.
Why LACP?
When you upgrade your CPUs, add NVMe storage, suddenly your network gets put under the microscope. Especially when you are doing software-defined networking, the network is at the heart of how well things perform and work. This was the point where I found myself.
LACP, or Link Aggregation Control Protocol, takes multiple physical network interfaces and “bonds” these together into a single logical interface. From the operating system and switch perspective, this looks like one higher throughput link instead of several independent ones.
Here is a good Reddit thread on LACP: Explain like I’m 5- Link Aggregation? : r/HomeNetworking
Here are a few of the benefits of LACP:
- Bandwidth aggregation – One virtual machine might not need more than a single 1 Gb or 2.5 Gb link, but dozens of VMs, storage replication, migrations, and backups absolutely can. LACP lets you have multiple devices share total bandwidth across multiple physical links.
- Resiliency – If you accidentally unplug a cable, port goes down, or NIC fails, traffic will still keep flowing over the other links in the bond. This is not high availability in the clustered sense, but it is fault tolerance at the network layer.
- No multiple interface juggling – You have only one logical interface to deal with like vmbr0 and is easier to deal with than multiple bridges. In a way it simplifies your Proxmox networking model once you get past the complexity of setting up LACP.

One of the other reasons I started looking at LACP is that I took a bit of a step back in my configuration with the mini cluster since I added additional machines that had only 2.5 Gbps connections instead of 10 Gbps. I have gotten really used to 10 Gbps networking over the past few years in the home lab, so this was a bit of a hard downgrade to go back to something that was slower in speed.
Since I have multiple Proxmox server hosts, lots of east west traffic and storage replication, pushing all of these packets leads to loading up the network very heavily, even if it is 2.5 Gbps. On paper, LACP looked like the obvious way that I could add more throughput, even though I was working with slower connections on the mini PCs I was using.
However, there are some nuances with LACP that are definitely tricky unless you go in eyes wide open with your configuration.
What LACP actually improves and what it does not
LACP is an awesome feature and capability of Proxmox and modern managed switches, but it doesn’t magically increase the speed of a single TCP or UDP stream when you compare this to a faster single connection like 10 Gbps. In other words, a single VM copying a file to another VM will still be limited to the speed of one of your physical links.
But the difference is in what LACP does improve. That is aggregate throughput. For instance, if you have multiple VMs talking at the same time or being migrated for instance, these can be spread across multiple links. Storage replication traffic can use one path while VM traffic can use another. If you have migrations happening at the same time as backups, this is another example.
So, in a Proxmox cluster, when you have multiple connections or activities happening at once, this is when you can truly benefit from LACP and I think it justifies the effort in configuration to add it to the home lab.
Keep in mind that LACP does not help with latency in your network. And it does not reduce packet processing time. It doesn’t fix slow switches, or fix poor network drivers. These problems are ones that you need to solve another way. Don’t use LACP as a band aid for those types of problems. When it is used to solve the right challenge it can be a great feature.
A quick checklist of use cases that you might think about LACP for:
- You have three or more Proxmox hosts with frequent east west traffic
- You run Ceph, shared storage, or replication heavy workloads
- You routinely migrate VMs or containers between nodes
- You want redundancy without adding more switches or VLAN complexity
If you haven’t seen it yet, check out my post on my ceph erasure-coded NVMe cluster in the home lab here:

If you are running a single Proxmox host or light workloads, LACP is probably unnecessary and adds complexity without benefit.
Configuring and setting up LACP in Proxmox safely
There is one thing that you need to know about LACP. You need to configure things in tandem and have your configuration ready to go before you pull the trigger on either side. If you implement the configuration on your Proxmox host before you have the switch side ready, you risk disconnecting yourself and taking the connection down. Same goes for the switch side. Understanding this order matters. Have a game plan and think through the steps before you do them.
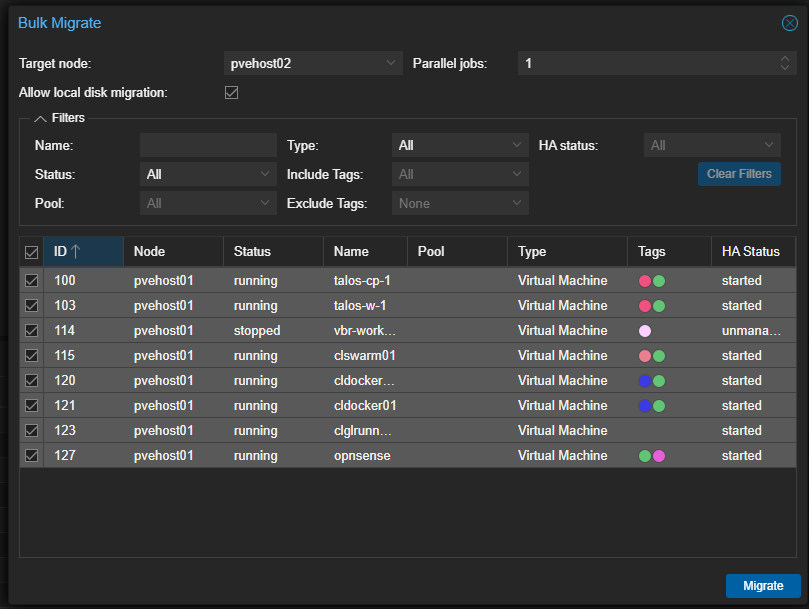
Also, what I did before I implemented LACP with Proxmox and the Switch side is of course do the things that make sense first, like migrating off your virtual machines from the host you are actively working on and implementing LACP on.
This way, even if something does go sideways, you are at least only losing connectivity to that particular host and not all the workloads as well that are running on it. Below, I am initiating a bulk migrate from one Proxmox host to another.
Choose the right NICs and ports
What I like to do when setting this up is uplinking your Proxmox host into 2 contiguous switch ports so this is intuitive how they are uplinked. This also makes it easier to create the LAG when you are ready.
Pick identical NICs also on your Proxmox host. try if at all possible to pick NICs that are of the same vendor, same speed, same driver, same firmware, etc. Mixing NIC types is asking for trouble and you will likely see unpredictable behavior setting it up that way.
Pick switch ports that are on the same switch and in the same VLAN configuration. LACP also not span multiple switches unless you are using technologies like MLAG or stacking, which adds another layer of complexity.
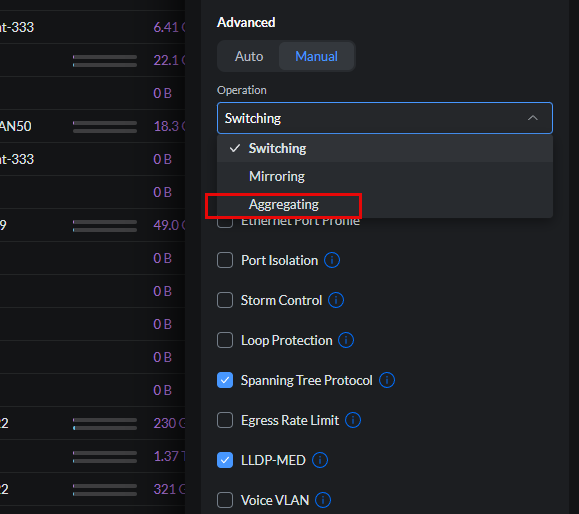
Below is an example of using a Unifi switch and seeing a particular switch port to the operation mode Aggregating.
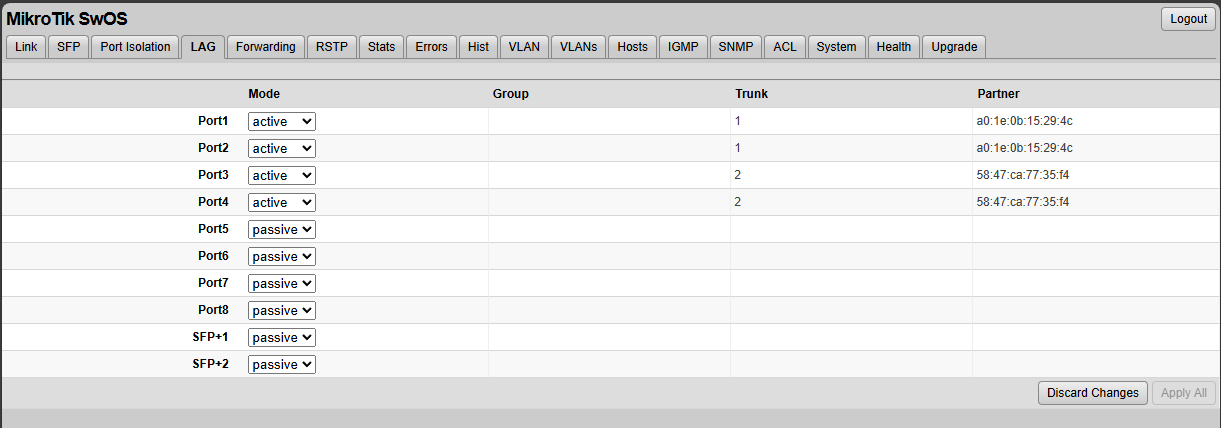
Below is a view of the actual switch I was using for this experiment, my Mikrotik CRS310-8S-2N. You can see here in the SwOS that you simply set the port to Active on the LAG screen. It will then form a bond with the mini PC (server, etc) that you are using on the Proxmox side. In my opinion, the SwOS interface isn’t really that good. I didn’t like how it left me guessing what particular LAG I was working with. The Group field never populated? Not sure what this column is for to be honest or if it is a relic from a previous version.
Different switch vendors are different in how they implement this, so be sure to follow the documentation for your particular switch manufacturer and the workflow to enable LACP. Most vendors use the notation Active bond to denote LACP. A static bond is usually a non-LACP statically assigned link aggregation which you don’t want to do.
Create the bond on the Proxmox host
What I did above was had the switch ready to apply the changes. So I set the Mikrotik to Active for the two ports I was working with and left it set and ready to apply. Then I went to my Proxmox host and got the configuration ready there as well.
Below, you can see the relevant bond configuration in the config below. I am also setting the MTU size to jumbo frames while I am at it. So the way this works is you configure an interface called bond0 and then setup the bond interface with 802.3ad (LACP) and the hashing policy, MTU, etc. Then on your vmbr0 bridge, you define the bridge-ports to be bond0.
After you set your config you need to run an ifreload -a command to apply it.
auto lo
iface lo inet loopback

iface enp44s0 inet manual
    mtu 9000

iface enp45s0 inet manual
    mtu 9000

auto bond0
iface bond0 inet manual
    bond-slaves enp44s0 enp45s0
    bond-mode 802.3ad
    bond-miimon 100
    bond-xmit-hash-policy layer3+4
    mtu 9000

auto vmbr0
iface vmbr0 inet static
    address 10.3.33.210/24
    gateway 10.3.33.1
    bridge-ports bond0
    bridge-stp off
    bridge-fd 0
    mtu 9000

source /etc/network/interfaces.d/*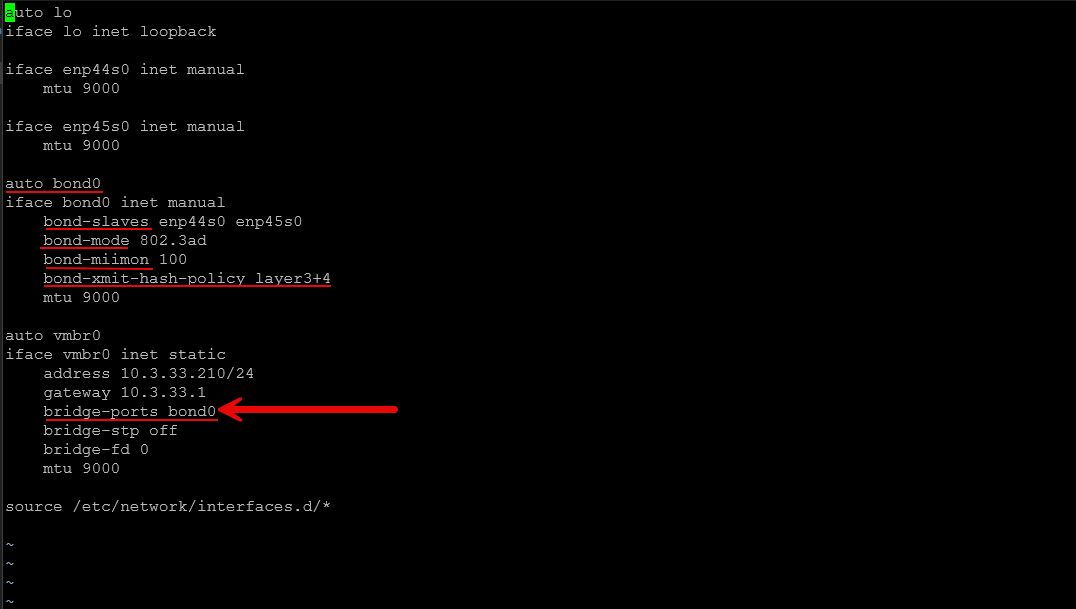
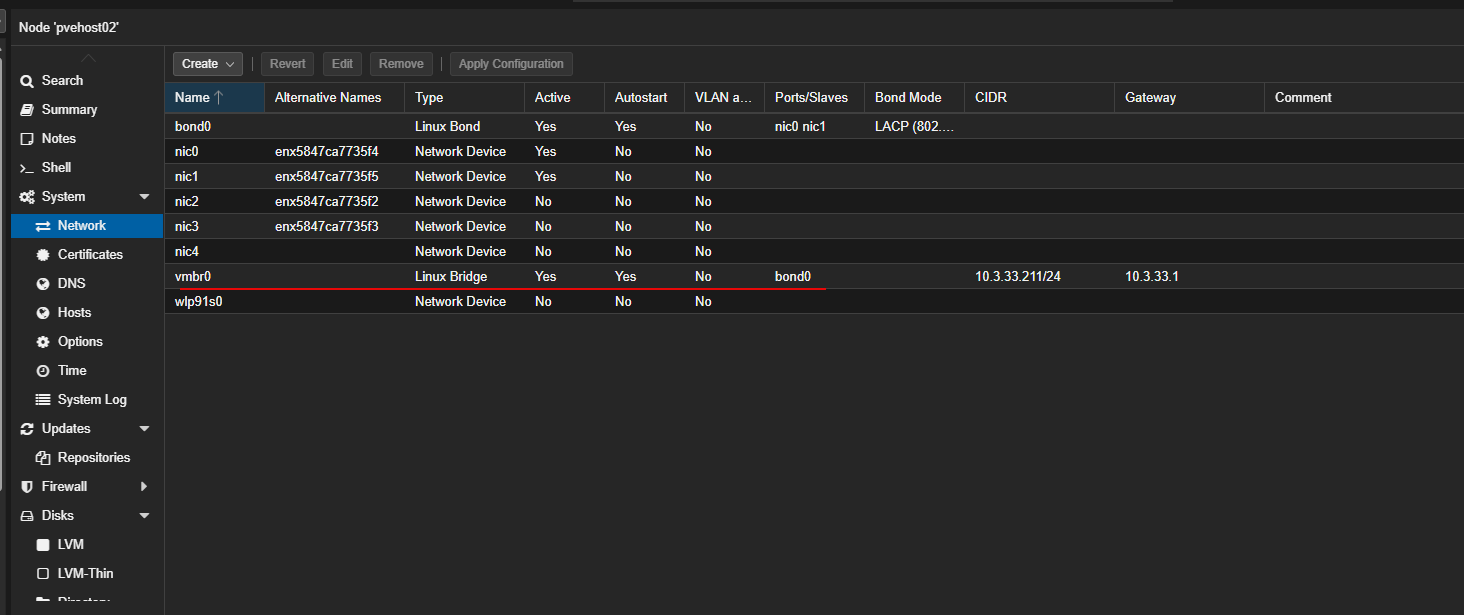
When you look at it int the Promxox web UI, you will see the same here.
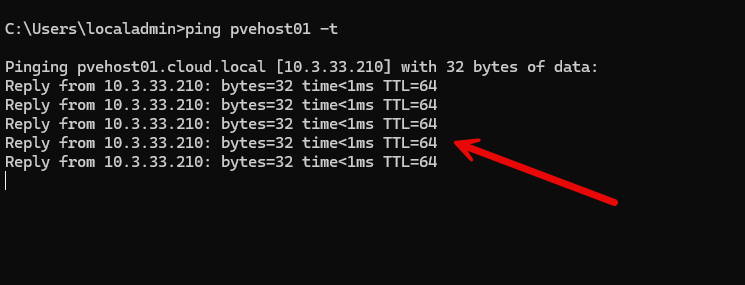
Confirm connectivity before configuring your other hosts
Make sure your host that you are configuring comes up ok and starts pinging with LACP configured. I let my hosts settle for a few minutes before moving on to another.
A few ideas of things to check after you introduce LACP on the links:
- You can reach the host management IP
- VMs still have network access
- Switch shows active LACP members
- No packet loss or excessive errors are logged
Only once one host is stable should you move to the next. Below, I am pinging my host that I configured with LACP and it returns pings successfully.
Don’t learn LACP lessons the hard way
LACP is fairly easy to implement, but it is very unforgiving. One mismatched setting is all it takes to break things or isolate a host. Be sure to go over your config a few times before you apply it.
The biggest surprise was how unforgiving partial LACP configurations are. One mismatched setting is enough to break connectivity even if everything looks correct at a glance. Make sure you have access to the console of the server you are working with. I would NOT recommend trying to introduce this type of change working remotely, unless you like to live dangerously 🙂
Wrapping up
Since implementing LACP with my Proxmox cluster hosts, I have seen a bump in throughput, especially when running multiple operations at once. This is critical when using Ceph storage I think since there is already a load on the network just for software-defined storage operations that Ceph performs.
If you approach it deliberately, configure the switch first, make changes in tandem, and verify each step. LACP can be a solid upgrade that grows with your lab instead of complicating it and the best part is, for most, it doesn’t require any additional hardware. Many switches support LACP and if you have two NICs in your Proxmox host, you can implement it without an issue following the recommendations we have listed here. What about you? Are you running LACP with your Proxmox hosts in the home lab?
Google is updating how articles are shown. Don’t miss our leading home lab and tech content, written by humans, by setting Virtualization Howto as a preferred source.
About The Author


I honestly tried LACP but I had some funky networking issues after I implemented it at the hypervisor level. Not sure I want to go back down that road again.
Hi there,
On my side, I have 2 different experiences:
– in my homelab : saddly, Unifi never implemented LACP accross switches. I have 2 Agregation Pro switches and LACP would really shine accross 2 physical switches, giving all kind of redundancy. I have LACP configured on a few hosts that doesn’t require network redundancy (like a pair of firewalls that are spread on each switch.
– at work: even if not really “best practive” for vSphere, I HAD TO configure LACP on some interfaces because with the normal standard interface setup, Extreme Network switches were kind of “not working” and we were experiencing a lot of lost packets from the VMs.
So I would say “it depends”, sometimes, keeping it simple is better even if LACP is not that complicated! 😊
Franck,
I totally agree with what you said here. Keeping things simple is “usually” always the best approach. I have definitely had my share of mixed results with LACP in production and home lab, some funky behavior, and other things. I think also, as you mention, it depends A LOT on the hardware vendor, switch capabilities, etc.
Brandon
Also, Franck I am sure there is a good story there you have worth telling about the packet loss, extreme switches, etc. I use Extreme basically daily. They have grown on me as a vendor. But they have some quirks.
Brandon
So, I also like to configure a non-LACP path to the GUI. I do this by creating another bridge with assigned IP (a new IP, so there are actually two IPs that will access PVE) and assign it to a NIC that is not connected to LACP.
Why do I do this? While it is extremely rare, occasionally a switch goes down. And when you are doing a panic switch replacement, you don’t want to find you can’t access your hosts because you don’t know at that moment how LACP was set up and to which ports. You can just put in a replacement switch and still access your hosts until you get LACP set up. You can even re-assign VMs to use the alternate bridge if you need to until you get the network straightened out.
Especially those old Cisco switches. The flash gets old. Someone does a firmware update and you are waiting and waiting for the switch to come up. It doesn’t always. And then you are toast.
Leopold,
That is a great idea and definitely a worthwhile fail safe. I have definitely seen my fair share of LACP weirdness as well, depending on the switch vendor, etc. You always want to have a “parachute” type configuration that allows you to access things when they are not working as expected and you are right to call out LACP as one of those. When it works it is great, when it isn’t working, it can be a nightmare.
Brandon
Nice article Brandon! As an old Cisco and VMware guy, I would say I have used LACP on many occasions, but I rarely used it with virtualization. Path selection was built in for VMware storage and lacp was actually not best practice. I am just beginning my proxmox journey as a VMware refugee so I am open to doing things a new way on a new platform. I think of LACP as a way to increase bandwidth on inter switch links in a layer 2 environment to prevent links from being disabled by spanning tree and much less useful in this situation.
Rob,
Great insights here! You are on my same journey. I “grew up” in tech with the early VMware days and have been through all the iterations. Feel like it is a shame what has happened. I still love the product, but Broadcom has unfortunately gone the way of making it inaccessible I think for most, outside of the largest organizations. I am with you on LACP. I had some odd LACP issues using LACP with VDS. Even though it worked for the most part, it just had some quirks. Definitely keep us posted on your journey with Proxmox. I think you will like it more and more when you get into it.
Thanks Rob!
Brandon
I always use LACP and it is really worth the effort. It is usually much easier to configure it right from the start when you are setting up the hosts, instead of later. I am running a 3 hosts xcp-ng+XOA with 2x 10G LAGG backed by 2 TrueNAS server also with 2x 10G LAGG. All hosts and servers linking up to 2x MikroTik CRS312 with MLAGG. This provide switch and port redundancy. I suggest to start using RouterOS for your switches which unlock much more features (Eg. MLAGG. ipv6, proper RSTP, L3HW, etc) and with LTS for the new ROS 7.21. SwOS is ancient. ROS is very approachable when you come from Cisco CLI.
Tan,
Great insights here. I am definitely considering going back to SwOS. I am actually more used to RouterOS with Winbox than I am SwOS. But, I was just keen on trying it since I didn’t realize my Mikrotik switch supported it, so wanted to give it a try. Definitely will give it a go again in RouterOS. Also, how are you liking XCP-ng with XOA? I am always curious what leads to ones choosing one platform over another. I honestly really like XCP-ng, especially the new look of XOA 6 and XOLite. Would love to see Proxmox implement a similar UI uplift.
Brandon
I deploy xcp-ng+XOA for my production and enjoying it. Interface and features boils down to your subjective taste and use case, xcp-ng just speaks to me much better and came forward as user friendly as compared to Proxmox. You just need to tune your understanding on the different terms and features. Tom from Lawrence Systems is a good resource to dive deeper and learning the ropes. It is like Proxmox + PBM + Proxmox DC manager, all in one.
Tan,
Right on. I have massive respect for Tom, great resource and channel! What I know about XOA and XCP-ng I learned from his vids and playing around in the home lab.
Brandon