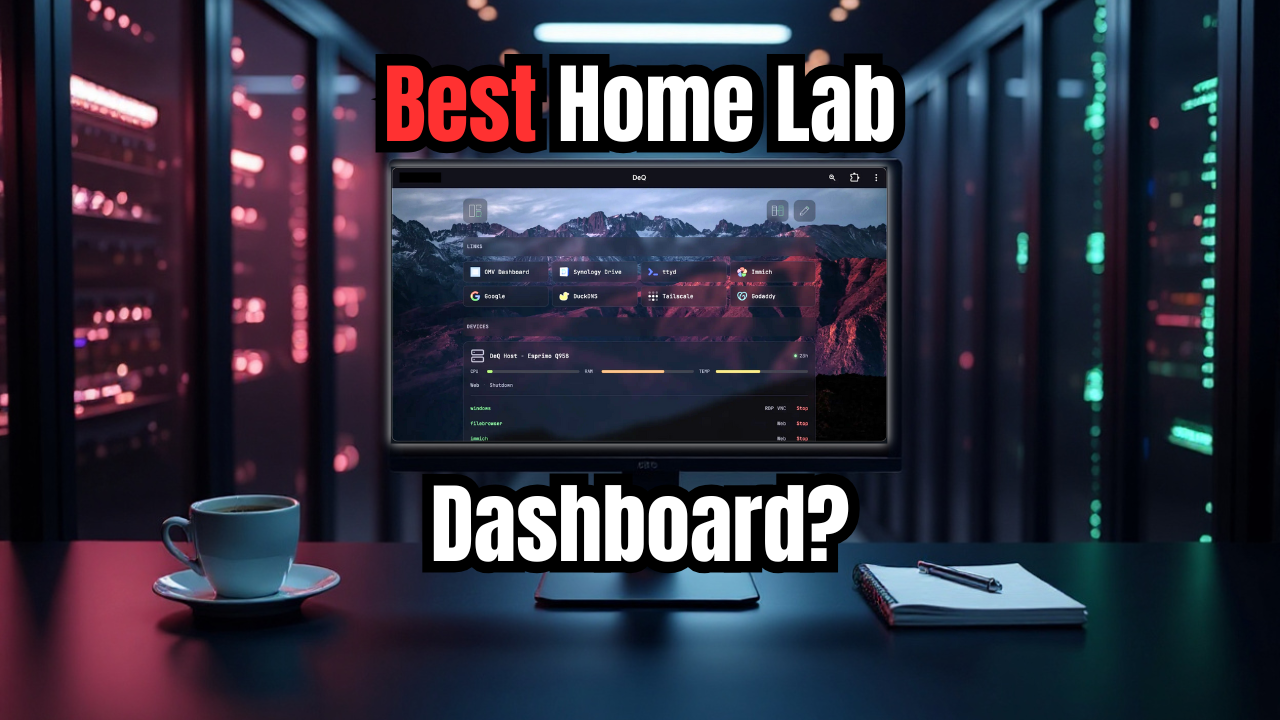
Most of us have tried many of the home lab dashboards that are out there. I know I have been through the common list of them available. And there are definitely things I like about each one of them. When I saw the new dashboard called Deq, it got my attention as it promised to be a much lighter weight and easy solution to get up and going. Plus it had some really nifty features that were touted about the solution. Let’s see why Deq might be the simplest home lab dashboard ever built to date and how you can run it in just a couple of minutes.
Challenge with many home lab dashboards
When you start self-hosting lots of services and apps in your own private cloud at home, most start wanting an easy way to access those services and have a launch page so to speak to access your relevant links. Many home lab dashboards are available that do this. However, many of them require Docker stacks, databases, heavy JavaScript or YAML editing. However, Deq is a dashboard that flips this idea on its head and is a much simpler approach.
What is Deq?
Deq is a new home lab dashboard that runs from a single Python script that the developer mentions is under 300 KB in size, so definitely lightweight. Even though I like dockerized solutions, these can be a chore to get your compose code right and you sometimes have to work with ports and stringing your containers together if they require more than one.
Deq just runs on a machine (could be a Linux VM, or even an LXC container) or bare metal that only needs Python installed. If you want to have a quick way to centralize and have a launch pad for your services, I think this might be the best option out there, especially for those just getting started.
One interesting point to note is that it is specifically not meant for Docker. Instead it is meant for a low-power device that is already running online 24/7. The developer had specific things in mind when designing the solution and the WOL features and file manager need to run on a host. So there were some limitations there to think about when considering Docker.
Take a look at the concept for the project: https://github.com/deqrocks/deq?tab=readme-ov-file#concept
It’s designed for low-power devices that are already online 24/7 – a Pi, a mini PC, an old laptop. These devices give you always-on access to your homelab via Tailscale or LAN, without the overhead of a full server.
Docker would require a host capable of running Docker in the first place, plus workarounds for features that need direct hardware access: Wake-on-LAN requires raw sockets, the file manager needs your filesystem, SSH and rsync run as host processes, and shutdown commands don’t work from inside a container.
I think great solutions are often born from necessity. From the words of the developer:
I built DeQ because I couldn’t find a tool that combined the features I use daily: Wake-on-LAN, file transfers, scheduled backups — all in one place I can configure on my phone while the coffee brews. My homelab runs on a Fujitsu Esprimo with 4W idle. But spinning up VMs means 40W — and with European electricity prices, that adds up. DeQ helps me keep servers off until I actually need them. There are great dashboards out there, each with their own approach. DeQ is simply the one I built for myself. Maybe it’s the right fit for you too.
The official project page is found here: deqrocks/deq.
More detail on the differences with other dashboards
I think the biggest selling point for Deq is the simplicity of the solution. Without the need for a container, orchestrator or web server, etc, you only need the Python script. Then, Deq serves the dashboard directly. Due to this extremely small footprint and simplicity, it is blazing fast. So you could definitely host this on something like a Raspberry Pi or old mini PC. Really, any old hardware you have laying around. Or again, just spin up an LXC and your off.
The data is static in your configuration. So with this approach there is nothing to break that is dynamic to the solution. Many solutions try to autodetect services or poll endpoints for health checks. However, Deq purposely leaves that to your monitoring solution. After all, that is what those are for. Instead, it focuses on the layout and keeping things fast and simple. For many, I think this is exactly what you want for a dashboard.
Deq architecture and how it works under the hood
Deq runs from a Python script that starts a lightweight web server which serves the dashboard HTML and assets. The configuration file lives right beside the script and contains a hierarchical structure of sections. When the script runs, it reads the configuration, builds the dashboard layout, applies your styling choices, and presents a clean grid that fits to any size screen.
Because everything is static, the dashboard loads instantly and does not rely on JavaScript frameworks. You get a clean visual design and fast rendering without paying a performance cost.
Installing Deq home lab dashboard
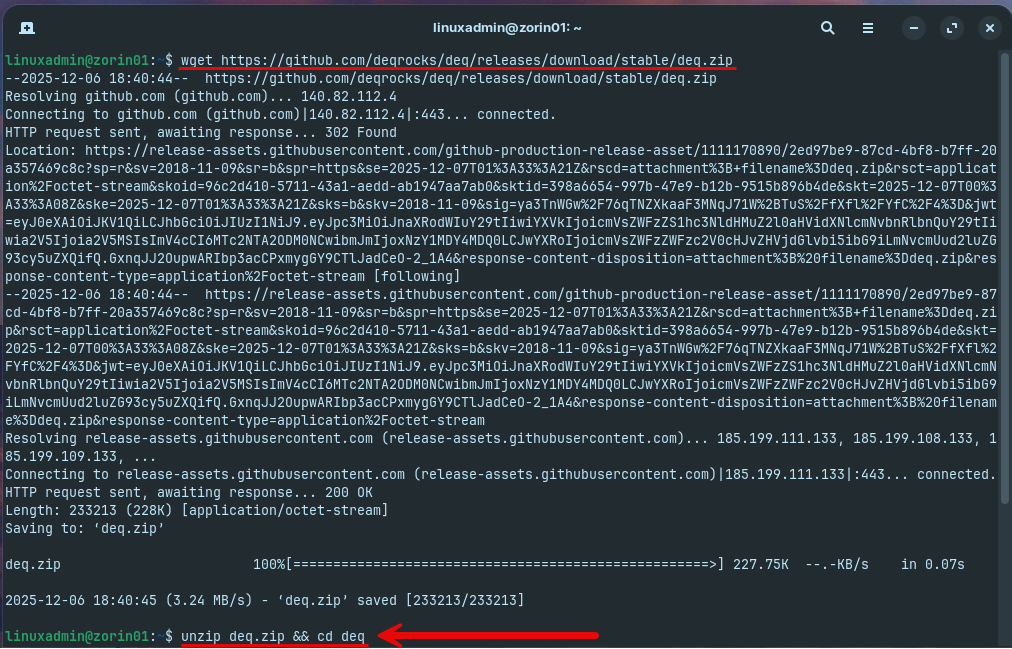
The installation is simple. Download the Python file, install Python 3 if needed, write a basic configuration file, and run it. That is all you need to get a professional looking dashboard running in your home lab. Let’s look at the process, which is, well, VERY easy. You just run these commands:
wget https://github.com/deqrocks/deq/releases/download/stable/deq.zip
unzip deq.zip
cd deq
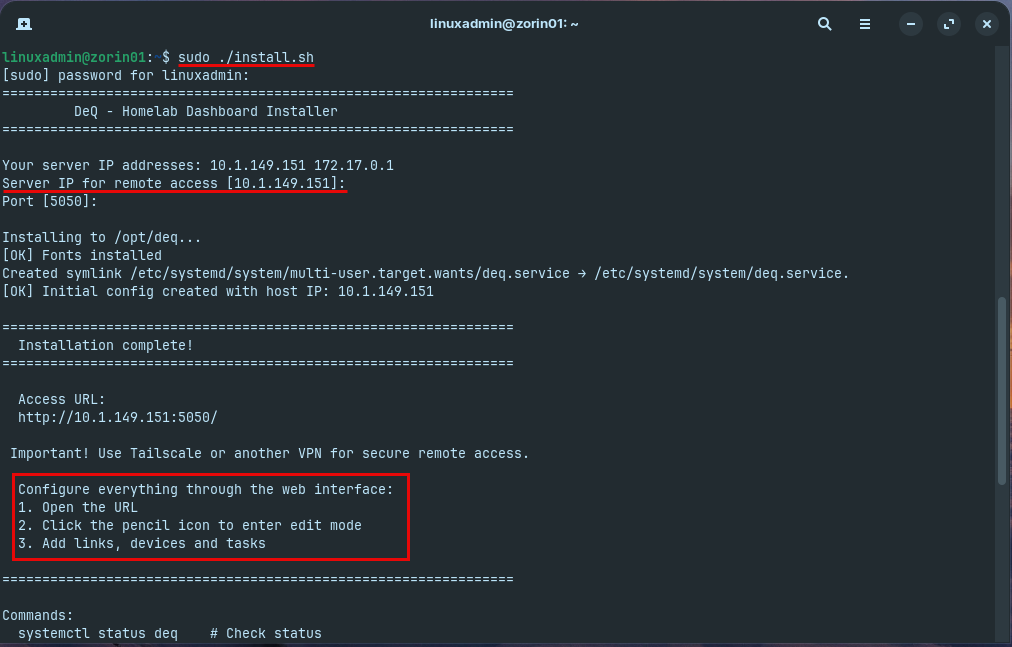
sudo ./install.shBelow, we are pulling down the latest stable .zip file for the Deq installation.
Below, I have extracted the .zip file and am running the install.sh script using sudo. You will see it request the server IP for your Deq installation. Then it will direct you to open the URL and edit the dashboard to get started.
Browsing to Deq and port
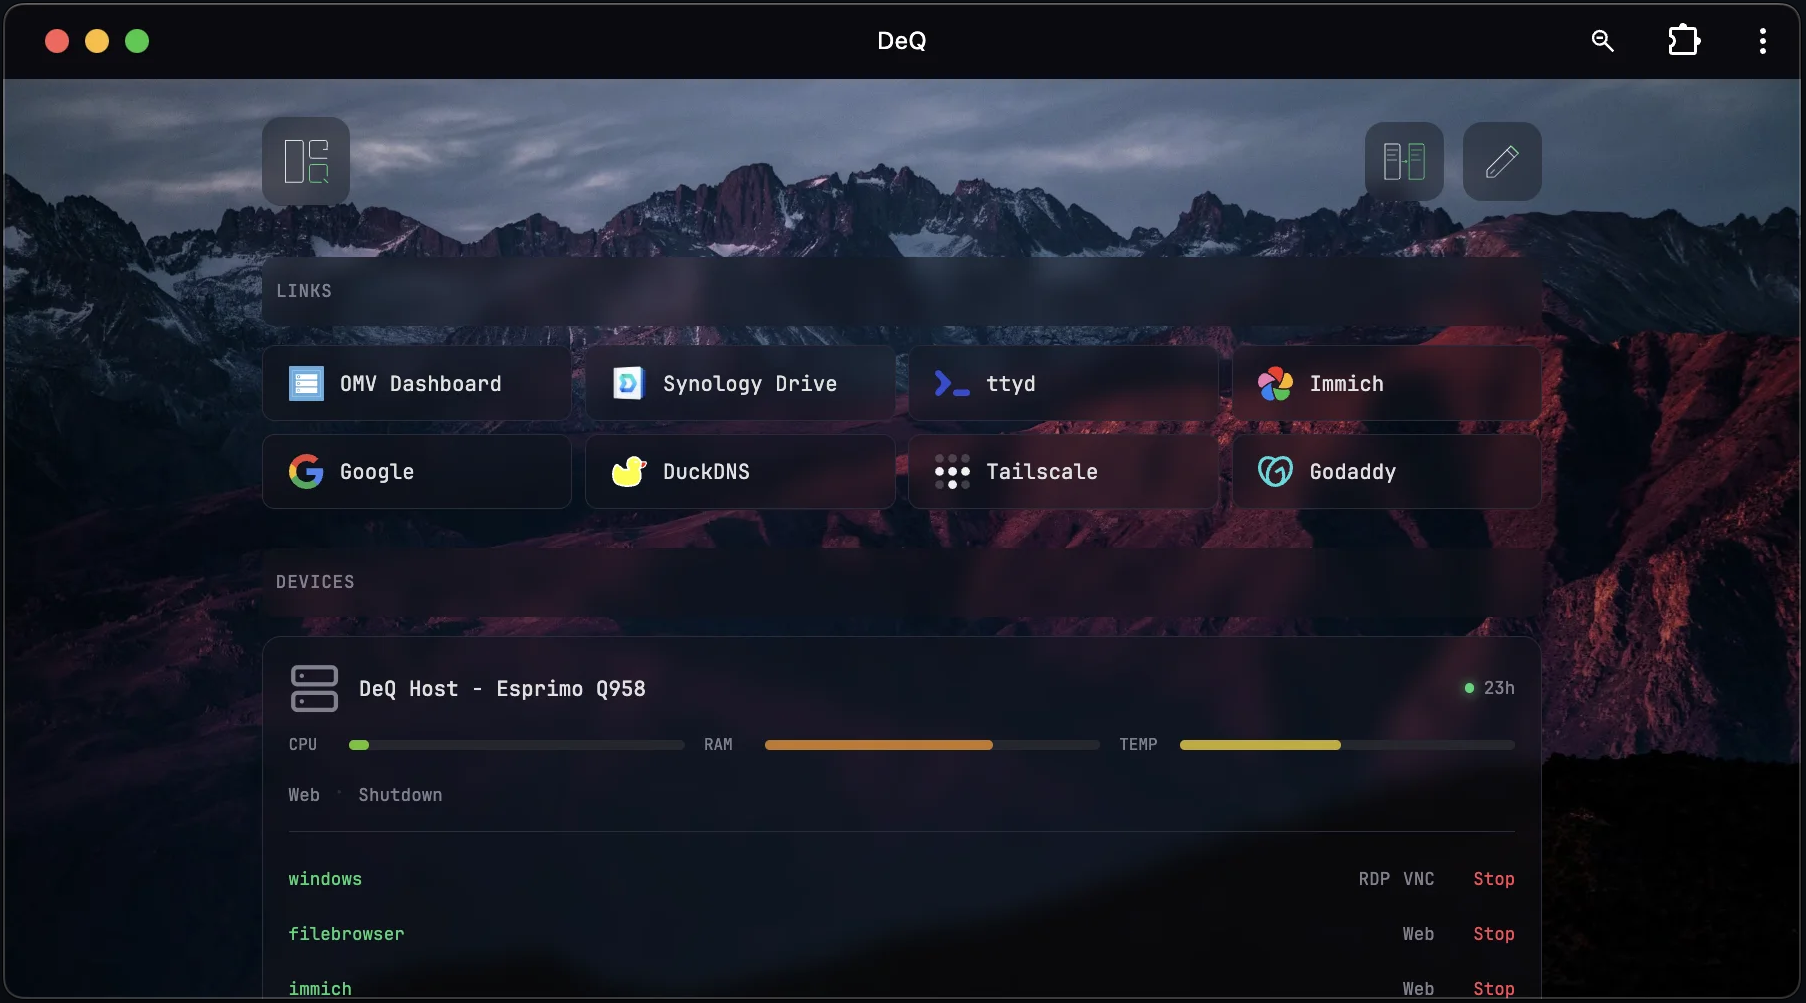
You can browse out to your IP and port 5050 to access the Deq dashboard. Below is the default screen that shows up when you browse out to your new Deq installation. Here I am click the + sign next to the scheduled tasks.
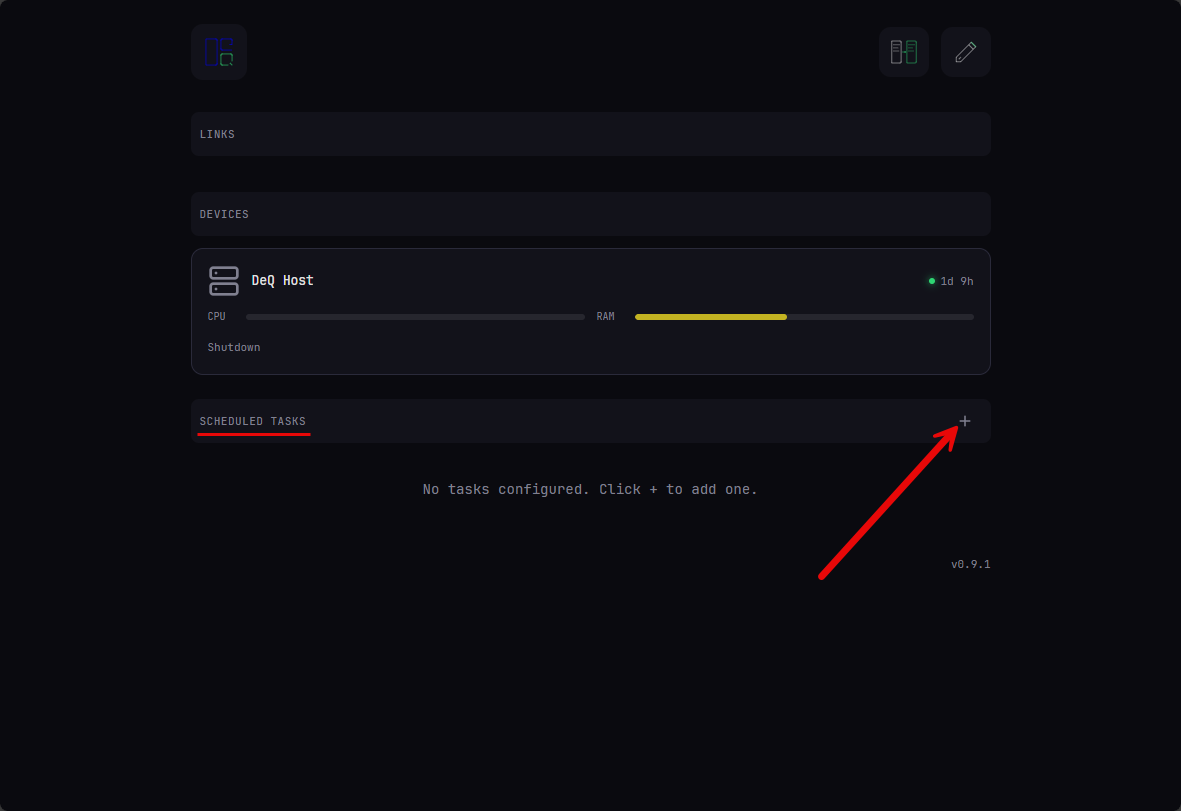
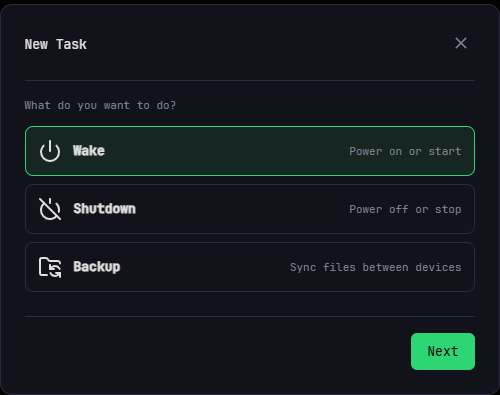
This brings up the New Task screen. Here you can configure wake, shutdown, backup.
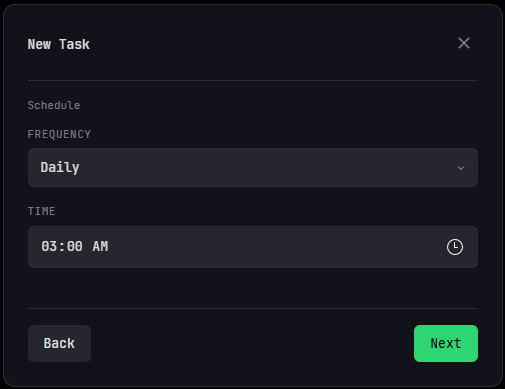
Just as an example I selected backup and it will take you to the schedule screen to configure the time the task will run.
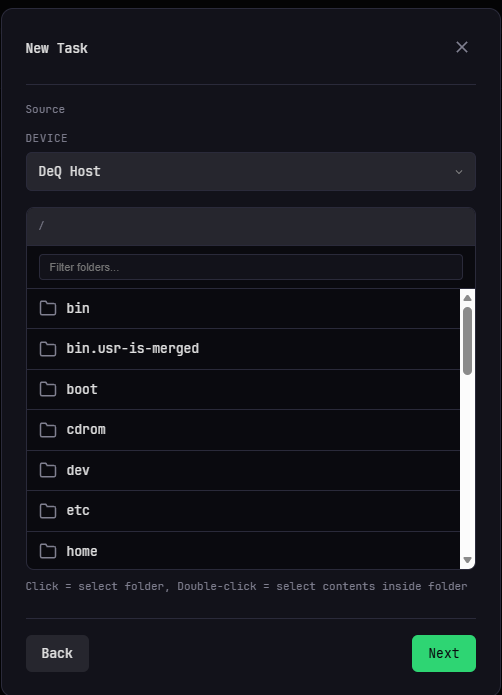
On the new task screen here is an example of selecting a folder as a folder you want to back up.
If you click the + sign under the Links section, here is where we actually add links to home lab services or apps.
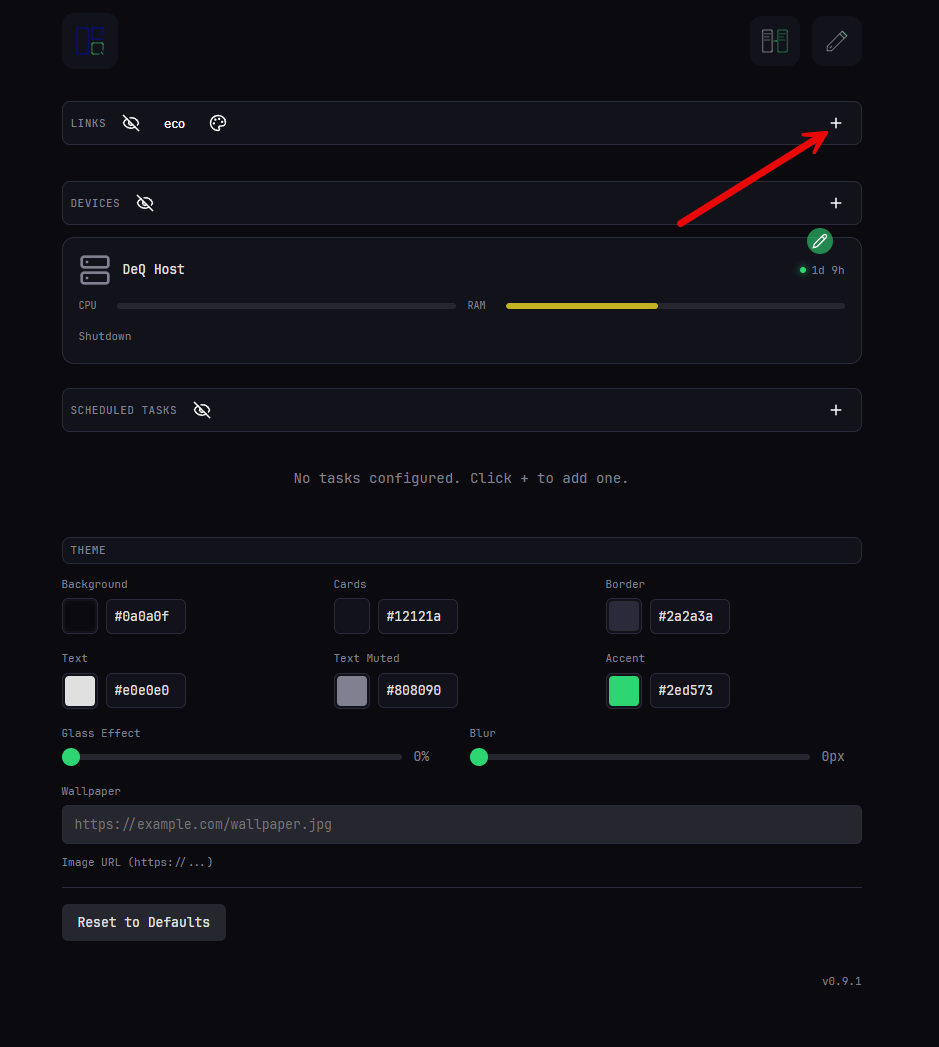
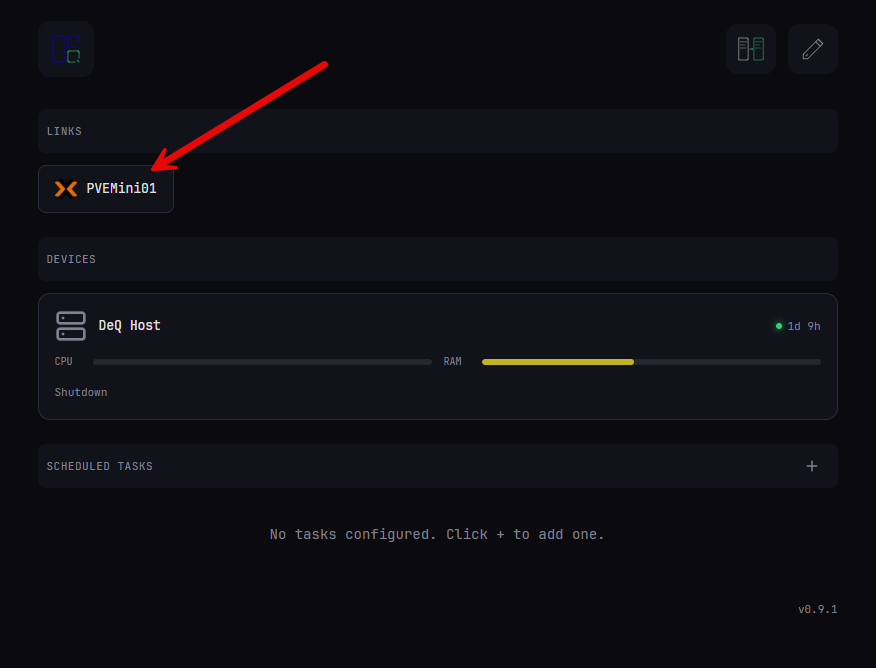
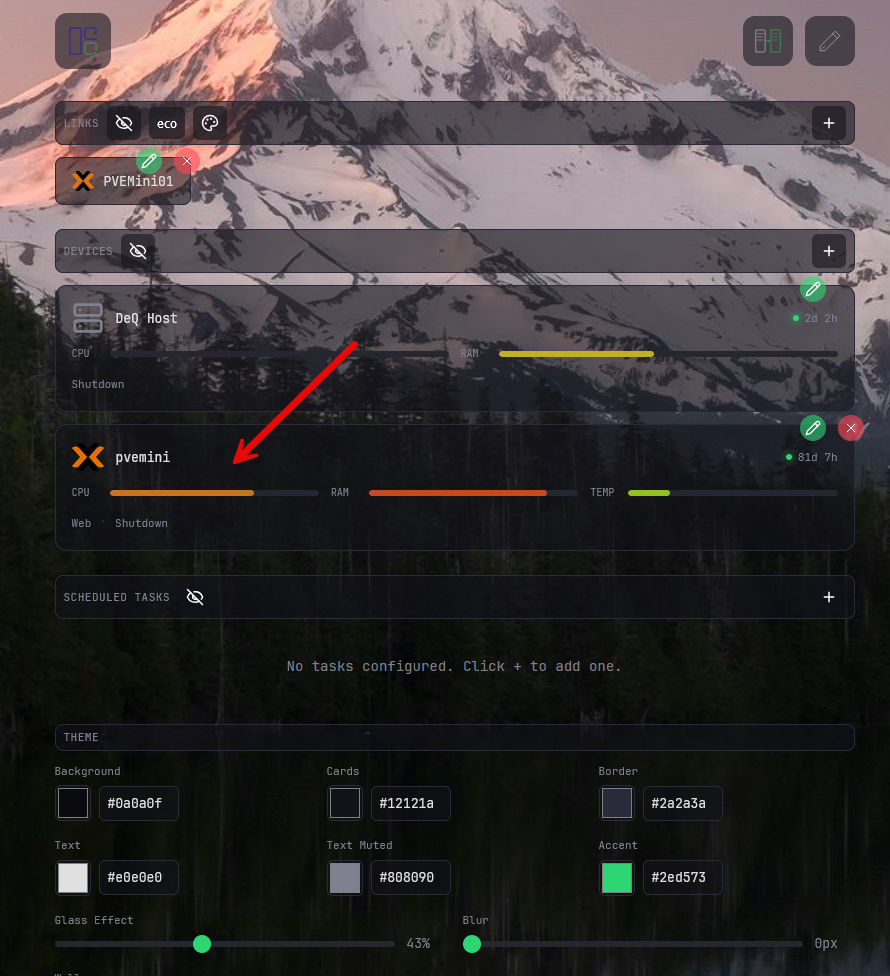
Below, I am adding a connection to one of my Proxmox mini PCs.
After adding the link to Proxmox.
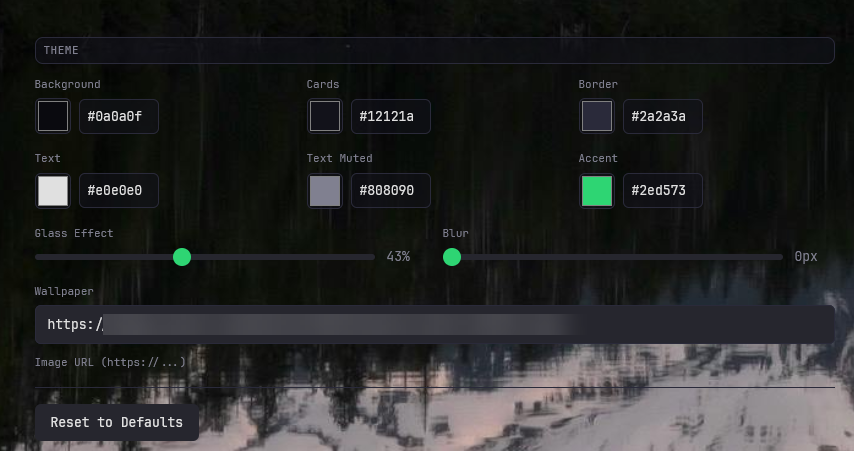
Also, it is easy to spruce up the look of the dashboard. Below, I have edited the appearance and you can see you can point it to a URL of a wallpaper you want to use. Also, one of the sliders allows you to set a “glass” appearance to give translucence to the look of the sections.
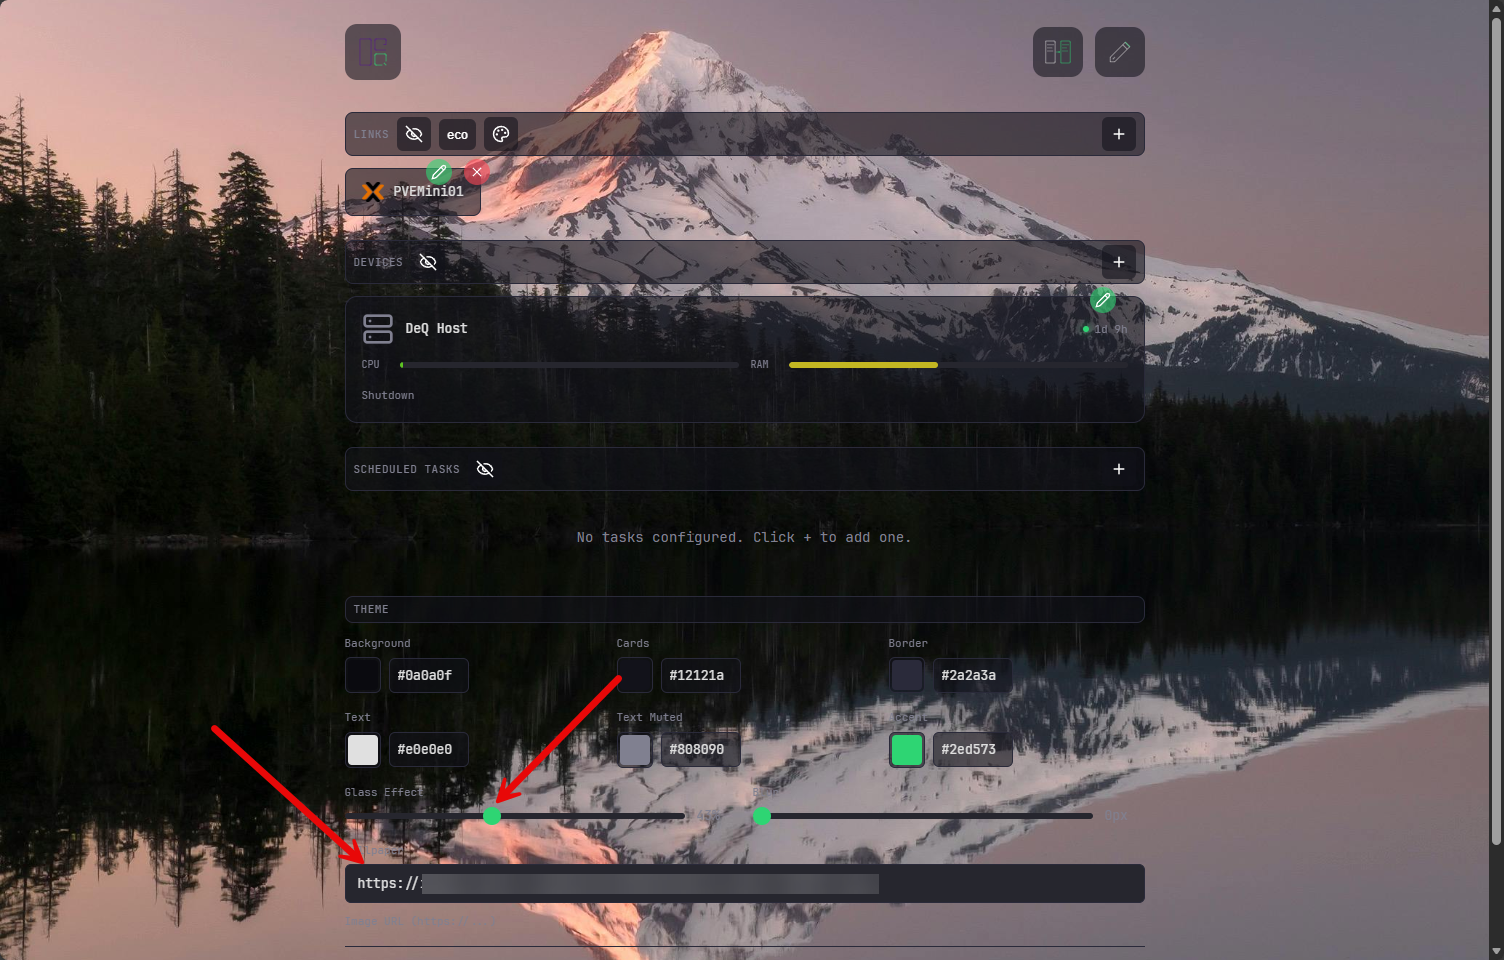
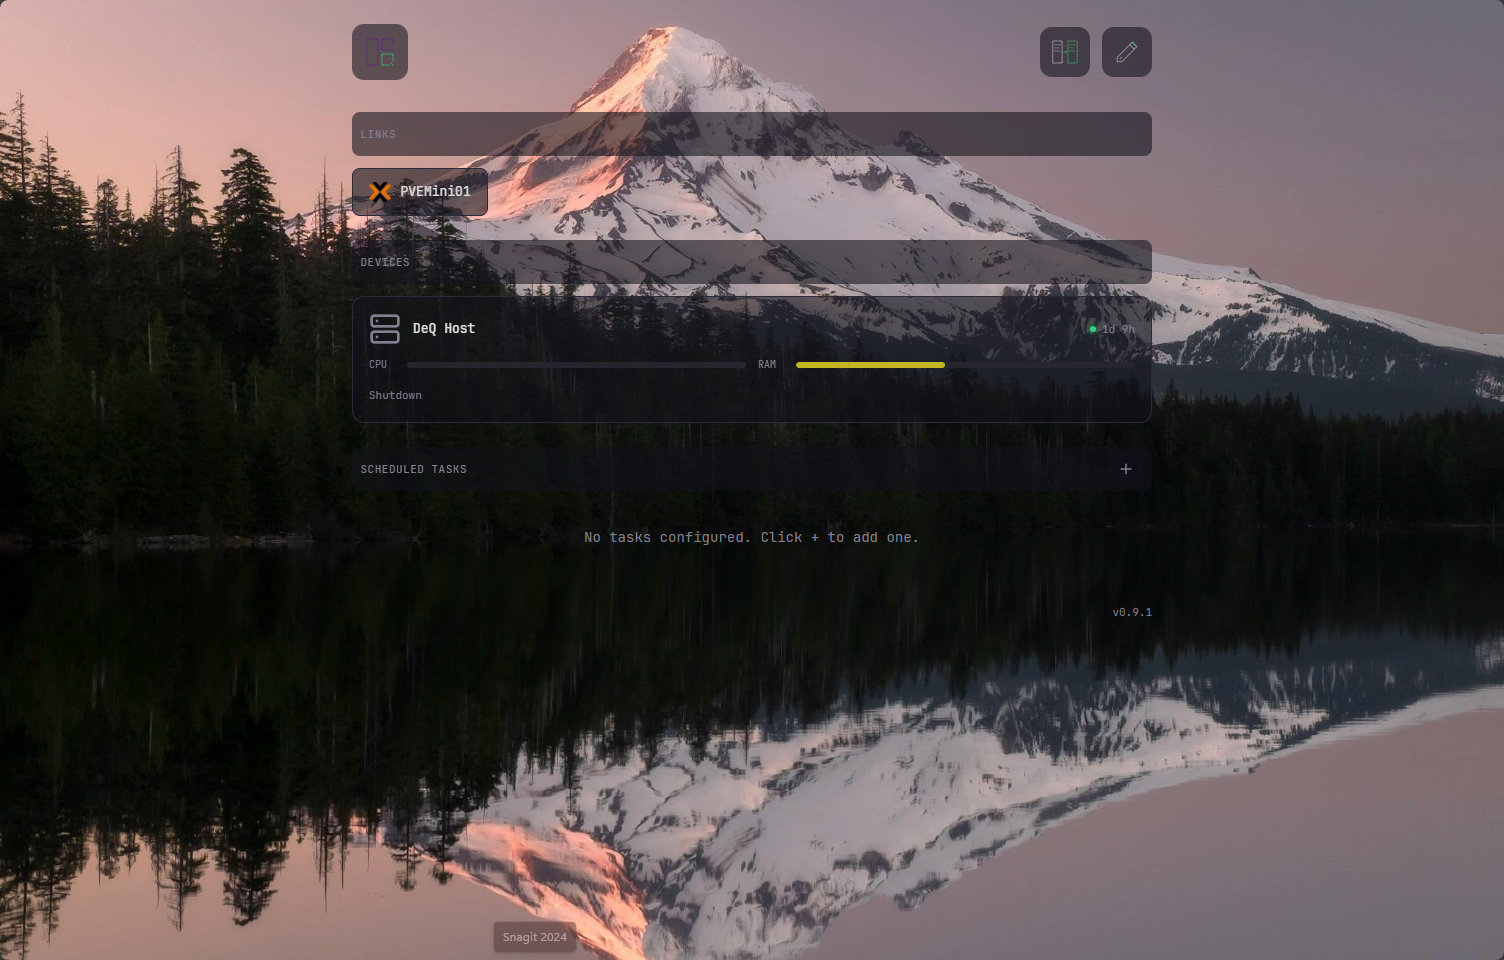
After finishing the edit. Looks nice!
Adding a device
There are some interesting things we can do when we add a “device” in the Deq dashboard interface. What are those? Each device can have the following configurations set:
| Feature | What it does |
|---|---|
| Wake-on-LAN | This allows you to power on the device remotely |
| Quick Connect | You can configure buttons for RDP, VNC, or web interfaces |
| Docker | If a Docker host, you can start/stop containers, with optional RDP/VNC/Web buttons |
| SSH | When you configure your SSH connection, it allows you to gather stats and perform shutdown for remote devices you add |
To add a device, you just click the + sign in the Devices section. This will bring up the dialog box that looks like the following. You will notice you can populate several things including:
- IP address
- Icon
- Wake-On-LAN address
- Broadcast address
- Optional: RDP
- Optional: VNC
- Web URL
- Docker containers
- SSH user and port
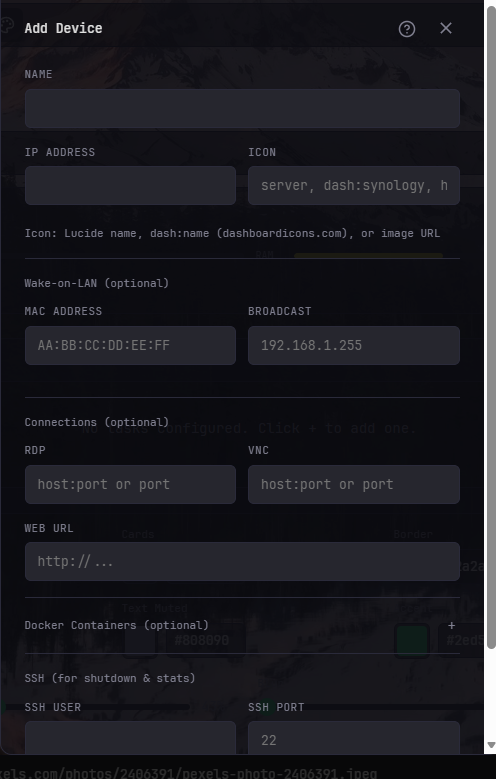
The SSH details are the critical bit here if you want to be able to shutdown the machine or copy files over to the device you add. To do this, we need to use SSH key authentication.
Here, I am spinning up a new keypair for use with the connection to the devices.
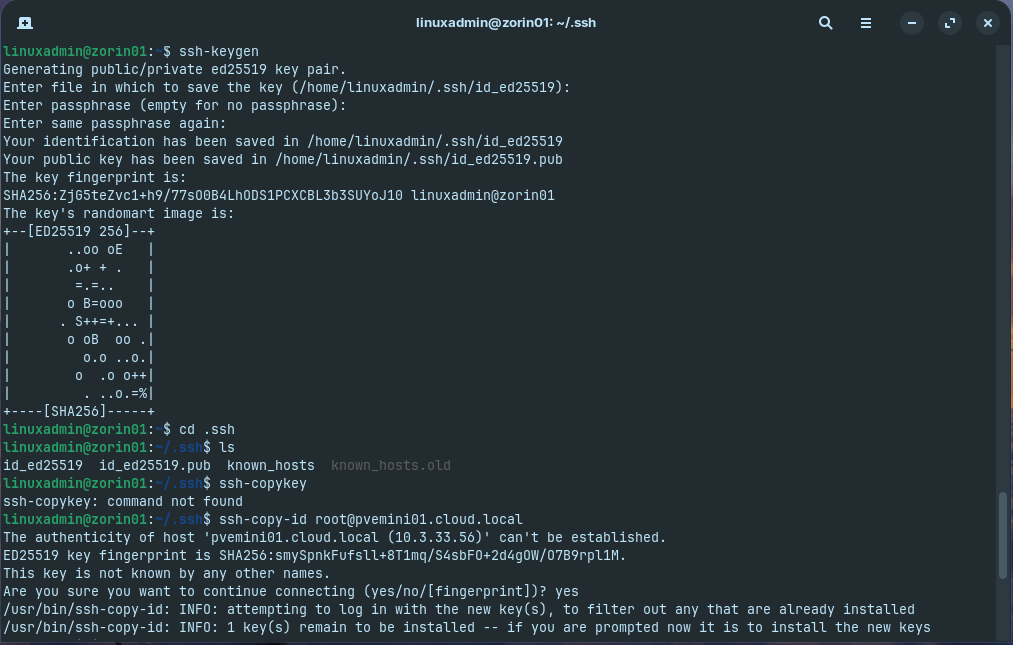
Since Deq runs underneath the root user, we need to copy the generated SSH key over to the root profile .ssh folder.

You will know it is working correctly when you see that it is able to pull over metrics for your device. Here I have added the same Proxmox server that I had added under the links section.
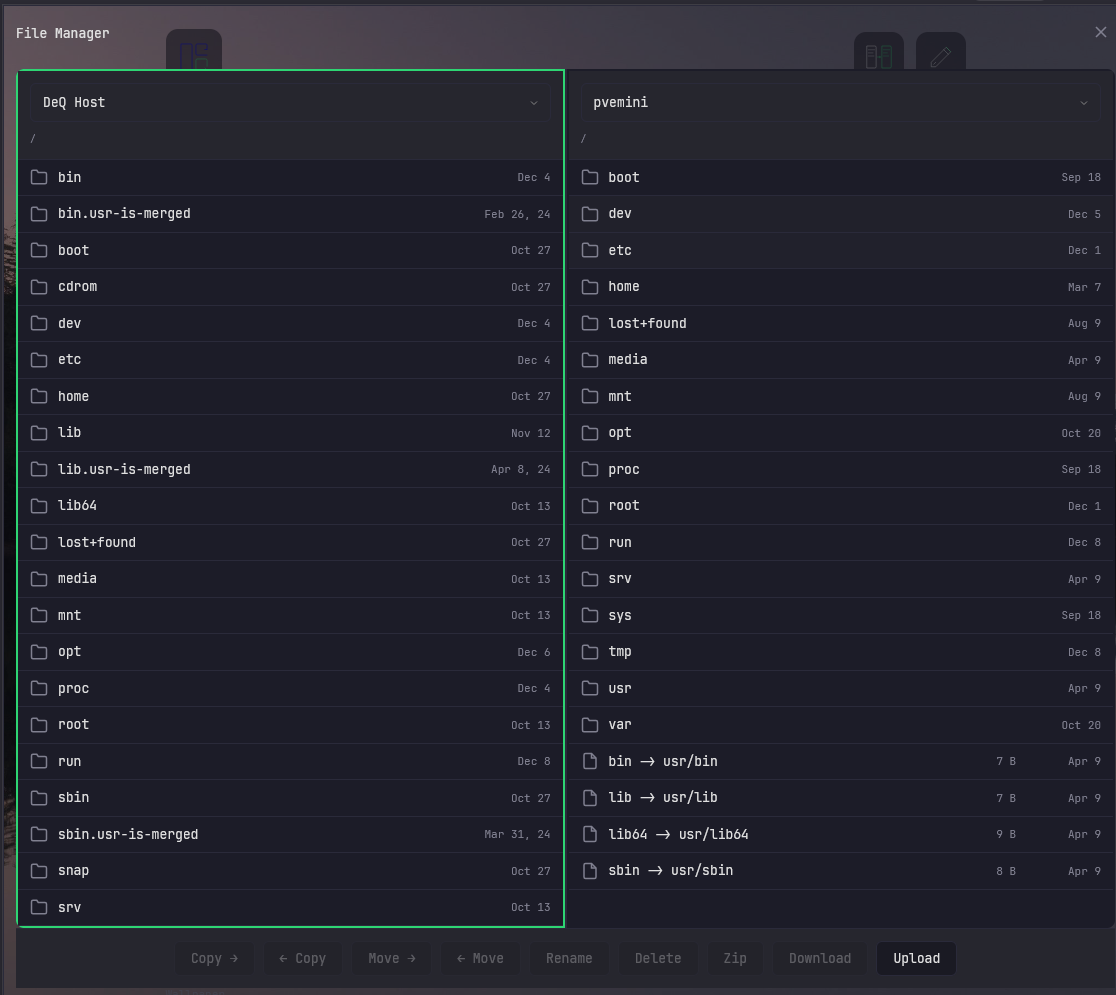
File Manager
The Deq dashboard also has a dual-pane file manager that is built into the solution. You can use this to browse and copy files from any device that you have SSH configured in Deq.
What can you do with the file manager?
- Copy and move files between devices
- Upload files
- Delete files
- Create zip archives
- Download files
Themes, icons, and styling
Deq comes with the ability to support themes, icons, and styling for your dashboard so you don’t have to hunt down image files, and low-level configs. It has the various sliders that we showed above as well as HEX editors for setting colors for various styling.
You have sliders for:
- Glass effect
- Blur
You can edit colors for:
- Background
- Cards
- Border
- Text
- Text Muted
- Accent
Then we also have an option for setting a wallpaper URL.
Will want to put behind a reverse proxy for SSL
Keep in mind that you will want to put this most likely behind a reverse proxy to properly encrypt your traffic as it defaults to plain HTTP traffic on port 5050. This allows you to protect the dashboard with authentication, TLS certificates, and DNS routing if you are using something like Nginx Proxy Manager, Traefik, Caddy, or HAProxy.
Overall benefits of the solution
| Benefit | Description |
|---|---|
| Lightweight and portable | Under 300 KB in size, smaller than many favicon files. Easy to store, relocate, and migrate by copying only two files. |
| Works everywhere | Runs on any machine with Python 3, including Raspberry Pis, NUCs, ARM boards, Proxmox containers, and nearly all Linux distributions. |
| Very stable | Uses static content and minimal dependencies, which makes it extremely reliable. No database, no backend logic, nothing dynamic to fail. |
| Simple configuration | Dashboard can be built in minutes. No JavaScript frameworks, no YAML complexity, and no templating systems. Everything is clean and human readable. |
| Ideal for jump page use cases | Perfect as a fast access point to home lab services rather than full monitoring or analytics. Provides a polished central entry point with almost zero overhead. |
| Easy to personalize | Icons, colors, categories, and layout options make it simple to build a dashboard that fits your environment and preferences. |
Good use cases for the Deq home lab dashboard
There are several use cases where I think Deq shines that you may want to consider it for. What are those? Check out the following:
- As a front page for your entire lab – This is the main use case I think that most will want to consider the solution for. You can run this as your launch page for your home lab. You can also put it behind your reverse proxy and put it behind a subdomain name like dashboard.mydomain.com as an example. This would make it the entrypoint for everything you run. Perhaps make this your browser home page.
- As a dashboard on a wall display or tablet – Because Deq is static and responsive, it works extremely well on small screens or permanent displays.
- As a low resource dashboard on edge nodes – If you run small ARM devices or distributed home lab nodes, Deq adds almost no load. It can even be used per host to link local services.
- As a minimal dashboard for lab users – If you share your home lab with family or friends – Deq gives them a simple list of what they can access without exposing unnecessary tools or configuration complexity.
Wrapping up
I think in wrapping this one up, Deq is one of the most interesting home lab dashboards available out there today. If you want speed and simplicity as a launchpad for your home lab, Deq really fills that need and does a great job providing a simple tool that checks all the right boxes. I really like the fact that it is a single Python script, no Javascript, no containers, etc. Just a simple script that provides static data. For the most part I don’t want my dashboard to be a monitoring tool and Deq seems to stay within the realms of its purpose-built use case here. What about you, have you tried Deq out as of yet? Let me know your thoughts and if you are looking for a home lab dashboard change late 2025.
Google is updating how articles are shown. Don’t miss our leading home lab and tech content, written by humans, by setting Virtualization Howto as a preferred source.
About The Author


DeQ dev here – someone emailed me about this article today. Thanks for the thorough write-up, Brandon. Really appreciate you taking the time to walk through the setup and features. This article has been a lot of work!
If anyone has questions or runs into issues, feel free to open an issue on GitHub or ping me directly. Always happy to help.
Andre,
Thanks so much for the comment! I enjoyed testing out the dashboard solution and that you again for your contribution to the community with this project. Definitely a great tool. Keep us posted with new features and functionality as well and I will be glad to test drive out any new capabilities. Thanks again Andre.
Brandon
Hi Brandon,
Quick update as promised.
Native Android apps: Free version live on Google Play with background polling and push notifications. Pro version (€6.99) adds Android Auto, 5 widget styles, live wallpaper, and an ambient mode for wall-mounted phones. That last one was your idea from the article – loved it, had to build it. Added OLED burn-in protection with breathing animations so it actually works long-term.
Configurable alerts: Set thresholds for CPU, RAM, temps, disk usage. The app notifies you when something crosses the line – even when your phone is in your pocket.
The real value: reliable notifications and one-glance control. Widgets and live wallpaper show your homelab status without opening anything.
Zero-config onboarding: DeQ now auto-discovers devices (Tailscale peers, ARP cache) and scans for Docker containers. Users go from install to working dashboard in under 2 minutes without touching config files.
Also added a press kit, comprehensive FAQ, and clearer positioning: DeQ is the control layer that wakes up your Homepage server, not a replacement for it.
XDA picked it up too last week.
Thanks a ton again for the initial push. Views skyrocketed for three days!
André
Andre, awesome update here! I know the community will benefit from your efforts and lots of nice features with this latest update. I will have to pull down the latest and try out the apps as well. So, glad the article helped to shed light on the tool. Great work! Thanks again for the update and as always keep us posted here with what is coming or features released!
Brandon