
Most of us are looking for low-hanging fruit for optimizations you can do that get quick results that are beneficial. Below is a weekend-friendly set of optimizations that will provide immediate benefits for those who are running Proxmox in their home labs. These can improve performance, stability, and even help with hardware life.
Before you start a word of caution
Before making any major changes, be sure to at least do the following:
- Take a backup of any config file before you edit it
- Apply changes on one node first if this is a cluster
- Reboot only when you have a maintenance window
- After any sysctl change, verify it actually loaded
Here is a nice quick “checkpoint” command list that you can use to capture a few important configuration settings.
# Snapshot current state you can refer back to
cp -a /etc/sysctl.d /etc/sysctl.d.bak.$(date +%F)
cp -a /etc/apt/apt.conf.d /etc/apt/apt.conf.d.bak.$(date +%F)
cp -a /etc/logrotate.conf /etc/logrotate.conf.bak.$(date +%F)

# See current sysctl overrides
sysctl --system | tail -n 50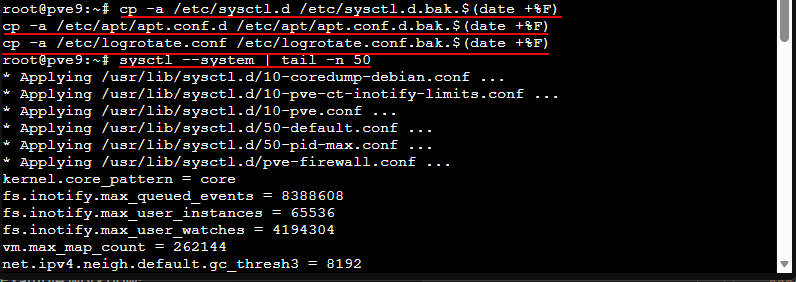
1. Skip downloading extra APT languages
This is a tweak that speeds up updates and saves a little disk. On servers, you usually do not need translation indexes for many different languages.
echo 'Acquire::Languages "none";' | tee /etc/apt/apt.conf.d/99-disable-translationsVerify it applied:
cat /etc/apt/apt.conf.d/99-disable-translations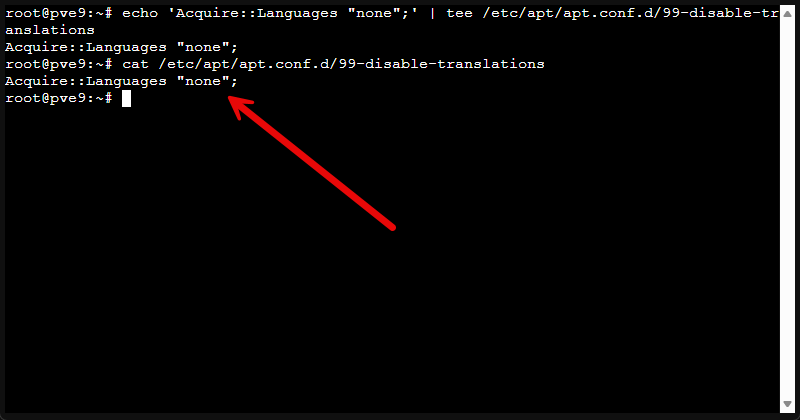
2. Force APT to use IPv4 (when IPv6 causes slow or flaky updates)
Let’s face it, most of us don’t have an IPv6 implementation in our home labs. If your ISP, router, or DNS configuration makes IPv6 unreliable, it can cause issues or slow things down. However, we can fix this by forcing IPv4 and it instantly makes updates consistent again.
echo 'Acquire::ForceIPv4 "true";' | tee /etc/apt/apt.conf.d/99force-ipv4Verify it applied
cat /etc/apt/apt.conf.d/99force-ipv4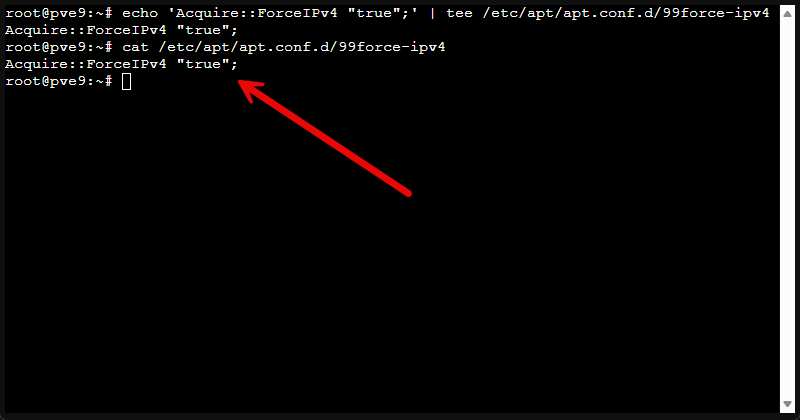
To roll it back:
sudo rm -f /etc/apt/apt.conf.d/99force-ipv43. Configure kernel panic auto-reboot
It is more on the rare side to experience a kernel panic. But they do happen. A host that has a kernel panic and is stuck is one of the worst things that can happen, especially if you are away from home and you can’t “poke it in the eye.”
This allows you to configure it to autoreboot:
echo "kernel.panic = 10" | tee /etc/sysctl.d/99-kernelpanic.conf
echo "kernel.panic_on_oops = 1" | tee -a /etc/sysctl.d/99-kernelpanic.conf
sysctl -p /etc/sysctl.d/99-kernelpanic.conf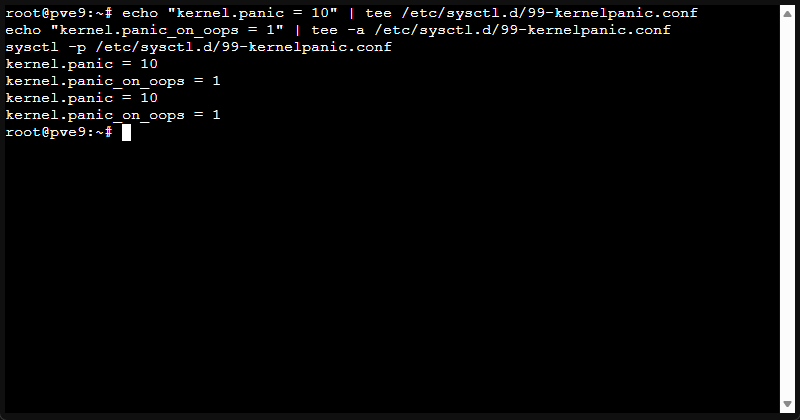
Verify it applied:
sysctl kernel.panic kernel.panic_on_oops4. Increase system limits (file watchers and open files)
This is a practical improvement for hosts running lots of containers, monitoring tools, or anything that keeps many files open. It can also help avoid weird edge-case failures.
echo "fs.inotify.max_user_watches = 1048576" | tee /etc/sysctl.d/99-maxwatches.conf
echo "* soft nofile 1048576" | tee /etc/security/limits.d/99-limits.conf
sysctl --system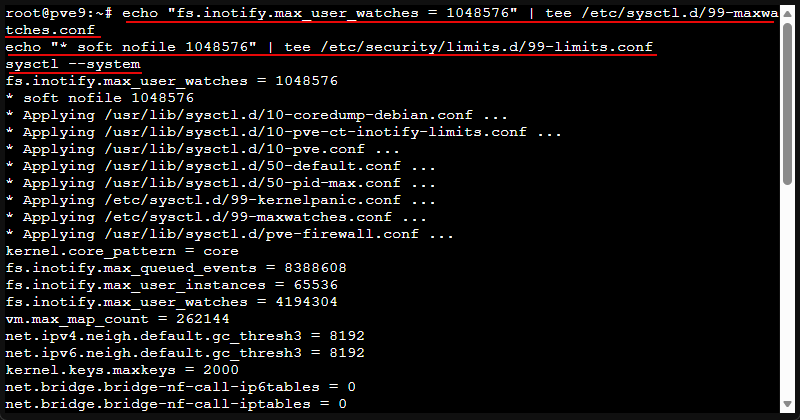
Verification it applied:
sysctl fs.inotify.max_user_watches
ulimit -n
5. Improve entropy generation with haveged
Headless servers and virtualized environments can run low on entropy. Uh what is that you might wonder? On a Linux system like Proxmox, entropy is used when the system needs something unpredictable. That includes generating encryption keys, securing network connections, creating SSH keys, starting TLS services, etc.
The operating system constantly tries to refill that bucket using unpredictable events like keyboard input, mouse movement, disk timing, and hardware interrupts.
Installing haveged is a classic “make it stop stalling” fix:
apt-get install -y haveged

tee /etc/default/haveged >/dev/null <<'EOF'
DAEMON_ARGS="-w 1024"
EOF

systemctl daemon-reload
systemctl enable haveged
systemctl start haveged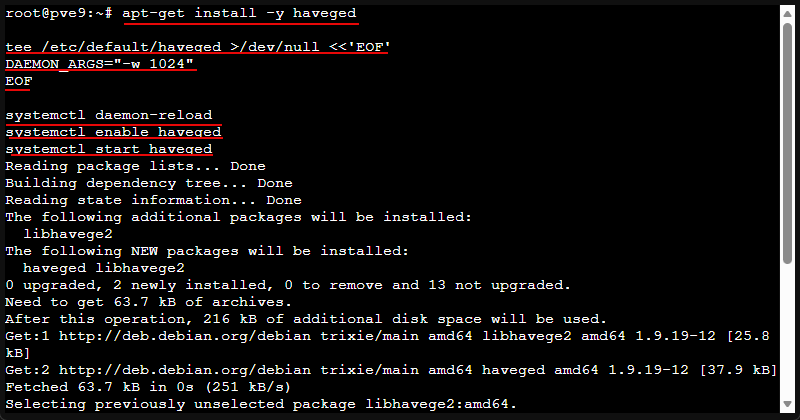
Verify it installed:
cat /proc/sys/kernel/random/entropy_avail
systemctl status haveged --no-pager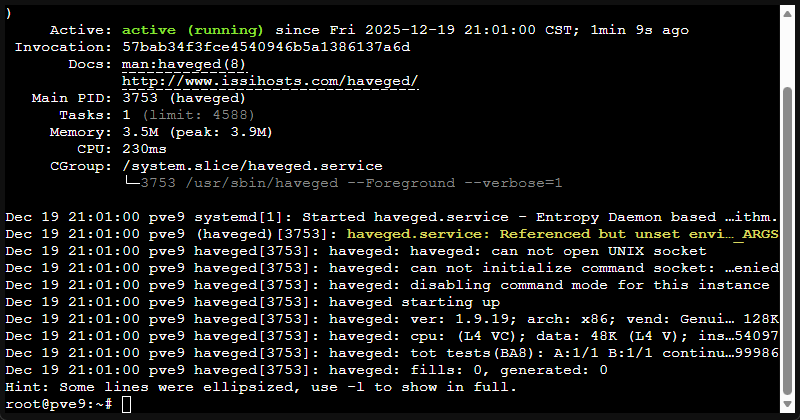
6. Optimize your memory management (may be more important than ever now)
Even on bigger boxes, there are some tweaks to help smooth out memory pressure events. On low-RAM nodes, these configurations help to keep a box responsive even with super low memory:
tee /etc/sysctl.d/99-memory.conf >/dev/null <<'EOF'
# Balanced Memory Optimization
vm.swappiness = 10
vm.dirty_ratio = 15
vm.dirty_background_ratio = 5
vm.overcommit_memory = 1
vm.max_map_count = 65530
EOF

# Enable memory compaction if supported by the system
if [ -f /proc/sys/vm/compaction_proactiveness ]; then
  echo "vm.compaction_proactiveness = 20" | tee -a /etc/sysctl.d/99-memory.conf
fi

sysctl -p /etc/sysctl.d/99-memory.conf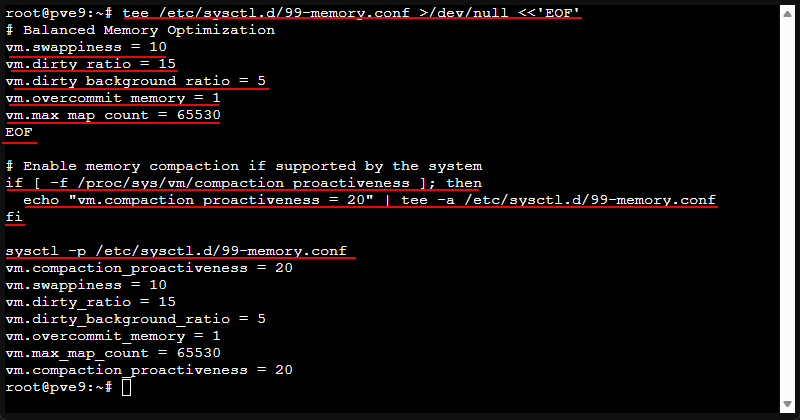
Verify that it applied:
sysctl vm.swappiness vm.dirty_ratio vm.dirty_background_ratio vm.overcommit_memory vm.max_map_count7. Apply network sysctl optimizations
If you have busy lots of network traffic, including big storage networks, lots of east-west VM traffic, or want to have tighter networking, take a look at these tweaks:
tee /etc/sysctl.d/99-network-performance.conf >/dev/null <<'EOF'
# Proxmox-safe network performance tuning

# Core network buffers
net.core.netdev_max_backlog = 8192
net.core.optmem_max = 8192
net.core.rmem_max = 16777216
net.core.wmem_max = 16777216
net.core.somaxconn = 8151

# IPv4 hardening
net.ipv4.conf.all.accept_redirects = 0
net.ipv4.conf.all.accept_source_route = 0
net.ipv4.conf.all.secure_redirects = 0
net.ipv4.conf.all.send_redirects = 0
net.ipv4.conf.all.log_martians = 0
net.ipv4.conf.all.rp_filter = 1

net.ipv4.conf.default.accept_redirects = 0
net.ipv4.conf.default.accept_source_route = 0
net.ipv4.conf.default.secure_redirects = 0
net.ipv4.conf.default.send_redirects = 0
net.ipv4.conf.default.log_martians = 0
net.ipv4.conf.default.rp_filter = 1

# ICMP sanity
net.ipv4.icmp_echo_ignore_broadcasts = 1
net.ipv4.icmp_ignore_bogus_error_responses = 1

# Ephemeral port range
net.ipv4.ip_local_port_range = 1024 65535

# TCP behavior tuning
net.ipv4.tcp_fin_timeout = 10
net.ipv4.tcp_keepalive_time = 240
net.ipv4.tcp_keepalive_intvl = 30
net.ipv4.tcp_keepalive_probes = 3
net.ipv4.tcp_max_syn_backlog = 8192
net.ipv4.tcp_limit_output_bytes = 65536
net.ipv4.tcp_mtu_probing = 1
net.ipv4.tcp_rfc1337 = 1
net.ipv4.tcp_sack = 1
net.ipv4.tcp_slow_start_after_idle = 0
net.ipv4.tcp_syn_retries = 3
net.ipv4.tcp_synack_retries = 2

# TCP memory buffers
net.ipv4.tcp_rmem = 8192 87380 16777216
net.ipv4.tcp_wmem = 8192 65536 16777216

# UNIX socket queue depth
net.unix.max_dgram_qlen = 4096
EOF

# Apply all sysctl settings cleanly
sysctl --system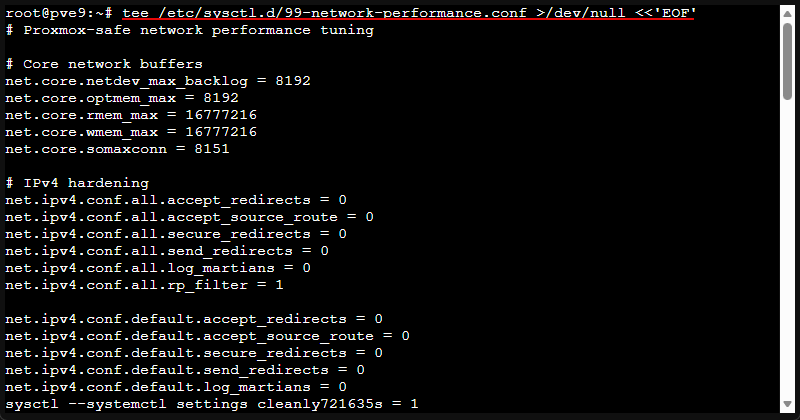
8. Enable TCP BBR and Fast Open
Below is a tweak that can help with throughput and latency in certain conditions. This can help over longer RTT links and congested network paths.
echo "net.core.default_qdisc = fq" | tee -a /etc/sysctl.d/99-tcp-bbr.conf
echo "net.ipv4.tcp_congestion_control = bbr" | tee -a /etc/sysctl.d/99-tcp-bbr.conf
echo "net.ipv4.tcp_fastopen = 3" | tee -a /etc/sysctl.d/99-tcp-fastopen.conf

modprobe tcp_bbr
sysctl -p /etc/sysctl.d/99-tcp-bbr.conf
sysctl -p /etc/sysctl.d/99-tcp-fastopen.conf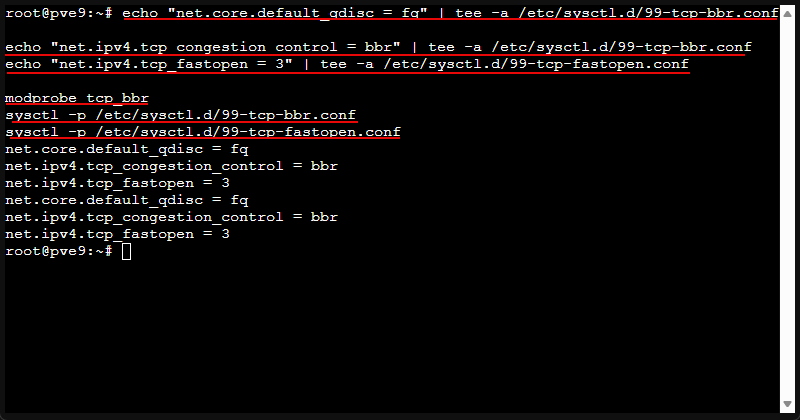
Verify it applied:
sysctl net.ipv4.tcp_congestion_control
lsmod | grep bbr || true
9. Optimize NIC queue length and make it persistent
This is a nice little tuning tweak when you see bursts, drops, or you just want to increase the queue depth for a busy interface.
Find your interface with the following command:
ip link showThen run the following using the interface you found in the above command. Here I am using ens192.
ip link set ens192 txqueuelen 10000

echo 'ACTION=="add", SUBSYSTEM=="net", KERNEL=="ens192", RUN+="/sbin/ip link set ens192 txqueuelen 10000"' | tee /etc/udev/rules.d/60-net-txqueue.rules

echo 'net.ipv4.tcp_timestamps = 1' | tee -a /etc/sysctl.d/99-network-performance.conf
sysctl -p /etc/sysctl.d/99-network-performance.conf
Verify it applied
ip -s link show ens192 | head -n 20
cat /etc/udev/rules.d/60-net-txqueue.rules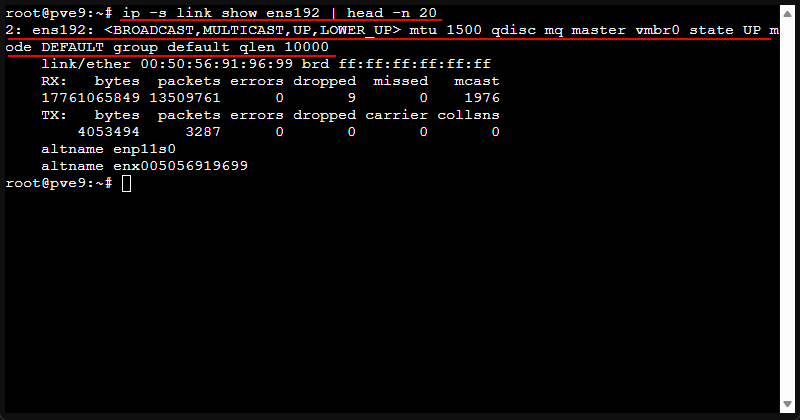
10. Tweak logrotate so logs do not slowly eat your root disk
This is I think one of the most underrated “set it and forget it” fixes. Below backs up your config and replaces it with a clean daily rotation policy.
#!/usr/bin/env bash
# Configure logrotate for Proxmox
set -euo pipefail

ROTATE_DAYS="${ROTATE_DAYS:-14}"

if [[ "${EUID:-$(id -u)}" -ne 0 ]]; then
  echo "ERROR: Please run as root (use sudo)." >&2
  exit 1
fi

# Backup existing config
cp /etc/logrotate.conf "/etc/logrotate.conf.bak.$(date +%F_%H%M%S)"

# Create new config
cat > /etc/logrotate.conf <<EOF
# Proxmox logrotate configuration
daily
rotate ${ROTATE_DAYS}
create
compress
delaycompress
dateext
missingok
notifempty
sharedscripts

include /etc/logrotate.d

/var/log/wtmp {
    missingok
    monthly
    create 0664 root utmp
    rotate 1
}

/var/log/btmp {
    missingok
    monthly
    create 0660 root utmp
    rotate 1
}
EOF

# Validate
if ! logrotate -d /etc/logrotate.conf >/dev/null 2>&1; then
  echo "ERROR: Config validation failed!"
  logrotate -d /etc/logrotate.conf
  exit 1
fi

echo "✓ Logrotate configured: ${ROTATE_DAYS} days retention"
echo "  To test: logrotate -f /etc/logrotate.conf"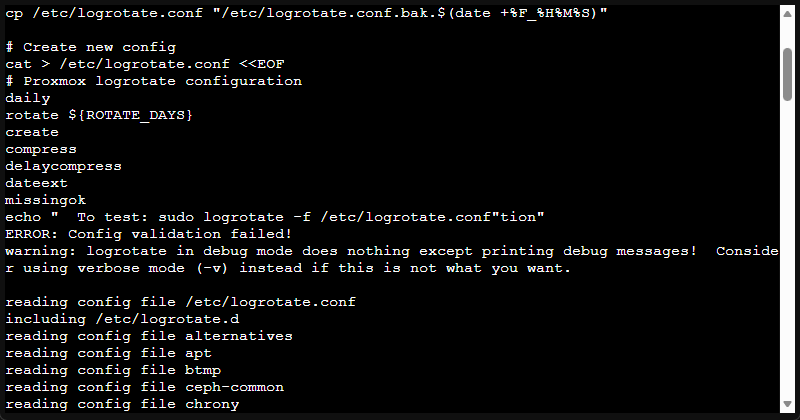
Test run:
logrotate -f /etc/logrotate.conf11. Log2RAM (for consumer SSDs)
Many of us run consumer SSDs in our home labs. We can keep frequent log writes off these SSDs by writing logs into RAM and syncing them to disk periodically. So, this helps to extend the lifespan of these SSDs by keeping the majority of the writes off them.
Check out the BASH script below that will install Log2RAM and configure it for Proxmox. Do test in your lab or test node before applying to “production”.
#!/usr/bin/env bash
# Install and configure Log2RAM on Proxmox
set -euo pipefail

LOG2RAM_SIZE="${LOG2RAM_SIZE:-256M}"
JOURNAL_MAX_USE="${JOURNAL_MAX_USE:-50M}"

if [[ "${EUID:-$(id -u)}" -ne 0 ]]; then
  echo "ERROR: Please run as root (use sudo)." >&2
  exit 1
fi

# Validate size formats
if ! [[ "$LOG2RAM_SIZE" =~ ^[0-9]+[KMG]$ ]] || ! [[ "$JOURNAL_MAX_USE" =~ ^[0-9]+[KMG]$ ]]; then
  echo "ERROR: Invalid size format. Use format like 256M, 512M, 1G" >&2
  exit 1
fi

TMPDIR="$(mktemp -d)"
trap "rm -rf $TMPDIR" EXIT

# Install dependencies
echo "[log2ram] Installing dependencies..."
export DEBIAN_FRONTEND=noninteractive
apt-get update -y
apt-get install -y rsync curl ca-certificates

# Check if already installed
if command -v log2ram >/dev/null 2>&1 || systemctl list-unit-files | grep -q "^log2ram\.service"; then
  echo "[log2ram] Already installed, skipping download"
else
  echo "[log2ram] Downloading and installing..."
  curl -fsSL -o "$TMPDIR/log2ram.tar.gz" \
    "https://github.com/azlux/log2ram/archive/refs/heads/master.tar.gz"
  tar -xzf "$TMPDIR/log2ram.tar.gz" -C "$TMPDIR"
  cd "$TMPDIR"/log2ram-* && bash ./install.sh </dev/null
fi

# Configure log2ram
if [[ -f /etc/log2ram.conf ]]; then
  cp /etc/log2ram.conf "/etc/log2ram.conf.bak.$(date +%F_%H%M%S)"
  sed -i -E "s|^[#[:space:]]*SIZE=.*|SIZE=${LOG2RAM_SIZE}|" /etc/log2ram.conf
  sed -i -E "s|^[#[:space:]]*USE_RSYNC=.*|USE_RSYNC=true|" /etc/log2ram.conf
  echo "[log2ram] Configured: SIZE=${LOG2RAM_SIZE}, USE_RSYNC=true"
fi

# Configure journald limits
cp /etc/systemd/journald.conf "/etc/systemd/journald.conf.bak.$(date +%F_%H%M%S)"
sed -i -E "s|^[#[:space:]]*SystemMaxUse=.*|SystemMaxUse=${JOURNAL_MAX_USE}|" /etc/systemd/journald.conf
sed -i -E "s|^[#[:space:]]*RuntimeMaxUse=.*|RuntimeMaxUse=${JOURNAL_MAX_USE}|" /etc/systemd/journald.conf

# Enable and start
systemctl daemon-reload
systemctl enable log2ram
systemctl start log2ram
systemctl restart systemd-journald

echo "✓ Log2RAM installed and configured"
echo "  SIZE=${LOG2RAM_SIZE}, JOURNAL_MAX_USE=${JOURNAL_MAX_USE}"
echo "  Reboot to fully activate tmpfs mount for /var/log"
12. Persistent network interface naming (stop interfaces from changing names)
Here is a simple, readable approach is to create a systemd link file that matches the NIC MAC and sets a stable name.
Example workflow:
First, identify the MAC:
ip link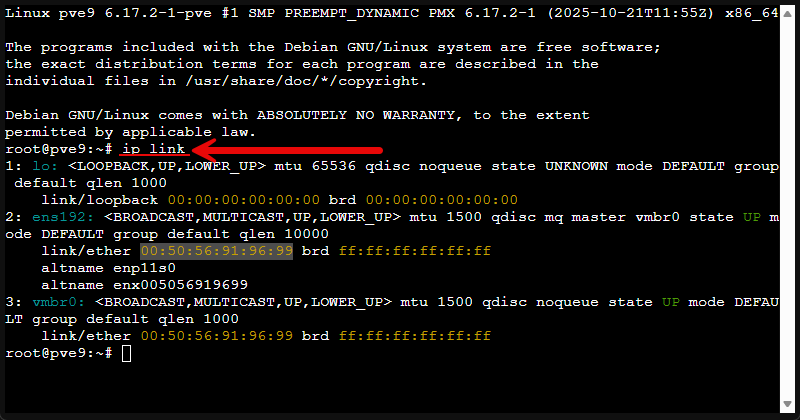
Then, create a systemd .link file (replace the MAC and desired name):
tee /etc/systemd/network/10-lan.link >/dev/null <<'EOF'
[Match]
MACAddress=AA:BB:CC:DD:EE:FF

[Link]
Name=lan0
EOF
Finally, reboot to apply cleanly:
rebootThen update /etc/network/interfaces (or your Proxmox network config) to use lan0.
Wrapping up
These are a few of the tweaks that are worth doing this weekend on your Proxmox host. Especially for the home lab, there are things here that are beneficial such as the Log2RAM tweak that helps to prevent prematurely wearing out a consumer-grade SSD. Also many of the network tweaks are beneficial. Let me know in the comments if these are tweaks that you make on your Proxmox setups? What other tweaks do you recommend?
Google is updating how articles are shown. Don’t miss our leading home lab and tech content, written by humans, by setting Virtualization Howto as a preferred source.
About The Author


I implemented the last three and the first one. Not sure if i want autorestart with a kernel panic. I have the fear, that a boot loop occurs which is destroying data/drives. Thank you!
June,
That is awesome and glad some of the tweaks were helpful and ones you wanted to implement. Definitely some good ones on the list. Thanks again for the comment and happy Proxmox’ing!
Brandon
Thanks for this Brandon. I’m relatively new to Proxmox and have a 3-node cluster running for a few weeks but learning all the time and I’m not at the point where I consider it stable enough to call it “Production”, especially as I’m running consumer-grade hardware (SFF HP G4 machines with single SSDs for storage and a boot NVMe drive). One of the nodes is infrequently becoming unreachable and I’m wondering if it’s having a kernel panic and still being on but not contactable so I implemented your tweaks in the hope that things will improve. I did notice a lot of space used up in /var/log (1.9G) and I had to purge a bit before deploying the log2ram tweak to give my SSDs a break! I see you have a Discord channel so I will definitely join there as I’m guessing that’s where you discuss those sort of issues?
Thanks again for your great advice and all the best for this year.
Ed,
Thank you so much for the comment on the post. It sounds like you are well on your way to gaining great experience with Proxmox. Honestly, this is the best way to learn. Get Proxmox nodes up and running as you have done and just start breaking things. Proxmox is a great hypervisor and is well on its way I think to being the mainstream favorite in SMB shops and home labs (I think it has undoubtedly already achieved this in the home lab). One think you might try if it is only one of the nodes is to switch out your RAM and see if the problem follows the memory. I have seen faulty memory modules lead to these types of crashes. Just a quick tip there of something to try. Definitely join the Discord. Also, join up on HomeLabExplorers, we have a lot of good conversations going on there as well.
Thanks again!
Brandon