I recently in compiling my latest list of Proxmox tools that you need to know about for the home lab, stumbled on a new community-developed tool called PVETUI. It is a VERY cool, text-based user interface that runs directly from your terminal to manage your Proxmox VE Server environment. Let’s see how we can use this tool for Proxmox terminal management and its features and functionality.
What is PVETUI?
If you are like me, speed and efficiency with any management tool is king in the home lab and in production environments. At the end of the day, if you don’t want to use it or it isn’t easy to use, it’s probably not going to be of any benefit to you.
This is where PVETUI (Proxmox Virtual Environment Terminal User Interface) stands out. It is a standalone tool written in Go (so yeah definitely fast) that lets you interact with your Proxmox VE cluster entirely through a terminal interface. If you want to know what the developer used for inspiration, think tools like k9s, lazydocker, and podman-tui. I immediately thought, this has the same look and feel as k9s when first using it.
It was created by the developer devnullvoid on Github and has evolved into an extremely polished tool in a very short period of time. It can manage everything from VMs and containers to nodes and cluster resources. Also, I like the fact that it includes support for Proxmox API tokens so you don’t have to use password auth if you don’t want to. You can setup multiple connection profiles, like you would with Kubernetes using the config file provided. Also, it even has embedded VNC console access right from the terminal.
Download the project here: https://github.com/devnullvoid/pvetui
Features of PVETUI
There is a lot to like about this tool at first glance. Here are a few things to take note of:
- Lightning fast performance – PVETUI is written in Golang and is lightning quick navigating between nodes, VMs, and containers. So, you no longer have to wait for slow-loading web pages to appear, you can zip through the different menus, etc
- Complete management – You can manage virtual machines, LXC containers, and even full Proxmox clusters. You can carry out tasks like Tasks like starting, stopping, migrating, and monitoring are all supported in the interface.
- Supports multiple profiles – If you run multiple Proxmox instances (for example, a home lab and a production cluster), PVETUI supports switching between profiles very easily. You can manage all your clusters from one terminal.
- Secure auth -You can connect using either API tokens or password-based authentication, with automatic token renewal to maintain sessions securely.
- Integrated Shells and SSH – PVETUI also has built-in SSH directly into your nodes, containers, and VMs as it has all of this built into the tool. If you are need to remote in and check things out closer, everything is right at your fingertips between the various menus.
- Built-in VNC – It has an embedded noVNC client. This gives you graphical access to your VMs and containers right from within your terminal in the home lab. The client handles automatic authentication and you don’t have to have a lot of involved setup for this.
- Plugins– PVETUI supports plugins which is great. One example of supported plugins for the tool is the Community Scripts installer. This lets you install popular Proxmox scripts right from the PVETUI interface.
- Modern keyboard navigation – It seems to have a lot of inspiration from Vim-style navigation. PVETUI also has customizable key bindings that lets you move through menus using h, j, k, and l, open global menus with g, or launch the SSH console with s as examples.
- Themes – You can customize its theme in the configuration file for better visibility or personal preference but otherwise it just adapts to your terminal or OS theme.
- It is cross-platform – I like this aspect a lot as well, since there are many different OS’es and management workstations used across the community base. You can use PVETUI on Linux, macOS, and Windows. It can be installed as a binary, through package managers, or you can even use it from a Docker.
Installing PVETUI
You can install PVETUI in different ways depending on which operating system you are running, or even as a Go module if you already have Go installed.
Windows
You need to have Scoop installed, which you can do with the command:
#Set execution policy
Set-ExecutionPolicy RemoteSigned -Scope CurrentUser

#Install scoop
irm get.scoop.sh | iex
Then, you just run the command:
scooop install pvetui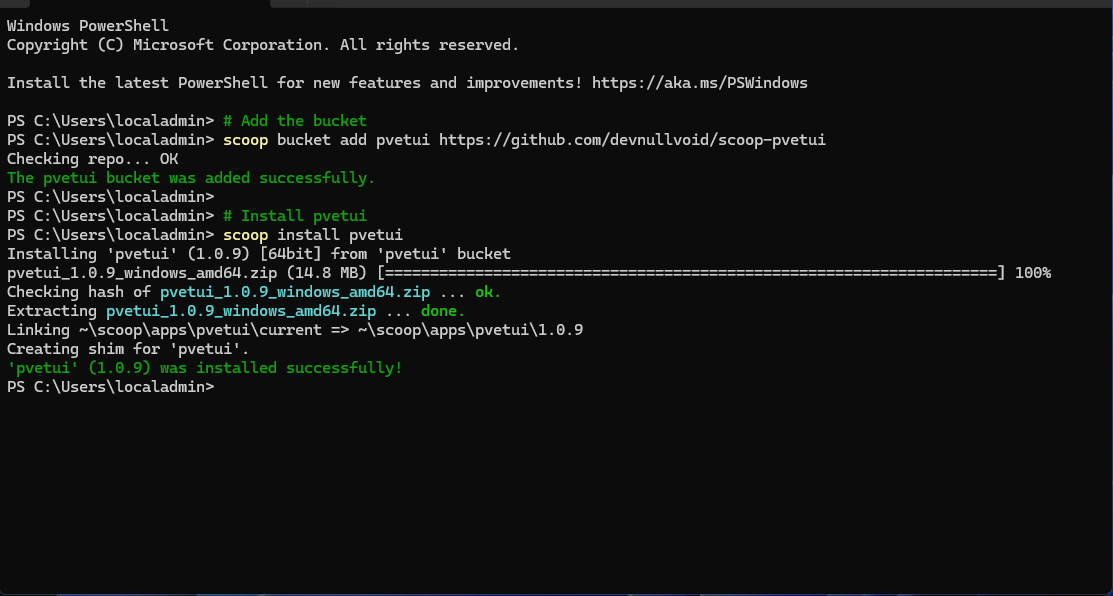
Using Go in Linux
I had an easy Zorin Linux desktop running in the environment. So, I quickly installed Go and this was one of the easiest methods.
sudo apt install golang-go -y
Now, we simply use the command below to install pvetui for Go:
go install github.com/devnullvoid/pvetui/cmd/pvetui@latest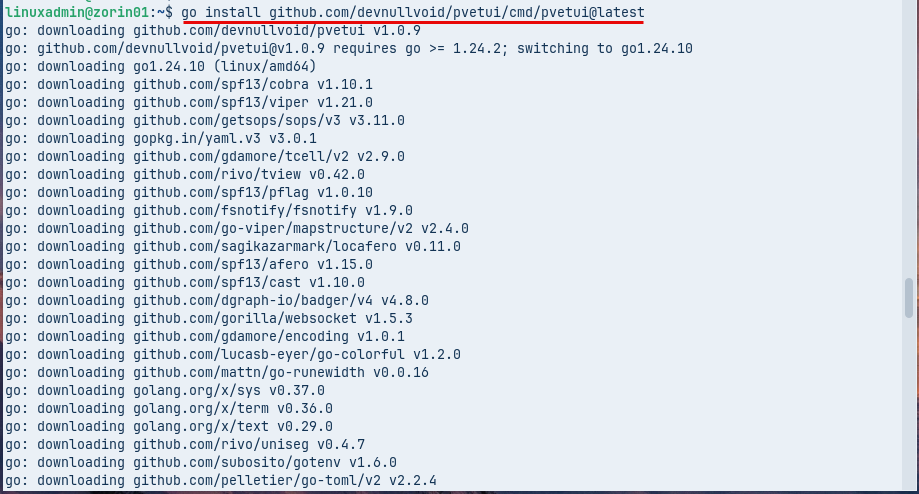
Precompiled Binaries
You can download the latest precompiled binary from the GitHub Releases page. Extract the package and run:
./pvetuimacOS users may encounter Gatekeeper warnings, which can be bypassed using the provided troubleshooting guide or by building from source.
Install with Package Managers
PVETUI can also be installed with popular package managers for multiple platforms:
- Arch Linux (AUR) – yay -S pvetui-bin or build from source: yay -S pvetui-git
- macOS (Homebrew) – brew tap devnullvoid/pvetui brew install pvetui
Docker Support
You can even run PVETUI in a Docker container. Clone the repository and use Docker Compose:
git clone https://github.com/devnullvoid/pvetui.git
cd pvetui
cp .env.example .env
docker compose run --rm pvetui
This makes it easy to test or run PVETUI in isolated environments without installing anything on your host.
Finally, you also have the option to build it from source code.
Navigation and key bindings
PVETUI is keyboard-driven and uses the following shortcuts for navigation:
- h, j, k, l to navigate through lists and menus
sto open an SSH shellvto open the VNC console- m for the context menu
- g for the global menu
- / for search
- a to toggle auto-refresh
- q to quit
You can also fully customize these key bindings in the configuration file. This is really helpful macOS users with different key layouts.
First launch configuration of PVETUI
When you first launch PVETUI, it walks you through a configuration wizard that creates your connection profiles. Below is the command if you don’t have Go in your PATH.
~/go/bin/pvetui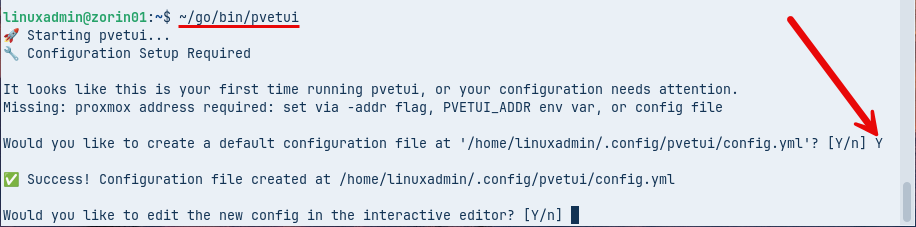
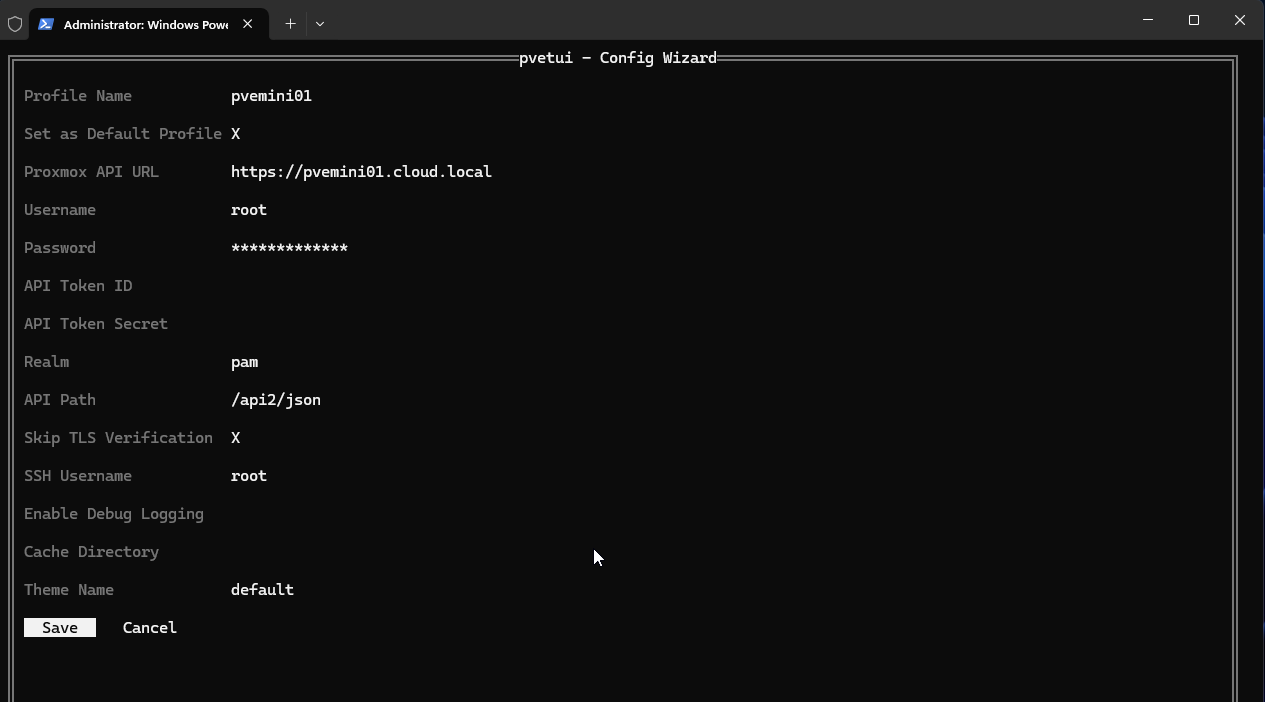
On the configuration screen for PVETUI Proxmox terminal, you have to fill in the details to allow the tool to connect to your Proxmox environment. you will see:
- Profile name
- Set as Default Profile
- Proxmox API URL
- username
- password
- API Token ID
- API Token Secret
- Realm
- API Path
- Skip TLS Verification
- SSH Username
- Enable Debug Logging
- Cache Directory
- Theme Name
As a note, you don’t need to fill in both username and password AND API token information. Actually it will give you an error as I found out if both are populated. So, choose one to connect with and leave the other blank.
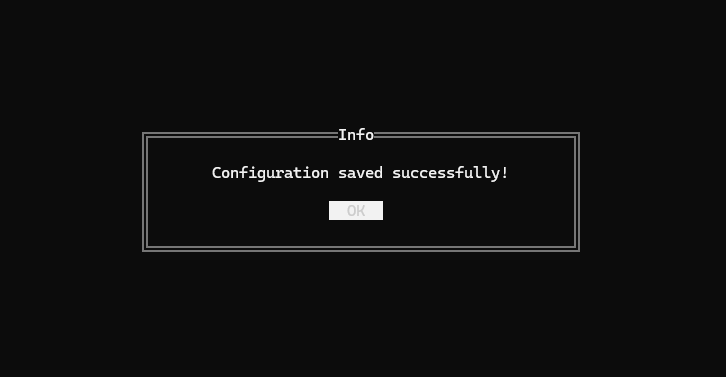
After you save, you will see the message that your configuration has been saved successfully.
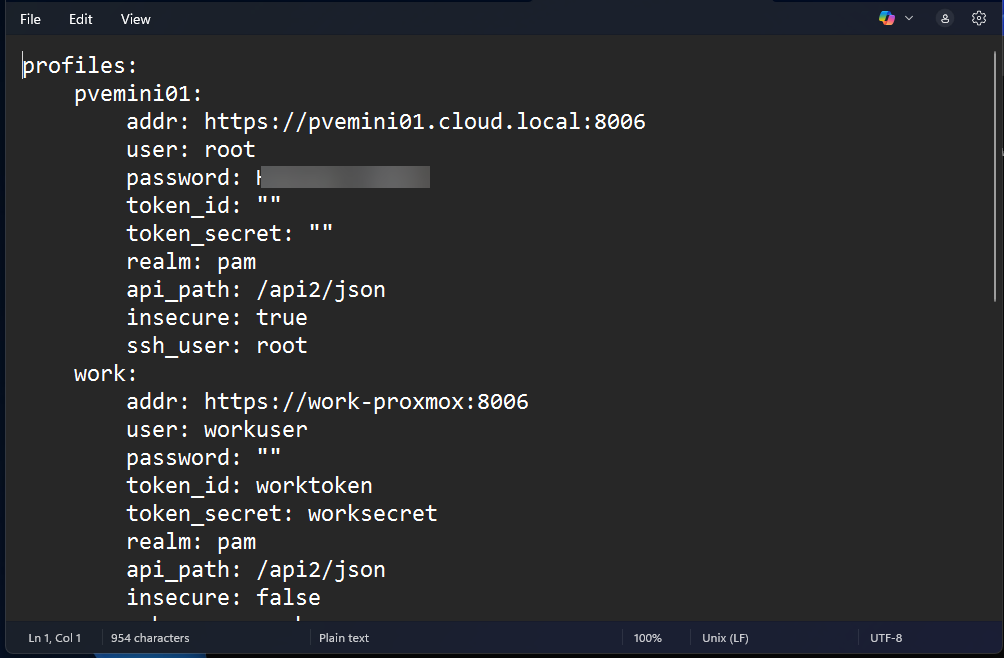
This saves this information to your PVETUI config file:
#Windows
C:\Users\<your user>\AppData\Roaming\pvetui\config.yml

#Linux
/home/linuxadmin/.config/pvetui/config.yml
I really like how your configuration is also in code. Just know too your password if you are using this auth method is in cleartext.
If you need to launch the config wizard at any point in time, you can do that with the command:
pvetui --config-wizardViewing the PVETUI Proxmox terminal and navigating around
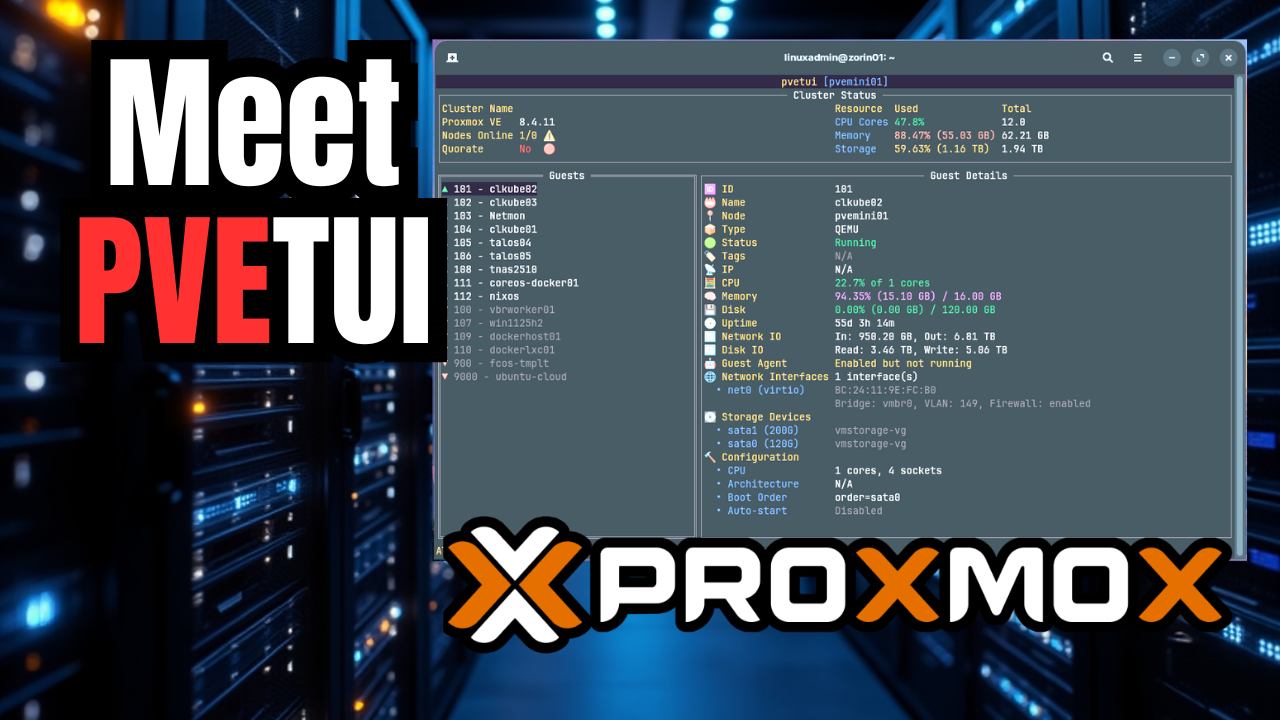
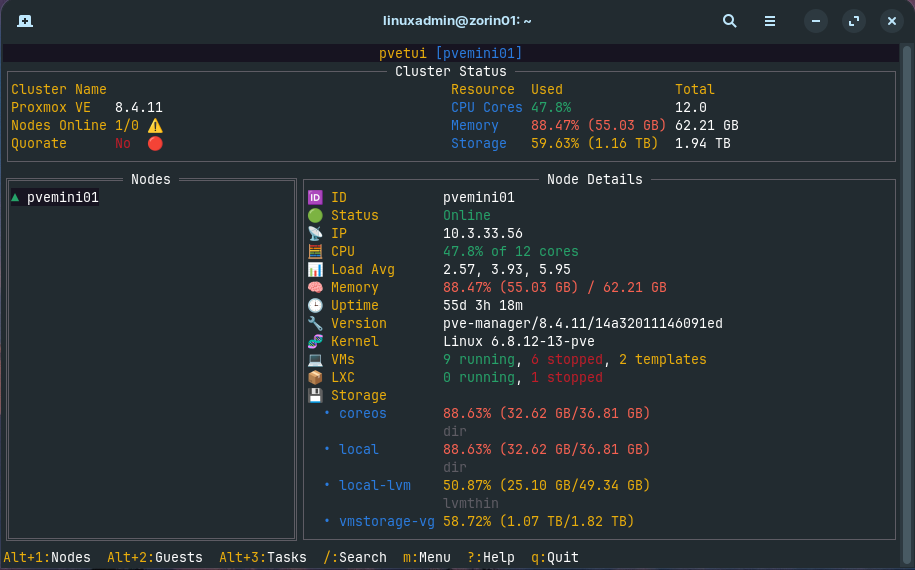
Below is what you will see when you first connect to your Proxmox VE Server. You are greeted with a screen full of information about the Proxmox host. You see the built-in navigation keyboard shortcuts in the bottom part of the terminal screen:
- Alt+1 – Nodes
- Alt+2 – Guests
- Alt+3 – Tasks
- / – Search
- m – Menu
- ? – Help
- q – Quit
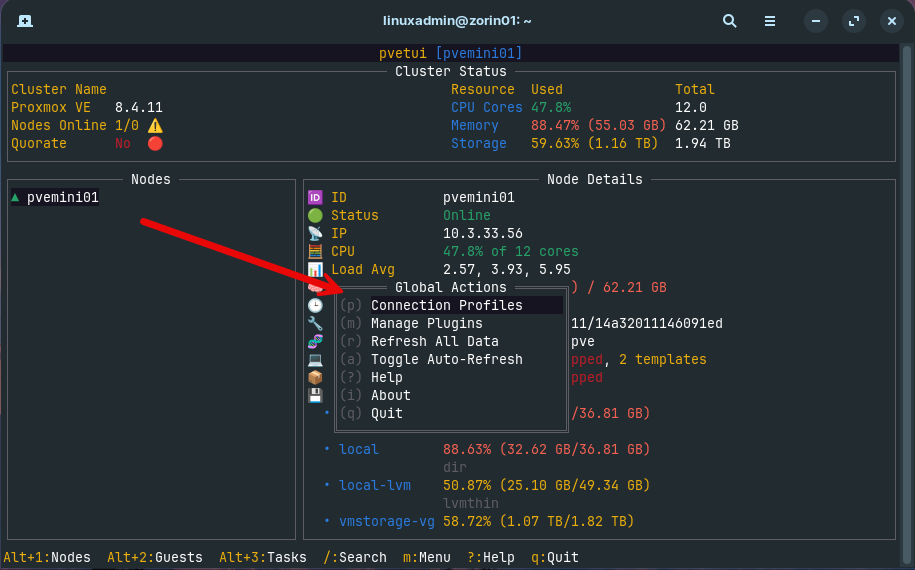
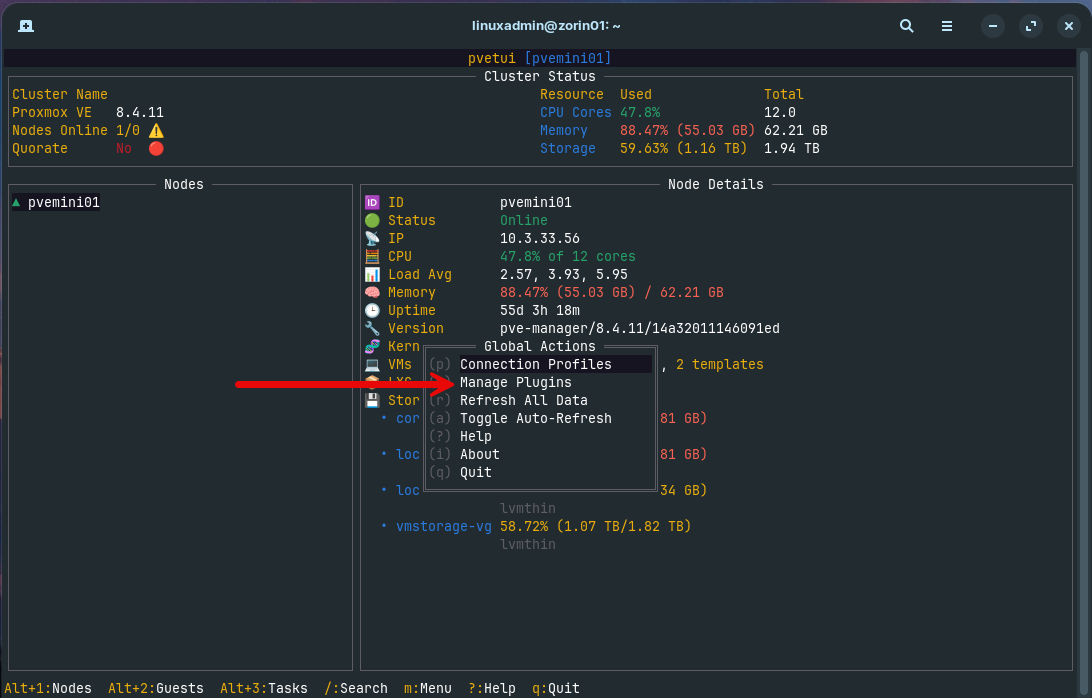
Once you are on the PVETUI terminal screen, you can press ESC and it will bring up the following command menu:
- Connection profiles
- Manage Plugins
- Refresh All Data
- Toggle Auto-Refresh
- Help
- About
- Quit
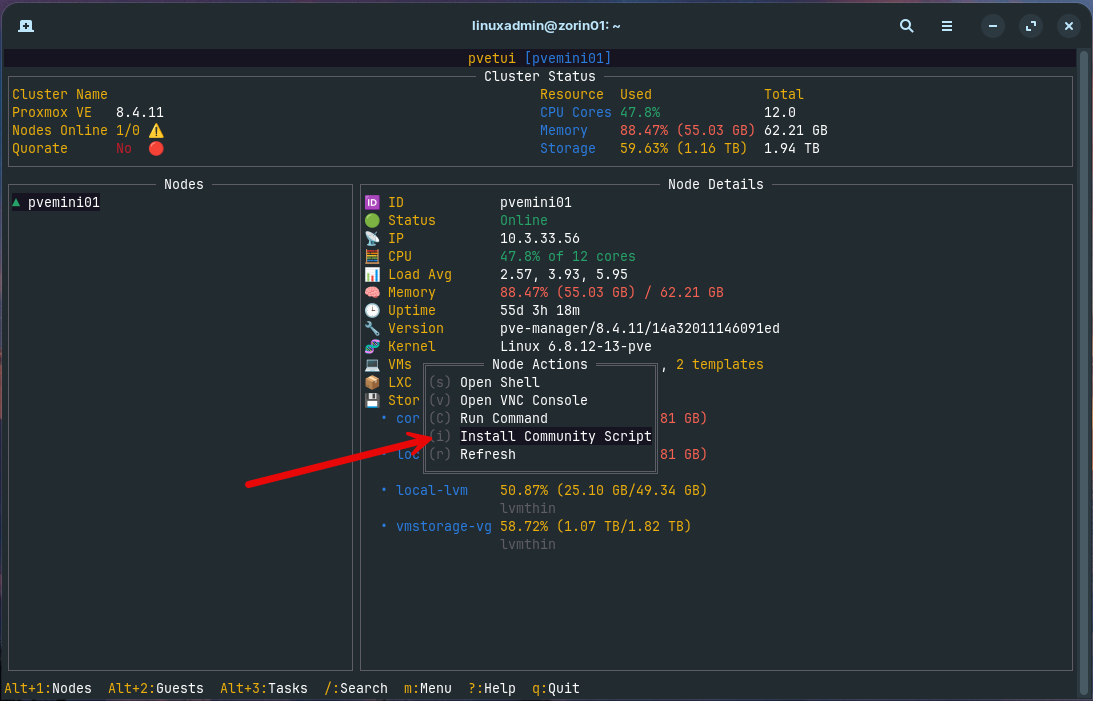
Below is an example of the Node actions menu that comes up when you press the m key when you are on the Nodes screen (ALT+1). You can see you can:
- Open Shell
- Open VNC Console
- Run Command
- Install Community Script (you have to enable this under options)
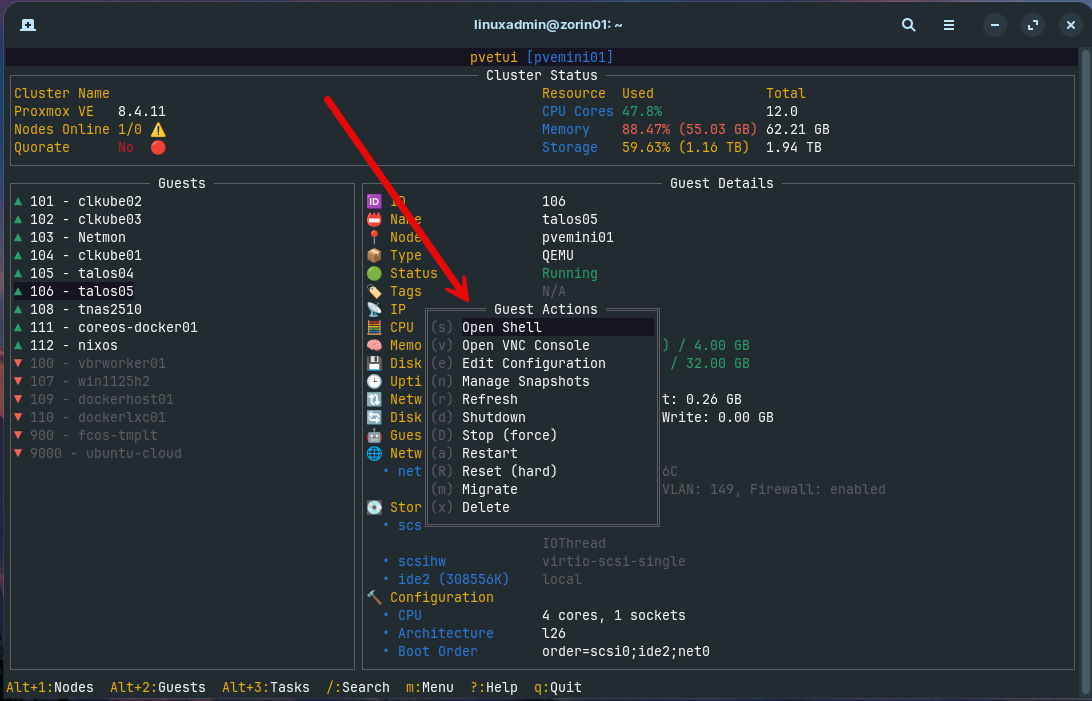
Guest screen
On the Guests screen (ALT+2) you will find the information about all the guest VMs or LXC containers you ahve running in your Proxmox environment. Below are the guest actions that you will have available when you press m on the Guests screen:
- Open shell
- Open VNC Console
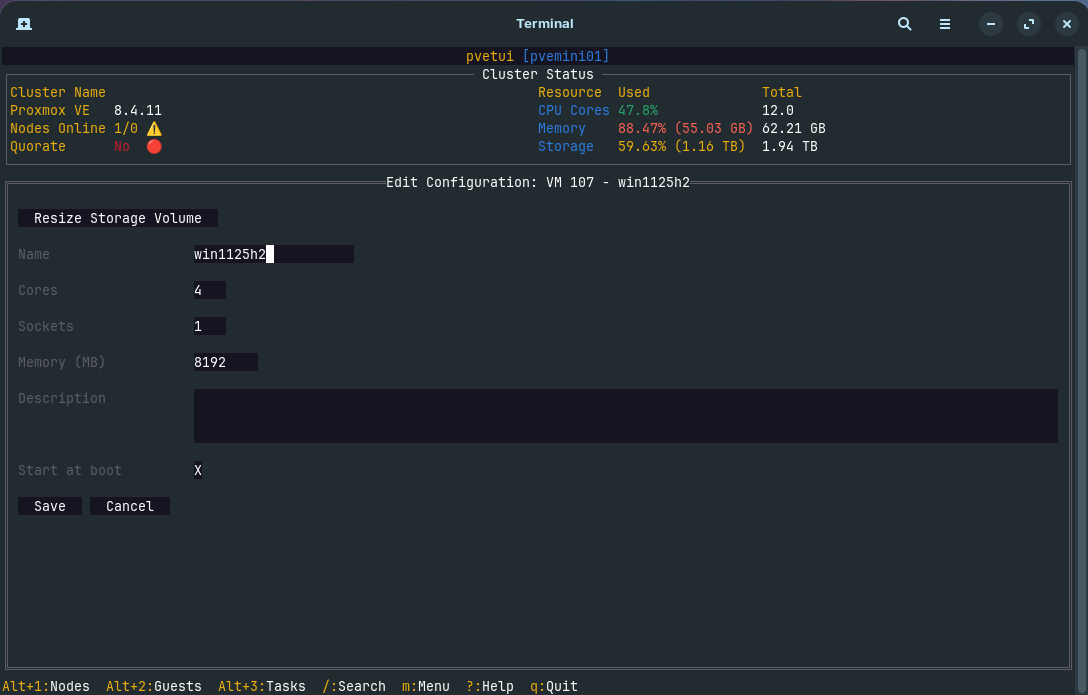
- Edit configuration
- Manage snapshots
- Refresh
- Shutdown
- Stop (force)
- Restart
- Reset (hard)
- Migrate
- Delete
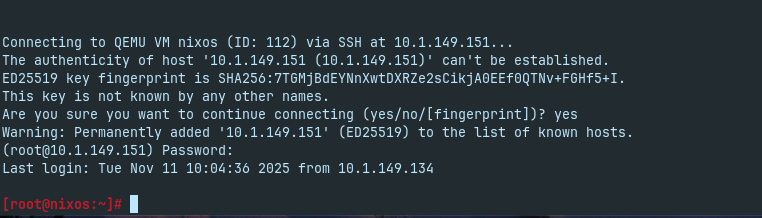
Below is an example of me using the Open Shell option for one of my guest VMs, my NixOS virtual machine. You can see it hands you off to the terminal where you accept the thumbprint as normal when connecting for the first time to an SSH host. Then type password or pubkey pass, etc.
Also, you can edit the properties of a virtual machine using PVETUI.
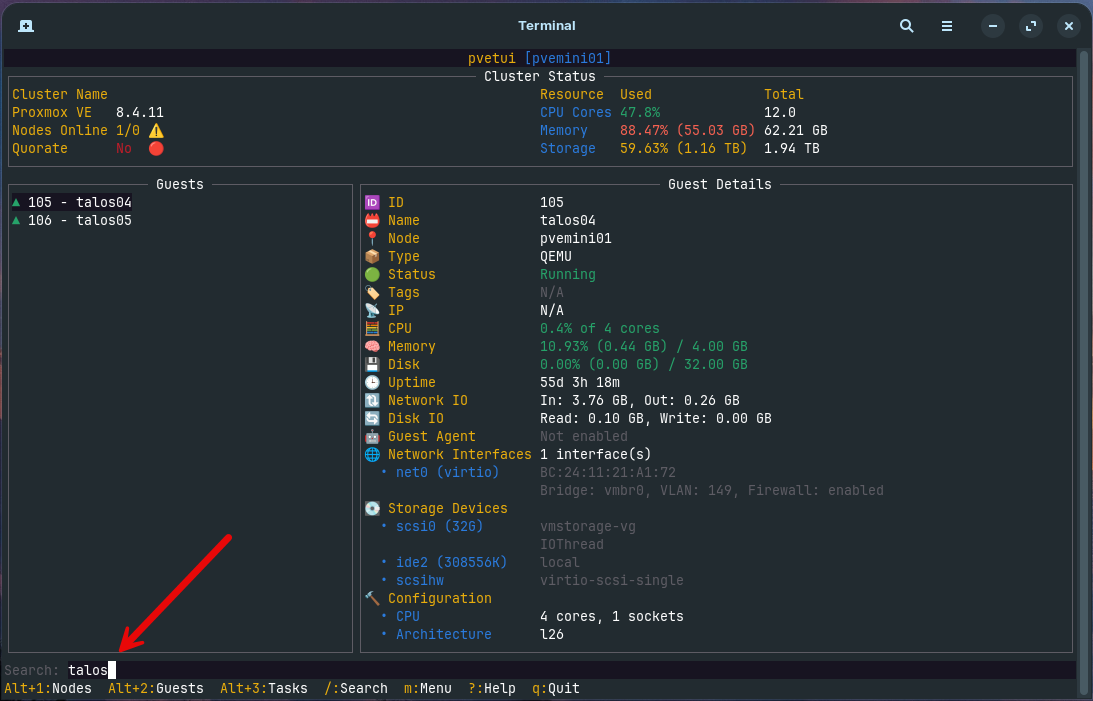
You can use the Search functionality on whichever screen you are on, either Nodes or Guests. This allows you to find a specific object. Here I am typing in “talos” to find search for my talos virtual machines.
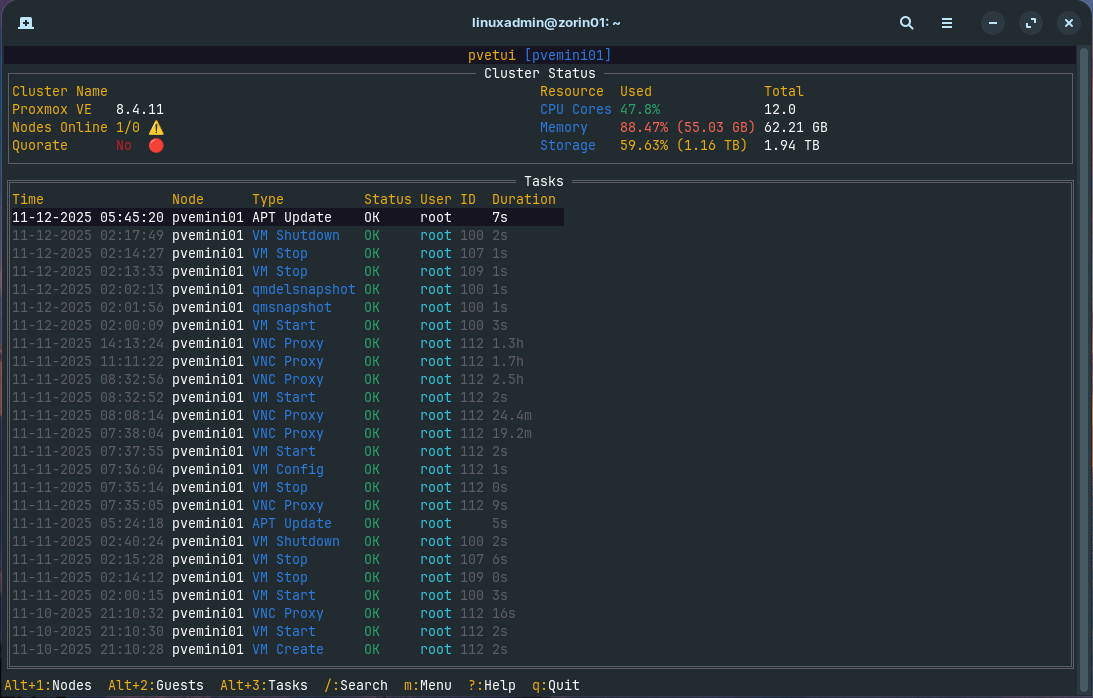
Tasks screen
The tasks screen shows you the various operations and tasks that have been carried out on the systems.
Plugins
One of the really cool aspects of this project is the developer has made it extensible with the ability to add plugins to the solution. It comes “out of the box” with the Proxmox Community Plugins add-on and also the ability to run commands that are approved on your Proxmox hosts.
You get to the Manage Plugins screen by hitting ESC on any of the screens you are on (Nodes, Guests, etc). You will see the option to Manage Plugins.
When you select to manage plugins, you will be able to select the Command Runner and Community Scripts.
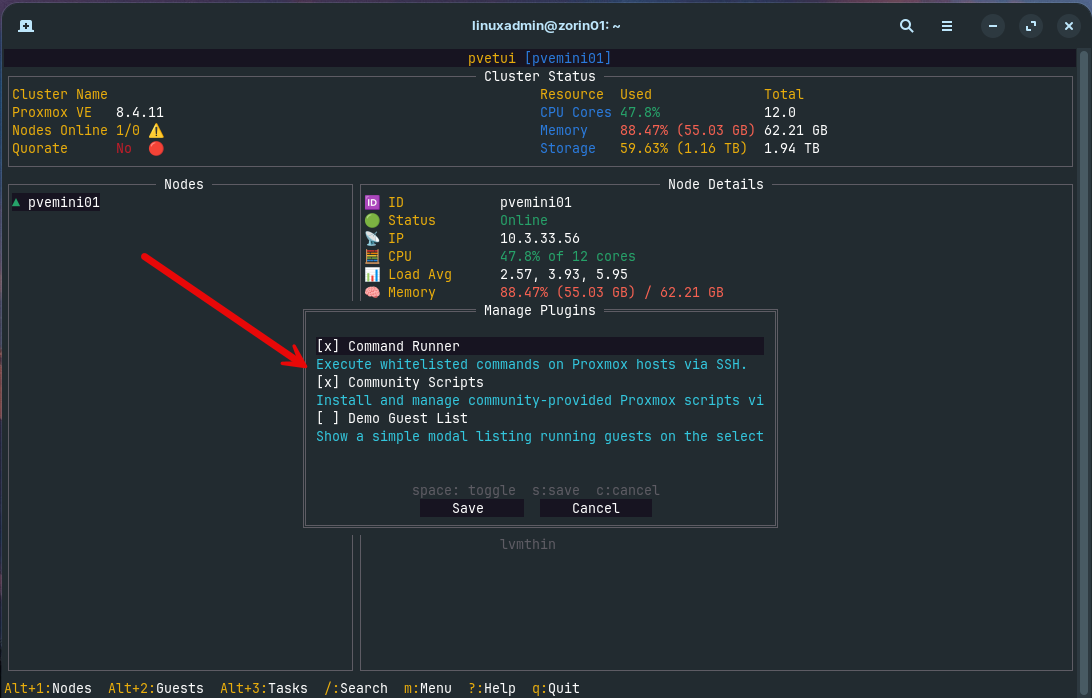
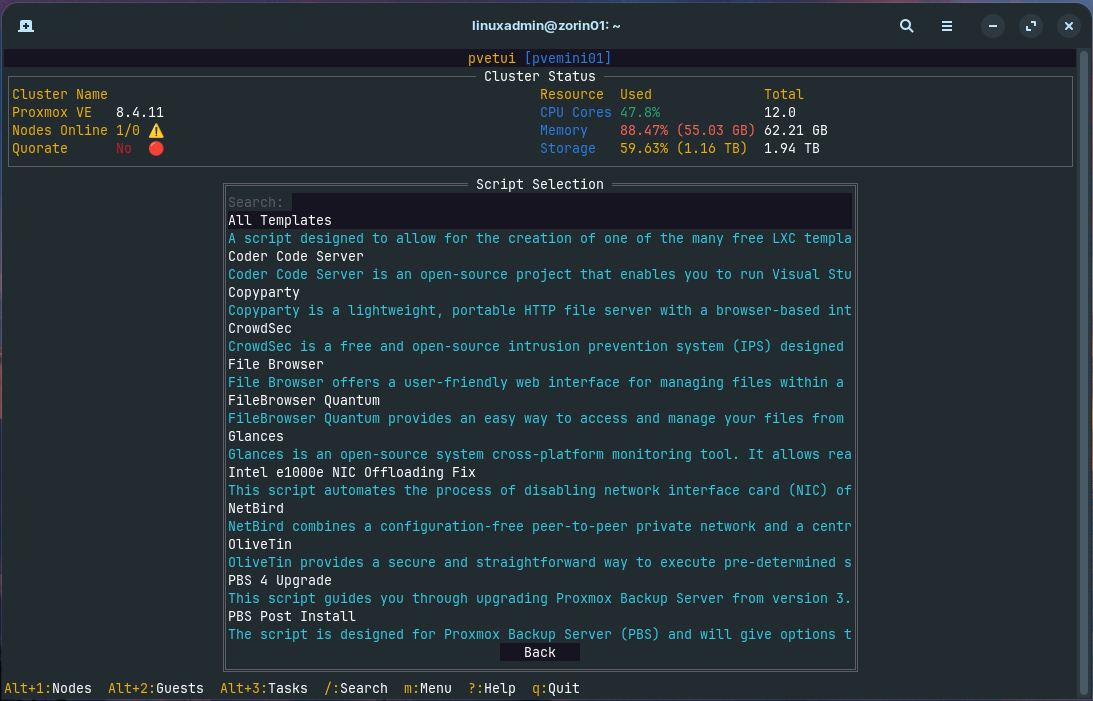
In the node actions, you can choose Install Community Script.

Once you launch the community helper scripts, it will download the available scripts and you can choose these to run on your PVE node.
Wrapping up
I think PVETUI is a perfect fit for most home lab environments for those who would like a fast, keyboard-driven way to manage Proxmox, akin to K9s for Kubernetes. I don’t know of anything else like it out there. Especially if you administer Proxmox over SSH, it requires minimal steps where running a web browser connection may not be ideal. When you consider the modular nature of the tool, the provided profile system, VNC access, and open-source utilities you have access to like the helper scripts, it is a really good one to add to the toolkit. Let me know in the comments if you have tried this out as of yet?
Google is updating how articles are shown. Don’t miss our leading home lab and tech content, written by humans, by setting Virtualization Howto as a preferred source.
About The Author


Man this is cool! I am a fan of Lazy Docker and this gives me the same vibes!
Thanks for doing the write-up! Actually, this made me aware of a few issues: storing password in cleartext, the cluster status showing 1/0 nodes available in a standalone deployment — I’ve addressed these in the latest release v1.0.10!
devnullvoid,
Thanks so much for this tool! It’s fantastic and looking forward to the next releases and features you introduce with it. Keep me posted on the new features when you add and I can do a followup blog on the enhancements 👍