
What are we talking about? Keep a home lab safe??? Well, it is easy to get carried away when you run a home lab. The whole point of having one is to test new things, new technologies, new software, etc. Also, breaking things is just by default a part of that. But when you have a setup that runs part of your actual workloads like your backups, dashboards, or home automation systems, then just a minor break in the wrong place can lead to big headaches. Over the years, I have developed a few “habits” for lack of a better word that can help you safely experiment without wrecking the main setup. Let’s look at how to keep your home lab safe and your data intact, when you are labbing.
Isolate, isolate, and isolate some more
The single best thing that can keep your “production” services and data intact in the home lab even when you are doing some destructive or disruptive type testing is isolation. Early in my home lab adventures, I made the mistake of deploying new containers or beta services I was testing directly into my main “production” Docker environment and on the same network.
Everything might seem fine doing that, until some container tried to claim a port that was already in use or a script I was working on accidentally stopped my production containers or worse, deleted some kind of container data. Now, I treat testing new services and “things” like a totally separate environment.
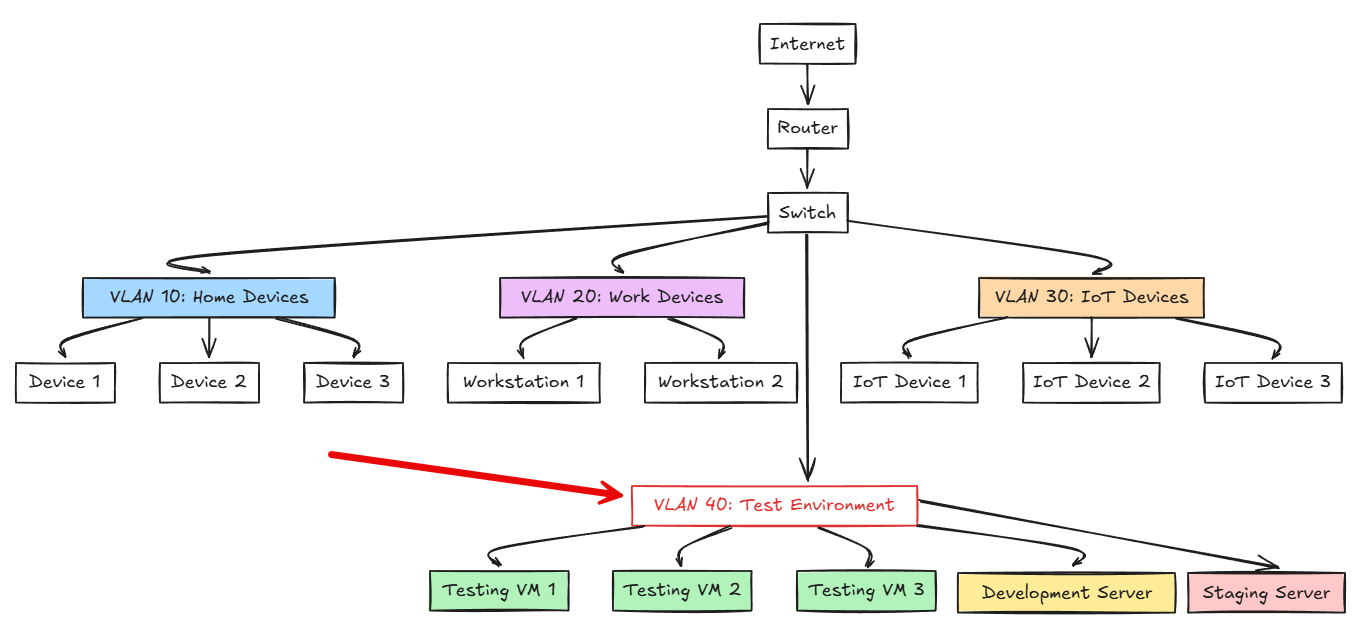
Outside of Docker containers, in Proxmox you isolate using dedicated VLANs for testing. Also, if you have a separate host loaded with Proxmox as a completely separate host even. This helps to make sure that if you change the wrong setting or spin something up that saturates the CPU or disk IO, then your production workloads will suffer. Then the VLANs will also keep the network side of things isolated.
Check out my posts on how to setup VLANs in Proxmox:
- How I Use VLANs to Isolate Docker and Proxmox Services (+ Free Worksheet)
- Proxmox Network Configuration for Beginners including VLANs
These same kinds of safeguards also apply to DNS and proxy configurations. I have “test” docker hosts that are just standalone hosts that have a quick and easy Nginx Proxy Manager configuration where I can throw a cert on the app if needed, but if it is just a quick test of an app, I may skip this altogether also.
Separating out your infrastructure is always a good idea across the board. I have tried to architect things so that I have duplicate infrastructure for testing. Keep in mind this doesn’t mean you have to have lots of expensive hardware. Two mini PCs could be one for test and one for production.
Snapshot virtual machines often when you are “labbing”
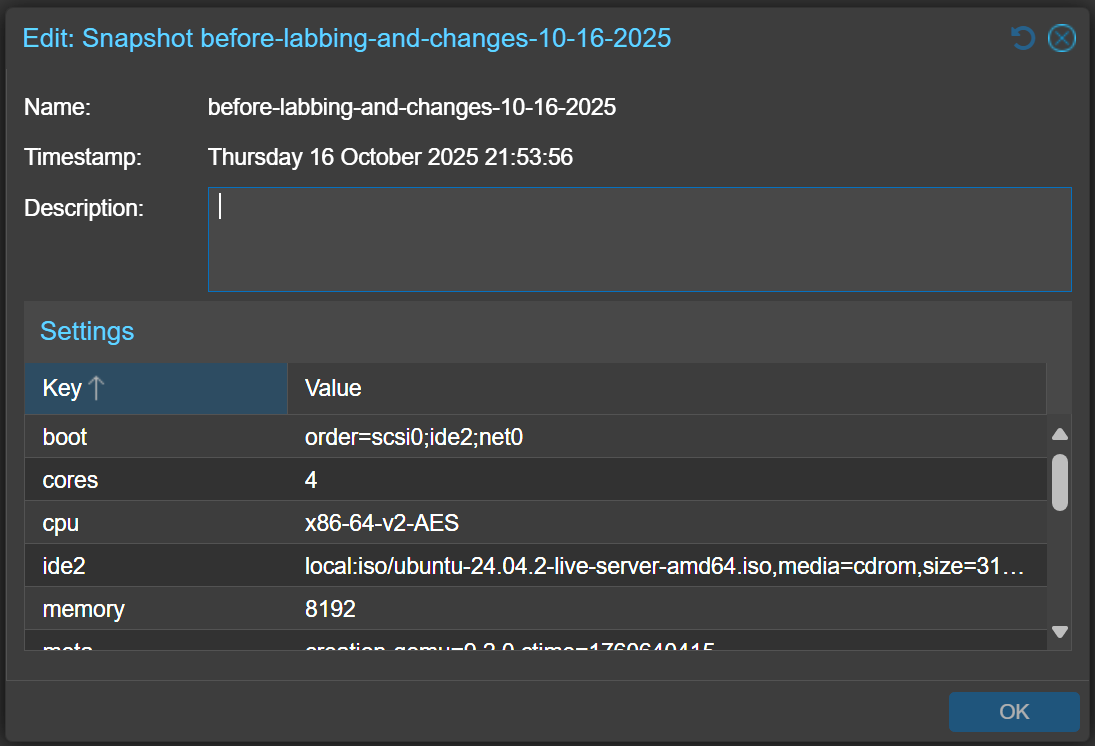
There is another habit that I have trained myself with in the home lab and that is to create a snapshot on virtual machines before labbing. This gives you a quick and easy path to roll back if anything breaks or happens.
Before any major change, I create a snapshot. With snapshots in Proxmox, you can’t have spaces. Note the other requirements:
- Maximum length: 40 characters
- Must start with a letter or number (not a special character)
- Case sensitive
So for my Proxmox snapshots, I will use something like the following format. I always include the date in the name even though I have the timestamp. It just helps give me a visual of the time and date in the name, without looking at the properties of the snapshot.
If you are using ZFS or something like CephFS, you can do things like ZFS snapshots, or with CephFS, subvolume snapshots. This is a good way to roll back a shared storage volume.
If you use ZFS or CephFS, the same concept applies. ZFS snapshots can capture the exact state of a dataset before an update. In CephFS, subvolume snapshots are a great way to roll back a shared storage volume.
See how I am using CephFS: CephFS for Docker Container Storage.
On Docker hosts, I sometimes use simple tar archives of volume directories before testing a migration script. The point is to never test on something you can’t restore.
Backups and immutability as your safety net
So for short term rollbacks, snapshots are definitely the way to go. You have probably heard the old adage that snapshots are not backups. Even though they are not, we use them as a tool for a purpose.
But if you need a real safety net for your lab and data, every serious home lab should have automated backups running on a schedule. I use a combination of tools and solutions in my lab environment. These include NAKIVO Backup & Replication to backup Proxmox and VMware environments. I use Veeam Backup & Replication for other workloads and for the Linux agents so I can backup my CephFS hosts and the Docker container data these contain. Also, I have Proxmox Backup Server running and covering workloads in Proxmox.

Immutable backups are now the recommendation for backups so that these can’t be deleted for a certain number of days or period of time that you specify. This makes doubly sure that you don’t accidentally get rid of data or have other things like ransomware cause data loss. I think in most home labs ransomware is fairly unlikely compared to us as admins making mistakes or deleting things we shouldn’t or breaking things unintentionally.
So, long story short to keep your home lab safe, have a backup plan and stick to it. Follow the 3-2-1 backup best practice to make sure you have 3 copies of your data on 2 different kinds of media with 1 offsite.
Test on disposable containers or virtual machines
Spin up test VMs and containers. When you have this kind of test environment, you will have a purpose-built place to test things that you don’t mind causing issues because they are running in these test VMs and containers.
If your labbing and testing prove to be promising as in it may be software or a tool you want to promote to be part of your production home lab, then you can promote it to your production hosts in your home lab where you have proper monitoring and backups scheduled.
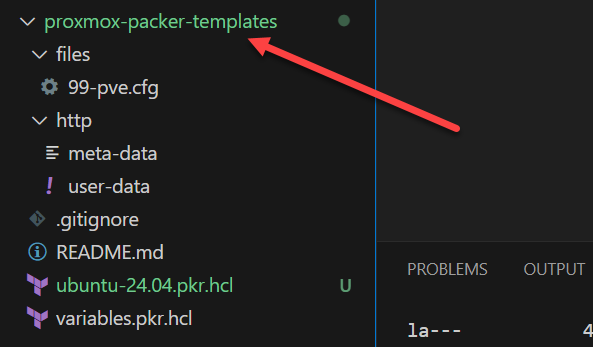
This is two-fold in purpose as it doesn’t waste your monitoring and backup resources on VMs and containers that are just meant for test and it keeps your production hosts lean. I also like to version control all my Docker Compose so I can quickly build out both my production and test environments. The same thing works with tools like Terraform for infrastructure as code and Ansible for configuration management. I use Packer to build out VM templates that can easily be spun up as test VMs.
Check out how to use Packer in Proxmox:
When you are in the habit of testing new tools weekly, it helps to have a repeatable way to spin up disposable environments. Docker and Proxmox make this easy. For most software I want to try, I’ll start with a temporary container or an LXC. If it looks promising, I then promote it to something persistent and add it to my monitoring and backup routines.
Don’t immediately promote new things to production
What do I mean by this? Even if you decide that a new piece of software running in a virtual machine or container is something that you want to add to your production stack, don’t do that immediately. I like to run things in a test environment at least a week. This gives you an extended period of time to discover any potential issues that may only present after the workload has been running a few days.
This way, if you discover a memory leak or some other problem, it still won’t be taking down your production infrastructure, only your test environment. You can throw a Netdata agent on your test Docker host or hypervisor and monitor it for any anomalies during the test phase.
Keep your production secrets separate from test
Another habit that I have tried to break in the home is using the same credentials for testing new things as I do in production. Use a separate .env file for any test stack and store temp credentials or tokens inside this file instead. You can also use tools like Doppler or Hashicorp Vault to manage secrets in a secure way in both your test and prod home lab segments.
Check out my post on Doppler here: Stop Using .env Files: Docker Secrets Made Easy with Doppler.
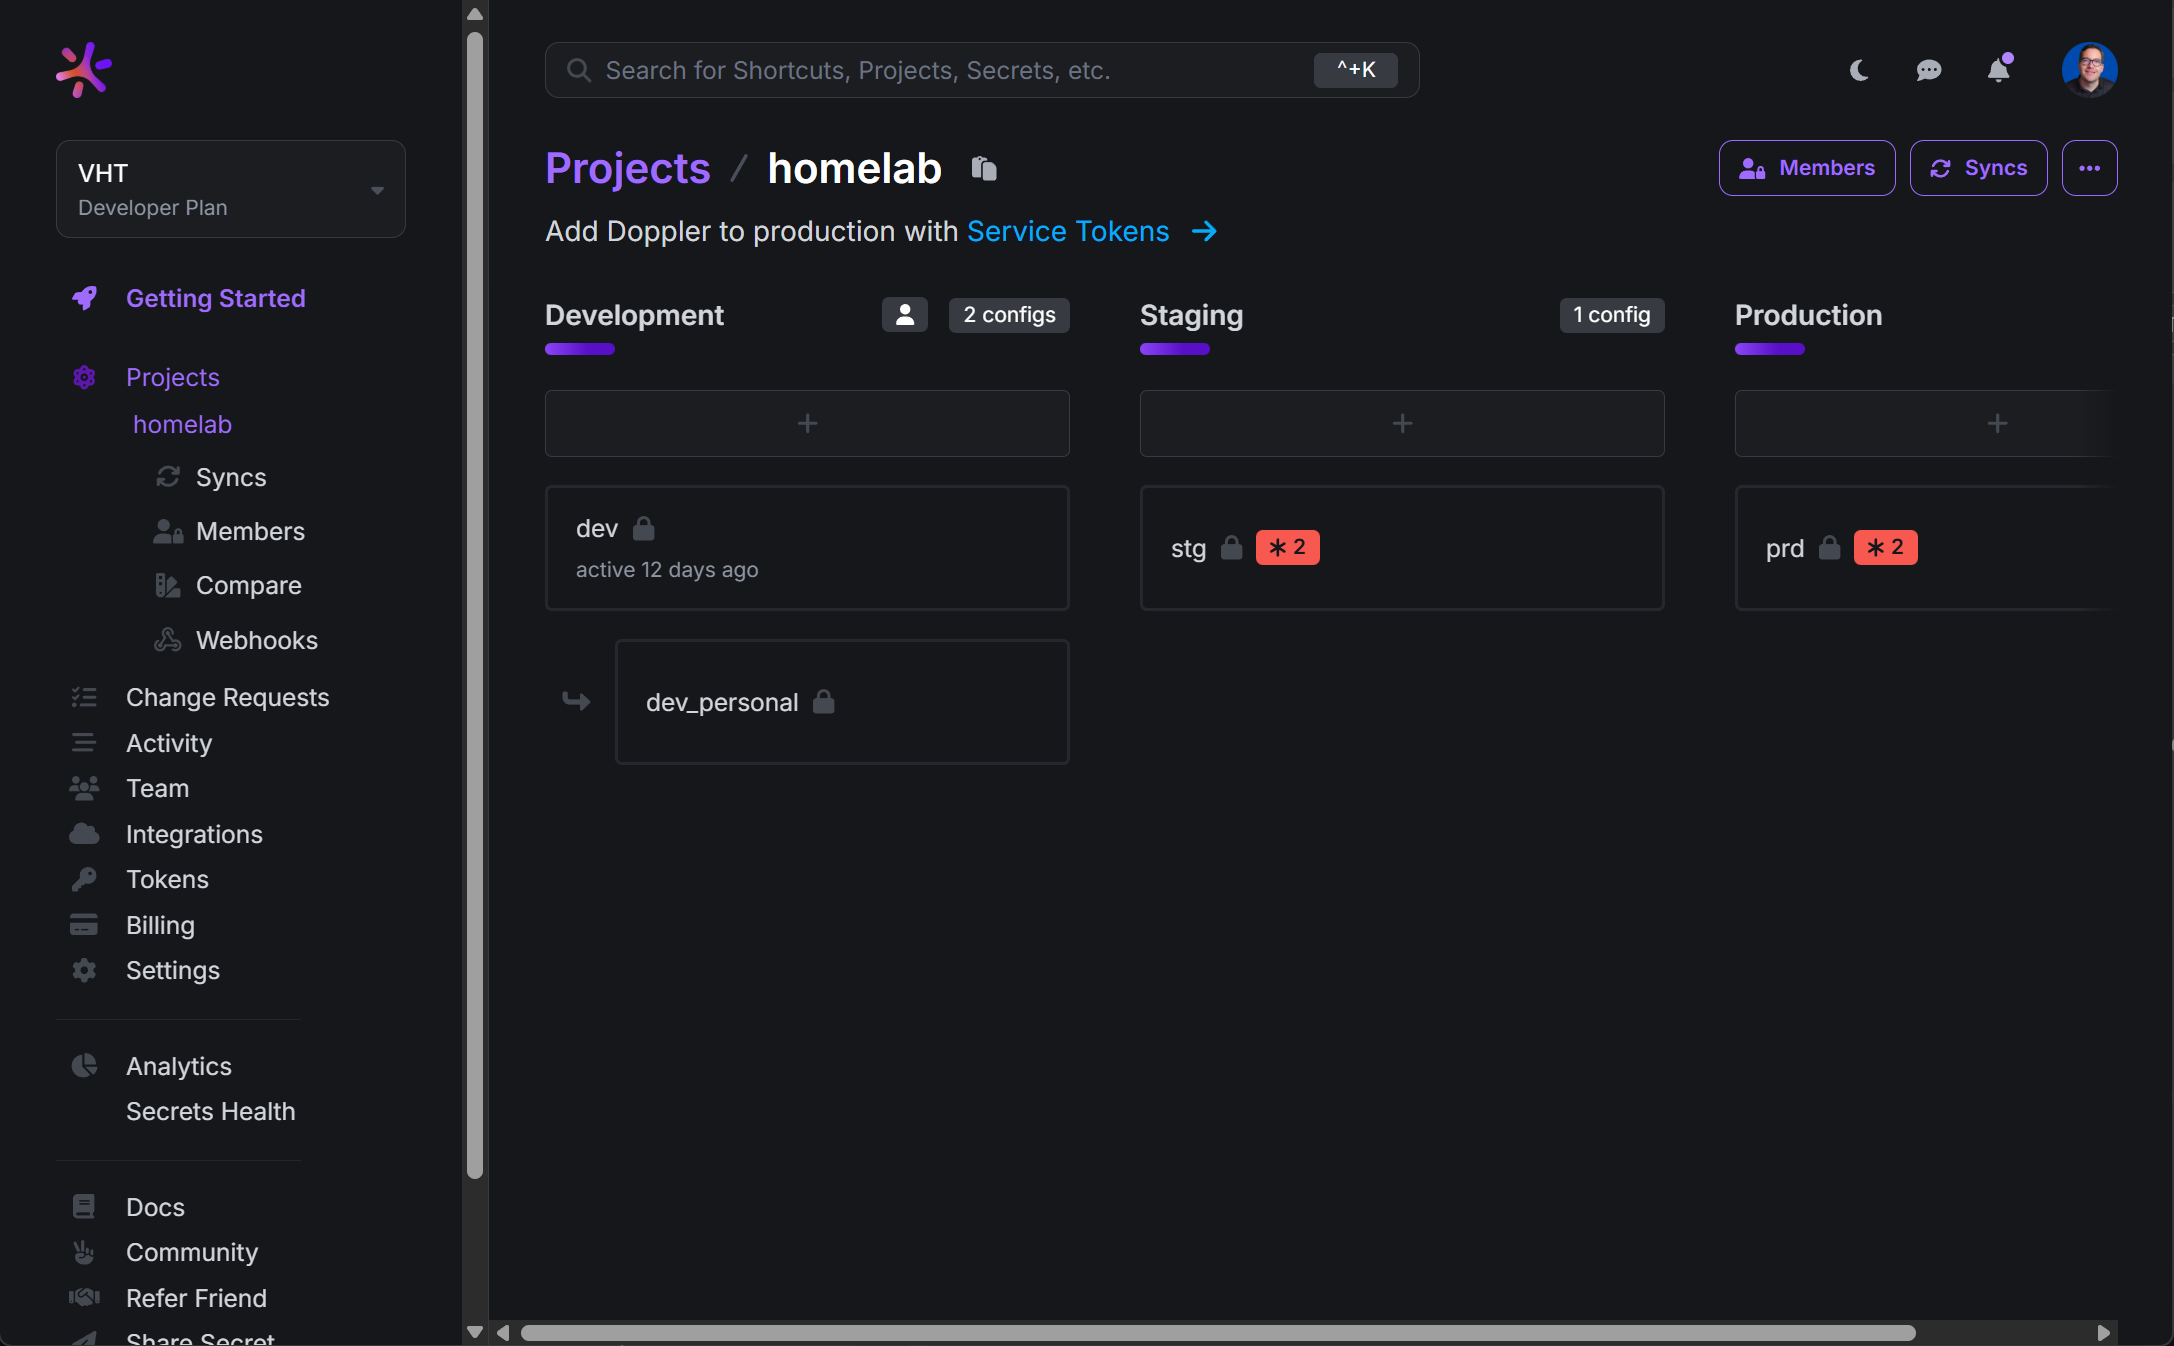
This helps to reduce the “blast radius” if a secret or credential gets exposed or accidentally leaked. Then you don’t have to worry about your prod environment since you are using different secrets between both.
Version control your home lab (both prod and your experiments)
Keeping things in version control in Git may sound like extreme overkill. But, I can assure you, this saves tons of time in the long run. If you have every Docker Compose file, Terraform files, configuration scripts, Ansible playbooks, etc in your private Git repo, you will have a repeatable and version controlled living documentation of your home lab, both prod and test.
See how to install Gitlab, runner, and container registry on your home server: Installing GitLab, Runner, and Container Registry on Your Home Server.

Also, this will serve you well later when and if you decide to roll your code into your production part of your lab. You won’t have to remember what settings you changed, or other tweaks you made as these will be there in your code. So, even if this seems like a massive time sink, don’t cut corners. The time up front will pay for itself many times over later.
Don’t expose half-baked or untested services to the Internet
Another point to keep in mind is to never expose test services or services that aren’t fully tested for security and other things out to the Internet. Keep traffic to these test services limited to your internal network. You may need to create temporary DNS entries like testserver.local.lab.

But, don’t expose something unless you have gone through some basic hardening and review firewall ports and ingress rules, etc. Always assume the new service or app you are testing is insecure until you prove that it is safe.
Check out my post on exposing your home lab to the Internet: Stop Exposing Your Home Lab – Do This Instead.
Learn from when things break
Keep in mind that despite your best efforts, there will likely be times when you break something. That is the fun part of home labs. But, the difference is, when you follow the guidelines and best practices we have talked about here to keep your home lab network and data safe, you will be able to recover things in minutes instead of hours or longer.
Every data restore I have had to do has taught me something new about my backups, or things that I should have checked before I made a change that broke something or corrupted data. Over time, recovering data and learning from these times has made my home lab much more resilient.
By approaching your lab this way, it will make it safe enough that failures turn into just easy lessons learned and not a major disaster. As a pro tip, keep a log when things break, what caused it, and how you resolved it. You will be surprised at how much light this will shed on things you may need to change in keeping things running smoothly.
Check out how to document your home lab the right way: How to Document Your Home Lab (The Right Way).
A weekend challenge for you and your lab
If you are looking for a weekend challenge to take on this weekend, take an hour or so to harden your testing environment. Do things like creating an isolated and dedicated VLAN and subnet that you use for experimenting. Set up a quick snapshot routine and also make sure your backups are running and that you can restore them.
Also, look at your monitoring and install Netdata or Prometheus to monitor your lab and send alerts when something isn’t working right. These small little steps will help keep home lab safe and a place where you can safely experiment and push the boundaries of what you do normally, learn more, and be able to recover when things break. What about you? Are you testing with any specific testing safeguards? What safety nets do you put in place?
Google is updating how articles are shown. Don’t miss our leading home lab and tech content, written by humans, by setting Virtualization Howto as a preferred source.
About The Author


I need to get another mini PC to separate my testing from production in my lab. Good use case for multiple pcs
I have a cluster for production and then a couple of standalone mini PCs for testing and breaking things.
Hi there to all, for the reason that I am genuinely keen of reading this website’s post to be updated on a regular basis. It carries pleasant stuff.
Agustin,
Thank you for your comment and kind words!
Brandon
Thank you — the troubleshooting tips saved me from major issues.
Bronson,
That is wonderful. So glad the post was helpful!
Brandon