I have been experimenting with SSO lately in the home lab and decided to give Authentik a try. And let me tell you, it is a crazy good self-hosted SSO solution that will likely do anything you need it to do. What’s more, we can install Authentik SSO with Docker Compose easily.
Overview of Authentik
If you’re not familiar with Authentik, it’s an open-source identity provide. The whole idea of the solution is that you can replace pay-for solutions like Okta, Keycloak, or Auth0 and host your own authentication provider. It supports all the major technologies like SAML, OpenID Connect (OIDC), LDAP, and others.
Any app that supports some type of modern authentication will likely work well with Authentik. For the home lab, this is a win/win since it means you can have a centralized service (that you self-host) that allows you to centralize your logins and enforce strong security across your lab environment.
If you want to log in once and get access to self-hosted services like Portainer, Gitea, Nextcloud, and Proxmox, Authentik can make that possible.
What do you need to run Docker Compose and Authentic?
Well, nothing out of the ordinary. Really, we just need the basics. You will need the following:
- A server or VM running Linux (Ubuntu, Debian, or similar works fine)
- Docker and Docker-Compose installed – for Ubuntu, see the official docs here: Ubuntu | Docker Docs
- A domain name for your Authentik instance – either hosted internally or externally. Keep in mind you will want an external domain if you want to do Let’s Encrypt certificates
- A reverse proxy like Traefik or Nginx Proxy Manager if you want HTTPS with Let’s Encrypt certificates
Authentik does rely on a few other open-source solutions like:
- PostgreSQL database
- Redis for caching
However, Docker-Compose makes wiring together your Authentik “stack” staightforward and easy. You will also want to have persistent volumes defined for the database and Authentik’s config so these survive a respin of your container.
Authentik SSO Docker-Compose file
So I played around with this one quite a bit in the home lab to get things right for Authentik SSO Docker-Compose. Hopefully this compose code will be helpful and save you tons of time on your end to get up and running quickly. I am also using Traefik as my reverse proxy in the lab so this is a prerequisite for this example code. However, you can easily strip out the Traefik labels and connect the required containers to the Docker network you wnat to use.
There are two parts to this, the Docker-Compose code and the .env file to house the sensitive variables. First, here is the Docker-Compose V2 code:
services:
  authentik-db:
    image: postgres:15
    environment:
      - POSTGRES_USER=${POSTGRES_USER}
      - POSTGRES_PASSWORD=${POSTGRES_PASSWORD}
      - POSTGRES_DB=${POSTGRES_DB}
    volumes:
      - ${AUTHENTIK_DB_VOLUME_PATH}:/var/lib/postgresql/data
    networks:
      - traefik
    healthcheck:
      test: ["CMD-SHELL", "pg_isready -U ${POSTGRES_USER} -d ${POSTGRES_DB}"]
      interval: 10s
      timeout: 5s
      retries: 5
      start_period: 30s
    deploy:
      replicas: 1
      restart_policy:
        condition: on-failure

  authentik-redis:
    image: redis:7-alpine
    volumes:
      - ${AUTHENTIK_REDIS_VOLUME_PATH}:/data
    networks:
      - traefik
    deploy:
      replicas: 1
      restart_policy:
        condition: on-failure

  authentik:
    image: ${AUTHENTIK_IMAGE}
    restart: always
    command: server
    depends_on:
      - authentik-db
      - authentik-redis
    environment:
      - AUTHENTIK_POSTGRESQL__HOST=${AUTHENTIK_POSTGRESQL__HOST}
      - AUTHENTIK_POSTGRESQL__PORT=${AUTHENTIK_POSTGRESQL__PORT}
      - AUTHENTIK_POSTGRESQL__NAME=${AUTHENTIK_POSTGRESQL__NAME}
      - AUTHENTIK_POSTGRESQL__USER=${AUTHENTIK_POSTGRESQL__USER}
      - AUTHENTIK_POSTGRESQL__PASSWORD=${AUTHENTIK_POSTGRESQL__PASSWORD}
      - AUTHENTIK_REDIS__HOST=${AUTHENTIK_REDIS__HOST}
      - AUTHENTIK_REDIS__PORT=${AUTHENTIK_REDIS__PORT}
      - AUTHENTIK_SECRET_KEY=${AUTHENTIK_SECRET_KEY}
      - AUTHENTIK_ERROR_REPORTING__ENABLED=${AUTHENTIK_ERROR_REPORTING__ENABLED}
      - AUTHENTIK_LOG_LEVEL=${AUTHENTIK_LOG_LEVEL}
      - AUTHENTIK_WEB__TRUSTED_PROXIES=${AUTHENTIK_WEB__TRUSTED_PROXIES}
      - AUTHENTIK_LISTEN__HTTP=${AUTHENTIK_LISTEN__HTTP}
      - AUTHENTIK_LISTEN__HTTPS=${AUTHENTIK_LISTEN__HTTPS}
      - AUTHENTIK_BOOTSTRAP_PASSWORD=${AUTHENTIK_BOOTSTRAP_PASSWORD}
      - AUTHENTIK_BOOTSTRAP_EMAIL=${AUTHENTIK_BOOTSTRAP_EMAIL}
      - AUTHENTIK_BOOTSTRAP_USERNAME=${AUTHENTIK_BOOTSTRAP_USERNAME}
      - AUTHENTIK_BOOTSTRAP_TOKEN=${AUTHENTIK_BOOTSTRAP_TOKEN}
    volumes:
      - ${AUTHENTIK_DATA_VOLUME_PATH}:/data
    networks:
      - traefik
    deploy:
      replicas: 1
      restart_policy:
        condition: on-failure
      labels:
        - "traefik.enable=true"
        - "traefik.http.routers.authentik.rule=Host(`${AUTHENTIK_DOMAIN}`)"
        - "traefik.http.routers.authentik.entrypoints=websecure"
        - "traefik.http.routers.authentik.tls.certresolver=letsencrypt"
        - "traefik.http.services.authentik.loadbalancer.server.port=${AUTHENTIK_PORT}"

  authentik-worker:
    image: ${AUTHENTIK_IMAGE}
    restart: always
    command: worker
    depends_on:
      - authentik-db
      - authentik-redis
    environment:
      - AUTHENTIK_POSTGRESQL__HOST=${AUTHENTIK_POSTGRESQL__HOST}
      - AUTHENTIK_POSTGRESQL__PORT=${AUTHENTIK_POSTGRESQL__PORT}
      - AUTHENTIK_POSTGRESQL__NAME=${AUTHENTIK_POSTGRESQL__NAME}
      - AUTHENTIK_POSTGRESQL__USER=${AUTHENTIK_POSTGRESQL__USER}
      - AUTHENTIK_POSTGRESQL__PASSWORD=${AUTHENTIK_POSTGRESQL__PASSWORD}
      - AUTHENTIK_REDIS__HOST=${AUTHENTIK_REDIS__HOST}
      - AUTHENTIK_REDIS__PORT=${AUTHENTIK_REDIS__PORT}
      - AUTHENTIK_SECRET_KEY=${AUTHENTIK_SECRET_KEY}
      - AUTHENTIK_ERROR_REPORTING__ENABLED=${AUTHENTIK_ERROR_REPORTING__ENABLED}
      - AUTHENTIK_LOG_LEVEL=${AUTHENTIK_LOG_LEVEL}
      - AUTHENTIK_WEB__TRUSTED_PROXIES=${AUTHENTIK_WEB__TRUSTED_PROXIES}
      - AUTHENTIK_LISTEN__HTTP=${AUTHENTIK_LISTEN__HTTP}
      - AUTHENTIK_LISTEN__HTTPS=${AUTHENTIK_LISTEN__HTTPS}
      - AUTHENTIK_BOOTSTRAP_PASSWORD=${AUTHENTIK_BOOTSTRAP_PASSWORD}
      - AUTHENTIK_BOOTSTRAP_EMAIL=${AUTHENTIK_BOOTSTRAP_EMAIL}
      - AUTHENTIK_BOOTSTRAP_USERNAME=${AUTHENTIK_BOOTSTRAP_USERNAME}
      - AUTHENTIK_BOOTSTRAP_TOKEN=${AUTHENTIK_BOOTSTRAP_TOKEN}
    volumes:
      - ${AUTHENTIK_DATA_VOLUME_PATH}:/data
    networks:
      - traefik
    deploy:
      replicas: 1
      restart_policy:
        condition: on-failure

networks:
  traefik:
    external: true
Save this Authentik SSO docker-compose as docker-compose.yml. Next, the .env file to house your sensitive variables. You can use this example file and replace with the values you want to use.
# Database Configuration
POSTGRES_USER=authentik
POSTGRES_PASSWORD=your_secure_postgres_password_here
POSTGRES_DB=authentik

# Authentik PostgreSQL Connection
AUTHENTIK_POSTGRESQL__HOST=authentik-db
AUTHENTIK_POSTGRESQL__PORT=5432
AUTHENTIK_POSTGRESQL__NAME=authentik
AUTHENTIK_POSTGRESQL__USER=authentik
AUTHENTIK_POSTGRESQL__PASSWORD=your_secure_postgres_password_here

# Authentik Redis Connection
AUTHENTIK_REDIS__HOST=authentik-redis
AUTHENTIK_REDIS__PORT=6379

# Authentik Configuration
AUTHENTIK_SECRET_KEY=your_very_long_random_secret_key_at_least_50_characters_long
AUTHENTIK_ERROR_REPORTING__ENABLED=false
AUTHENTIK_LOG_LEVEL=info

# Reverse Proxy Configuration
AUTHENTIK_WEB__TRUSTED_PROXIES=*
AUTHENTIK_LISTEN__HTTP=0.0.0.0:9000
AUTHENTIK_LISTEN__HTTPS=0.0.0.0:9443

AUTHENTIK_BOOTSTRAP_PASSWORD=your_initial_admin_password
[email protected]
AUTHENTIK_BOOTSTRAP_USERNAME=admin
AUTHENTIK_BOOTSTRAP_TOKEN=your_bootstrap_token_here

# Container Image Version
AUTHENTIK_IMAGE=ghcr.io/goauthentik/server:2025.8.1

# Volume Paths
AUTHENTIK_DB_VOLUME_PATH=/your/path/to/authentik/database
AUTHENTIK_REDIS_VOLUME_PATH=/your/path/to/authentik/redis
AUTHENTIK_DATA_VOLUME_PATH=/your/path/to/authentik/data

# Traefik Configuration
AUTHENTIK_DOMAIN=auth.yourdomain.com
AUTHENTIK_PORT=9000
Save the second file as .env. Then, run docker compose up -d. Within a minute or so, Authentik should be running on port 9000 (HTTP) on the backend. Then Traefik will use the labels to issue a proper SSL certificate to secure connectivity to your Authentik container.
Setting things up
Since we have set the initial bootstrap username and password, this part is already done. We just need to browse out to the URL of the server using the Traefik (or other reverse proxy added domain name) and login with those initial credentials.
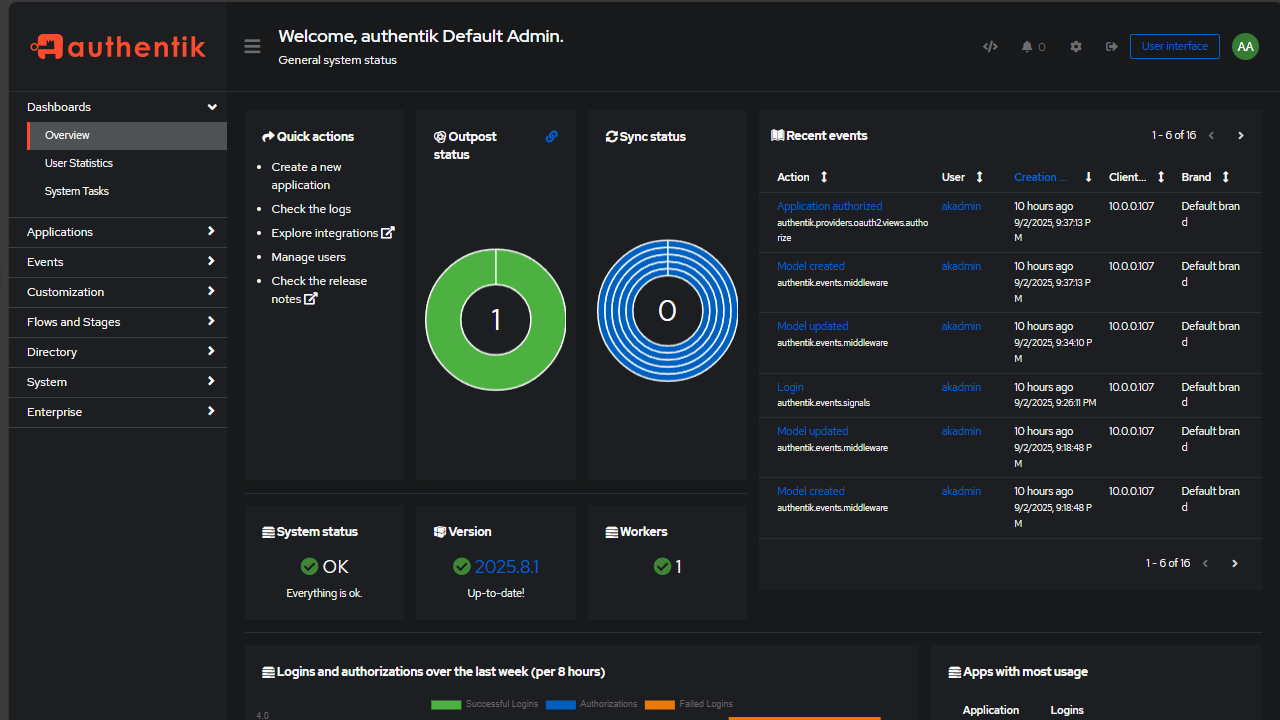
You will be greeted with a “wizard” of sorts that asks you to set up your first application. However, you can cancel out of that if you want and navigate to the dashboard.
Authentik has a really nice, modern-looking dashboard that gives you an overview of your SSO environment.
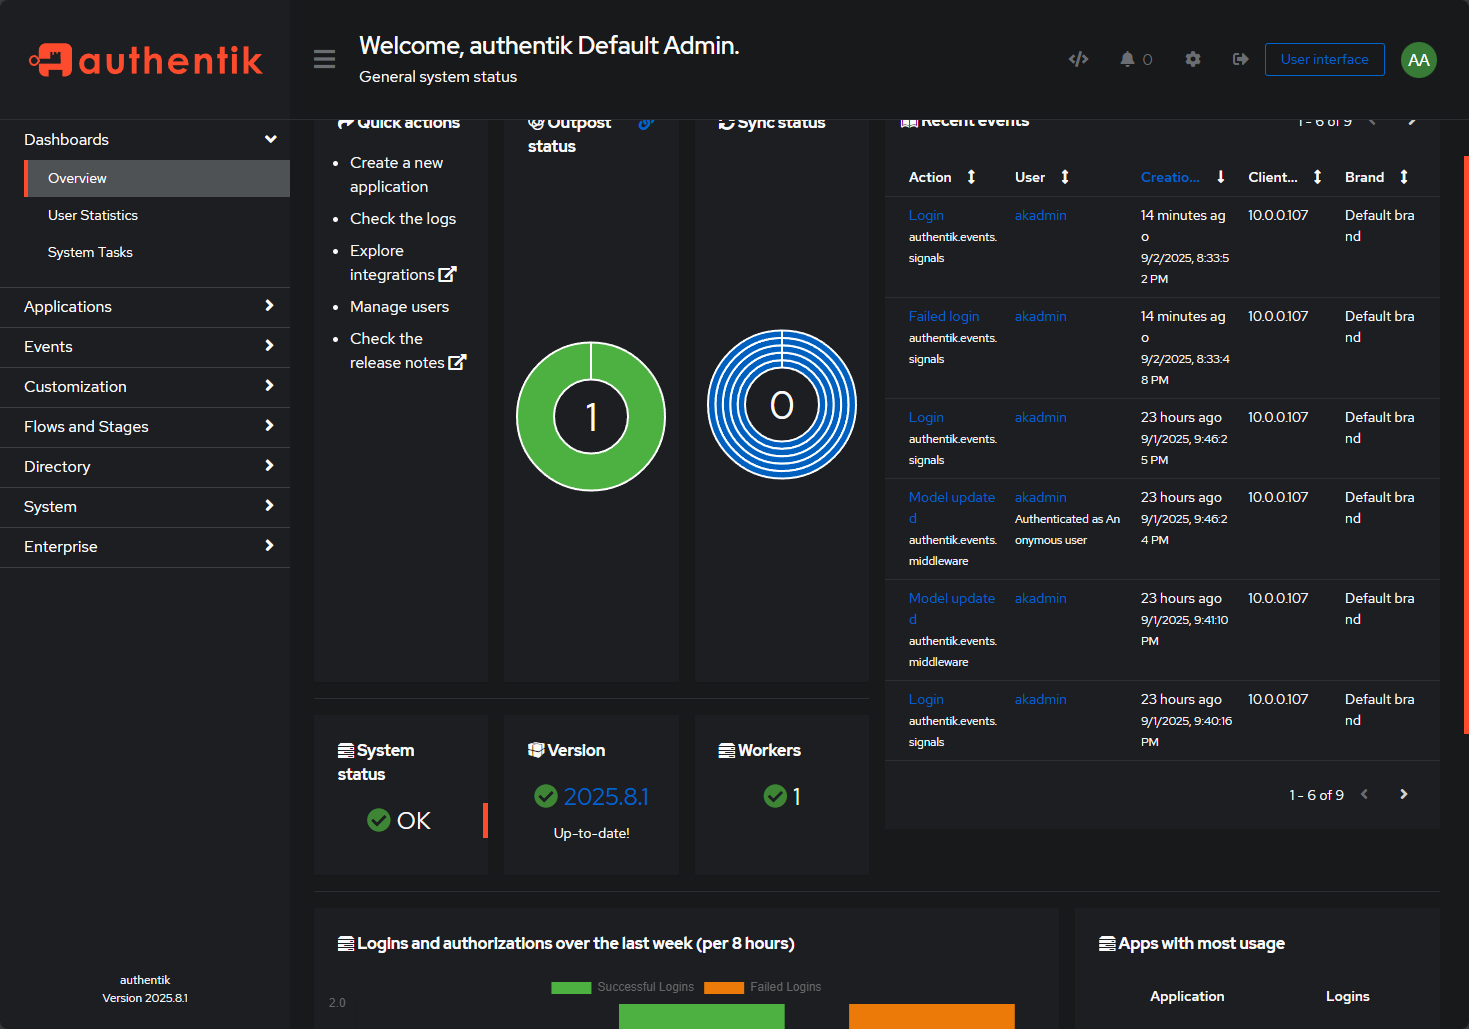
I skipped out of first creating an application because if you navigate to the dashboard, it will show you if everything is functioning like it needs to. You will see things like:
- System status
- Version
- Workers
You should see green checkboxes if everything is healthy.
Adding a reverse proxy or not
Having a reverse proxy with Authentik isn’t required, but if you expose Authentik to the Internet or if you just want to be cleaner and have trusted encrypted traffic using a real certificate authority, a reverse proxy is required.
You can see the example code with Traefik above. However, just to key in on the configuration that enables your reverse proxy connection, note the configuration code below that is part of your docker compose.
    labels:
      - "traefik.enable=true"
      - "traefik.http.routers.authentik.rule=Host(`auth.mydomain.com`)"
      - "traefik.http.routers.authentik.entrypoints=websecure"
      - "traefik.http.routers.authentik.tls.certresolver=myresolver"
Then, in our environment, we have the following related to reverse proxies:
- AUTHENTIK_WEB__TRUSTED_PROXIES=${AUTHENTIK_WEB__TRUSTED_PROXIES}
- AUTHENTIK_LISTEN__HTTP=${AUTHENTIK_LISTEN__HTTP}
- AUTHENTIK_LISTEN__HTTPS=${AUTHENTIK_LISTEN__HTTPS}
If you don’t use a reverse proxy, you will need to access it browsing out to the clear text site at http://ip:9000. Once you add Traefik or another reverse proxy, you’ll be able to reach Authentik at https://auth.mydomain.com with a Let’s Encrypt certificate issued automatically. Pretty cool.
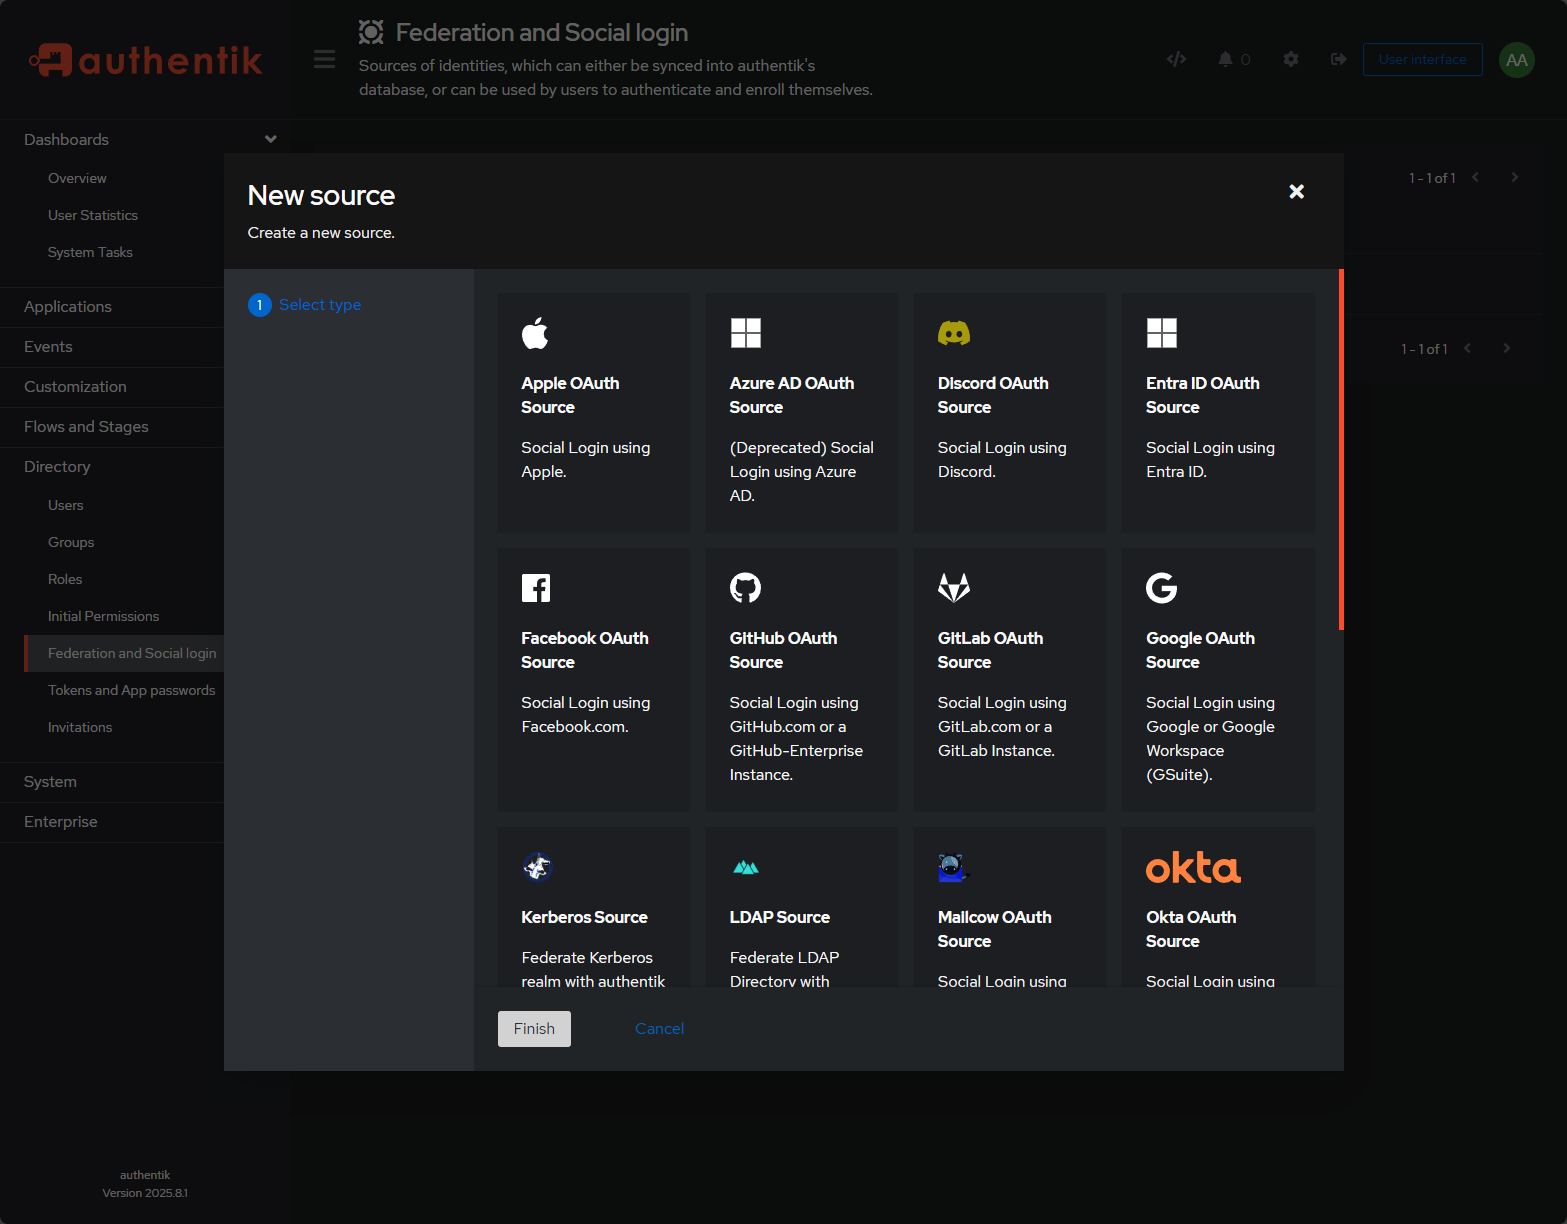
Connecting a federated or social login source
You really start to see the beauty of what Authentik can do, when you navigate to the Users menu and add federated or social login source. You will see a very healthy list of federated identity sources you can add. Note the screenshot below. Notably, you can add sources like:
- Apple OAuth
- Discord
- Entra ID
- GitHub OAuth
- GitLab OAuth
- Google OAuth
- Kerberos source
- LDAP source
- Okta
- …more
Terminology and workflow
All of the different applications and SSO providers have similar workflows but they can have certain variations of the terminology. In Authentik, note the following terms that you will want to be familiar with:
- Provider – This is the protocol endpoint that your external app (think Portainer, GitLab, Grafana, etc.) talks to. This is Authentik’s side of the handshake.” A provider can be OIDC, SAML, LDAP, or something else depending on what the target app supports
- Application – This is a logical grouping in Authentik that bundles together one or more providers. This is where you can set the branding (the logo/URL you or your other users click from the Authentik dashboard, and policy bindings. This is the customized dashboard users will see in the Authentik launch portal.
So you will follow this workflow:
- Create a provider (OIDC or SAML, depending on the app)
- Apps like Portainer and GitLab support OIDC, so you’d make an OIDC provider in Authentik
- Create an Application that points to that provider
- The Application is the “friendly tile” users can click in the Authentik dashboard
- You can also set policies to control what types of auth users need to pass along like requiring MFA for GitLab but not for Grafana as an example
- Configure your self-hosted app to use the Authentik Provider you just created. You’ll copy the client ID, secret, issuer URL, etc. from Authentik into your app’s settings.
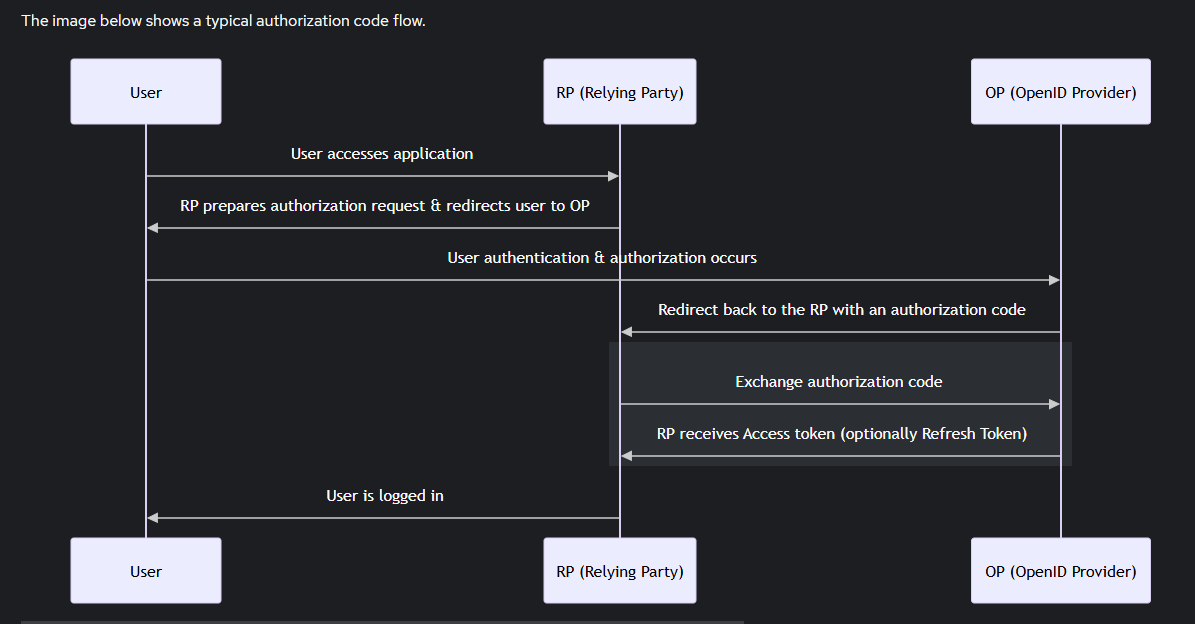
Below is an overview diagram from Authentik on the flow:
Don’t wait to implement SSO
You may think like I did for a while that having SSO in the home lab is just a nice to have. However, the reality is that if you are exposing services through reverse proxies, Cloudflare tunnels or port forwarding, you need the strong authentication layer to your apps. With Authentik you can implement MFA, have password policies and reduce any weak points with authentication in your lab..
Wrapping it
I really like Authentik. It “feels” like an enterprise provider with the polish you would expect all for free. With Docker-Compose, it isn’t that difficult to spin up and it has tons of features and capabilities that make it a must have in the home lab. It integrates with most self-hosted services and it gives you peace of mind in your lab that authentication is secure. Are you using Authentik or another SSO provider? Let me know in the comments as I would love to see what everyone is doing in regards to auth in the home lab.
Google is updating how articles are shown. Don’t miss our leading home lab and tech content, written by humans, by setting Virtualization Howto as a preferred source.
About The Author


I’ve been running Authentik for a while now and I love it, but my instance is a few revisions behind due to being unable to upgrade the postgresql db from 12 to 16. As a result I’m stuck at 2025.2.4. I’ve followed the official postgres upgrade docs, but the logs keep saying “Authentik user could not be found” when I run the very last command to migrate my old db to the new db container.
Romeo,
Thanks for the comment! I’m thinking that pg_upgrade should bring roles over automatically if the cluster directories are mounted correctly. But if something went sideways you would probably see the “Authentik user could not be found” message.
I’d check inside your Postgres 16 container with \du and confirm the authentik role is there. If it’s missing, you can recreate it before the final step:
CREATE ROLE authentik WITH LOGIN PASSWORD ‘yourpassword’;
CREATE DATABASE authentik OWNER authentik;
Let me know if that helps!
Brandon
I’ll give that a shot this weekend and report back! Thanks, Brandon.
Nice article 👍
I don’t think Keycloak is one of the pay-for solutions, though.
Thanks Brandon. I got it up and running in my portainer 3-node docker swarm i followed from your docker swarm tutorial. Setting up SAML is a beast, are you planning to create video to setup saml auth on an app? I’m a splunker, maybe setting up saml auth with authentik is cool.
henryh20,
Definitely, I plan on covering this so stay tuned!
Brandon
Authentik makes single-sign-on and MFA so seamless in a home lab—especially for apps like Portainer, Gitea, and Proxmox (all centralizing authentication). For those running similar setups, how have you handled fallback or recovery mechanisms if Authentik becomes unavailable (e.g., SSO down)? Have you integrated any redundancies or emergency access methods to avoid being locked out of your own services?
Desain,
Thank you for the comment. A lot of the solutions still allow you to login locally like Portainer. There is an option in Portainer to “hide local authentication” but I wouldn’t advise turning this on. I still leave the local logins active for a super user of sorts for break glass needs.
Brandon
I use this one to upgrade my PG databases. I upgraded Authentik in this way wo any issues: Here’s the yaml
name: pgautoupgrade services: pgautoupgrade: image: pgautoupgrade/pgautoupgrade:latest container_name: pgauto stdin_open: true tty: true volumes: - type: bind source: ./database target: /var/lib/postgresql/data environment: - POSTGRES_PASSWORD=${PG_PASS:?database password required} - POSTGRES_USER=${PG_USER:-authentik} - POSTGRES_DB=${PG_DB:-authentik} env_file: - .envReneB,
Thank you for sharing your code that worked. This will be helpful to the community!
Brandon