
I have had some questions in the comments about showing the upgrade from Proxmox VE 8 to 9. The official documentation is there, but can be a little hard to follow at times. So, here you go, my how to upgrade from Proxmox VE 8 to 9 guide. We will cover the high points, as well as other things like upgrading cluster hosts and Ceph nodes.
***Updated Note about Veeam backups***
Take a look here at the note about Veeam backups failing after the upgrade to Proxmox VE 9. Even with the latest November 2025 update to Veeam Backup & Replication v12.3.2.4165, you will get failures evidently due to QEMU 10.x disks. There is a workaround though if you want to go ahead and upgrade and set your QEMU version back down. See the Proxmox forum thread here: (4) Veeam error Failed to map disks (since upgrade v8 to v9) | Proxmox Support Forum.
Brief look at what’s new in Proxmox VE 9
Check out my full blog post covering the what’s new as I looked at things with the Proxmox VE 9 Beta release here: Proxmox VE 9 Beta Is Here: All the New Features You Need to Know.
However, just as a cliff’s notes version of that post, check out the following new features for Proxmox 9:
- Based on Debian 13 (Trixie) with Linux kernel 6.14.8-2
- Updated core stack: QEMU 10.0.2, LXC 6.0.4, ZFS 2.3.3, Ceph Squid 19.2.3
- Snapshots now work on thick-provisioned LVM (iSCSI / FC SAN)
- New SDN fabrics (OpenFabric, OSPF mesh)
- HA affinity rules for smarter VM placement in your cluster
- ZFS RAID-Z allows expansion with little if any downtime
- Modern mobile UI
- No more support for GlusterFS
A note about third-party backups
Now that Proxmox is much like other enterprise solutions like VMware vSphere, if you are using a third-party backup solution, note that it is always best practice to wait until you know whether or not your third-party backup solution supports the newest version of Proxmox VE Server. Proxmox Backup Server (PBS) 4.0 will be the PBS server version you will need to be supported for Proxmox VE 9 server.
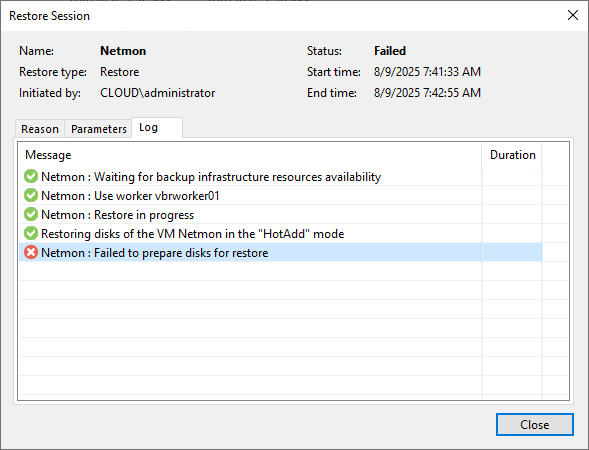
A case in point, I ran into an issue with Proxmox VE 9 and Veeam Backup & Replication 12.x when restoring VMware VMs to a PVE 9 server, which leads me to believe Veeam will need to release a patch to bring support to VBR for Proxmox 9.
Below is the error that I received trying to restore disks to a Proxmox VE 9 server. Downgrading the host to Proxmox VE 8 solved the issue. You can see my forum write up on this here: Veeam failed to prepare disks Proxmox VE 9.
Looking at upgrade paths
You have two main options for upgrading, a clean install or an in-place upgrade. Be sure to read through the official documentation from Proxmox on the upgrade process, in addition to this post: Upgrade from 8 to 9 – Proxmox VE.
1. Clean Install is recommended if you want to have a clean fresh start with PVE
If you can afford to rebuild your environment and restore from backups, this is the cleanest and safest way. Upgrades carry with them the baggage of old environments, settings, etc.
Overview of steps:
- Backup everything — VMs, containers, and important config files. Configs you need to think about may be the:
/etc(especially/etc/pve,/etc/network/interfaces,/etc/resolv.conf)
- Download the Proxmox VE 9 ISO
- Boot from the ISO and install, erasing the disk
- After installation, clear your browser cache before accessing the new web UI
- Rebuild your cluster if you have or want to have one
- Restore your configs and VM/CT backups back to your server
2. In-Place upgrade for the least disruption and effort
If you want to keep your current setup intact and avoid a full rebuild, keeping things mostly as they are, you will want to perform an in-place upgrade.
Preparing for the in-place upgrade
- Check your current version. According to Proxmox documentation, you need to at least be on
8.4.1: Run the command:pveversion - Upgrade Ceph first if you are using it, to Ceph Squid 19.2.x
- Make sure your cluster is healthy:
pvecm status - Make sure you have backups and these are tested and working
- Have at least 5-10 GB free on your root partition
Use the built-in upgrade test script
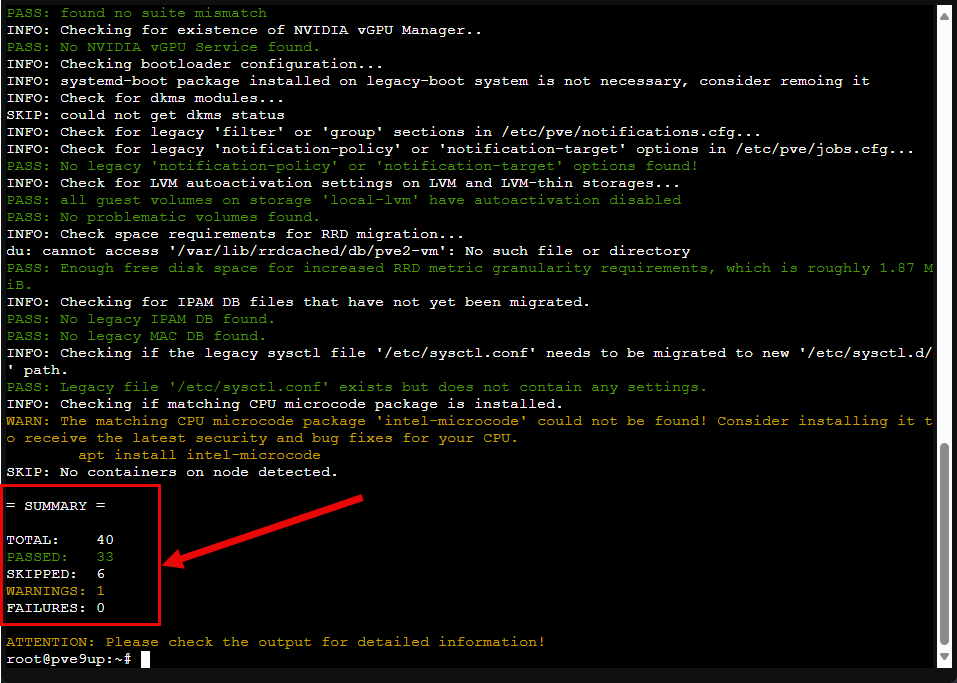
Run the built-in check script:
pve8to9 --fullThis will flag potential issues before you start. Fix any problems it reports, especially around networking, storage, or unsupported packages.
Below, I am launching the built-in script:

Once the script finishes, it will call out any concerns or outright issues that will cause the upgrade to fail. Do take note of these and correct or remediate as needed.
In-place upgrade steps: Single host
Let’s go through the steps to upgrade on a single Proxmox VE 8 host.
1. Backup and shutdown VMs and CTs
First thing you need to do before making any changes to your PVE host is backup all your VMs and containers. Either use Proxmox Backup Server or another third-party backup tool.
2. Update your Proxmox VE 8 system
Before we can upgrade, Proxmox makes mention that we need to be at the latest version of 8.4.1. From the command line or GUI, pull down all updates for your Proxmox VE 8 host.
apt update
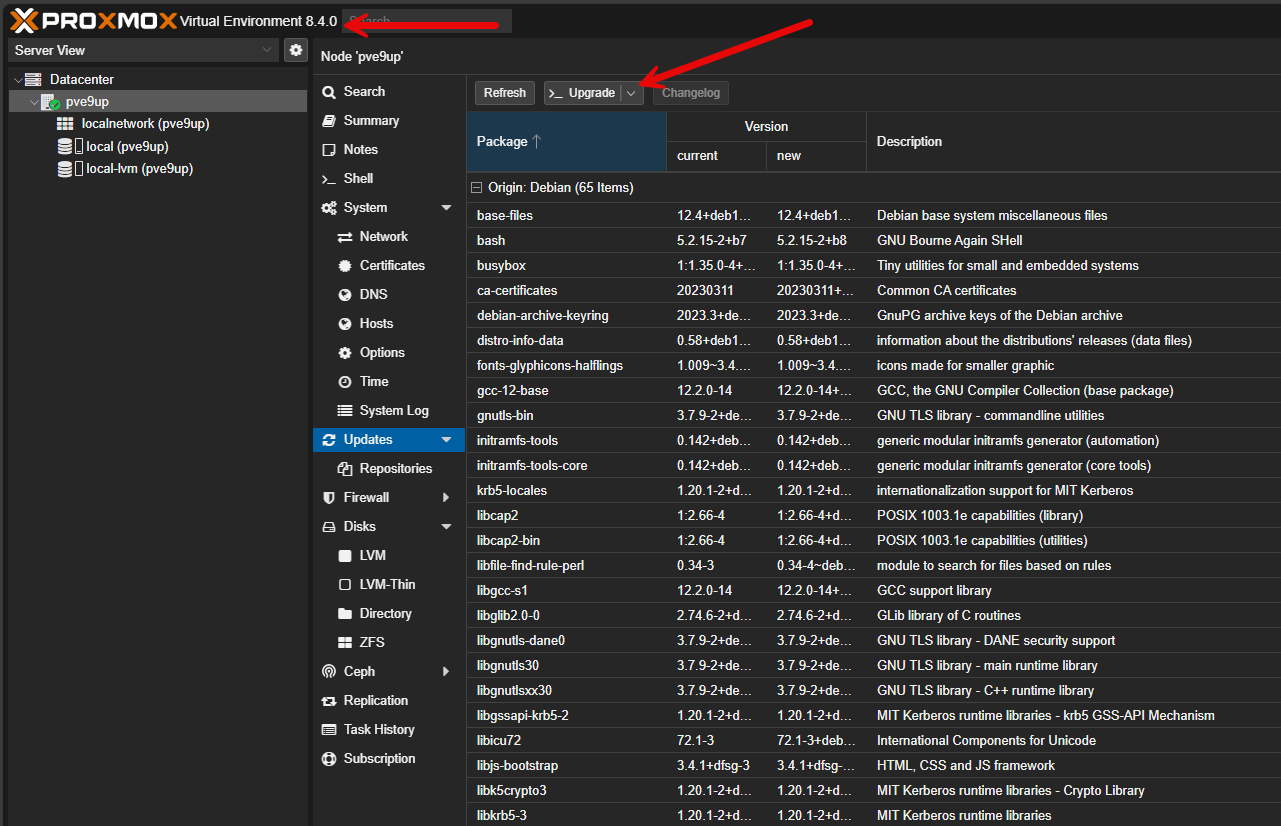
apt dist-upgradeYou can also run your upgrades from the Proxmox web GUI as well. Navigate to your PVE host > Updates and click the Refresh button to see what updates are available. Then click the Upgrade button to actually perform the upgrade. It will launch the shell window that will generally have you confirm the updates installation from there.
Once you have upgraded to the latest and greatest version of PVE 8, which at the time of this writing is Proxmox 8.4.9, then you are in a good position to run the upgrade to PVE 9.
3. Remove references to the Bookworm repos
First we need to remove the old Debian Bookworm repo entries. To do that, edit these files and comment out the “Bookworm” references:
/etc/apt/sources.list
/etc/apt/sources.list.d/*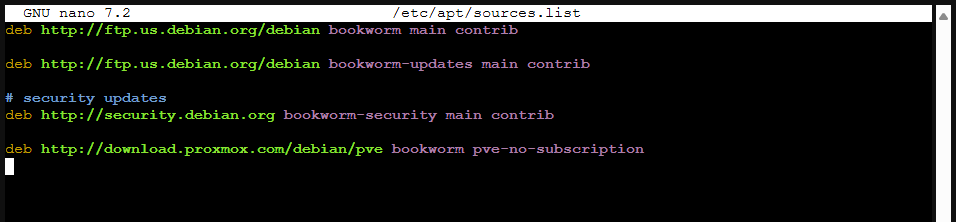
As always, a script makes things better and easier, try out this upgrade-repos-pve8-to-9.sh script. You can use the dry run parameter to see what it will change. It will go through and comment out the bookworm references for the files needed and use the source files for trixie.
Script commands:
- Dry run:
bash upgrade-repos-pve8-to-9.sh - No subscription repos:
bash upgrade-repos-pve8-to-9.sh - Enterprise repos:
bash upgrade-repos-pve8-to-9.sh --enterprise
Most will want to do the no subscription repos.
#!/usr/bin/env bash
set -euo pipefail

# Upgrade APT repos from Proxmox VE 8 (Bookworm) to Proxmox VE 9 (Trixie)
# - Backs up APT lists
# - Comments out Bookworm entries
# - Writes Trixie + Proxmox 9 + Ceph Squid repos in Deb822 format
# Usage:
#   sudo bash upgrade-repos-pve8-to-9.sh [--enterprise] [--dry-run]

ENTERPRISE=0
DRYRUN=0
for arg in "$@"; do
  case "$arg" in
    --enterprise) ENTERPRISE=1 ;;
    --dry-run)    DRYRUN=1 ;;
    *) echo "Unknown arg: $arg" >&2; exit 1 ;;
  esac
done

timestamp="$(date +%Y%m%d-%H%M%S)"
backup_dir="/root/apt-repo-backup-$timestamp"
mkdir -p "$backup_dir"

say() { echo -e "\e[1;32m[INFO]\e[0m $*"; }
warn() { echo -e "\e[1;33m[WARN]\e[0m $*"; }
act() {
  if [[ $DRYRUN -eq 1 ]]; then
    echo -e "\e[1;34m[DRYRUN]\e[0m $*"
  else
    eval "$@"
  fi
}

say "Backing up APT repo files to: $backup_dir"
act "cp -a /etc/apt/sources.list $backup_dir/ 2>/dev/null || true"
act "cp -a /etc/apt/sources.list.d $backup_dir/ 2>/dev/null || true"

# Comment out *bookworm* lines in the classic .list files
say "Commenting out Bookworm entries in sources.list and sources.list.d/*.list"
list_files=()
while IFS= read -r -d '' f; do list_files+=("$f"); done < <(find /etc/apt -maxdepth 2 -type f \( -name '*.list' -o -name 'sources.list' \) -print0)

for f in "${list_files[@]}"; do
  if grep -qE 'bookworm' "$f"; then
    say " - Updating: $f"
    act "sed -ri 's/^(\\s*deb(\\-src)?\\s+[^#]*bookworm[^$]*)$/# \\1/g' '$f'"
  fi
done

# Optionally remove old deb822 sources that explicitly mention bookworm
deb822_files=()
while IFS= read -r -d '' f; do deb822_files+=("$f"); done < <(find /etc/apt/sources.list.d -type f -name '*.sources' -print0 2>/dev/null || true)

for f in "${deb822_files[@]}"; do
  if grep -qi 'bookworm' "$f"; then
    say " - Disabling Deb822 file referencing Bookworm: $f"
    act "mv '$f' '$f.disabled-$timestamp'"
  fi
done

# Make sure keyrings exist (on Proxmox they should)
[[ -f /usr/share/keyrings/proxmox-archive-keyring.gpg ]] || warn "proxmox-archive-keyring.gpg not found (expected on Proxmox)."
[[ -f /usr/share/keyrings/debian-archive-keyring.gpg  ]] || warn "debian-archive-keyring.gpg not found (expected on Debian/Proxmox)."

# Write clean Deb822 Debian sources for Trixie
say "Writing Debian 13 (Trixie) Deb822 sources"
debian_sources="/etc/apt/sources.list.d/debian.sources"
act "cat > '$debian_sources' <<'EOF'
Types: deb
URIs: http://deb.debian.org/debian
Suites: trixie
Components: main contrib
Signed-By: /usr/share/keyrings/debian-archive-keyring.gpg

Types: deb
URIs: http://deb.debian.org/debian
Suites: trixie-updates
Components: main contrib
Signed-By: /usr/share/keyrings/debian-archive-keyring.gpg

Types: deb
URIs: http://security.debian.org/debian-security
Suites: trixie-security
Components: main contrib
Signed-By: /usr/share/keyrings/debian-archive-keyring.gpg
EOF"

# Proxmox VE 9 repo (Deb822)
say "Writing Proxmox VE 9 Deb822 source"
pve_sources="/etc/apt/sources.list.d/pve.sources"
if [[ $ENTERPRISE -eq 1 ]]; then
  act "cat > '$pve_sources' <<'EOF'
Types: deb
URIs: https://enterprise.proxmox.com/debian/pve
Suites: trixie
Components: pve-enterprise
Signed-By: /usr/share/keyrings/proxmox-archive-keyring.gpg
EOF"
else
  act "cat > '$pve_sources' <<'EOF'
Types: deb
URIs: http://download.proxmox.com/debian/pve
Suites: trixie
Components: pve-no-subscription
Signed-By: /usr/share/keyrings/proxmox-archive-keyring.gpg
EOF"
fi

# Ceph Squid repo for Trixie
say "Writing Ceph Squid Deb822 source"
ceph_sources="/etc/apt/sources.list.d/ceph.sources"
if [[ $ENTERPRISE -eq 1 ]]; then
  act "cat > '$ceph_sources' <<'EOF'
Types: deb
URIs: https://enterprise.proxmox.com/debian/ceph-squid
Suites: trixie
Components: enterprise
Signed-By: /usr/share/keyrings/proxmox-archive-keyring.gpg
EOF"
else
  act "cat > '$ceph_sources' <<'EOF'
Types: deb
URIs: http://download.proxmox.com/debian/ceph-squid
Suites: trixie
Components: no-subscription
Signed-By: /usr/share/keyrings/proxmox-archive-keyring.gpg
EOF"
fi

# Clean any leftover bookworm references in ceph.list (if it exists)
if [[ -f /etc/apt/sources.list.d/ceph.list ]]; then
  say "Commenting out legacy Bookworm ceph.list entries"
  act "sed -ri 's/^(\\s*deb(\\-src)?\\s+[^#]*bookworm[^$]*)$/# \\1/g' /etc/apt/sources.list.d/ceph.list"
fi

say "Final sanity check: show new Deb822 sources"
act "grep -Hn 'Suites:' /etc/apt/sources.list.d/*.sources || true"

say "Updating package lists (apt update)"
if [[ $DRYRUN -eq 1 ]]; then
  echo "[DRYRUN] Skipping apt update"
else
  apt update
  say "Done. Backup of your old repo files: $backup_dir"
  say "Next steps: run 'pve8to9 --full' and then 'apt dist-upgrade'"
fi
4. Update and upgrade to Proxmox 9:
Let’s go through the process to actually perform the upgrade now. Note the following commands to get things kicked off:
apt update
apt dist-upgrade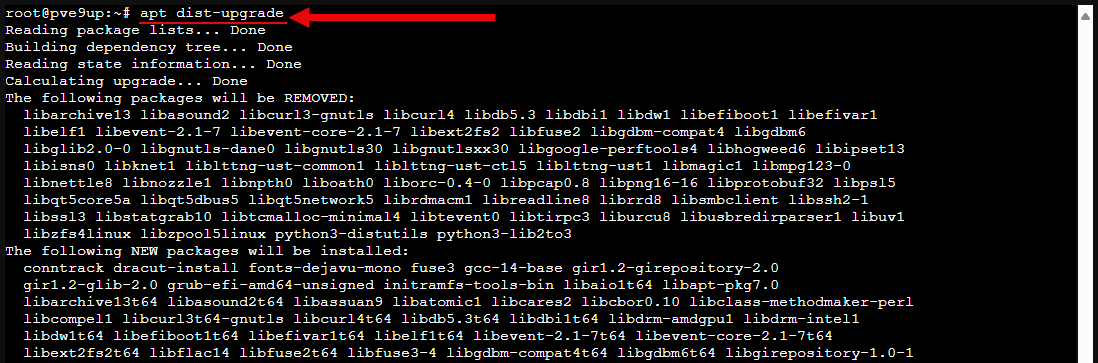
You will be asked to confirm the upgrade in the SSH terminal window.
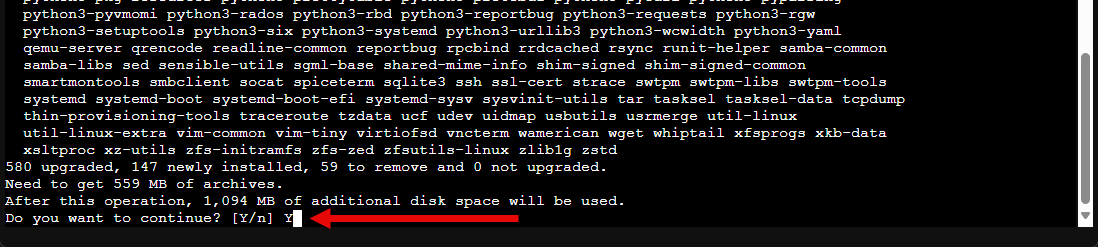
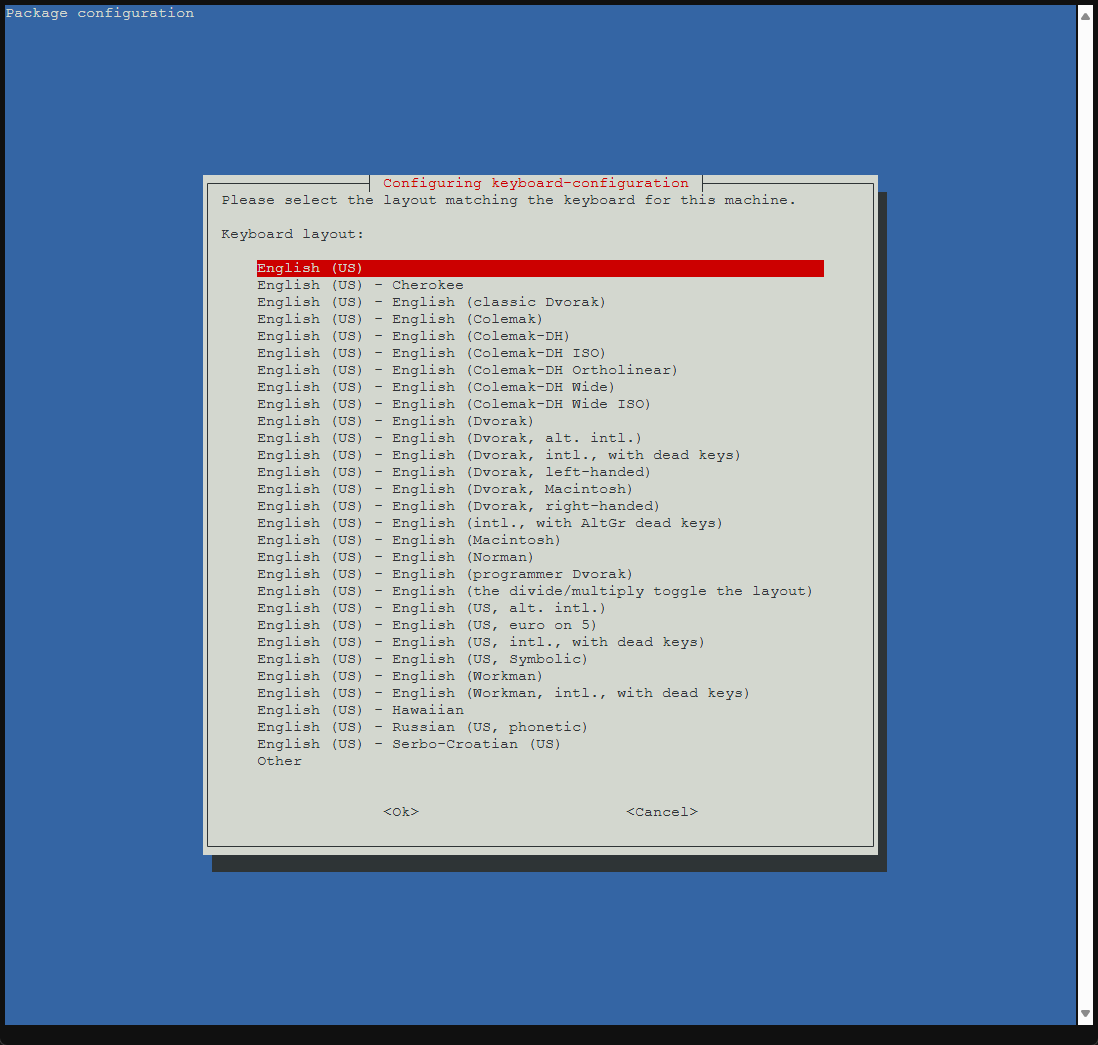
After confirming, you will be asked to confirm a few other things like keyboard configuration, etc.
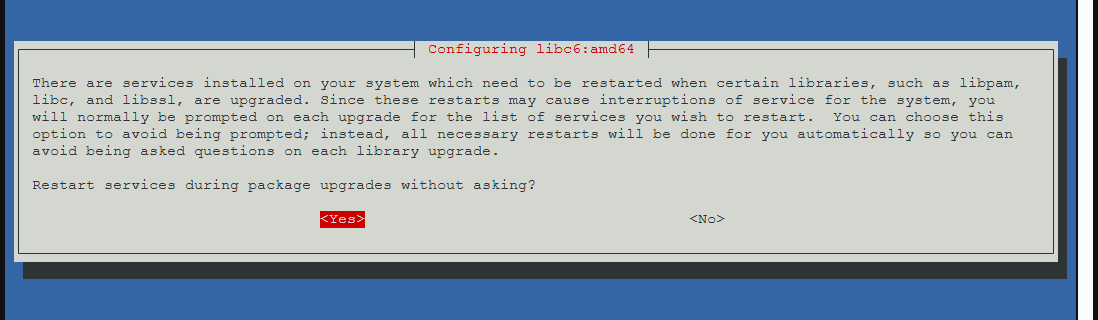
This prompt asks you if you want to restart services without asking. At this point of the upgrade process you have everything quiesced so this should be fine.
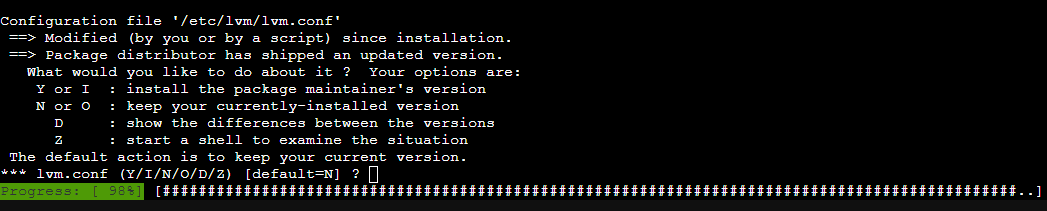
Along the way, you will likely see prompts like this one that ask you if you want to keep the current version of a configuration file, overwrite it, or something else. The default is to keep your current configuration file.
Once the upgrade has finished, you will need to reboot to instantiate the new kernel, etc.
Reboot into the new kernel:
reboot
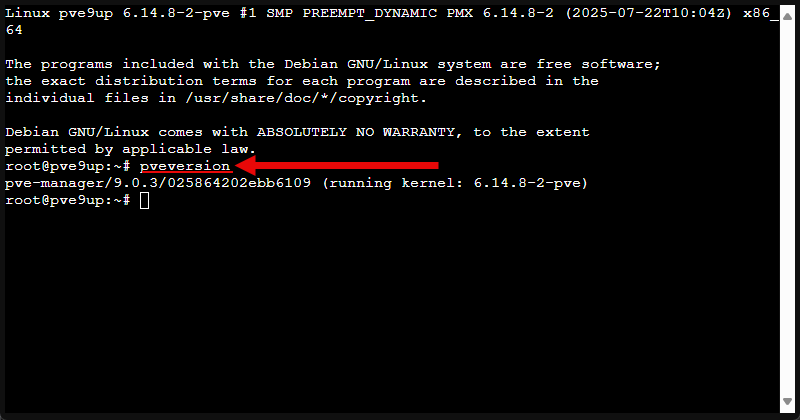
5. Verify the upgrade
Once we have rebooted from the upgrade, we can verify the upgrade was successful. You can check your PVE version from the command line with this command:
pveversionIt should now report a 9.x.x version.
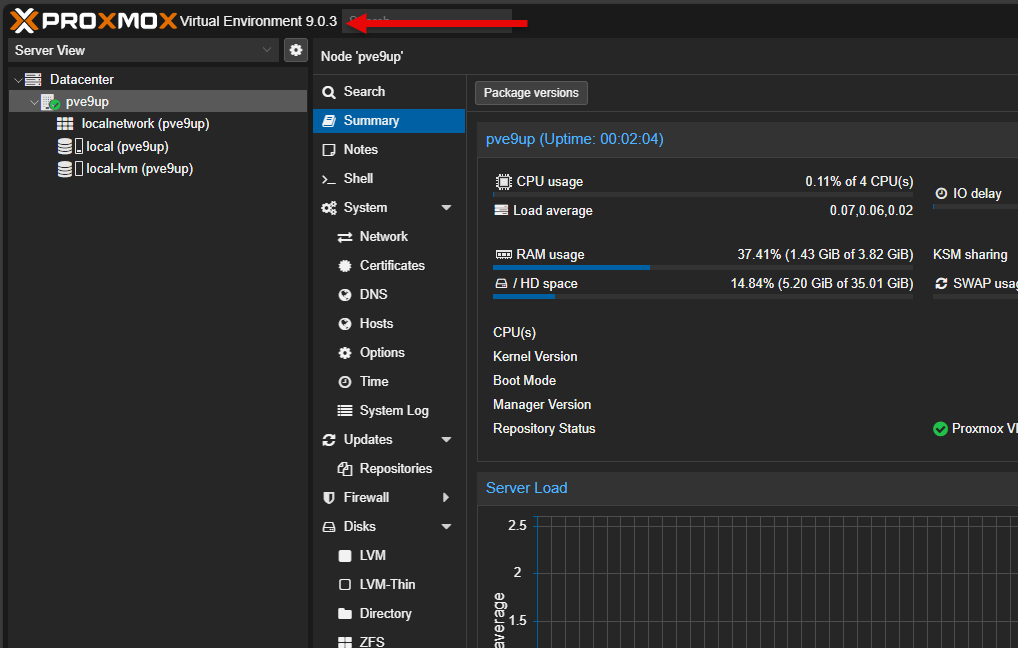
We can also see this in the GUI as well.
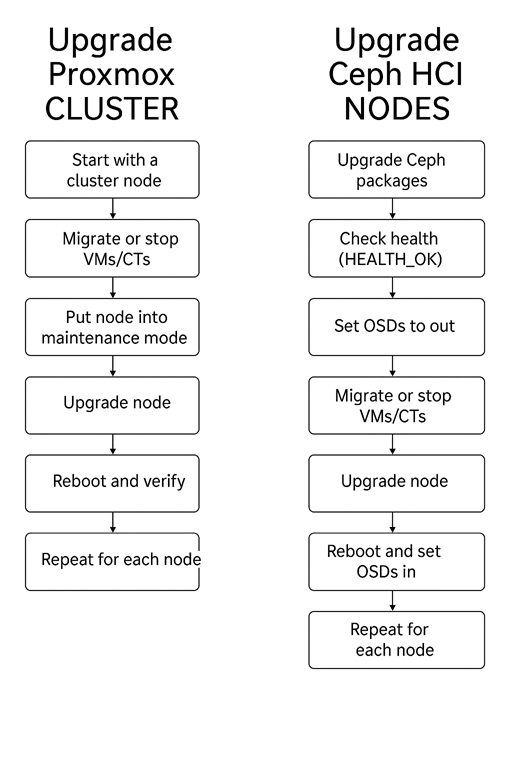
How to Upgrade a Proxmox Cluster
For the most part, a Proxmox cluster is going to be the same, except you are going to roll through your hosts one at a time and use more care in checking hosts before taking them down. Ceph also adds another layer of complexity, but again, taking out Ceph nodes one by one allows you to roll through them.
Overview of steps for each node:
- Migrate VMs/CTs off the node you plan to upgrade
- Put the node into maintenance mode:
ha-manager set <vmid> --state stoppedor disable HA for the node temporarily - Follow the in-place upgrade steps above on that node
- Reboot and verify:
pvecm status - Migrate workloads back to the upgraded node
- Repeat for each remaining node until the entire cluster is on Proxmox VE 9
Here’s how you can simulate an ESXi-like “maintenance mode” for a Proxmox node from the command line. This will cover both regular nodes and Ceph HCI nodes.
1. Check the Node’s Current Workload
List all running VMs and containers on the node you want to upgrade:
qm list
pct list
2. Migrate Running VMs and Containers Off the Node
Migrate each VM or container to another node in the cluster:
qm migrate <vmid> <target-node>
pct migrate <ctid> <target-node>
If you can’t migrate (due to local storage), power off the VM/CT:
qm stop <vmid>
pct stop <ctid>
3. Disable HA for Resources on This Node
If the node participates in HA, disable HA for any VMs/CTs so Proxmox doesn’t try to restart them during the upgrade:
# See what’s HA-managed
ha-manager status
ha-manager set <vmid> --state stopped
You can re-enable after the upgrade with:
ha-manager set <vmid> --state started4. For Ceph HCI Nodes: Mark OSDs as Out
This ensures Ceph stops writing to this node while you upgrade:
# Find the OSD IDs for this node
ceph osd tree

# Run for each OSD on this node
ceph osd out <osd_id>
Wait for Ceph to rebalance and reach HEALTH_OK:
ceph status5. Stop or Limit Services (Optional)
If you want to be extra cautious, you can stop cluster services before rebooting.
systemctl stop pve-cluster
systemctl stop corosync
(Only do this right before the upgrade/reboot, and be aware that it will sever the node from the cluster until restarted.)
6. Perform the Upgrade
Run your upgrade steps (pve8to9, apt dist-upgrade, etc.).
7. Bring the Node Back into Service
After the upgrade and reboot:
For Ceph nodes, mark OSDs back in:
ceph osd in <osd_id>Re-enable HA for any workloads:
ha-manager set <vmid> --state startedMigrate VMs/CTs back if needed:
qm migrate <vmid> <upgraded-node>
pct migrate <ctid> <upgraded-node>
Always keep at least a majority of nodes online to keep quorum. In a 3-node cluster, don’t take down two nodes at the same time.
After the upgrade checklist of sorts
These are just a few of the things that you will want to make sure of. You know your environment and services you are running. However, below are just a few general checks to make.
- Cluster nodes: Verify quorum and HA status
- Ceph: Confirm
HEALTH_OKand no degraded PGs - Networking: Make sure your bridges, VLANs, and bonds are intact
- Make sure VMs are still reachable on the network
- Storage: Test VM/CT startup from each storage backend
Wrapping up
Hopefully, this walkthrough of steps will help any who are looking to upgrade their Proxmox VE 8 server to Proxmox VE 9. The steps are pretty straightforward and don’t take much time to run through, especially for a single host. Take your time though and be sure to run the pve8to9 script from Proxmox to surface any issues before you kick off the upgrade. Let me know in the comments if you have begun the upgrade process from Proxmox 8 to 9 or if you are waiting for a bit? If you have already upgraded, any issues so far in your lab?
Google is updating how articles are shown. Don’t miss our leading home lab and tech content, written by humans, by setting Virtualization Howto as a preferred source.
About The Author


Thank you for encouraging words for upgrade, But I will for sure wait until dust settles 🙂 And also to have proxmox backup serv v4 available…
Tom,
Thank you for the comment! I think many will probably wait for a bit on 9 for their “production” systems while maybe playing around with it in the lab. I have been using Veeam to bridge the gap between vSphere and Proxmox with migrations. I ran into the issue I noted in the post, so I need to wait on a Veeam update to provide compatibility with version 9 before I can upgrade my prod boxes.
Brandon
You could also do a remove node/ fresh install the node and then rejoin the cluster one by one, right?
Vlad,
Yes that should work as well. It might be more effort to do things that way with the steps to take a node out and bring back in, but definitely an option.
Brandon
How would you do a offline upgrade? During the upgrade process the VM that is the router is shutdown.
Hey Jim, you could definitely just use the ISO image and upgrade your host that way. Just download the ISO, “burn” to USB with Rufus or use Ventoy. Then, upgrade your host, power on your router, and then you are good to go. You could also do your updates as well once the router is online and then pick a time to do the reboot after you have pulled down the updates to instantiate any new updates that require a reboot. However, I believe the available 9.x updates are very minimal at this point and just install without the need for a reboot.
Brandon
I’m not sure if my original post failed or was lost, so I’ll try again! This article was exactly what I was looking for to help address the challenges of complete in place upgrade of my 3 nodes in my PVE Cluster. In particular, I found the upgrade-repos-pve8-to-9.sh very helpful (Note: the dry run tag isn’t shown on the command example). I followed the steps for an In-place upgrade steps: Single host, but I’d not Migrate VMs/CTs off the node being upgraded or put the node in maintenance mode. However, I backed up all my LXC containers, VM’s and templates, plus they were all shutdown before I started. The 1st node successfully upgraded (with some warnings). However, the 2nd node only got to 98% complete before a login prompt appears. I couldn’t successfully complete or close this prompt to finish the upgrade. I then went to the 3rd node, which also upgraded successfully (also with warnings). In the end, I decided to power cycle the 2nd node, but it obviously hadn’t successfully completed. I’ve since discovered the drive is not bootable, so I guess I’ll need to undertake a fresh manual install. However, I’m unsure how I can manually remove the now missing node from the cluster.
David,
So glad the post was helpful. Let me take a stab at steps you can run to remove the missing node. First, check with pvecm status to confirm it’s offline, then deleting its config folder under /etc/pve/nodes/. Then you can edit /etc/pve/corosync.conf to remove the node’s entry and restart corosync with systemctl restart corosync. Last, run pvecm nodes to make sure it’s gone, and clean up any leftover storage references in /etc/pve/storage.cfg if this is needed. If you plan to reinstall that server, just do a fresh PVE install and rejoin it with pvecm add .
Brandon
Brandon,
Thankyou so much for that information, I have successfully managed to remove the missing node tonight by following these steps and also managed to update PBS from V3 to V4 using Proxmox’s upgrade instructions (https://pbs.proxmox.com/wiki/Upgrade_from_3_to_4#Installed_alongside_Proxmox_VE), so I’ll tackle the reinstall tomorrow and hopefully that should be fairly straight forward. I can end the day a lot happier tonight than last night!. Again, thankyou for you posts and instructions.
David,
Very nice! Thank you for the update and so glad you were able to make progress! Keep us posted on your experiences there.
Brandon
Under “script commands” where you’re demonstrating the syntax to run each option, you missed the –dry-run flag
Brandon thanks for the comment! Will get this updated.
Brandon
TY, this save me a lot!
Guilherme,
Awesome! Glad this was helpful.
Brandon