
When you start building a home lab, one of the first things you realize is how important DNS is. Every service you run, including Proxmox, Docker containers, Kubernetes clusters, or even something simple depends on DNS resolving correctly. Many when they get started running a home lab rely on their router’s built-in DNS or their ISP’s resolvers. But if you want full control over your name resolution, we need to control this ourselves. Controlling DNS gives you security, privacy, and flexibility in how names are resolved. It lets you decide where queries go, how fast they resolve, and even what traffic never leaves your network at all. Let’s go over a few ways you can totally control DNS in your home lab.
Why you need to control DNS
Let’s face it, the main reason we have home labs and home networks and self-hosted resources is, “control”. Why control everything else, including data, network, and other types of traffic, and not control name resolution? It actually has many benefits to self-host and control your own DNS.
At its core, DNS is the phonebook of the Internet. If DNS breaks, your services break. When you control DNS, you gain several advantages. What are these? Note the following:
- You control uptime: You’re not dependent on ISP DNS servers that may go down and you can “point” to any number of online recursive DNS servers
- It keeps things safe and private: You can keep your ISP or third parties from logging every site you visit
- It performs better: By resolving queries locally, you cut out unnecessary latency
- You control which records are resolved: You can resolve internal records for your lab, even if they don’t exist on the public internet
- It keeps things secure: Blocking ads, malware, and known bad domains at the DNS layer adds a powerful layer of defense
Now let’s break down the ways you can take control.
Run your own DNS server
When talking about taking control of DNS, this is the best way. And, you have control over which DNS server you run. In other words, you can run BIND on Linux, Microsoft DNS, Pi-Hole, Unbound, or even a mix of these as I am doing.
Here is my setup:
- Microsoft Windows Server 2025 DNS server for Home Lab
- This has a conditional forwarder setup to Unbound where I control “public” domain records that I want to respond locally (a subset of these)
- Then I have a pair of Pi-Hole servers configured for my LAN, general purpose home network. The settings and configuration for these are synchronized using Nebula Sync.

Running your own DNS server gives you authority over your own local zone. You can create zones for internal domains like lab.local or home.cloud, set forwarders for external domains, and manage everything centrally.
For example, if you’re running VMware vSphere or Proxmox, a local DNS server means you can give every host and service a memorable name that is easy to remember. Instead of remembering IP addresses like 10.1.149.50, you just type proxmox01.lab.local.
Pi-hole, AdGuard, or Technitium for filtering DNS requests
One of the really cool things you can do as well when running something like Pi-Hole or AdGuard for DNS is doing something called DNS filtering or “sink-holing”. These solutions allow you to use block lists to block ads, trackers, telemetry data, and malware domains at the DNS level. This means a client or server never even makes the HTTP request to load the ad or malicious script.
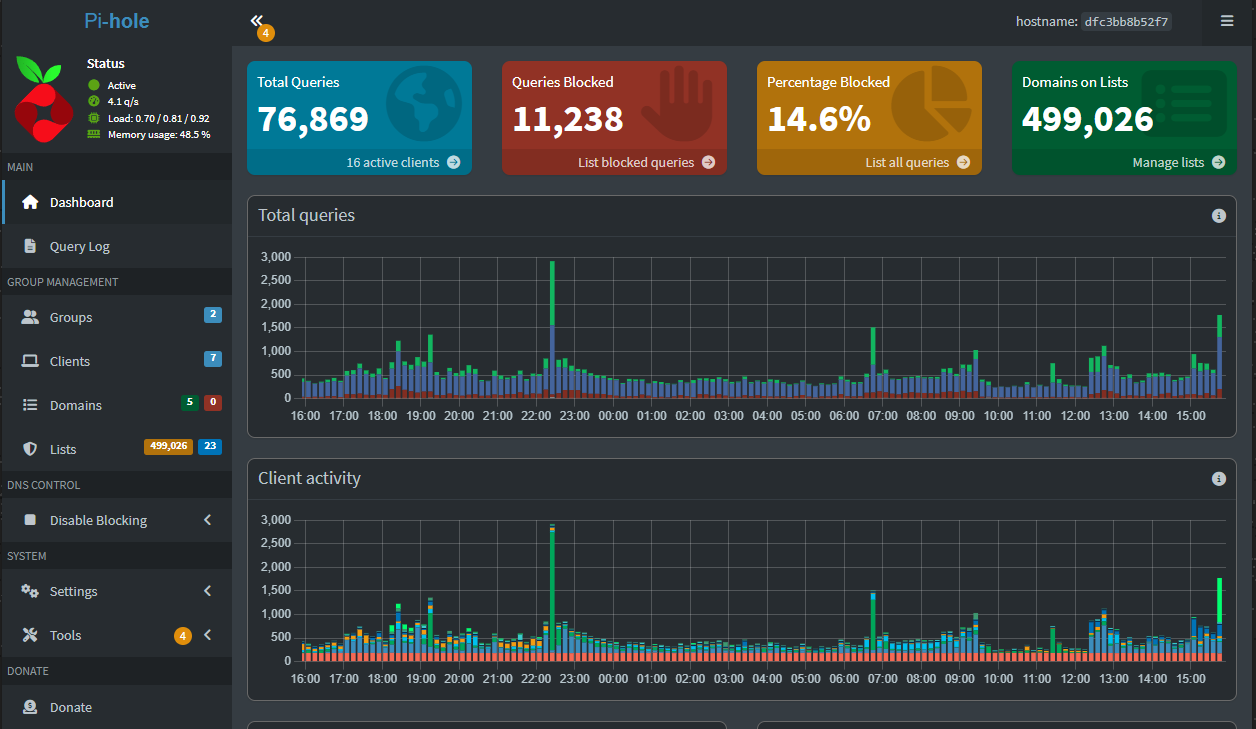
Setting up Pi-hole on a Raspberry Pi or as a Docker container is simple. Once installed, you can point your devices or your router’s DHCP settings at it. From there, you can load blocklists, create allowlists, and even set custom DNS rules and blocklists for your clients.
The three that I recommend are:
Use Unbound as a recursive resolver
Most DNS setups forward queries to an upstream DNS server like Google DNS, Cloudflare, or your ISP. But when you run Unbound, you’re actually resolving DNS queries recursively yourself. That means your DNS server goes straight to the root servers and walks the chain down to authoritative servers. The benefit here is huge. No one in the middle is logging your queries. Plus you can use it as a conditional forwarder for your domain as well.

Unbound can be combined with Pi-hole to give you both filtering and recursion. Pi-hole sends unknown queries to Unbound, which then resolves them directly. This combination is one that is popular with those who want to have a privacy-focused home lab.
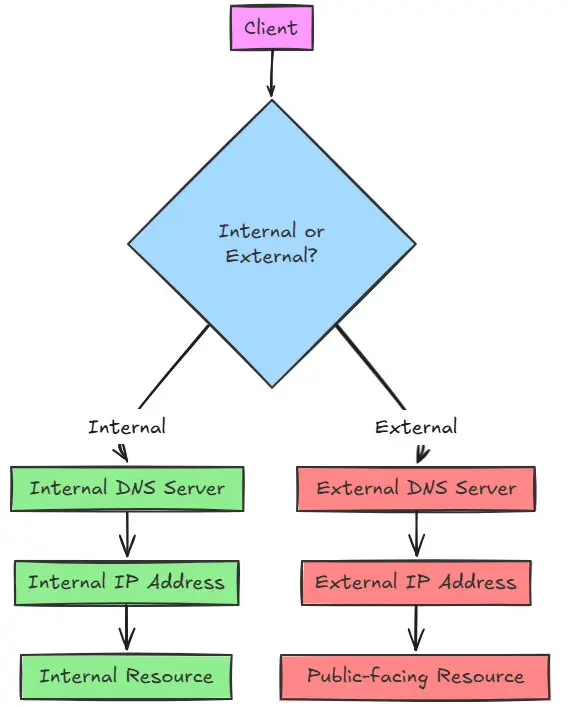
Split-Horizon DNS for Local and Public Records
If you’re running public-facing services like a blog, GitLab instance, or Nextcloud server, you’ve probably run into the split-horizon problem. From outside, gitlab.mydomain.com needs to resolve to your public IP. But inside your network, you want it to resolve to the private address to avoid hairpin NAT and routing problems.
Self-hosting DNS also allows split-horizon configurations. Split-horizon DNS is VERY cool as it means you can serve queries from inside your network differently than you do outside, or you can serve some hosts for a domain as one set of IPs internally, and the rest can come from an external authoritative DNS server.
I mentioned this in my setup above. If you want to read the blog post on this, check it out here:
Conditional Forwarders
Another powerful DNS tool is the conditional forwarder. Let’s say you run multiple networks, like your home lab and a work test environment. You may want queries for corp.local to go to one DNS server, while all other queries go out to your upstream or recursive resolver. Conditional forwarders let you route requests based on domain.
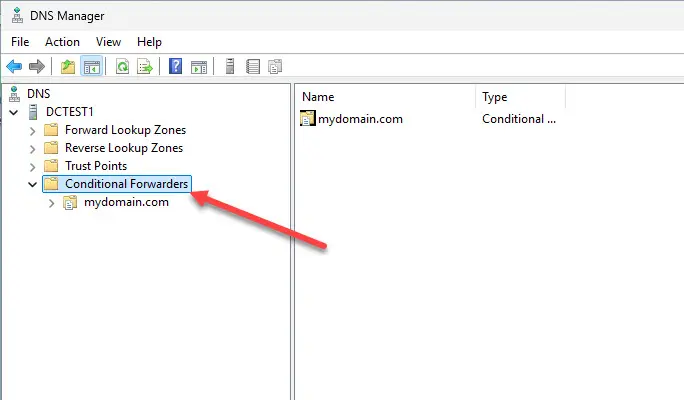
This is also handy when integrating Active Directory with your home lab. You can point AD-related DNS queries to your domain controllers, while everything else uses Pi-hole or Unbound. It’s a clean way to split responsibilities without breaking resolution.
Encrypted DNS (DoH and DoT)
I know an area where I am increasingly interested in and I know many home labbers are as well is encrypted DNS. You can use protocols like DNS-over-HTTPS (DoH) and DNS-over-TLS (DoT) to prevent ISPs and anyone else in the middle from snooping on your DNS traffic.
Many of the solutions we have already discussed support these security specifications with DNS, including Pi-Hole, AdGuard Home, Technitium, and Unbound.
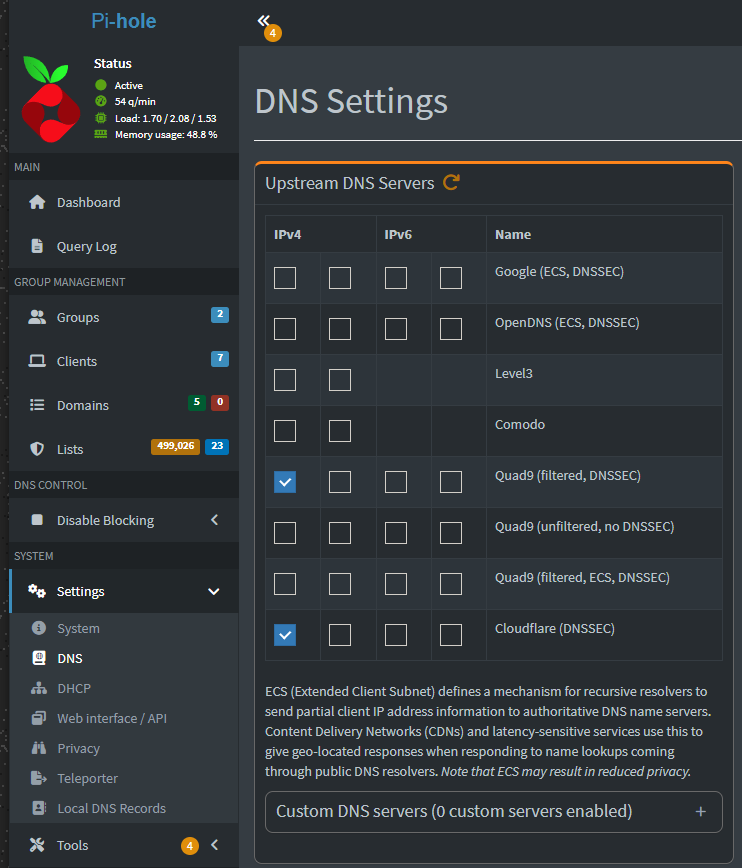
As examples, you can configure Pi-hole to forward queries to Cloudflare using DoH. Or, you could run Unbound with DoT directly to authoritative servers. There is a negligible performance hit, but the privacy gains are far beyond any performance hit. These features are great especially if you run a lab behind an ISP known for aggressive logging or DNS redirection.
Combine different DNS configurations
As is the case with everything it seems in IT and technology, there are so many ways to do things and one configuration doesn’t fit everyone. Also, you can layer DNS technologies and I think this is probably going to be
Think about chaining together the following solutions in any number of combinations:
- Run Pi-hole for filtering
- Use Unbound as the recursive resolver behind Pi-hole
- Add split-horizon DNS so lab services resolve internally
- Use conditional forwarders for specialized environments
- Encrypt queries going out to the internet
Practical Tips for Home Lab DNS Control
- Plan your naming scheme: Decide early if you’ll use
.lab,.local, or a subdomain of a real domain you own. Consistency saves headaches later. - Run redundant DNS servers: Don’t rely on a single Pi-hole or DNS VM. Have at least two servers so clients fail over cleanly.
- Monitor your DNS traffic: Tools like Grafana, Netdata, or even Pi-hole’s built-in dashboards help you spot anomalies, like a device beaconing out thousands of queries to a single domain.
- Integrate with DHCP: If you use something like OPNsense or pfSense, tie DHCP to your DNS setup so hostnames automatically resolve without manual entries.
- Secure your DNS servers: Limit access to trusted subnets, and don’t expose your resolvers directly to the public internet unless you really know what you’re doing.
Wrapping Up
DNS is one of the most rewarding infrastructure services that you can control and gain knowledge about. Hopefully this post has given you a few ideas on how to totally control DNS in your home lab using a few readily available solutions out there. By running your own self-hosted DNS server, you will be able to control name resolution and guide traffic as you want it to flow, instead of the other way around. Also, don’t feel like you just have to use one solution. I have found that having different DNS solutions on different parts of my network, including home lab is the best approach for me where I can use the DNS technologies in different ways. Let me know in the comments what solutions you are using for DNS or you have an awesome solution you want to share.
Google is updating how articles are shown. Don’t miss our leading home lab and tech content, written by humans, by setting Virtualization Howto as a preferred source.
About The Author


Thank you for the nice tutorial, Brandon. Would it not make sense to run OPNsense (that is free as opposed to MS Windows Server) and run Unbound with block lists (to replace the Pihole) and additional plugins, as required? Then you can set it all up in one place including DHCP, firewall rules, reverse proxy, ISP fail-over, dynamic DNS, etc.?
Jan,
Thank you for your comment! Absolutely. I think OPNsense is a great solution and it has many features you can take advantage of. The great thing about controlling DNS is there isn’t one solution for everyone and OPNsense/pfSense may be another option for those using it as their firewall/gateway. Also, I love the Unbound integration.
Brandon
This is awesome. Would you consider writing a more in depth guide?
I have so far failed to figure out how to correctly integrate (or deprecate) my router’s DNS and DHCP with Windows DNS, let alone all this other fun stuff.
Kirill,
Thank you for the comment! Sure what types of issues are you running into? Hop over to the forums and I can help you there more easily – https://www.virtualizationhowto.com/community/.
Brandon