Man so many projects to try and most of us feel like we don’t have enough time. However, I hope you have been enjoying my “weekend” series blog post I have been releasing each Friday to spur on some project-based learning in the home lab. This is hands down the best way to learn new skills and do very cool things in the home lab. Networking is the foundation on which all other things are built. So having good networking projects should be front and center to everything else. Let’s look at 5 secure networking projects to tackle.
The projects!
Below is a quick overview of the secure networking projects, just as ideas to get started:
- Project 1 – Network segmentation with VLANs and Docker macvlan
- Project 2 – Zero-trust remote access via Twingate or Tailscale
- Project 3 – Network-wide ad-blocking with Pi-hole, Technitium, or Adguard
- Project 4 – Protect your internal apps with SSO using Authelia & Traefik
- Project 5 – Automated network rule deployments with Ansible, CI/CD, or Kestra
Let’s dive into these one by one.
Project 1: Network segmentation with VLANs and Docker macvlan
By far, one of the most important home lab networking projects you can tackle is segmenting your network with VLANs. And, what’s more, you can extend this to your Docker containers, having some containers run on certain networks and others run on different networks.
By segmenting your network, you are helping to provide a “layer 2” boundary if a VM gets compromised, infected, etc. We often hear about “lateral movement” and this is what we are talking about. An attacker gets on a machine and then can move from side to side in the network. So if everything is on the same network, it can much more easily be compromised.

You can place public-facing services on one VLAN, sensitive databases on another, and management interfaces on a third as examples, each isolated even on the same physical host.
Prerequisites
- A managed switch and some type of firewall for routing between VLANs
- If running VMs, you will create these networks on your hypervisor so you can attach VMs to each network
- Docker Engine installed on your host(s) if you want to use containers and macvlan networks
- Basic comfort with Linux networking commands
Steps
There are a few steps to consider with this. I like to tackle things in this order:
- Create the new VLAN subinterface in your firewall – This “establishes” the new VLAN at least as a “network” that you can now work with
- Create the VLAN on your managed switch
- Create the VLAN in your hypervisor like Proxmox
- Tag a VM with the VLAN
Check out my full post on macvlan networks here: Docker Networking Tutorial: Bridge vs. Macvlan vs. Overlay for Home Labs.
Estimated project time?
It depends on how far you want to go with your VLANs. However, if you just let’s say want to split off a “home lab” VLAN from your normal LAN network, this actually isn’t that involved. Estimated time involved would be: 1–1.5 hours.
Project 2: Zero-trust remote access with Twingate or Tailscale
Recently, I wrote a blog post covering the topic of “stop exposing your home lab to the Internet” and this seemed to strike a chord with many. In the old days we would punch holes in the firewall and then setup port forwards to get traffic inward to the server it was destined to reach. However, these days we have modern solutions that work very effectively to get traffic in without opening and exposing any ports to the Internet.

Also modern solutions implement what is called zero-trust, where just because you have access to the network via a VPN, you don’t by default get access to everything. Tools like Twingate and Tailscale grant access on a per-service basis and this helps to reduce lateral-movement risk.
Prerequisites
- Twingate or Tailscale account
- Installation of the client on each mini PC or server
Steps
- Set up your network
- Register an account on Twingate or Tailscale.
- In Twingate you will configure your “networks” that are basically sites you configure to be able to connect to
- Then you will install “connectors” that live in your network
- These connectors are basically “subnet routers” that provide access to the subnets on your local network
- Configure users and groups, then assign those users/groups to resources. In this way, the users when they login with a client only get access to those resources they have been assigned.
- Install clients – In the case of Twingate, install the client on your laptop, phone, etc that will allow you to connect
Estimated project time?
This is another easy one. Twingate makes it exceptionally easy to stand up a new account, add networks, and download connectors which can be run in Docker containers. Estimated time involved: 1–1.5 hours
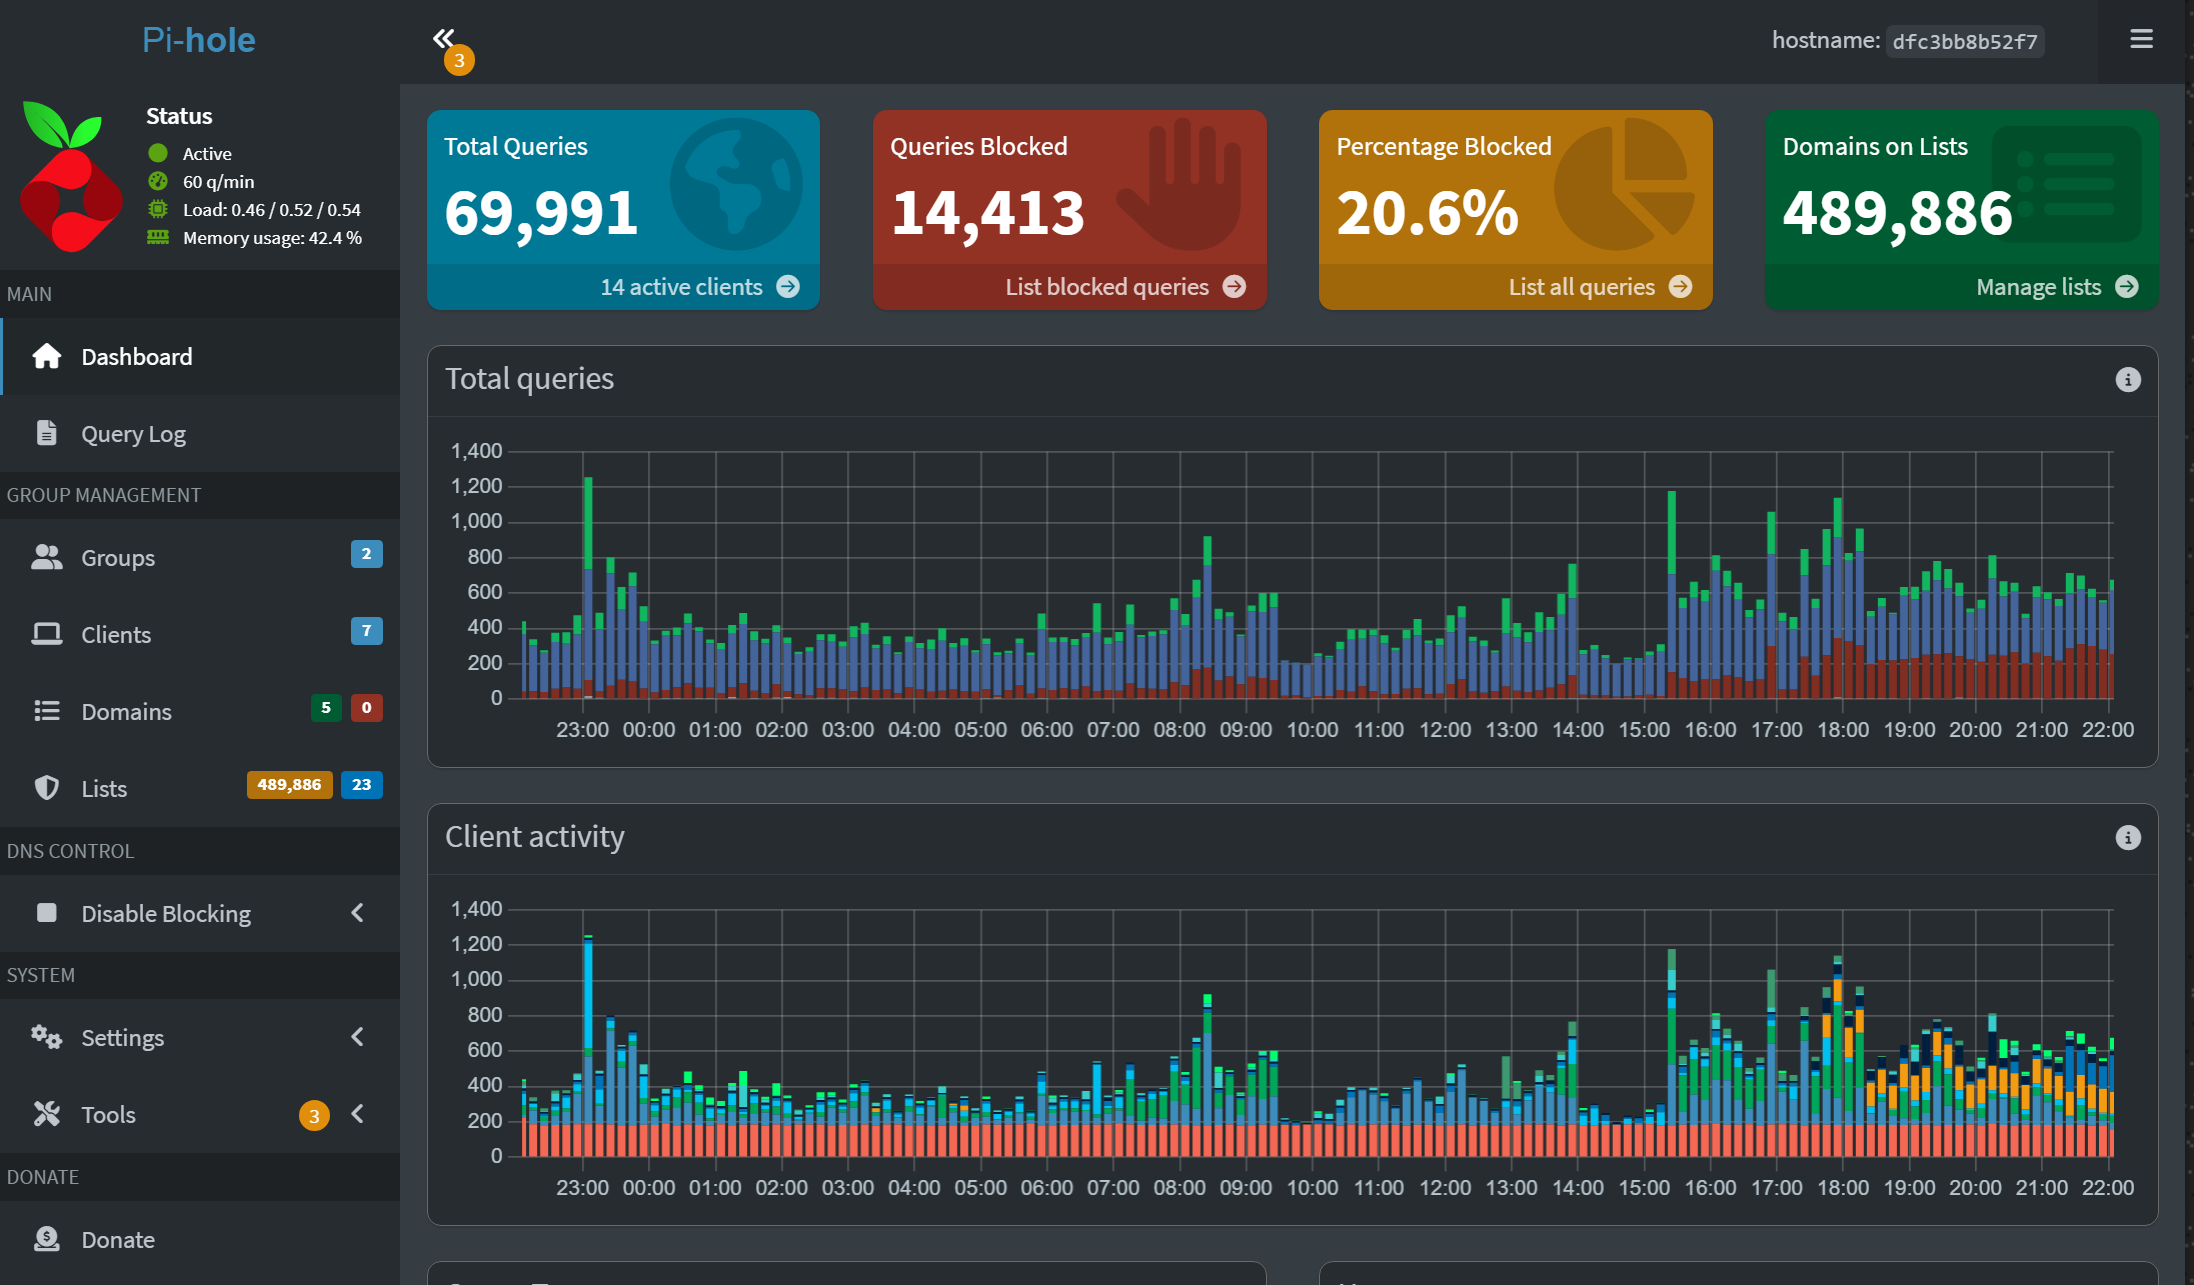
Project 3: Network-wide ad-blocking with Pi-hole, Technitium, or Adguard
One of the most fun home lab projects I tacked was standing up a Pi-Hole server. Then I found Technitium, Adguard, and others and tried those out as well. I love Technitium and also Pi-Hole. Blocking ads and malware using Pi-Hole is not only fun but it is also extremely beneficial from a network perspective.
By cutting out the extra traffic associated with ads and telemetry data, you are freeing up bandwidth for your traffic that you want, and reaping the security benefits. Do check this one out as a weekend project for your home lab.
Prerequisites
- Docker (or bare-metal install)
- A DoH client like Cloudflared
Steps
- In a hypervisor like Proxmox, stand up either a VM, LXC container, or VM that serves as a Docker container host
- Create your Docker Compose code needed for Pi-Hole
- Tweak your settings and blocklists as you want.
Check out my walkthrough on how to get Pi-Hole installed in Ubuntu Server 24.04 LTS:
Estimated time
1 hour
Project 4: Protect your internal apps with SSO using Authelia & Traefik
This is a great project to go along with project 2. After you have secured access to your network using a solution like Twingate or Tailscale, you can also tighten in on making sure access to individual services is secured. There is some overlap with what Twingate can do as an example, but if you are rolling your own VPN with Wireguard or using another solution that doesn’t have any identity-based access, this project will help you with that.
Using Authelia and Twingate you can gate each app with SSO, MFA, and group-based policy. Even if someone reaches the service, they can’t see anything without authenticating.
You can check out my full post on Authelia here:

Prereqs
- Docker or Swarm/K8s (works anywhere you run Traefik)
- An IdP (GitHub, Google, Keycloak, or other OIDC provider)
- Traefik as reverse proxy
Quick start (Docker Compose example)
version: "3.8"

services:
  traefik:
    image: traefik:v3.0
    command:
      - --providers.docker=true
      - --entrypoints.websecure.address=:443
      - --certificatesresolvers.le.acme.tlschallenge=true
      - [email protected]
      - --certificatesresolvers.le.acme.storage=/letsencrypt/acme.json
    ports:
      - "443:443"
    volumes:
      - /var/run/docker.sock:/var/run/docker.sock:ro
      - ./letsencrypt:/letsencrypt
    networks: [proxy]

  authelia:
    image: authelia/authelia:latest
    volumes:
      - ./authelia:/config
    environment:
      - TZ=America/Chicago
    networks: [proxy]

  whoami:
    image: traefik/whoami
    labels:
      - traefik.enable=true
      - traefik.http.routers.whoami.rule=Host(`whoami.yourdomain.com`)
      - traefik.http.routers.whoami.entrypoints=websecure
      - traefik.http.routers.whoami.tls.certresolver=le
      # Forward auth to Authelia
      - traefik.http.middlewares.authelia.forwardauth.address=http://authelia:9091/api/verify?rd=https://auth.yourdomain.com
      - traefik.http.middlewares.authelia.forwardauth.trustForwardHeader=true
      - traefik.http.routers.whoami.middlewares=authelia
    networks: [proxy]

networks:
  proxy:
    external: false
Minimal Authelia config (./authelia/configuration.yml) – OIDC example
server:
  address: 0.0.0.0
  port: 9091

session:
  name: authelia_session
  secret: "CHANGE_ME"
  expiration: 3600
  inactivity: 300
  domain: yourdomain.com

identity_providers:
  oidc:
    clients: [] # only if Authelia is the IdP. If using external IdP, configure below instead.

authentication_backend:
  file:
    path: /config/users_database.yml

access_control:
  default_policy: deny
  rules:
    - domain: "whoami.yourdomain.com"
      policy: one_factor
      subject:
        - "group:admins"

notifier:
  smtp:
    host: smtp.yourprovider.com
    port: 587
    username: [email protected]
    password: "CHANGE_ME"
Estimated project time?
I would say this project will take 2-3 hours likely with standing everything up and figuring out your policies, etc.
Project 5: Automate networking rules with Ansible, CI/CD, or Kestra
Networking configuration can definitely be tedius, when you get into the area of Docker containers and Kubernetes. Even with legacy workloads like traditional servers or virtual machines it can still be a chore to accomplish your networking configuration by hand. This is where automation comes in handy. I think a great weekend project for secure networking enhancements for the home lab includes a project to automate your networking rules
Prerequisites
- Control host or workstation where you can write your automation code
- Ansible (or GitLab CI runner, Kestra scheduler) installed in Docker or a virtual machine.
Ansible is honestly my favorite configuration management tool. With Ansible you can do just about anything and write playbooks to set or assign any type of configuration you need.
Example: Ansible Playbook to Open a Firewall Port
- name: Ensure WireGuard port is open
hosts: all
become: true
tasks:
- name: Install ufw
apt:
name: ufw
state: present
- name: Allow WireGuard UDP port 51820
ufw:
rule: allow
port: 51820
proto: udp
- name: Enable ufw if not already
ufw:
state: enabled
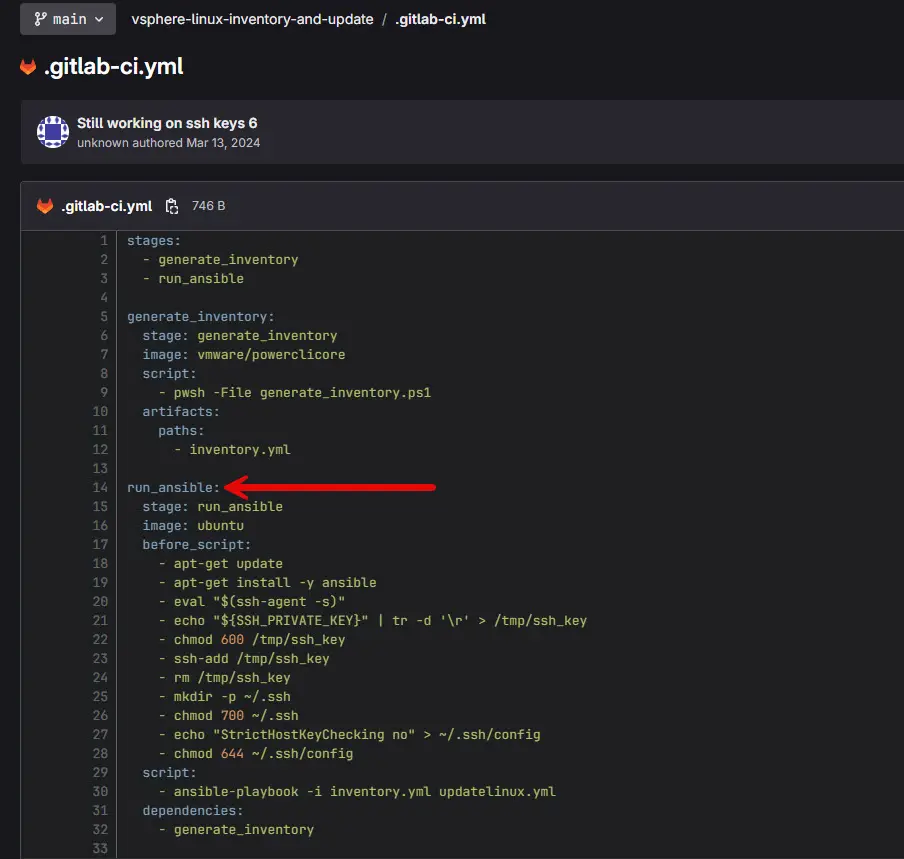
enabled: yesIntegrate into CI/CD like Gitlab or use something native for Ansilbe like Semaphore UI.
- Store your playbooks in GitLab
- Create a gitlab-ci.yml file that calls your Ansible script and allows you to run these on a schedule
Schedule with Kestra or Semaphore UI
- If you are not using a full-blown CI/CD platform like GitLab, you can use something like Kestra or Semaphore UI to run your playbook automatically.
Estimated time
The time for this one will vary depending on how deep you want to get into automating your network. Honestly, this one will not have an end most likely as if you are like me, you will always find new things to automate with your network configuration, etc. Estimated time for this project: 1-1.5 hours.
Wrapping up
Keep in mind, the weekend projects don’t mean you have to accomplish everything in the list in a single weekend. The idea is just to get started. Project-based learning is the best to provide you with hands on experience and give you real benefits. Even if your networking projects don’t include projects on this list, there are many other networking projects that would fit in a weekend like upgrading to 10 gig uplinks, documenting your network, etc.
Google is updating how articles are shown. Don’t miss our leading home lab and tech content, written by humans, by setting Virtualization Howto as a preferred source.
About The Author