
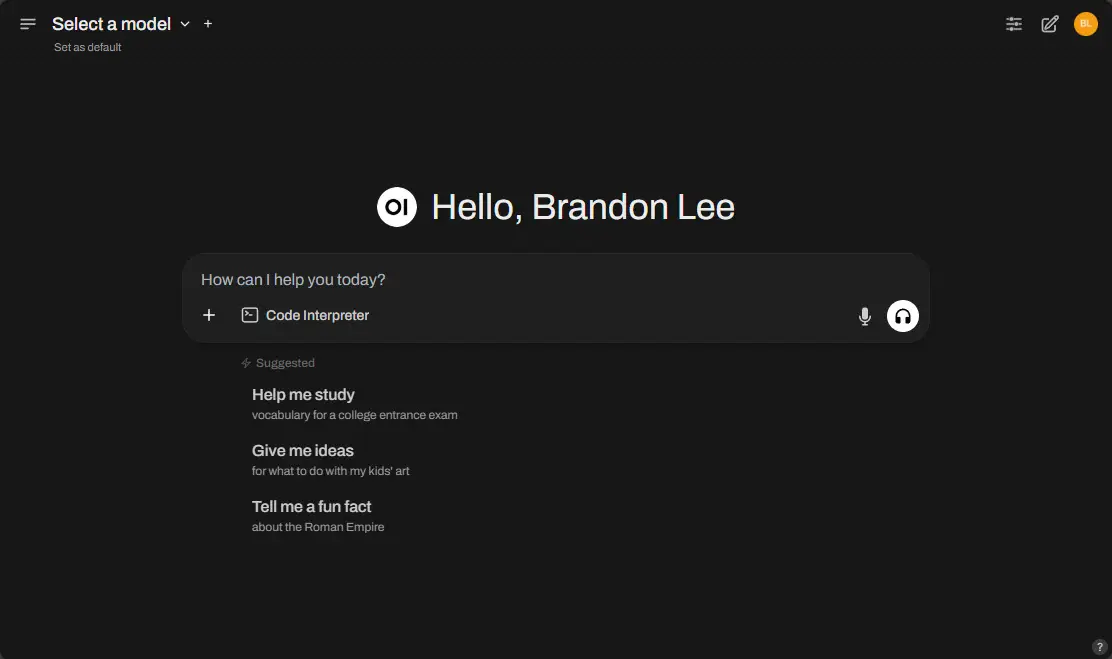
One of the coolest things that you can self-host is large language models (LLMs) like GPT. AI has transformed everything from writing content to coding. However, if you want to run your own self-hosted GPT this is a great idea for privacy and security. Instead of sending your data to a cloud provider, you can keep your data local using tools like Ollama and OpenWebUI. You can do this whether you are running a Proxmox server at home or just a simple standalone Docker host, or running in Docker Desktop in Windows. You can deploy your own chatbot with full control, no API keys needed and no dependency on the cloud.
Why self-host a GPT model?
Well, the answer to this one is pretty obvious but like anything that you can self-host, it puts you in control of the data. It also allows you to do the following:
- Privacy and Control: Your prompts and data stay local since your model is housed locally
- No API Costs: Avoid recurring subscriptions from OpenAI or other online cloud AI vendors
- Offline Capability: Use your own compute resources, even without internet access since these are local
- Experimentation: Self-hosting allows you the ability to tune, tweak and fine-tune models and tools
Even though cloud hosted models are powerful and provide an easy way to experiment with GPT models, self-hosting gives you complete freedom and data transparency which is perfect for the home lab environment.
What you need to get started
Actually, if you are running a home lab and have a server with a GPU, or even if you just have a Windows or Linux workstation with a GPU, you have what you need.
Note the following components and requirements:
- A Proxmox node (or any Linux box running Docker), you can also use Docker Desktop with Windows and a WSL2 backend
- At least 16GB RAM (32GB+ preferred for larger models)
- A semi recent GPU (NVIDIA GPU with CUDA for acceleration, optional but highly recommended)
- Docker installed – You can run what you need on a dedicated Docker host, or you can use something like Docker Desktop on Windows to host the containers for OpenWebUI and Ollama
- About 10–20 GB of free disk space (depending on model size) and enough space to house multiple models for experimentation
If you’re running on Proxmox, you can either:
- Run Docker directly on a lightweight LXC container (with
nesting=1enabled), or - Use a virtual machine with Docker installed (e.g., Ubuntu or Debian base image)
Ollama & OpenWebUI
There are two main components outside of Docker that make self-hosting your own GPT model possible. These are Ollama and OpenWebUI. First of all, what is Ollama?
Ollama
Ollama is the backend engine that downloads and runs open-source LLMs locally. It allows you to run popular models like the following:
- llama3
- mistral
- gemma
- codellama
- phi3
- neural-chat
Also, it exposes an API that allows other solutions like OpenWebUI to interact with the backend models.
OpenWebUI
OpenWebUI as the name suggests, is the piece of the solution that provides the web interface that looks very ChatGPT-like in appearance and allows you to create and manage your chats with the various models. You can easily switch models or users and you can control access to different models and chats.
How to spin these solutions up in Docker
Now that we have an idea of what each of the required components do, let’s see how to spin them up in Docker which is the easiest way to get up and running quickly. I love Docker as it provides an easy way to spin up apps and not have to worry about the dependencies as these are packaged as part of the container image.
This setup works on any Docker host, whether it is a VM on Proxmox or a bare-metal Docker server.
Step 1: Install Docker
The first step is to install Docker. Look at the official Docker documentation for your operating system and see how to get it installed properly. For Windows, you can download Docker Desktop which provides a nice GUI-based tool to create, configure, and manage your containers.
For Debian variants like Ubuntu, you can follow the guide here: Ubuntu | Docker Docs. For Windows, install Docker Desktop.
Step 2: Create a Docker Compose File or run Docker CLI to bring up containers
I like to create project directories for Docker solutions I am playing around with:
mkdir ~/ollama-openwebui
cd ~/ollama-openwebui
For the Docker command line, you can bring up the containers, using the commands:
##OpenWebUI
docker run -d -p 3000:8080 --gpus all --add-host=host.docker.internal:host-gateway -e OLLAMA_BASE_URL=http://host.docker.internal:11434 -v open-webui:/app/backend/data --name open-webui --restart always ghcr.io/open-webui/open-webui:cuda

#Ollama
docker run -d --name ollama --restart always -p 11434:11434 --gpus all -v ollama:/root/.ollama ollama/ollama
You can use docker-compose like this. Create a docker-compose.yml file:
version: '3.9'

services:
  ollama:
    image: ollama/ollama
    container_name: ollama
    ports:
      - "11434:11434"
    volumes:
      - ollama:/root/.ollama
    deploy:
      resources:
        reservations:
          devices:
            - capabilities: [gpu]
    restart: always

  openwebui:
    image: ghcr.io/open-webui/open-webui:cuda
    container_name: open-webui
    ports:
      - "3000:8080"
    environment:
      - OLLAMA_BASE_URL=http://host.docker.internal:11434
    extra_hosts:
      - host.docker.internal:host-gateway
    volumes:
      - open-webui:/app/backend/data
    deploy:
      resources:
        reservations:
          devices:
            - capabilities: [gpu]
    restart: always

volumes:
  ollama:
  open-webui:
This file does the following:
- Starts the Ollama container on port 11434
- Starts OpenWebUI on port 3000
- Connects OpenWebUI to Ollama using Docker’s internal networking
- It provides access to all GPUs on your host system (Keep in mind, if traditional Linux system, you will need to also install the nvidia-container-toolkit mentioned below under step 5) WSL doesn’t need this.
Step 3: Run docker-compose up
Launch the stack with:
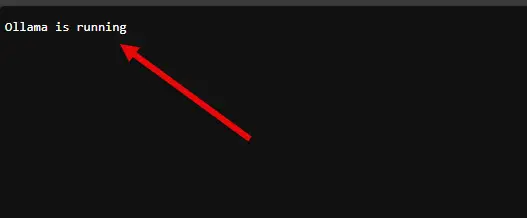
docker-compose up -dYou should now have OpenWebUI running on port 3000 of your Docker host and Ollama running on port 11434. If you browse to port 11434, you should see “ollama is running” in the browser.
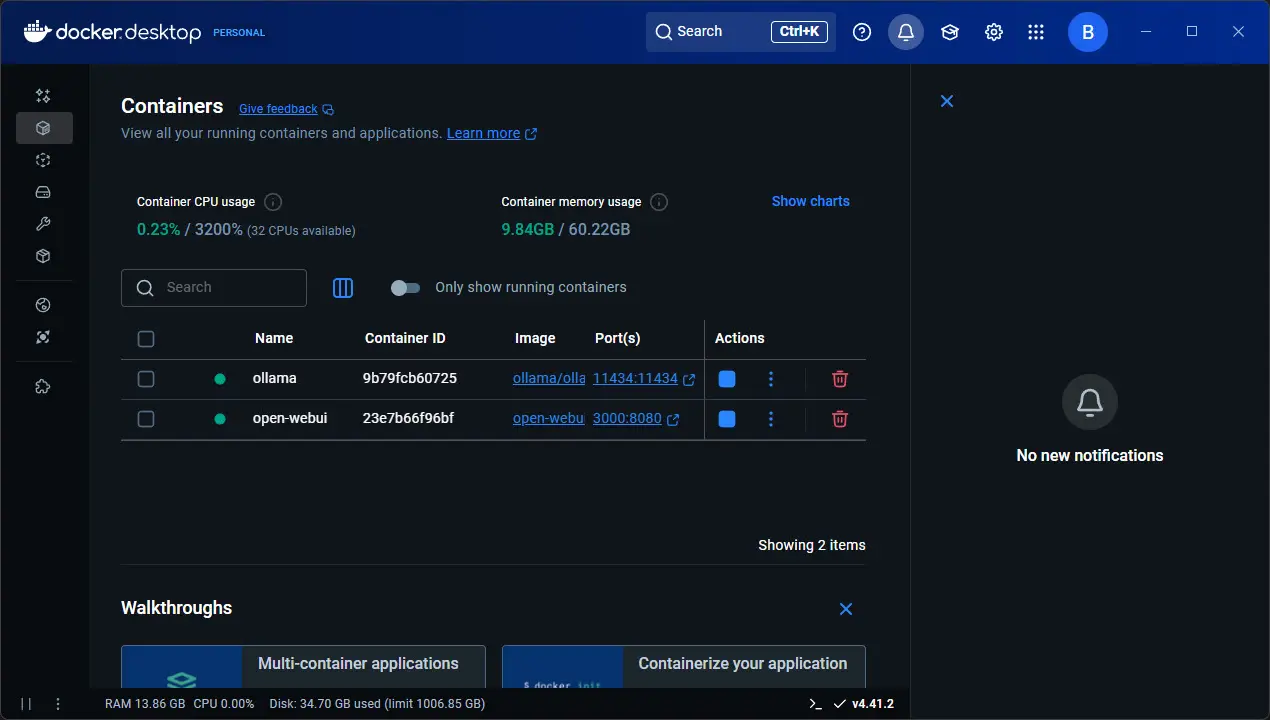
If you are using Docker Desktop in Windows, make sure you see both containers running:
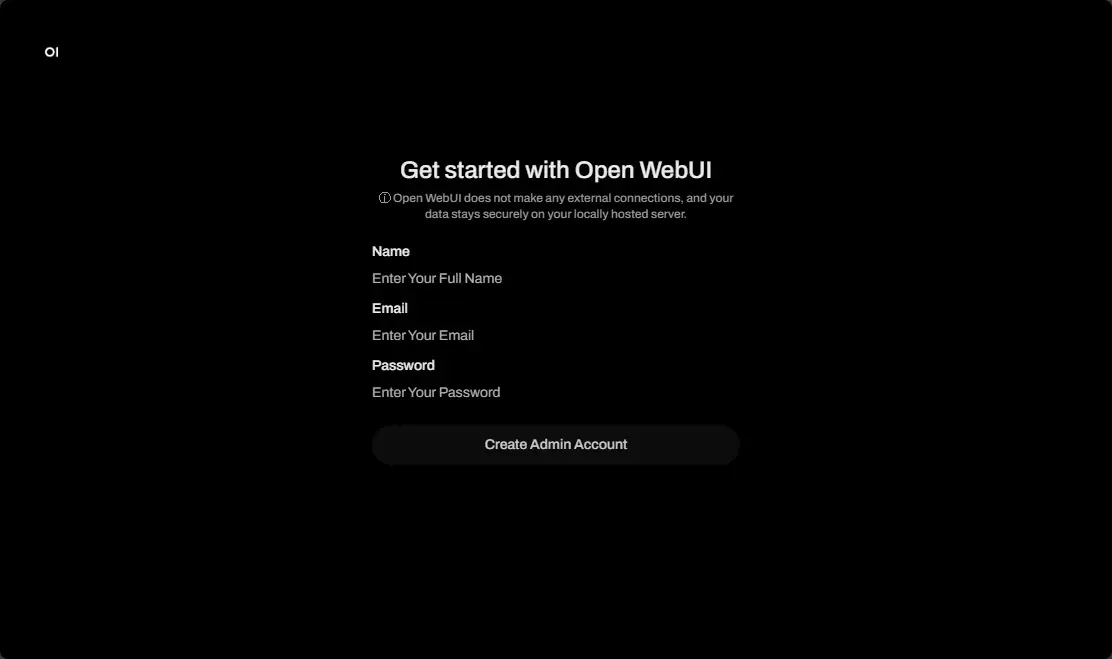
Step 4: Set up OpenWebUI
Now that you have brought up the containers, you can access the Web UI at:
http://<your-server-ip>:3000You will be prompted to setup your admin login in OpenWebUI.
After setting up my user.
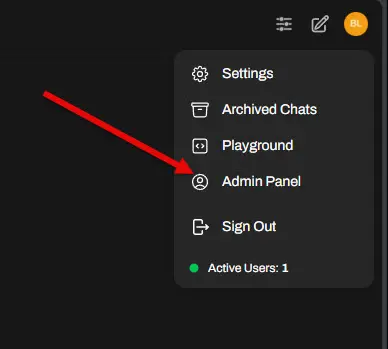
In the web interface, click your profile bubble over in the upper right-hand corner, and then navigate to Admin Panel.
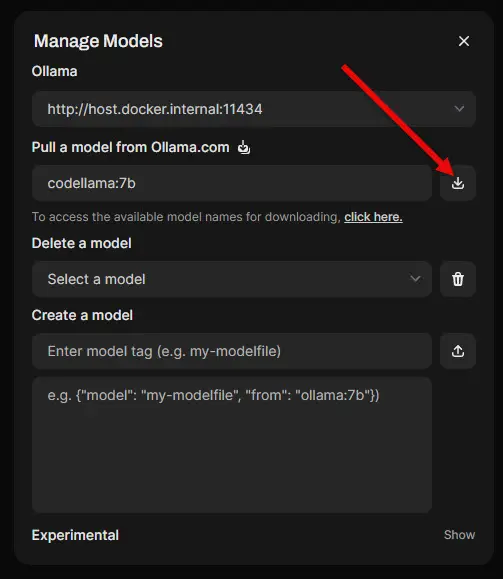
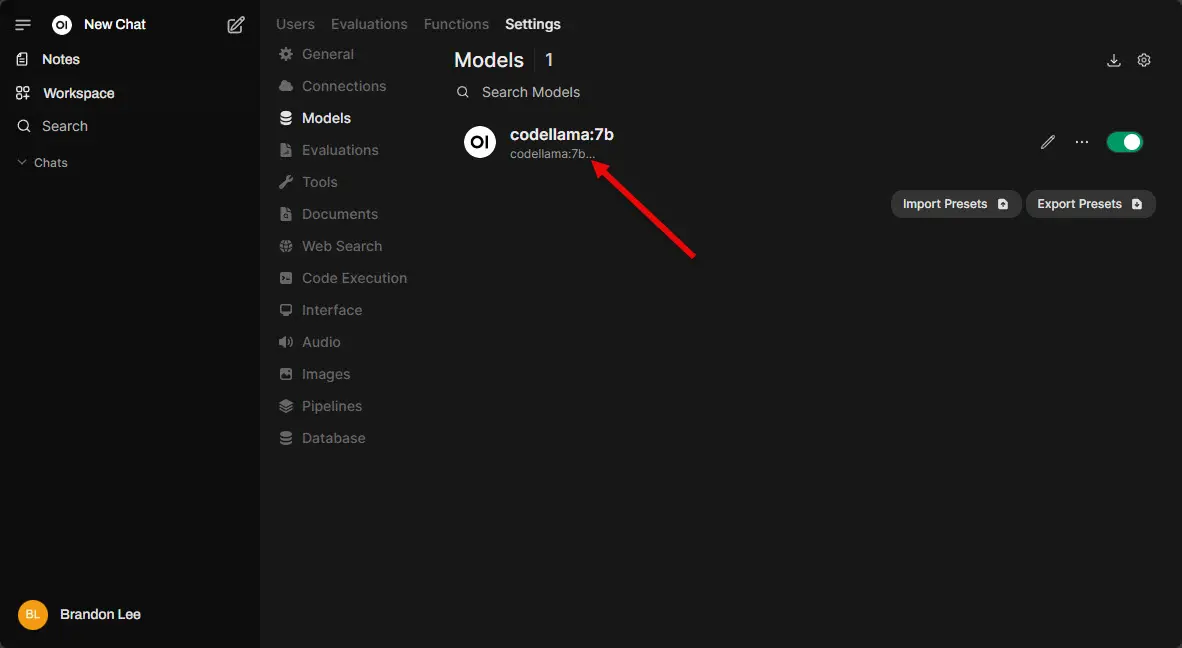
Next, navigate to Settings > Models. To download new models, click the down arrow over in the upper right-hand corner.

Below, you can see I am downloading codellama:7b. Once you enter the model and tag, you need to click the little down arrow over on the right-hand side of this box. This will begin the download of the model.
Once you click the little download arrow, you will see the progress of the model download. This will complete on its own.
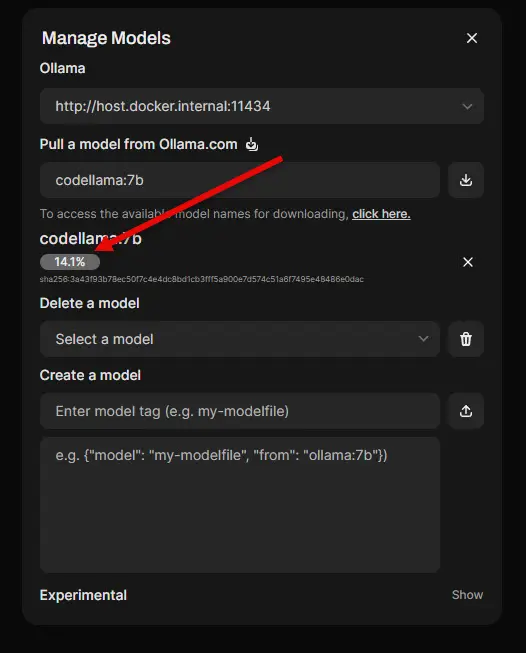
Once the download completes and adds it to the inventory, you can refresh your models page and see the model successfully downloaded.
Step 5: Optional GPU Acceleration
When using Docker Desktop on Windows for self-hosting LLMs, the setup for GPU support depends on your system configuration. If you’re using WSL2-based Docker Desktop (which most modern setups do), you do not need to manually install the NVIDIA Container Toolkit like on Linux.
Instead:
- Docker Desktop integrates GPU support via WSL2.
- You just need:
- Windows 10 21H2+ or Windows 11
- NVIDIA GPU drivers that support WSL2 (CUDA-enabled)
- Docker Desktop version 3.3+ with WSL2 backend
- Enable GPU support in Docker settings under Settings > Resources > WSL Integration > Enable GPU support
Once all that is in place, you can run containers with --gpus all as you’re already doing.
If you’re running Docker natively on Linux, then yes, you need to install and configure the NVIDIA Container Toolkit and nvidia-container-runtime to enable GPU pass-through.
sudo apt install nvidia-container-toolkit
sudo nvidia-ctk runtime configure --runtime=docker
sudo systemctl restart docker
Then modify your docker-compose.yml to add GPU support under the ollama service:
    deploy:
      resources:
        reservations:
          devices:
            - capabilities: [gpu]
Alternatively, for docker run, just add:
--gpus allThis can drastically reduce inference time, especially on 7B+ parameter models.
Running LLMs on Proxmox: Container vs VM
If you’re on Proxmox, you have a couple of ways to run this setup:
Option 1: LXC Container (Lightweight)
Create a privileged LXC container (Ubuntu or Debian) and enable nesting:
pct set <vmid> -features nesting=1Then install Docker inside it. This gives you a lightweight setup with less overhead.
Option 2: Virtual Machine (More Compatibility)
Create a VM with 4+ cores and 16GB+ RAM. Install Docker and Docker Compose like a regular Linux host.
This method is more flexible and may be more compatible with GPU passthrough.
Tips for self-hosting LLMs locally
Here are a few tips for getting the most out of your self-hosted LLM:
- Trim Model Size: Use smaller models that will fit inside the amount of VRAM your GPU has available
- Use SSD or NVMe: Model loading is disk-intensive
- Snapshot the LLM VM or Container: In Proxmox, create snapshots for easy rollback if you are making lots of changes or experimenting
- SSL it with Nginx Proxy Manager: If you want access from outside your LAN, secure it with SSL and a reverse proxy
- Back up your volumes: Keep a backup of your Docker volumes to keep chat history and model cache
Real-World Use Cases for Local GPT
Once running, your self-hosted GPT can serve many purposes:
- Private coding assistant with CodeLlama
- Chatbot for local apps or websites
- Air-gapped environments without internet access that need access to AI
- Content generation without cloud lock-in
- Research and experimentation with prompts
You can even write scripts to connect Ollama’s REST API with other tools like Obsidian, VS Code, or Home Assistant.
Wrapping Up
Thanks to tools like Ollama and OpenWebUI, self-hosting LLMs GPT style AI models at home in your home lab or self-hosted environment is super easy and it is extremely powerful. Even these small models that are “distilled” can provide an extremely powerful solution for prompt engineering or chatting with AI to bounce ideas off the models. Hopefully, the above walkthrough will help anyone who is looking to get started with running their own llm hosted locally. Let me know in the comments what locally hosted AI tools you are using and what you are using them for.
Google is updating how articles are shown. Don’t miss our leading home lab and tech content, written by humans, by setting Virtualization Howto as a preferred source.
About The Author


An alternative to Docker and Ollama is the MSTY app which is essentially a GUI front end to their embedded Ollama server.
This has many advantages over using Ollama alone or even with Open WebUI.