I personally think that running Ceph in the home lab for your Proxmox cluster shared storage is one of the most rewarding upgrades you can make to your virtualization environment. When you combine Ceph with Proxmox, you get a highly available distributed storage system that means you don’t have to have an external storage device connected. It pools together storage between your nodes. After running Ceph seriously in the home lab on my 5 node Proxmox cluster, benchmarking it, troubleshooting it, and learning some of the nuances there, I wanted to share five things I wish I had fully understood before running Proxmox with Ceph in the home lab.
1. Enterprise SSDs matter a lot more than you might think
One of the huge lessons that I have learned recently with Ceph in a home lab is that even when you have fast consumer SSDs or NVMe drives, these are just not cut out for serious Ceph workloads. Many people start a Ceph cluster using consumer NVMe and I get it. I have used consumer NVMe drives in my lab for years now. It’s cheap (well, it used to be at least), and in general it works.
But, the reality is that Ceph places a very different kind of demand on storage devices much more so than a typical desktop or workstation that consumer drives are built for, or even a standalone virtualization how with local storage where you run virtual machines.
Ceph is a storage technology that generates a lot of small, random writes and metadata operations. It needs consistent write performance for long periods of time and this is where just about all consumer drives struggle. Why is this?
Most consumer SSDs rely heavily on SLC caching to boost performance. This is a type of cache that temporarily accelerates writes by storing data in a fast portion of the NAND. Once that cache fills up though, write performance can drop off pretty dramatically. In Ceph workloads, this can lead to latency spikes and inconsistent performance across OSDs.
You can see the difference in latency between consumer drives and enterprise drives. The enterprise drives are all the drives that show “0” for the latency.
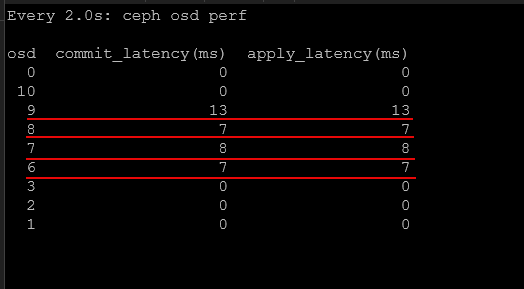
Enterprise SSDs are designed to behave very differently. They are designed for sustained write workloads and use larger DRAM buffers, as well as higher endurance NAND. They are also configured with firmware that is meant for consistent performance during write operations. Enterprise drives have much lower latency and much more predictable latency under heavy load. This is exactly what Ceph needs.
In my own testing, switching from consumer drives to enterprise NVMe drives dramatically improved performance in my mini cluster. Latency dropped and the cluster was much more predictabe under load. Check out my nerdy deep dive into benchmark comparisons between consumer and enterprise drives here:
If you plan to run Ceph in your home lab, investing in enterprise SSDs is one of the best hardware decisions you can make for your home lab.
2. Network design and bandwidth is critical for Ceph
One of the other things that I can say is extremely important for Ceph and how it performs is the network. I see so many comments on Reddit and other forums where users are asking about trying Ceph out and they are trying to run it on 1 GbE network connections. While you can do things like this for learning and I totally respect that, Ceph is an absolutely beast when it comes to needing a fast network. But I will say that this isn’t really specific to Ceph. Software-defined storage is totally reliant and dependent on the network.
Ceph relies heavily on node to node communication, and network design is extremely important for your cluster stability and performance. I will say that my first foray into Ceph was on a variety of mini PCs that only had 2.5 GbE networking. And, it actually was usable with my 2.5 GbE networking and running around 15-20 VMs. But, in my honest opinion, Ceph comes alive starting at 10 GbE.
Ceph uses the network for several important tasks.
- Data replication between OSDs
- Recovery and rebalancing operations
- Client I/O requests
- Cluster messaging and health checks
If the network is congested or not designed very well, you will experience very slow performance, and any recovery operations will just about kill your cluster. There are several best practices that make a significant difference.
- Using a dedicated network for Ceph traffic – this helps isolate storage operations from normal VM traffic and keeps you from having virtual machine workloads from interfering with storage replication and recovery tasks
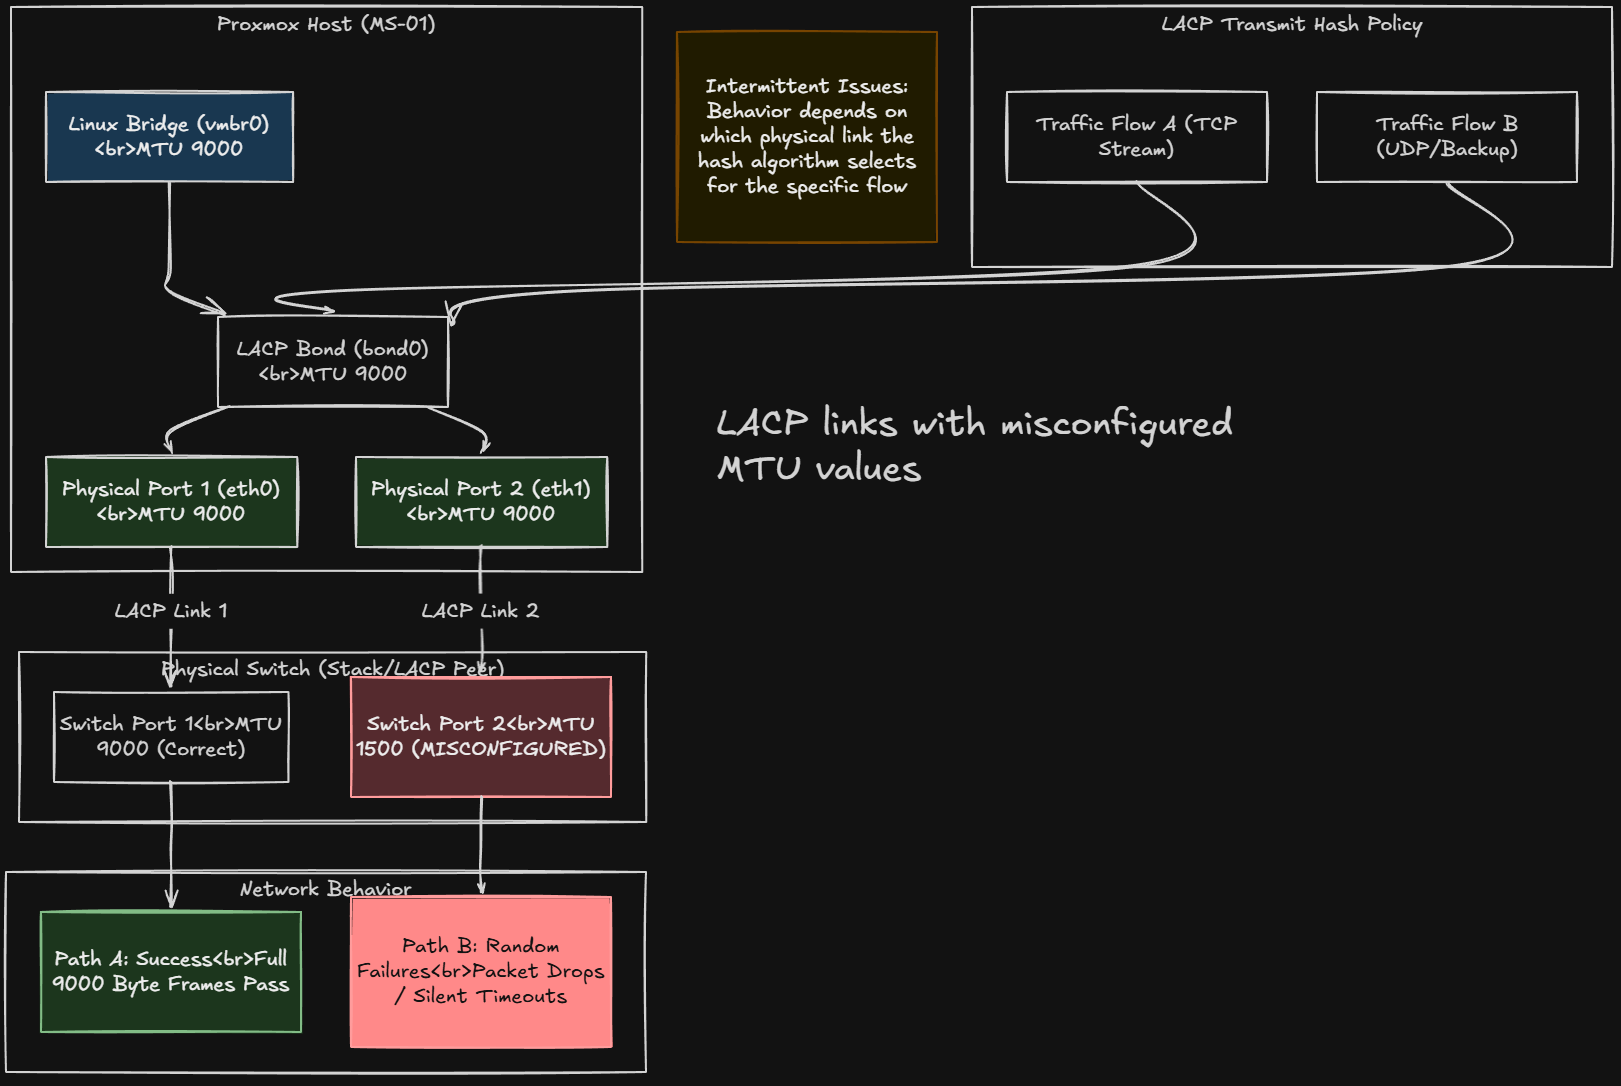
- Jumbo frames can also provide benefits in many environments – Increasing the MTU to 9000 can reduce CPU overhead and improve throughput with the large volumes of Ceph storage traffic.
- However, it is important that jumbo frames are configured consistently across the entire network path including switches and host interfaces. See what happens in my post here when they aren’t: Jumbo frames broke my Proxmox cluster.
So, if you are going to run Ceph, don’t skimp on your network design and the faster the network the better, or you will be troubleshooting things later.
3. Ceph uses more resources than you might expect
Another lesson I have learned and that often comes as a surprise to those that try out Ceph in their Proxmox cluster is how many system resources it consumes. Keep in mind that Ceph is not like traditional storage systems. With these solutions, the logic and processing lives inside the dedicated storage appliance.
In contrast, Ceph storage is taken on internally by each Proxmox host. So, each storage device becomes an OSD daemon, and each OSD consumes CPU, RAM, and network bandwidth. This means that running Ceph on Proxmox hosts impacts the available resources for virtual machines. The more OSDs you run, the more resources Ceph will use.
RAM usage is one of the areas that is important. Ceph relies heavily on memory for caching and internal operations. A common rule of thumb is that each OSD requires several gigabytes of RAM to perform correctly.
CPU usage is also higher than many expect, especially during recovery operations when data is rebalanced across the cluster. When a node goes down or a drive fails, Ceph needs to rebuild the lost data across remaining OSDs. This process can generate a lot of CPU and disk activity.
In a home lab environment, it is important to size your hardware so that your Ceph operations do not starve your virtual machines of the resources they need. Be sure to plan for this kind of overhead to make sure your cluster stays responsive even during maintenance events or drive failures.
4. Failure domains matter even in small clusters
Ceph is one of those systems that is designed to provide redundancy for your data and fault tolerance so that you can withstand failures of all kinds and still have access to your data. But, keep in mind that how well you are protected depends on how your failure domains are designed.
What is a failure domain exactly? A failure domain is a logical grouping of components in a system that could fail together due to a single event. In distributed systems like Ceph, failure domains help you to determine how your data replicas are placed so that multiple copies are not stored on hardware that could fail at the same time.
Ceph defines this logic in the CRUSH map. Ceph will make sure that each replica of an object is stored on a different server. This way, if one node fails, the other copies of the data still exist on other nodes and the cluster can continue operating without you losing access to your data.
Below is a look at the CRUSH rules for my cluster. You can see the failure domains are set to host. You can view these with:
ceph osd crush rule dump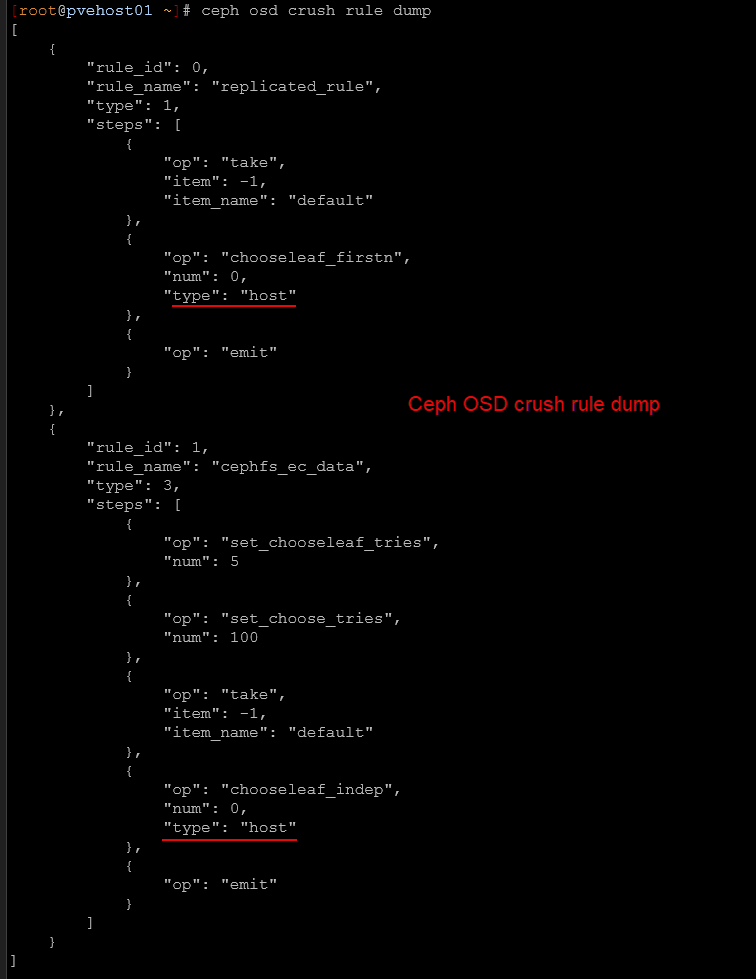
In enterprise environments, failure domains can be defined at the rack or host level. In a home lab cluster, hosts are typically the most practical failure domain.
This means Ceph should place data replicas across different physical nodes. If a single node fails, the remaining replicas still exist on other nodes and the cluster continues to operate.
However, if multiple replicas end up on the same host due to misconfiguration, a single host failure could result in data loss. So, keep this in mind, that even in a three node home lab cluster, your failure domains are important. Ceph should be configured so that each replica is stored on a different host when possible.
5. Monitoring Ceph is crucial to running it successfully
If there is one thing that is important with Ceph, it is monitoring the solution carefully. You can’t just configure it and then just walk away and always assume everything is ok. Monitoring is essential for keeping your cluster healthy and making sure your data is safe.
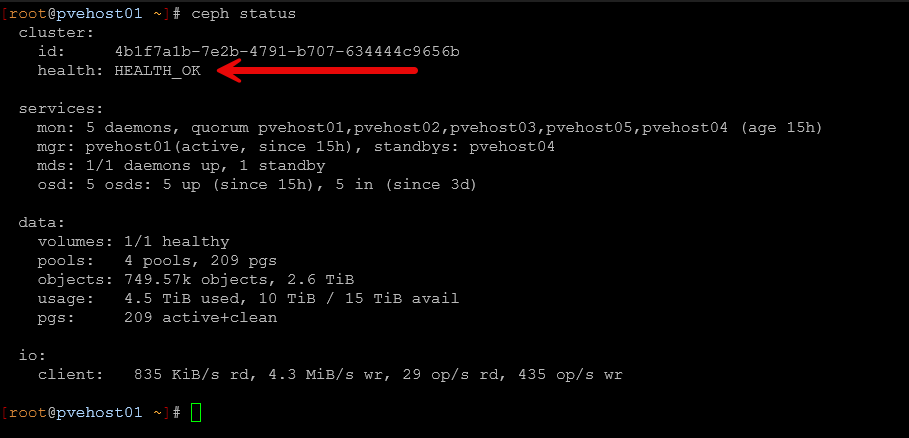
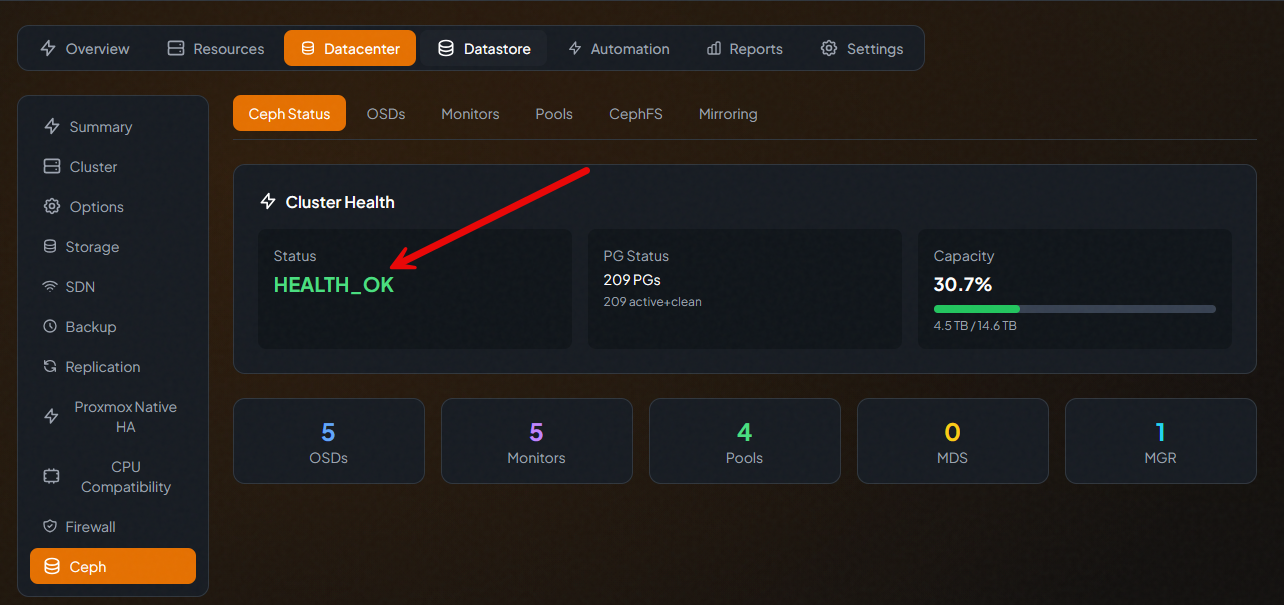
Ceph gives you many tools for visibility into cluster health. The built in Ceph dashboard is something you can spin up that gives a graphical view of cluster status, OSD health, and storage utilization. However, I find myself just navigating around and viewing cluster health using the command ine. There are tons of built-in commands that are helpful. One of the commands you get familiar with quickly is the ceph -s command or the ceph status command (they do the same thing).
There are many third-party solutions that allow you to view and monitor the health of Ceph as well, including PegaProx.
This commands gives you a quick overview of the health of the cluster and whether or not you have degraded components, backfilling going on, or some other operation is in progress.
You can also enable the built-in native Prometheus endpoint in Ceph and you can use many solutions to scrape these metrics and present these in a dashboard like in Grafana. If you have an event like an OSD failing or a node going offline, Ceph will start rebuilding the data across the remaining nodes in the cluster. So, keeping an eye on your cluster health even during a rebuild is important to make sure things complete successfully.
Wrapping up
Ceph is a fantastic storage solution I think for home lab environments, especially those running Proxmox VE Server. It gives you the ability to run distributed storage across multiple nodes so you don’t have to have a dedicated storage appliance for shared storage across your cluster.
However, as we have discussed, there are many aspects of Ceph that you need to give attention to so you can run it successfully. It is a beast in many respects and requires high quality drives and also an extremely healthy network. I think realistically for most production environments and for serious home labs, 10 GbE is the minimum. I have ran 2.5 GbE successfully and rather satisfactorily, but just know that even with 2.5 GbE you will start to see some performance hits during backup operations, backfilling, or other things going on in the environment. What about you? Have you tried out Ceph in your home lab or are you running it today? Let me know in the comments.
Google is updating how articles are shown. Don’t miss our leading home lab and tech content, written by humans, by setting Virtualization Howto as a preferred source.
About The Author