Docker is one of the most popular tools not only in the home lab, but in production environments that lets you run services quickly and easily. If you are like me, I hate the thought now of having to spin up a full VM just to try out a service. I look for services and apps that run in Docker. For my home lab and many others, Docker is the foundation that powers everything. However, most are only scratching the surface of features and capabilities that Docker can do. In this article, I want to walk through five Docker features that many home labbers are not using yet, but I think that you should absolutely consider using in your lab.
1. Health checks to monitor container status
The first one is absolutely an overlooked feature for Docker that provides a measure of self-healing and monitoring capabilities right in the box. By default, Docker only looks at whether or not the container process is running. If the process inside the container starts but the application is actually broken, Docker may still see the container as being healthy.
This can lead to situations where the service appears to be healthy and running but it is actually broken. With a well-designed healthcheck, you can test whether or not the app inside the container is working as it is intended to work. Instead of it just checking to see if the container is running, Docker can verify the service is responding as it should be.
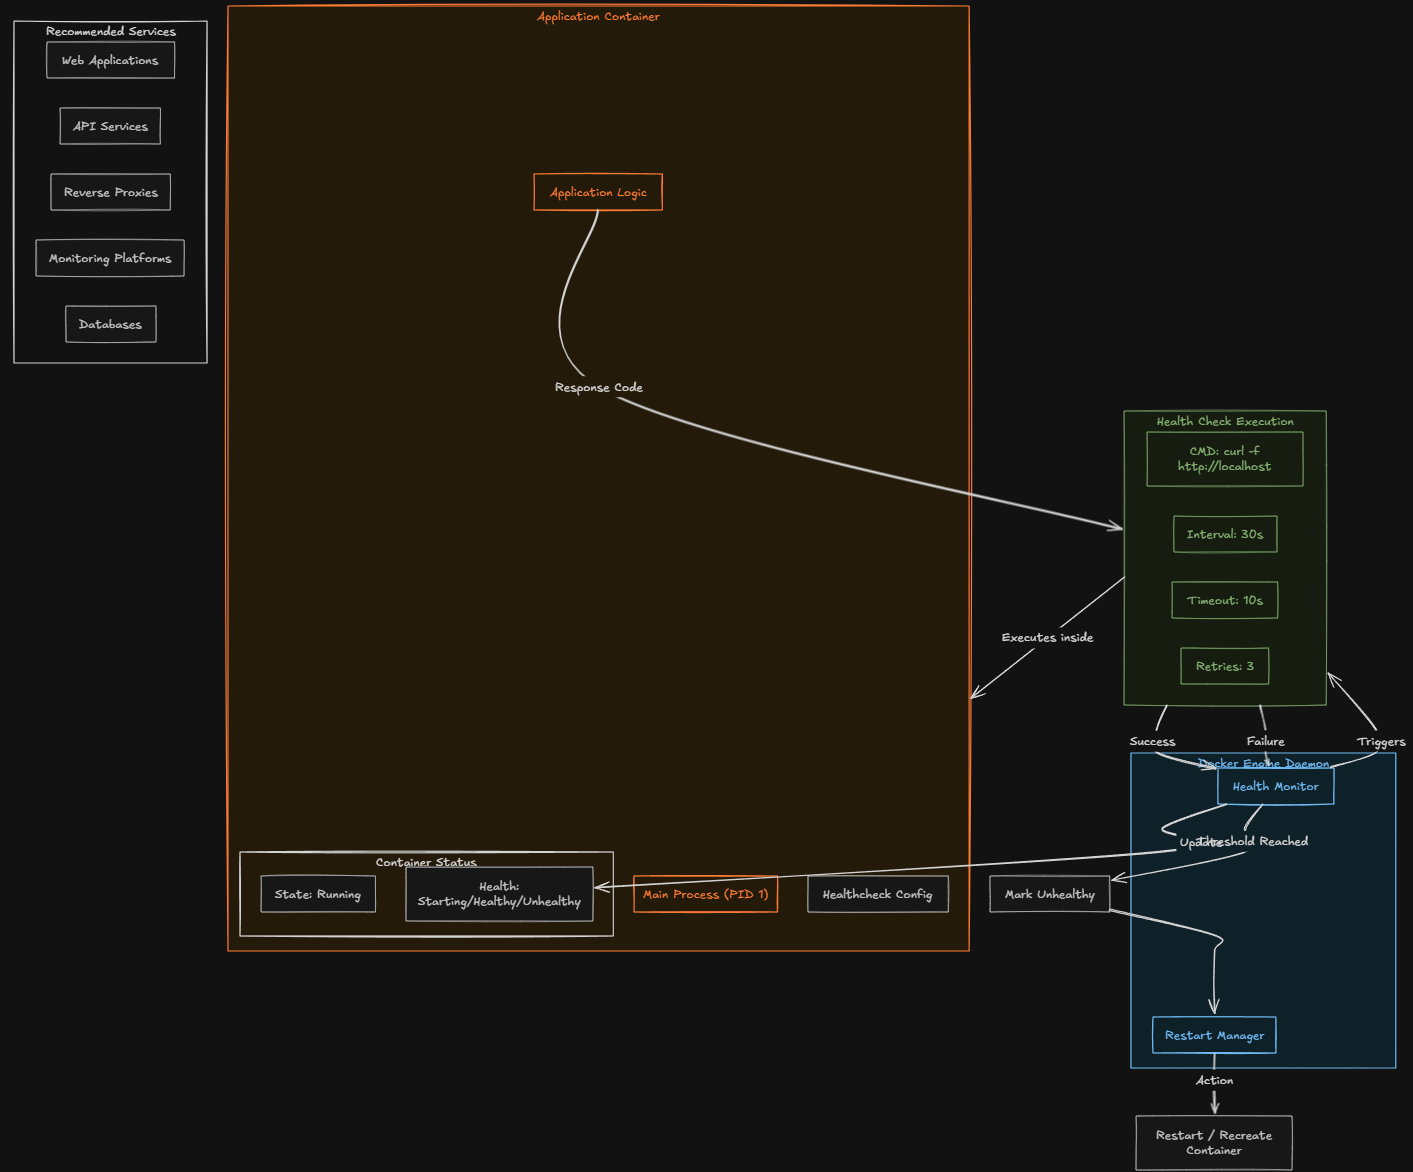
As an example, you might think about configuring an HTTP request to a web service inside the container. If the response fails repeatedly, Docker can mark the container as unhealthy. Here is a simple example of a health check in a Docker Compose file:
healthcheck:
  test: ["CMD", "curl", "-f", "http://localhost"]
  interval: 30s
  timeout: 10s
  retries: 3
This health check config instructs Docker to test the container every 30 seconds and verify that the application responds correctly. Are there services that work better with health checks than others? You can create health checks for just about anything you can imagine, but health checks for sure work very good with services like:
- Web applications
- API services
- Reverse proxies
- Monitoring platforms
- Databases
Then, you can combine your health checks with restart policies or orchestration systems. Health checks allow Docker to automatically recover itself from application failures. For a home lab running many services, this small feature can greatly improve on your container’s reliability.
2. Secrets management for safer credentials
Another really great docker feature that many home lab enthusiasts ignore is Docker secrets. Keep in mind as a callout, the secrets management features of Docker are only really supported in Docker Swarm mode. But if you are using swarm, you can store passwords, API keys, database credentials, and many other types of secrets in a secure way.
Docker Swarm mode allows you to use Docker secrets to have a safer way to handle sensitive data. Secrets allow credentials to be stored securely and injected into containers at runtime. So, instead of you having to store secrets in configuration files or env variables, secrets can be made available inside the container through temp files.
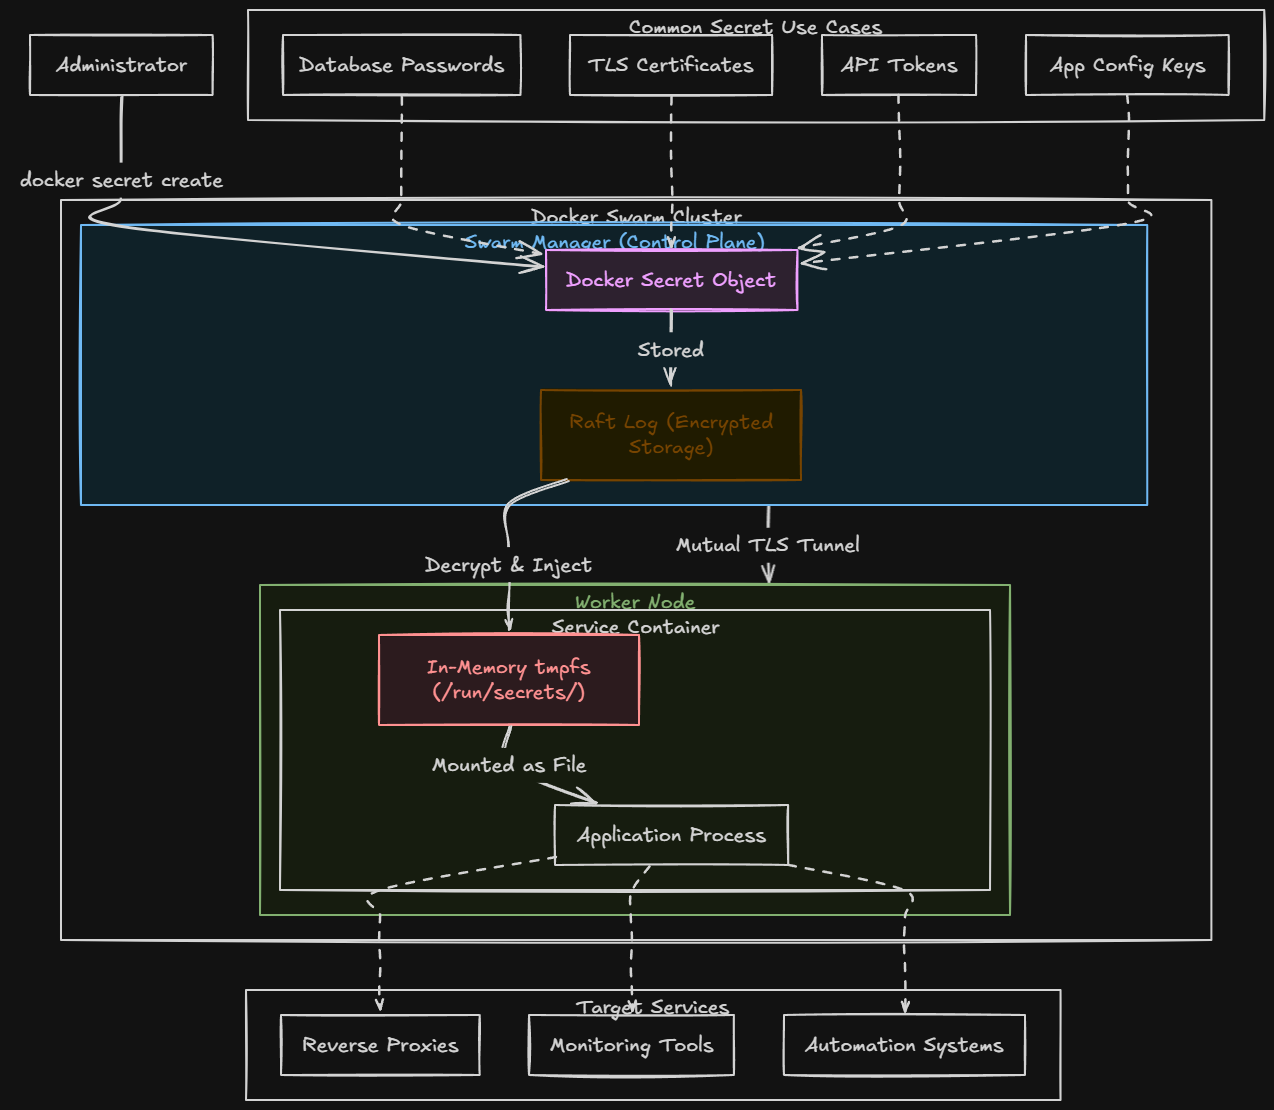
Using and handling secrets in this way reduces the risk of accidentally exposing your credentials. What are some common things you can use Docker secrets for in your containers?
- Database passwords
- TLS certificates
- API tokens
- Application configuration keys
Even in a home lab where you may not be as concerned about sensitive information, using secrets helps build better habits for managing credentials. If you treat your home lab like production, this prepares you for real world environments where secure configuration management is a necessary evil.
Services like reverse proxies, monitoring tools, or automation systems, usually need to store and use sensitive information. Storing these values to secrets can drastically improve your security posture.
Here is an example of creating a secret:
# From a string
echo "mysecretpassword" | docker secret create db_password -

# From a file
docker secret create ssl_cert ./cert.pem

# List secrets
docker secret ls

# Inspect (won't show value)
docker secret inspect db_password
Example below of using a secret in docker compose stack code:
services:
  db:
    image: postgres:15
    environment:
      POSTGRES_USER: appuser
      POSTGRES_PASSWORD_FILE: /run/secrets/db_password  # postgres supports _FILE vars natively
      POSTGRES_DB: appdb
    secrets:
      - db_password
    deploy:
      replicas: 1

  app:
    image: myapp:latest
    secrets:
      - db_password
      - api_key
    environment:
      DB_HOST: db
    deploy:
      replicas: 3

secrets:
  db_password:
    external: true   # already created with `docker secret create`
  api_key:
    external: true
3. Multi-stage builds for smaller and more efficient images
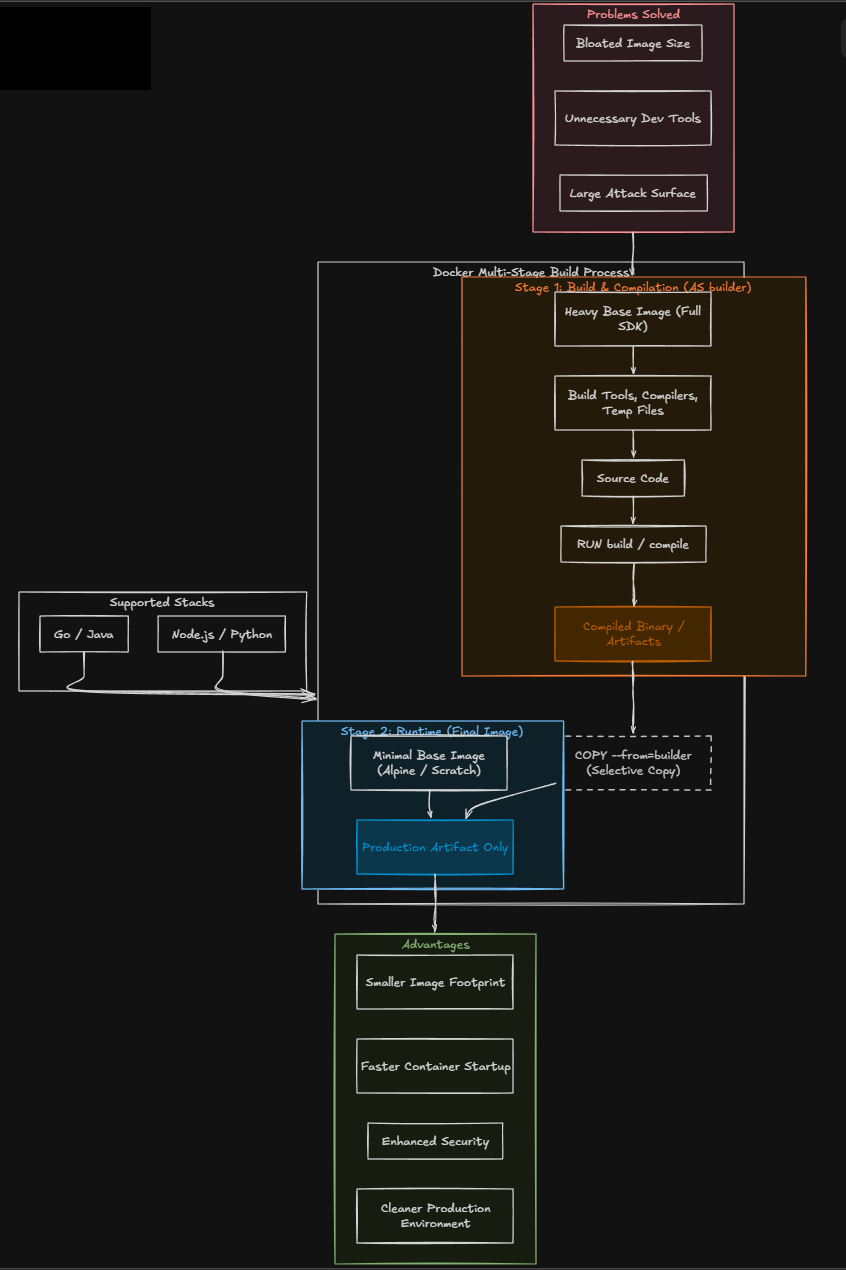
Another feature of Docker if you are getting into building your own custom container images is the ability to perform a multi-stage build. What problem do these multi-stage builds solve? Often when you build your Docker images, the images may contain more than the software that is needed. These include development tools, compilers, temp files, etc. This will lead to the image size getting bloated.
A multi-stage Dockerfile lets you perform a set of build steps in one container stage and then copy only the final compiled artifacts into a much smaller runtime container. This results in having a much cleaner and more efficient image. The result is a cleaner and more efficient image.
A typical multi stage workflow might look like this:
- Stage one builds the application using development tools
- Stage two copies the compiled output into a minimal runtime container
This approach provides several advantages:
- Smaller image sizes
- Faster container startup times
- Reduced attack surface
- Cleaner production environments
Multistage builds are commonly used when compiling applications written in languages like Go, Node.js, Java, or Python. Even if you are not building custom applications in your home lab today, learning how multistage builds work will help you create better Docker images when you do.
Below is an example Dockerfile that uses a multi-stage build:
# Stage 1: Build
FROM node:20-alpine AS builder
WORKDIR /app
COPY package*.json ./
RUN npm ci
COPY . .
RUN npm run build

# Stage 2: Runtime
FROM node:20-alpine AS runtime
WORKDIR /app
COPY --from=builder /app/dist ./dist
COPY --from=builder /app/node_modules ./node_modules
EXPOSE 3000
CMD ["node", "dist/index.js"]
4. Resource limits that keep you from having runaway containers
Many do not realize this but there are resource limits that you can place on your containers. In the home lab, many already face resource contention. When you run several containers on the same Docker host, if you have one container that starts misbehaving, it can consume excessive CPU or memory and this creates the “noisy neighbor” effect and makes it where your other containers and apps suffer as a result.
Docker includes built in tools that allow you to put in place resource limits to control how much CPU and memory a container can use. By defining limits, you prevent containers from consuming more resources than intended.
For example, a container running a small web service probably does not need access to all CPU cores or several gigabytes of memory.
In Docker Compose, you can define limits like this:
deploy:
  resources:
    limits:
      cpus: "1.0"
      memory: 512M
This configuration restricts the container to one CPU core and 512 MB of memory.
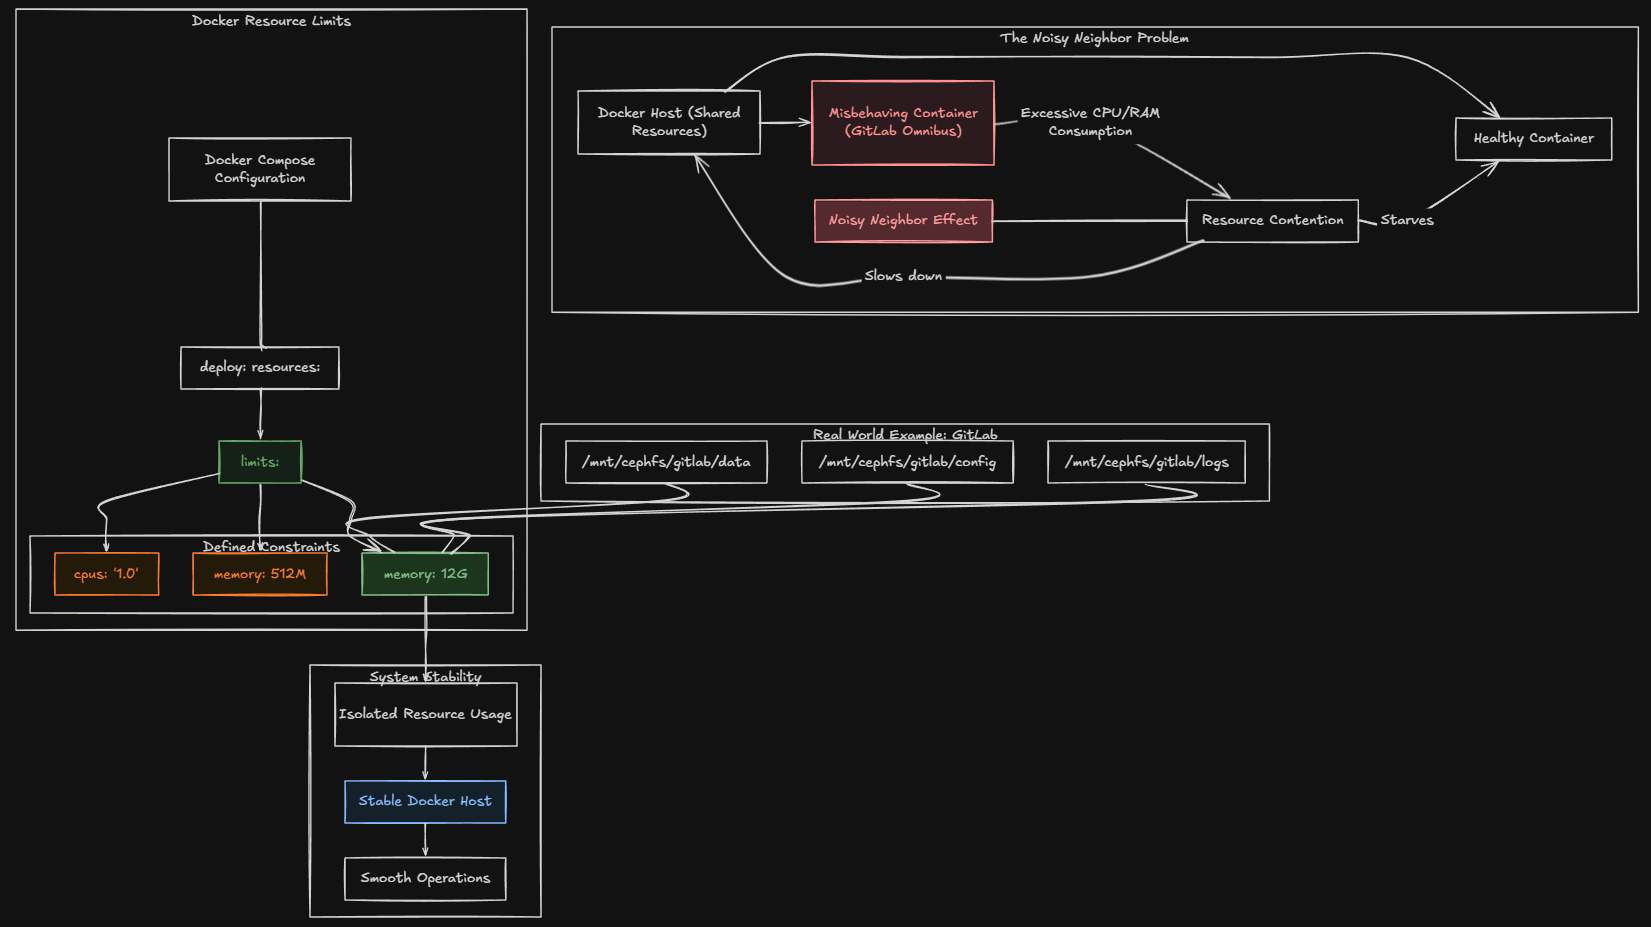
I had a real-world example of a situation in my home lab where I had to put these resource limits in place to keep things running smoothly. My GitLab container which is an Omnibus configuration (notorious for taking lots of resources) kept running away and causing my container host to come to a crawl when memory on the host would get exhausted.
I learned quickly about how I needed to set resources limits for just this reason. here is the snippet of Docker compose code that I settled on to lock my GitLab container at 12 gigs of memory:
volumes:
      - /mnt/cephfs/gitlab/data:/var/opt/gitlab
      - /mnt/cephfs/gitlab/config:/etc/gitlab
      - /mnt/cephfs/gitlab/logs:/var/log/gitlab
    deploy:
      mode: replicated
      replicas: 1
      resources:
        limits:
          memory: 12G
5. Custom Docker networks for isolating your services
Another super helpful feature and powerful one at that of Docker is Docker networking. Many rely on the defaults and Docker does a great job with default settings. When it starts containers, it places them on the default Docker bridge network that is created by default. This network works perfectly fine.
However, it doesn’t provide much control when you put everything on the same network and there are definitely reasons for splitting things off. Custom Docker networks allow you to define how containers interact. By creating separate networks for different groups of services, you can isolate components and improve security.
For example, you might create:
- A frontend network for web services
- A backend network for APIs
- A database network for storage services
Only containers that belong to a specific network can communicate with each other.
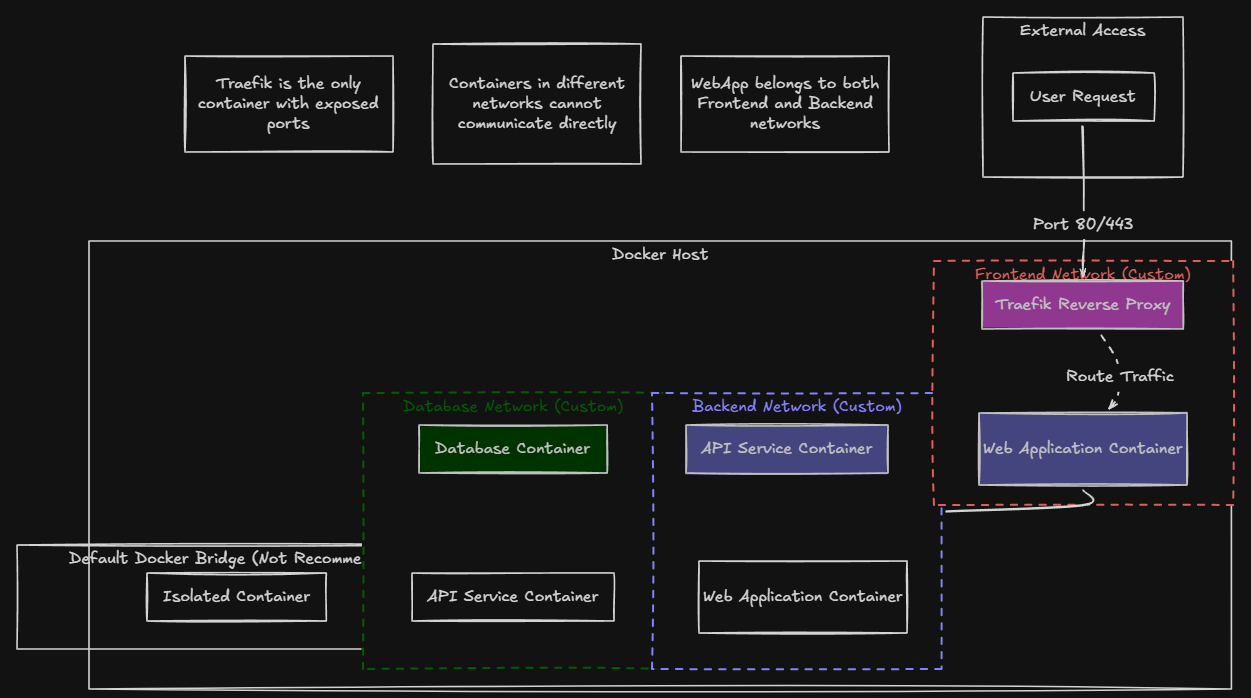
This creates a more organized architecture and prevents communication between unrelated services. As an example in my lab, I use a dedicated network with traefik for my frontend services. When you do this, you can eliminate the need to expose specific ports to the outside for your specific app containers you run. Instead, you only expose Traefik. Then through Traefik application routing, it routes traffic to the appropriate container that is found on the Traefik network.
Here is a simple example of defining networks in Docker Compose:
networks:
  frontend:
  backend:
Containers can then be assigned to one or both networks depending on their role. This approach is pretty useful when running stacks that include multiple layers such as web applications, databases, and background workers. Custom networks also make troubleshooting easier because you have a clearer picture of how services connect.
Why these docker features matter in the home lab
Most of us are running Docker now in the home lab and I think these features really matter in the home lab now more than ever. Once you become familiar with what each of these five capabilities can do for you in conjunction with running Docker, your lab will be more efficient and more secure as a result of using them.
And, what I love about learning like this in the home lab, is the skills and disciplines that you learn by implementing these in a lab environment, directly translate to running in production environments. I can’t tell you how many senior level engineers that are just not that familiar with plain Docker and its capabilities.
Wrapping up
As we all know, often its not the tool or how powerful the tool is, it is how well you know how to use it. When you know how to use these things skillfully, you can solve an amazing number of problems that may stump others.
What about you? What Docker features do you like that aren’t necessarily the features that are on the beaten path with running containers with Docker? I would love to know about them in the comments. Let me know what I am missing in my list.
Google is updating how articles are shown. Don’t miss our leading home lab and tech content, written by humans, by setting Virtualization Howto as a preferred source.
About The Author