There is no question that one of THE most important parts of your home lab is the networking component. Home labs are like real production environments. If the network is absolutely crap, everything else is going to suffer and perform badly. All too often, networking is the afterthought instead of one of the most important components when you begin. Understanding VLANs, subnets, and segmentation is what separates a basic setup from an advanced home lab that is able to scale with the projects you want to scale with. These concepts might sound intimidating, especially for beginners. However, they are actually not that bad once you have a little help getting started. That is what we are going to take a look at with this post.
Why home lab networking matters
Again, the network is the foundation that provides the building blocks for building everything else on top. Your hypervisors, bare metal servers, virtual machines, Docker containers, and everything else will connect to your network to communicate with all the other devices.
A poorly designed network can lead to performance issues, instability, or even security risks. I can’t tell you how many times an issue boils down to a problem with the network. Either there is something that isn’t configured right or there are issues with the network performance that leads to many other issues cropping up. Check out my post on avoiding network mistakes in your home lab: Top Home lab Networking Mistakes to Avoid in 2025.
What VLANs are and how they fit in
Most everyone starts out with a “flat” network. In other words, every single device is on the same broadcast domain, generally, we refer to this as VLAN 1 since most enterprise and prosumer switches or routers that you buy will default to VLAN 1 as the default VLAN.
As you start to gain knowledge in your home lab and want to start “segmenting” your network so that you can isolate different types of devices and traffic, VLANs will come into play. So, instead of just having VLAN 1, you will create additional VLANs for other types of traffic or devices.
A VLAN (Virtual Local Area Network) is a way to separate traffic logically. This can be done even when it shares the same physical switch. Instead of running separate switches for each subnet, you can create VLANs that isolate traffic on the same hardware. Keep in mind that you have to have a “VLAN aware” switch where you can manage and create the VLANs you want to use for segmentation.
Every VLAN has an ID (a number between 1 and 4094). When you tag network traffic with a VLAN ID, devices on the same VLAN can communicate. But traffic on one VLAN is kept isolated from other VLANs unless these are routed by your router.
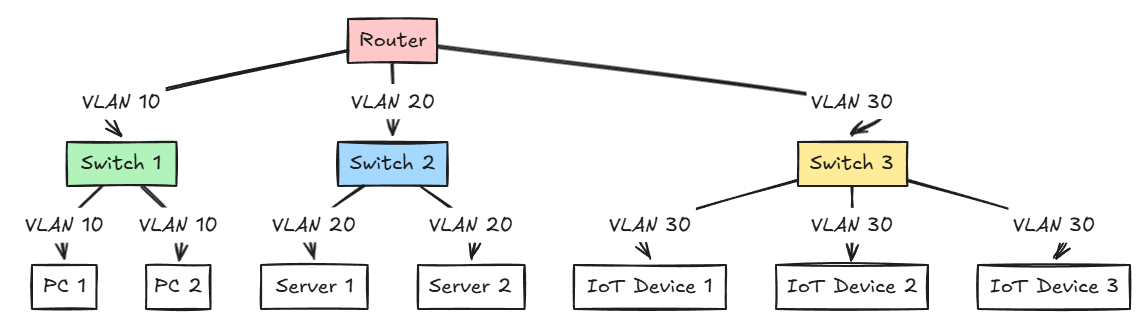
For example you might have VLANs like this:
- VLAN 10: Management
- VLAN 20: Lab servers
- VLAN 30: IoT devices
- VLAN 40: Storage
If you have a smart managed switch or router that supports 802.1Q VLAN tagging (most managed switches do), you can assign ports or virtual interfaces to specific VLANs. This lets you be able to combine different traffic types on one cable without them communicating or interfering with each other.
VLAN tagging and trunking explained
There are two key types of ports when working with VLANs: access ports and trunk ports. Here are how those come into play:
- Access port: These ports connect to an endpoint (like a PC, NAS, or server) that belongs to one VLAN. It sends untagged traffic. Just as a hint, “tagged” vs “untagged” is from the perspective of the device on the port, not the switch perspective. It means your device is either adding a VLAN “tag” or not.
- Trunk port: Connects switches, routers, or hypervisors. These ports carry multiple VLANs at once. Traffic on these ports is tagged with VLAN IDs.
In your home lab, your Proxmox host or ESXi server likely connects to your main switch using a trunk port. This lets your hypervisor virtual switches serve multiple VLANs over a single physical NIC. Inside your virtual machines, you can tag their network interfaces so these are connected to the right VLAN.
For example:
- Your Proxmox node uses vmbr0 connected to a trunk port.
- VM1 is configured with VLAN tag 20 (lab).
- VM2 is configured with VLAN tag 40 (storage).
Both VMs use the same physical NIC, but their traffic remains separate.
Inter-VLAN routing
VLANs are Layer 2 constructs as they are a flag set in the Ethernet frame. To actually have VLANs communicate with other VLANs, if your switch is doing the routing between your VLANs, you need to add what’s called a Switched Virtual Interface (SVI) on your switch which is basically just an IP address that sits on that VLAN that acts as the gateway for your devices on that segment.
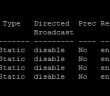
Below is an example of a Cisco device and setting IPs on interfaces.
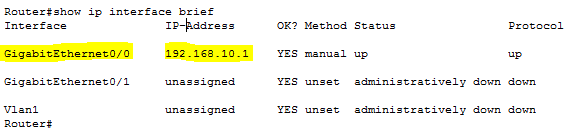
Here we can see which IP is the gateway interface for two different subnets.

Our router’s next hop in the above example would be the interface that is on the same network as the router. Then for the additional subnets, you would configure the next hop on the router to be the switch interface IP for the additional subnets.
Network segmentation and why it matters in the home lab
Segmentation is absolutely critical for security and performance and really modern firewalls require them for different subnets. Typically you tie a subnet to a unique VLAN. Again, most firewalls will make you create a unique sub interface for each new subnet/VLAN.
So for instance, the following types of devices you likely want to host in your home lab may include things like:
- Smart TVs and IoT devices
- Virtual machines
- Network-attached storage
You don’t want IoT devices communicating directly with your hypervisors or NAS. Segmentation using VLANs forces devices to be isolated and you can use firewall rules to restrict which networks can talk to each other.
Implementing segmentation in practice
You can achieve segmentation in several ways, depending on your gear:
1. Using a managed switch
Using a managed switch for segmentation is common. Note the following:
- Create VLANs for each type of traffic.
- Assign access ports for IoT, servers, or management devices.
- Configure trunk ports to connect to Proxmox, routers, or other switches.
If the VLANs are not connected by a router or a switched virtual interface, the segments are essentially islands that are disconnected from the rest of your network.
2. Using a router or firewall (like OPNsense or pfSense):
This is the easiest way to have segmented networks using your firewall rules.
- Create interfaces for each VLAN (for example, vlan10, vlan20, etc)
- Assign subnets and DHCP ranges for each network
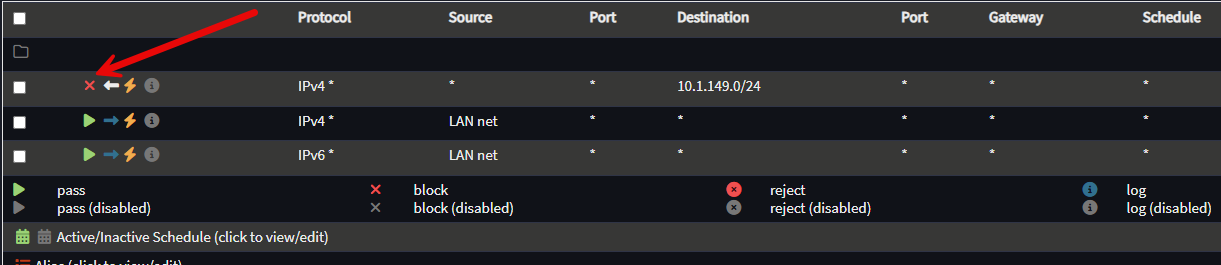
- Then, define firewall rules to control traffic between VLANs
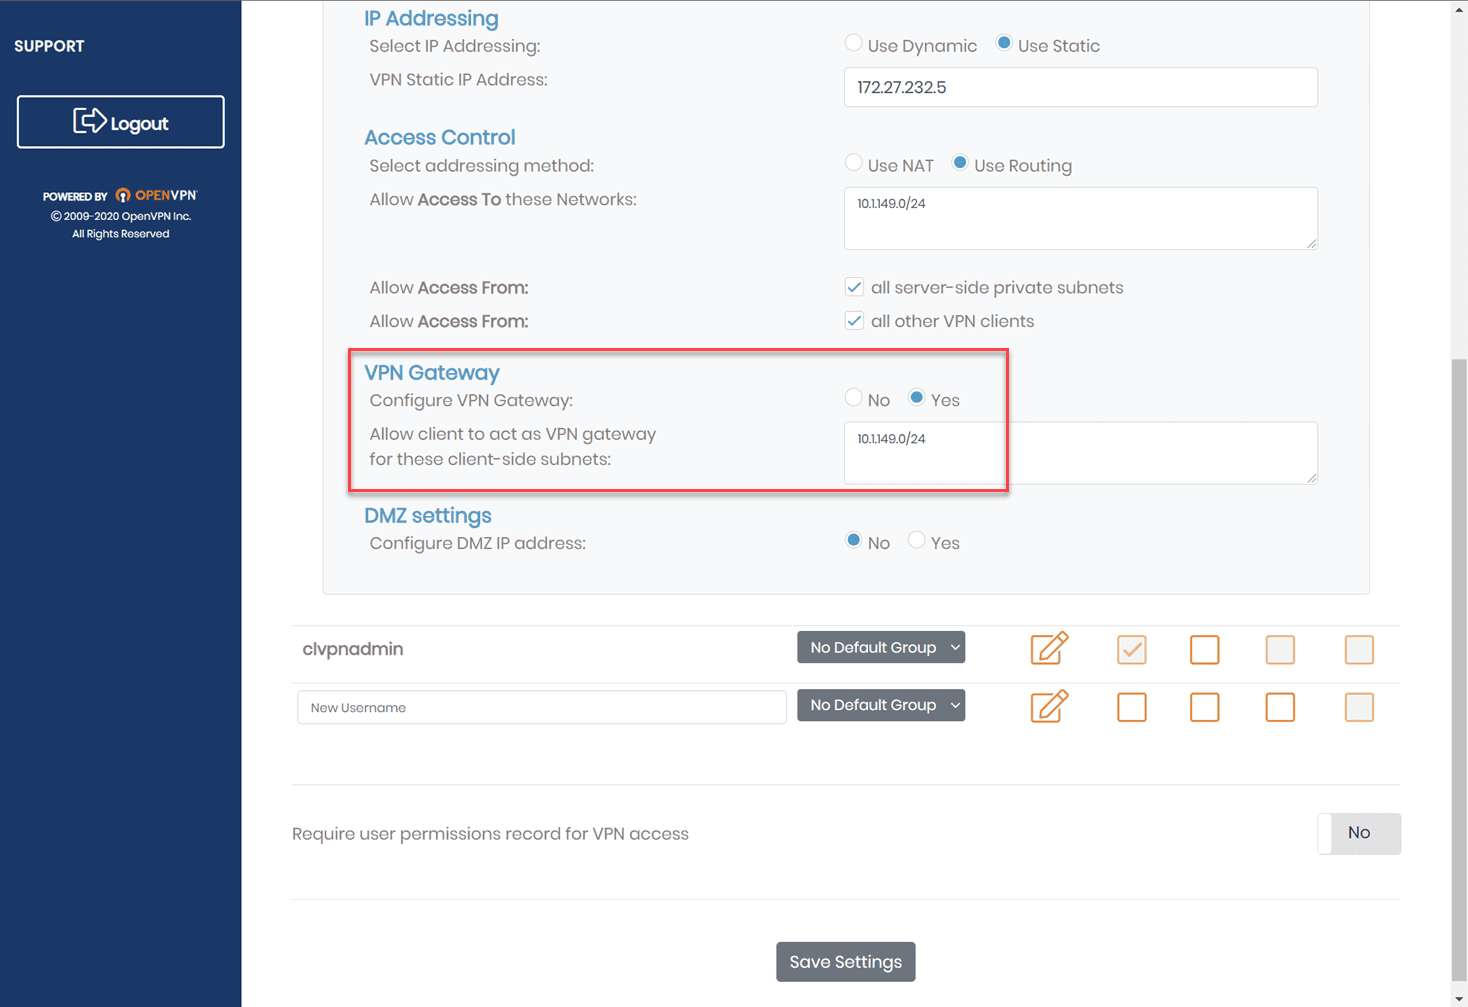
Below is a rule blocking the destination network 10.1.149.0/24 which may be a subnet for a specific type of device or traffic that you don’t want this segment to be able to reach.
3. Inside Proxmox:
You can segment traffic also inside your hypervisor.
- Create virtual bridges (vmbr1, vmbr2, etc.) for each VLAN
- Assign VLAN tags to VM interfaces as needed
- Make sure your host NIC is connected to a trunk port on your switch

This creates and makes use of a layered approach where you have the physical segmentation and virtual segmentation as well.
Understanding subnets
At its simplest, a subnet is a logical division of your network. It uses a subnet mask to define how many IP addresses belong to that group or network range.
For example:
- 10.1.10.0/24 includes addresses from 10.1.10.1 to 10.1.10.254
- 10.1.20.0/24 includes addresses for devices on a different network
Each subnet operates as a self-contained group of devices. Routers (or Layer 3 switches) are required to communicate between subnets.
In your home lab, you might have subnets for:
- 10.1.10.0/24 – Management network (Proxmox, switches, firewalls)
- 10.1.20.0/24 – Server or lab workloads (VMs, containers)
- 10.1.30.0/24 – IoT devices or guest devices
- 10.1.40.0/24 – Storage (NAS, iSCSI, Ceph)
This structure gives you clear separation and lets you apply different firewall rules and quality-of-service policies per subnet.
How you can plan your IP address schemes
When building multiple VLANs, it’s helpful to plan your IP addressing scheme to keep things consistent and easy to remember.
Here’s a simple example. I kind of like to have the 3rd octet in the subnet reflect the same number as the VLAN I have created. Now, this isn’t possible for all VLANs (once you go past 254, or 4 digits for the VLAN), but it can help make things intuitive if you are using lower VLAN numbers.
- VLAN 10 (Management): 10.1.10.0/24
- VLAN 20 (Servers): 10.1.20.0/24
- VLAN 30 (IoT): 10.1.30.0/24
- VLAN 40 (Storage): 10.1.40.0/24
- VLAN 50 (Guests): 10.1.50.0/24
Also you can reserve low IPs (like .1, .2, .3) for gateways and infrastructure and then leave the higher range IPs for dynamic clients. These are just a couple of suggestions.
How to connect your VLANs
By default, VLANs cannot talk to each other. To route between them, you need Layer 3 routing, usually done by your router or firewall, but as we mentioned above, you can also have a managed switch with layer 3 capabilities do the routing as well.
For example on a firewall if you are using something like OPNsense, you might have interfaces for each VLAN and handle all inter-VLAN routing.
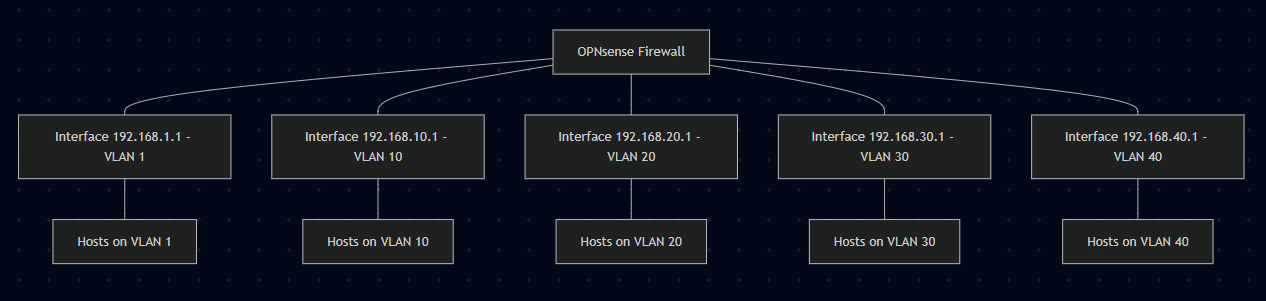
When your firewall routes your traffic from the different VLANs, this makes it super easy to create firewall rules to filter traffic and control which devices can talk to which other devices.
- Allow the management VLAN to access all other VLANs
- Allow lab VLAN to access the internet
- Block IoT VLAN from accessing management VLAN
That kind of control is what makes VLAN segmentation so powerful.
Common mistakes to avoid
There are several mistakes that you will want to avoid when it comes to designing and configuring your home lab network. These include:
- Using the same subnet on multiple VLANs – This defeats the purpose of segmentation and causes routing issues
- Forgetting to tag trunk ports – If your Proxmox host or switch trunk isn’t properly tagged, VLAN traffic won’t flow correctly
- No firewall between VLANs – Segmentation only helps if you can actually restrict communication between networks
- Inconsistent VLAN numbering – Use a logical scheme (like VLAN 10 for management, VLAN 20 for servers) and stick to it
- Mixing IoT with lab traffic – Keep your experimental or low-trust devices in separate networks
Adding DHCP and DNS for each VLAN
Let’s face it, you don’t want to have to manually assign all the IP addresses for each subnet/VLAN that you have configured. Having DHCP do that for you is the course of wisdom. DHCP will keep up with all the devices and their IP addresses that have been assigned so you don’t have duplicate IPs.
Again, most routers and firewalls will be able to turn on DHCP for a particular VLAN and even act as a DNS server for each. Each VLAN should have its own DHCP scope to hand out IP addresses for the subnet range you have configured for each segment.
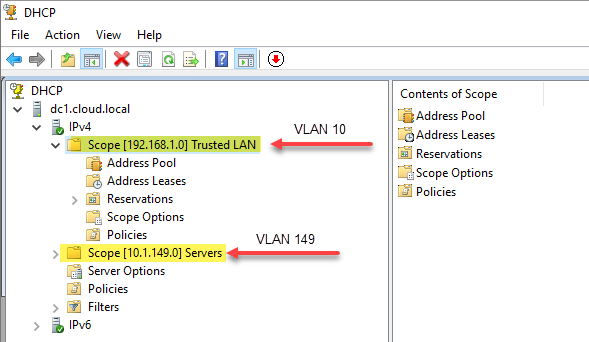
If you are using an external DHCP server to your router/firewall, like Windows Server DHCP, you don’t have to have multiple Windows Servers (one for each VLAN). Instead you configure one server with multiple scopes and route the traffic to the DHCP server using a DHCP helper address. The switch or router will use the DHCP helper address to forward DHCP requests to so an IP address will be handed out and configured for the client.
See my post on how to configure Windows Server DHCP for this: Windows Server DHCP VLAN Configuration: Detailed Guide.
Then, once you have different segments, you can then have different DNS values or solutions for different segments. See my recent post about running multiple DNS servers and ideas to do this here: Why I run multiple DNS servers in my home lab (and you should too).
Wrapping up
So, do yourself a favor. When you are building out or reconfiguring your home lab, don’t skip proper planning and configuration of your network. This step is absolutely critical. A really bad design will haunt your home lab until you tear it down and fix it the right way. So, it will save you time to take more time on the frontend and design it correctly. Hopefully this network primer on a few concepts will help get you pointed in the right direction. Do create a new forum topic if you need detailed help with a home lab networking project you want to tackle. How is your network designed? Are you planning any network configuration in your lab soon? I would love to hear about it in the comments.
Google is updating how articles are shown. Don’t miss our leading home lab and tech content, written by humans, by setting Virtualization Howto as a preferred source.
About The Author

Very good article for beginners. I wish when I started I had more guidance on the network config. Would have saved me lots of headaches! 🙂
This is a very good writing!
Sasha thank you!
Brandon
Overkill for the vast majority….. A well built flat network it’s simple and reliable, you don’t want a vlan mess if you also need robust stability if you work from home
Irwin,
I agree simple is definitely best no matter how complex a network becomes, dont overcomplicate it. I think a flat network is fine for a few devices. I like to introduce them when bringing up a hypervisor or IoT devices.
Brandon
If you’re reading this, you’re probably not part of the “vast majority.”
VLANs only cause a “mess” to those who don’t understand their (very simple) core concepts — and that’s exactly what this (excellent) article is about.
Even consumer-grade routers now ship with straightforward options to enable at least three well-defined networks: main, IoT, and guest. With the rapid proliferation of IoT devices, I wouldn’t recommend a flat network to anyone in 2025. Specially if you work from home.
Well said F.D.Castel! I think once you get to a certain point with a network, VLANs are required IMHO to have reasonable security and performance. However, as you also mention, many of the consumer routers have VLANs built-in with an easy button for at least these types of traffic.
Brandon
Hi Brandon
Instead of using a vlan tag in Proxmox I use vmbridge’s.
1. Create per Vlan a Linux Vlan name it like eno3.20 on eno3 interface for vlan20 (Dropdown box under Network). Don’t forget to switch the autostart on
2. Create a new Linux Bridge name it like vmbr20
3. Then you can use vmbr20 as the bridge
This is also useful if you have a multi-homed environment. You then can have under hardware multiple network interfaces and assign like vmbr10, vmbr20 etc.
I included two pictures to illustrate this.
Hope this is helpful
Rene.
ReneB,
I definitely agree with configuring Proxmox networking this way. This I think is a more logical approach especially if you have lots of VMs and it makes a clear distinction where the network is connected. Thank you for bringing this configuration option up here. Great guidance. This is also the approach I used with this post: Proxmox VLAN Configuration: Management IP, Bridge, and Virtual Machines.
Thanks again Rene!
Brandon
Brandon: in a recent article you published a homelab VLAN segmentation worksheet. I was thinking about a production environment and I wonder how good an idea it is for the different segments to be on completely separate subnets. Example: 10.0.20.x, 172.50.128.7.x, 192.168.99.x. Would this make any difference for a cybercriminal?
Mauricio,
Thanks for the comment. Great question. It is always best practice to align a different subnet to a different segment. Most modern firewalls won’t allow you to tie two subnets to the same layer 2 VLAN segment. Also, segmentation is a basic foundation to cybersecurity. You can’t JUST rely on segmentation, but it is definitely one of the layers of the security onion so to speak and is a building block for other security layers. Hopefully this helps.
Brandon