Reverse proxies I think are one of the most important services that you can spin up in your home lab. In fact, if you caught my recent blog post and video focused on the first services I spin up in the home lab, reverse proxies are on my list of these critical services. However, which one would I pick if I were starting my home lab today? I have recommended Nginx Proxy Manager many times, I currently use Traefik, and I recently tried out Caddy. However, for its blend of functionality and sheer capabilities, Pangolin is the one reverse proxy I would start out using.
Why Pangolin?
Pangolin takes the core functionality of Nginx Proxy Manager. It adds clustering, modern security defaults, and hybrid cloud coordination for your endpoints. It is simple when you need it to be simple. For instance, when you just want to bring up a container, and have SSL termination. Then, the advanced features you will appreciate later if you want redundancy or global failover, etc.
What is Pangolin?
At the simplest level, Pangolin is an open source reverse proxy. You point DNS at it, it listens on ports 80 and 443. It terminates SSL, and routes requests to the right backend container or VM. This is functionality that we are used to. If that is all you want, Pangolin does that just fine. You can think of it as a drop in replacement for Nginx Proxy Manager with a more modern architecture and a cloud dashboard.
Check out the official website here: Pangolin | Secure Access Platform. Also, check out the GitHub page here: fosrl/pangolin.

But Pangolin can also do much more. It was designed to solve the scaling and single point of failure problems that come up with something like Nginx Proxy Manager. It supports clustering across multiple nodes and it has stronger TLS handling. With the cloud managed option, it can coordinate DNS and failover automatically. That is why sometimes Pangolin feels more like Cloudflare Tunnel or something like Twingate, because it can handle tunneling and multi node ingress as well.
How Pangolin compares to something like Nginx Proxy Manager
Most are familiar with Nginx Proxy Manager in their home lab environment. So, can Pangolin just do the same thing that NPM can do in this regard? Terminate SSL and allow you to access your resources? Yes.
If you want this basic functionality, you can:
- Run it behind your firewall on your home lab network
- Terminate SSL connections so you can have friendly service names
- Route traffic into backend Docker containers or virtual machines you are hosting
So if all you want is NPM style reverse proxying inside your lab, Pangolin can handle it without needing to use any of the extra features it provides in regards to tunneling.
With NPM you only get a single node setup. If that container dies, all your proxied services go down with it. With Pangolin you can add more nodes to your setup. Also, you can enable cloud coordination as well, and your services will keep running if one node fails.
Installing Pangolin using the “quick setup” installer and adopting your node
In the Pangolin documentation, there is a quick setup option that allows you to easily get up and running with Pangolin. In fact, you just curl down an installer and run the installer and then just go through a little wizard inside the command line. This makes it where you don’t have to write one single line of Docker compose and can instead get up and running quickly and start proxying your services.
To pull down the installer as part of the quick install, run the command:
curl -fsSL https://digpangolin.com/get-installer.sh | bash
Next, run the installer:
./installerWhen you run the installer, you will get direction on firewall requirements and then it will step you through the “basic configuration”.
- Do you want to install Pangolin as a cloud-managed (beta) node? (yes/no)
- Do you already have credentials from the dashboard? If not, we will create them later (yes/no)
***Note*** If you choose “no” on Do you want to install Pangolin as a cloud-managed (beta) node?, it will set it up locally and expose the UI locally for management which is similar to what we all know with other reverse proxies like NPM.
You can choose to use your public IP address or point it to a DNS record if you own a public DNS domain. If you don’t have a Pangolin cloud account, you will need to create one. I did this after browsing out to the https://pangolin.fossorial.io address and signed up. It has the typical workflow as it will have you verify your email address, etc.
Then, you will notice the ID and Secret shown to you. Once you can login to your Pangolin account, you will use these to adopt the node.

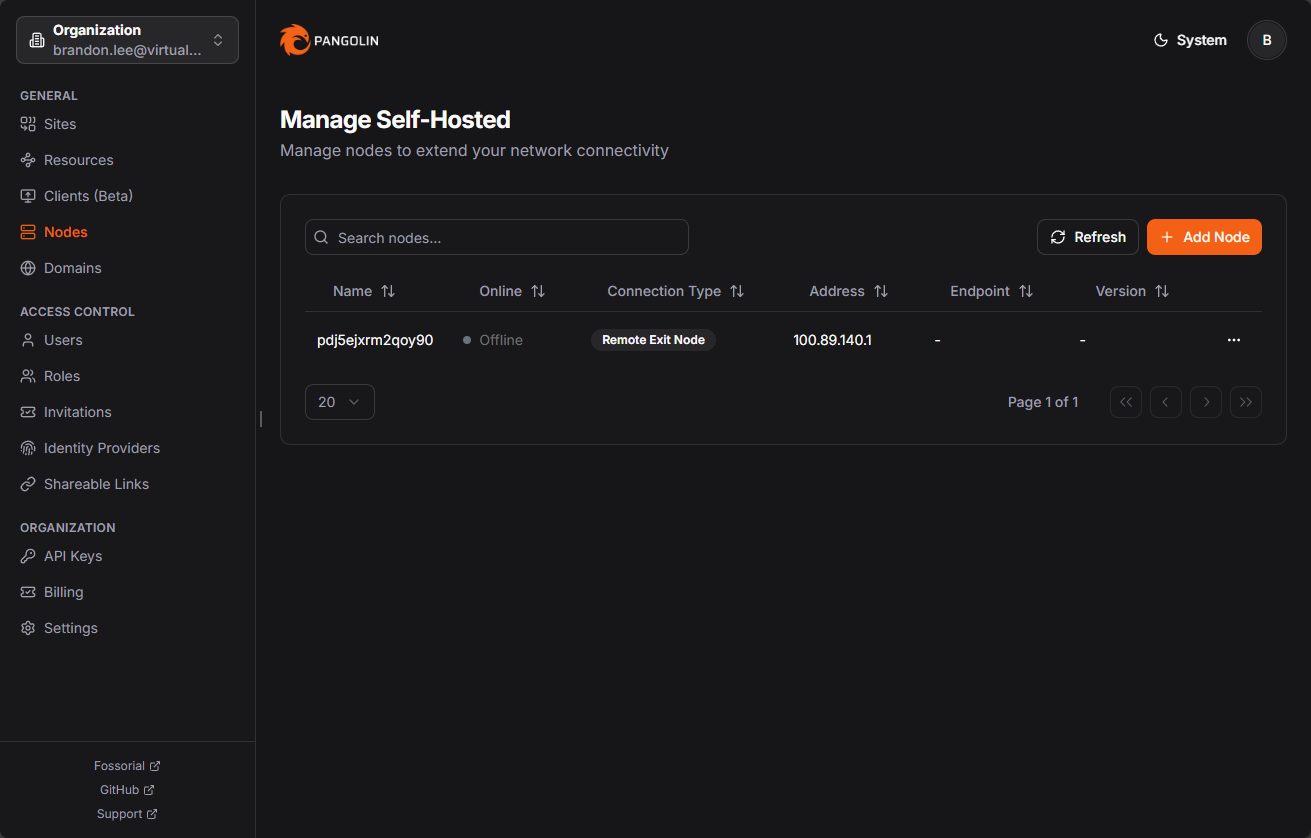
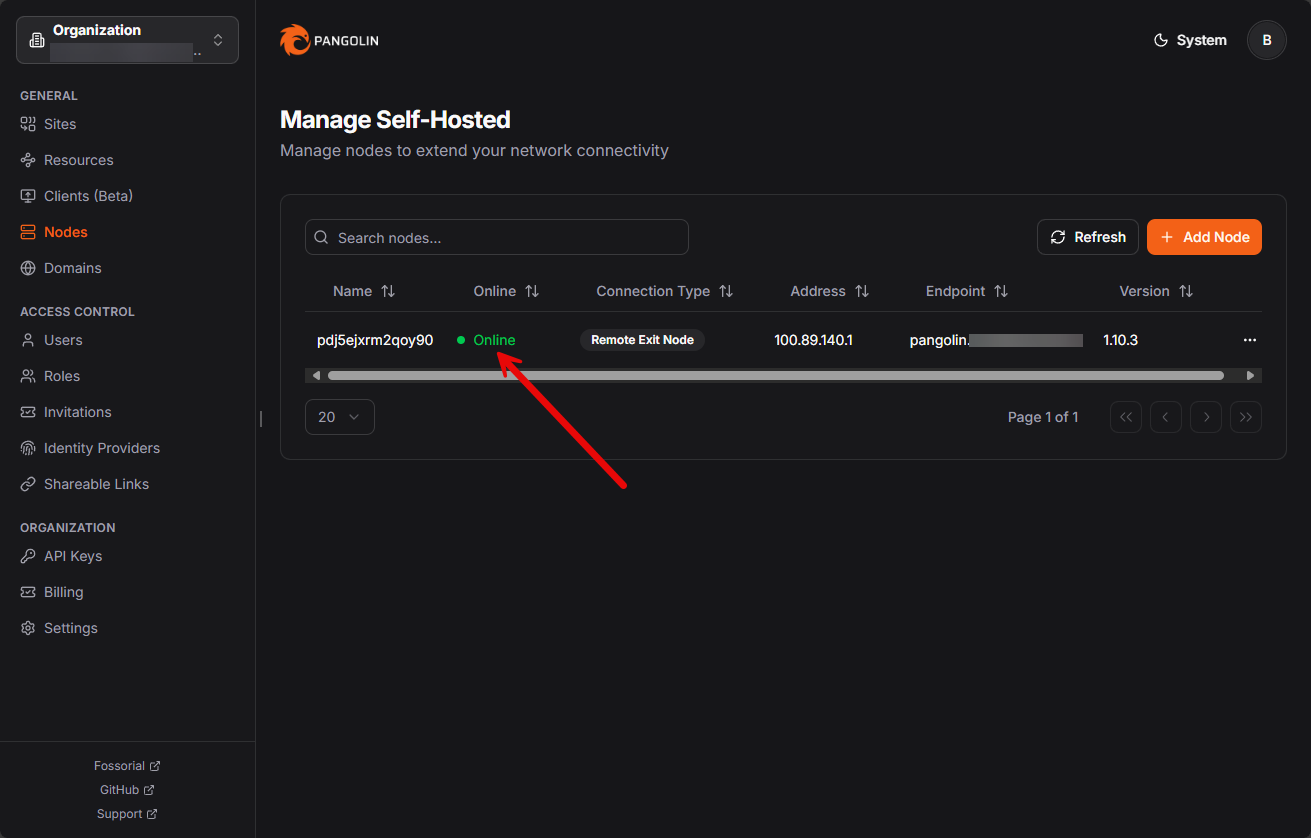
Node adoption
Once you get logged into your Pangolin instance, you will navigate to Nodes and then + Add Nodes to add a new node.
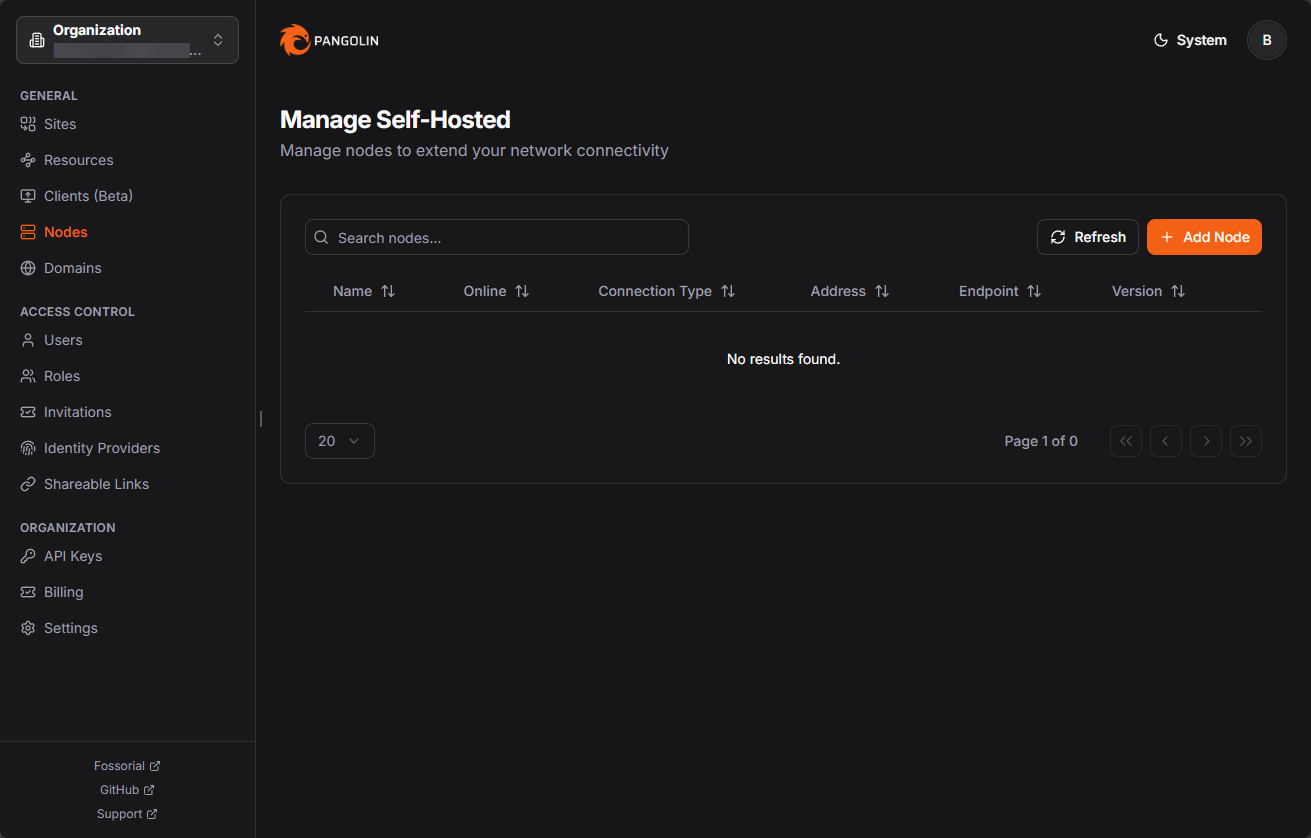
Here, we want to choose Adopt Node. When you choose to adopt a node, you will see the Node ID and Secret fields that you will populate with the values from your quick setup in the command line.

Once you add it, you will see it listed in your Self-hosted nodes.
Now, we return to the quick setup command line and enter yes on the question have you adopted your node? (yes/no). This will finish out the setup and pull the required containers needed by Pangolin.
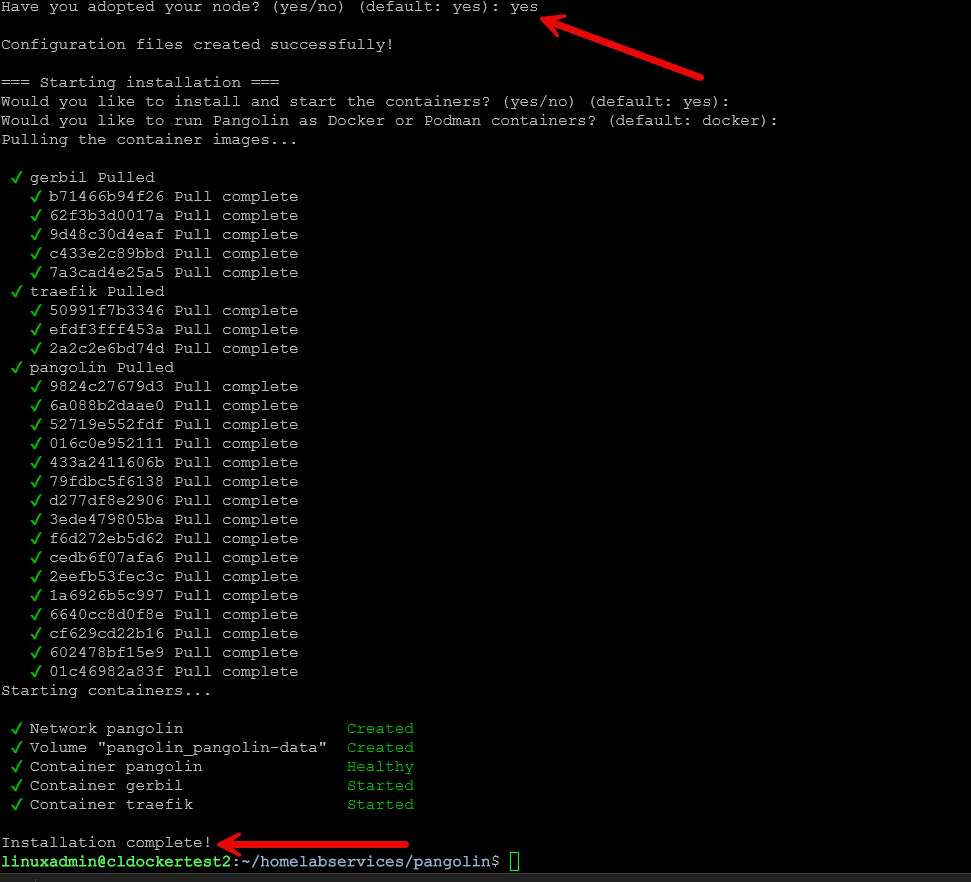
Below are the containers I saw after running the installer:
- traefik manages HTTP and HTTPS routing
- pangolin which is the main control plane and API
- gerbil which handles WireGuard and UDP ingress

This stack is enough to give you the reverse proxy functionality you are used to with NPM. You do not need to install anything extra for SSL termination and proxying to backend containers. Once this is running, your self hosted node registers with the Pangolin cloud so that you can manage it from the dashboard.
Creating a Pangolin site
Next, you will want to create a Pangolin site. Mine, I called Home Lab which makes sense as this is the site I will use to spin up “local resources only” at this point and don’t need any tunneling. In the pic below, you will see I chose local and then selected the node I just added above under the Node Selection option.

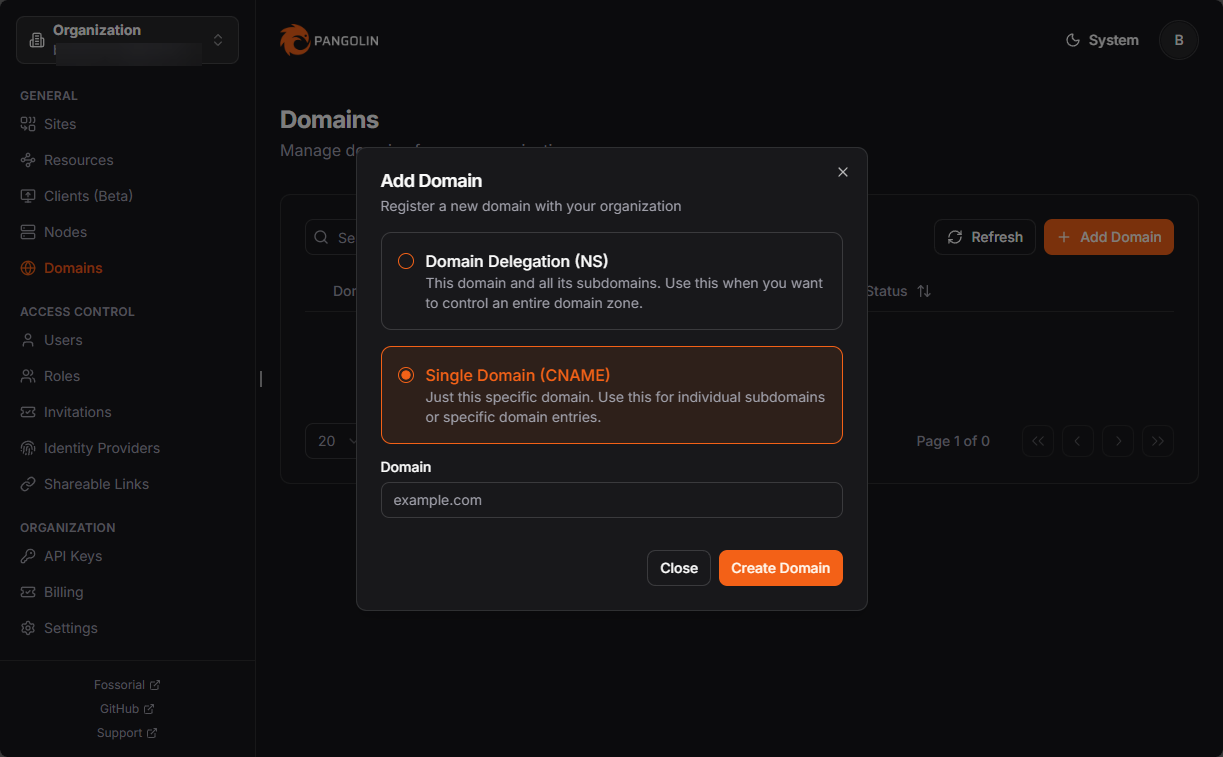
Add a domain in Pangolin

When you select to Add Domain, you will see the options:
- Domain Delegation (NS) – This domain and all its subdomains. Use this when you want to control an entire domain zone
- Single Domain (CNAME) – Just this specific domain. Use this for individual subdomains or specific domain entries
You will see a box pop up once you give it the domain you want to use like server1.mydomain.com. It will display the CNAME records that need to be added.
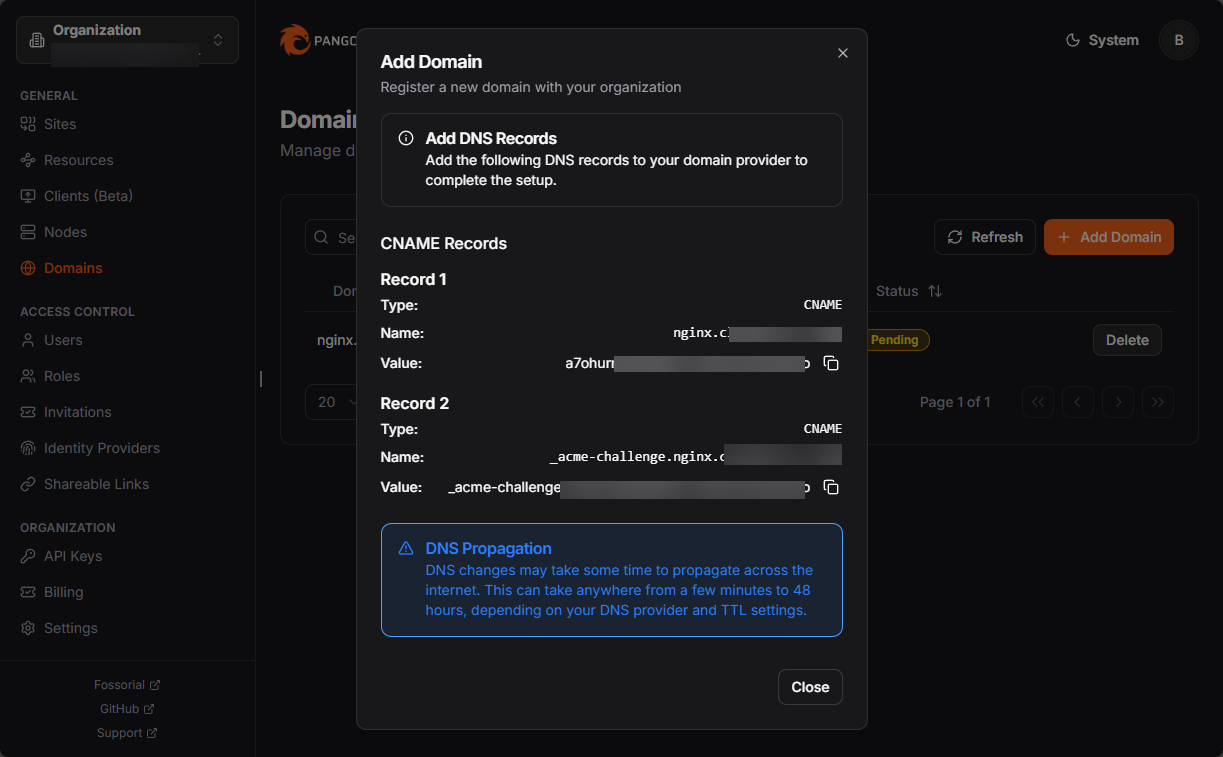
After just a short while, you should see the status of the domain go to Verified.

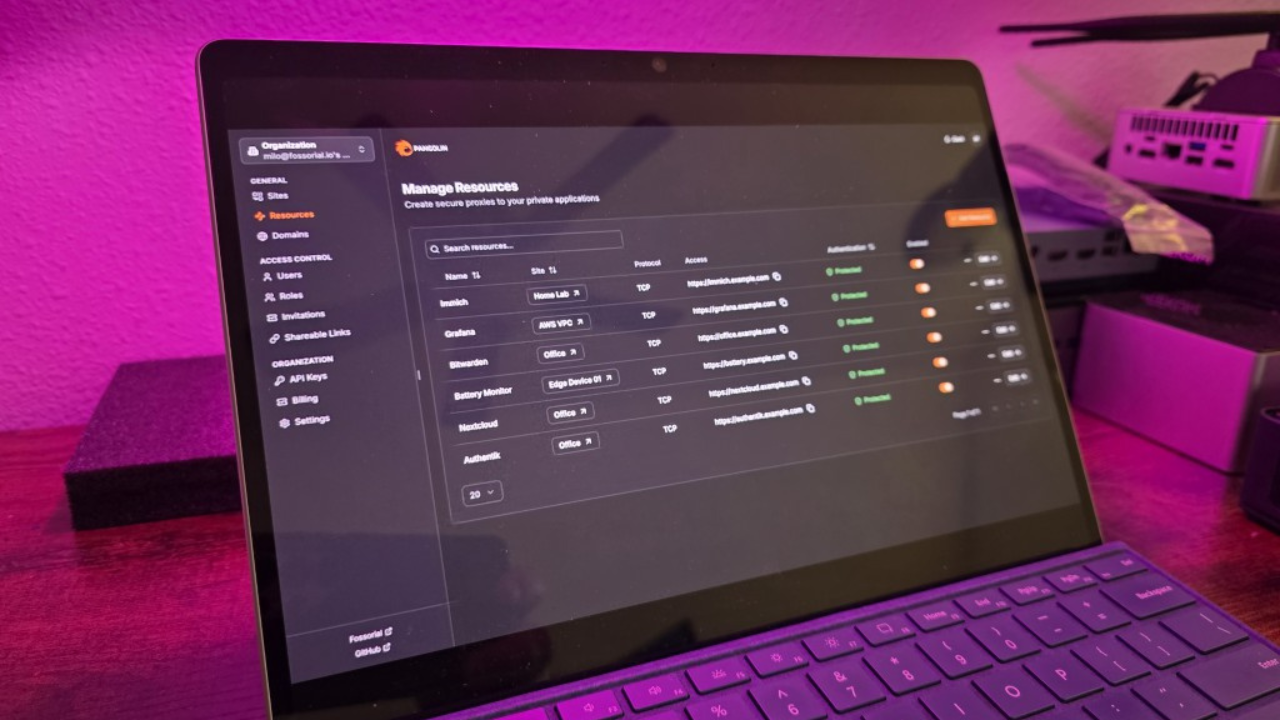
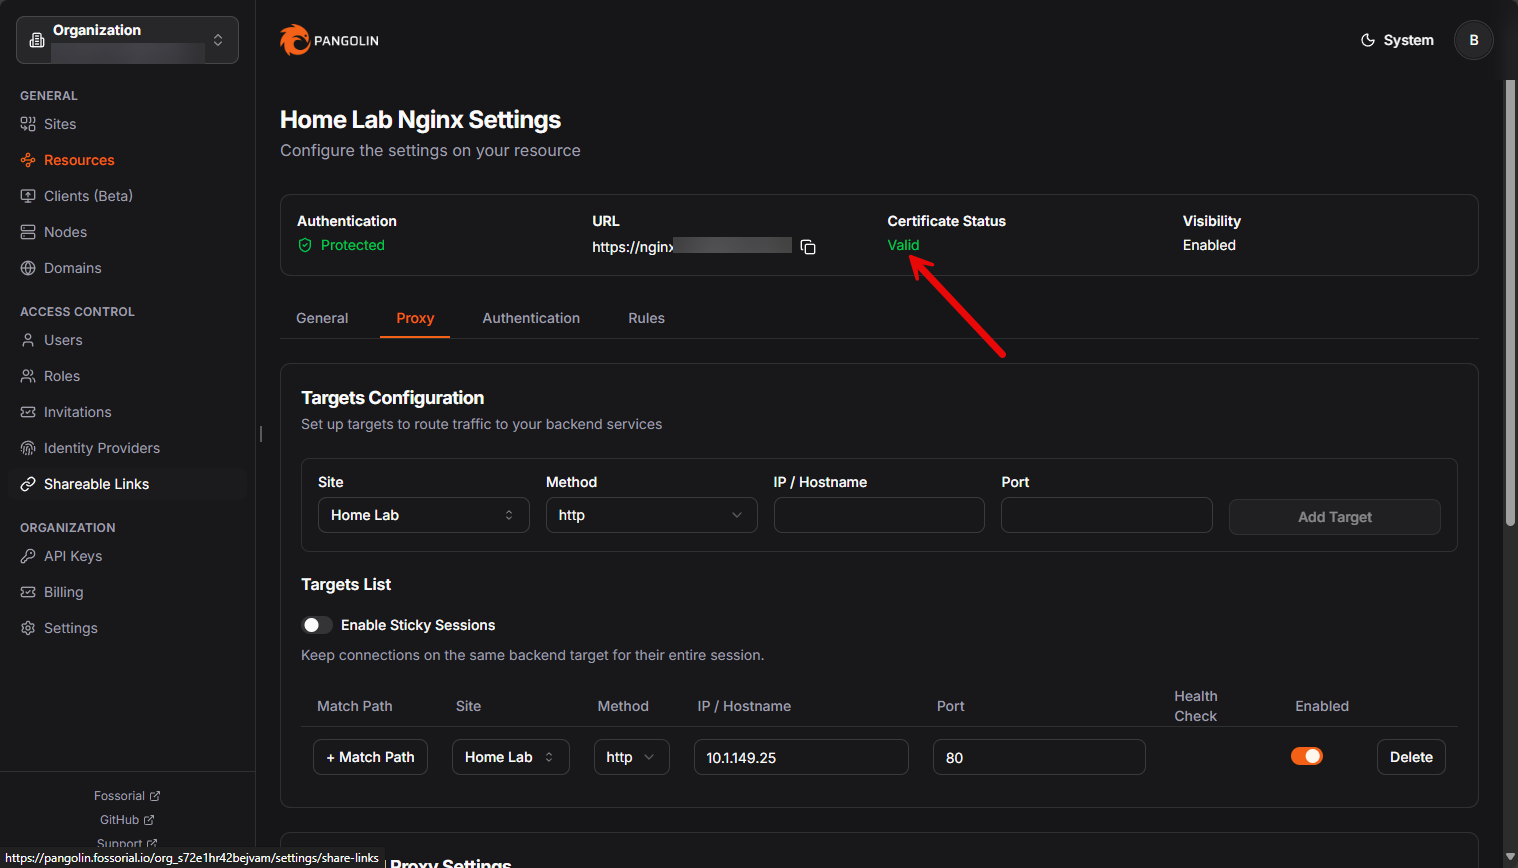
Create a resource in Pangolin
After you have your DNS CNAME records configured (this is the option I chose), you can setup a resource.

If you refresh the console, you will see the certificate status go from “pending” to valid in a short time. This is provisioning the Let’s Encrypt certificates for your host that you created. Notice at the bottom of this screen I am also telling Pangolin where we are forwarding traffic. This is the part that we are familiar with in NPM and other proxies, telling it where to send the traffic for the requested host.

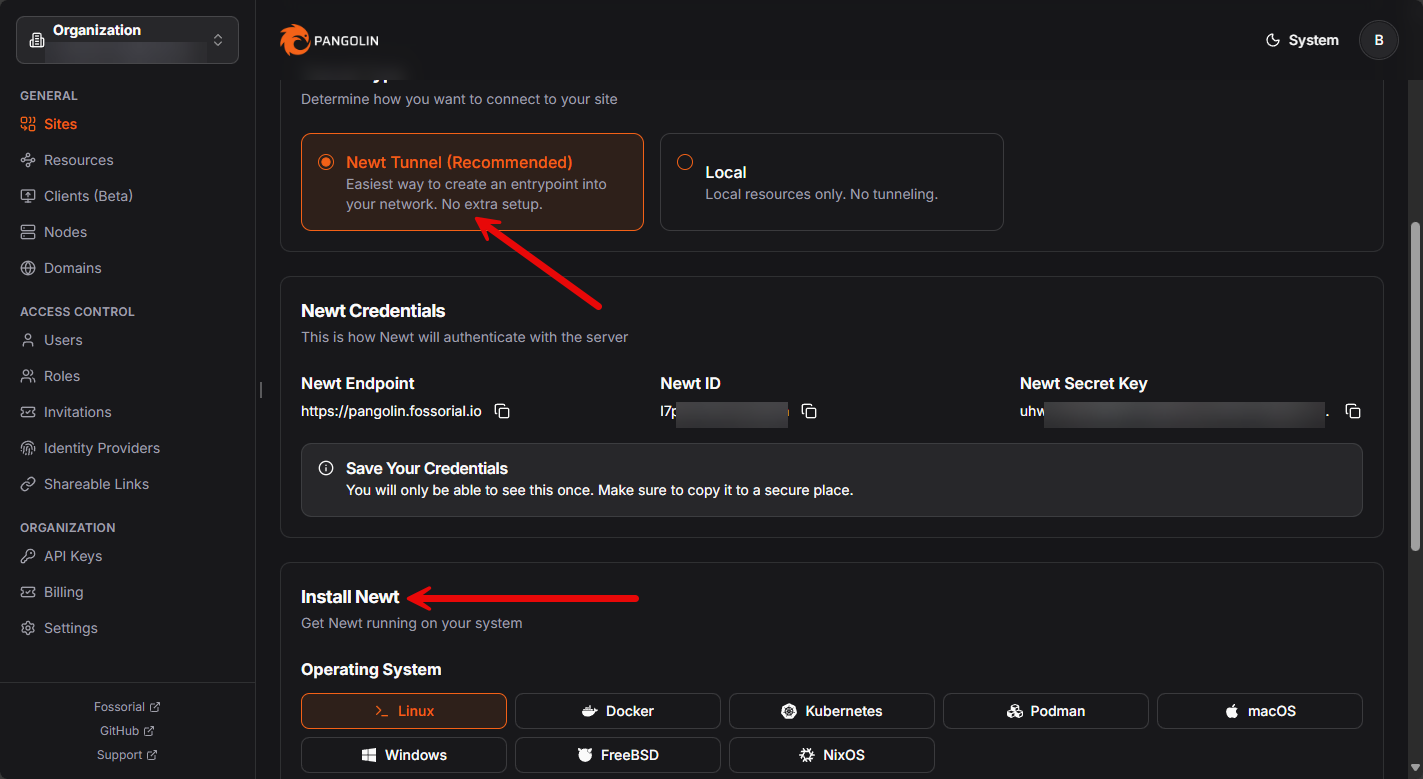
What is a Pangolin Newt?
A Newt is a separate client agent that you install on another machine. This is a machine that may live behind a NAT or in a different location. Newt tunnels back to your Pangolin cluster. This makes it possible to expose services without opening ports on that remote network, which is awesome!
Think of Pangolin and Gerbil as the front door of your lab. That is where DNS points, SSL is terminated, and requests come in. Then, the Newt is more like a secure tunnel you deploy elsewhere that lets Pangolin pull services from another network. I
f all you want is the same reverse proxy functionality as NPM inside your home lab, you do not need Newt. But for tunneling in other resources, you will need the Newt piece.
You will see the option to setup a Newt when configuring a new Site. You will see the option to install the Newt in a variety of environments, including:
- Linux
- Docker
- Kubernetes
- Podman
- macOS
- Windows
- FreeBSD
- NixOS
Managed Pangolin and cloud coordination
There is functionality in the Pangolin cloud coordination that you won’t get with something like Nginx Proxy Manager. This cloud coordination feature connects your self-hosted nodes to a cloud control plane (this is what we have demonstrated above). The cloud control plane takes care of DNS and failover. So, when you adopt your nodes, these get an ID and secret and when they are connected, the cloud knows how to route traffic to them.
The advantage here is that if a node goes down, traffic is automatically shifted to another node without downtime. This makes Pangolin feel closer to something like a Cloudflare Tunnel, etc.
Wrapping up
If you are looking for a fully featured reverse proxy that can do just about anything, including a hybrid cloud control plane that allows you to control DNS and have failover orchestrated from the cloud, Pangolin is definitely the right pick. Frankly, the other reverse proxies that you can self-host just don’t have this kind of feature set.
Pangolin can do everything a simple reverse proxy like NPM can do and it will allow you to grow a lot more into self-hosting and using tunneling behind the scenes as well as terminating and issuing your SSL certificates. Let me know in the comments. Are you already using Pangolin? What do you think about it?
Google is updating how articles are shown. Don’t miss our leading home lab and tech content, written by humans, by setting Virtualization Howto as a preferred source.
About The Author


I have been looking for something like Pangolin for quite some time. It seems like it combines the best of both worlds between what I see other proxies do and something on the line of Cloudflare Tunnel.
Hi there,
Great presentation, I think I’ll give it a try, but when I started looking at website, the licencing was not really clear.
Mayve you can add a section to explain what you can get in homelab for free.
For me the term “Open Source Self-host without management” wasn’t clear enoucht, what is “without management”? 🙂
Thanks and kind regards
Franck
Hey Franck,
I do think their documentation is a bit vague in a sense too. I believe all tiers, including free, get the management by the cloud piece if you want that. However, with free tier, you get 1 node you can manage this way. Also, you don’t get a few of the other auth pieces like SSO, etc. But in the wizard, you can choose not to have it “cloud managed” as well and it will function like a traditional Nginx Proxy Manager installation, etc. I am going to do more testing myself on the variances.
Brandon
Which version did you try for your demo?
I’m really interested by the community edition because you still have the SSO and “no limit” whatsoever, but this “without management” thing make me hesitant.
If it is only the cloud management piece, great, I don’t want that anyway, but I’ll still require a GUI! 😊
To be precise, Pangolin itself is NOT a reverse proxy. Traefik is the actual reverse proxy that ships with it. Pangolin is the frontend to configure the routes and services of the underlying Traefik.
Hendrik,
Great point here. Pangolin does make use of Traefik.
Brandon
Brandon,
Great write-up. I’m new to homelabbing, and I’m in the process of setting up my services. After many hours, I was just able to complete set up Traefik on my homelab. I guess that I just need some clarification on how Pangolin works. I travel a lot and I want to be able to access my Plex and Nextcloud documents. If I set up Pangolin on a VPS that I’m going to purchase shortly, do I no longer need Traefik on my homelab (since it will be apart of Pangolin on my VPS)? If I understand correctly, I’ll be able to access Pangolin outside of my network, which would tunnel into my homelab, correct?
One more question. Does it make sense to for me to run Pangolin on my home network instead? I have two different homelabs at home that both run Proxmox. Can I set them up on different SDNs, install Pangolin on one and use it to tunnel into my other homelab on a different SDN?
Thanks, Antonio
Antonio,
Thank you for the comment! Actually no you won’t need Traefik on your homelab anymore. Pangolin actually has Traefik built-in and uses it as its reverse proxy. So you could run Pangolin on your VPS, then your homelab services will connect to Pangolin using an encrypted WireGuard tunnel. This tunnel uses their Newt client. Then Pangolin will handle all the reverse proxy requests, SSL certs, etc. On the two home labs configuration, it is important to note that Pangolin is meant to be the central hub. So, I would run Pangolin on your VPS and connect both home labs as separate “sites” which will give you remote access to everything from anywhere. Pangolin really shines when you need remote access with identity management, SSL, and access control. Let me know if this helps.
Thanks again,
brandon
Update on my comments/questions, apparently, you can self host the Enterprise Edition for free if non-commercial use or for small business and then, you’ll have all functionalities.
Source: https://pangolin.net/blog/posts/license-change
I’ll try it out I think! 😉
Awesome Franck, great to know! Appreciate you posting this here. I really like these projects where the developers allow you to have it for free if you self-host it, makes me respect it even more.
Brandon