
Terraform is one of the defacto tools when it comes to being about to quickly deploy both virtual machines and LXC containers on Proxmox or any other environment for that matter. I have used it for years in VMware vSphere for on-premises environments, and in AWS and Azure for other deployments. Since I have pivoted mainly to Proxmox for home labbing, let me share my go-to terraform templates for quick deployment.
Why do I use Terraform with Proxmox?
Well, again, it is THE tool to use. If you need to deploy infrastructure, Terraform is the tool most use. Open ToFu is gaining lots of ground, but I still think Terraform still has the lion’s share and will for the foreseeable future. Terraform allows you to do what is called “infrastructure as Code” or IaC. You describe your infrastructure in the HCL language and then Terraform makes it happen.
This gives you many advantages over manual efforts in deploying your infrastructure, including:
- Repeatability: Your VM/LXC configuration is version-controlled and reusable.
- Speed: Launch full systems in seconds, no UI clicks required.
- Scalability: Build multiple VMs or containers with loops, variables, and modules.
- Automation: Easily tie into CI/CD pipelines (e.g., GitLab, Jenkins) for dynamic environments.
For any serious Proxmox user or home labber looking to streamline deployments, Terraform is a natural fit. And the cool thing is you learn actual production skills you can use in any environment.
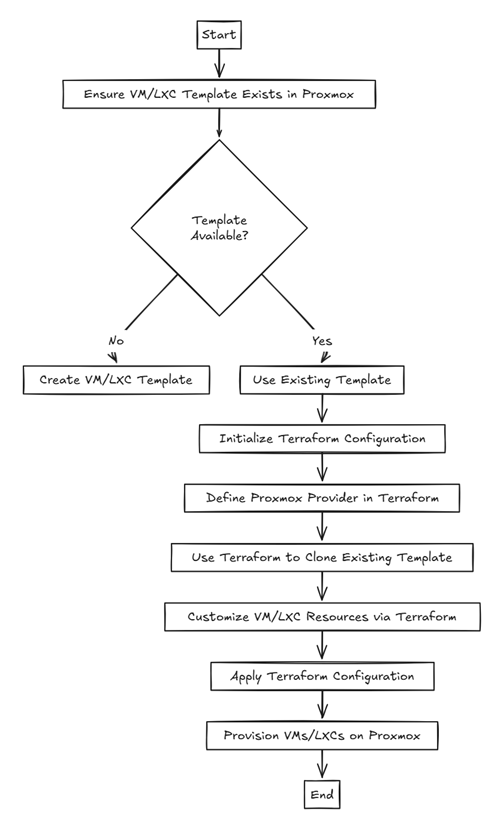
The workflow when using Terraform with Proxmox
Before we look at the specifics in Terraform, let’s look at an overview of the workflow with creating VMs and LXC containers with Terraform. So, generally speaking, you need a VM or LXC template in place. I usually use Hashicorp Packer to build these and then use Terraform to automate the provisioning of the template as a new VM or container.
What you need to use Terraform with Proxmox
Terraform uses providers to interact with different environments. For Proxmox, there are a couple of providers: telmate/proxmox and the bpg/proxmox provider. Using these providers, you can create both virtual machines and LXC containers. I will show the bpg provider for VMs and the telmate provider for LXCs.
At the top of your main.tf, you will load the provider with the following. Lately I have been trying out the bpg/proxmox provider which seems to work well. I have noticed it is more actively developed than the telmate provider as well, which is great to see.
terraform {
  required_version = ">= 1.0"
  required_providers {
    proxmox = {
      source  = "bpg/proxmox"
      version = "~> 0.66"
    }
  }
}
2. API Access
In Proxmox, create a user like terraform@pve with appropriate permissions (PVEVMAdmin is usually enough). Generate an API token and store it securely.
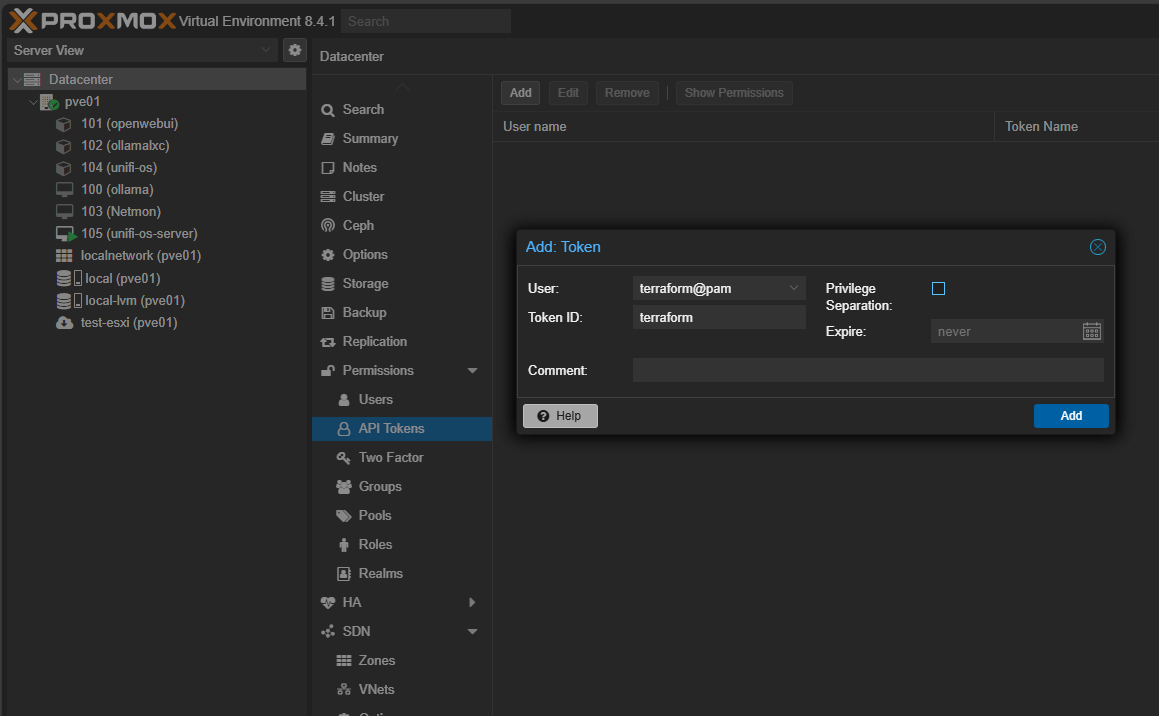
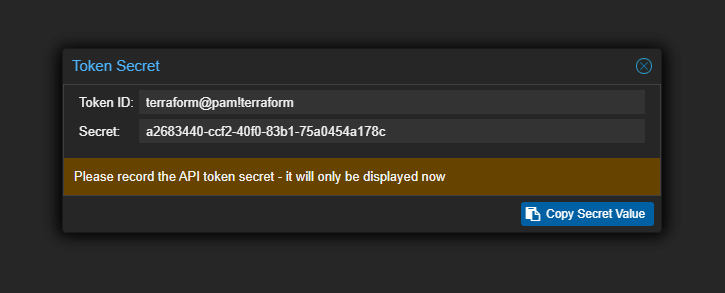
Below, it will show you the secret once you create it. Copy this down as it will only be shown once.
Example provider block that interacts with your API using the token.
provider "proxmox" {
  endpoint = var.proxmox_api_url
  api_token = "${var.proxmox_token_id}=${var.proxmox_token_secret}"
  insecure  = var.proxmox_tls_insecure
}
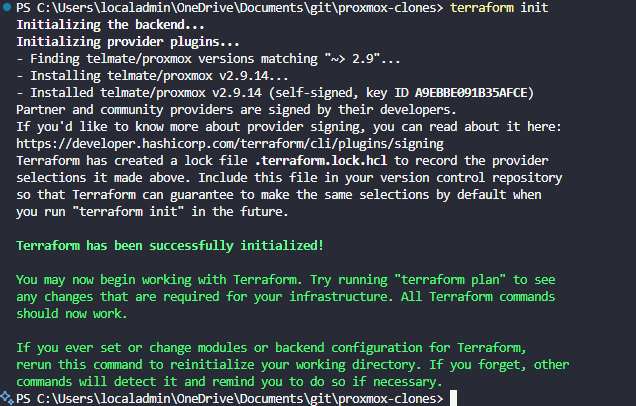
Whichever provider you use, run a terraform init to pull down the provider and get it ready for use.
Use a terraform.tfvars or .env file for sensitive values as a best practice.
Here are my Terraform template files
Below is the scaffolding for cloning an Ubuntu 24.04 cloud-init template stored on local-lvm storage. Here’s a trimmed version of my favorite VM template:
main.tf
If you want Terraform to interact with the qemu agent, you can set the agent enabled = true. Below I have it disabled.
terraform {
  required_version = ">= 1.0"
  required_providers {
    proxmox = {
      source  = "bpg/proxmox"
      version = "~> 0.66"
    }
  }
}

provider "proxmox" {
  endpoint = var.proxmox_api_url
  api_token = "${var.proxmox_token_id}=${var.proxmox_token_secret}"
  insecure  = var.proxmox_tls_insecure
}

data "proxmox_virtual_environment_vms" "all_vms" {
  node_name = var.proxmox_node
}

locals {
  template_vms = [
    for vm in data.proxmox_virtual_environment_vms.all_vms.vms : vm
    if vm.name == var.vm_template
  ]
  template_vm_id = length(local.template_vms) > 0 ? local.template_vms[0].vm_id : null
}

resource "proxmox_virtual_environment_vm" "ubuntu_vm" {
  name        = var.vm_name
  node_name   = var.proxmox_node

  clone {
    vm_id = local.template_vm_id
    full  = true
  }

  # VM Hardware Configuration
  cpu {
    cores   = var.vm_cores
    sockets = var.vm_sockets
  }

  memory {
    dedicated = var.vm_memory
  }

  agent {
    enabled = false
  }

  # Network Configuration
  network_device {
    bridge = var.vm_network_bridge
    model  = var.vm_network_model
  }

  # Cloud-Init Configuration
  initialization {
    user_account {
      username = var.vm_ci_user
      password = var.vm_ci_password
      keys     = var.vm_ssh_keys != "" ? [file(var.vm_ssh_keys)] : []
    }

    ip_config {
      ipv4 {
        address = var.vm_ip_config != "" && var.vm_ip_config != "ip=dhcp" ? split(",", var.vm_ip_config)[0] : "dhcp"
        gateway = var.vm_ip_config != "" && var.vm_ip_config != "ip=dhcp" ? split("=", split(",", var.vm_ip_config)[1])[1] : null
      }
    }
  }

  # Tags
  tags = split(",", var.vm_tags)
}
variables.tf
# Proxmox Provider Configuration
variable "proxmox_api_url" {
  description = "Proxmox API URL"
  type        = string
  default     = "https://pve01.cloud.local:8006/api2/json"
}

variable "proxmox_user" {
  description = "Proxmox user for API access"
  type        = string
  default     = "terraform@pam"
}

variable "proxmox_token_id" {
  description = "Proxmox API token ID"
  type        = string
  sensitive   = true
}

variable "proxmox_token_secret" {
  description = "Proxmox API token secret"
  type        = string
  sensitive   = true
}

variable "proxmox_tls_insecure" {
  description = "Skip TLS verification for Proxmox API"
  type        = bool
  default     = true
}

variable "proxmox_node" {
  description = "Proxmox node name where VM will be created"
  type        = string
  default     = "pve01"
}

# VM Template Configuration
variable "vm_template" {
  description = "Name of the Proxmox template to clone"
  type        = string
  default     = "ubuntu-24.04-template"
}


# VM Basic Configuration
variable "vm_name" {
  description = "Name of the virtual machine"
  type        = string
  default     = "ubuntu-cloudinit"

  validation {
    condition     = length(var.vm_name) > 0
    error_message = "VM name cannot be empty."
  }
}

variable "vm_cores" {
  description = "Number of CPU cores for the VM"
  type        = number
  default     = 2

  validation {
    condition     = var.vm_cores > 0 && var.vm_cores <= 32
    error_message = "VM cores must be between 1 and 32."
  }
}

variable "vm_memory" {
  description = "Amount of memory in MB for the VM"
  type        = number
  default     = 2048

  validation {
    condition     = var.vm_memory >= 512
    error_message = "VM memory must be at least 512 MB."
  }
}

variable "vm_sockets" {
  description = "Number of CPU sockets for the VM"
  type        = number
  default     = 1

  validation {
    condition     = var.vm_sockets > 0 && var.vm_sockets <= 4
    error_message = "VM sockets must be between 1 and 4."
  }
}

# VM Hardware Configuration
variable "vm_boot_order" {
  description = "Boot order for the VM"
  type        = string
  default     = "order=ide0;net0"
}

variable "vm_scsihw" {
  description = "SCSI hardware type"
  type        = string
  default     = "virtio-scsi-pci"
}

variable "vm_qemu_agent" {
  description = "Enable QEMU guest agent"
  type        = number
  default     = 1

  validation {
    condition     = contains([0, 1], var.vm_qemu_agent)
    error_message = "QEMU agent must be 0 (disabled) or 1 (enabled)."
  }
}

# Network Configuration
variable "vm_network_model" {
  description = "Network model for the VM"
  type        = string
  default     = "virtio"
}

variable "vm_network_bridge" {
  description = "Network bridge for the VM"
  type        = string
  default     = "vmbr0"
}

# Disk Configuration
variable "vm_disk_type" {
  description = "Disk type for the VM"
  type        = string
  default     = "scsi"
}

variable "vm_disk_storage" {
  description = "Storage location for the VM disk"
  type        = string
  default     = "local-lvm"
}

variable "vm_disk_size" {
  description = "Size of the VM disk"
  type        = string
  default     = "10G"
}

# Cloud-Init Configuration
variable "vm_ci_user" {
  description = "Cloud-init username"
  type        = string
  default     = "ubuntu"
}

variable "vm_ci_password" {
  description = "Cloud-init password"
  type        = string
  sensitive   = true
  default     = ""
}

variable "vm_ip_config" {
  description = "IP configuration for the VM (e.g., 'ip=192.168.1.110/24,gw=192.168.1.1')"
  type        = string
  default     = ""
}

variable "vm_ssh_keys" {
  description = "Path to SSH public key file"
  type        = string
  default     = ""
}

variable "vm_tags" {
  description = "Tags for the VM"
  type        = string
  default     = "terraform,ubuntu"
}

# Legacy variables (kept for backward compatibility)
variable "ssh_key_path" {
  description = "Path to SSH public key file (deprecated, use vm_ssh_keys)"
  type        = string
  default     = "~/.ssh/id_rsa.pub"
}

variable "vm_ip" {
  description = "VM IP address (deprecated, use vm_ip_config)"
  type        = string
  default     = ""
}

variable "gateway" {
  description = "Gateway IP address (deprecated, use vm_ip_config)"
  type        = string
  default     = ""
}

# LXC variables (if needed for future use)
variable "lxc_name" {
  description = "Name of the LXC container"
  type        = string
  default     = "alpine-lxc"
}

variable "lxc_template" {
  description = "LXC template path"
  type        = string
  default     = "local:vztmpl/alpine-3.19-default_20240110_amd64.tar.xz"
}

variable "lxc_ip" {
  description = "LXC container IP address"
  type        = string
  default     = ""
}
terraform.tfvars
Don’t worry about me putting the actual token secret below, this is just a test environment and want everyone to see how things are actually formatted.
# Proxmox API Configuration
proxmox_api_url    = "https://pve01.cloud.local:8006/api2/json"
proxmox_user       = "terraform@pam"
proxmox_token_id   = "terraform@pam!terraform"
proxmox_token_secret = "a2683440-ccf2-40f0-83b1-75a0454a178c"
proxmox_tls_insecure = true
proxmox_node       = "pve01"

# VM Template Configuration
vm_template = "ubuntu-24.04-template"

# VM Basic Configuration
vm_name    = "ubuntutest01"
vm_cores   = 2
vm_memory  = 2048
vm_sockets = 1

# VM Hardware Configuration
vm_boot_order   = "order=ide0;net0"
vm_scsihw      = "virtio-scsi-pci"
vm_qemu_agent  = 1

# Network Configuration
vm_network_model  = "virtio"
vm_network_bridge = "vmbr0"

# Disk Configuration
vm_disk_type    = "scsi"
vm_disk_storage = "local-lvm"
vm_disk_size    = "100G"

# Cloud-Init Configuration
vm_ci_user     = "ubuntu"
vm_ci_password = "your-secure-password"
vm_ip_config   = "ip=dhcp"
vm_ssh_keys    = ""

# VM Tags
vm_tags = "terraform,ubuntu,production"

# Example configurations for different scenarios:

# DHCP Configuration (no static IP)
# vm_ip_config = "ip=dhcp"

# Multiple network interfaces
# vm_ip_config = "ip=192.168.1.100/24,gw=192.168.1.1"

# Larger VM configuration
# vm_cores   = 4
# vm_memory  = 8192
# vm_disk_size = "50G"

# Development environment tags
# vm_tags = "terraform,ubuntu,development"
outputs.tf
# VM Information Outputs
output "vm_id" {
description = "The ID of the created VM"
value = proxmox_virtual_environment_vm.ubuntu_vm.vm_id
}
output "vm_name" {
description = "The name of the created VM"
value = proxmox_virtual_environment_vm.ubuntu_vm.name
}
output "vm_node" {
description = "The Proxmox node where the VM is running"
value = proxmox_virtual_environment_vm.ubuntu_vm.node_name
}
output "vm_template_name" {
description = "The template name used to create the VM"
value = var.vm_template
}
output "vm_template_id" {
description = "The template ID used to create the VM"
value = local.template_vm_id
}
# VM Configuration Outputs
output "vm_cores" {
description = "Number of CPU cores assigned to the VM"
value = var.vm_cores
}
output "vm_memory" {
description = "Amount of memory (MB) assigned to the VM"
value = var.vm_memory
}
output "vm_sockets" {
description = "Number of CPU sockets assigned to the VM"
value = var.vm_sockets
}
# Network Information
output "vm_ip_config" {
description = "IP configuration of the VM"
value = var.vm_ip_config
sensitive = false
}
output "vm_network_bridge" {
description = "Network bridge used by the VM"
value = var.vm_network_bridge
}
# Cloud-Init Information
output "vm_ci_user" {
description = "Cloud-init username"
value = var.vm_ci_user
}
# VM Status and Connection Info
output "vm_tags" {
description = "Tags assigned to the VM"
value = var.vm_tags
}
# SSH Connection Information
output "ssh_connection_info" {
description = "SSH connection information for the VM"
value = var.vm_ip_config != "" && var.vm_ip_config != "ip=dhcp" && var.vm_ci_user != "" ? {
user = var.vm_ci_user
host = split("/", split("=", var.vm_ip_config)[1])[0]
command = "ssh ${var.vm_ci_user}@${split("/", split("=", var.vm_ip_config)[1])[0]}"
} : {
user = var.vm_ci_user
host = "DHCP - check Proxmox console for IP"
command = "Check Proxmox console for assigned IP address"
}
}
# Summary Output
output "vm_summary" {
description = "Summary of the created VM"
value = {
id = proxmox_virtual_environment_vm.ubuntu_vm.vm_id
name = proxmox_virtual_environment_vm.ubuntu_vm.name
node = proxmox_virtual_environment_vm.ubuntu_vm.node_name
template_id = local.template_vm_id
template_name = var.vm_template
cores = var.vm_cores
memory = var.vm_memory
ip_config = var.vm_ip_config
tags = var.vm_tags
}
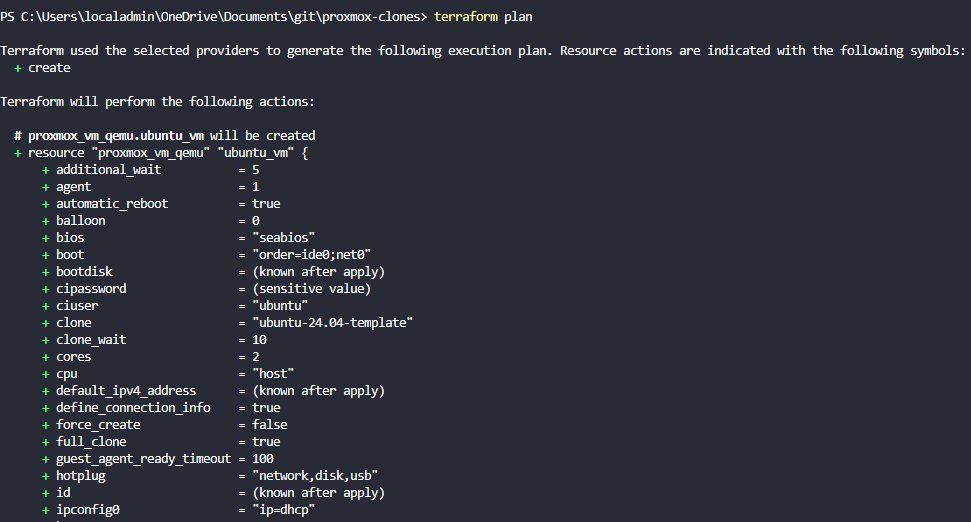
}After you have the files in place, run a terraform plan and then a terraform apply.
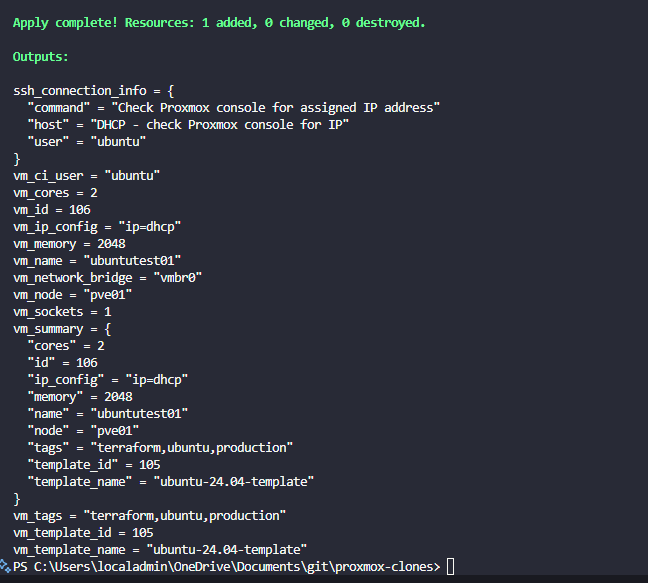
This config gives me a ready-to-go VM in about 20 seconds.
My go-to LXC container template
LXC provisioning with Terraform is just as easy. I use Alpine or Ubuntu containers for lightweight workloads.
terraform {
  required_providers {
    proxmox = {
      source = "telmate/proxmox"
    }
  }
}


provider "proxmox" {
  pm_api_url          = var.pm_api_url
  pm_api_token_id     = var.pm_api_token_id
  pm_api_token_secret = var.pm_api_token_secret
  pm_tls_insecure     = true
}


resource "proxmox_lxc" "test-container" {
  count        = var.lxc_count
  hostname     = "LXC-test-${count.index + 1}"
  target_node  = var.node_name
  vmid         = 1000 + count.index # Ensure unique VMIDs
  ostemplate   = "local:vztmpl/${var.lxc_template}"
  cores        = var.lxc_cores
  memory       = var.lxc_memory
  password     = var.lxc_password
  unprivileged = true
  onboot       = true
  start        = true

  rootfs {
    storage = "local-lvm"
    size    = "2G"
  }

  features {
    nesting = true
  }

  network {
     name   = "eth0"
     bridge = "vmbr0"
     ip     = "dhcp"
     type   = "veth"
  }
}
terraform.tfvars
pm_api_url          = "https://REDACTED-IP:8006/api2/json"
pm_api_token_id     = "REDACTED-TOKEN-ID"
pm_api_token_secret = "REDACTED-API-TOKEN"
node_name           = "REDACTED-NODE-NAME" # replace with your Proxmox node name
lxc_password        = "REDACTED-PASSWORD"
variables.tf
Note at the bottom, the lxc_count tells you how many containers you will be spinning up. Below is set to 3, but you can change this to whatever you need.
variable "pm_api_url" {
  type = string
}

variable "pm_api_token_id" {
  type = string
}

variable "pm_api_token_secret" {
  type      = string
  sensitive = true
}

variable "node_name" {
  type    = string
  default = "REDACTED-NODE-NAME"
}

variable "lxc_template" {
  type    = string
  default = "ubuntu-22.04-standard_22.04-1_amd64.tar.zst"
}

variable "lxc_storage" {
  type    = string
  default = "local-lvm"
}

variable "lxc_password" {
  type      = string
  default   = "REDACTED-PASSWORD"
  sensitive = true
}

variable "lxc_memory" {
  type    = number
  default = 384
}

variable "lxc_cores" {
  type    = number
  default = 1
}

variable "lxc_count" {
  type    = number
  default = 3
}
Use modules to make it reusable
If you’re spinning up multiple VMs or containers, use Terraform modules to avoid duplication.
In a modules/vm/ folder:
variable "name" {}
variable "ip" {}
variable "clone_template" {}

resource "proxmox_vm_qemu" "vm" {
  name        = var.name
  clone       = var.clone_template
  ipconfig0   = "ip=${var.ip}/24,gw=192.168.1.1"
  ...
}
Then call it like this in your root main.tf:
module "vm1" {
  source         = "./modules/vm"
  name           = "webserver01"
  ip             = "192.168.1.101"
  clone_template = "ubuntu-24.04-template"
}
Tips if you use cloud-init
If you’re creating your own cloud-init template:
- Start a fresh Ubuntu VM.
- Install cloud-init, update packages, and shut down.
- Convert to template in Proxmox.
- Make sure you select “Cloud-Init” under Hardware > CD Drive.
Optional things to do/try:
- Add your SSH key to /home/ubuntu/.ssh/authorized_keys and test first boot.
- Use the qemu-guest-agent for better integration.
Use Terraform with Proxmox and CI/CD
One of the really cool things you can do once you have your templates created and dialed in with a few manual runs of your Terraform code, is you can plug these into your GitLab or Gitea pipelines for even more automation.
In GitLab CI you can do something like this in your pipeline:
terraform:
  script:
    - terraform init
    - terraform plan -out=tfplan
    - terraform apply -auto-approve tfplan
If you want to destroy a lab resource and then provision something totally fresh, you can do a terraform destroy and then a terraform apply.
Wrapping it up
I love automation and if you try it in your home lab, you will too. There are so many great advantages to using Terraform along with your Proxmox environment. You can spin up new VMs or containers in just a few seconds in a predictable and repeatable way. And, you can then combine this with other automation tools like a CI/CD pipeline. Are you currently using Terraform with your Proxmox environment? If so, what are you automating? Let me know in the comments.
Google is updating how articles are shown. Don’t miss our leading home lab and tech content, written by humans, by setting Virtualization Howto as a preferred source.
About The Author