I have been having tons of fun working with local LLMs in the home lab the last few days and I wanted to share a few steps and tweaks having to do with how to run Ollama with NVIDIA GPU in Proxmox in your VMs, LXC, and then exposing this to clients on your network. GPU processing makes the AI experience SO much better than without. However, you don’t have to have the latest and greatest. I will show you that with even something as old as an NVIDIA RTX 1060, you can have a pleasant experience running models in the home lab.
Why Run Ollama with GPU in Proxmox?
Proxmox is an awesome home lab hypervisor and production for that matter. I definitely recommend virtualization for those looking to get into a home lab, even with the added complexity on the frontend. Hypervisors make learning easier with all the tools you have available with them, like snapshots.
I wish I could say Proxmox was super easy to do GPU passthrough for. However, the steps are definitely convoluted to do it. I think the developers could definitely make it easier to do GPU passthrough than it is currently. Hopefully, this is something that is being worked on.
Once you enable GPU passthrough though, it is easy to pass these PCI devices to your virtual machines, or LXC containers.
Ollama has support for GPU acceleration using CUDA. When you have GPU available, the processing of the LLM chats are offloaded to your GPU. This way, you can run high-performance LLM inference locally and not need a cloud service.
This setup is really good if you are:
- Using a headless VM for AI model serving
- Running other services in LXC containers (like OpenWebUI)
- Looking to serve models over your local network for your home lab
Let’s take a look at setting up GPU passthrough in Proxmox.
1. Set Up GPU Passthrough in Proxmox
First things first, you will need to enable IOMMU in your BIOS. Every BIOS is different, so consult with your individual motherboard manufacturer for turning this setting on. You will also need to enable IOMMU in Proxmox:
##Edit this file
nano /etc/default/grub

##Add or alter this line to include the below
GRUB_CMDLINE_LINUX_DEFAULT="quiet iommu=on iommu=pt video=efifb:off video=vesafb:off"

##Run these commands
update-grub
reboot
You should be able to grep for IOMMU configuration status, with the command (below is for an AMD CPU):
dmesg | grep -e IOMMU -e AMD-Vi
First, identify your GPU and its audio function using:
lspci -nn | grep -i nvidia
You should see entries like:
01:00.0 VGA compatible controller [10de:1c03]
01:00.1 Audio device [10de:10f1]
Next, tell vfio-pci to claim these IDs
nano /etc/modprobe.d/vfio.conf

options vfio-pci ids=10de:1c03,10de:10f1 disable_vga=1
You will now need to blacklist NVIDIA drivers to keep the Proxmox host from using them:
cat <<EOF > /etc/modprobe.d/blacklist-nvidia.conf
blacklist nouveau
blacklist nvidia
blacklist nvidiafb
blacklist rivafb
EOF
Now, we need to add vfio modules to /etc/modules:
echo -e "vfio\nvfio_iommu_type1\nvfio_pci\nvfio_virqfd" >> /etc/modules

update-initramfs -u -k all

reboot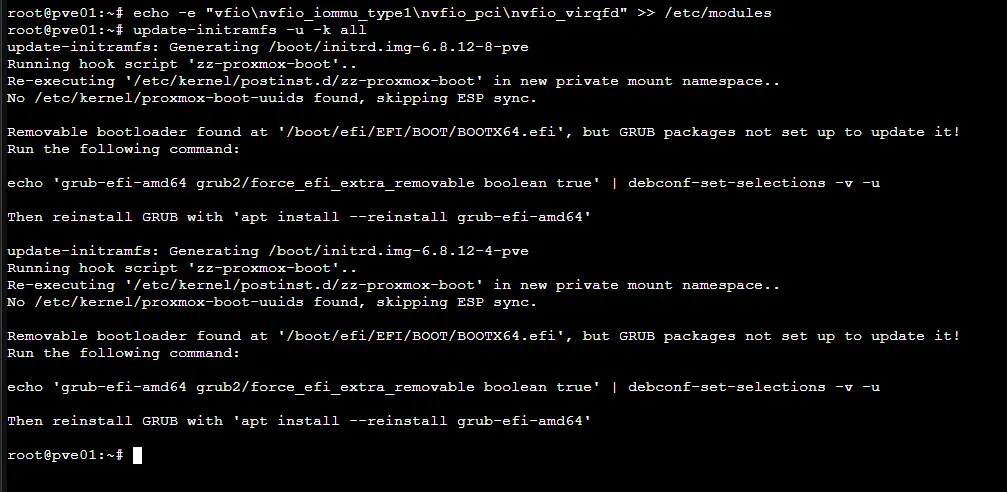
After the reboot, you can confirm vfio-pci is Now Active for the GPU (below is just examples of what you might see):
##video portion
lspci -nnk | grep -iA 3 '10de:1c03'

##audio portion
lspci -nnk | grep -iA 3 '10de:10f1'
2. Add the PCI passthrough device to a Proxmox VM
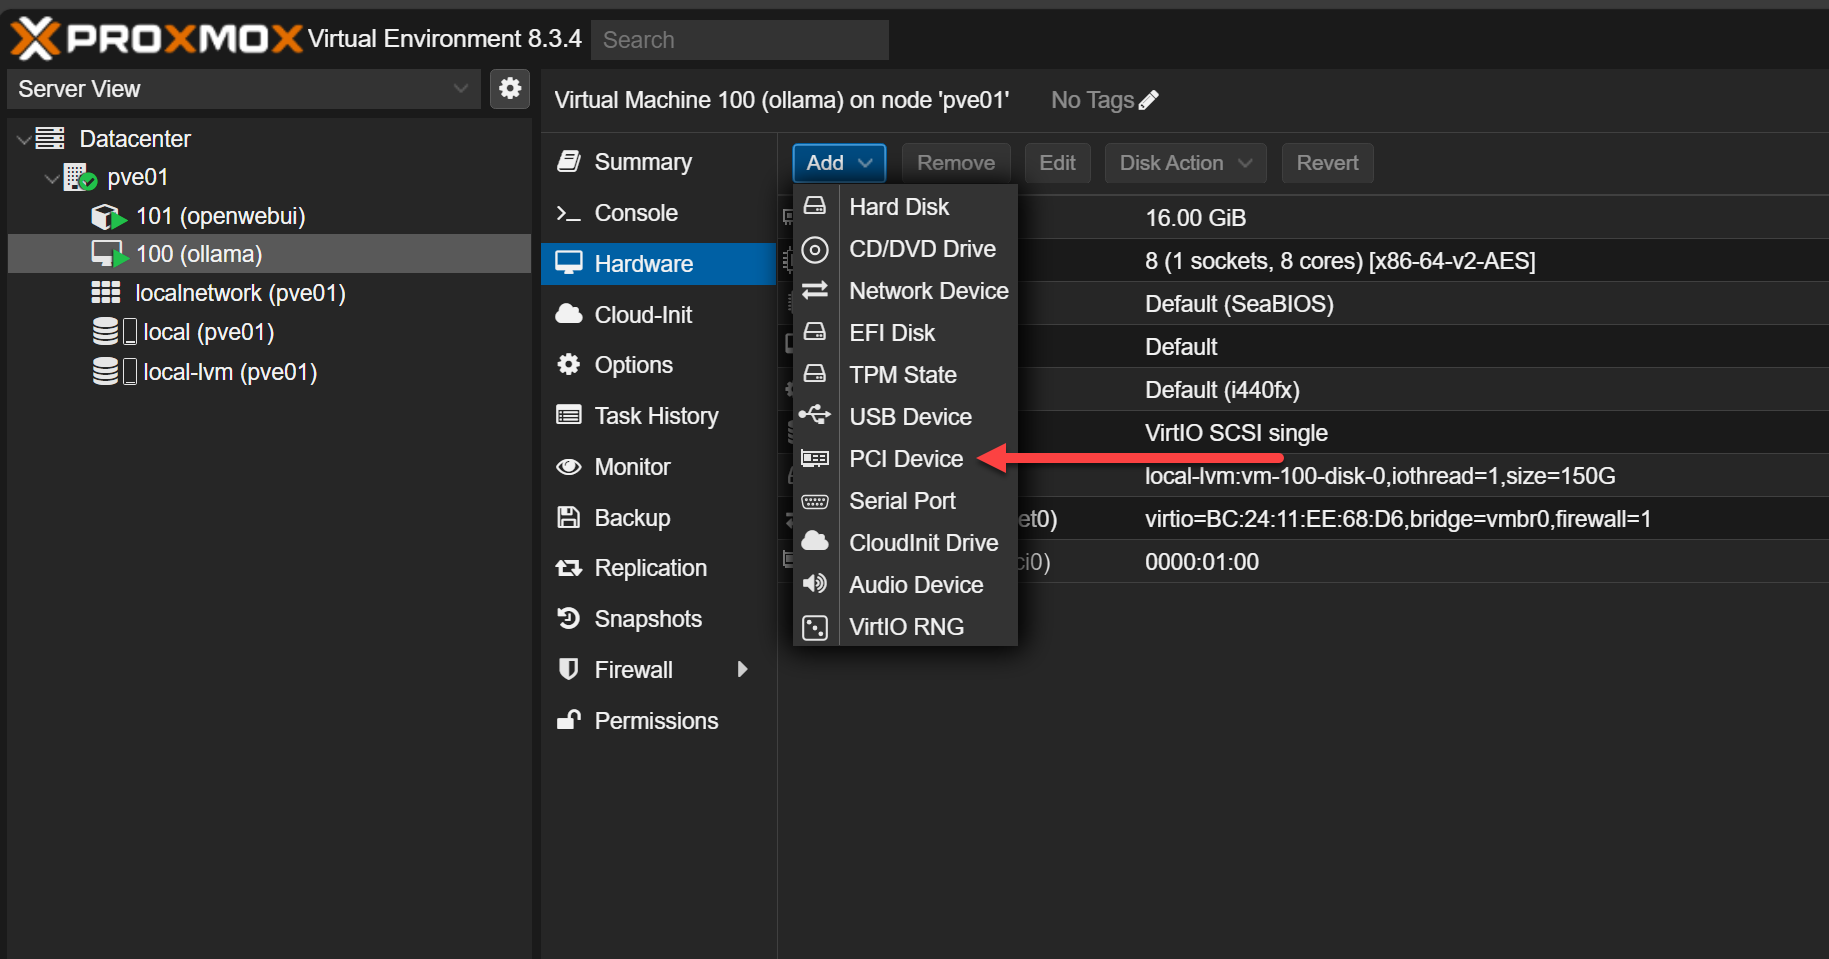
In the Proxmox web UI, add 01:00.0 and 01:00.1 to your VM using PCI Passthrough:
- Select “Raw Device”
- Check “All Functions” (this includes both GPU and audio)
- Enable “PCI-Express”
- Do not check “Primary GPU” if you’re not using this VM for display output
Many of the guides out there will say you need to use the OVMF (UEFI BIOS). However, I didn’t find this to be the case, if I wasn’t using the GPU for the main display adapter for the VM. So, with AI, the GPU is fully dedicated to the AI token processing, so not used for display. Do keep this in mind and test in your environment.
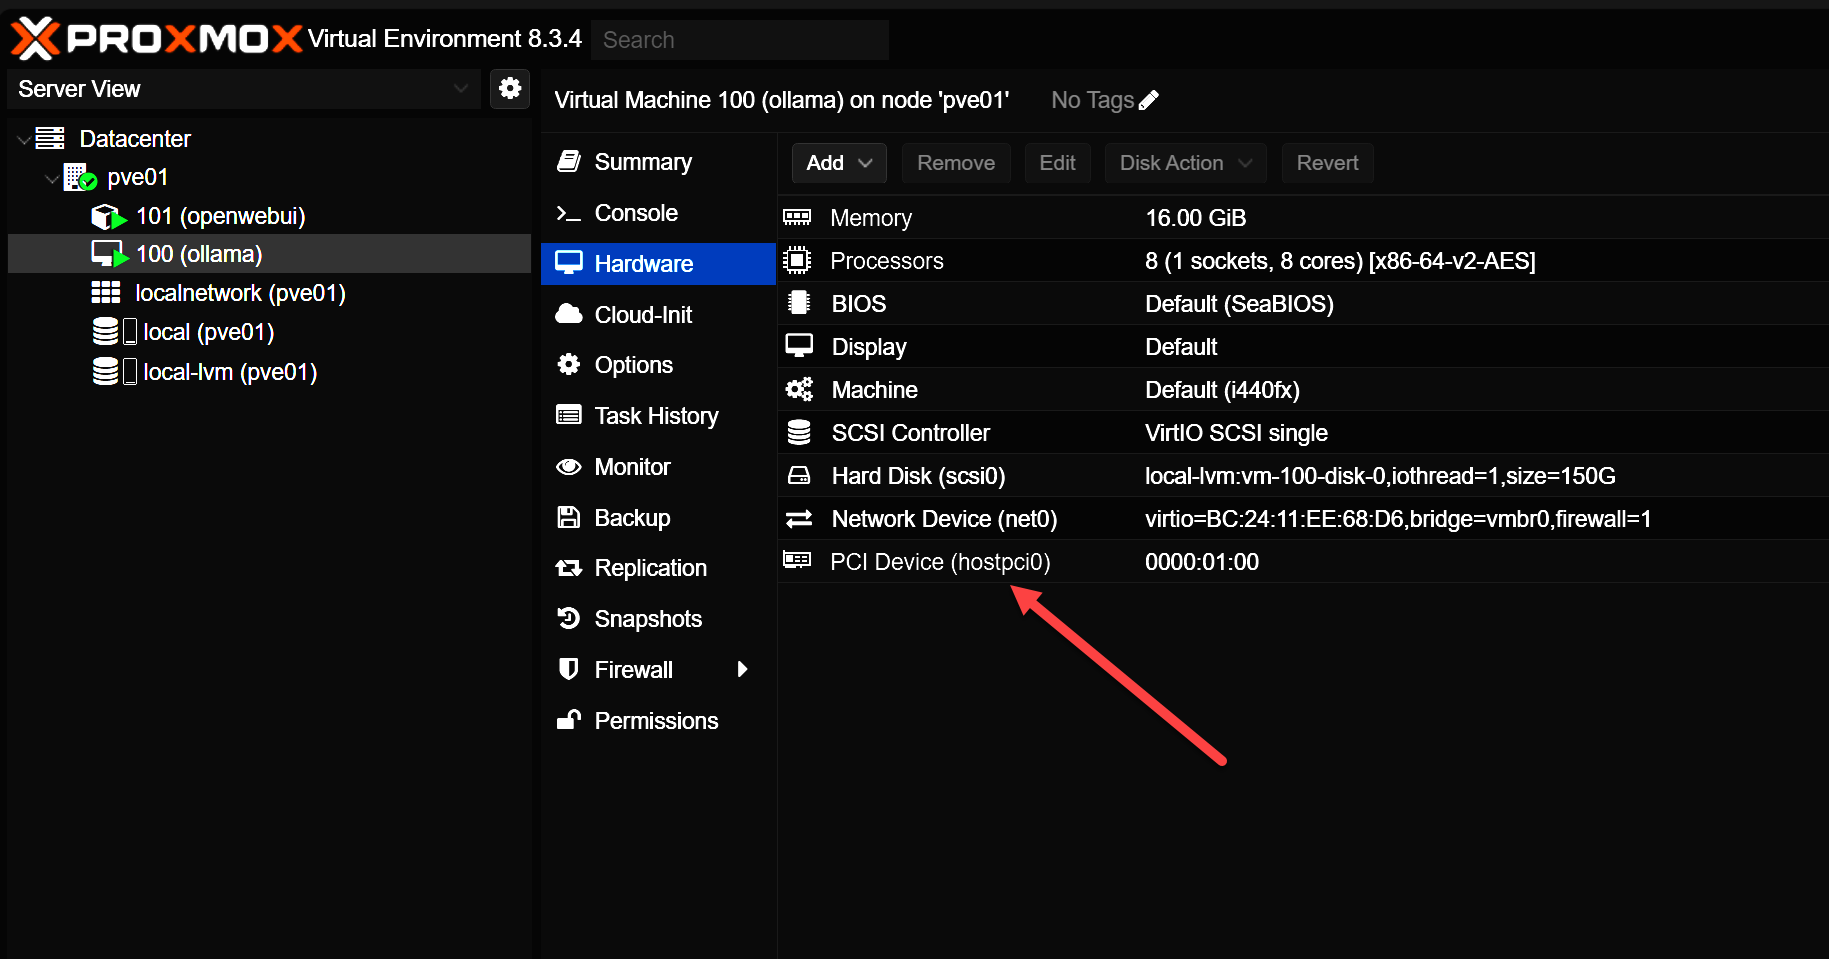
Below is a look at the Add menu > PCI Device.
Here I am selecting the Raw Device radio button, then clicking the Device drop down. You should see your GPU listed. Don’t select Primary GPU.
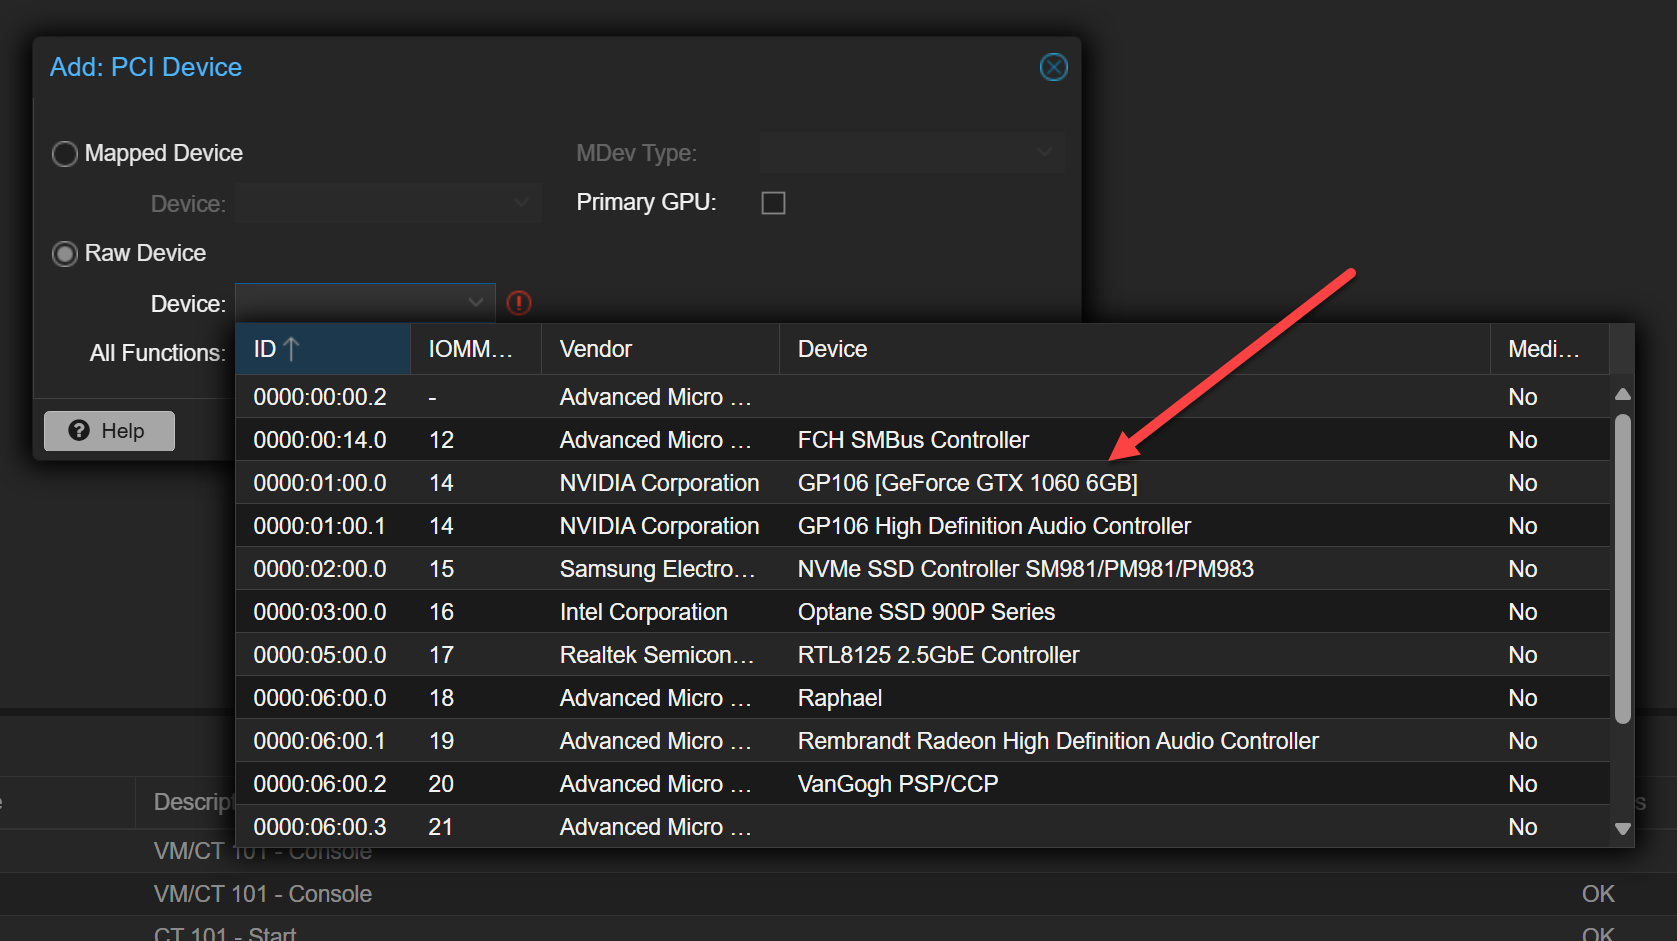
After adding the PCI device. Also, note that if you select the All functions checkbox, you don’t have to also select the audio device that goes along with the GPU.
3. Install NVIDIA Drivers Inside the VM
If you have passed through the NVIDIA GPU into your Proxmox virtual machine, you will need to install the driver as you would normally. This will allow the VM to have full access to the latest driver for your card.
In Debian Linux/Ubuntu, you can easily install the latest driver using the command structure below.
sudo apt update
sudo apt install -y nvidia-driver-570
sudo reboot
After reboot, run:
nvidia-smiYou should see your GPU listed, indicating the driver is correctly installed.
4. Install Ollama
Install Ollama via the official script:
curl -fsSL https://ollama.com/install.sh | shThis will:
- Download the latest
.debpackage - Install Ollama
- Start it as a systemd service
You can now test it locally:
ollama run llama3You can also install it in Docker: Self-Hosting LLMs with Docker and Proxmox: How to Run Your Own GPT
5. Expose the Ollama API to LAN Clients
One thing you will want to correct and change most likely, is Ollama only listens on 127.0.0.1:11434 by default. To expose it to the LAN, you need to set the OLLAMA_HOST environment variable in its systemd service.
Create a systemd override
Run:
##Edit the ollama service file
sudo vi /etc/systemd/system/ollama.service

#Make sure your Service configuration includes the following
[Service]
Environment="OLLAMA_HOST=0.0.0.0:11434"

##Run commands
sudo systemctl daemon-reload
sudo systemctl restart ollama
Confirm it worked:
ss -tulnp | grep 11434You should now see something similar to the following:
tcp LISTEN 0 4096 0.0.0.0:114346. Allow Network Access (UFW or LAN Firewall)
If you’re using UFW in your Ubuntu installation, you can allow the Ollama API port using the following:
sudo ufw allow 11434/tcpOr restrict access to a subnet:
sudo ufw allow from 10.3.33.0/24 to any port 11434 proto tcp7. Use OpenWebUI in a container
How I like to run the OpenWebUI container is in an LXC container. One of the easiest ways to run OpenWebUI is to spin up the LXC container and then install Docker inside LXC. Docker makes spinning up the OpenWebUI interface super easy.
To easily spin up an OpenWebUI container, run the following Docker run command. Replace your ollama host URL with the address of your Ollama instance:
##OpenWebUI
docker run -d -p 3000:8080 --gpus all --add-host=host.docker.internal:host-gateway -e OLLAMA_BASE_URL=http://<your ollama host URL>:11434 -v open-webui:/app/backend/data --name open-webui --restart always ghcr.io/open-webui/open-webui:cuda
Access OpenWebUI in your browser via the container’s IP on port 3000.
Wrapping up
This setup gives you a powerful, GPU-accelerated Ollama backend running in a Proxmox VM, fully accessible to any client on your local network, including LXC containers. Whether you’re using OpenWebUI, building your own AI tools, or just experimenting with models like LLaMA 3, this gives you control and flexibility — all on your own infrastructure.
With this guide, you’re now able to:
- Run Ollama with full GPU acceleration
- Serve LLMs to any device in your lab
- Integrate with frontends like OpenWebUI or custom scripts
Let me know if you’d like to expand this with authentication, reverse proxies, or remote TLS access!
Google is updating how articles are shown. Don’t miss our leading home lab and tech content, written by humans, by setting Virtualization Howto as a preferred source.
About The Author