Create a USB Drive for Windows Server 2019 Installation
USB devices have solidly replaced optical media across the board for various uses. This includes installation media. USB devices are superior to optical media in many ways since they are easily reusable for installing operating systems. They are convenient and extremely inexpensive these days. Additionally, there are many tools available to interact with USB drives and use this for installation purposes. Installing Windows Server 2019 from a USB disk is extremely easy. This post will examine several ways to create a USB drive to install Windows Server 2019 locally and across the network that allows getting Windows Server 2019 installed on a physical device.
Why create a USB drive for Windows Server 2019 installation?
Can’t you mount an ISO image to a virtual machine and install the Windows Server OS from there? Yes, you can. However, this is in a virtual world. You need to have some physical media if you want to install the OS on a physical device. Creating a Windows Server 2019 USB disk is the easiest way to get Windows Server installed on a physical server. This process also works equally well on Windows Server 2016.
Create a USB Drive for Windows Server 2019 Installation
In this walkthrough, we will take a look at three different methods to create a Windows Server bootable USB drive. These progress from arguably the easiest method to the most involved. These include the following:
- Use Rufus
- Manually preparing a USB disk and copying the contents of an ISO
- Use OSDBuilder for custom Windows Server 2019
Before you are able to select which method you want to use, you must first download the Windows Server 2019 ISO file. If you have access to a Visual Studio subscription, you can easily download the files from there. Also, you can download Windows Server 2019 ISO file from the Microsoft Evaluation Center.
1. Use Rufus
Most everyone has heard of Rufus if you have performed any installation of operating systems in the past few years. Back in the day, we had to use some sort of utility to “burn” an ISO image to optical media (CD or DVD). However, now, Rufus provides essentially the same functionality to allow “burning” your ISO image to a USB drive.
You can download Rufus from here:
Rufus even provides a portable version of the software which allows simply running it without any installation. Rufus provides, “hands down” the easiest way to quickly get an ISO image loaded on a USB flash drive.
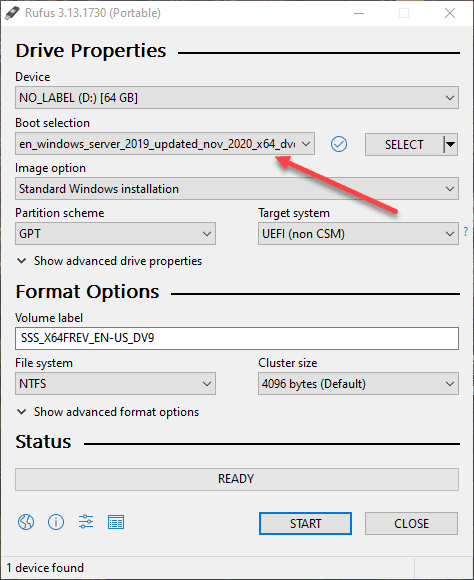
Once you launch Rufus, you simply select the ISO image from your local hard drive. It will populate the options for creating the USB disk that you will want to choose by default. Simply hit Start and
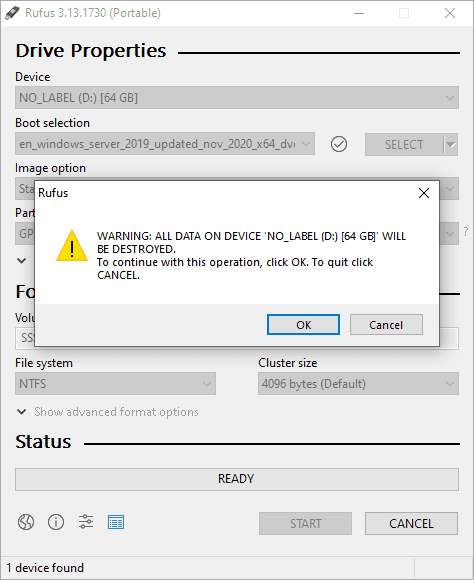
Click OK to allow Rufus to format the destination USB disk.
2. Manually preparing a USB disk and copying the contents of an ISO
If you don’t have access to Rufus or you want to manually create the USB disk for Windows Server 2019 installation, you can do this with a few steps. You will want to have your destination USB disk mounted to your workstation/laptop. We will use diskpart to prepare the USB disk as needed.
Mount your USB disk. Use the following diskpart commands to prepare the disk. ***Note*** make sure this is a USB disk you are ok to format (meaning you will loose all data contained on the USB drive). Below is the output of my running through the commands needed. You will “clean” the disk, create a primary partition, and format it with FAT32.
PS C:WINDOWSSystem32> diskpart

Microsoft DiskPart version 10.0.18362.1171

Copyright (C) Microsoft Corporation.
On computer: SPRO6

DISKPART> list disk

  Disk ###  Status         Size     Free     Dyn  Gpt
  --------  -------------  -------  -------  ---  ---
  Disk 0    Online          476 GB      0 B        *
  Disk 1    Online           58 GB    48 GB

DISKPART> select disk 1

Disk 1 is now the selected disk.

DISKPART> clean

DiskPart succeeded in cleaning the disk.

DISKPART> convert gpt

DiskPart successfully converted the selected disk to GPT format.

DISKPART> create partition primary size=10240

DiskPart succeeded in creating the specified partition.

DISKPART> list partition

  Partition ###  Type              Size     Offset
  -------------  ----------------  -------  -------
* Partition 1    Primary             10 GB  1024 KB

DISKPART> select partition 1

Partition 1 is now the selected partition.

DISKPART> format fs=fat32 quick

  100 percent completed

DiskPart successfully formatted the volume.

DISKPART>

Mount the Windows Server 2019 ISO image in Windows. You can do this by simply right-clicking and choosing Mount. After that select all the files in your mounted ISO and copy these to the destination USB drive.

You will most likely run into the error “The file install.wim is too large for the destination file system. You can click Skip to allow it to skip the install.wim file but copy everything else. We will solve the install.wim issue below.
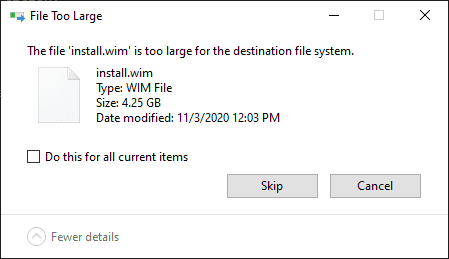
To get around this error due to FAT32, you will need to split up the install.wim file on your destination USB disk. To do that, you use the following command. The first source is the mounted ISO image. The second source is the target USB disk.
dism /Split-Image /ImageFile:E:sourcesinstall.wim /SWMFile:D:sourcesinstall.swm /FileSize:4096

Once you have the files copied to the USB drive, including the install.wim file split apart, you will have a bootable USB drive for Windows Server 2019 installation.
3. Use OSDBuilder for custom Windows Server 2019 installation disk
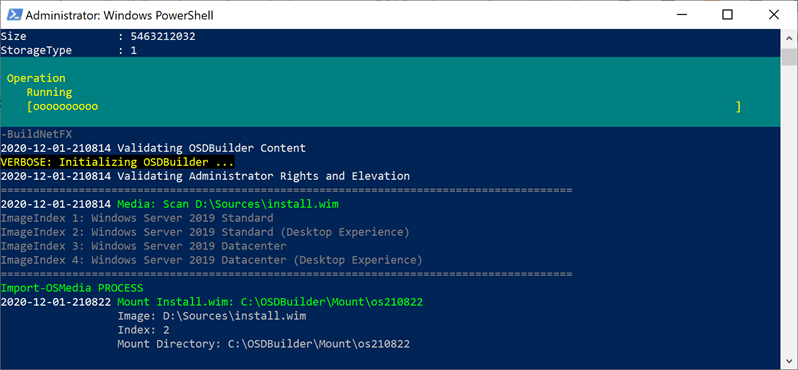
If you are looking to create a customized ISO image of your Windows Server 2019 build or you would like to have features, updates, and other configurations installed right from the ISO, OSDBuilder is a really powerful PowerShell module that allows you to do just that. Additionally, it includes a New-MediaUSB cmdlet that allows you to create bootable USB media from any OSMedia, OSBuild, or PEBuild.
OSDBuilder is a PowerShell module that allows you to perform offline servicing of your Windows operating system, including Windows Server 2019. You can then import the image into MDT or another OS deployment tool of your choosing. A compelling feature of OSDBuilder is that it creates an answer file called a Task that allows automating your offline image’s servicing. The Task has the information needed to service the image, so no interaction is needed.
install-module OSDBuilder
import-module OSDBuilder
Mount-DiskImage -ImagePath C:windowstoolsISOen_windows_server_2019_updated_nov_2020_x64_dvd_8600b05f.iso
Import-OSMedia -ImageName 'Windows Server 2019 Standard (Desktop Experience)' -SkipGrid -Update -BuildNetFX
Using the New-MediaUSB as part of the OSDBuilder- You can create bootable USB of any OSMedia, OSBuild, or PEBuild. Once you customize your ISO image, this cmdlet allows easily “burning” the image to USB from the OSDBuilder process.
Learn more about how to use OSDBuilder to create a USB drive for Windows Server 2019 installation:
Concluding Thoughts
As you can tell, there are multiple ways to approach the process of creating a USB drive for Windows Server 2019 installation. Using the three approaches to creating a USB disk for installing Windows Server 2019, you can easily create a USB disk to work with the installation of Windows Server 2019. Rufus is arguably the easiest way to create a USB installation disk for Windows Server 2019 quickly. You can also manually create the disk by preparing a USB disk appropriately and then copying the Windows Server 2019 ISO contents to the USB disk. Finally, using OSDBuilder, you can create a custom ISO that can create a USB installation disk. It can install features, apply updates, all from the customized ISO file.