WG-Easy: Wireguard Config Generator VPN Server in Docker
WireGuard has made a significant impact since its initial release in 2016, providing a modern VPN that is not just secure but straightforward to set up. It is widely deployed and works for home networks and supercomputers alike, but the setup can sometimes be a bit of a headache. Enter “WG Easy,” the easiest way to install and manage WireGuard on any Linux host. Let’s see how it makes an easy Wireguard config generator for VPN server.
Table of contents
- What is WireGuard?
- Comparing WireGuard to Other VPNs
- WireGuard Easy – Your Comprehensive VPN Server Solution
- Connecting with a Wireguard client
- Applying Advanced Configurations
- Integrating WG Easy with Other Applications
- Frequently Asked Questions
- What does the WG Easy in WireGuard Easy signify?
- How does WireGuard handle IP forwarding and routing?
- Can WireGuard work with Docker?
- What is the role of public and private keys in WireGuard?
- How is the WireGuard interface name determined?
- How do embedded interfaces work in WireGuard?
- Can I use WireGuard to connect to a home network?
- Is WireGuard widely deployable across different platforms?
- Harness the Power of WireGuard with WG Easy
- Other posts you may like
What is WireGuard?
Functioning on the Linux kernel, WireGuard is a heavyweight, capable of managing numerous connections simultaneously, thereby making it applicable for various use-cases, from minor home networks to advanced supercomputing applications. A pivotal feature of WireGuard lies in its adoption of advanced cryptography standards such as Curve25519 for key exchange, ChaCha20 for data encryption, and Poly1305 for ensuring data authenticity. This integrated security approach is instrumental in safeguarding your VPN connection and preserving the integrity of the transmitted data.
WireGuard operates on the Linux kernel and can handle a large number of connections, making it suitable for everything from small home networks to supercomputers. A key aspect of WireGuard is that it employs state-of-the-art cryptography protocols, such as Curve25519 for key agreement, ChaCha20 for encryption, and Poly1305 for data authentication. This ensures your VPN connection’s security and the data’s integrity.

Functioning on the Linux kernel, WireGuard interfaces are a heavyweight, capable of managing numerous connections simultaneously, thereby making it applicable for various use-cases, from minor home networks to advanced supercomputing applications. A pivotal feature of WireGuard lies in its adoption of advanced cryptography standards such as Curve25519, ChaCha20 for data encryption, and Poly1305 for ensuring data authenticity. This integrated security approach is instrumental in safeguarding your VPN connection and preserving the integrity of the transmitted data for a client configuration.
Comparing WireGuard to Other VPNs
Speaking of VPNs, a plethora of options are available, but WireGuard distinguishes itself with its minimalistic design and superior performance. The setup procedure is notably uncomplicated, involving the installation of WireGuard, generation of public and private keys for every peer, and fine-tuning the WireGuard interface with essential details like IP addresses, permissible IPs, and other crucial parameters.
WireGuard excels by trimming unnecessary complexities and prioritizing core essentials – secure, rapid, and dependable connections. For example, it employs UDP for data transport, offering enhanced speeds over TCP, the common choice for numerous VPNs.
In terms of security, WireGuard’s contemporary cryptography protocols outmatch the older methodologies adopted by several VPN solutions. The integration of WireGuard within the Linux kernel promotes superior alignment with network and firewall regulations, culminating in a more secure ecosystem.
WireGuard’s efficient handling of IP routing and forwarding is another key highlight, making it a prime choice for users desiring extensive control over their network interfaces. Moreover, WireGuard’s configuration files are intuitively designed, offering relief from the complex configuration process typically associated with VPN servers.
WireGuard Easy – Your Comprehensive VPN Server Solution
WireGuard Easy, or WG Easy is an all-in-one Wireguard config generator solution that combines WireGuard with a user-friendly web UI. It simplifies the VPN server setup process, enabling users to easily list, create, edit, delete, enable, and disable clients. Additional features include displaying a client’s QR code, downloading a client’s configuration file, and providing statistics for connected clients.
You can find the Github repository here: wg-easy/wg-easy: The easiest way to run WireGuard VPN + Web-based Admin UI. (github.com).
Understanding the Prerequisites for WG Easy
Before installing WG Easy, confirming the host’s compatibility is essential. The host should have an installed kernel that supports WireGuard (part of all modern kernels) and Docker.
The WG Easy Installation Process
The installation of WG Easy is a two-step process. First, you want to have Docker installed, which can be achieved by running a straightforward curl command. Once Docker is installed, WG Easy can be run using a docker run command with specific parameters.
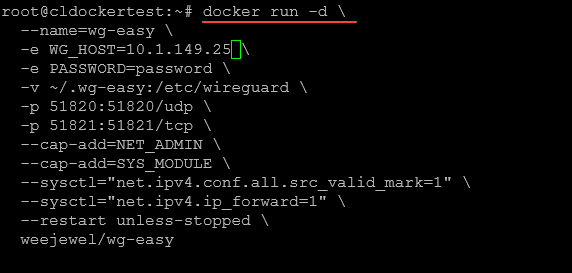
Running WG Easy with Docker is quite straightforward. You need to replace the YOUR_SERVER_IP (public IP address of your wireguard interface name) and YOUR_ADMIN_PASSWORD placeholders with your own values.
Moreover, you can customize environment variables such as Ethernet device for WireGuard traffic, public UDP port of your VPN server, MTU, clients’ IP address range, and DNS servers. Your WireGuard server configuration files will be saved in ~/.wg-easy.
Here’s a simple example:
$ docker run -d
  --name=wg-easy
  -e WG_HOST=<YOUR_SERVER_IP>
  -e PASSWORD=<YOUR_ADMIN_PASSWORD>
  -v ~/.wg-easy:/etc/wireguard
  -p 51820:51820/udp
  -p 51821:51821/tcp
  --cap-add=NET_ADMIN
  --cap-add=SYS_MODULE
  --sysctl="net.ipv4.conf.all.src_valid_mark=1"
  --sysctl="net.ipv4.ip_forward=1"
  --restart unless-stopped
  weejewel/wg-easy
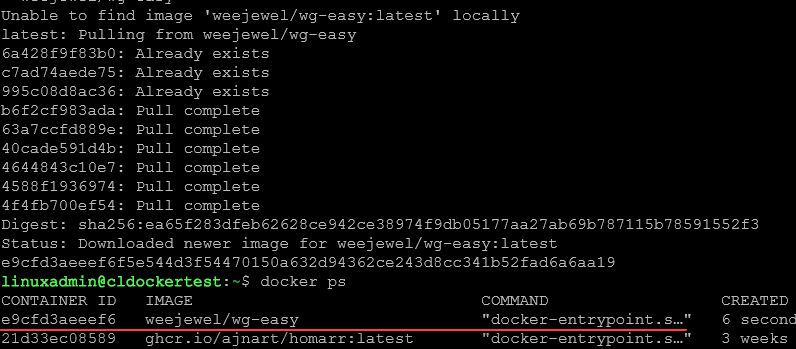
Below is a look at running the command on my test Docker host.
The container image pulls down and the new Wg Easy container is created.
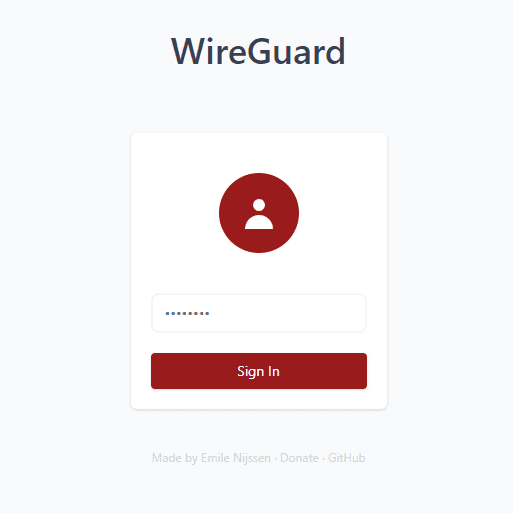
Once you run this command, the web UI will be available at http://0.0.0.0:51821. All your configuration files will be saved in ~/.wg-easy.
Running WG Easy with Docker Compose
You can also use Docker Compose to run WG Easy. Below is a sample docker-compose.yml file:
version: "3.8"

services:
  wg-easy:
    environment:
      - WG_HOST=<your_server_ip>
      - PASSWORD=<your_admin_password>
    image: weejewel/wg-easy
    volumes:
      - ~/.wg-easy:/etc/wireguard
    ports:
      - "51820:51820/udp"
      - "51821:51821/tcp"
    cap_add:
      - NET_ADMIN
      - SYS_MODULE
    sysctls:
      - net.ipv4.conf.all.src_valid_mark=1
      - net.ipv4.ip_forward=1
    restart: unless-stopped
To start the service, you run docker-compose up -d in the same directory as your docker-compose.yml file.
Updating Your WG Easy Installation
When it’s time to update your WG Easy installation, the process is as straightforward as the initial setup. The following command sequence will stop the Docker container, remove the old image, pull the new one from Docker Hub, and re-run the container with your existing configuration.
You can also use a solution like Watchtower to automatically watch and pull new container images once these are found in the repository. See my tutorial on Watchtower configuration here:
Configuring Your WG Easy Setup
Once you’ve installed WG Easy, the next step is to configure it. You can set your server’s hostname and a password for the web UI.
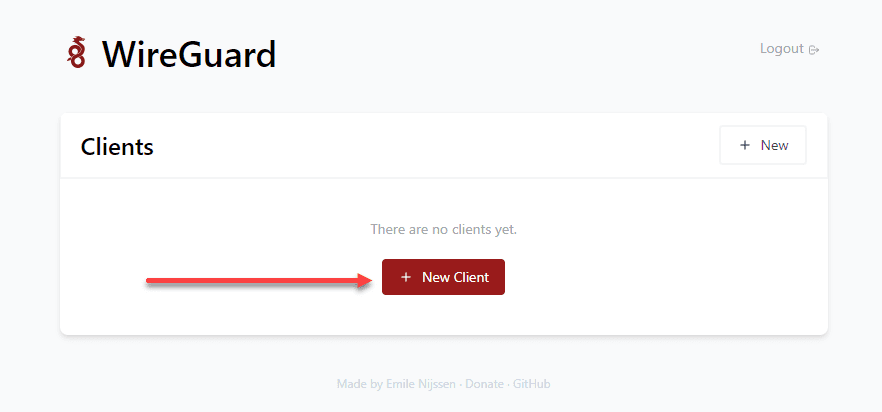
The web UI of WG Easy provides a seamless way to manage your WireGuard server. You can access it at http://0.0.0.0:51821 after running the Docker container. This web UI lets you enable and disable clients, manage configuration files, and observe real-time statistics of connected clients, eliminating the massive headache of dealing with multiple interfaces.
Login with the configured admin password.
To create a new client, click the New Client button.
The New Client dialog box will have you name the client. Click Create.

Once you have created the new client, you will see the option to click the QR code icon which can be scanned for the configuration, click the down arrow to download the conf file or the trash icon to delete the client.
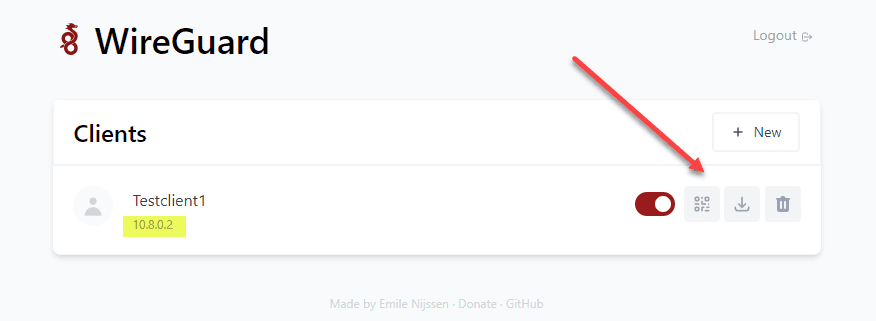
If you click the download button, a <clientname>.conf file is downloaded containing the configuration for the client configured.
Just out of curiosity, peeking inside the .conf file reveals the following. You will see:
PrivateKey
Address – The Wireguard client address
DNS – DNS server value
PublicKey – for the peer
PresharedKey
AllowedIPs
PersistentKeepalive
Endpoint – The Wireguard server
Below is the file I downloaded for the Testclient1 created above.
[Interface]
PrivateKey = cJjvMfIXWhAqjemSobuigNmoIRLh2M+Mahwk7PSBD2w=
Address = 10.8.0.2/24
DNS = 1.1.1.1


[Peer]
PublicKey = zq0n2/5v1F1UVc+llIJqKtjV9sRK7VGv9m6fAItJTjQ=
PresharedKey = 7KINJE/cSiHhMB3wgBtqPyld5Wtb1J3JdHya6bZixT4=
AllowedIPs = 0.0.0.0/0, ::/0
PersistentKeepalive = 0
Endpoint = 10.1.149.25:51820
Connecting with a Wireguard client
I have an Ubuntu 22.04 workstation that I will use to test the connection. First, let’s install Wireguard.
sudo apt install wireguard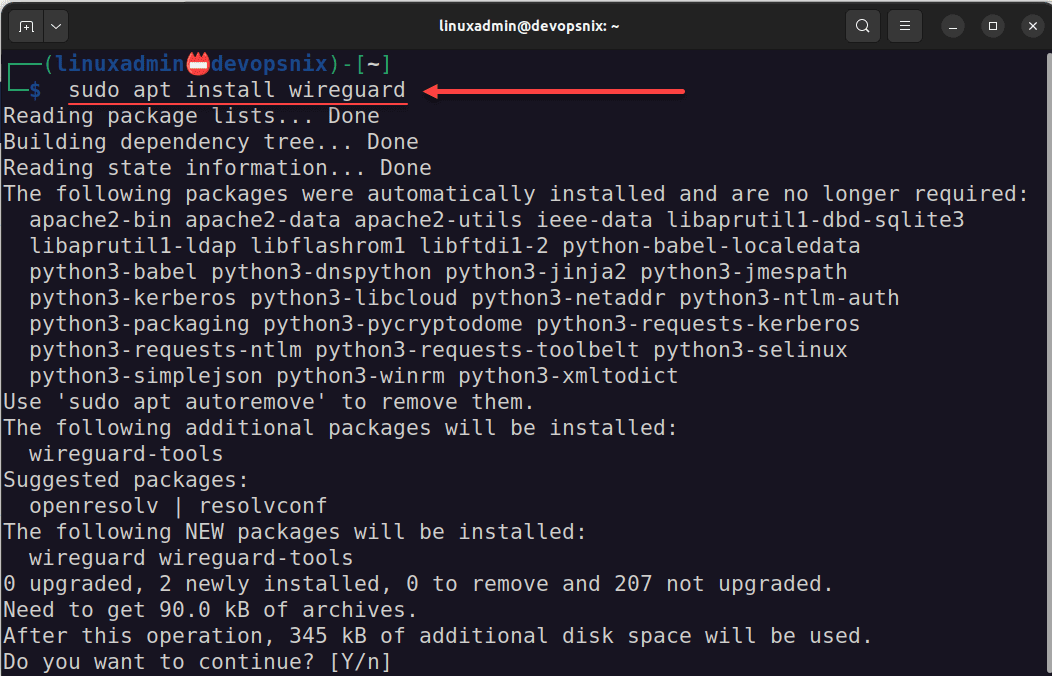
Next, we will point the Wireguard client to the configuration file from WG Easy. Here we are storing in a variable. Then running the command to import the connection.
file=~/downloads/Testclient1.conf
sudo nmcli connection import type wireguard file "$file"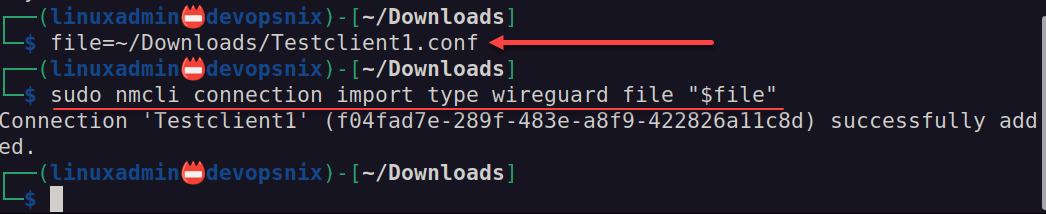
Now we can bring the connection up with the following command:
sudo nmcli connection up Testclient1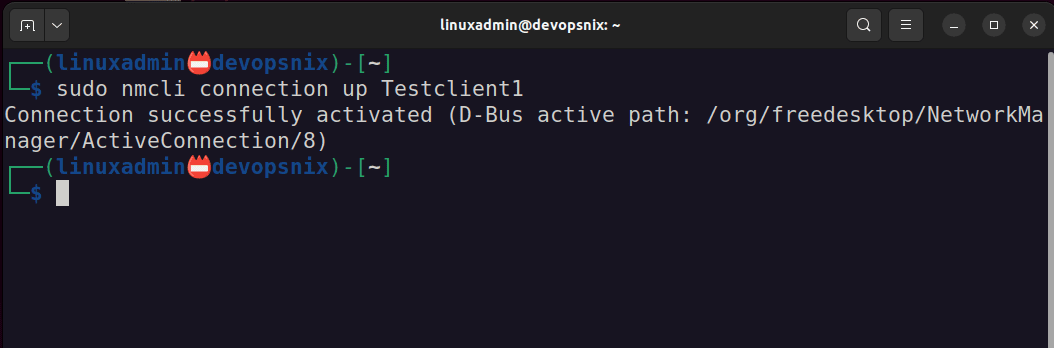
I ran a quick test to see if I could ping the Wireguard interface on the WG Easy container:
ping 10.8.0.1The ping is successful.

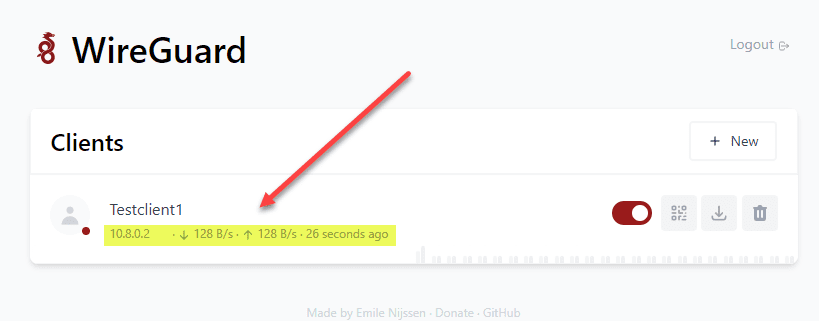
If we hop over to the WG Easy interface, we will see the Testclient1 is connected and traffic is flowing. One enhancement I would recommend for the project is to make the bubble color green instead of red, long associated with not connected instead of connected.
Applying Advanced Configurations
With WG Easy, you can customize advanced settings like IP forwarding, enabling VPN clients to access your internal network. You can also specify the allowed IPs, which define the network interfaces accessible over the VPN connection.
Integrating WG Easy with Other Applications
One of the powerful features of WG Easy is its interoperability with other services. For instance, it can be integrated with Pi-Hole, a popular network-wide ad-blocking service. Modifying the DNS setting in the WG Easy configuration allows all connected clients to use Pi-Hole as their DNS server, providing ad-free internet browsing.
The integration of WG Easy with Pi-Hole can be accomplished using Docker Compose. Here’s an example of how it can be set up:
version: "3.8"

services:
  wg-easy:
    environment:
      - WG_HOST=<your_server_ip>
      - PASSWORD=<your_admin_password>
      - WG_DEFAULT_DNS=10.8.1.3
    image: weejewel/wg-easy
    volumes:
      - ~/.wg-easy:/etc/wireguard
    ports:
      - "51820:51820/udp"
      - "51821:51821/tcp"
    restart: unless-stopped
    cap_add:
      - NET_ADMIN
      - SYS_MODULE
    sysctls:
      - net.ipv4.ip_forward=1
      - net.ipv4.conf.all.src_valid_mark=1
    networks:
      wg-easy:
        ipv4_address: 10.8.1.2

  pihole:
    image: pihole/pihole
    environment:
      - WEBPASSWORD=<your_pihole_password>
    volumes:
      - '~/.pihole/etc-pihole:/etc/pihole'
      - './.pihole/etc-dnsmasq.d:/etc/dnsmasq.d'
    ports:
      - "53:53/tcp"
      - "53:53/udp"
      - "80:80/tcp"
    restart: unless-stopped
    networks:
      wg-easy:
        ipv4_address: 10.8.1.3

networks:
  wg-easy:
    ipam:
      config:
        - subnet: 10.8.1.0/24
If you want to learn more about Pi-Hole configuration in the home lab, check out my video here:
Frequently Asked Questions
What does the WG Easy in WireGuard Easy signify?
WG Easy is a simplifying wrapper around WireGuard. It aims to make setting up and managing your WireGuard server configuration files as easy as possible. By using WG Easy, even those unfamiliar with VPNs can quickly establish their secure network.
How does WireGuard handle IP forwarding and routing?
WireGuard simplifies IP forwarding and routing by managing it within the VPN interface. It maintains the list of allowed IPs for each peer and ensures that data traffic is securely routed to the correct destination. This ease of handling IP routing and forwarding is a standout feature of WireGuard, making it an excellent choice for controlling network interfaces.
Can WireGuard work with Docker?
Yes, absolutely! WireGuard can be configured to run inside a Docker container. This can be particularly beneficial if you have Docker installed and wish to leverage its features to simplify the deployment of your WireGuard server. You can make use of WG Easy with Docker to manage this setup seamlessly.
What is the role of public and private keys in WireGuard?
In WireGuard, each peer in the network has a pair of public and private keys. The private key is kept secret and secure, while the public key is shared with other peers in the network. When a peer wants to send encrypted data, it uses the recipient’s public key. This key-based approach provides a high level of security for your VPN connections.
How is the WireGuard interface name determined?
The WireGuard interface name can be chosen when you create the interface. This name is used to identify the network interface and is helpful when configuring or managing multiple WireGuard interfaces.
How do embedded interfaces work in WireGuard?
In WireGuard, interfaces can be embedded within each other. This means that a WireGuard peer can act as both a client and a server, routing traffic between other peers. This functionality provides flexibility and control over your network topology, making WireGuard suitable for complex networks, from home setups to supercomputers alike.
Can I use WireGuard to connect to a home network?
WireGuard can be an ideal choice for connecting to your home network. Its lightweight and efficient design makes it suitable for personal use. Plus, with the WG Easy tool, you can manage your WireGuard setup without diving deep into complex VPN configurations. This makes WireGuard a popular choice for creating secure tunnels to access home networks from remote locations.
Is WireGuard widely deployable across different platforms?
WireGuard is cross-platform compatible and can be used on many operating systems, including Linux, Windows, MacOS, and more. This broad compatibility makes WireGuard a widely deployable VPN solution for general-purpose use. It’s as suited to individual users wanting to secure their connections as it is to businesses looking for a reliable and efficient VPN solution.
Harness the Power of WireGuard with WG Easy
WG Easy brings WireGuard’s powerful VPN capabilities within reach of non-technical users. Encapsulating WireGuard’s functions within a simple and intuitive web UI makes creating, managing, and securing VPN connections easy.
Whether you’re setting up a VPN for your home network or a supercomputer, WG Easy ensures the process is smooth and straightforward. Remember, a secure network is extremely important. With WG Easy, this can be a reality for any Linux host.